
CLEO VLTrader Made Simple Guide

Page | 2
CLEO | Office: 800.233.2536 | Streem Fax: 815.654.8294 | support@cleo.com | www.cleo.com
Table of Contents
Quick Reference................................................................................................................................ 3
Miscellaneous Technical Notes .............................................................................................................................. 3
CLEO VLTrader at a Glance .................................................................................................................................. 3
Introduction ....................................................................................................................................... 5
Application Page Layout .......................................................................................................................................... 5
Preconfigured Hosts ................................................................................................................................................. 5
Full List of Protocols (Generic Folder) ................................................................................................................ 6
1 - Activate, Configure and Run a Connection ........................................................................... 7
1.1 Activate a Client-Side Preconfigured Connection ...................................................................................... 7
1.2 Configure the Preconfigured Connection .................................................................................................... 8
1.3 Activate and Configure a Connection from Scratch .................................................................................. 9
1.4 Configure the Generic Connection ............................................................................................................... 9
1.5 Activate an FTP Server (Local FTP Users) ................................................................................................. 11
1.6 Create a Self-Signed Certificate .................................................................................................................... 11
1.7 Configure the FTP Local Listener (FTP/FTPs) ........................................................................................... 12
1.8 Create an FTP Server Trading Partner Mailbox........................................................................................ 13
1.9 Create a Mailbox Action ................................................................................................................................ 13
1.10 Send and Receive a File ................................................................................................................................ 15
1.11 View the File Transfer Report .................................................................................................................... 16
2 – Specify Additional Transfer Options .................................................................................... 18
2.1 Schedule the Client <send> Action ............................................................................................................. 18
2.2 Configure Alert Notification ......................................................................................................................... 18
2.3 Guarantee Unique Filenames Using Macros .............................................................................................. 19
3 – Additional Functionality .......................................................................................................... 21
3.1 Explore and Customize the File Transfer Web Portal ............................................................................ 21
3.2 Explore the Certificate Manager ................................................................................................................... 27
3.3 Explore CLEO VLNavigator .......................................................................................................................... 30

Page | 3
CLEO | Office: 800.233.2536 | Streem Fax: 815.654.8294 | support@cleo.com | www.cleo.com
Quick Reference
Miscellaneous Technical Notes
The following are just a few miscellaneous notes regarding OS compatibility and the CLEO VLTrader interface.
CLEO VLTrader is 100% Java, supporting Windows, Linux, Ubuntu, CentOS, AIX, HP-UX, and Solaris,
32 and 64 bit, VMWare and Microsoft Hyper-V.
CLEO VLTrader is 100% self-contained. No external application servers, web servers, SMTP servers,
etc. are required, providing two major benefits, 1) minimize time, effort and cost to install, maintain and
support and 2) it is compatible with (e.g., it doesn’t conflict or cause problems with) other applications.
JRE 1.5 is also deployed as a part of the installation and does not conflict with existing runtimes.
CLEO VLTrader has two interface options, a native Java interface and a web-based interface. The
Web-based interface can be used for remote access or for when a UNIX® server is not configured
for graphics.
CLEO VLTrader at a Glance
Consolidate and Secure Communications Internally and Externally:
Any to Any file exchange: data type, any protocol: supports client and server side protocols –
Drummond Certified AS2, AS3, and ebXML Messaging Service (ebMS), and also supports fasp™, FTP,
FTPs, SSH FTP, HTTP, HTTPs, IBM® WebSphere® MQ, MLLP, OFTP, OFTP2, RNIF, SMTP, SMTPs and
Web Services.
Secure managed file transfer software uses the tightest security standards: X.509 digital certificates,
public key exchange, symmetric key encryption, digital signatures, and message acknowledgements.
CLEO VLProxy, a forward and reverse proxy server, ensures tight security when a DMZ is in place.
Integrate with Any Backend System or Database:
File System Scheduling from within the managed file transfer software.
A Command-line API and a Java API, either streaming or file-based.
Completely customize reporting using backend databases.
EDI Translator Integrations.
Powerful and Reliable Secure Managed File Transfer Software:
High Throughput, Scalable: 10 to unlimited connection options; affordably priced.
Reliable, High Availability: 100% uptime. Auto-Synchronization and Load Balancing.
Full-Featured, Yet Easy to Manage:
Preconfigured Connections
Real-time File Transfer Status
Robust Certificate Manager
Role-based Accounts with CLEO VLNavigator
Outbound EDI Routing
Web Portal
Web-Based Operation
Network Deployment
Secure and Large Email
Check-Point Restart

Page | 4
CLEO | Office: 800.233.2536 | Streem Fax: 815.654.8294 | support@cleo.com | www.cleo.com
Available Options:
FIPS Compliance utilizing FIPS 140-2 approved cryptographic operations via a CLEO VLTrader and
CLEO VLProxy custom edition.
Soft-Branding: Provide a soft-branded client package to trading partners.
Unlimited Licensing.
Professional Services: Custom development, rollout management, custom integrations.

Page | 5
CLEO | Office: 800.233.2536 | Streem Fax: 815.654.8294 | support@cleo.com | www.cleo.com
Introduction
CLEO VLTrader is a powerful, feature-rich secure managed file transfer solution that is easy to implement and
operate. The core secure communication technology is proven in more than 30,000 installations worldwide and
is used to transfer and manage any and all types of data including EDI, XML, financial data and other sensitive
business information.
Application Page Layout
1. Start CLEO VLTrader.
The main application page is separated into three panes: Tree Pane, Content Pane and
Message Pane.
Preconfigured Hosts
Notice the two Tree Pane tabs, Preconfigured and Active.
Content Pane
Tree Pane
Message Pane
Note: If you don’t have an internet connection, you won’t be able to perform all of the steps in this
short section, but read through the steps anyway for an explanation of the functionality.

Page | 6
CLEO | Office: 800.233.2536 | Streem Fax: 815.654.8294 | support@cleo.com | www.cleo.com
2. Select the Preconfigured tab.
The Preconfigured tab consists of over 800 pre-configured connections that you can leverage to
quickly setup new trading partner connections. We are continually adding new connections upon
request and updating the list on the website which is accessed from within CLEO VLTrader so that
CLEO VLTrader always has access to the most recent updates.
Depending on the protocol, these connections are preconfigured 85-95% complete. You simply
activate the connection and complete the configuration based on your unique requirements. You
can also create connections from scratch if you prefer.
3. Select the WebSite folder to download the latest list of pre-configured hosts.
After an initial download completes, the pre-configured hosts will be displayed in the WebSite branch, sorted
into folders by specific industries.
4. Expand an industry folder to view the hosts within the industry.
5. Select the desired pre-configured connection to download the most recent configuration for that host.
Full List of Protocols (Generic Folder)
6. Select the Generic folder to show the full list of protocols.

Page | 7
CLEO | Office: 800.233.2536 | Streem Fax: 815.654.8294 | support@cleo.com | www.cleo.com
1 - Activate, Configure and Run a Connection
In this section, you will learn how to do the following:
Client-Side (e.g., sending files)
o Activate a pre-configured Client-Side host (e.g., trading partner connection).
o Configure the trading partner host connection.
Server-Side (e.g., passively receiving files)
o Activate an FTP Local Listener (FTP Server).
o Configure the FTP Local Listener.
o Create an FTP Server Mailbox.
o Create a Mailbox Action that will trigger when the file arrives.
Send and Receive Files (e.g., run the client-side <send> Action to send a file to the server (looptest)
and show that the server received the file).
1.1 Activate a Client-Side Preconfigured Connection
1. In the Preconfigured tab, after you have selected the WebSite folder, expand the Financial folder
and select American Express FTPs.
2. After the configuration download is complete. Right- click on the American Express FTPs
pre-configured connection and select Clone and Activate.
Time Estimate: approximately 45 minutes. For sections 1 and 2, when setting up the Client-Side,
you are acting as an American Express trading partner. When setting up the Server-Side Mailbox, you
are acting as American Express.
Note: If you do not have an internet connection, skip to section 1.3. If you do have an internet
connection, continue with this section 1.1 and 1.2, then skip to section 1.5.

Page | 8
CLEO | Office: 800.233.2536 | Streem Fax: 815.654.8294 | support@cleo.com | www.cleo.com
1.2 Configure the Preconfigured Connection
From the Active tab, on the American Express connection, select the following:
1. On the General tab, change the server address and port from;
to:
Then select Apply.
2. Select the Mailbox folder in the Tree Pane.
3. On the Mailbox FTP tab, enter the User Name and Password. Use amex as the password.
Then select Apply.
4. Select <send> in the Tree Pane.

Page | 9
CLEO | Office: 800.233.2536 | Streem Fax: 815.654.8294 | support@cleo.com | www.cleo.com
5. In the Content Pane, change the default Action PUT –DEL * to the following. Then select Apply.
Now the Client-Side Action is ready to run. Next you will configure the FTP Listener and
Server Mailbox.
1.3 Activate and Configure a Connection from Scratch
In the Preconfigured tab, select and expand the Generic folder. Then, right-click on the Generic FTPs
pre-configured connection and select Clone and Activate.
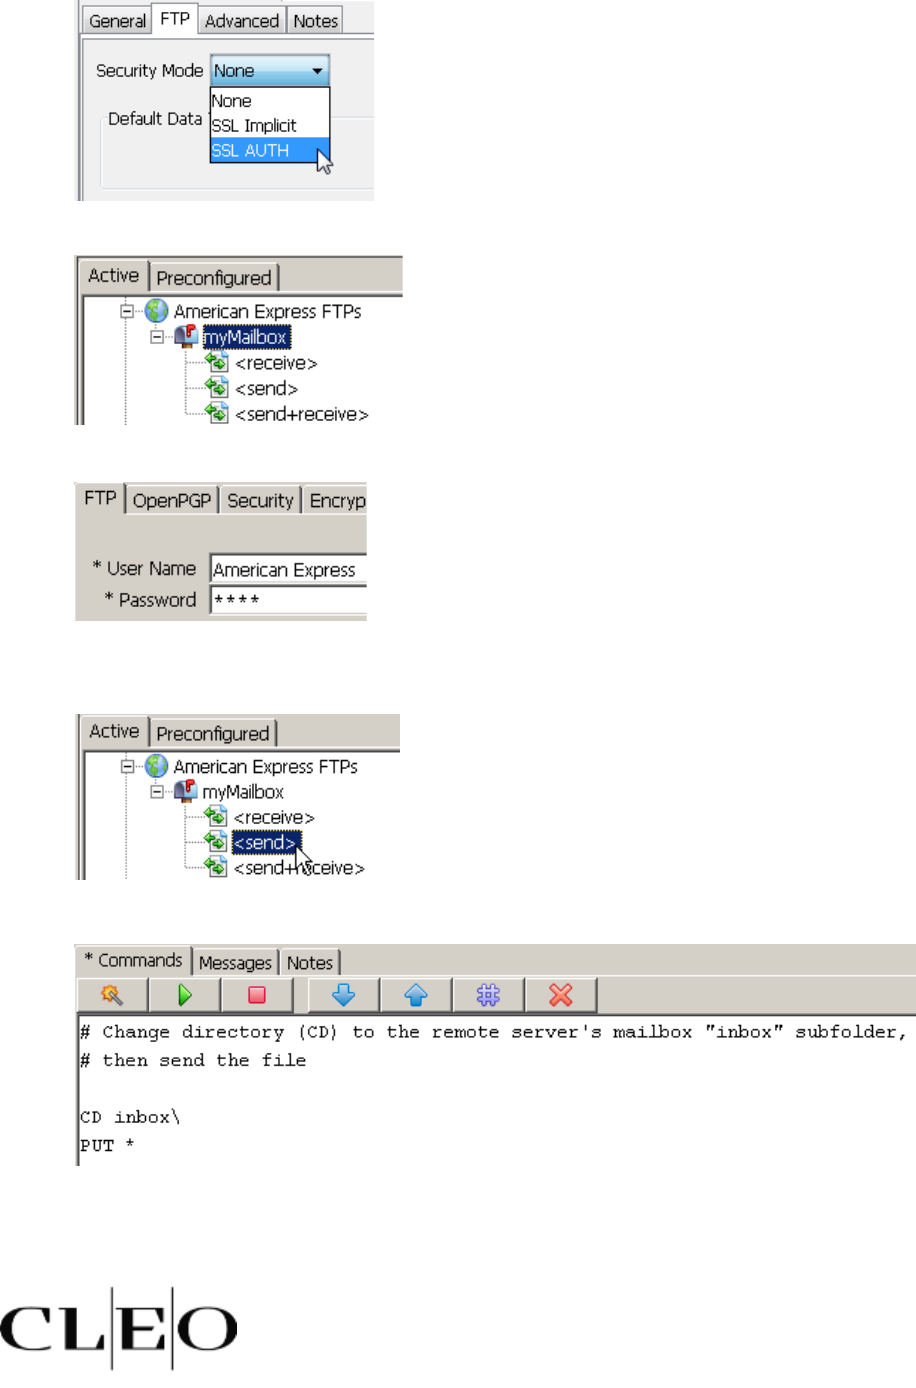
1.4 Configure the Generic Connection
From the Active tab, on the Generic FTPs connection node, select the following:
1. On the General tab, change the Server Address Port, Inbox and Outbox as follows.
Then select Apply.
Page | 10
CLEO | Office: 800.233.2536 | Streem Fax: 815.654.8294 | support@cleo.com | www.cleo.com
Select the FTP tab. Select SSL AUTH in the Security Mode pull-down menu. Then select Apply.
2. Select the Mailbox folder in the Tree Pane.
3. On the Mailbox FTP tab, enter the user name and password as follows. Use amex for the password.
Then select Apply.
4. Select <send> in the Tree Pane.
In the Content Pane, change the default Action PUT –DEL * to the following. Then select Apply.
Now the Client-Side Action is ready to run. Next you will configure the FTP Listener and
Server Mailbox.

Page | 11
CLEO | Office: 800.233.2536 | Streem Fax: 815.654.8294 | support@cleo.com | www.cleo.com
1.5 Activate an FTP Server (Local FTP Users)
Check the Active tab to see if the Local FTP Users node has been activated. If yes, skip the following step.
On the Preconfigured tab, right-click the Local FTP Users node and select Clone and Activate.
1.6 Create a Self-Signed Certificate
1. Select Certificates.
2. Right-click the Users Store in the Tree Pane and select Generate > Self-signed
User Certificate…

Page | 12
CLEO | Office: 800.233.2536 | Streem Fax: 815.654.8294 | support@cleo.com | www.cleo.com
3. Enter the X.509 Certificate fields as follows. Use DEMO for the password. Then select OK and exit
the Certificate Manager.
1.7 Configure the FTP Local Listener (FTP/FTPs)
1. On the Active tab, select the Local Listener.
2. On the Content Pane, select the FTP tab. Then, check the Explicit AUTH SSL option and
enter 990.
3. Before you leave the FTP tab, assign a SSL Server Certificate to the FTP Listener. The certificate
is already created. Select Browse to display the existing user certificates. Select the DEMO certificate
and then Select. You will return to the FTP tab. Enter the DEMO certificate password, DEMO.
4. Then select Apply.

Page | 13
CLEO | Office: 800.233.2536 | Streem Fax: 815.654.8294 | support@cleo.com | www.cleo.com
1.8 Create an FTP Server Trading Partner Mailbox
1. Select the Local FTP Users node that you previously activated.
2. Right-click the Local FTP Users node and select New Mailbox.
3. Select the newMailbox node that was just created. Then rename the mailbox to American Express
by editing the Mailbox alias field. Add the password amex. Then select Apply.
1.9 Create a Mailbox Action
1. Right-click the newly renamed American Express node in the tree and select New Action.

Page | 14
CLEO | Office: 800.233.2536 | Streem Fax: 815.654.8294 | support@cleo.com | www.cleo.com
2. Rename newAction to collect by editing the Mailbox alias field in the Content Pane.
3. Type the short script shown in the following image into the free form text editor. The text editor is
blank by default when you create a newAction. (Alternatively, you can use the Wizard ( ) to
create the LCOPY command. You might want to experiment with the Wizard to do this. The #
indicates that the first two lines are comments. Then select Apply.
4. Schedule the Action to run automatically when the file is uploaded to the mailbox by right-clicking on
the <collect> Action node in the Tree Pane and selecting Schedule... Then select OK.
5. The following message will be displayed telling you that if you schedule an Action for autosend. Make
sure that you are deleting the file (-DEL) after sending the file. Then select OK.

Page | 15
CLEO | Office: 800.233.2536 | Streem Fax: 815.654.8294 | support@cleo.com | www.cleo.com
1.10 Send and Receive a File
To recap, so far you have:
Created an FTPs client connection American Express FTPs that has a <send> Action for sending
files to a Server Mailbox and
Created an FTPs Server Mailbox American Express with a <collect> Action that is triggered
when a file is received.
1. As a pre-requisite to sending a file from the Client Outbox Folder to the Server Mailbox, copy a
file, test.edi, from:
C:\Program Files\CLEO VLTrader\outbox\test\
to:
C:\Program Files\CLEO VLTrader\outbox\American Express FTPs\
2. View the status bar at the bottom of the application screen as follows to determine if the scheduler is
running or not.
1. If the scheduler is stopped, then go to File > Start Scheduler to start it.
2. In order to send the file to the Server Mailbox, select the Client-Side <send> Action.
3. Run the <send> Action by selecting Run ( ).

Page | 16
CLEO | Office: 800.233.2536 | Streem Fax: 815.654.8294 | support@cleo.com | www.cleo.com
When you run the Action, if everything is setup correctly, you will see messages in the Message Pane indicating
1) that test.ed was successfully sent to the server mailbox (e.g., the <send> Action on the client side) and, after
5 to 10 seconds, 2) that test.edi was appended to recvfile.dat (e.g., the <collect> Action on the server mailbox.)
And, as you walk through the messages in the Message Pane, keep in mind that the Message Pane contains
both the client and server messages.
The following is intended to be an example and only contains a partial list of messages generated for sending the
file and receiving the file. If you run the <send> Action several times, then recvfile.dat will contain several
appended copies of test.edi.
You can further validate the file transfers through Windows Explorer by monitoring the Server Mailbox location
and opening recvfile.dat to see that each time you send another file, the file is appended into recvfile.dat.
C:\Program Files\CLEO VLTrader\local\root\American Express\inbox\
1.11 View the File Transfer Report
1. Transfer Logging is turned off by default on the product therefore you will need to enable Transfer
Logging before reviewing the report. To turn on the Transfer Logging you will need to enable the
XML File.

Page | 17
CLEO | Office: 800.233.2536 | Streem Fax: 815.654.8294 | support@cleo.com | www.cleo.com
2. After running the <send> Action several times, view the file transfer report by selecting Transfers.
You can then select various options on the filter; then select Continue to view a list of the file
transfers.
3. Right-click on a transfer row and select View to view metrics for a particular file transfer.

Page | 18
CLEO | Office: 800.233.2536 | Streem Fax: 815.654.8294 | support@cleo.com | www.cleo.com
2 – Specify Additional Transfer Options
2.1 Schedule the Client <send> Action
In this section, you will schedule the Client Action to run automatically when a file is dropped into the
Outbox folder.
1. Select the Client-Side American Express FTPs <send> Action. Double-click on the PUT
command line in the Content Pane and the following command editor will be displayed. Add –DEL to
the PUT Action by selecting the Delete source after put checkbox. Then select Apply.
2. In the Tree Pane, right-click the <send> Action and select Schedule…. Then, select Whenever
the Action has files to send or copy. With this configuration change, instead of selecting the
3. Run command to invoke the Action, you will drop in the test.edi file into the Outbox to trigger
the Action.
2.2 Configure Alert Notification
In this section you will learn how to setup an automatic email alert notification using the Email on Successful
Send advanced property.
4. In the Tree Pane, select the American Express FTPs host node.
5. Select the Advanced tab.
Time Estimate: approximately 10 minutes. In this section you will 1) schedule the Client
Action to run automatically when a file is dropped into the outbox folder, 2) setup an automatic email
alert notification when a file is uploaded to the server mailbox and 3) guarantee unique file names
using the %date% and %time% macros.

Page | 19
CLEO | Office: 800.233.2536 | Streem Fax: 815.654.8294 | support@cleo.com | www.cleo.com
6. Enter your email address in the Email on Successful Send property.
7. Alternatively, you can configure the Email on Successful Receive property in the American
Express FTP Server Mailbox.
8. Drop test.edi into the Outbox again to trigger the Action and receive an email notification.
2.3 Guarantee Unique Filenames Using Macros
In this section you will learn how to use the use macros in an Action.
9. In the Tree Pane, select the American Express FTPs host node.
10. Select the Advanced tab.
11. Scroll down the advanced properties and look for the Macro Date Format and Macro Time
Format properties. These can be changed, but don’t have to be.
12. In the Tree Pane, select the American Express FTPs <send> Action.
13. In the Content Pane, change the PUT command to the following, using the Date and Time macros.
14. Run the <send> Action again and look in the American Express Server Mailbox Inbox. Notice
the Time and Date are appended to amex for the file name. Also notice that the Server Mailbox
<collect> Action did not trigger because now the file name did not match test.edi.

Page | 20
CLEO | Office: 800.233.2536 | Streem Fax: 815.654.8294 | support@cleo.com | www.cleo.com
The following symbols can be used to build the Date and Time macro formats.

Page | 21
CLEO | Office: 800.233.2536 | Streem Fax: 815.654.8294 | support@cleo.com | www.cleo.com
3 – Additional Functionality
3.1 Explore and Customize the File Transfer Web Portal
The web portal feature allows your trading partners to perform ad hoc payload transfers and to view transfer
reports, all through some simple web pages. It also allows you to add custom web pages. The niche of the
web portal is that customers can very quickly deploy it with very little effort.
By default the file transfer web portal looks like the following.
Now, let’s customize the Portal.
1. In the Tree Pane, select and expand the Local Listener. Then select the Web Browser node.
2. In the Content Pane, select the CLEO VLPortal tab.
Time Estimate: approximately 25 minutes.

Page | 22
CLEO | Office: 800.233.2536 | Streem Fax: 815.654.8294 | support@cleo.com | www.cleo.com
The Portal Title defaults to the owner of the CLEO VLTrader license. This title will be displayed as the
document title on each web page. It can be changed at any time. (See screen shot on previous page.)
Use Images... to customize the graphic images within the framework of the web portal.
1. Select Images to view options.
Use Import... to import new graphic images that can subsequently be selected through the Logo, Banner,
and Menu fields. All imported files are stored in webserver\VLPortal\img' under the CLEO VLTrader
home directory.
Note: The CLEO VLPortal Resource Path defaults to the component name /VLPortal. Trading
partners must include this resource path in the URL when accessing the portal through a web
browser. It can be changed at any time, but must start with a forward slash (/) character.

Page | 23
CLEO | Office: 800.233.2536 | Streem Fax: 815.654.8294 | support@cleo.com | www.cleo.com
The following are examples of a file transfer web portal that has been customized using different graphics. You
can also customize the portal by adding and editing pages.

Page | 24
CLEO | Office: 800.233.2536 | Streem Fax: 815.654.8294 | support@cleo.com | www.cleo.com
Each row in the table below represents one web page. Use the right-click Menu Options to manipulate each
row. Only one row may be selected at a time.
The default configuration provides three pages:
CLEO VLPortal default home page (CLEO VLTrader Web Portal)
Ad hoc file transfer page (Manual File Transfer)
Transfer reporting page (File Transfer History)
These pages cannot be removed. However, users can edit the default home page contents.
To edit a page, select Edit... from the desired row's right-click menu. If the row corresponds to Manual File
Transfer or File Transfer History, the following is displayed as only the title can be edited for these
two pages.
If any other web page is chosen, the following Edit Page window is displayed. In this window, select Custom
to modify your custom-built web page. These are pages that a customer has created within CLEO VLTrader.
Select Link to insert a link directly to any web pages that have been built outside of the CLEO VLTrader. The
following is displayed for the Custom option.

Page | 25
CLEO | Office: 800.233.2536 | Streem Fax: 815.654.8294 | support@cleo.com | www.cleo.com
Each row in the table represents specific content for the web page. Use the right-click Menu Options to
manipulate each row.
Let’s create a new page by linking to an external web page.
2. Right-click the File Transfer History page. Then select Insert Below…
3. Select Link.

Page | 26
CLEO | Office: 800.233.2536 | Streem Fax: 815.654.8294 | support@cleo.com | www.cleo.com
4. Replace the default page title with Google Search. Then select URL and enter
http://www.google.com.
Select OK. Then select Apply. Notice the new Google page listed in the page table.
Now let’s configure a portal user and log into the portal as that user to see the new page that we just added.
5. On the Preconfigured tab, right-click the Local HTTP Users node and select Clone and Activate.

Page | 27
CLEO | Office: 800.233.2536 | Streem Fax: 815.654.8294 | support@cleo.com | www.cleo.com
6. Select the Local HTTP Users node. On the HTTP tab select the dropdown for Associated web
portal and select the desired portal to be associated to this user group.
7. Select the Mailbox node and rename the mailbox to DemoFTP by editing the Mailbox alias field.
Add the password DemoFTP. Then select Apply.
8. Launch Internet Explorer. Enter the address: http://localhost:5080/vlportal.
9. Log in at the prompt using the following:
Username: DemoFTP
Password: DemoFTP
3.2 Explore the Certificate Manager
Certificate Manager manages digital certificates and private keys. It facilitates:
Generating self-signed user certificates and certificate signing requests (CSR's),
Importing/exporting user certificates/private keys,
Importing/exporting certificate authority (CA) certificates and
Marking CA certificates as either trusted or pending.
When invoked through CLEO VLTrader during SSL negotiation, it also is used to:
Provide the set of trusted CA root certificates and
Provide a selected user certificate chain.
Time Estimate: approximately 10 minutes.

Page | 28
CLEO | Office: 800.233.2536 | Streem Fax: 815.654.8294 | support@cleo.com | www.cleo.com
1. To view the Certificate Manager, select Certificates.
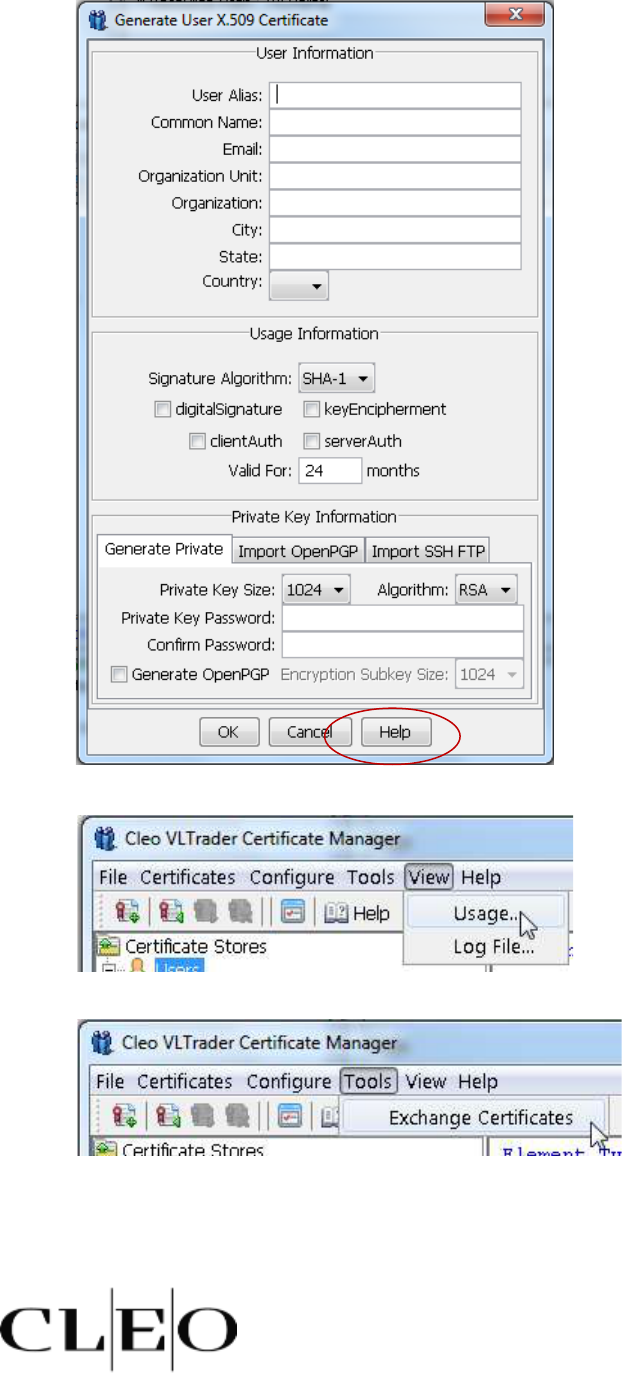
2. To generate a self-signed user certificate, right-click Users in the Certificate Stores tree. Then select
Generate > Self-signed User Certificate.
Page | 29
CLEO | Office: 800.233.2536 | Streem Fax: 815.654.8294 | support@cleo.com | www.cleo.com
3. Select Help for a definition of the fields and an example.
4. Select View > Usage to view the Certificate Usage Report.
5. Select Tools > Exchange Certificates.

Page | 30
CLEO | Office: 800.233.2536 | Streem Fax: 815.654.8294 | support@cleo.com | www.cleo.com
3.3 Explore CLEO VLNavigator
Launch CLEO VLNavigator from the Start Menu (Start Menu > CLEO VLTrader > CLEO
VLNavigator) and log in using the following:
Username: administrator
Password: Admin
CLEO VLNavigator is a CLEO VLTrader add-on component for optional multiple CLEO VLTrader and user
management. It facilitates:
Grouping CLEO VLTraders into Pools,
Defining user groups with specific CLEO VLNavigator and CLEO VLTrader privileges and
Creating individual user logins.
CLEO VLTrader Pools
CLEO VLNavigator allows multiple CLEO VLTraders to be logically grouped into pools. CLEO VLTraders which
synchronize at least one CLEO VLTrader configuration item (i.e. CA certificates, User Certificates, Hosts,
Schedule, etc.) must be in the same pool. Otherwise, disjoint CLEO VLTraders can be placed in separate pools.
The installed CLEO VLTrader and already synchronizing CLEO VLTrader will automatically be placed in a default
myCLEO VLTraders Pool when CLEO VLNavigator is first started. Additionally any CLEO VLTrader
reverse proxying through CLEO VLProxy will be presented to the CLEO VLNavigator user for optional
inclusion in a pool. Pools, including the default my CLEO VLTraders pool, can be named with any alias.
CLEO VLTraders must be identified by their serial number, but can also have an additional, optional alias.
User groups are assigned access to either all CLEO VLTraders within a pool or individual CLEO VLTraders.
User Groups
User privileges for both CLEO VLNavigator and CLEO VLTrader are established via user groups. Within a user
group, each privileged item is set to either no access, view-only, or editable. CLEO VLNavigator is broken down
into two privileges – the CLEO VLTrader tree and the Users tree – while the CLEO VLTrader privileges match
the list of configurable synchronization items (CA certificates, User Certificates, Hosts, Schedule, etc.)
A default Administrators group comes installed with full CLEO VLNavigator and CLEO VLTrader privileges
and cannot be modified. The Administrators group also cannot be renamed or deleted.
Even when CLEO VLNavigator is installed, by default CLEO VLTrader does not require a login (except for the
web GUI). But once at least one user group is assigned to a specific CLEO VLTrader or its pool, a login to that
CLEO VLTrader is required (and the existing web GUI edit and view-only passwords are deactivated).
Users
A user can be a member of one and only one user group. A user consists of a username and password. It can
also have an additional, optional alias. A default Administrator user within the Administrators user group
comes installed. Its initial password is communicated by the installer, and should be modified as soon as possible.
The administrator user cannot be renamed or deleted.
Time Estimate: approximately 10 minutes.
© 2012, CLEO Communications. All Rights Reserved.
Reproduction of this material is prohibited without express, written permission.
