
MULTI CHANNEL AV RECEIVER STR-DH770
Parts and Controls
Receiver
Front panel (upper section) [1]
Front panel (lower section) [2]
Power indicator [3]
Indicators on the display panel [4]
Rear panel [5]
Remote control
Remote control (upper section) [6]
Remote control (lower section) [7]
Preparation
1. Installing speakers
Names and functions of speakers [8]
Installing 5.1-channel speaker system [9]
Installing 7.1-channel speaker system using surround back speakers [10]
Installing 7.1-channel speaker system using front high speakers [11]
Installing 5.1-channel speaker system with bi-amplifier connection [12]
Installing 5.1-channel speaker system with front B speaker connection [13]
Speaker configuration and speaker pattern settings [14]
2. Connecting speakers
Connecting 5.1-channel speaker system [15]
Connecting 7.1-channel speaker system using surround back speakers [16]
Connecting 7.1-channel speaker system using front high speakers [17]
Connecting 5.1-channel speaker system with bi-amplifier connection [18]
Connecting 5.1-channel speaker system with front B speaker connection [19]
3. Connecting a TV
Connecting a TV [20]
Connecting a 4K TV [21]
Notes on connecting cables [22]
About HDMI connections [23]
4. Connecting audio-visual devices and the antennas (aerials)
Connecting devices with HDMI jacks [24]
Connecting devices with jacks other than HDMI jacks [25]
Connecting a USB device [26]

Connecting the antenna (aerial) [27]
Digital audio formats supported by the receiver [28]
Notes on connecting cables [29]
About HDMI connections [30]
5. Turning on the receiver/preparing the remote control
Inserting batteries into the remote control [31]
Turning on the receiver [32]
6. Setting up the receiver using Easy Setup
Setting up the receiver using Easy Setup [33]
Selecting the language [34]
Assigning the surround back speaker terminals (Surround Back Speakers Assign)
[35]
Performing Auto Calibration
1. About Auto Calibration [36]
2. Before you perform Auto Calibration [37]
3. Connecting the calibration microphone [38]
4. Selecting the front speakers [39]
5. Performing Auto Calibration [40]
6. Checking Auto Calibration results [41]
Enjoying Video and Sound
Playing AV devices
Enjoying video and sound [42]
Using the menu on the TV screen [43]
Enjoying video/sound from the connected device [44]
Enjoying sound of an ARC (Audio Return Channel) compatible TV [45]
Watching HDCP 2.2 copyright-protected content [46]
Playing content from an iPhone/iPod
Enjoying audio content using the BLUETOOTH function (Pairing operation) [47]
Compatible iPhone/iPod models [48]
Playing content from a USB device
Enjoying audio content stored on a USB device [49]
USB specifications and compatible USB devices [50]
Notes on USB devices [51]
Listening to the radio
Listening to FM radio [52]
Presetting FM radio stations [53]
Naming preset stations (NAME IN) [54]

Tuning to a station directly [55]
Receiving RDS broadcasts (for European and Asia-Pacific models only) [56]
Enjoying sound effects
Selecting a sound field [57]
Relations between sound fields and speaker outputs [58]
Resetting sound fields to the default settings [59]
Enjoying clear sound at a low volume level (NIGHT MODE) [60]
Adjusting the equalizer (EQ) [61]
Enjoying high-fidelity sound (Pure Direct) [62]
Using BLUETOOTH Features
About BLUETOOTH Features
What you can do with BLUETOOTH features [63]
Enjoying audio content stored on a BLUETOOTH device
Turning the BLUETOOTH function on/off (BT POWER) [64]
Enjoying audio content stored on a BLUETOOTH device with a one-touch
connection (NFC) [65]
Enjoying audio content using the BLUETOOTH function (Pairing operation) [66]
Controlling a BLUETOOTH device using the remote control [67]
Compatible BLUETOOTH version and profiles [68]
Using SongPal to control the receiver from a smartphone or tablet device
Controlling the receiver using a smartphone or tablet device (SongPal) [69]
Using Other Features
Interlocking with BRAVIA TV and other devices (“BRAVIA” Sync)
What is “BRAVIA” Sync? [70]
Preparing to use the “BRAVIA” Sync function [71]
Turning off the receiver and connected devices simultaneously with the TV
(System Power Off function) (STBY LINK) [72]
Enjoying TV sound from the speakers connected to the receiver (System Audio
Control function) [73]
Enjoying an input source from a connected device immediately (One-Touch Play
function) [74]
Selecting the optimum picture quality and sound field automatically (Scene Select
function) [75]
About Home Theatre Control function [76]
Operating the receiver menu using the TV remote control (Remote Easy Control
function) [77]
Echo Canceling function [78]
About Language Follow function [79]
Enjoying video and sound with your desired way of use

Switching between digital and analog audio (INPUT MODE) [80]
Using other audio input jacks (A. ASSIGN) [81]
Using the sleep timer
Using the sleep timer [82]
Checking information on the receiver
Viewing information on the display panel [83]
Adjusting Settings
Using the menu on the display panel
Operating the receiver with the menu on the display panel [84]
Viewing information on the display panel [85]
Easy Setup
Setting up the receiver using Easy Setup [86]
Selecting the language [87]
Assigning the surround back speaker terminals (Surround Back Speakers Assign)
[88]
Performing Auto Calibration
1. About Auto Calibration [89]
2. Before you perform Auto Calibration [90]
3. Connecting the calibration microphone [91]
4. Selecting the front speakers [92]
5. Performing Auto Calibration [93]
6. Checking Auto Calibration results [94]
Selecting the Auto Calibration type (CAL TYPE) [95]
Level Settings
Outputting a test tone from each speaker (TEST TONE) [96]
Adjusting the speaker level (Level) [97]
Speaker Settings
Selecting the speaker pattern (SP PATTERN) [98]
Assigning the surround back speaker terminals (Surround Back Speakers Assign)
[99]
Adjusting the speaker size (Size) [100]
Adjusting the speaker distance (Distance) [101]
Setting the crossover frequency of the speakers (Crossover Freq) [102]
Selecting the unit of measurement (DIST. UNIT) [103]
Input Settings
Switching between digital and analog audio (INPUT MODE) [104]

Changing the name for each input (NAME IN) [105]
Using other audio input jacks (A. ASSIGN) [106]
Surround Settings
Selecting the HD-D.C.S. effect type (HD-D.C.S. TYP) [107]
Equalizer Settings
Adjusting the equalizer (EQ) [108]
Tuner Settings
Setting the FM station receiving mode (FM MODE) [109]
Naming preset stations (NAME IN) [110]
Audio Settings
Enjoying clear sound at a low volume level (NIGHT MODE) [111]
Synchronizing audio with video output (A/V SYNC) [112]
Adjusting the volume automatically (AUTO VOL) [113]
Selecting the language of digital broadcasts (DUAL MONO) [114]
Compressing the dynamic range (D. RANGE) [115]
HDMI Settings
Controlling HDMI devices (CTRL HDMI) [116]
Turning off the receiver and connected devices simultaneously with the TV
(System Power Off function) (STBY LINK) [117]
Enjoying content of a connected device without turning on the receiver (STBY
THRU) [118]
Setting the HDMI audio signal output of connected devices (AUDIO OUT) [119]
Setting the level of the subwoofer (SW LEVEL) [120]
Setting HDMI signal format (SIGNAL FMT.) [121]
Bluetooth Settings
Setting the Bluetooth Standby mode (BT STANDBY) [122]
Setting BLUETOOTH audio codecs (BT AAC) [123]
Turning the BLUETOOTH function on/off (BT POWER) [124]
System Settings
Setting standby mode (AUTO STBY) [125]
Reverting to the factory default settings
Reverting to the factory default settings [126]
Troubleshooting
Error messages
PROTECTOR [127]

List of messages after Auto Calibration measurements [128]
USB message list [129]
General
The receiver is turned off automatically. [130]
Cannot find an available input when connecting several digital devices. [131]
The receiver does not turn on even when the TV is turned on. [132]
The receiver turns off when the TV is turned off. [133]
The receiver does not turn off even when the TV is turned off. [134]
Image
No image appears on the TV screen. [135]
No 3D content appears on the TV screen. [136]
No 4K content appears on the TV screen. [137]
No image is output from the TV screen when the receiver is in standby mode.
[138]
The home menu does not appear on the TV screen. [139]
The display panel is turned off. [140]
Image does not appear on the TV screen when the receiver is not turned on. [141]
When the language for the on-screen display of the TV is changed, the on-screen
display language of the receiver is changed simultaneously. [142]
Sound
No sound or only a very low level of sound is heard, no matter which device is
selected. [143]
There is severe humming or noise. [144]
No sound or only a very low level of sound is heard from specific speakers. [145]
There is no sound from a specific device. [146]
There is no sound from the TV via the HDMI TV OUT (ARC) jack when using the
Audio Return Channel function. [147]
The left and right sound is unbalanced or reversed. [148]
Dolby Digital or DTS multi-channel sound is not reproduced. [149]
The surround effect cannot be obtained. [150]
A test tone is not output from the speakers. [151]
A test tone is output from a different speaker than the speaker displayed on the
display panel. [152]
No sound is output from the TV when the receiver is in standby mode. [153]
No TV sound is output from the receiver. [154]
Image and sound are not output from the TV when the receiver is not turned on.
[155]
The sound is output from both the receiver and the TV. [156]
Tuner
The FM reception is poor. [157]
The FM stereo reception is poor. [158]
You cannot tune to radio stations. [159]
RDS does not work (for European and Asia-Pacific models only). [160]

The RDS information that you want does not appear (for European and Asia-
Pacific models only). [161]
iPhone/iPod
The sound is distorted. [162]
USB devices
Are you using a compatible USB device? [163]
There is noise, skipping, or distorted sound. [164]
A USB device is not recognized. [165]
Playback does not start. [166]
A USB device cannot be connected to the USB port. [167]
Erroneous display. [168]
[READING] is displayed for an extended time, or it takes a long time before
playback starts. [169]
An audio file cannot be played. [170]
BLUETOOTH device
Pairing cannot be done. [171]
Cannot make a BLUETOOTH connection. [172]
The sound skips or fluctuates, or the connection is lost. [173]
The sound of your BLUETOOTH device cannot be heard on the receiver. [174]
Severe humming or noise. [175]
SongPal application is closed. [176]
“BRAVIA” Sync (Control for HDMI)
The Control for HDMI function does not work properly. [177]
TV sound cannot be heard from the speakers connected to the receiver. [178]
Remote control
The remote control does not function. [179]
If the problem is not solved
Reverting to the factory default settings [180]
Resetting sound fields to the default settings [181]
Customer support websites [182]
Other Information
Trademarks
Trademarks [183]
[1] Parts and Controls Receiver
Front panel (upper section)

[2] Parts and Controls Receiver
Front panel (lower section)
[3] Parts and Controls Receiver
Power indicator
(power)
1.
Power indicator
2.
SPEAKERS
3.
TUNING MODE, TUNING +/–
Press to operate the FM tuner.
Press TUNING +/– to scan a station.
4.
NFC sensor
5.
2CH/MULTI , MOVIE, MUSIC
6.
Display panel
7.
NIGHT MODE
Activates the Night Mode function which allows you to retain a theater-like environment at
low volume levels.
8.
CONNECTION PAIRING BLUETOOTH
Operates the BLUETOOTH function.
9.
DISPLAY
Displays information on the display panel.
10.
DIMMER
Adjusts the brightness of the display panel in 3 levels.
11.
Remote control sensor
Receives signals from remote control.
12.
PURE DIRECT
The indicator above the button lights up when the Pure Direct function is activated.
13.
PHONES jack
Connect headphones here.
1.
CALIBRATION MIC jack
2.
(USB) port
3.
INPUT SELECTOR
4.
MASTER VOLUME
5.

Green: The receiver is turned on.
Amber: The receiver is in standby mode, and you have set one of the following:
[CTRL HDMI] is set to [CTRL ON].
[STBY THRU] is set to [ON] or [AUTO].
[BT STANDBY] is set to [STBY ON]. (*)
Indicator turns off when the receiver is in standby mode and:
[CTRL HDMI] is set to [CTRL OFF].
[STBY THRU] is set to [OFF].
[BT STANDBY] is set to [STBY OFF].
[4] Parts and Controls
Receiver
Indicators on the display panel
When [BT STANDBY] is activated, the indicator only lights in amber when a device has been paired with the
receiver. If there are no devices paired with the receiver, the indicator turns off.
*
USB
Lights up when a USB device is detected.
1.
Input indicator
Lights up to indicate the current input.
ARC
TV input is selected and Audio Return Channel (ARC) signals are detected.
OPT
Digital signals are input through the OPTICAL jack.
COAX
Digital signals are input through the COAXIAL jack.
HDMI
Digital signals are input through the selected HDMI IN jack.
2.
MEM
Lights up when FM memory function is activated.
3.
D.R.C.
Lights up when dynamic range compression is activated.
4.
TrueHD (*)
Lights up when the receiver is decoding the Dolby TrueHD format signals.
5.
PL
Lights up when the receiver performs Dolby Pro Logic processing. This matrix surround
decoding technology can enhance input signals.
6.
EQ
Lights up when the equalizer is activated.
7.
DTS-HD (*)
Lights up when the receiver is decoding the DTS-HD format signals.
8.
ST
Lights up when the receiver tunes to a FM stereo broadcast.
9.
D.C.A.C.
Lights up when the measurement results of the Auto Calibration function are applied.
10.

Note
[ PL] (6) may not light up depending on the speaker pattern setting.
[5] Parts and Controls Receiver
Rear panel
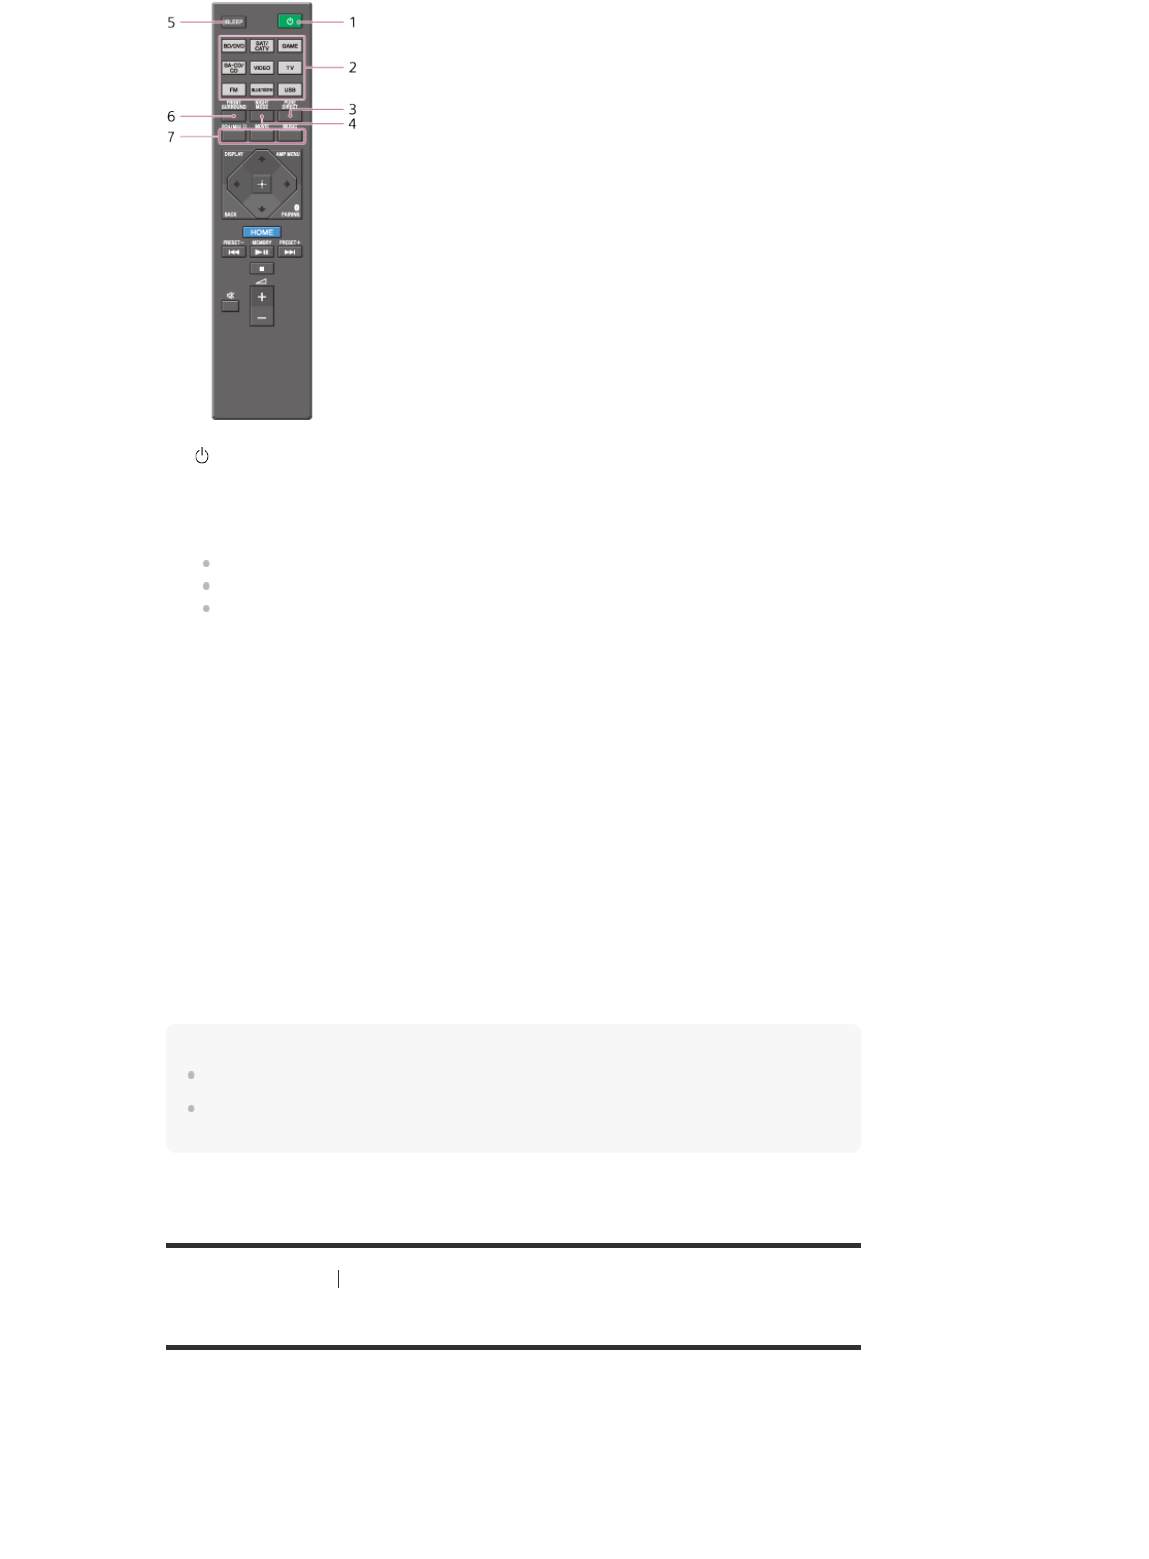
[6] Parts and Controls Remote control
Remote control (upper section)
Use the supplied remote control to operate this receiver.
SLEEP
Lights up when the sleep timer is activated.
11.
BT
Lights up when a BLUETOOTH device is connected. Flashes while pairing and connecting.
12.
Speaker system indicator
13.
When playing a Dolby Digital or DTS format disc, make sure that you have completed the digital connections and
[<INPUT>] - [INPUT MODE] is not set to [ANALOG] on the display panel.
*
HDMI IN/OUT jacks (*1) (*2)
1.
SPEAKERS terminals
2.
SUBWOOFER OUT jacks
3.
AUDIO IN jacks
4.
VIDEO IN/MONITOR OUT jacks (*1)
5.
FM ANTENNA terminal
6.
COAXIAL IN jack
7.
OPTICAL IN jack
8.
Connect a TV to the corresponding output jacks to watch video input from these jacks. For details, see
“Connecting a TV
.”
*1
Input jack Output jack
HDMI IN HDMI TV OUT
VIDEO IN MONITOR OUT
HDCP 2.2 is newly enhanced copyright protection technology that is used to protect content such as 4K movies.
*2
Note
The above explanations are intended to serve as examples.
Depending on the model of your connected device, some functions explained in this section may not
work with the supplied remote control.
[7] Parts and Controls Remote control
Remote control (lower section)
Use the supplied remote control to operate this receiver.
(power)
Turns the receiver on or sets it to the standby mode.
Saving power in standby mode
Save power by setting:
[CTRL HDMI] to [CTRL OFF] in the [<HDMI>] menu.
[STBY THRU] to [OFF] in the [<HDMI>] menu.
[BT STBY] to [STBY OFF] in the [<BT>] menu.
1.
Input buttons
Select the device you want to use.
When you press any of the input buttons, the receiver turns on. The input buttons are pre-
assigned to automatically control Sony devices when you select them.
2.
PURE DIRECT
Activates the Pure Direct function which allows you to enjoy higher-fidelity sound from all
inputs.
3.
NIGHT MODE
Activates the Night Mode function which allows you to retain a theater-like environment at
low volume levels.
4.
SLEEP
Sets the receiver to turn off automatically after a specified period of time.
5.
FRONT SURROUND
Activates the Front Surround function which allows you to enjoy theater-like surround sound
only with two front speakers.
6.
2CH/MULTI, MOVIE, MUSIC
Select a sound field.
7.

Note
The above explanations are intended to serve as examples.
Depending on the model of your connected device, some functions explained in this section may not
work with the supplied remote control.
[8] Preparation 1. Installing speakers
Names and functions of speakers
Location of each speaker
AMP MENU
Displays the menu on the display panel to operate the receiver.
1.
, / / /
Press / / / to select the menu items. Then press to enter the selection.
2.
PAIRING
Sets the receiver to the BLUETOOTH pairing mode.
3.
HOME
Displays the home menu on the TV screen.
4.
/ , (*),
Skip, play, pause, stop operation.
When [FM] is selected as the input, press and hold
/ to scan stations automatically.
Press
to change to the direct tuning mode.
PRESET+/–
Select preset stations or channels.
MEMORY (*)
Stores a station during tuner operation.
5.
+ (*)/–
Adjust the volume level of all speakers at the same time.
6.
DISPLAY
Displays information on the display panel.
7.
BACK
Returns to the previous menu or exits a menu or on-screen guide that is displayed on the
TV screen.
8.
Turns off the sound temporarily. Press the button again to restore the sound.
9.
The /MEMORY and + buttons have tactile dots. Use the tactile dots as a reference when operating the
receiver.
*

[9] Preparation 1. Installing speakers
Installing 5.1-channel speaker system
To fully enjoy theater-like multi-channel surround sound, you need five speakers (two front
speakers, a center speaker, and two surround speakers) and a subwoofer.
Abbreviations
used in
illustrations
Speaker
name
Functions
FL
Front left
speaker
Produces stereo sounds from front left/right channels.
FR
Front right
speaker
CNT
Center
speaker
Produces vocal sounds from center channel.
SL
Surround left
speaker
Produces sounds from surround left/right channels.
SR
Surround right
speaker
SBL
Surround back
left speaker
Produces sounds from surround back left/right
channels.
SBR
Surround back
right speaker
SB
Surround back
speaker
Produces sounds from surround back channel.
SW Subwoofer
Produces LFE (low frequency effect) channel sounds
and reinforces bass parts of other channels.
LH
Left front high
speaker
Produces vertical sound effects from front high
left/right channels.
RH
Right front
high speaker

30°
100° - 120°
Hint
As the subwoofer does not emit highly directional signals, you can place it wherever you want.
[10] Preparation 1. Installing speakers
Installing 7.1-channel speaker system using surround
back speakers
You can enjoy high-fidelity reproduction of recorded sound from DVD or Blu-ray Disc software in
6.1-channel or 7.1-channel format.
30°
100° - 120°
Same angle
Note
When you use a 6.1-channel connection, place a surround back speaker directly behind the listening
position.
Hint
As the subwoofer does not emit highly directional signals, you can place it wherever you want.

[11] Preparation 1. Installing speakers
Installing 7.1-channel speaker system using front high
speakers
You can enjoy vertical sound effects by connecting additional two front high speakers.
30°
100° - 120°
30° - 45°
H: Left front high speaker or right front high speaker
F: Front left speaker or front right speaker
Hint
As the subwoofer does not emit highly directional signals, you can place it wherever you want.
[12] Preparation 1. Installing speakers
Installing 5.1-channel speaker system with bi-amplifier
connection
You can enhance the sound quality of the front speakers by connecting a different amplifier to
both a tweeter and a woofer, using bi-amplifier connection.

30°
100° - 120°
Hint
As the subwoofer does not emit highly directional signals, you can place it wherever you want.
[13] Preparation 1. Installing speakers
Installing 5.1-channel speaker system with front B
speaker connection
If you have an additional front speaker system, connect it to SPEAKERS SURROUND
BACK/BI-AMP/FRONT HIGH/FRONT B terminals.
You can output sound from either front A speakers or front B speakers, or both front A
speakers and front B speakers.
30°
100° - 120°
Hint
As the subwoofer does not emit highly directional signals, you can place it wherever you want.
[14] Preparation 1. Installing speakers
Speaker configuration and speaker pattern settings
Select the speaker pattern from the [<SPEAKER>] menu on the display panel according to the
speaker configuration which you are using.
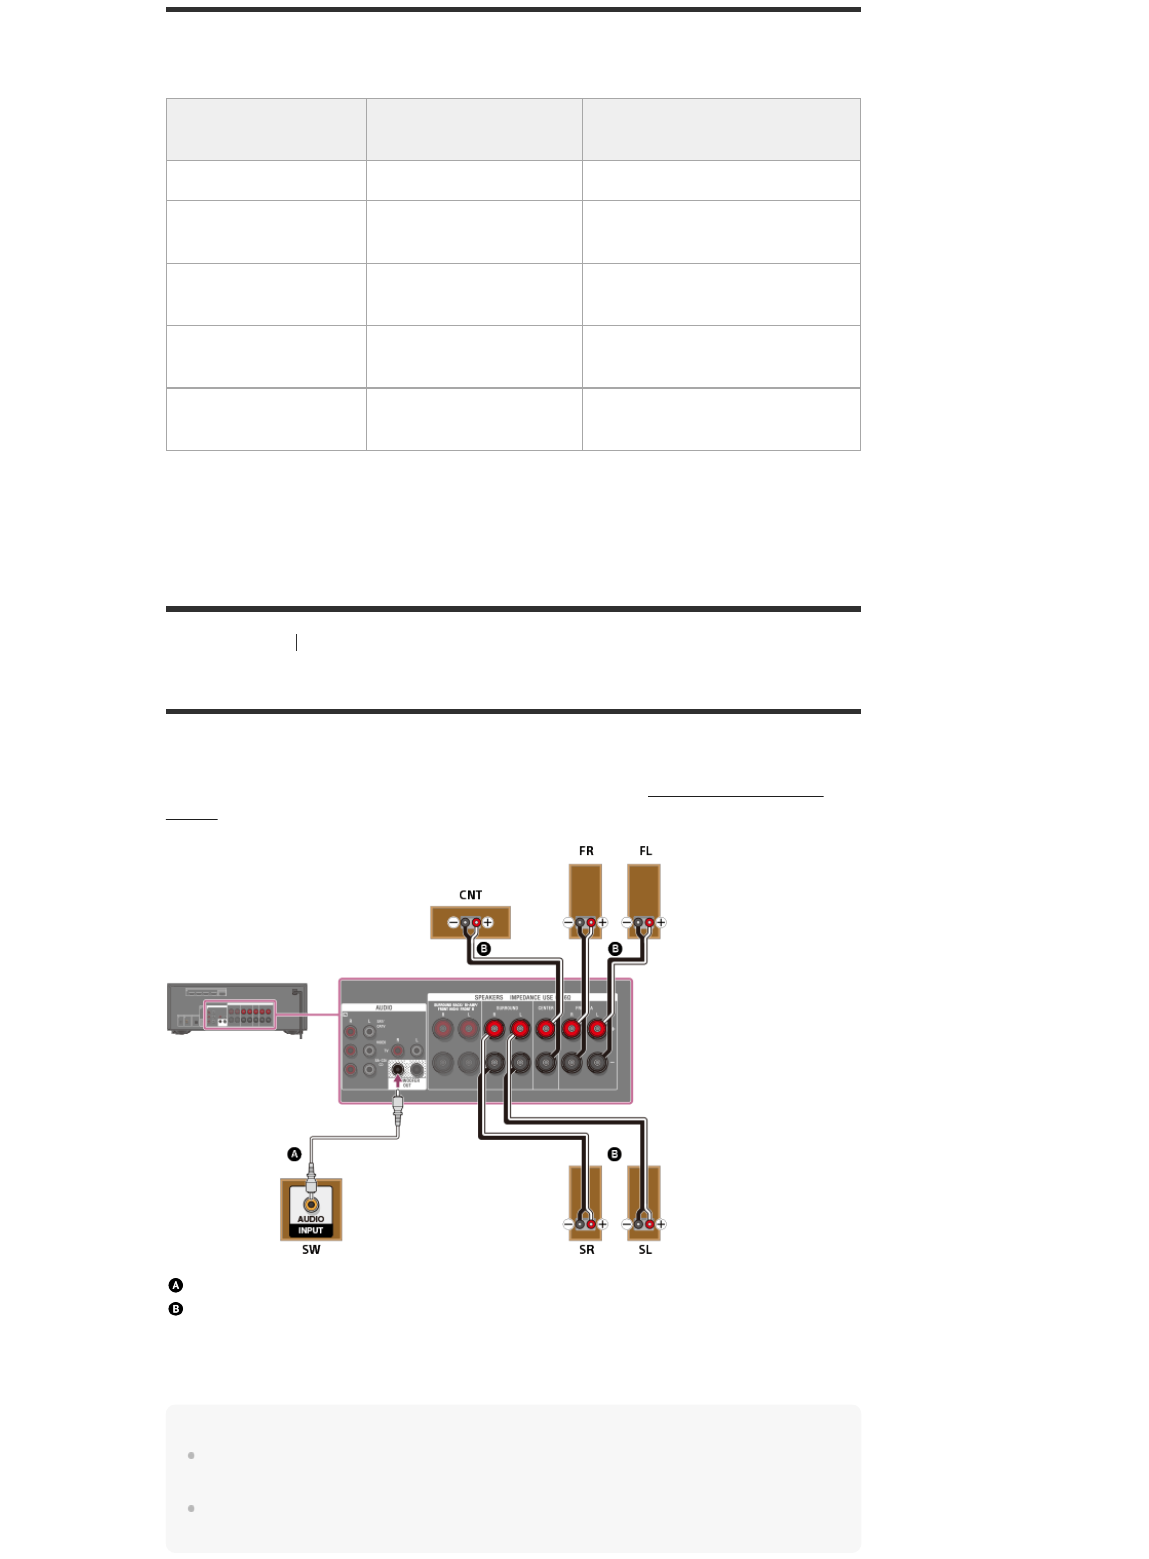
[15] Preparation
2. Connecting speakers
Connecting 5.1-channel speaker system
Connect each speaker as illustrated below.
Before connecting cables, be sure to disconnect the AC power cord (mains lead).
For details on how to connect speaker cables to the receiver, see “How to connect speaker
cables.”
Monaural audio cable (not supplied)
Speaker cable (not supplied)
After you have made the connections, set [Speaker Setting] - [Surround Back Speakers Assign]
to [None Speaker] from the home menu.
Hint
You can also set the assignment for the surround back speaker terminals on the display panel. Set
[SB ASSIGN] to [OFF] in the [<SPEAKER>] menu.
You can only set [SB ASSIGN] if the speaker pattern is set to a setting that does not have surround
back and front high speakers.
Speaker configuration
[SB ASSIGN] setting on
the display panel (*)
Speaker pattern to be selected in
the [<SPEAKER>] menu
5.1-channel [OFF] [3/2.1]
7.1-channel using
surround back speakers
- [3/4.1]
7.1-channel using front
high speakers
- [5/2.1]
5.1-channel with bi-
amplifier connections
[BI-AMP] [3/2.1]
5.1-channel with front B
speaker connection
[SPK B] [3/2.1]
You can only set [SB ASSIGN] if the speaker pattern is set to a setting that does not have surround back and
front high speakers.
*
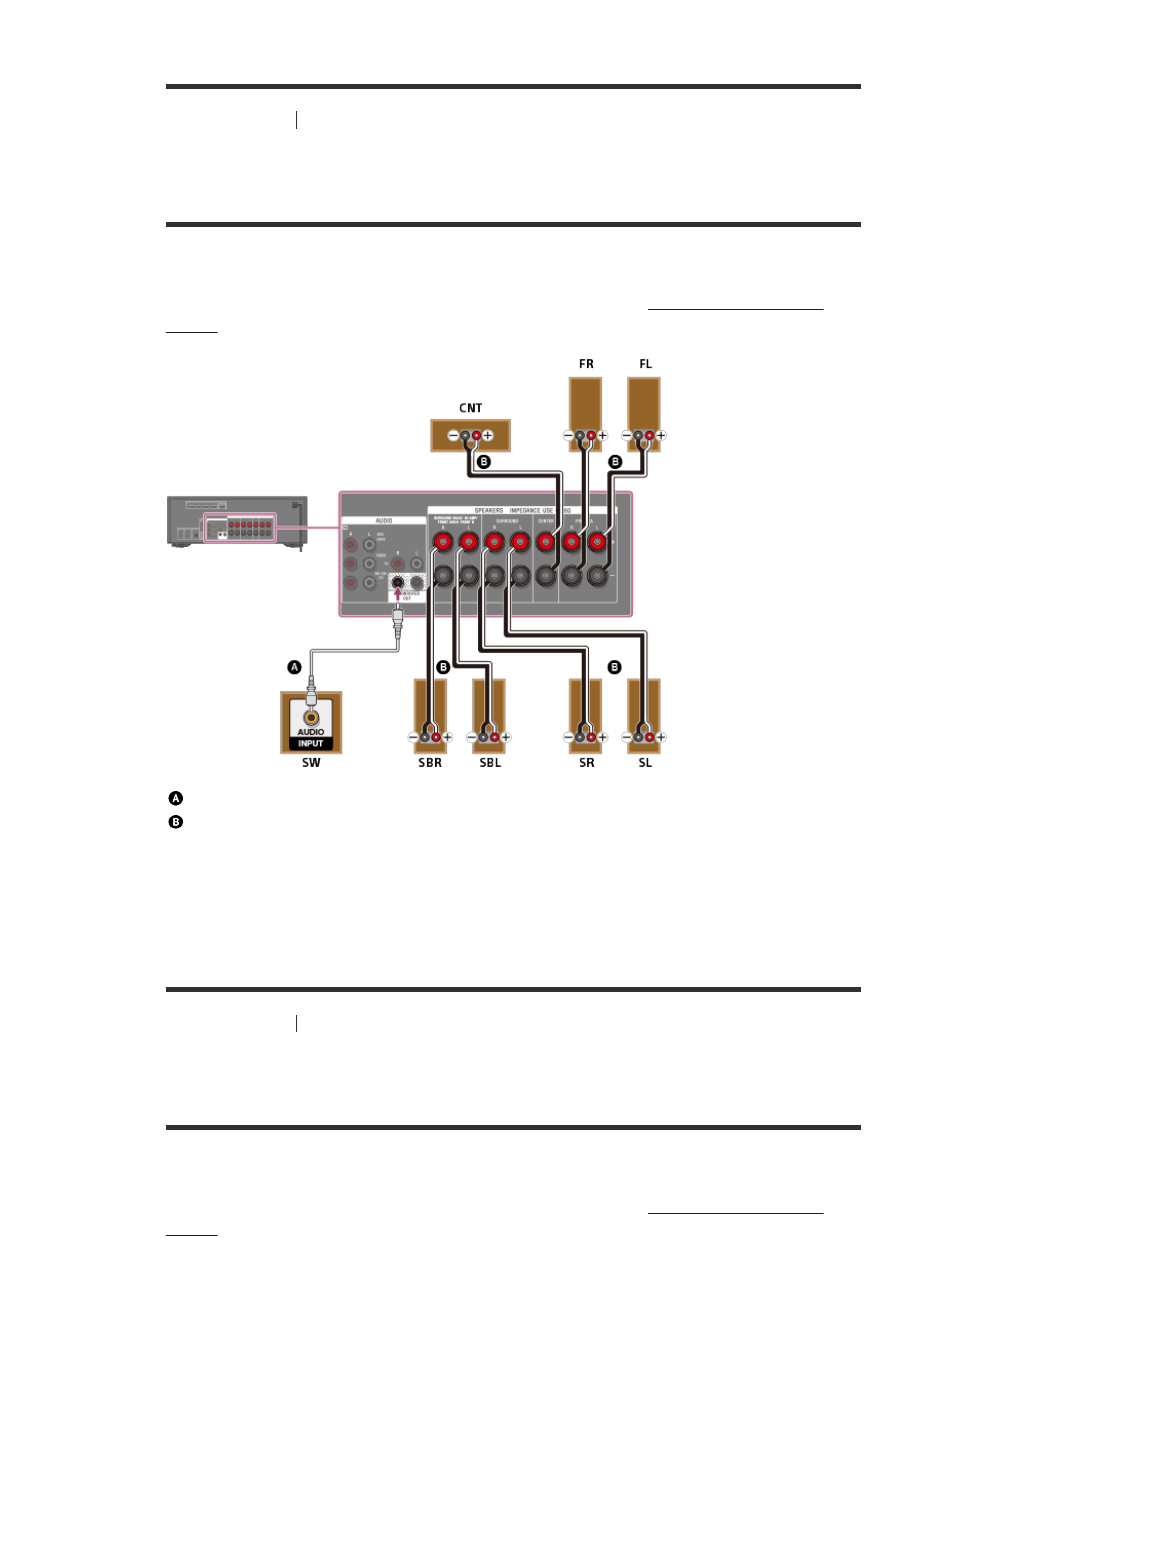
[16] Preparation 2. Connecting speakers
Connecting 7.1-channel speaker system using
surround back speakers
Connect each speaker as illustrated below.
Before connecting cables, be sure to disconnect the AC power cord (mains lead).
For details on how to connect speaker cables to the receiver, see “How to connect speaker
cables.”
Monaural audio cable (not supplied)
Speaker cable (not supplied)
After you have connected the surround back speakers, set [Speaker Setting] - [Surround Back
Speakers Assign] to [Surround Back Speakers] from the home menu.
[17] Preparation
2. Connecting speakers
Connecting 7.1-channel speaker system using front
high speakers
Connect each speaker as illustrated below.
Before connecting cables, be sure to disconnect the AC power cord (mains lead).
For details on how to connect speaker cables to the receiver, see “How to connect speaker
cables.”

Monaural audio cable (not supplied)
Speaker cable (not supplied)
After you have connected the front high speakers, set [Speaker Setting] - [Surround Back
Speakers Assign] to [Front High Speakers] from the home menu.
[18] Preparation
2. Connecting speakers
Connecting 5.1-channel speaker system with bi-
amplifier connection
You can enhance the sound quality of the front speakers by connecting different amplifiers to
both a tweeter and a woofer, using bi-amplifier connection.
If you are not using surround back speakers or front high speakers, you can connect the front
speakers to the SPEAKERS SURROUND BACK/BI-AMP/FRONT HIGH/FRONT B terminals
using a bi-amplifier connection. Connect each speaker as illustrated below.
Before connecting cables, be sure to disconnect the AC power cord (mains lead).
For details on how to connect speaker cables to the receiver, see “How to connect speaker
cables.”
Connecting front speakers with bi-amplifier connection
Connect the jacks on the Lo (or Hi) side of the front speakers to the SPEAKERS FRONT A
terminals, and connect the jacks on the Hi (or Lo) side of the front speakers to the SPEAKERS
SURROUND BACK/BI-AMP/FRONT HIGH/FRONT B terminals.
Make sure that metal fittings of Hi/Lo attached to the speakers have been removed from the
speakers to avoid receiver malfunction.
Speaker cable (not supplied)

Connecting speakers other than front speakers
Monaural audio cable (not supplied)
Speaker cable (not supplied)
After you have made the bi-amplifier connection, set [Speaker Setting] - [Surround Back
Speakers Assign] to [Bi-Amplifier Speakers] from the home menu.
Hint
You can also set the assignment for the surround back speaker terminals on the display panel. Set
[SB ASSIGN] to [BI-AMP] in the [<SPEAKER>] menu.
You can only set [SB ASSIGN] if the speaker pattern is set to a setting that does not have surround
back and front high speakers.
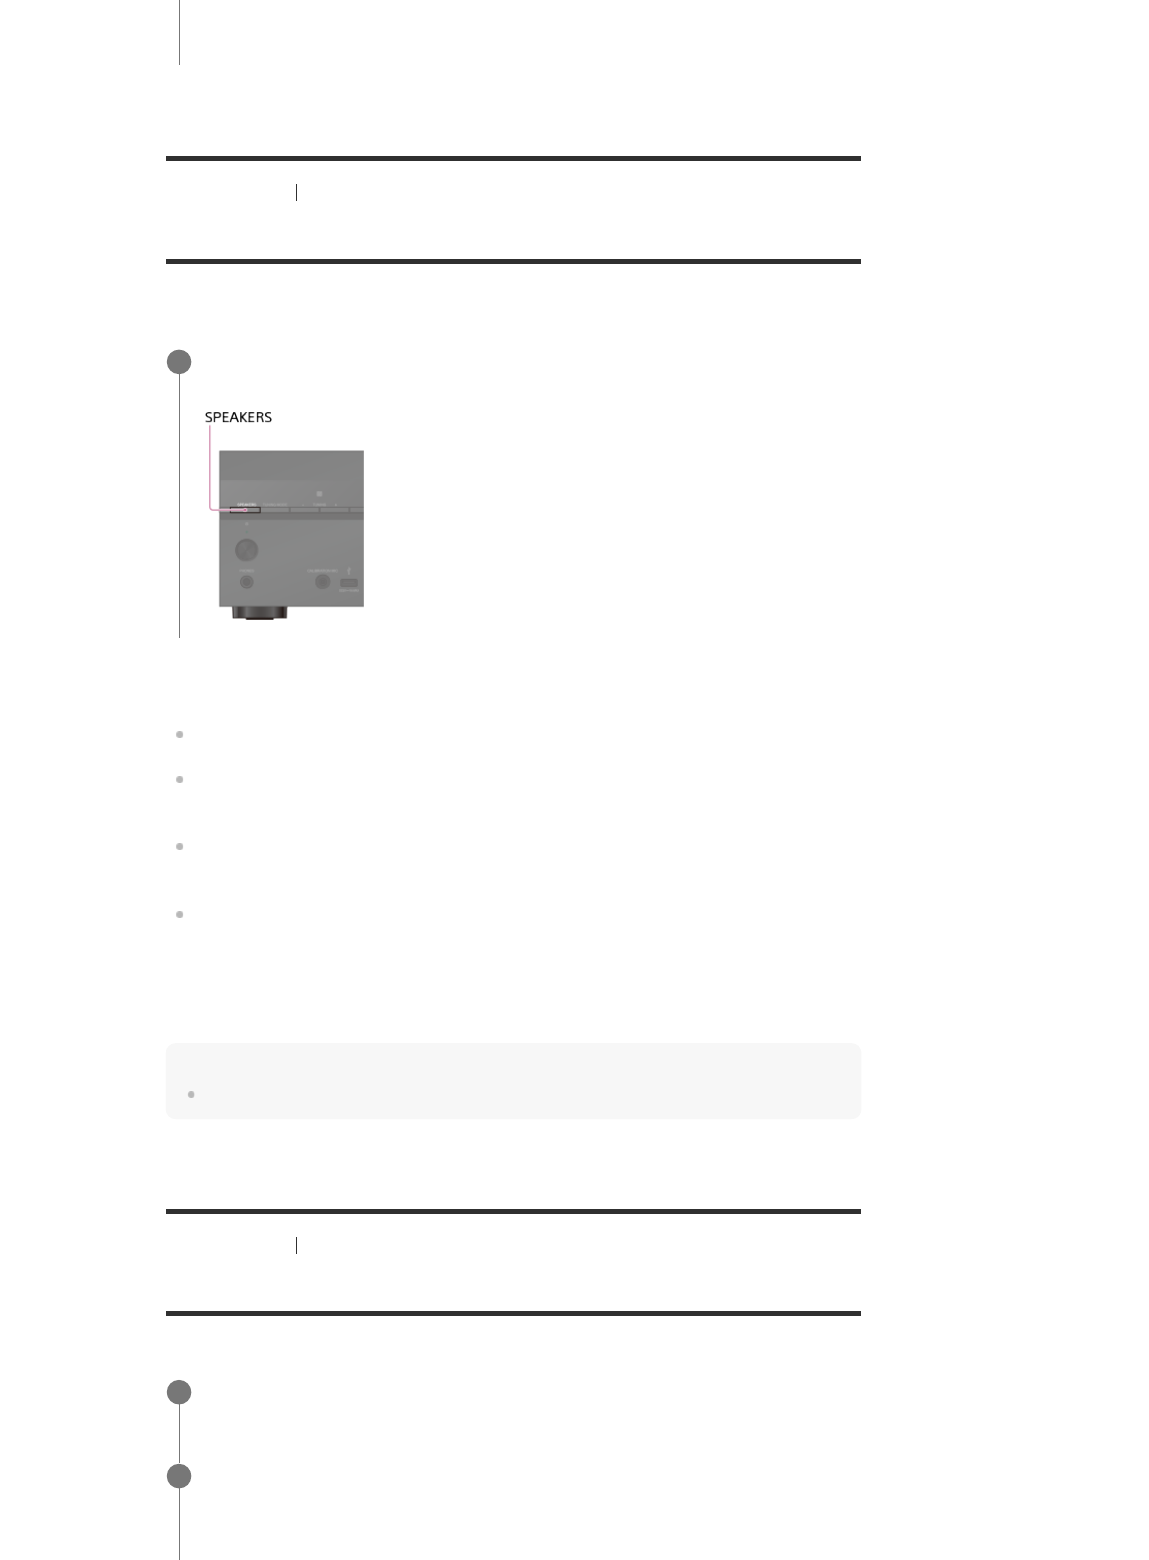
[19] Preparation 2. Connecting speakers
Connecting 5.1-channel speaker system with front B
speaker connection
If you are not using surround back speakers or front high speakers, you can connect additional
front B speakers to the SPEAKERS SURROUND BACK/BI-AMP/FRONT HIGH/FRONT B
terminals.
Connect each speaker as illustrated below.
Before connecting cables, be sure to disconnect the AC power cord (mains lead).
For details on how to connect speaker cables to the receiver, see “How to connect speaker
cables.”
Monaural audio cable (not supplied)
Speaker cable (not supplied)
After you have made the front B speaker connection, set [Speaker Setting] - [Surround Back

Speakers Assign] to [Front B Speakers] from the home menu.
You can select the front speaker system you want to use by pressing SPEAKERS on the
receiver.
Hint
You can also set the assignment for the surround back speaker terminals on the display panel. Set
[SB ASSIGN] to [SPK B] in the [<SPEAKER>] menu.
You can only set [SB ASSIGN] if the speaker pattern is set to a setting that does not have surround
back and front high speakers.
[20] Preparation 3. Connecting a TV
Connecting a TV
Connect a TV to the HDMI TV OUT or MONITOR OUT jack. You can operate this receiver
using the menu on the TV screen when you connect the TV to the HDMI TV OUT jack.
Before connecting cables, be sure to disconnect the AC power cord (mains lead).
Connecting a TV incompatible with the Audio Return Channel (ARC) function
via an HDMI connection
Solid lines show recommended connections and the dashed lines show alternative connections
for audio signals. It is not necessary to connect all the cables. HDMI connection for audio/video
signals is required.
Optical digital cable (not supplied)
Audio cable (not supplied)
HDMI cable (not supplied)
Note
Sony recommends that you use an HDMI-authorized cable or HDMI cable made by Sony. Be sure to
use a High Speed HDMI Cable with Ethernet. Premium High Speed HDMI Cable with Ethernet is
required for 4K/60p 4:4:4, 4:2:2, and 4K/60p 4:2:0 10 bit, etc.
Connecting a TV compatible with the Audio Return Channel (ARC) function via

an HDMI connection
With just one HDMI cable connection, you can listen to the TV audio from the speakers
connected to the receiver while the receiver sends audio and video to the TV.
HDMI cable (not supplied)
Note
Sony recommends that you use an HDMI-authorized cable or HDMI cable made by Sony. Be sure to
use a High Speed HDMI Cable with Ethernet. Premium High Speed HDMI Cable with Ethernet is
required for 4K/60p 4:4:4, 4:2:2, and 4K/60p 4:2:0 10 bit, etc.
For this connection, you need to turn the Control for HDMI function on. Press AMP MENU, then set
[<HDMI>] - [CTRL HDMI] to [CTRL ON] on the display panel.
Hint
If the HDMI jack of the TV (labeled “ARC”) is already connected to another device, disconnect the
device and connect the receiver.
Connecting a TV without HDMI jacks
Solid lines show recommended connections and the dashed lines show alternative connections
for audio signals. It is not necessary to connect all the cables. Connections for video signals
are required.
Video cable (not supplied)
Audio cable (not supplied)
Optical digital cable (not supplied)
Note
Connect a TV monitor or a projector to the HDMI TV OUT or MONITOR OUT jack on the receiver.
Depending on the status of the connection between the TV and the antenna (aerial), the image on
the TV screen may be distorted. If this is the case, place the antenna (aerial) farther away from the
receiver.
Hint
When connecting a TV to the receiver via the TV IN jacks of the receiver, set the sound output jack
of the TV to “Fixed” if it can be switched between “Fixed” or “Variable.”

[21] Preparation 3. Connecting a TV
Connecting a 4K TV
All HDMI jacks on the receiver support 4K resolution and HDCP 2.2 (High-bandwidth Digital
Content Protection System Revision 2.2).
HDCP 2.2 is newly enhanced copyright protection technology that is used to protect content
such as 4K movies.
To watch HDCP 2.2 protected content such as 4K content, connect the HDMI jacks to jacks that
support HDCP 2.2 on the TV and AV device. For details on whether the TV and AV device are
equipped with HDCP 2.2-compatible HDMI jack, refer to the operating instructions of the
connected device.
When you use high bandwidth video formats such as 4K/60p 4:4:4, 4:2:2, and 4K/60p 4:2:0 10
bit, etc., be sure to set the HDMI signal format. For details, see “Setting HDMI signal format
(SIGNAL FMT.).”
When an HDCP 2.2-compatible HDMI jack on the TV is labeled “ARC” (*)
HDMI cable (not supplied)
Note
Sony recommends that you use an HDMI-authorized cable or HDMI cable made by Sony. Be sure to
use a High Speed HDMI Cable with Ethernet. Premium High Speed HDMI Cable with Ethernet is
required for 4K/60p 4:4:4, 4:2:2, and 4K/60p 4:2:0 10 bit, etc.
When you want to watch HDCP 2.2 protected content and the non-HDCP 2.2-
compatible HDMI jack on the TV is labeled “ARC”
If the HDMI jack on the TV is labeled ARC and is not HDCP 2.2-compatible, connect the
receiver to the HDCP 2.2-compatible HDMI jack on the TV using a High Speed HDMI Cable
with Ethernet. Then, connect an optical digital cable to the optical output jack of the TV to listen
to digital sound.
The ARC (Audio Return Channel) function sends digital sound from a TV to the receiver using only an HDMI
cable.
*

Optical digital cable (not supplied)
HDMI cable (not supplied)
Note
Sony recommends that you use an HDMI-authorized cable or HDMI cable made by Sony. Be sure to
use a High Speed HDMI Cable with Ethernet. Premium High Speed HDMI Cable with Ethernet is
required for 4K/60p 4:4:4, 4:2:2, and 4K/60p 4:2:0 10 bit, etc.
[22] Preparation 3. Connecting a TV
Notes on connecting cables
Before connecting cables, be sure to disconnect the AC power cord (mains lead).
It is not necessary to connect all of the cables. Connect cables according to the availability
of jacks on the connected device.
Sony recommends that you use an HDMI-authorized cable or HDMI cable made by Sony.
Be sure to use a High Speed HDMI Cable with Ethernet. Premium High Speed HDMI Cable
with Ethernet is required for 4K/60p 4:4:4, 4:2:2, and 4K/60p 4:2:0 10 bit, etc. For details
about the high bandwidth video format, refer to “Supported video formats” in “About HDMI
connections.”
We do not recommend using an HDMI-DVI conversion cable. If you connect an HDMI-DVI
conversion cable to a DVI-D device, the sound and/or image may be lost. Connect separate
audio cables or digital connecting cables, then reassign the input jacks if the sound is not
output correctly.
When connecting optical digital cables, insert the plugs straight until they click into place.
Do not bend or tie optical digital cables.
When you use high bandwidth video formats such as 4K/60p 4:4:4, 4:2:2 and 4K/60p 4:2:0
10 bit, be sure to set the HDMI signal format. For details, see “Setting HDMI signal format
(SIGNAL FMT.).”
Hint
All of the digital audio jacks are compatible with 32 kHz, 44.1 kHz, 48 kHz and 96 kHz sampling
frequencies.

If you want to connect several digital devices, but cannot find an unused input
In this case, reassign the input jacks.
[23] Preparation
3. Connecting a TV
About HDMI connections
High-Definition Multimedia Interface (HDMI) is an interface that transmits video and audio
signals in digital format. Connecting Sony “BRAVIA” Sync-compatible devices using HDMI
cables simplifies operations.
HDMI features
Digital audio signals transmitted by HDMI can be output from the speakers connected to the
receiver. This signal supports Dolby Digital, DTS, DSD, and Linear PCM.
The receiver can receive Multi Channel Linear PCM (up to 8 channels) with a sampling
frequency of 192 kHz or less via an HDMI connection.
This receiver supports High Bitrate Audio (DTS-HD Master Audio, Dolby TrueHD), Deep
Color (Deep Colour), and 4K or 3D transmission.
To enjoy 3D content, connect a 3D-compatible TV and video device (Blu-ray Disc player,
Blu-ray Disc recorder, PlayStation 4, etc.) to the receiver using High Speed HDMI Cables
with Ethernet, put on 3D glasses, and then play 3D-compatible content.
To enjoy 4K content, connect a 4K-compatible TV or video device (Blu-ray Disc player, etc.)
to the receiver using Premium High Speed HDMI Cables with Ethernet, and then play 4K-
compatible content.
Premium High Speed HDMI Cable with Ethernet is required for 4K/60p 4:4:4, 4:2:2, and
4K/60p 4:2:0 10 bit, etc.
All HDMI jacks on the receiver support High-bandwidth Digital Content Protection System
Revision 2.2 (HDCP 2.2). Connect these HDMI jacks to jacks that support HDCP 2.2 on the
TV and AV device. Refer to the operating instructions of the connected device for details.
All HDMI jacks on the receiver support bandwidth up to 18 Gbps, HDCP 2.2, ITU-R BT.2020
wide color spaces, 3D, Deep Color (Deep Colour), Audio Return Channel (ARC), and HDR
(High Dynamic Range) contents pass-through.
HDCP 2.2 is newly enhanced copyright protection technology that is used to protect content
such as 4K movies.
BT.2020 color space is new wider color standard that is defined for ultra-high definition
television systems.
HDR is an emerging video format that can display a wider range of brightness levels.
Supported video formats
Format 2D
3D
Frame
packing
Side-by-Side
(Half)
Over-Under (Top-and-
Bottom)
4096 × 2160p @
59.94/60 Hz
○
(*1)
- - -
4096 × 2160p @ 50 Hz
○
(*1)
- - -
4096 × 2160p @
29.97/30 Hz
○
(*2)
- - -
4096 × 2160p @ 25 Hz
○
(*2)
- - -
4096 × 2160p @
23.98/24 Hz
○
(*2)
- - -
3840 × 2160p @
59.94/60 Hz
○
(*1)
- - -
3840 × 2160p @ 50 Hz
○
(*1)
- - -

Note
Depending on the TV or video device, 4K or 3D content may not be displayed. Check the HDMI
video formats supported by the receiver.
Refer to the operating instructions of each connected device for details.
[24] Preparation 4. Connecting audio-visual devices and the antennas (aerials)
Connecting devices with HDMI jacks
Connect devices to the receiver as illustrated below.
Before connecting cables, be sure to disconnect the AC power cord (mains lead).
All HDMI jacks on the receiver support HDCP 2.2 (High-bandwidth Digital Content Protection
System Revision 2.2). To watch content protected by HDCP 2.2, such as 4K content, connect
3840 × 2160p @
29.97/30 Hz
○
(*2)
- - -
3840 × 2160p @ 25 Hz
○
(*2)
- - -
3840 × 2160p @
23.98/24 Hz
○
(*2)
- - -
1920 × 1080p @
59.94/60 Hz
○ - ○ ○
1920 × 1080p @ 50 Hz ○ - ○ ○
1920 × 1080p @
29.97/30 Hz
○ ○ ○ ○
1920 × 1080p @ 25 Hz ○ ○ ○ ○
1920 × 1080p @
23.98/24 Hz
○ ○ ○ ○
1920 × 1080i @
59.94/60 Hz
○ ○ ○ ○
1920 × 1080i @ 50 Hz ○ ○ ○ ○
1280 × 720p @
59.94/60 Hz
○ ○ ○ ○
1280 × 720p @ 50 Hz ○ ○ ○ ○
1280 × 720p @
29.97/30 Hz
○ ○ ○ ○
1280 × 720p @
23.98/24 Hz
○ ○ ○ ○
720 × 480p @ 59.94/60
Hz
○ - - -
720 × 576p @ 50 Hz ○ - - -
640 × 480p @ 59.94/60
Hz
○ - - -
If you use YCbCr 4:4:4/YCbCr 4:2:2/RGB 4:4:4 or YCbCr 4:2:0 Deep Color (Deep Colour) (10 bit or 12 bit) of
these video formats, we recommend you to use Premium High Speed HDMI Cables with Ethernet, which can
support bandwidth up to 18 Gbps, and be sure to set the HDMI signal format to [ENHANCED] in the [<HDMI>]
menu. For details, see “Setting HDMI signal format (
SIGNAL FMT.).”
*1
If you use Deep Color (Deep Colour) (10 bit or 12 bit) of these video formats, we recommend you to use
Premium High Speed HDMI Cables with Ethernet, which can support bandwidth up to 18 Gbps, and be sure to
set the HDMI signal format to [ENHANCED] in the [<HDMI>] menu. For details, see “Setting HDMI signal format
(SIGNAL FMT.).”
*2

these HDMI jacks to jacks that support HDCP 2.2 on the TV and AV device. Refer to the
operating instructions of the connected device for details.
HDMI cable (not supplied)
Cable box or satellite box
Game console such as PlayStation 4
Blu-ray Disc player, DVD player
DVD recorder
Note
Sony recommends that you use an HDMI-authorized cable or HDMI cable made by Sony. Be sure to
use a High Speed HDMI Cable with Ethernet. Premium High Speed HDMI Cable with Ethernet is
required for 4K/60p 4:4:4, 4:2:2, and 4K/60p 4:2:0 10 bit, etc.
Hint
This HDMI connection is an example. You can connect each HDMI device to any HDMI input.
The image quality depends on the connecting jack. We recommend that you connect your devices
via an HDMI connection if they have HDMI jacks.
[25] Preparation 4. Connecting audio-visual devices and the antennas (aerials)
Connecting devices with jacks other than HDMI jacks
Connect devices to the receiver as illustrated below.
Solid lines show recommended connections and the dashed lines show alternative connections.
It is not necessary to connect all the cables.
Before connecting cables, be sure to disconnect the AC power cord (mains lead).

Audio cable (not supplied)
Video cable (not supplied)
Coaxial digital cable (not supplied)
Hint
You can rename each input so that the name can be displayed on the display panel of the receiver.
For details, see “Changing the name for each input (
NAME IN).”
The image quality depends on the connecting jack. We recommend that you connect your devices
via an HDMI connection if they have HDMI jacks.
[26] Preparation 4. Connecting audio-visual devices and the antennas (aerials)
Connecting a USB device
Connect a USB device as illustrated below.
USB device
Note
iPhone/iPod playback via (USB) port is not possible.

[27] Preparation 4. Connecting audio-visual devices and the antennas (aerials)
Connecting the antenna (aerial)
Connect the supplied FM wire antenna (aerial) to the receiver as illustrated below.
Before connecting antenna (aerial), be sure to disconnect the AC power cord (mains lead).
FM wire antenna (aerial) (supplied)
Note
Be sure to fully extend the FM wire antenna (aerial).
After connecting the FM wire antenna (aerial), keep it as horizontal as possible.
[28] Preparation 4. Connecting audio-visual devices and the antennas (aerials)
Digital audio formats supported by the receiver
The digital audio formats that this receiver can decode depend on the digital audio output jacks
of the connected device. This receiver supports the following audio formats. The words in
brackets are those indicated on the display panel.
Digital audio format
Maximum number of
channels
Connection with the
receiver
Dolby Digital [DOLBY D] 5.1
COAXIAL/OPTICAL,
HDMI
Dolby Digital EX [DOLBY D EX] 6.1
COAXIAL/OPTICAL,
HDMI
Dolby Digital Plus [DOLBY D +] (*1) 7.1 HDMI
Dolby TrueHD [DOLBY HD] (*1) 7.1 HDMI
DTS [DTS] 5.1
COAXIAL/OPTICAL,
HDMI
DTS-ES Discrete [DTS-ES DSC] 6.1
COAXIAL/OPTICAL,
HDMI
DTS-ES Matrix [DTS-ES MTX] 6.1
COAXIAL/OPTICAL,
HDMI
DTS 96/24 [DTS 96/24] 5.1
COAXIAL/OPTICAL,
HDMI
DTS-HD High Resolution Audio [DTS-
HD HR] (*1)
7.1 HDMI
DTS-HD Master Audio [DTS-HD MA]
(*1)(*2)
7.1 HDMI
DSD [DSD] (*1) 5.1 HDMI
Multi Channel Linear PCM [PCM] (*1) 7.1 HDMI

[29] Preparation 4. Connecting audio-visual devices and the antennas (aerials)
Notes on connecting cables
Before connecting cables, be sure to disconnect the AC power cord (mains lead).
It is not necessary to connect all of the cables. Connect cables according to the availability
of jacks on the connected device.
Sony recommends that you use an HDMI-authorized cable or HDMI cable made by Sony.
Be sure to use a High Speed HDMI Cable with Ethernet. Premium High Speed HDMI Cable
with Ethernet is required for 4K/60p 4:4:4, 4:2:2, and 4K/60p 4:2:0 10 bit, etc. For details
about the high bandwidth video format, refer to “Supported video formats” in “About HDMI
connections.”
We do not recommend using an HDMI-DVI conversion cable. If you connect an HDMI-DVI
conversion cable to a DVI-D device, the sound and/or image may be lost. Connect separate
audio cables or digital connecting cables, then reassign the input jacks if the sound is not
output correctly.
When connecting optical digital cables, insert the plugs straight until they click into place.
Do not bend or tie optical digital cables.
When you use high bandwidth video formats such as 4K/60p 4:4:4, 4:2:2 and 4K/60p 4:2:0
10 bit, be sure to set the HDMI signal format. For details, see “Setting HDMI signal format
(SIGNAL FMT.).”
Hint
All of the digital audio jacks are compatible with 32 kHz, 44.1 kHz, 48 kHz and 96 kHz sampling
frequencies.
If you want to connect several digital devices, but cannot find an unused input
In this case, reassign the input jacks.
[30] Preparation
4. Connecting audio-visual devices and the antennas (aerials)
About HDMI connections
High-Definition Multimedia Interface (HDMI) is an interface that transmits video and audio
signals in digital format. Connecting Sony “BRAVIA” Sync-compatible devices using HDMI
cables simplifies operations.
HDMI features
Digital audio signals transmitted by HDMI can be output from the speakers connected to the
receiver. This signal supports Dolby Digital, DTS, DSD, and Linear PCM.
The receiver can receive Multi Channel Linear PCM (up to 8 channels) with a sampling
frequency of 192 kHz or less via an HDMI connection.
This receiver supports High Bitrate Audio (DTS-HD Master Audio, Dolby TrueHD), Deep
Color (Deep Colour), and 4K or 3D transmission.
To enjoy 3D content, connect a 3D-compatible TV and video device (Blu-ray Disc player,
Blu-ray Disc recorder, PlayStation 4, etc.) to the receiver using High Speed HDMI Cables
with Ethernet, put on 3D glasses, and then play 3D-compatible content.
To enjoy 4K content, connect a 4K-compatible TV or video device (Blu-ray Disc player, etc.)
to the receiver using Premium High Speed HDMI Cables with Ethernet, and then play 4K-
compatible content.
Premium High Speed HDMI Cable with Ethernet is required for 4K/60p 4:4:4, 4:2:2, and
4K/60p 4:2:0 10 bit, etc.
All HDMI jacks on the receiver support High-bandwidth Digital Content Protection System
Revision 2.2 (HDCP 2.2). Connect these HDMI jacks to jacks that support HDCP 2.2 on the
Audio signals are output in another format if the playback device does not correspond to the actual format. For
details, refer to the operating instructions of the playback device.
*1
Signals with a sampling frequency of more than 96 kHz are played at 96 kHz or 88.2 kHz.
*2

TV and AV device. Refer to the operating instructions of the connected device for details.
All HDMI jacks on the receiver support bandwidth up to 18 Gbps, HDCP 2.2, ITU-R BT.2020
wide color spaces, 3D, Deep Color (Deep Colour), Audio Return Channel (ARC), and HDR
(High Dynamic Range) contents pass-through.
HDCP 2.2 is newly enhanced copyright protection technology that is used to protect content
such as 4K movies.
BT.2020 color space is new wider color standard that is defined for ultra-high definition
television systems.
HDR is an emerging video format that can display a wider range of brightness levels.
Supported video formats
Format 2D
3D
Frame
packing
Side-by-Side
(Half)
Over-Under (Top-and-
Bottom)
4096 × 2160p @
59.94/60 Hz
○
(*1)
- - -
4096 × 2160p @ 50 Hz
○
(*1)
- - -
4096 × 2160p @
29.97/30 Hz
○
(*2)
- - -
4096 × 2160p @ 25 Hz
○
(*2)
- - -
4096 × 2160p @
23.98/24 Hz
○
(*2)
- - -
3840 × 2160p @
59.94/60 Hz
○
(*1)
- - -
3840 × 2160p @ 50 Hz
○
(*1)
- - -
3840 × 2160p @
29.97/30 Hz
○
(*2)
- - -
3840 × 2160p @ 25 Hz
○
(*2)
- - -
3840 × 2160p @
23.98/24 Hz
○
(*2)
- - -
1920 × 1080p @
59.94/60 Hz
○ - ○ ○
1920 × 1080p @ 50 Hz ○ - ○ ○
1920 × 1080p @
29.97/30 Hz
○ ○ ○ ○
1920 × 1080p @ 25 Hz ○ ○ ○ ○
1920 × 1080p @
23.98/24 Hz
○ ○ ○ ○
1920 × 1080i @
59.94/60 Hz
○ ○ ○ ○
1920 × 1080i @ 50 Hz ○ ○ ○ ○
1280 × 720p @
59.94/60 Hz
○ ○ ○ ○
1280 × 720p @ 50 Hz ○ ○ ○ ○
1280 × 720p @
29.97/30 Hz
○ ○ ○ ○
1280 × 720p @
○ ○ ○ ○

Note
Depending on the TV or video device, 4K or 3D content may not be displayed. Check the HDMI
video formats supported by the receiver.
Refer to the operating instructions of each connected device for details.
[31] Preparation 5. Turning on the receiver/preparing the remote control
Inserting batteries into the remote control
Insert two R03 (size AAA) batteries (supplied) into the remote control. Make sure that the + and
– ends are in the correct position when installing batteries.
Note
Do not leave the remote control in an extremely hot or humid place.
Do not use a new battery with an old one.
Do not mix manganese batteries with other kinds of batteries.
Do not expose the remote control sensor to direct sunlight or lights. Doing so may cause a
malfunction.
If you do not intend to use the remote control for an extended period of time, remove the batteries to
avoid possible damage from battery leakage and corrosion.
When the receiver no longer responds to the remote control, replace both of the batteries with new
ones.
[32] Preparation 5. Turning on the receiver/preparing the remote control
Turning on the receiver
Before connecting the AC power cord (mains lead), be sure to make connections with speakers
and the other devices.
23.98/24 Hz
720 × 480p @ 59.94/60
Hz
○ - - -
720 × 576p @ 50 Hz ○ - - -
640 × 480p @ 59.94/60
Hz
○ - - -
If you use YCbCr 4:4:4/YCbCr 4:2:2/RGB 4:4:4 or YCbCr 4:2:0 Deep Color (Deep Colour) (10 bit or 12 bit) of
these video formats, we recommend you to use Premium High Speed HDMI Cables with Ethernet, which can
support bandwidth up to 18 Gbps, and be sure to set the HDMI signal format to [ENHANCED] in the [<HDMI>]
menu. For details, see “Setting HDMI signal format (
SIGNAL FMT.).”
*1
If you use Deep Color (Deep Colour) (10 bit or 12 bit) of these video formats, we recommend you to use
Premium High Speed HDMI Cables with Ethernet, which can support bandwidth up to 18 Gbps, and be sure to
set the HDMI signal format to [ENHANCED] in the [<HDMI>] menu. For details, see “Setting HDMI signal format
(SIGNAL FMT.).”
*2
Connect the AC power cord (mains lead) to a wall outlet.
1

Note
After you turn off the receiver, [STANDBY] flashes on the display panel. Do not disconnect the AC
power cord (mains lead) while [STANDBY] is flashing. This may cause a malfunction.
[33] Preparation 6. Setting up the receiver using Easy Setup
Setting up the receiver using Easy Setup
When you turn on the receiver for the first time or after the receiver is initialized, the Easy Setup
screen appears on the TV screen. You can set up the following settings for the receiver by
following the instructions on the Easy Setup screen.
Language
Select the language of messages on the screen.
Surround Back Speakers Assign
You can set the assignment for the SPEAKERS SURROUND BACK/BI-AMP/FRONT
HIGH/FRONT B terminals.
Auto Calibration
The Auto Calibration function checks and measures the speakers and the environment to
adjust various settings for optimum listening condition.
Note
Switch the input of the TV to the input to which the receiver is connected to use this function.
If the Easy Setup screen does not appear or you want to display the Easy Setup screen
manually, you can display it by pressing HOME to display the home menu, then selecting [Easy
Setup].
Press (power) to turn on the receiver.
You can also turn on the receiver using (power) on the remote control. To turn off the
receiver, press
(power) again.
2

[34] Preparation 6. Setting up the receiver using Easy Setup
Selecting the language
You can select the language of messages on the screen.
Note
When the Control for HDMI function on both the receiver and the TV (BRAVIA TV) is turned on, the
on-screen display language of the receiver is changed simultaneously when you change the
language for the on-screen display of the TV.
[35] Preparation 6. Setting up the receiver using Easy Setup
Assigning the surround back speaker terminals
(Surround Back Speakers Assign)
You can set the assignment for the SPEAKERS SURROUND BACK/BI-AMP/FRONT
HIGH/FRONT B terminals.
Note
You can only set [Surround Back Speakers Assign] when headphones are not connected.
Hint
You can also set the assignment for the surround back speaker terminals from [SB ASSIGN] in the
[<SPEAKER>] menu on the display panel.
[36] Preparation Performing Auto Calibration
1. About Auto Calibration
Select [Easy Setup] from the home menu.
1
Select the language you want.
2
Select [Speaker Setting] from the home menu.
1
Select [Surround Back Speakers Assign].
2
Set the assignment for the SPEAKERS SURROUND BACK/BI-AMP/FRONT
HIGH/FRONT B terminals.
Surround Back Speakers: When using the surround back speaker connection.
Bi-Amplifier Speakers: When using the bi-amplifier speaker connection.
Front B Speakers: When using the front B speaker connection.
Front High Speakers: When using the front high speaker connection.
None Speaker: When none of the connections above is used.
3

Auto Calibration allows you to perform automatic calibration as follows.
Check the connection between each speaker and the receiver.
Adjust the speaker level.
Measure the distance of each speaker from your seating position. (*)
Measure the speaker size. (*)
Measure the frequency characteristics (EQ). (*)
Note
The D.C.A.C. is designed to achieve proper sound balance for your room. However, you can adjust
the speaker levels manually according to your preference using [<LEVEL>] - [TEST TONE] in the
[Speaker Settings] menu.
[37] Preparation Performing Auto Calibration
2. Before you perform Auto Calibration
Before you perform Auto Calibration, check the following items:
Set up and connect the speakers.
Do not connect any microphones other than the supplied calibration microphone to the
CALIBRATION MIC jack.
If using a bi-amplifier connection or a front B speaker connection, set the assignment for the
SPEAKERS SURROUND BACK/BI-AMP/FRONT HIGH/FRONT B terminals properly.
Set the speaker output to a setting other than [SPK OFF].
Disconnect the headphones.
Remove any obstructions between the calibration microphone and the speakers.
For accurate measurement, make sure the environment is quiet and free from noise.
Note
The speakers emit very loud sound during the calibration and the volume cannot be adjusted. Be
considerate of your neighbors and any children who are present.
If the muting function has been activated before you perform Auto Calibration, the muting function
will shut off automatically.
It may not be possible to take the correct measurements or to perform Auto Calibration at all if
special speakers such as dipole speakers are used.
[38] Preparation Performing Auto Calibration
3. Connecting the calibration microphone
Calibration microphone (supplied)
The measurement result is not utilized when [DIRECT] is being used and an analog input is selected.
*
Connect the supplied calibration microphone to the CALIBRATION MIC jack.
1
Set up the calibration microphone.
2
[39] Preparation Performing Auto Calibration
4. Selecting the front speakers
You can select the front speakers you want to operate.
Be sure to use the buttons on the receiver to perform this operation.
The indicators on the display panel shows which set of terminals are selected.
SP A:
Speakers connected to the SPEAKERS FRONT A terminals.
SP B (*):
Speakers connected to the SPEAKERS SURROUND BACK/BI-AMP/FRONT HIGH/FRONT
B terminals.
SP A B (*):
Speakers connected to both the SPEAKERS FRONT A and SPEAKERS SURROUND
BACK/BI-AMP/FRONT HIGH/FRONT B terminals (parallel connection).
(None):
[SPK OFF] appears on the display panel. No audio signals are output from any speaker
terminals.
Note
This setting is not available when headphones are connected.
[40] Preparation Performing Auto Calibration
5. Performing Auto Calibration
You can perform automatic calibration from your listening position.
Place the calibration microphone at your listening position and set it at the same height as
your ears.
Press SPEAKERS on the receiver repeatedly to select the front speaker system you
want to operate.
1
To select [SP B] or [SP A B], set the assignment for the SPEAKERS SURROUND BACK/BI-AMP/FRONT
HIGH/FRONT B terminals to [Front B Speakers] by using [Speaker Setting] - [Surround Back Speakers Assign].
*
Select [Easy Setup] from the home menu.
1
Follow the instructions on the TV screen, then select [Start].
The measurement starts in a few seconds.
The measurement process will take approximately 30 seconds with a test tone.
2

Note
If an error code or warning message appears on the screen in step 2, see “List of messages after
Auto Calibration measurements.”
This setting is not available when headphones are connected.
Hint
The Auto Calibration function will be canceled if you perform the following during the measurement
process:
Press
.
Press the input buttons on the remote control or turn the INPUT SELECTOR on the receiver.
Press HOME, AMP MENU or
on the remote control.
Press SPEAKERS on the receiver.
Change the volume level.
Connect headphones.
[41] Preparation Performing Auto Calibration
6. Checking Auto Calibration results
To check error codes or warning messages received in Auto Calibration, proceed with the
following steps:
If an error code appears
Check the error and perform Auto Calibration again.
When the measurement ends, a beep sounds and the screen switches.
Select the item you want.
Retry: Performs the Auto Calibration again.
Save&Exit: Saves the measurement results and exits the setting process.
Exit: Exits the setting process without saving the measurement results.
For details on the measurement results, see “6. Checking
Auto Calibration results.”
3
Save the measurement results.
Select [Save&Exit] in step 3.
4
Select [Retry].
1
Follow the instructions on the TV screen and then press
to select [Start].
The measurement starts in a few seconds.
The measurement process will take approximately 30 seconds with a test tone.
When the measurement ends, a beep sounds and the screen switches.
2
Select the item you want.
Retry: Performs the Auto Calibration again.
Save&Exit: Saves the measurement results and exits the setting process.
Exit: Exits the setting process without saving the measurement results.
3

If a warning message appears
Check the warning message and select [OK]. For details on the warning messages, see “List of
messages after Auto Calibration measurements.”
Hint
The measurement results may vary depending on the position of the subwoofer. However, continuing
to use the receiver with that value does not cause problems.
[42] Enjoying Video and Sound Playing AV devices
Enjoying video and sound
This topic explains the operations you can use to enjoy movies and music with this receiver.
For example, you can use multiple devices with this receiver as shown below.
BLUETOOTH devices
Enjoying audio content from an iPhone/iPod or other smartphone
You can transmit audio from an iPhone/iPod or other smartphone to the receiver via
BLUETOOTH.
Enjoying audio content using the BLUETOOTH function (Pairing operation)
FM
Listening to FM radio
You can listen to FM broadcasts in high-quality sound through the built-in tuner.
Preset function enables you to store up to 30 of your favorite FM stations as presets.
Listening to FM radio
USB devices
Enjoying content from a USB device
You can enjoy music from a USB device such as an external hard disk, USB flash drive or
Walkman® by connecting it to the
(USB) port on the front panel of the receiver and listening
through speakers or headphones connected to the receiver.
Enjoying audio content stored on a USB device
Save the measurement results.
Select [Save&Exit] in step 3.
4

AV devices
Enjoying movies or audio from an AV device such as a Blu-ray Disc player, CD player,
satellite box or game console
You can connect AV devices to the receiver to enjoy a wide range of content such as movies
and audio.
As the receiver is equipped with HDCP 2.2-compatible HDMI jacks, you can also enjoy 4K
content via streaming services, satellite broadcasts, etc.
Enjoying video/sound from the connected device
[43] Enjoying Video and Sound Playing AV devices
Using the menu on the TV screen
You can display the menu of the receiver on the TV screen.
Home menu items
Watch: Select to display video from the connected device.
Listen: Select to listen to sound from the connected device.
Easy Setup: Select to perform Easy Setup.
Speaker Setting: Select to adjust the speaker settings.
Hint
To return to the previous screen, press BACK.
To exit the menu, press HOME to display the home menu, then press HOME again.
[44] Enjoying Video and Sound Playing AV devices
Enjoying video/sound from the connected device
Switch the input of the TV to the input to which the receiver is connected.
1
Press HOME to display the home menu on the TV screen.
2
Press
/ repeatedly to select the menu you want, then press to enter the
menu.
3
Switch the input of the TV to the input to which the receiver is connected.
1
Press HOME.
2

Note
Before you turn off the receiver, be sure to turn down the volume level to avoid damaging your
speakers.
Hint
You can turn INPUT SELECTOR on the receiver or press the input buttons on the remote control to
select the device you want.
You can adjust the volume differently using the MASTER VOLUME knob on the receiver or the
+/– buttons on the remote control.
To turn the volume up or down quickly
Turn the knob quickly.
Press and hold one of the buttons.
To make fine adjustments
Turn the knob slowly.
Press one of the buttons and release it immediately.
[45] Enjoying Video and Sound Playing AV devices
Enjoying sound of an ARC (Audio Return Channel)
compatible TV
If the receiver is connected to a TV's HDMI input jack compatible with Audio Return Channel
(ARC), you can listen to TV sound from the speakers connected to the receiver without
connecting an optical digital cable or an audio cable. Set the receiver by the following
procedure to output the sound of the TV from the speakers connected to the receiver.
This operation is only available using the display panel on the front of the receiver.
The home menu is displayed on the TV screen.
Depending on the TV, the home menu may take some time to appear on the TV screen.
Select [Watch] or [Listen] from the home menu.
The menu item list appears on the TV screen.
3
Select the device you want to play.
4
Turn on the device and start playback.
5
Press
+/– to adjust the volume.
You can also use MASTER VOLUME on the receiver.
6

If you connect to a TV that is not compatible with the Audio Return Channel
(ARC) function or you want to select an audio signal using a cable other than
an HDMI cable (e.g. via an optical digital cable or an audio cable)
Switch the audio input mode. For details, “Switching between digital and analog audio (INPUT
MODE).”
Note
ARC function may work on other devices than those manufactured by Sony. However, operation is
not guaranteed.
Be sure to turn off the volume of the TV or activate the muting function of the TV.
If your TV does not support the System Audio Control function, press AMP MENU, then set
[<HDMI>] - [AUDIO OUT] to [TV+AMP] on the display panel to output the sound of the TV from the
TV speaker and the speakers connected to the receiver.
[46] Enjoying Video and Sound Playing AV devices
Watching HDCP 2.2 copyright-protected content
To watch HDCP 2.2 copyright-protected content such as 4K content, connect the receiver and
TV via an HDCP 2.2-compatible HDMI jack. You can only view copyright-protected 4K content
through the HDCP 2.2-compatible HDMI jack connection. For details on whether the TV and 4K
devices are equipped with an HDCP 2.2-compatible HDMI jack, refer to the operating
instructions of the TV and 4K devices.
[47] Enjoying Video and Sound
Playing content from an iPhone/iPod
Enjoying audio content using the BLUETOOTH
function (Pairing operation)
Pairing is an operation where BLUETOOTH devices are registered to each other before
connection. Once a pairing operation is performed, it does not need to be performed again.
Press AMP MENU.
1
Select [<HDMI>] - [CTRL HDMI] on the display panel.
2
Select [CTRL ON].
3
Place the BLUETOOTH device within 1 meter (3.3 feet) of the receiver.
1
Press BLUETOOTH on the remote control to select the BLUETOOTH function.
2
Press
PAIRING to activate the pairing mode of the receiver.
[PAIRING] appears and [BT] flashes quickly on the display panel. Perform step 4 within
five minutes, otherwise pairing will be canceled. In this case, repeat this step.
3

Canceling pairing operation
Press and hold CONNECTION PAIRING BLUETOOTH on the receiver after step 3.
Note
You can also use INPUT SELECTOR on the receiver to select the BLUETOOTH function in step 2.
If the BLUETOOTH device does not support the AVRCP profile, you cannot perform playback or
other operations on the receiver.
If a passkey is required on the display of the BLUETOOTH device in step 6, enter [0000]. The
passkey may be called “Passcode,” “PIN code,” “PIN number” or “Password.”
You can pair up to 9 BLUETOOTH devices. If a 10th BLUETOOTH device is paired, the least
recently connected device will be replaced by the new one.
Hint
You can also activate the pairing mode of the receiver by pressing and holding CONNECTION
PAIRING BLUETOOTH on the receiver.
On some types of BLUETOOTH devices, you can adjust the volume using the controls of the
BLUETOOTH device.
[48] Enjoying Video and Sound Playing content from an iPhone/iPod
Compatible iPhone/iPod models
You can use the following iPhone/iPod models on this receiver. Update your iPhone/iPod with
the latest software before using it.
BLUETOOTH technology works with
iPhone:
iPhone 6s Plus/iPhone 6s/iPhone 6 Plus/iPhone 6/iPhone 5s/iPhone 5c/iPhone 5
iPod touch:
iPod touch (5th and 6th generation)
Perform pairing on the BLUETOOTH device to detect this receiver.
For details, refer to the operating instructions of your BLUETOOTH device.
A list of detected devices may appear on the BLUETOOTH device display depending on
the type of BLUETOOTH device. This receiver is displayed as [STR-DH770].
4
Select [STR-DH770] on the BLUETOOTH device display.
If [STR-DH770] is not displayed, repeat this process from step 1.
5
Check that the connection is completed and [BT] lights up on the display panel.
6
Start playback on the BLUETOOTH device.
7
Adjust the volume.
Adjust the volume of the BLUETOOTH device first. If the volume level is still too low, adjust
the volume level of the receiver.
8

[49] Enjoying Video and Sound Playing content from a USB device
Enjoying audio content stored on a USB device
You can enjoy music from a USB device by connecting it to the (USB) port on the receiver.
Operating the USB device using the remote control
Press USB before you use the following buttons:
: Starts or pauses playback.
: Stops playback.
/ : Moves to the start of the previous/current or next track.
Note
To listen to music files stored on your Walkman, you need to drag and drop the files in formats
supported by the receiver (such as MP3) from your computer to the Walkman. However, music files
transferred to the Walkman using Media Go can be played back on the receiver because the files
are stored in the [Music] folder.
Audio content with DRM (Digital Rights Management) copyright protection cannot be played on this
receiver.
[50] Enjoying Video and Sound Playing content from a USB device
USB specifications and compatible USB devices
USB specifications
Supported formats (*)
The music file formats that can be played back by this receiver are as follows:
MP3 (MPEG 1 Audio Layer-3):
.mp3
WMA:
.wma
AAC:
.m4a, .mp4, .3gp
WAV:
.wav
Note
Some files may not play depending on the file format, the file encoding or the recording condition.
Some files that have been edited on a PC may not play.
Fast forward or fast reverse functions may not be available for some files.
Select [Listen] - [USB] from the home menu.
When the USB device is connected, [USB] lights up on the display panel. You can operate
the USB device using the remote control of the receiver.
1
Select the content you want using
/ .
The selected content starts playing and the track number appears on the display panel.
2
Compatibility with all encoding/writing software, recording devices and recording media cannot be guaranteed.
*

The receiver does not play coded files such as DRM.
The receiver can recognize the following files or folders in USB devices:
folder paths up to 128 characters long
200 folders (including the root folder)
150 audio files in each folder
The maximum number of audio files and folders may vary depending on the file and folder structure.
Do not save other types of files or unnecessary folders on a USB device.
Some USB devices may not work with this receiver.
The receiver can recognize Mass Storage Class (MSC) devices (such as flash memory or an HDD).
Compatible USB device
Mass Storage Class
Maximum current
1 A
Verified Sony USB devices
You can use the following Sony USB devices on this receiver:
Walkman:
NW-A16/A17/A25/A26/A27
NW-W274S
NW-WH505
NW-WS615
NWZ-A15/A17
NWZ-B162/B162F/B163F/B172/B172F/B173/B173F/B183F
NWZ-E053/E363/E364/E365/E373/E374/E375/E383/E384/E385
/E454/E463/E464/E465/E573/E574/E575/E583/E584/E585
NWZ-F805N
NWZ-F885/F800 series
NWZ-M504
NWZ-S773/S774/S775
NWZ-W252/W273/W274S
NWZ-WH303/WH505
NWZ-WS613/WS615
NWZ-Z1050
MICROVAULT:
USM4GP/8GV/32GP
USM8GT/64GT
USM64GU
Digital Voice Recorder:
ICD-FX88
ICD-PX232/PX240/PX440
ICD-SX733/SX734/SX813/SX1000
ICD-TX650
ICD-UX533/UX533F/UX534F/UX543/UX543F/UX544F
ICZ-R51/R100
PCM-D100
Note
The receiver is unable to read data in NTFS format.
The receiver is unable to read data other than that saved in the first partition of a hard disk drive.
Operation of models not listed here is not guaranteed.
Operation may not always be guaranteed even when using these USB devices.
Some of these USB devices may not be available for purchase in certain areas.
When formatting the above models, be sure to format using the model itself or the dedicated
formatting software for that model.

When connecting a USB device to the receiver, be sure to connect after the display “Creating
Library” or “Creating Database” on the USB device has disappeared.
[51] Enjoying Video and Sound Playing content from a USB device
Notes on USB devices
Do not remove a USB device during operation. To avoid data corruption and damage to the
USB device, turn the receiver off when connecting or removing a USB device.
Do not connect a USB device to the receiver through a USB hub.
When a USB device is connected, [READING] appears.
It may take about 10 seconds before [READING] appears depending on the type of USB
device connected.
When a USB device is connected, the receiver reads all of the files on the USB device. If
there are many folders or files on the USB device, it may take a long time to finish reading
the USB device.
The receiver can recognize the following files or folders in USB devices:
folder paths up to 128 characters long
200 folders (including the root folder)
150 audio files in each folder
The maximum number of audio files and folders may vary depending on the file and folder
structure. Do not save other types of files or unnecessary folders on a USB device.
Compatibility with all encoding/writing softwares, recording devices, and recording media
cannot be guaranteed. Incompatible USB devices may produce noise or interrupted audio
or may not play at all.
Some time may be needed to start playback when:
the folder structure is complex.
the memory capacity is excessive.
This receiver does not necessarily support all of the functions provided in a connected USB
device.
The playback order for the receiver may differ from the playback order of the connected
USB device.
If a USB device that has no audio files is connected, [NO TRACK] appears on the display
panel.
When playing a very long track, some operations may cause playback delay.
[52] Enjoying Video and Sound
Listening to the radio
Listening to FM radio
You can listen to FM broadcasts through the built-in tuner. Scan the radio frequencies by the
following procedure to tune in to a station automatically. Be sure that the FM wire antenna
(aerial) is connected to the receiver before performing this operation.
Select [Listen] - [FM] from the home menu.
The FM screen appears.
1
Press and hold
or until the frequency digits begin to change on the FM
screen.
The receiver automatically scans the radio frequencies and stops scanning whenever a
station is received.
2

FM screen
A: Frequency indication
Shows the frequency of the station which the tuner is receiving.
Hint
You can also use / on the remote control or TUNING +/– on the receiver for tuning.
[53] Enjoying Video and Sound Listening to the radio
Presetting FM radio stations
You can store up to 30 FM stations as your favorite stations.
FM screen
Select [Listen] - [FM] from the home menu.
The FM screen appears.
1
Tune to the station that you want to preset.
2
Press MEMORY.
3
Press PRESET +/– to select a preset number.
4
Press MEMORY again.
The station is stored as the selected preset number.
5
Repeat steps 1 to 4 to store another station.
You can store stations as follows:
FM band: FM 1 to FM 30
6

A: Frequency indication
Shows the frequency of the station which the tuner is receiving.
B: Preset station number
Shows the preset number which you are selecting.
[54] Enjoying Video and Sound
Listening to the radio
Naming preset stations (NAME IN)
You can enter a name up to 8 characters for a preset station.
This operation is only available using the display panel on the front of the receiver.
Canceling naming input
Press BACK.
[55] Enjoying Video and Sound
Listening to the radio
Tuning to a station directly
You can enter the frequency of a station directly.
Select the preset number to which you want to assign a name.
1
Press AMP MENU.
2
Select [<TUNER>] - [NAME IN] on the display panel.
3
Press
/ repeatedly to select a character, then press .
You can move the input position backward and forward by pressing
/ .
4
Repeat step 4 to input characters one by one, then press
.
The name you entered is registered.
5
Select [Listen] - [FM] from the home menu.
The FM screen appears.
1

Note
If the tuned frequency is invalid or out of range, [---.-- MHz] appears and then the screen returns to
the current frequency.
Make sure you have entered the right frequency. If not, repeat steps 3 and 4. If you still cannot tune
to a station, the frequency may not be in use in your area.
Hint
The tuning scale for direct tuning is shown below:
USA and Canadian models
100 kHz
Other models
50 kHz
[56] Enjoying Video and Sound Listening to the radio
Receiving RDS broadcasts (for European and Asia-
Pacific models only)
This receiver allows you to use Radio Data System (RDS), which enables FM radio stations (*)
to send additional information along with the regular programming signal. This receiver offers
convenient RDS features, such as Program Service name display.
Note
RDS may not work properly if the station you tuned to does not transmit the RDS signal or if the
signal strength is weak.
Some letters that can be displayed on the TV screen cannot be displayed on the display panel.
Hint
You can check the frequency while a Program Service name is displayed by pressing DISPLAY
Press .
2
Enter the frequency.
3
Press
/ to change the digit on the display panel.
1.
Press to move to the next digit.
You can move the input position backward and forward by pressing
/ .
2.
Repeat step 3 until the desired frequency is displayed.
4
Not all FM stations provide RDS service, nor do they provide the same type of services. If you are not familiar
with the RDS services in your area, check with your local radio stations for details.
*
Select [Listen] - [FM] from the home menu.
1
Select a station.
When you tune to a station that provides RDS services, the Program Service name
appears on the display panel.
2

repeatedly.
[57] Enjoying Video and Sound Enjoying sound effects
Selecting a sound field
You can select from a variety of sound field modes according to speaker connections or input
sources.
Note
When listening with headphones, only the sound field for headphones appear.
The sound fields for movie and music may not work, depending on the input or the speaker pattern
you select, or with audio formats.
The receiver may play signals at a lower sampling frequency than the actual sampling frequency of
the input signals, depending on the audio format.
[PLIIX MV] or [PLIIX MS] may not appear, depending on the speaker pattern you select.
Some speakers or the subwoofer may not output sound, depending on the sound field setting.
[58] Enjoying Video and Sound Enjoying sound effects
Relations between sound fields and speaker outputs
The list below shows which speaker outputs sound when a certain sound field is selected.
Note
When no sound is heard, check that all the speakers are securely connected to the correct speaker
terminals, and the correct speaker pattern is selected.
2-channel content
Press FRONT SURROUND, 2CH/MULTI, MOVIE, or MUSIC to select a sound field you
want.
You can also use 2CH/MULTI, MOVIE, or MUSIC on the receiver.
1
Sound field Display panel
Front
speakers
Center
speaker
Surround
speakers
Surround
back
speakers
Subwoofer
Front
high
speakers
2CH/MULTI
2ch Stereo 2CH STEREO
◎
- - - - -
Multi Channel Stereo MULTI ST.
◎
○ ○ ○ ○ ○
Direct (Analog input) DIRECT
◎
- - - - -
Direct (Others) DIRECT
◎
- - - ○ (*1) -
MOVIE
HD-D.C.S.
(Dynamic/Theater/Studio)
HD-D.C.S.
◎
○ ○ ○ ○ ○
PLII Movie PLII MV
◎
○ ○ - ○ -
PLIIx Movie PLIIX MV
◎
○ ○ ○ ○ -
Neo:6 Cinema NEO6.CINEMA
◎
○ ○ ○ ○ (*2) -

-: No sound is output.
◎
: Outputs sound.
○: Outputs sound depending on the speaker pattern setting.
Multi-channel content
-: No sound is output.
◎
: Outputs sound.
○: Outputs sound depending on the speaker pattern setting and the channels included in the
input source.
Front Surround FRONT SUR.
◎
- - - ○ (*2) -
MUSIC
Audio Enhancer A. ENHANCER
◎
- - - ○ -
Concert Hall HALL
◎
○ ○ ○ ○ (*2) ○
Jazz Club JAZZ
◎
○ ○ ○ ○ (*2) ○
Live Concert CONCERT
◎
○ ○ ○ ○ (*2) ○
Stadium STADIUM
◎
○ ○ ○ ○ (*2) ○
Sports SPORTS
◎
○ ○ ○ ○ (*2) ○
PLII Music PLII MS
◎
○ ○ - ○ -
PLIIx Music PLIIX MS
◎
○ ○ ○ ○ -
Neo:6 Music NEO6.MUSIC
◎
○ ○ ○ ○ (*2) -
USA and Canadian models: outputs sound.
Other models: output sound depending on the speaker pattern setting only when [Speaker Setting] - [Size] is set
to [Small].
*1
Outputs sound depending on the speaker pattern setting only when [Speaker Setting] - [Size] is set to [Small].
*2
Sound field Display panel
Front
speakers
Center
speaker
Surround
speakers
Surround
back
speakers
Subwoofer
Front
high
speakers
2CH/MULTI
2ch Stereo 2CH STEREO
◎
- - - - -
Multi Channel Stereo MULTI ST.
◎
○ ○ ○ ○ ○
Direct DIRECT
◎
○ ○ ○ ○ ○
MOVIE
HD-D.C.S.
(Dynamic/Theater/Studio)
HD-D.C.S.
◎
○ ○ ○ ○ ○
PLII Movie PLII MV
◎
○ ○ ○ ○ ○
PLIIx Movie PLIIX MV
◎
○ ○ ○ ○ -
Neo:6 Cinema NEO6.CINEMA
◎
○ ○ ○ ○ ○
Front Surround FRONT SUR.
◎
- - - ○ -
MUSIC
Audio Enhancer A. ENHANCER
◎
○ ○ ○ ○ ○
Concert Hall HALL
◎
○ ○ ○ ○ ○
Jazz Club JAZZ
◎
○ ○ ○ ○ ○
Live Concert CONCERT
◎
○ ○ ○ ○ ○
Stadium STADIUM
◎
○ ○ ○ ○ ○
Sports SPORTS
◎
○ ○ ○ ○ ○
PLII Music PLII MS
◎
○ ○ ○ ○ ○
PLIIx Music PLIIX MS
◎
○ ○ ○ ○ -
Neo:6 Music NEO6.MUSIC
◎
○ ○ ○ ○ ○

[59] Enjoying Video and Sound Enjoying sound effects
Resetting sound fields to the default settings
Be sure to use the buttons on the receiver to perform this operation.
[60] Enjoying Video and Sound
Enjoying sound effects
Enjoying clear sound at a low volume level (NIGHT
MODE)
This function allows you to retain a theater-like environment at low volume levels. When
watching a movie late at night, you will be able to hear the dialog clearly even at a low volume
level. This function can be used with other sound fields.
This operation is only available using the display panel on the front of the receiver.
Note
This function does not work when [DIRECT] is selected and an analog input is selected.
Hint
You can also set the Night Mode function on and off by using NIGHT MODE on the receiver.
While the Night Mode function is turned on, the bass, treble, and effect levels increase, and [D.
RANGE] is automatically set to [COMP. ON].
[61] Enjoying Video and Sound Enjoying sound effects
Adjusting the equalizer (EQ)
You can use the following parameters to adjust the tonal quality (bass/treble level) of the front
speakers.
This operation is only available using the display panel on the front of the receiver.
Turn off the receiver.
1
Hold down MUSIC and press
(power) on the receiver.
[S.F. CLEAR] appears on the display panel and all sound fields are reset to their default
setting.
2
Press AMP MENU.
1
Select [<AUDIO>] - [NIGHT MODE] on the display panel.
2
Select [NIGHT ON] or [NIGHT OFF].
3

Level (dB)
Frequency (Hz)
Bass
Treble
Note
This function does not work in the following cases:
[DIRECT] is selected and an analog input is selected.
Pure Direct function is activated.
Depending on the audio format, the receiver may play signals at a lower sampling frequency than the
original sampling frequency of the input signals.
Frequencies for [BASS] and [TREBLE] are fixed.
[62] Enjoying Video and Sound Enjoying sound effects
Enjoying high-fidelity sound (Pure Direct)
You can enjoy higher-fidelity sound from all inputs using the Pure Direct function. When the
Pure Direct function is on, the display panel lights off to suppress noise that affects sound
quality.
Canceling the Pure Direct function
The Pure Direct function will be canceled when you perform the following:
Press PURE DIRECT again.
Change the sound field.
Change the scene setting on the TV (Scene Select).
Change the setting of [EQ], [NIGHT MODE], [AUTO VOL], or [D. RANGE].
Note
[EQ], [NIGHT MODE], [AUTO VOL], or [D. RANGE] do not work when the Pure Direct function is
selected.
Press AMP MENU.
1
Select [<EQ>] on the display panel.
2
Select [BASS] or [TREBLE].
3
Adjust the gain.
4
Press PURE DIRECT.
1

[63] Using BLUETOOTH Features About BLUETOOTH Features
What you can do with BLUETOOTH features
Listening to the audio content from a BLUETOOTH device on the receiver
You can receive audio from an iPhone/iPod, smartphone or tablet that has a BLUETOOTH
function and listen to it via this receiver.
Devices that have the NFC function can be connected by a one-touch connection simply by
bringing the device close to the receiver.
Enjoying audio content stored on a BLUETOOTH device with a one-touch connection (NFC)
Enjoying audio content using the BLUETOOTH function (Pairing operation)
See “Compatible BLUETOOTH version and profiles” for details on BLUETOOTH device
versions and profiles that can be paired.
[64] Using BLUETOOTH Features
Enjoying audio content stored on a BLUETOOTH device
Turning the BLUETOOTH function on/off (BT POWER)
You can turn the BLUETOOTH function on or off. The NFC function is also turned on/off in
conjunction with this setting.
This operation is only available using the display panel on the front of the receiver.
Note
You cannot set this function when [BT] (BLUETOOTH device) is selected as the input. ([BT POWER]
on the display panel will become dimmed.)
[65] Using BLUETOOTH Features Enjoying audio content stored on a BLUETOOTH device
Enjoying audio content stored on a BLUETOOTH
device with a one-touch connection (NFC)
Press AMP MENU.
1
Select [<BT>] - [BT POWER] on the display panel.
2
Select [BT ON] or [BT OFF].
3

You can enjoy audio content on a BLUETOOTH device with a one-touch connection using the
NFC function.
Compatible smartphones
Smartphones with the NFC function (compatible OS: Android 2.3.3 or later, excluding Android
3.x)
Hint
If you want to connect a BLUETOOTH device when the receiver is in standby mode, press AMP
MENU, then set [<BT>] - [BT STANDBY] to [STBY ON] on the display panel.
[66] Using BLUETOOTH Features Enjoying audio content stored on a BLUETOOTH device
Enjoying audio content using the BLUETOOTH
function (Pairing operation)
Pairing is an operation where BLUETOOTH devices are registered to each other before
connection. Once a pairing operation is performed, it does not need to be performed again.
If you are using an NFC-compatible BLUETOOTH device with Android OS 4.0 or
earlier, download the “NFC Easy Connect” application to your device.
You do not need to install the “NFC Easy Connect” application if you are using an NFC-
compatible BLUETOOTH device with Android OS 4.1 or later installed.
1
Touch the
mark on the receiver with your BLUETOOTH device.
2
Follow the on-screen instructions displayed on the BLUETOOTH device, and
complete the procedure for BLUETOOTH connection.
3
Check that the connection is completed and [BT] lights up on the display panel.
4
Start playback on the BLUETOOTH device.
5
Adjust the volume.
Adjust the volume of the BLUETOOTH device first. If the volume level is still too low, adjust
the volume level of the receiver.
6

Canceling pairing operation
Press and hold CONNECTION PAIRING BLUETOOTH on the receiver after step 3.
Note
You can also use INPUT SELECTOR on the receiver to select the BLUETOOTH function in step 2.
If the BLUETOOTH device does not support the AVRCP profile, you cannot perform playback or
other operations on the receiver.
If a passkey is required on the display of the BLUETOOTH device in step 6, enter [0000]. The
passkey may be called “Passcode,” “PIN code,” “PIN number” or “Password.”
You can pair up to 9 BLUETOOTH devices. If a 10th BLUETOOTH device is paired, the least
recently connected device will be replaced by the new one.
Hint
You can also activate the pairing mode of the receiver by pressing and holding CONNECTION
PAIRING BLUETOOTH on the receiver.
On some types of BLUETOOTH devices, you can adjust the volume using the controls of the
BLUETOOTH device.
Place the BLUETOOTH device within 1 meter (3.3 feet) of the receiver.
1
Press BLUETOOTH on the remote control to select the BLUETOOTH function.
2
Press
PAIRING to activate the pairing mode of the receiver.
[PAIRING] appears and [BT] flashes quickly on the display panel. Perform step 4 within
five minutes, otherwise pairing will be canceled. In this case, repeat this step.
3
Perform pairing on the BLUETOOTH device to detect this receiver.
For details, refer to the operating instructions of your BLUETOOTH device.
A list of detected devices may appear on the BLUETOOTH device display depending on
the type of BLUETOOTH device. This receiver is displayed as [STR-DH770].
4
Select [STR-DH770] on the BLUETOOTH device display.
If [STR-DH770] is not displayed, repeat this process from step 1.
5
Check that the connection is completed and [BT] lights up on the display panel.
6
Start playback on the BLUETOOTH device.
7
Adjust the volume.
Adjust the volume of the BLUETOOTH device first. If the volume level is still too low, adjust
the volume level of the receiver.
8

[67] Using BLUETOOTH Features Enjoying audio content stored on a BLUETOOTH device
Controlling a BLUETOOTH device using the remote
control
You can operate a BLUETOOTH device using the following buttons on the remote control:
(*): Starts or pauses playback.
: Stops playback.
/ : Moves to the start of the previous/current or next track.
Note
These operations may not be available for certain BLUETOOTH devices. The actual operations may
also differ depending on the connected BLUETOOTH device.
[68] Using BLUETOOTH Features Enjoying audio content stored on a BLUETOOTH device
Compatible BLUETOOTH version and profiles
“Profile” refers to a standard set of capabilities for various BLUETOOTH product capabilities.
This receiver supports the following BLUETOOTH version and profiles:
Compatible BLUETOOTH version: BLUETOOTH Specification Version 4.2
Compatible BLUETOOTH profiles:
A2DP 1.3 (Advanced Audio Distribution Profile): Receives high-quality audio content.
AVRCP 1.5 (Audio Video Remote Control Profile): Controls audio/video devices
(pausing, stopping, starting playback, volume control, etc.)
SPP 1.2 (Serial Port Profile)
DID (Device Identification Profile)
For the latest information about compatible BLUETOOTH devices, check the websites listed
under “Customer support websites
.”
Note
The functions may differ depending on the specifications of the BLUETOOTH device.
The audio playback on this receiver may be delayed from that on the BLUETOOTH device because
of the characteristics of the BLUETOOTH wireless technology.
[69] Using BLUETOOTH Features Using SongPal to control the receiver from a smartphone
or tablet device
Controlling the receiver using a smartphone or tablet
device (SongPal)
SongPal is a dedicated app for operating SongPal-compatible audio devices manufactured by
Sony using a smartphone or tablet device.
Search for SongPal on Google Play or the App Store and download to your smartphone or
tablet device.
SongPal allows you to:
change commonly used settings, selecting the input of the receiver and adjusting the
volume.
If you press when no BLUETOOTH device is connected, the receiver automatically connects to the last
connected BLUETOOTH device.
*

enjoy music content stored on a smartphone on the receiver.
enjoy music visually with your smartphone display.
Note
SongPal uses the BLUETOOTH functions of the receiver.
SongPal does not support iPad.
Specifications and design of SongPal may change without prior notice.
[70] Using Other Features Interlocking with BRAVIA TV and other devices (“BRAVIA” Sync)
What is “BRAVIA” Sync?
“BRAVIA” Sync is an extended function developed by Sony based on the Control for HDMI (*1)
function. By connecting “BRAVIA” Sync-compatible devices, such as a TV or a Blu-ray Disc
player, using an HDMI cable (*2) (not supplied) you can control the devices with the TV remote
control. The following functions can be used with “BRAVIA” Sync.
Turning off the receiver and connected devices simultaneously with the TV (System Power
Off function) (STBY LINK)
Enjoying TV sound from the speakers connected to the receiver (System Audio Control
function)
Enjoying sound of an ARC (Audio Return Channel) compatible TV
Enjoying an input source from a connected device immediately (One-Touch Play function)
Operating the receiver menu using the TV remote control (Remote Easy Control function)
Enjoying content of a connected device without turning on the receiver (STBY THRU)
Selecting the optimum picture quality and sound field automatically (Scene Select function)
About Home Theatre Control function
Echo Canceling function
About Language Follow function
Note
Functions such as System Power Off, System Audio Control, One-Touch Play, and Remote Easy
Control may be used with other devices than those manufactured by Sony that support the Control
for HDMI function. However, compatibility with other devices than those manufactured by Sony is
not guaranteed.
[71] Using Other Features Interlocking with BRAVIA TV and other devices (“BRAVIA” Sync)
Preparing to use the “BRAVIA” Sync function
Turn the Control for HDMI function on to use the "BRAVIA" Sync function. The Control for HDMI
Download the SongPal application to your mobile device.
1
Connect the receiver and mobile device by BLUETOOTH connection.
2
Launch SongPal and follow the on-screen instructions.
After the connection is completed, you can control the receiver using SongPal.
3
Control for HDMI is a standard used by CEC (Consumer Electronics Control) specification that enables
interoperability of connected devices for HDMI (High-Definition Multimedia Interface) connections.
*1
Sony recommends a Premium High Speed HDMI Cable with Ethernet.
*2

function needs to be turned on separately for the receiver and the connected device.
This operation is only available using the display panel on the front of the receiver.
Note
Perform the steps above again if you unplug the HDMI cable or change the connection.
[72] Using Other Features Interlocking with BRAVIA TV and other devices (“BRAVIA” Sync)
Turning off the receiver and connected devices
simultaneously with the TV (System Power Off
function) (STBY LINK)
You can turn off the receiver and connected device automatically when you turn off the TV.
This operation is only available using the display panel on the front of the receiver.
Press AMP MENU.
1
Select [<HDMI>] - [CTRL HDMI] on the display panel.
2
Select [CTRL ON].
The Control for HDMI function of the receiver is turned on.
3
Press AMP MENU to exit the menu.
4
Select the HDMI input of the TV to the input to which the receiver is connected using
the TV remote control to display the settings menu of the TV.
5
Turn on the Control for HDMI function of the TV.
For details on settings for the TV, refer to the operating instructions supplied with the TV.
6
Turn on the Control for HDMI function of the connected devices.
For details on setting the connected device, refer to the operating instructions of the
respective devices.
7
Press AMP MENU.
1
Select [<HDMI>] - [STBY LINK] on the display panel.
2
Select the setting you want.
AUTO
:
When the input of the receiver is set to [TV], [BD/DVD], [GAME], [SAT/CATV],
or [VIDEO], the receiver will turn off when the TV is turned off.
ON
:
The receiver will turn off when the TV is turned off, regardless of the input of the
3

Note
Depending on the status of the device, the connected device may not turn off.
The System Power Off function may work with other devices than those manufactured by Sony, but
operation is not guaranteed.
[73] Using Other Features Interlocking with BRAVIA TV and other devices (“BRAVIA” Sync)
Enjoying TV sound from the speakers connected to
the receiver (System Audio Control function)
If you turn on the receiver while you are watching the TV, the TV sound will be output from the
speakers connected to the receiver. The volume of the receiver can be adjusted using the TV
remote control.
If the TV sound was output from the speakers connected to the receiver last time you watched
the TV, the receiver will be turned on automatically when you turn on the TV again.
Operations can also be made using the TV menu. For details, refer to the operating instructions
of the TV.
Note
Depending on the TV, the number of the receiver volume level is displayed on the TV screen. The
volume number displayed on the TV may differ from the number on the front panel display of the
receiver.
System Audio Control function may work with other devices than those manufactured by Sony, but
operation is not guaranteed.
Depending on the settings of the TV, the System Audio Control function may not be available. For
details, refer to the operating instructions of the TV.
When [<HDMI>] - [CTRL HDMI] is set to [CTRL ON], [<HDMI>] - [AUDIO OUT] will be set
automatically according to the setting of the System Audio Control function.
[74] Using Other Features Interlocking with BRAVIA TV and other devices (“BRAVIA” Sync)
Enjoying an input source from a connected device
immediately (One-Touch Play function)
When you play content on a device (Blu-ray Disc player, PlayStation®4, etc.) connected to the
receiver, the receiver and the TV are turned on automatically, the input of the receiver is
switched to the input of the device being played, and sound is output from the speakers
connected to the receiver.
Note
If [<HDMI>] - [STBY THRU] is set to [AUTO] or [ON], and the TV sound was output from the
speakers of the TV last time you watched the TV, the receiver does not turn on and the sound and
picture are output from the TV even if you play content on the device.
Depending on the TV, the beginning part of content being played may not play correctly.
One-Touch Play function may work with other devices than those manufactured by Sony, but
operation is not guaranteed.
receiver.
OFF
:
The receiver does not turn off when the TV is turned off, regardless of the input
of the receiver.

[75] Using Other Features Interlocking with BRAVIA TV and other devices (“BRAVIA” Sync)
Selecting the optimum picture quality and sound field
automatically (Scene Select function)
The sound field are selected automatically according to the Scene Select or Sound Mode
setting on your TV.
For details on this operation, refer to the operating instructions of the TV.
The Scene Select/Sound Mode setting and the sound field setting of the receiver will change as
follows.
Cinema: HD-D.C.S.
Sports: SPORTS
Music: CONCERT
Animation: MULTI ST.
Photo: MULTI ST.
Game: MULTI ST.
Graphics: MULTI ST.
Note
The Scene Select function is a function developed by Sony, and cannot be used on other devices
than those manufactured by Sony.
[76] Using Other Features Interlocking with BRAVIA TV and other devices (“BRAVIA” Sync)
About Home Theatre Control function
Setting the receiver, the sound field settings, input switching, etc., can be done by selecting the
Home Theatre Control application on the TV.
This function can be used when the TV is compatible with the Home Theatre Control application
and connected to the Internet. For details, refer to the operating instructions of the TV.
Note
The Home Theatre Control application is a function developed by Sony, and cannot be used on other
devices than those manufactured by Sony.
[77] Using Other Features Interlocking with BRAVIA TV and other devices (“BRAVIA” Sync)
Operating the receiver menu using the TV remote
control (Remote Easy Control function)
You can select the receiver by the SYNC MENU of the TV and operate the receiver. This
function can be used if the TV supports the SYNC MENU. For details, refer to the operating
instructions of the TV.
Note
The receiver is recognized as [Tuner] by the TV.
Some of the operations may not be available depending on the type of TV.
Remote Easy Control function may work with other devices than those manufactured by Sony, but
operation is not guaranteed.
[78] Using Other Features Interlocking with BRAVIA TV and other devices (“BRAVIA” Sync)
Echo Canceling function
The Echo Canceling function reduces reverberation that may occur when using the Social
Viewing functions such as Skype while watching TV programs. This function can be used if the
TV supports the Social Viewing functions. For details, refer to the operating instructions of the
TV.
Note
The Echo Canceling function works when you select [TV] or an HDMI input jack to which the device
is connected as the input on the receiver.
When you use the Social Viewing function, the input of the receiver is switched automatically to the
input to which the TV is connected, even if another HDMI input jack has been selected. The sound
from the Social Viewing function and the TV will be output from the speakers connected to the
receiver.
This function cannot be used when the sound is output from the TV.
The Echo Canceling function is a function developed by Sony, and cannot be used on other devices
than those manufactured by Sony.
[79] Using Other Features Interlocking with BRAVIA TV and other devices (“BRAVIA” Sync)
About Language Follow function
The on-screen display language of the receiver may be changed simultaneously when you
change the language for the on-screen display of the TV.
[80] Using Other Features
Enjoying video and sound with your desired way of use
Switching between digital and analog audio (INPUT
MODE)
When you connect devices to both digital and analog audio input jacks on the receiver, you can
fix the audio input mode to either device, or switch from one to the other, depending on the type
of material you intend to watch.
This operation is only available using the display panel on the front of the receiver.
Press the input buttons to select the input.
1
Press AMP MENU.
2
Select [<INPUT>] - [INPUT MODE] on the display panel.
3
Select the setting you want.
4

Note
Depending on the input, [INPUT MODE] may be dimmed on the display panel and other modes
cannot be selected.
Hint
You can also use INPUT SELECTOR on the receiver to select the input in step 1.
[81] Using Other Features Enjoying video and sound with your desired way of use
Using other audio input jacks (A. ASSIGN)
You can reassign the OPTICAL/COAXIAL digital audio input jacks to other input if the default
settings of the jacks do not correspond to your connected equipment.
E.g. When connecting a DVD player to the OPTICAL TV IN jack, assign the OPTICAL TV IN
jack to [BD/DVD].
This operation is only available using the display panel on the front of the receiver.
Assignable audio input jacks
OPT:
BD/DVD, SAT/CATV, GAME, SA-CD/CD, VIDEO (*)
COAX:
BD/DVD, SAT/CATV, GAME, SA-CD/CD (*), VIDEO
NONE:
BD/DVD (*), SAT/CATV (*), GAME (*), SA-CD/CD, VIDEO (*)
Note
When you assign the digital audio input, the Input Mode setting may change automatically.
One reassignment is allowed for each input.
If no sound is output from the jacks which you have assigned, also check the Input Mode settings.
AUTO: Gives priority to digital audio signals. If there are more than one digital
connection, HDMI audio signals have priority. If there is no digital audio signals,
analog audio signals are selected. When TV input is selected, priority is given to Audio
Return Channel (ARC) signals. If your TV is not compatible with the ARC function,
digital optical audio signals are selected.
OPT: Specifies input of digital audio signals to the OPTICAL IN jack.
COAX: Specifies input of digital audio signals to the COAXIAL IN jack.
ANALOG: Specifies input of analog audio signals to the AUDIO IN (L/R) jacks.
Select the input name you want to assign.
1
Press AMP MENU.
2
Select [<INPUT>] - [A. ASSIGN].
3
Select the jack you want to assign to the input.
4
Default setting
*

[82] Using Other Features Using the sleep timer
Using the sleep timer
You can set the receiver to turn off automatically after a specified period of time.
Hint
To check the remaining time before the receiver turns off, press SLEEP. The remaining time appears
on the display panel.
The sleep timer will be canceled if you press
(power).
[83] Using Other Features Checking information on the receiver
Viewing information on the display panel
The display panel provides various information on the status of the receiver, such as the sound
field.
Note
Characters or marks in some languages may not be displayed.
[84] Adjusting Settings Using the menu on the display panel
Operating the receiver with the menu on the display
panel
Press SLEEP.
Each time you press SLEEP, the display changes cyclically as follows:
0-30-00 - 1-00-00 - 1-30-00 - 2-00-00 - OFF
[SLEEP] lights up on the display panel of the receiver when sleep timer is being used.
1
Select the input for which you want to check information.
1
Press DISPLAY repeatedly.
Each time you press DISPLAY, the display will change cyclically as follows:
Index name of the input (*1) - Input you selected - Sound field currently applied (*2) -
Volume level - Stream information (*3)
When listening to FM radio
Preset station name (*1) - Frequency - Sound field currently applied (*2) - Volume level
When receiving RDS broadcasts (for European and Asia-Pacific models
only)
Program service name or preset station name (*1) - Frequency, band and preset number -
Sound field currently applied (*2) - Volume level
2
Index name appears only when you have assigned one to the input or preset station. Index name does not
appear if only blank spaces have been entered or it is same as the input name.
*1
[PURE.DIRECT] appears on the display panel when the Pure Direct function is activated.
*2
Stream information may not be displayed.
*3

You can operate this receiver using the display panel even if the TV is not connected to the
receiver.
To return to the previous display
Press or BACK.
To exit the menu
Press AMP MENU.
Note
Some parameters and settings may appear dimmed on the display panel. This means that they are
either unavailable or fixed and unchangeable.
[85] Adjusting Settings Using the menu on the display panel
Viewing information on the display panel
The display panel provides various information on the status of the receiver, such as the sound
field.
Note
Press AMP MENU.
The menu is displayed on the display panel of the receiver.
1
Press
/ repeatedly to select the menu you want, then press .
2
Press
/ repeatedly to select the parameter you want to adjust, then press .
3
Press
/ repeatedly to select the setting you want, then press .
4
Select the input for which you want to check information.
1
Press DISPLAY repeatedly.
Each time you press DISPLAY, the display will change cyclically as follows:
Index name of the input (*1) - Input you selected - Sound field currently applied (*2) -
Volume level - Stream information (*3)
When listening to FM radio
Preset station name (*1) - Frequency - Sound field currently applied (*2) - Volume level
When receiving RDS broadcasts (for European and Asia-Pacific models
only)
Program service name or preset station name (*1) - Frequency, band and preset number -
Sound field currently applied (*2) - Volume level
2
Index name appears only when you have assigned one to the input or preset station. Index name does not
appear if only blank spaces have been entered or it is same as the input name.
*1
[PURE.DIRECT] appears on the display panel when the Pure Direct function is activated.
*2
Stream information may not be displayed.
*3

Characters or marks in some languages may not be displayed.
[86] Adjusting Settings Easy Setup
Setting up the receiver using Easy Setup
When you turn on the receiver for the first time or after the receiver is initialized, the Easy Setup
screen appears on the TV screen. You can set up the following settings for the receiver by
following the instructions on the Easy Setup screen.
Language
Select the language of messages on the screen.
Surround Back Speakers Assign
You can set the assignment for the SPEAKERS SURROUND BACK/BI-AMP/FRONT
HIGH/FRONT B terminals.
Auto Calibration
The Auto Calibration function checks and measures the speakers and the environment to
adjust various settings for optimum listening condition.
Note
Switch the input of the TV to the input to which the receiver is connected to use this function.
If the Easy Setup screen does not appear or you want to display the Easy Setup screen
manually, you can display it by pressing HOME to display the home menu, then selecting [Easy
Setup].
[87] Adjusting Settings
Easy Setup
Selecting the language
You can select the language of messages on the screen.
Note
When the Control for HDMI function on both the receiver and the TV (BRAVIA TV) is turned on, the
on-screen display language of the receiver is changed simultaneously when you change the
language for the on-screen display of the TV.
[88] Adjusting Settings Easy Setup
Assigning the surround back speaker terminals
(Surround Back Speakers Assign)
You can set the assignment for the SPEAKERS SURROUND BACK/BI-AMP/FRONT
Select [Easy Setup] from the home menu.
1
Select the language you want.
2

HIGH/FRONT B terminals.
Note
You can only set [Surround Back Speakers Assign] when headphones are not connected.
Hint
You can also set the assignment for the surround back speaker terminals from [SB ASSIGN] in the
[<SPEAKER>] menu on the display panel.
[89] Adjusting Settings Performing Auto Calibration
1. About Auto Calibration
Auto Calibration allows you to perform automatic calibration as follows.
Check the connection between each speaker and the receiver.
Adjust the speaker level.
Measure the distance of each speaker from your seating position. (*)
Measure the speaker size. (*)
Measure the frequency characteristics (EQ). (*)
Note
The D.C.A.C. is designed to achieve proper sound balance for your room. However, you can adjust
the speaker levels manually according to your preference using [<LEVEL>] - [TEST TONE] in the
[Speaker Settings] menu.
[90] Adjusting Settings Performing Auto Calibration
2. Before you perform Auto Calibration
Before you perform Auto Calibration, check the following items:
Set up and connect the speakers.
Do not connect any microphones other than the supplied calibration microphone to the
CALIBRATION MIC jack.
If using a bi-amplifier connection or a front B speaker connection, set the assignment for the
SPEAKERS SURROUND BACK/BI-AMP/FRONT HIGH/FRONT B terminals properly.
Set the speaker output to a setting other than [SPK OFF].
Select [Speaker Setting] from the home menu.
1
Select [Surround Back Speakers Assign].
2
Set the assignment for the SPEAKERS SURROUND BACK/BI-AMP/FRONT
HIGH/FRONT B terminals.
Surround Back Speakers: When using the surround back speaker connection.
Bi-Amplifier Speakers: When using the bi-amplifier speaker connection.
Front B Speakers: When using the front B speaker connection.
Front High Speakers: When using the front high speaker connection.
None Speaker: When none of the connections above is used.
3
The measurement result is not utilized when [DIRECT] is being used and an analog input is selected.
*

Disconnect the headphones.
Remove any obstructions between the calibration microphone and the speakers.
For accurate measurement, make sure the environment is quiet and free from noise.
Note
The speakers emit very loud sound during the calibration and the volume cannot be adjusted. Be
considerate of your neighbors and any children who are present.
If the muting function has been activated before you perform Auto Calibration, the muting function
will shut off automatically.
It may not be possible to take the correct measurements or to perform Auto Calibration at all if
special speakers such as dipole speakers are used.
[91] Adjusting Settings Performing Auto Calibration
3. Connecting the calibration microphone
Calibration microphone (supplied)
[92] Adjusting Settings
Performing Auto Calibration
4. Selecting the front speakers
You can select the front speakers you want to operate.
Be sure to use the buttons on the receiver to perform this operation.
The indicators on the display panel shows which set of terminals are selected.
Connect the supplied calibration microphone to the CALIBRATION MIC jack.
1
Set up the calibration microphone.
Place the calibration microphone at your listening position and set it at the same height as
your ears.
2
Press SPEAKERS on the receiver repeatedly to select the front speaker system you
want to operate.
1

SP A:
Speakers connected to the SPEAKERS FRONT A terminals.
SP B (*):
Speakers connected to the SPEAKERS SURROUND BACK/BI-AMP/FRONT HIGH/FRONT
B terminals.
SP A B (*):
Speakers connected to both the SPEAKERS FRONT A and SPEAKERS SURROUND
BACK/BI-AMP/FRONT HIGH/FRONT B terminals (parallel connection).
(None):
[SPK OFF] appears on the display panel. No audio signals are output from any speaker
terminals.
Note
This setting is not available when headphones are connected.
[93] Adjusting Settings Performing Auto Calibration
5. Performing Auto Calibration
You can perform automatic calibration from your listening position.
Note
If an error code or warning message appears on the screen in step 2, see “List of messages after
Auto Calibration measurements.”
This setting is not available when headphones are connected.
Hint
The Auto Calibration function will be canceled if you perform the following during the measurement
process:
Press
.
Press the input buttons on the remote control or turn the INPUT SELECTOR on the receiver.
Press HOME, AMP MENU or
on the remote control.
To select [SP B] or [SP A B], set the assignment for the SPEAKERS SURROUND BACK/BI-AMP/FRONT
HIGH/FRONT B terminals to [Front B Speakers] by using [Speaker Setting] - [Surround Back Speakers Assign].
*
Select [Easy Setup] from the home menu.
1
Follow the instructions on the TV screen, then select [Start].
The measurement starts in a few seconds.
The measurement process will take approximately 30 seconds with a test tone.
When the measurement ends, a beep sounds and the screen switches.
2
Select the item you want.
Retry: Performs the Auto Calibration again.
Save&Exit: Saves the measurement results and exits the setting process.
Exit: Exits the setting process without saving the measurement results.
For details on the measurement results, see “6. Checking
Auto Calibration results.”
3
Save the measurement results.
Select [Save&Exit] in step 3.
4
Press SPEAKERS on the receiver.
Change the volume level.
Connect headphones.
[94] Adjusting Settings Performing Auto Calibration
6. Checking Auto Calibration results
To check error codes or warning messages received in Auto Calibration, proceed with the
following steps:
If an error code appears
Check the error and perform Auto Calibration again.
If a warning message appears
Check the warning message and select [OK]. For details on the warning messages, see “List of
messages after Auto Calibration measurements.”
Hint
The measurement results may vary depending on the position of the subwoofer. However, continuing
to use the receiver with that value does not cause problems.
[95] Adjusting Settings Performing Auto Calibration
Selecting the Auto Calibration type (CAL TYPE)
You can select a calibration type after you have performed the Auto Calibration and saved the
settings.
This operation is only available using the display panel on the front of the receiver.
Select [Retry].
1
Follow the instructions on the TV screen and then press
to select [Start].
The measurement starts in a few seconds.
The measurement process will take approximately 30 seconds with a test tone.
When the measurement ends, a beep sounds and the screen switches.
2
Select the item you want.
Retry: Performs the Auto Calibration again.
Save&Exit: Saves the measurement results and exits the setting process.
Exit: Exits the setting process without saving the measurement results.
3
Save the measurement results.
Select [Save&Exit] in step 3.
4
Press AMP MENU.
1

Note
This function does not work in the following cases:
[DIRECT] is selected and an analog input is selected.
Headphones are connected.
The receiver may play signals at a lower sampling frequency than the actual sampling frequency of
the input signals, depending on the audio format.
[96] Adjusting Settings Level Settings
Outputting a test tone from each speaker (TEST TONE)
You can output a test tone from each speaker in sequence.
This operation is only available using the display panel on the front of the receiver.
Hint
To adjust the level of all speakers at the same time, press +/–. You can also use MASTER
VOLUME on the receiver.
The adjusted value is shown on the display panel during adjustment.
Select [<AUTO CAL>] - [CAL TYPE] on the display panel.
2
Select the setting you want.
FULL FLAT: Makes the measurement of frequency from each speaker flat.
ENGINEER: Sets to “the Sony listening room standard” frequency characteristics.
FRONT REF: Adjusts the characteristics of all of the speakers to match the
characteristics of the front speaker.
OFF
3
Press AMP MENU.
1
Select [<LEVEL>] - [TEST TONE] on the display panel.
2
Select the setting you want.
OFF
AUTO XXX (*): The test tone is output from each speaker in sequence.
3
XXX represents a speaker channel (FL, CNT, FR, SR, SBR, SB, SBL, SL, LH, RH, SW)
*
Select the speaker on the screen for which you want to adjust the speaker level.
4
Adjust the speaker level.
5

[97] Adjusting Settings Level Settings
Adjusting the speaker level (Level)
You can adjust the level of each speaker (front left/right, front high left/right, center, surround
left/right, surround back left/right and subwoofer).
Note
When one of the sound fields for music is selected, no sound is output from the subwoofer if [Size]
for all of the speakers are set to [Large] in the [Speaker Setting] menu. However, sound will be
output from the subwoofer if:
the digital input signal contains LFE signals.
[Size] for the front or surround speakers are set to [Small].
[MULTI ST.], [PLII MV], [PLII MS], [PLIIX MV], [PLIIX MS], [HD-D.C.S.] or [A. ENHANCER] is
selected.
If headphones are connected, you can only set [Level] for [Front Left] and [Front Right].
Hint
You can also adjust the level of each speaker from the [<LEVEL>] menu on the display panel.
[98] Adjusting Settings Speaker Settings
Selecting the speaker pattern (SP PATTERN)
You can select the speaker pattern according to the speaker system which you are using.
This operation is only available using the display panel on the front of the receiver.
[99] Adjusting Settings
Speaker Settings
Assigning the surround back speaker terminals
(Surround Back Speakers Assign)
Select [Speaker Setting] from the home menu.
1
Select [Level].
2
Select the speaker on the screen for which you want to adjust the speaker level.
3
Adjust the level.
4
Press AMP MENU.
1
Select [<SPEAKER>] - [SP PATTERN] on the display panel.
2
Select the speaker pattern you want.
Select the speaker pattern according to the speaker configuration.
3

You can set the assignment for the SPEAKERS SURROUND BACK/BI-AMP/FRONT
HIGH/FRONT B terminals.
Note
You can only set [Surround Back Speakers Assign] when headphones are not connected.
Hint
You can also set the assignment for the surround back speaker terminals from [SB ASSIGN] in the
[<SPEAKER>] menu on the display panel.
[100] Adjusting Settings Speaker Settings
Adjusting the speaker size (Size)
You can adjust the size of each speaker (front left/right, front high left/right, center, surround
left/right and surround back left/right).
Note
[Size] cannot be set when headphones are connected.
Select [Speaker Setting] from the home menu.
1
Select [Surround Back Speakers Assign].
2
Set the assignment for the SPEAKERS SURROUND BACK/BI-AMP/FRONT
HIGH/FRONT B terminals.
Surround Back Speakers: When using the surround back speaker connection.
Bi-Amplifier Speakers: When using the bi-amplifier speaker connection.
Front B Speakers: When using the front B speaker connection.
Front High Speakers: When using the front high speaker connection.
None Speaker: When none of the connections above is used.
3
Select [Speaker Setting] from the home menu.
1
Select [Size].
2
Select the speaker on the screen for which you want to adjust the size.
3
Select the size you want.
Large: If you connect large speakers that will effectively reproduce bass frequencies,
select [Large]. Select [Large] usually.
Small: If the sound is distorted or you hear a lack of surround effects when using multi
channel surround sound, select [Small]. You can activate the bass redirection circuitry
and output the bass frequencies of each channel from the subwoofer or other [Large]
speakers.
4

Hint
The surround back speakers will be set to the same setting as that of the surround speakers.
When the front speakers are set to [Small], the center, surround, and surround back/front high
speakers are also automatically set to [Small].
If you do not use the subwoofer, the front speakers are automatically set to [Large].
You can also adjust the size of each speaker from the [<SPEAKER>] menu on the display panel.
[101] Adjusting Settings Speaker Settings
Adjusting the speaker distance (Distance)
You can adjust the distance from listening position to each speaker (front left/right, front high
left/right, center, surround left/right, surround back left/right and subwoofer).
Note
Some parameters may not be available depending on the speaker pattern setting.
[Distance] cannot be set when headphones are connected.
Hint
You can also adjust the distance of each speaker from the [<SPEAKER>] menu on the display panel.
[102] Adjusting Settings Speaker Settings
Setting the crossover frequency of the speakers
(Crossover Freq)
You can set the bass crossover frequency of speakers for which the speaker size has been set
to [Small] in the [Speaker Setting] menu. A measured speaker crossover frequency is set for
each speaker after the Auto Calibration is performed.
Select [Speaker Setting] from the home menu.
1
Select [Distance].
2
Select the speaker on the screen for which you want to adjust the distance from
your listening position.
3
Adjust the distance.
4
Select [Speaker Setting] from the home menu.
1
Select [Crossover Freq].
2
Select the speaker on the screen for which you want to adjust the crossover
3

Note
[Crossover Freq] cannot be set when headphones are connected.
[Crossover Freq] for the particular speaker cannot be set if [Size] is set to [Large] in the [Speaker
Setting] menu.
The surround back speakers will be set to the same setting as that of the surround speakers.
Hint
You can also set the crossover frequency of speakers from the [<SPEAKER>] menu on the display
panel.
[103] Adjusting Settings Speaker Settings
Selecting the unit of measurement (DIST. UNIT)
You can select the unit of measurement for setting distances.
This operation is only available using the display panel on the front of the receiver.
[104] Adjusting Settings
Input Settings
Switching between digital and analog audio (INPUT
MODE)
When you connect devices to both digital and analog audio input jacks on the receiver, you can
fix the audio input mode to either device, or switch from one to the other, depending on the type
of material you intend to watch.
This operation is only available using the display panel on the front of the receiver.
frequency.
Set the crossover frequency.
4
Press AMP MENU.
1
Select [<SPEAKER>] - [DIST. UNIT] on the display panel.
2
Select the setting you want.
METER: The distance is displayed in meters.
FEET: The distance is displayed in feet.
3
Press the input buttons to select the input.
1
Press AMP MENU.
2
Select [<INPUT>] - [INPUT MODE] on the display panel.
3

Note
Depending on the input, [INPUT MODE] may be dimmed on the display panel and other modes
cannot be selected.
Hint
You can also use INPUT SELECTOR on the receiver to select the input in step 1.
[105] Adjusting Settings Input Settings
Changing the name for each input (NAME IN)
You can enter up to 8 characters for each input name.
This operation is only available using the display panel on the front of the receiver.
[106] Adjusting Settings
Input Settings
Using other audio input jacks (A. ASSIGN)
You can reassign the OPTICAL/COAXIAL digital audio input jacks to other input if the default
settings of the jacks do not correspond to your connected equipment.
E.g. When connecting a DVD player to the OPTICAL TV IN jack, assign the OPTICAL TV IN
Select the setting you want.
AUTO: Gives priority to digital audio signals. If there are more than one digital
connection, HDMI audio signals have priority. If there is no digital audio signals,
analog audio signals are selected. When TV input is selected, priority is given to Audio
Return Channel (ARC) signals. If your TV is not compatible with the ARC function,
digital optical audio signals are selected.
OPT: Specifies input of digital audio signals to the OPTICAL IN jack.
COAX: Specifies input of digital audio signals to the COAXIAL IN jack.
ANALOG: Specifies input of analog audio signals to the AUDIO IN (L/R) jacks.
4
Select the input name you want to change.
1
Press AMP MENU.
2
Select [<INPUT>] - [NAME IN] on the display panel.
3
Press
/ repeatedly to select a character, then press .
You can move the input position backward and forward by pressing
/ .
4
Repeat step 4 to input characters one by one, then press
.
The name you entered is registered.
5
jack to [BD/DVD].
This operation is only available using the display panel on the front of the receiver.
Assignable audio input jacks
OPT:
BD/DVD, SAT/CATV, GAME, SA-CD/CD, VIDEO (*)
COAX:
BD/DVD, SAT/CATV, GAME, SA-CD/CD (*), VIDEO
NONE:
BD/DVD (*), SAT/CATV (*), GAME (*), SA-CD/CD, VIDEO (*)
Note
When you assign the digital audio input, the Input Mode setting may change automatically.
One reassignment is allowed for each input.
If no sound is output from the jacks which you have assigned, also check the Input Mode settings.
[107] Adjusting Settings Surround Settings
Selecting the HD-D.C.S. effect type (HD-D.C.S. TYP)
Select the HD-D.C.S. effect type you want.
This operation is only available using the display panel on the front of the receiver.
Note
This function works only when the sound field is set to [HD-D.C.S.].
This function does not work when headphones are connected.
Select the input name you want to assign.
1
Press AMP MENU.
2
Select [<INPUT>] - [A. ASSIGN].
3
Select the jack you want to assign to the input.
4
Default setting
*
Press AMP MENU.
1
Select [<SURROUND>] - [HD-D.C.S. TYP] on the display panel of the receiver.
2
Select the setting you want.
DYNAMIC
THEATER
STUDIO
3

[108] Adjusting Settings Equalizer Settings
Adjusting the equalizer (EQ)
You can use the following parameters to adjust the tonal quality (bass/treble level) of the front
speakers.
This operation is only available using the display panel on the front of the receiver.
Level (dB)
Frequency (Hz)
Bass
Treble
Note
This function does not work in the following cases:
[DIRECT] is selected and an analog input is selected.
Pure Direct function is activated.
Depending on the audio format, the receiver may play signals at a lower sampling frequency than the
original sampling frequency of the input signals.
Frequencies for [BASS] and [TREBLE] are fixed.
[109] Adjusting Settings Tuner Settings
Setting the FM station receiving mode (FM MODE)
You can set the FM station receiving mode to the stereo mode or mono mode.
This operation is only available using the display panel on the front of the receiver.
Press AMP MENU.
1
Select [<EQ>] on the display panel.
2
Select [BASS] or [TREBLE].
3
Adjust the gain.
4
Press AMP MENU.
1
Select [<TUNER>] - [FM MODE] on the display panel of the receiver.
2
Select the setting you want.
STEREO: The FM station is received in stereo.
MONO: The FM station is received in mono.
3

Note
This function works only when [FM] is selected as the input.
[110] Adjusting Settings Tuner Settings
Naming preset stations (NAME IN)
You can enter a name up to 8 characters for a preset station.
This operation is only available using the display panel on the front of the receiver.
Canceling naming input
Press BACK.
[111] Adjusting Settings
Audio Settings
Enjoying clear sound at a low volume level (NIGHT
MODE)
This function allows you to retain a theater-like environment at low volume levels. When
watching a movie late at night, you will be able to hear the dialog clearly even at a low volume
level. This function can be used with other sound fields.
This operation is only available using the display panel on the front of the receiver.
Select the preset number to which you want to assign a name.
1
Press AMP MENU.
2
Select [<TUNER>] - [NAME IN] on the display panel.
3
Press
/ repeatedly to select a character, then press .
You can move the input position backward and forward by pressing
/ .
4
Repeat step 4 to input characters one by one, then press
.
The name you entered is registered.
5
Press AMP MENU.
1
Select [<AUDIO>] - [NIGHT MODE] on the display panel.
2
Select [NIGHT ON] or [NIGHT OFF].
3
Note
This function does not work when [DIRECT] is selected and an analog input is selected.
Hint
You can also set the Night Mode function on and off by using NIGHT MODE on the receiver.
While the Night Mode function is turned on, the bass, treble, and effect levels increase, and [D.
RANGE] is automatically set to [COMP. ON].
[112] Adjusting Settings Audio Settings
Synchronizing audio with video output (A/V SYNC)
You can delay the output of audio to minimize the time gap between audio output and a visual
display.
This function is useful when using a large LCD or plasma monitor or a projector. You can set
the function for each input independently.
This operation is only available using the display panel on the front of the receiver.
Note
The receiver may play signals at a lower sampling frequency than the actual sampling frequency of
the input signals, depending on the audio format.
[113] Adjusting Settings Audio Settings
Adjusting the volume automatically (AUTO VOL)
This receiver can adjust its volume automatically depending on the input signal or content from
a connected device.
This function is useful, for example, when the sound of commercials is louder than a TV
program.
This operation is only available using the display panel on the front of the receiver.
Press AMP MENU.
1
Select [<AUDIO>] - [A/V SYNC] on the display panel.
2
Select the setting you want.
SYNC ON (Delay time: 60ms): The audio output is delayed so that the time gap
between the audio output and visual display is minimized.
SYNC OFF (Delay time: 0ms): The audio output is not delayed.
3
Press AMP MENU.
1
Select [<AUDIO>] - [AUTO VOL] on the display panel.
2
Set to [A. VOL ON] or [A. VOL OFF].
3

Note
Be sure to reduce the volume level before you turn this function on or off.
The AUTO VOL function may not work, depending on the audio format.
This function does not work when [DIRECT] is selected and an analog input is selected.
[114] Adjusting Settings Audio Settings
Selecting the language of digital broadcasts (DUAL
MONO)
You can select the language you want when listening to a digital broadcast with dual audio. This
function only works for Dolby Digital sources.
This operation is only available using the display panel on the front of the receiver.
[115] Adjusting Settings
Audio Settings
Compressing the dynamic range (D. RANGE)
You can compress the dynamic range of the soundtrack. This may be useful when you want to
watch movies at a low volume late at night, etc.
This function only works for Dolby Digital and Dolby TrueHD sources.
This operation is only available using the display panel on the front of the receiver.
Press AMP MENU.
1
Select [<AUDIO>] - [DUAL MONO] on the display panel.
2
Select the setting you want.
MAIN/SUB: Sound in the main language will be output through the front left speaker
and sound in the sub language will be output through the front right speaker
simultaneously.
MAIN: Sound in the main language will be output.
SUB: Sound in the sub language will be output.
3
Press AMP MENU.
1
Select [<AUDIO>] - [D. RANGE] on the display panel.
2
Select the setting you want.
COMP. ON: The dynamic range is compressed as intended by the recording
engineer.
COMP. AUTO: The dynamic range is compressed automatically when there is a flag
in the sound source that recommends using the D. RANGE function.
COMP. OFF
3

[116] Adjusting Settings HDMI Settings
Controlling HDMI devices (CTRL HDMI)
You can turn the Control for HDMI function on or off. For details, see“Preparing to use the
“BRAVIA” Sync function.”
This operation is only available using the display panel on the front of the receiver.
Note
When you set [CTRL HDMI] to [CTRL ON], [AUDIO OUT] may be changed automatically.
When the receiver is in standby mode, the
(power) indicator on the front panel lights up in amber
if [CTRL HDMI] is set to [CTRL ON].
[117] Adjusting Settings HDMI Settings
Turning off the receiver and connected devices
simultaneously with the TV (System Power Off
function) (STBY LINK)
You can turn off the receiver and connected device automatically when you turn off the TV.
This operation is only available using the display panel on the front of the receiver.
Note
Depending on the status of the device, the connected device may not turn off.
The System Power Off function may work with other devices than those manufactured by Sony, but
operation is not guaranteed.
Press AMP MENU.
1
Select [<HDMI>] - [CTRL HDMI] on the display panel.
2
Set to [CTRL ON] or [CTRL OFF].
3
Press AMP MENU.
1
Select [<HDMI>] - [STBY LINK] on the display panel.
2
Select the setting you want.
AUTO
:
When the input of the receiver is set to [TV], [BD/DVD], [GAME], [SAT/CATV],
or [VIDEO], the receiver will turn off when the TV is turned off.
ON
:
The receiver will turn off when the TV is turned off, regardless of the input of the
receiver.
OFF
:
The receiver does not turn off when the TV is turned off, regardless of the input
of the receiver.
3

[118] Adjusting Settings HDMI Settings
Enjoying content of a connected device without
turning on the receiver (STBY THRU)
This function allows you to enjoy the sound and image of a connected device without turning on
the receiver.
This operation is only available using the display panel on the front of the receiver.
Note
Set [STBY THRU] to [ON] when no image from the connected device appears on the TV.
When the receiver is in standby mode, the
(power) indicator on the front panel lights up in amber
if [STBY THRU] is set to [ON] or [AUTO].
[AUTO] may work on other devices than those manufactured by Sony. However, operation is not
guaranteed.
[119] Adjusting Settings HDMI Settings
Setting the HDMI audio signal output of connected
devices (AUDIO OUT)
You can set the HDMI audio signal output of playback devices connected to the receiver via an
HDMI connection.
This operation is only available using the display panel on the front of the receiver.
Press AMP MENU.
1
Select [<HDMI>] - [STBY THRU] on the display panel.
2
Select the setting you want.
ON: The receiver continuously outputs HDMI signals from the HDMI TV OUT jack
when in standby mode. Sony recommends this setting if you are using a TV that is not
manufactured by Sony.
AUTO: The receiver outputs HDMI signals to the TV from the HDMI TV OUT jack
when the TV is turned on while the receiver is in the standby mode. This setting saves
power in the standby mode compared to the [ON] setting.
OFF: The receiver does not output HDMI signals from the HDMI TV OUT jack when in
standby mode. Turn on the receiver if you want to enjoy content of the connected
device on the TV.
This setting saves power in the standby mode compared to the [ON] setting.
3
Press AMP MENU.
1
Select [<HDMI>] - [AUDIO OUT] on the display panel.
2
Select the setting you want.
AMP: HDMI audio signals from playback devices are only output to the speakers
connected to the receiver. Multi-channel sound can be played back as it is.
3

Note
Audio signals are not output from the speaker of the TV when [AUDIO OUT] is set to [AMP].
When [TV+AMP] is selected, the sound quality of the playback equipment depends on the TV’s
sound quality, such as the number of channels, and the sampling frequency, etc. If the TV has
stereo speakers, the sound output from the receiver is also in stereo as that of the TV, even if you
play back multi channel source.
When you connect the receiver to a video device (projector, etc.), sound may not be output from the
receiver. In this case, select [AMP].
When you select [TV+AMP], only sound from the HDMI IN jacks is output from the speaker of the TV.
[120] Adjusting Settings HDMI Settings
Setting the level of the subwoofer (SW LEVEL)
You can set the level of the subwoofer to 0 dB or +10 dB when PCM signals are input via an
HDMI connection. The level for each input to which an HDMI input jack is assigned can be set
independently.
This operation is only available using the display panel on the front of the receiver.
Note
This setting is invalid when [FM], [USB], [BT], [SA-CD/CD] or [TV] is selected.
[121] Adjusting Settings HDMI Settings
Setting HDMI signal format (SIGNAL FMT.)
You can select the signal format so that the receiver can receive high resolution 4K signals.
This operation is only available using the display panel on the front of the receiver.
TV+AMP: The sound is output from the speaker of the TV and the speakers
connected to the receiver.
Press AMP MENU.
1
Select [<HDMI>] - [SW LEVEL] on the display panel.
2
Select the setting you want.
SW AUTO: Automatically sets the level to 0 dB or +10 dB, depending on the audio
stream.
SW +10 dB
SW 0 dB
3
Press AMP MENU.
1
Select [<HDMI>] - [SIGNAL FMT.] on the display panel.
2

Note
When [ENHANCED] is selected, we recommend using a Premium High Speed HDMI Cable with
Ethernet, which can support bandwidth up to 18 Gbps.
When [ENHANCED] is selected, some devices (cable box or satellite box, Blu-ray Disc player, and
DVD player) does not work properly. In this case, select [STANDARD].
If your TV has similar menu for high bandwidth video format, check the setting on the TV menu when
you select [ENHANCED] on this receiver. For details on the setting of the TV menu, refer to the
operating instructions of the TV.
For details about the high bandwidth video format, refer to “Supported video formats” in “About HDMI
connections.”
[122] Adjusting Settings Bluetooth Settings
Setting the Bluetooth Standby mode (BT STANDBY)
You can set the Bluetooth Standby mode so that the receiver can be controlled by a
BLUETOOTH device even when the receiver is in standby mode.
This operation is only available using the display panel on the front of the receiver.
Note
If a previously paired device is paired when the receiver is in standby mode, the (power) indicator
on the front panel lights up in amber if [BT STANDBY] is set to [STBY ON].
You can only select this parameter when a BLUETOOTH device is paired.
[123] Adjusting Settings Bluetooth Settings
Setting BLUETOOTH audio codecs (BT AAC)
You can enable and disable AAC (Advanced Audio Coding) audio.
This operation is only available using the display panel on the front of the receiver.
Select the input name you want to apply the setting.
3
Select the setting you want.
STANDARD: If you do not receive high resolution 4K signals, select [STANDARD].
ENHANCED: If you want to receive high resolution 4K signals, such as 4K/60p 4:4:4,
4:2:2, and 4K/60p 4:2:0 10 bit, etc., select [ENHANCED].
4
Press AMP MENU.
1
Select [<BT>] - [BT STANDBY] on the display panel.
2
Select the setting you want.
STBY ON: You can turn on the receiver from a BLUETOOTH device.
STBY OFF
3

Note
When you change this setting, the setting is applied from the next time you connect the
BLUETOOTH device.
Hint
You can enjoy high-quality sound if AAC is enabled.
[124] Adjusting Settings Bluetooth Settings
Turning the BLUETOOTH function on/off (BT POWER)
You can turn the BLUETOOTH function on or off. The NFC function is also turned on/off in
conjunction with this setting.
This operation is only available using the display panel on the front of the receiver.
Note
You cannot set this function when [BT] (BLUETOOTH device) is selected as the input. ([BT POWER]
on the display panel will become dimmed.)
[125] Adjusting Settings System Settings
Setting standby mode (AUTO STBY)
You can set the receiver to switch to standby mode automatically when you do not operate the
receiver or when no signals are input to the receiver.
This operation is only available using the display panel on the front of the receiver.
Press AMP MENU.
1
Select [<BT>] - [BT AAC] on the display panel.
2
Select [AAC ON] or [AAC OFF].
AAC ON: AAC audio is available if the BLUETOOTH device supports AAC.
AAC OFF: AAC audio is not available.
3
Press AMP MENU.
1
Select [<BT>] - [BT POWER] on the display panel.
2
Select [BT ON] or [BT OFF].
3
Press AMP MENU.
1
Select [<SYSTEM>] - [AUTO STBY] on the display panel.
2

Note
This function does not work when [FM] is selected as the input.
If you use the AUTO STBY function and the sleep timer at the same time, the sleep timer has
priority.
[126] Adjusting Settings Reverting to the factory default settings
Reverting to the factory default settings
You can clear all memorized settings and restore the receiver to the factory default settings by
the following procedure. This procedure can also be used to initialize the receiver before you
use it for the first time.
Be sure to use the buttons on the receiver to perform this operation.
Note
It takes a few minutes for the memory to be cleared completely. Do not turn the receiver off until
[CLEARED *] appears on the display panel.
[127] Troubleshooting Error messages
PROTECTOR
The receiver will automatically turn off after a few seconds. Check the followings:
There may be an electrical surge or power failure. Unplug the AC power cord (mains lead)
and then plug in the cord again after 30 minutes.
The receiver is covered and the ventilation holes are blocked. Remove the object covering
the ventilation holes of the receiver.
The impedance of the connected speakers is below the rated impedance range indicated on
the back panel of the receiver. Reduce the volume level.
Unplug the AC power cord (mains lead) and let the receiver cool down for 30 minutes while
performing the following troubleshooting:
Disconnect all of the speakers and subwoofer.
Check that the speaker wires are tightly twisted on both ends.
Connect the front speaker first, increase the volume level and operate the receiver for at
least 30 minutes until it completely warms up. Then, connect each additional speaker
one by one and test each additional speaker until you detect which speaker is causing
the protection error.
Select the setting you want.
STBY ON: The receiver switches to standby mode after approximately 20 minutes.
STBY OFF
3
Turn off the receiver.
1
Hold down
(power) on the receiver for 5 seconds.
[CLEARING] flashes on the display panel for a while, then changes to [CLEARED *].
2

After checking the above items and fixing any problems, plug in the AC power cord (mains
lead) and turn on the receiver. If the problem persists, consult your nearest Sony dealer.
[128] Troubleshooting
Error messages
List of messages after Auto Calibration measurements
Error 30:
Headphones are connected to the PHONES jack on the front of the receiver. Remove the
headphones and retry the Auto Calibration again.
Error 31:
Front speaker system is set to [SPK OFF]. Select the front speaker system you want to
operate by pressing SPEAKERS on the receiver repeatedly, then retry the Auto Calibration.
Error 32:
The receiver cannot detect any speaker. Make sure that the calibration microphone is
connected securely to the CALIBRATION MIC jack, then retry the Auto Calibration.
Error 33: The receiver cannot detect sound from front, surround, surround back, and front
high speakers. Check the followings:
The calibration microphone is not damaged and is connected to the CALIBRATION MIC
jack.
All speakers are connected properly.
Warning 40:
The receiver has completed the Auto Calibration and detected a high noise level. Retry the
Auto Calibration in a quiet environment for a better result.
Warning 41, Warning 42:
The receiver detects a high level signal from the calibration microphone. The distance
between the microphone and speakers may be too short. Place the microphone at listening
position apart from the speakers, then retry the Auto Calibration.
Warning 43:
The receiver cannot detect distance and position of subwoofer. This may be caused by
noise. Retry the Auto Calibration in a quiet environment.
[129] Troubleshooting
Error messages
USB message list
The following messages appear on the display panel.
READING:
The receiver is recognizing and reading the information of the USB device.
NO SUPPORT:
An incompatible USB device is connected, an unknown device is connected, the USB
device is connected through a USB hub or the USB device could not be recognized.
NO DEVICE:
No USB device is connected or the connected USB device is not recognized.
NO TRACK:
No track was found.
[130] Troubleshooting
General
The receiver is turned off automatically.

[<SYSTEM>] - [AUTO STBY] is set to [STBY ON] on the display panel.
The sleep timer function was activated.
[PROTECTOR] was activated.
[131] Troubleshooting
General
Cannot find an available input when connecting
several digital devices.
You can reassign the COAXIAL/OPTICAL digital audio input jacks to other inputs.
See “Using other audio input jacks (
A. ASSIGN).”
[132] Troubleshooting
General
The receiver does not turn on even when the TV is
turned on.
Press AMP MENU, then set [<HDMI>] - [CTRL HDMI] to [CTRL ON] on the display panel.
The TV must support the Control for HDMI function. For details, refer to the operating
instructions of the TV.
Check the speaker settings of the TV. The receiver power syncs with the speaker settings of
the TV. For details, refer to the operating instructions of the TV.
If sound was output from the speakers of the TV last time, the receiver does not turn on
even when the TV is turned on.
[133] Troubleshooting
General
The receiver turns off when the TV is turned off.
Press AMP MENU, then check [<HDMI>] - [STBY LINK] on the display panel. When the
function is set to [ON], the receiver automatically turns off interlocked with the TV-power off
operation, regardless of the input of the receiver.
[134] Troubleshooting
General
The receiver does not turn off even when the TV is
turned off.
Press AMP MENU, then check [<HDMI>] - [STBY LINK] on the display panel. If you want
the receiver to turn off when the TV is turned off regardless of the input of the receiver, set
[STBY LINK] to [ON]. The TV must support the Control for HDMI function. For details, refer
to the operating instructions of the TV.
Press AMP MENU, then set [<HDMI>] - [CTRL HDMI] to [CTRL ON] on the display panel.
The TV must support the Control for HDMI function. For details, refer to the operating
instructions of the TV.

[135] Troubleshooting Image
No image appears on the TV screen.
Select the appropriate input using the input buttons.
Set your TV to the appropriate input mode.
Move your audio device away from the TV.
Make sure that cables are correctly and securely connected to devices.
Press AMP MENU, then set [<HDMI>] - [SIGNAL FMT.] of the selected input to
[STANDARD] on the display panel.
Some playback devices need to be set up. Refer to the operating instructions supplied with
each device.
Be sure to use a High Speed HDMI Cable with Ethernet when you view images or listen to
sound, especially for 1080p, Deep Color (Deep Colour), 4K or 3D transmission. Premium
High Speed HDMI Cable with Ethernet is required for 4K/60p 4:4:4, 4:2:2 and 4K/60p 4:2:0
10 bit etc.
If you want to play HDCP 2.2 content, connect the receiver to an HDMI input jack of a TV
that supports HDCP 2.2.
[136] Troubleshooting
Image
No 3D content appears on the TV screen.
Depending on the TV or the video device, 3D content may not be displayed. Check the
HDMI video formats supported by the receiver.
Be sure to use a High Speed HDMI Cable with Ethernet.
[137] Troubleshooting
Image
No 4K content appears on the TV screen.
Depending on the TV or the video device, 4K content may not be displayed. Check the
video capability and settings of your TV and video device.
Be sure to use a High Speed HDMI Cable with Ethernet.
When you use high bandwidth video formats such as 4K/60p 4:4:4, 4:2:2 and 4K/60p 4:2:0
10 bit, we recommend you to use a Premium High Speed HDMI Cable with Ethernet.
If your TV has similar menu for high bandwidth video format, check the setting on the TV
menu when you set [SIGNAL FMT.] to [ENHANCED] on this receiver. For details on the
setting of the TV menu, refer to the operating instructions of the TV.
Be sure to connect the receiver to an HDMI input jack of a TV or video device that supports
4K. You have to connect an HDMI cable to an HDMI jack that supports HDCP 2.2 when you
use a playback device for 4K resolution video content, etc.
[138] Troubleshooting
Image
No image is output from the TV screen when the
receiver is in standby mode.
When the receiver enters standby mode, the image from the last HDMI device selected
before you turned off the receiver is displayed. If you are enjoying content from another
device, play the content on the device and perform the One-Touch Play operation, or turn

on the receiver to select the HDMI device from which you want to enjoy content.
Make sure [<HDMI>] - [STBY THRU] is set to [ON] or [AUTO] on the display panel.
[139] Troubleshooting
Image
The home menu does not appear on the TV screen.
The home menu can only be used when you connect the TV to the HDMI TV OUT jack.
Press HOME to display the home menu.
Check that the TV is connected correctly.
The home menu may take some time to appear on the TV screen depending on the TV.
[140] Troubleshooting
Image
The display panel is turned off.
If the PURE DIRECT indicator on the front panel lights up, press PURE DIRECT to turn off
this function.
Press DIMMER on the receiver to adjust the brightness of the display panel.
[141] Troubleshooting
Image
Image does not appear on the TV screen when the
receiver is not turned on.
Press AMP MENU, then set [<HDMI>] - [CTRL HDMI] to [CTRL ON], and then set
[<HDMI>] - [STBY THRU] to [AUTO] or [ON] on the display panel.
Turn on the receiver, then select the input to which the playing device is connected.
If connected to other devices than those manufactured by Sony that support the Control for
HDMI function, press AMP MENU, then set [<HDMI>] - [CTRL HDMI] to [CTRL ON] on the
display panel.
[142] Troubleshooting
Image
When the language for the on-screen display of the TV
is changed, the on-screen display language of the
receiver is changed simultaneously.
Press AMP MENU, then check [<HDMI>] - [CTRL HDMI] on the display panel. If [CTRL
HDMI] is set to [CTRL ON], the on-screen display language of the receiver may be changed
simultaneously when you change the language for the on-screen display of the TV. Select
the language on the receiver again to return to the previous setting.
[143] Troubleshooting
Sound

No sound or only a very low level of sound is heard,
no matter which device is selected.
Check that all connecting cables are inserted to their input/output jacks on the receiver,
speakers and the devices.
Check that the receiver and all devices are turned on.
Check that MASTER VOLUME on the receiver is not set to [VOL MIN].
Check that SPEAKERS on the receiver is not set to [SPK OFF].
Check that headphones are not connected to the receiver.
Press
to cancel the muting function.
Try pressing the input button on the remote control or turning INPUT SELECTOR on the
receiver to select the device of your choice.
If you want to listen to sound from the TV speaker, press AMP MENU, then set [<HDMI>] -
[AUDIO OUT] to [TV+AMP] on the display panel. If you cannot play multi-channel audio
source, set to [AMP]. However, the sound will not be output through the TV speaker.
Sound may be interrupted when the sampling frequency, number of channels or audio
format of audio output signals from the playback device is switched.
[144] Troubleshooting
Sound
There is severe humming or noise.
Check that the speakers and device are connected securely.
Check that the connecting cables are not near a transformer or motor, and are at least 3
meters (10 feet) away from a TV set or fluorescent light.
Move your audio device away from the TV.
The plugs and jacks are dirty. Wipe them with a cloth slightly moistened with alcohol.
[145] Troubleshooting
Sound
No sound or only a very low level of sound is heard
from specific speakers.
Connect a pair of headphones to the PHONES jack to verify that sound is output from the
headphones. If only one channel is output from the headphones, the device may not be
connected to the receiver correctly. Check that all of the cables are fully inserted into the
jacks on both the receiver and the device.
If both channels are output from the headphones, the front speaker may not be connected
to the receiver correctly. Check the connection of the front speaker that is not outputting
any sound.
Make sure you have connected to both the L and R jacks of an analog device, as analog
devices require both L and R jack connections. Use an audio cable (not supplied).
Adjust the speaker level.
Check that the speaker settings are appropriate for the setup using Auto Calibration in
[Easy Setup] from the home menu or [<SPEAKER>] - [SP PATTERN] on the display panel.
Then check that sound is output from each speaker correctly using [<LEVEL>] - [TEST
TONE].
Some discs have no Dolby Digital Surround EX information. In this case, sound may not be
output from some speakers.
Check that the subwoofer is connected correctly and securely.
Make sure you have turned on your subwoofer.
Depending on the selected sound field, sound may not be available from the subwoofer.
Depending on the source, there may be no sound from the subwoofer when all speakers
are set to [LARGE] and [NEO6.CINEMA] or [NEO6.MUSIC] is selected.

[146] Troubleshooting Sound
There is no sound from a specific device.
Check that the device is correctly connected to the corresponding audio input jacks.
Check that the cable(s) used for the connection is (are) fully inserted into the jacks on both
the receiver and the device.
Press AMP MENU, then check [<INPUT>] - [INPUT MODE].
Check that the device is correctly connected to the corresponding HDMI jack.
The HDMI settings of some playback devices need to be configured. Refer to the operating
instructions supplied with each device.
Be sure to use a High Speed HDMI Cable with Ethernet when you view images or listen to
sound, especially for 1080p, Deep Color (Deep Colour), 4K or 3D transmission. Premium
High Speed HDMI Cable with Ethernet is required for 4K/60p 4:4:4, 4:2:2 and 4K/60p 4:2:0
10 bit etc.
Sound may not be output from the receiver while the home menu is displayed on the TV
screen. Press HOME to exit the home menu.
Audio signals (format, sampling frequency, bit length, etc.) transmitted from an HDMI jack
may be suppressed by the connected device. Check the setup of a device connected via an
HDMI cable if the image is poor or the sound does not come out of the device.
When a connected device does not support the copyright protection technology (HDCP), the
image and/or the sound from the HDMI TV OUT jack may be distorted or may not be
output. If this is the case, check the specifications of the connected device.
Set the image resolution of the playback device to more than 720p/1080i to enjoy High
Bitrate Audio (DTS-HD Master Audio, Dolby TrueHD).
The image resolution of the playback device may need to be configured to certain settings
before you can enjoy DSD and Multi Channel Linear PCM. Refer to the operating
instructions of the playback device.
Make sure the TV supports the System Audio Control function.
If the TV does not have a System Audio Control function, press AMP MENU, then set on
the display panel [<HDMI>] - [AUDIO OUT] to:
[TV+AMP] if you want to listen to the sound from the TV speaker and receiver.
[AMP] if you want to listen to the sound from the receiver only.
When you connect the receiver to a video device (projector, etc.), sound may not be output
from the receiver. In this case, press AMP MENU, then set [<HDMI>] - [AUDIO OUT] to
[AMP] on the display panel.
You cannot listen to the sound of a device connected to the receiver while TV input is
selected on the receiver.
Be sure to change the input of the receiver to HDMI if you want to watch a program on a
device connected via HDMI connection to the receiver.
Change the TV channel if you want to watch a TV broadcast.
Be sure to select the correct device or input when watching a program from a device
connected to the TV. Refer to the section on this operation in the operating instructions
of the TV.
Sound is not output if you use [DIRECT] when an HDMI input or digital input (COAXIAL or
OPTICAL) is selected. Use another sound field.
When using the Control for HDMI function, you cannot control connected devices using the
remote control of the TV.
Some devices and TVs need to be set up. Refer to the operating instructions supplied
with each device and TV.
Change the input of the receiver to the HDMI input connected to the device.
Check that the selected digital audio input jack is not assigned to another input.
[147] Troubleshooting
Sound
There is no sound from the TV via the HDMI TV OUT
(ARC) jack when using the Audio Return Channel

function.
Press AMP MENU, then set [<HDMI>] - [CTRL HDMI] to [CTRL ON] on the display panel.
Make sure that your TV is compatible with the Audio Return Channel function.
Make sure that the HDMI cable is connected to a jack on your TV that is compatible with the
Audio Return Channel function.
[148] Troubleshooting
Sound
The left and right sound is unbalanced or reversed.
Check that the speakers and device are connected correctly and securely.
Adjust the sound level parameters using [Speaker Setting] from the home menu.
[149] Troubleshooting
Sound
Dolby Digital or DTS multi-channel sound is not
reproduced.
Check that the DVD, etc., you are playing is recorded in Dolby Digital or DTS format.
When connecting the DVD player, etc., to the digital input jacks of this receiver, make sure
the digital audio output setting of the connected device is available.
Press AMP MENU, then set [<HDMI>] - [AUDIO OUT] to [AMP] on the display panel.
You can only enjoy High Bitrate Audio (DTS-HD Master Audio, Dolby TrueHD), DSD and
Multi Channel Linear PCM with an HDMI connection.
[150] Troubleshooting
Sound
The surround effect cannot be obtained.
Make sure you have selected a sound field for movies or music.
[PLII MV], [PLII MS], [PLIIX MV], [PLIIX MS], [NEO6.CINEMA], and [NEO6.MUSIC] do not
work when [<SPEAKER>] - [SP PATTERN] is set to [2/0] or [2/0.1].
[151] Troubleshooting
Sound
A test tone is not output from the speakers.
The speaker cables may not be connected securely. Check that they are connected
securely and cannot be disconnected by pulling on them slightly.
The speaker cables may have short-circuited.
[152] Troubleshooting
Sound

A test tone is output from a different speaker than the
speaker displayed on the display panel.
The speaker pattern setting is incorrect. Make sure that the speaker connections and the
speaker pattern match correctly.
[153] Troubleshooting
Sound
No sound is output from the TV when the receiver is in
standby mode.
When the receiver enters standby mode, sound is output from the last HDMI device selected
before you turned off the receiver. If you are enjoying content from another device, play the
content on the device and perform the One-Touch Play operation, or turn on the receiver to
select the HDMI device from which you want to enjoy content.
Make sure [<HDMI>] - [STBY THRU] is set to [ON] or [AUTO] on the display panel.
[154] Troubleshooting
Sound
No TV sound is output from the receiver.
Check the type and connection of the HDMI cable, optical digital cable, or audio cable that is
connected to the receiver and the TV (refer to the supplied Startup Guide).
When the receiver is connected with a TV compatible with Audio Return Channel, make
sure the receiver is connected to an ARC-compatible HDMI input jack of the TV (refer to the
supplied Startup Guide). If sound is still not output or if sound is interrupted, connect the
optical digital cable (not supplied). Then, press AMP MENU and set [<HDMI>] - [CTRL
HDMI] to [CTRL OFF] on the display panel.
If the TV is not compatible with Audio Return Channel (ARC), connect the receiver to the TV
using an optical digital cable (not supplied) or audio cable (not supplied). There will be no
TV sound from the connected speakers when the receiver is connected to an HDMI input
jack of a TV that is not compatible with ARC.
Switch input of the receiver to [TV].
Increase the volume on the receiver or cancel muting.
If the sound of a cable box or satellite box connected to the TV is not output, connect the
device to an HDMI input jack of the receiver and switch the input of the receiver to the input
for the connected device (refer to the supplied Startup Guide).
Depending on the order in which you connect the TV and the receiver, the receiver may be
muted and [Muting] is displayed on the front panel display of the receiver. If this happens,
turn on the TV first, then the receiver.
Set the speaker setting of the TV (BRAVIA) to “Audio System.” Refer to the operating
instructions of your TV regarding how to set the TV.
[155] Troubleshooting
Sound
Image and sound are not output from the TV when the
receiver is not turned on.
Press AMP MENU, then set [<HDMI>] - [CTRL HDMI] to [CTRL ON], and then set
[<HDMI>] - [STBY THRU] to [AUTO] or [ON] on the display panel.
Turn on the receiver, then select the input to which the playing device is connected.
If connected to other devices than those manufactured by Sony that support the Control for

HDMI function, press AMP MENU, then set [<HDMI>] - [CTRL HDMI] to [CTRL ON] on the
display panel.
[156] Troubleshooting
Sound
The sound is output from both the receiver and the TV.
Mute the sound of the receiver or the TV.
[157] Troubleshooting
Tuner
The FM reception is poor.
Extend and adjust the position of the FM wire antenna (aerial) to a place where the
reception conditions are good.
Place the FM wire antenna (aerial) near a window.
[158] Troubleshooting
Tuner
The FM stereo reception is poor.
Press AMP MENU, then set [<TUNER>] - [FM MODE] to [MONO] on the display panel.
[159] Troubleshooting
Tuner
You cannot tune to radio stations.
Check that the antennas (aerials) are connected securely. Adjust the antennas (aerials) if
necessary.
The signal of the stations is too weak with automatic tuning. Use direct tuning.
No stations have been preset or the preset stations have been cleared (when tuning by
scanning preset stations is used). Preset the stations.
Press DISPLAY repeatedly so that the frequency appears on the display panel.
[160] Troubleshooting
Tuner
RDS does not work (for European and Asia-Pacific
models only).
Make sure that you are tuned to an FM RDS station.
Select a stronger FM station.
The station you tuned to is not transmitting the RDS signal or the signal is weak.

[161] Troubleshooting Tuner
The RDS information that you want does not appear
(for European and Asia-Pacific models only).
The service may be temporarily out of order. Contact the radio station and find out whether
they actually provide the service in question.
[162] Troubleshooting
iPhone/iPod
The sound is distorted.
Press - on the remote control repeatedly. You can also use MASTER VOLUME on the
receiver.
[163] Troubleshooting
USB devices
Are you using a compatible USB device?
If you connect an incompatible USB device, the following problems may occur.
The USB device is not recognized.
File or folder names are not displayed on this receiver.
Playback is not possible.
The sound skips.
There is noise.
Distorted sound is output.
[164] Troubleshooting
USB devices
There is noise, skipping, or distorted sound.
Turn off the receiver, reconnect the USB device, and then turn on the receiver.
The music data itself contains noise, or the sound is distorted.
[165] Troubleshooting
USB devices
A USB device is not recognized.
Turn off the receiver, then disconnect the USB device. Turn on the receiver again and
reconnect the USB device.
Connect a compatible USB device.
The USB device does not work properly. Refer to the section on how to deal with this
problem in the operating instructions of the USB device.

[166] Troubleshooting USB devices
Playback does not start.
Turn off the receiver, reconnect the USB device, and then turn on the receiver.
Connect a compatible USB device.
Select [USB] and select a folder/track, then press to start playback.
[167] Troubleshooting
USB devices
A USB device cannot be connected to the USB port.
The USB device is being connected upside down. Connect the USB device in the correct
orientation.
[168] Troubleshooting
USB devices
Erroneous display.
The data stored in the USB device may have been corrupted.
The character codes that can be displayed by this receiver are as follows:
Upper case letters (A to Z)
Numbers (0 to 9)
Symbols (’ = < > * + , – . / @ [ \ ] _ `)
Other characters may not be displayed correctly.
[169] Troubleshooting
USB devices
[READING] is displayed for an extended time, or it
takes a long time before playback starts.
The reading process can take a long time in the following cases:
There are many folders or files on the USB device.
The file structure is extremely complex.
The memory capacity is excessive.
The internal memory is fragmented.
We therefore recommend following these guidelines:
Folder paths: up to 128 characters long
Total files per folder: 150 or less.
[170] Troubleshooting
USB devices
An audio file cannot be played.
MP3 files in MP3 PRO format cannot be played.

The audio file is a multiple track audio file.
Some AAC files may not be played correctly.
WMA files in Windows Media Audio Lossless and Professional formats cannot be played.
USB devices formatted with file systems other than FAT16, FAT32 or NTFS are
unsupported (*).
Playback is possible up to 8 levels(including the root folder).
Folder paths to the file are longer than 128 characters.
There are more than 150 files.
If you use a partitioned USB device, only audio files on the first partition can be played.
Files that are encrypted, protected by passwords, etc., cannot be played.
[171] Troubleshooting
BLUETOOTH device
Pairing cannot be done.
Move the BLUETOOTH device closer to the receiver.
Pairing may not be possible if there are other BLUETOOTH devices near the receiver. In
this case, turn off the other BLUETOOTH devices.
Correctly enter the same passkey that was entered on the BLUETOOTH device.
[172] Troubleshooting
BLUETOOTH device
Cannot make a BLUETOOTH connection.
The BLUETOOTH device you attempted to connect does not support the A2DP profile, and
cannot be connected with the receiver.
Press BLUETOOTH on the receiver to connect to the last connected BLUETOOTH device.
Turn on the BLUETOOTH function of the BLUETOOTH device.
Establish a connection from the BLUETOOTH device.
The pairing registration information has been erased. Perform the pairing operation again.
While connected to a BLUETOOTH device, this receiver cannot be detected.
Erase the pairing registration information of the BLUETOOTH device and perform the
pairing operation again.
[173] Troubleshooting
BLUETOOTH device
The sound skips or fluctuates, or the connection is
lost.
The receiver and the BLUETOOTH device are too far apart.
If there are obstructions between the receiver and your BLUETOOTH device, remove these
or move the receiver and/or device avoid them.
If there is a device that generates electromagnetic radiation, such as a wireless LAN, other
BLUETOOTH device, or a microwave oven nearby, move it away.
[174] Troubleshooting
BLUETOOTH device
The sound of your BLUETOOTH device cannot be
The receiver supports FAT16, FAT32 or NTFS, but some USB devices may not support these FAT systems.
For details, refer to the operating instructions of each USB device or contact the manufacturer.
*

heard on the receiver.
Turn up the volume on your BLUETOOTH device first, and then adjust the volume using
+ (or MASTER VOLUME on the receiver).
[175] Troubleshooting
BLUETOOTH device
Severe humming or noise.
If there are obstructions between the receiver and your BLUETOOTH device, remove them
or move the receiver and/or device avoid them.
If there is a device that generates electromagnetic radiation, such as a wireless LAN, other
BLUETOOTH device, or a microwave oven nearby, move it away.
Turn down the volume of the connected BLUETOOTH device.
[176] Troubleshooting
BLUETOOTH device
SongPal application is closed.
Disconnect the BLUETOOTH connection on your smartphone, then reconnect it to the
receiver again.
[177] Troubleshooting
“BRAVIA” Sync (Control for HDMI)
The Control for HDMI function does not work properly.
Check the HDMI connection with the receiver (refer to the supplied Startup Guide).
Enable the Control for HDMI function on the TV. For details, refer to the operating
instructions of the TV.
Wait for a while, and then try again. If you unplug the receiver, it will take a while before the
operation is completed. Wait for 15 seconds or longer, and then try again.
If you unplug the HDMI cable or change the connection, repeat the procedures of “Preparing
to use the “BRAVIA” Sync function.”
Make sure your TV is connected to the HDMI TV OUT jack of the receiver.
Press AMP MENU, then set [<HDMI>] - [CTRL HDMI] to [CTRL ON] on the display panel.
When [<HDMI>] - [CTRL HDMI] is set to [CTRL OFF], “BRAVIA” Sync does not work
properly, even if the device is connected to the HDMI IN jack.
Make sure the connected device supports the Control for HDMI function.
Enable the Control for HDMI function on the connected device. For details, refer to the
operating instructions of the connected device.
The types and number of devices that can be controlled by the “BRAVIA” Sync feature are
restricted by the HDMI CEC standard as follows:
Recording devices (Blu-ray Disc recorders, DVD recorders, etc.): up to 3 devices
Playback devices (Blu-ray Disc players, DVD players, etc.): up to 3 devices
Tuner-related devices: up to 4 devices
Audio system (receiver/headphones): up to 1 device (used by this receiver)
[178] Troubleshooting
“BRAVIA” Sync (Control for HDMI)

TV sound cannot be heard from the speakers
connected to the receiver.
Make sure [<HDMI>] - [CTRL HDMI] is set to [CTRL ON] on the display panel.
Make sure [<INPUT>] - [INPUT MODE] for the TV is set to [AUTO] on the display panel.
Make sure your TV supports the ARC function. Make sure that the HDMI input of your TV is
labeled “ARC.”
If your TV has multiple HDMI input jacks, make sure the receiver is connected to the one
supports the ARC function.
Make sure your TV is connected to the HDMI TV OUT jack of the receiver.
[179] Troubleshooting
Remote control
The remote control does not function.
Point the remote control at the remote control sensor on the receiver.
Remove any obstructions between the remote control and the receiver.
Replace both of the batteries in the remote control with new ones if they are weak.
[180] Troubleshooting
If the problem is not solved
Reverting to the factory default settings
You can clear all memorized settings and restore the receiver to the factory default settings by
the following procedure. This procedure can also be used to initialize the receiver before you
use it for the first time.
Be sure to use the buttons on the receiver to perform this operation.
Note
It takes a few minutes for the memory to be cleared completely. Do not turn the receiver off until
[CLEARED *] appears on the display panel.
[181] Troubleshooting If the problem is not solved
Resetting sound fields to the default settings
Be sure to use the buttons on the receiver to perform this operation.
Turn off the receiver.
1
Hold down
(power) on the receiver for 5 seconds.
[CLEARING] flashes on the display panel for a while, then changes to [CLEARED *].
2
Turn off the receiver.
1
Hold down MUSIC and press
(power) on the receiver.
2

[182] Troubleshooting If the problem is not solved
Customer support websites
Refer to the following websites for the latest information on the receiver.
For customers in the USA:
http://esupport.sony.com/
For customers in Canada:
http://esupport.sony.com/CA/
For customers in Europe:
www.sony.eu/support
For customers in Asia-Pacific countries and regions:
http://www.sony-asia.com/support
[183] Other Information Trademarks
Trademarks
This receiver incorporates Dolby (*1) Digital and Pro Logic Surround and the DTS (*2)
Digital Surround System.
This receiver incorporates High-Definition Multimedia Interface (HDMI™) technology. The
terms HDMI and HDMI High-Definition Multimedia Interface, and the HDMI Logo are
trademarks or registered trademarks of HDMI Licensing LLC in the United States and other
countries.
Apple, the Apple logo, iPhone, iPod, iPod touch, and Retina are trademarks of Apple Inc.,
registered in the U.S. and other countries.
App Store is a service mark of Apple Inc.
“Made for iPod” and “Made for iPhone” mean that an electronic accessory has been
designed to connect specifically to iPod or iPhone, respectively, and has been certified by
the developer to meet Apple performance standards. Apple is not responsible for the
operation of this device or its compliance with safety and regulatory standards. Please note
that the use of this accessory with iPod or iPhone may affect wireless performance.
Windows Media is either a registered trademark or trademark of Microsoft Corporation in
the United States and/or other countries.
This product is protected by certain intellectual property rights of Microsoft Corporation. Use
or distribution of such technology outside of this product is prohibited without a license from
Microsoft or an authorized Microsoft subsidiary.
MPEG Layer-3 audio coding technology and patents licensed from Fraunhofer IIS and
Thomson.
“BRAVIA” is a trademark of Sony Corporation.
“PlayStation” is a registered trademark of Sony Computer Entertainment Inc.
“WALKMAN” and “WALKMAN” logo are registered trademarks of Sony Corporation.
MICROVAULT is a trademark of Sony Corporation.
The BLUETOOTH® word mark and logos are registered trademarks owned by Bluetooth
SIG, Inc. and any use of such marks by Sony Corporation is under license. Other
trademarks and trade names are those of their respective owners.
The N-Mark is a trademark or registered trademark of NFC Forum, Inc. in the United States
and in other countries.
Android™ is a trademark of Google Inc.
Google Play™ is a trademark of Google Inc.
[S.F. CLEAR] appears on the display panel and all sound fields are reset to their default
setting.
Manufactured under license from Dolby Laboratories. Dolby, Pro Logic, Surround EX, and the double-D
symbol are trademarks of Dolby Laboratories.
*1
For DTS patents, see http://patents.dts.com. Manufactured under license from DTS Licensing Limited. DTS,
DTS-HD, the Symbol, & DTS and the Symbol together are registered trademarks, and DTS-HD Master
Audio is a trademark of DTS, Inc. © DTS, Inc. All Rights Reserved.
*2

All other trademarks and registered trademarks are of their respective holders. In this
manual, ™ and ® marks are not specified.
How to connect speaker cables
Connect speaker cables as illustrated below.
Confirming active subwoofer setup
When a subwoofer is connected, turn on the subwoofer and turn up the volume prior to
activating the subwoofer. Turn the LEVEL to just before the mid-point.
If you connect a subwoofer with a crossover frequency function, set the value to maximum.
If you connect a subwoofer with an auto standby function, set it to off (deactivated). For
details, refer to the operating instructions of the subwoofer.
Note
Depending on the characteristics of the subwoofer you are using, the setup distance value may be
different from the actual position.
2-channel sound mode/Multi channel stereo mode
(2CH/MULTI)
Direct (DIRECT):
Presets the sound as it was recorded/encoded without adding any surround effects.
However, for USA and Canada models, this receiver will generate a low-frequency signal for
output to the subwoofer when there is no LFE signals.
Multi Channel Stereo (MULTI ST.):
Outputs 2-channel left/right or monaural signals from all speakers. However, sound may not be
output from certain speakers depending on the speaker settings.
2ch Stereo (2CH STEREO):
Strip the jacket to 10 mm (13/32 in) at each end of the speaker cables.
*

The receiver outputs the sound from the front left/right speakers only. There is no sound from
the subwoofer.
Standard 2-channel stereo sources completely bypass the sound field processing and multi-
channel surround formats are downmixed to 2-channels.
Note
[MULTI ST.] does not work when multi-channel audio signals are being received.
Depending on the audio format, if you select [DIRECT] and play a 5.1ch source when surround
speakers and two surround back speakers are connected, the same audio as that from surround
speakers will be output from surround back speakers, similar to that of a 7.1ch surround system.
The sound level of surround and surround back speakers are adjusted automatically for optimum
balance.
Movie mode (MOVIE)
You can take advantage of surround sound simply by selecting one of the receiver’s pre-
programmed sound fields. These bring the exciting and powerful sound of movie theaters into
your home.
HD-D.C.S.:
HD Digital Cinema Sound (HD-D.C.S.) is Sony’s new innovative home theater technology using
the latest acoustic and digital signal processing technologies. It is based on the precise
response measurement data of a mastering studio.
With this mode, you can enjoy Blu-ray and DVD movies at home with not only a high-quality of
sound but also the best sound ambience, just as the movie’s sound engineer intended in the
mastering process.
Dynamic (DYNAMIC): This setting is suitable for an environment which is reverberant but
lacks a spacious feel (where sound absorption is not sufficient). It emphasizes the reflection
of sound and reproduces the sound of a large, classic movie theater. This emphasizes the
spacious feel of a dubbing theater and creates a unique acoustic field.
Theater (THEATER): This setting is suitable for a general living room. It reproduces the
reverberation of sound just like in a movie theater (dubbing theater). It is most appropriate
for watching content recorded on a Blu-ray Disc when you want the atmosphere of a movie
theater.
Studio (STUDIO): This setting is suitable for a living room with the appropriate sound
devices. It reproduces the reverberation of sound provided when a theatrical sound source
is remixed for a Blu-ray Disc to a volume level suitable for home use. The level of reflection
and reverberation of sound is kept to a minimum, while dialogues and surround effects are
reproduced vividly.
PLll Movie (PLII MV):
Performs Dolby Pro Logic II Movie mode decoding. This setting is ideal for movies encoded in
Dolby Surround. In addition, this mode can reproduce sound in 5.1-channel format when
watching videos of overdubbed or old movies.
PLllx Movie (PLIIX MV):
Performs Dolby Pro Logic IIx Movie mode decoding. This setting expands Dolby Pro Logic II
Movie or Dolby Digital 5.1 to 7.1 discrete movie channels.
Neo:6 Cinema (NEO6.CINEMA):
Performs DTS Neo:6 Cinema mode decoding. Sources recorded in 2-channel format are
enhanced up to 7 channels.
Front Surround (FRONT SUR.):
Generates virtual surround sound with only two front speakers.
Music mode (MUSIC)
You can take advantage of surround sound simply by selecting one of the receiver’s pre-
programmed sound fields. These bring the exciting and powerful sound of concert halls into

your home.
Audio Enhancer (A. ENHANCER):
Reproduces a clear enhanced sound from your portable audio device. This mode is ideal for
MP3 and other compressed audio formats.
Concert Hall (HALL):
Reproduces the acoustics of a concert hall.
Jazz Club (JAZZ):
Reproduces the acoustics of a jazz club.
Live Concert (CONCERT):
Reproduces the acoustics of a 300-seat live house.
Stadium (STADIUM):
Reproduces the feel of a large open-air stadium.
Sports (SPORTS):
Reproduces the feel of sports broadcasting.
PLll Music (PLII MS):
Performs Dolby Pro Logic II Music mode decoding. This setting is ideal for normal stereo
sources such as CDs.
PLllx Music (PLIIX MS):
Performs Dolby Pro Logic IIx Music mode decoding. This setting is ideal for normal stereo
sources such as CDs.
Neo:6 Music (NEO6.MUSIC):
Performs DTS Neo:6 Music mode decoding. Sources recorded in 2-channel format are
enhanced up to 7 channels. This setting is ideal for normal stereo sources such as CDs.
When listening with headphones
These sound fields are available if headphones are connected to the receiver.
Headphone(2ch) (HP 2CH):
This mode is selected automatically if you use headphones. Standard 2-channel stereo sources
completely bypass the sound field processing and multi-channel surround formats are
downmixed to 2 channels except LFE signals.
Checking the information of a connected BLUETOOTH
device
You can check the BLUETOOTH device information by pressing DISPLAY repeatedly.
Each time you press DISPLAY, the display will change cyclically as follows:
BLUETOOTH device name - Sound field currently applied - Volume level - Input you are
selecting
Menu list (on the display panel)
The following options are available in each menu.
Auto Calibration settings [<AUTO CAL>]
Auto Calibration start [A.CAL START]
Auto Calibration type [CAL TYPE] (*1)

FULL FLAT, ENGINEER, FRONT REF, OFF
Level settings [<LEVEL>]
Test Tone [TEST TONE] (*2) OFF, AUTO XXX (*3)
Front left speaker level [FL LEVEL ] (*2)
FL -10.0 dB to FL +10.0 dB (0.5 dB interval)
Front right speaker level [FR LEVEL] (*2)
FR -10.0 dB to FR +10.0 dB (0.5 dB interval)
Center speaker level [CNT LEVEL] (*2)
CNT -10.0 dB to CNT +10.0 dB (0.5 dB interval)
Surround left speaker level [SL LEVEL] (*2)
SL -10.0 dB to SL +10.0 dB (0.5 dB interval)
Surround right speaker level [SR LEVEL] (*2)
SR -10.0 dB to SR +10.0 dB (0.5 dB interval)
Surround back speaker level [SB LEVEL] (*2)
SB -10.0 dB to SB +10.0 dB (0.5 dB interval)
Surround back left speaker level [SBL LEVEL] (*2)
SBL -10.0 dB to SBL +10.0 dB (0.5 dB interval)
Surround back right speaker level [SBR LEVEL] (*2)
SBR -10.0 dB to SBR +10.0 dB (0.5 dB interval)
Front left high speaker level [LH LEVEL] (*2)
LH -10.0 dB to LH +10.0 dB (0.5 dB interval)
Front right high speaker level [RH LEVEL] (*2)
RH -10.0 dB to RH +10.0 dB (0.5 dB interval)
Subwoofer Level [SW LEVEL] (*2)
SW -10.0 dB to SW +10.0 dB (0.5 dB interval)
Speaker settings [<SPEAKER>]
Speaker Pattern [SP PATTERN]
5/2.1 to 2/0 (20 patterns)
Front speakers size [FRT SIZE] (*2)
LARGE, SMALL
Center speaker size [CNT SIZE] (*2)
LARGE, SMALL
Surround speakers size [SUR SIZE] (*2)
LARGE, SMALL
Front high speakers size [FH SIZE] (*2)
LARGE, SMALL
Surround back speakers assign [SB ASSIGN] (*4)
SPK B, BI-AMP, OFF
Front left speaker distance [FL DIST.] (*2)
FL 1.00 M to FL 10.00 M (FL 3’3” to FL 32’9”) (0.01 m (1 inch) interval)
Front right speaker distance [FR DIST.] (*2)
FR 1.00 M to FR 10.00 M (FR 3’3” to FR 32’9”) (0.01 m (1 inch) interval)
Center speaker distance [CNT DIST.] (*2)
CNT 1.00 M to CNT 10.00 M (CNT 3’3” to CNT 32’9”) (0.01 m (1 inch) interval)
Surround left speaker distance [SL DIST.] (*2)
SL 1.00 M to SL 10.00 M (SL 3’3” to SL 32’9”) (0.01 m (1 inch) interval)
Surround right speaker distance [SR DIST.] (*2)
SR 1.00 M to SR 10.00 M (SR 3’3” to SR 32’9”) (0.01 m (1 inch) interval)
Surround back speaker distance [SB DIST.] (*2)
SB 1.00 M to SB 10.00 M (SB 3’3” to SB 32’9”) (0.01 m (1 inch) interval)
Surround back left speaker distance [SBL DIST.] (*2)
SBL 1.00 M to SBL 10.00 M (SBL 3’3” to SBL 32’9”) (0.01 m (1 inch) interval)
Surround back right speaker distance [SBR DIST.] (*2)
SBR 1.00 M to SBR 10.00 M (SBR 3’3” to SBR 32’9”) (0.01 m (1 inch) interval)
Front left high speaker distance [LH DIST.] (*2)
LH 1.00 M to LH 10.00 M (LH 3’3” to LH 32’9”) (0.01 m (1 inch) interval)
Front right high speaker distance [RH DIST.] (*2)
RH 1.00 M to RH 10.00 M (RH 3’3” to RH 32’9”) (0.01 m (1 inch) interval)
Subwoofer distance [SW DIST.] (*2)
SW 1.00 M to SW 10.00 M (SW 3’3” to SW 32’9”) (0.01 m (1 inch) interval)
Distance unit [DIST. UNIT]
FEET, METER
Front speakers crossover frequency [FRT CROSS] (*5)
CROSS 40 Hz to CROSS 200 Hz (10 Hz interval)
Center speaker crossover frequency [CNT CROSS] (*5)
CROSS 40 Hz to CROSS 200 Hz (10 Hz interval)

Surround speakers crossover frequency [SUR CROSS] (*5)
CROSS 40 Hz to CROSS 200 Hz (10 Hz interval)
Front high speakers crossover frequency [FH CROSS] (*5)
CROSS 40 Hz to CROSS 200 Hz (10 Hz interval)
Input settings [<INPUT>]
Input Mode [INPUT MODE]
AUTO, OPT, COAX, ANALOG
Naming inputs [NAME IN]
For details, see “Changing the name for each input (
NAME IN).” in Input Settings menu.
Digital audio input assignment [A. ASSIGN]
OPT, COAX, NONE
Surround settings [<SURROUND>]
HD-D.C.S. effect type [HD-D.C.S. TYP] (*6)
DYNAMIC, THEATER, STUDIO
EQ settings [<EQ>]
Front speakers bass level [BASS]
BASS -10 dB to BASS +10 dB (1 dB interval)
Front speakers treble level [TREBLE]
TREBLE -10 dB to TREBLE +10 dB (1 dB interval)
Tuner settings [<TUNER>]
FM station receiving mode [FM MODE]
STEREO, MONO
Naming preset stations [NAME IN]
For details, see “Naming preset stations (
NAME IN).”
Audio settings [<AUDIO>]
Night Mode [NIGHT MODE]
NIGHT ON, NIGHT OFF
Synchronizes audio with video output [A/V SYNC]
SYNC ON, SYNC OFF
Auto Volume [AUTO VOL]
A. VOL ON, A. VOL OFF
Digital broadcast language selection [DUAL MONO]
MAIN/SUB, MAIN, SUB
Dynamic range compressor [D. RANGE]
COMP. ON, COMP. AUTO, COMP. OFF
HDMI settings [<HDMI>]
Control for HDMI [CTRL HDMI]
CTRL ON, CTRL OFF
Standby Link to TV [STBY LINK]
ON, AUTO, OFF
Standby Through [STBY THRU]
ON, AUTO, OFF
HDMI Audio Out [AUDIO OUT]
AMP, TV+AMP
HDMI Subwoofer Level [SW LEVEL]
SW AUTO, SW +10 dB, SW 0 dB
Signal Format [SIGNAL FMT.]
STANDARD, ENHANCED
BLUETOOTH settings [<BT>]
BLUETOOTH Standby mode [BT STANDBY] (*7)
STBY ON, STBY OFF
BLUETOOTH AAC [BT AAC]
AAC ON, AAC OFF
BLUETOOTH Power [BT POWER]
BT ON, BT OFF
System settings [<SYSTEM>]
Auto standby mode [AUTO STBY]
STBY ON, STBY OFF

Version display [VER. X.XXX] (*8)
You can select this setting only when you have performed Auto Calibration and saved the settings.
*1
Some parameters or settings may not be available depending on the speaker pattern setting.
*2
XXX represents a speaker channel (FL, FR, CNT, SL, SR, SB, SBL, SBR, LH, RH, SW).
*3
You can only select this parameter if [SP PATTERN] is not set to a pattern with surround back and front high
speakers.
*4
You can only select this parameter if the speaker is set to [SMALL].
*5
You can only select this parameter if you select [HD-D.C.S.] as the sound field.
*6
You can only select this parameter when a BLUETOOTH device is paired.
*7
X.XXX represents the version number.
*8
