
Help Guide
MULTI CHANNEL AV RECEIVER
STR-DH790
This Help Guide explains functions and settings that are not mentioned in the supplied Startup Guide or Operating
Instructions.
Introduction
How to use this Help Guide
Using the home menu
Playback
Overview
Playing AV devices
Playing back video and sound from connected AV devices
Listening to the radio
Listening to FM radio
Tuning to a station directly
Presetting FM radio stations
Setting the FM station receiving mode [FM Mode]
1

Naming preset stations [Name In]
Receiving RDS broadcasts (for European and Asia-Pacific models only)
Selecting sound effects
Selecting a sound field
Selectable sound fields and their effects
Relations between sound fields and speaker outputs
Enjoying clear sound at a low volume level [Night Mode]
Selecting the Auto Calibration type [Calibration Type]
Adjusting the equalizer [Equalizer]
Enjoying high-fidelity sound [Pure Direct]
Resetting sound fields to the default settings
Playing back sound from a BLUETOOTH device
What you can do with BLUETOOTH features
Turning the BLUETOOTH function on/off “BT POWER”
Listening to sound from a BLUETOOTH device (Pairing operation)
Compatible BLUETOOTH version and profiles
Customizing the speaker settings to your preferences
Adjusting the speaker size [Size]
Setting the crossover frequency of the speakers [Crossover Freq]
Adjusting the speaker level [Level]
Adjusting the speaker distance [Distance]
Using other functions
Interlocking with BRAVIA TV and other devices (“BRAVIA” Sync)
What is “BRAVIA” Sync?
Preparing to use the “BRAVIA” Sync function
Turning off the receiver and connected devices simultaneously with the TV (System Power Off function) “STBY.LINK”
Enjoying TV sound from the speakers connected to the receiver (System Audio Control function)
Enjoying an input source from a connected device immediately (One-Touch Play function)
Selecting the optimum sound field automatically (Sound Mode/Scene Select function) “S.F. SYNC”
2
About Home Theatre Control function
Operating the receiver menu using the TV remote control (Remote Easy Control function)
About Language Follow function
Using the sleep timer
Switching the brightness of the display panel
Saving power during standby mode
Viewing information on the display panel
Reverting to the factory default settings
Adjusting settings using the menu on the display panel
Operating the receiver with the menu on the display panel
List of settings that can be adjusted using the menu on the display panel
Auto Calibration “<A.CAL>”
Calibrating the phase characteristics of the speakers “A.P.M.” (Automatic Phase Matching)
Level settings “<LEVEL>”
Outputting a test tone from each speaker “T. TONE”
Adjusting the output level according to the connected TV “TV.OFFSET” (TV volume offset function)
Speaker settings “<SPKR>”
Setting the height from the floor to the ceiling “CEILING.H.”
Selecting the unit of measurement “DIST.UNIT”
Input settings “<INPUT>”
Switching between digital and analog audio “IN MODE”
Changing the name for each input “NAME IN”
Using other audio input jacks “A. ASSIGN”
Audio settings “<AUDIO>”
Synchronizing audio with video output “A/V SYNC”
Selecting the language of digital broadcasts “DUAL”
Compressing the dynamic range “D. RANGE”
Switching the mode of the DTS decoder “NEURAL-X”
Using the DTS:X Dialog Control function “DIALOG”
HDMI settings “<HDMI>”
3

Controlling HDMI devices “CTRL.HDMI”
Turning off the receiver and connected devices simultaneously with the TV (System Power Off function) “STBY.LINK”
What is eARC (Enhanced Audio Return Channel)?
Preparing to use the eARC function
Enjoying sound from a TV compatible with the eARC or ARC function
Enjoying content of a connected device without turning on the receiver “STBY.THRU”
Setting the HDMI audio signal output of connected devices “AUDIO.OUT”
Selecting the optimum sound field automatically (Sound Mode/Scene Select function) “S.F. SYNC”
Setting the level of the subwoofer “SW LVL”
BLUETOOTH settings “<BT>”
Setting the BLUETOOTH standby mode “BT STBY”
Setting BLUETOOTH audio codecs “BT AAC”
Turning the BLUETOOTH function on/off “BT POWER”
System settings “<SYSTEM>”
Setting standby mode “AUTO.STBY”
Updating the software “UPDATE”
Checking the software version “VER. X.XXX”
Troubleshooting
Error messages
PROTECT
USB FAIL
General
The receiver is turned off automatically.
Cannot find an available input when connecting several digital devices.
The receiver does not turn on even when the TV is turned on.
The receiver turns off when the TV is turned off.
The receiver does not turn off even when the TV is turned off.
Sound from connected TV
No TV sound is output from the receiver.
The sound is output from both the receiver and the TV.
4

No image and/or sound is output from the TV when the receiver is in the standby mode.
There is a time gap between the visual display on the TV and the audio output from the speaker connected to the receiver.
The sound is interrupted while watching a TV program or content on a Blu-ray Disc, etc.
The sound field switches automatically.
Sound from devices other than TV
No sound or only a very low level of sound is heard, no matter which device is selected.
No sound or only a very low level of sound is heard from specific speakers.
There is no sound from a specific device.
The left and right sound is unbalanced or reversed.
How can I enjoy Dolby Atmos playback?
How can I check if Dolby Atmos content is being played?
Dolby Digital or DTS multi-channel sound is not reproduced.
The surround effect cannot be obtained.
A test tone is not output from the speakers.
A test tone is output from a different speaker than the speaker displayed on the display panel.
No image and/or sound is output from the TV when the receiver is in the standby mode.
Image
No image appears on the TV screen.
No 4K content appears on the TV screen.
No image and/or sound is output from the TV when the receiver is in the standby mode.
The home menu does not appear on the TV screen.
Display does not appear on the display panel.
When the language for the on-screen display of the TV is changed, the on-screen display language of the receiver is changed
simultaneously.
Tuner
The FM stereo reception is poor.
You cannot tune to radio stations.
RDS does not work (for European and Asia-Pacific models only).
BLUETOOTH device
Pairing cannot be done.
Cannot make a BLUETOOTH connection.
5

4-731-211-11(2) Copyright 2018 Sony Corporation
The sound skips or fluctuates, or the connection is lost.
The sound of your BLUETOOTH device cannot be heard on the receiver.
Severe humming or noise.
“BRAVIA” Sync (Control for HDMI)
The Control for HDMI function does not work properly.
Remote control
The remote control does not function.
If the problem is not solved
Reverting to the factory default settings
Resetting sound fields to the default settings
Customer support websites
Other Information
Trademarks
6

Help Guide
MULTI CHANNEL AV RECEIVER
STR-DH790
How to use this Help Guide
This Help Guide explains functions and settings that are not mentioned in the supplied Startup Guide or Operating
Instructions. Refer to the Operating Instructions for explanation of how to install and prepare the receiver, and
descriptions of parts and controls.
You can search for information in this Help Guide by entering a keyword. Press
in the top left or top right of the
screen to search for the desired topic.
Note
This Help Guide mainly describes the procedures for using the remote control. You can also use the controls on the receiver if
they have the same or similar names as those on the remote control.
There are two types of setting menus that you can operate, as follows:
Menus displayed on the TV screen
Menus displayed on the display panel of the receiver
Setting menu items and parameters displayed on the TV screen are indicated using [ ], and setting menu items displayed on the
display panel of the receiver are indicated using “ ”.
You cannot search by entering multiple keywords at the same time.
4-731-211-11(2) Copyright 2018 Sony Corporation
7

Help Guide
MULTI CHANNEL AV RECEIVER
STR-DH790
Using the home menu
You can display the menu of the receiver on the TV screen to select the desired setting menu.
Home menu items
Watch, Listen: Select to enjoy videos or audio from AV devices or the built-in FM tuner.
Playing back video and sound from connected AV devices
Listening to FM radio
Listening to sound from a BLUETOOTH device (Pairing operation)
Easy Setup: Select to perform Easy Setup.
For details, refer to the supplied Startup Guide or Operating Instructions.
Sound Effect: Select to enjoy sound effects.
Selecting a sound field
Selectable sound fields and their effects
Speaker Setting: Select to adjust the speaker settings.
For details, refer to the the topics under “Customizing the speaker settings to your preferences” in this Help Guide.
Hint
While playing back videos or audio, you can display the options menu by pressing OPTIONS to select related settings.
To return to the previous screen, press BACK.
To exit any menu, press HOME to go back to the home menu, and then press HOME again.
Settings that cannot be operated on the TV screen can be adjusted using the menus on the display panel. Press AMP MENU to
display the menu on the display panel.
Switch the input of the TV to the input to which the receiver is connected.
1
Press HOME to display the home menu on the TV screen.
2
Press
/ repeatedly to select the menu you want, and then press to confirm the selection.
3
8

4-731-211-11(2) Copyright 2018 Sony Corporation
9

Help Guide
MULTI CHANNEL AV RECEIVER
STR-DH790
Overview
This topic explains the operations you can perform to enjoy movies and music with this receiver.
For example, you can use multiple devices with this receiver as shown below.
BLUETOOTH devices
Enjoying audio content from a WALKMAN®, smartphone or tablet
You can transmit audio from a WALKMAN, smartphone or tablet to the receiver via BLUETOOTH connection.
Listening to sound from a BLUETOOTH device (Pairing operation)
FM
Listening to FM radio
You can listen to FM broadcasts in high-quality sound through the built-in tuner.
Preset function enables you to store up to 30 of your favorite FM stations as presets.
Listening to FM radio
Presetting FM radio stations
AV devices
Enjoying movies or audio from AV devices such as the following:
Media box
Ultra HD Blu-ray™ player
Blu-ray Disc™ player
DVD player
CD player
Super Audio CD player
MD deck
Tape deck
Turntable (*)
Satellite box
10

Game console such as PlayStation®4
You can connect AV devices to the receiver to enjoy a wide range of content such as movies and audio.
As the receiver is equipped with HDCP 2.2-compatible HDMI jacks, you can also enjoy 4K content via streaming
services, satellite broadcasts, etc.
Related Topic
Playing back video and sound from connected AV devices
4-731-211-11(2) Copyright 2018 Sony Corporation
To connect a turntable that only has a PHONO output jack, you need to connect a phono equalizer (not supplied) between the turntable and this
receiver.
*
11

Help Guide
MULTI CHANNEL AV RECEIVER
STR-DH790
Playing back video and sound from connected AV devices
Note
Before you turn off the receiver, be sure to turn down the volume level. Otherwise, the next time you turn on the receiver, sound
may be output at a high volume level and damage your speakers.
Hint
You can turn INPUT SELECTOR on the receiver or press the input buttons on the remote control to select the device you want.
You can adjust the volume differently using the MASTER VOLUME knob on the receiver or the
+/– buttons on the remote
control.
To turn the volume up or down quickly
Turn the knob quickly.
Press and hold one of the buttons.
Switch the input of the TV to the input to which the receiver is connected.
1
Press HOME.
The home menu is displayed on the TV screen.
Depending on the TV, the home menu may take some time to appear on the TV screen.
2
Select [Watch] or [Listen] from the home menu.
Menu items will appear on the TV screen.
3
Select the device you want to play.
4
Turn on the device and start playback.
5
Press
+/– to adjust the volume.
You can also use MASTER VOLUME on the receiver.
6
12

To make fine adjustments
Turn the knob slowly.
Press one of the buttons and release it immediately.
4-731-211-11(2) Copyright 2018 Sony Corporation
13

Help Guide
MULTI CHANNEL AV RECEIVER
STR-DH790
Listening to FM radio
You can listen to FM broadcasts through the built-in tuner. Scan the radio frequencies by the following procedure to tune
in to a station automatically. Be sure that the FM wire antenna (aerial) is connected to the receiver before performing this
operation. For details on connecting the antenna (aerial), refer to the supplied Operating Instructions.
FM screen
A: Frequency indication
Shows the frequency of the station which the tuner is receiving.
Hint
You can also use TUNING+/– on the remote control or on the receiver for tuning.
4-731-211-11(2) Copyright 2018 Sony Corporation
Select [Listen] - [FM] from the home menu.
The FM screen appears.
1
Select [Tuning –] or [Tuning +].
The frequency digits will begin to change on the FM screen. The receiver automatically scans the radio frequencies
and stops scanning whenever a station is received.
Repeat this step until you are tuned in to the desired station.
2
14

Help Guide
MULTI CHANNEL AV RECEIVER
STR-DH790
Tuning to a station directly
You can enter the frequency of a station directly.
Note
Make sure you have entered the right frequency. If the tuned-in frequency is invalid or out of range, [---.-- MHz] will appear. If you
cannot receive a station even though you entered the correct frequency, the frequency may not be in use in your area.
Hint
The tuning scale for direct tuning is shown below:
USA and Canadian models
100 kHz
Other models
50 kHz
4-731-211-11(2) Copyright 2018 Sony Corporation
Select [Listen] - [FM] from the home menu.
The FM screen appears.
1
Select [Direct Tuning].
2
Enter the frequency.
3
Press
/ to change the digit.
1.
Press
to move to the next digit.
You can move the input position backward and forward by pressing
/ .
2.
Repeat step 3 until the frequency you want to tune in is displayed, then press
.
4
15

Help Guide
MULTI CHANNEL AV RECEIVER
STR-DH790
Presetting FM radio stations
You can store up to 30 FM stations as your favorite stations.
FM preset screen
A: Frequency indication
Shows the frequency of the station which the tuner is receiving.
B: Preset station number
Shows the preset number which you are selecting.
To tune in to a preset station
Select [Listen] - [FM] - [Preset List] from the home menu, and then press
/ to select the preset number.
Hint
You can store the station currently being received to a preset memory by pressing MEMORY on the remote control.
Select [Listen] - [FM] from the home menu.
The FM screen appears.
1
Tune to the station that you want to preset.
2
Select [Preset Memory].
3
Press
/ to select a preset number, then press .
The station is stored as the selected preset number.
4
Repeat steps 2 to 4 to store another station.
You can store FM stations as FM 01 through FM 30.
5
16


Help Guide
MULTI CHANNEL AV RECEIVER
STR-DH790
Setting the FM station receiving mode [FM Mode]
The FM station receiving mode is set to [Stereo] by default. If the reception is poor, set it to [Mono] to suppress the noise
so that you can hear clear sound.
Note
This function works only when [FM] is selected as the input.
Hint
This operation can also be performed using the display panel on the receiver by pressing AMP MENU.
Related Topic
List of settings that can be adjusted using the menu on the display panel
4-731-211-11(2) Copyright 2018 Sony Corporation
Press [Listen] - [FM] from the home menu.
The FM screen appears.
1
Select [FM Mode].
2
Press
/ to select [Mono], then press .
3
18

Help Guide
MULTI CHANNEL AV RECEIVER
STR-DH790
Naming preset stations [Name In]
You can enter up to 8 characters as the name for a preset station.
Canceling naming preset stations
Press BACK.
Hint
This operation can also be performed using the display panel on the receiver by pressing AMP MENU.
Related Topic
List of settings that can be adjusted using the menu on the display panel
4-731-211-11(2) Copyright 2018 Sony Corporation
Select [Listen] - [FM] from the home menu.
The FM screen appears.
1
Select [Preset List].
2
Press
/ to select the preset number to which you want to assign a name, then press .
This will take you back to the FM preset screen.
3
Select [Name In].
4
Press
/ repeatedly to select a character, then press .
To move the input position forward or backward, press
/ .
5
Repeat step 5 to input characters one by one, then press
.
The name you entered is registered.
To change the names of other preset stations, repeat steps 1 to 6.
6
19

Help Guide
MULTI CHANNEL AV RECEIVER
STR-DH790
Receiving RDS broadcasts (for European and Asia-Pacific models only)
This receiver allows you to use Radio Data System (RDS), which enables FM radio stations (*) to send additional
information along with the regular programming signal. This receiver offers convenient RDS features, such as Program
Service name display.
Note
RDS may not work properly if the station you tuned to does not transmit the RDS signal or if the signal strength is weak.
Some letters that can be displayed on the TV screen cannot be displayed on the display panel.
Hint
You can check the frequency while a Program Service name is displayed by pressing DISPLAY repeatedly.
4-731-211-11(2) Copyright 2018 Sony Corporation
Not all FM stations provide RDS service, nor do they provide the same type of services. If you are not familiar with the RDS services in your
area, check with your local radio stations for details.
*
Select [Listen] - [FM] from the home menu.
1
Select a station.
When you tune to a station that provides RDS services, the Program Service name appears on the display panel.
2
20
Help Guide
MULTI CHANNEL AV RECEIVER
STR-DH790
Selecting a sound field
You can select from a variety of sound fields according to the speaker connection and input source.
Note
When connecting headphones to the receiver, [Headphone(2ch)] is selected as a sound field automatically.
The sound fields for movie and music may not work, depending on the input or the speaker pattern you select and the audio
formats.
The receiver may play signals at a lower sampling frequency than the actual sampling frequency of the input signals, depending
on the audio format.
Some speakers or the subwoofer may not output sound, depending on the sound field setting.
Hint
You can also use 2CH/MULTI, MOVIE, MUSIC, or FRONT SURROUND on the remote control, or 2CH/MULTI, MOVIE, or MUSIC
on the receiver to select a sound field.
Related Topic
Selectable sound fields and their effects
Relations between sound fields and speaker outputs
Resetting sound fields to the default settings
4-731-211-11(2) Copyright 2018 Sony Corporation
Select [Sound Effect] - [Sound Field] from the home menu.
1
Press
/ to select the sound field you want, then press .
For movies, a sound field labeled with [Movie] is recommended.
For music, a sound field labeled with [Music] is recommended.
2
21

Help Guide
MULTI CHANNEL AV RECEIVER
STR-DH790
Selectable sound fields and their effects
Button
Sound
field
Display
panel
Effects of the sound field
2CH/MULTI
2ch
Stereo
2CH ST.
Plays back 2-channel audio signals without adding any surround effect.
Monaural and multi-channel audio signals are output after being converted
into a 2-channel signal.
This sound field is suited for playing back audio signals as they are from
two front speakers only, without adding any virtual surround effect.
The sound is output from the front left/right speakers only. There is no
sound from the subwoofer.
Multi Ch
Stereo
MULTI ST.
Outputs sound from all connected speakers.
When 2-channel or monaural audio signals are input, the receiver outputs
sound from all speakers without adding any surround effect.
When multi-channel audio signals are input, sound may not be output from
certain speakers depending on the speaker settings or playback content.
Direct DIRECT Plays back all audio signals without adding any surround effect.
A.F.D.
(Auto
Format
Decoding)
A.F.D.
Decodes and plays back audio signals using the optimal processing method
according to the audio signal input.
MOVIE
Dolby
Surround
DSUR
Dolby Surround upmixer expands traditional audio content for playback
through any multi-channel speaker configuration, including height speakers.
This makes it possible to reproduce height information for sound images
even when playing back conventional movie or audio content, providing a
more realistic sense of immersion than ever before. This upmixer is a new
and enhanced replacement for the popular Dolby Pro Logic II technology.
Neural-X NEURAL-X
Neural:X is a new upmixer technology developed by DTS and remaps
stereo, 5.1, and 7.1 movies and music to match your speaker layout. This
makes it possible to reproduce height information for sound images even
when playing back conventional movie or audio content, providing a more
realistic sense of immersion than ever before.
Front
Surround
(*)
FRT SUR.
Reproduces full surround effects with only two front speakers using Sony’s
virtual signal processing technology.
MUSIC
Audio
Enhancer
ENHANCER
Reproduces a clear enhanced sound from your portable audio device. This
mode is ideal for MP3 and other compressed audio formats.
Headphone(2ch) HP 2CH
There is no button to select [Headphone(2ch)]. This mode is selected
automatically if you use headphones (Other sound fields cannot be
selected). Plays back 2-channel audio signals without adding any surround
effect. Sound from monaural and multi-channel audio signals are output
after being converted into a 2-channel signal.
You can also use FRONT SURROUND on the remote control.
*
22

Note
Depending on the audio format, if you select [Direct] and play a 5.1ch source when surround speakers and two surround back
speakers are connected, the same audio as that from surround speakers will be output from surround back speakers, similar to
that of a 7.1ch surround system. The sound level of surround and surround back speakers are adjusted automatically for
optimum balance.
Dolby Atmos is decoded as Dolby TrueHD or Dolby Digital Plus when a sound field other than [Multi Ch Stereo], [A.F.D.] (Auto
Format Decoding), or [Dolby Surround] is selected.
Related Topic
Selecting a sound field
4-731-211-11(2) Copyright 2018 Sony Corporation
23

Help Guide
MULTI CHANNEL AV RECEIVER
STR-DH790
Relations between sound fields and speaker outputs
The list below shows which speaker outputs sound when a certain sound field is selected.
Note
When no sound is heard, check that all the speakers are securely connected to the correct speaker terminals, and the correct
speaker pattern is selected.
2-channel content
-: No sound is output.
◎: Outputs sound.
○: Outputs sound depending on the speaker pattern setting and content to be played back.
●: For Dolby and DTS audio streams, outputs sound depending on the speaker pattern setting. No sound is output for
Linear PCM, DSD, or AAC.
Button
Sound
field
Display
panel
Front
speakers
Center
speaker
Surround
speakers
Surround
back
speakers
Subwoofer
Height
speakers
2CH/MULTI
2ch Stereo 2CH ST. ◎ - - - - -
Multi Ch
Stereo
MULTI ST. ◎ ○ ○ ○ ○ (*1) ○
Direct
(Analog
input)
DIRECT ◎ - - - - -
Direct
(Others)
DIRECT ◎ - - - ○ (*2) -
Auto
Format
Decoding
A.F.D. ◎ ● ● ● ○ (*1) ● (*3)
MOVIE
Dolby
Surround
DSUR ◎ ○ ○ ○ ○ (*1) ○
Neural-X NEURAL-X ◎ ○ ○ ○ ○ (*1) ○ (*4)
Front
Surround
FRT SUR. ◎ - - - ○ (*1) -
MUSIC
Audio
Enhancer
ENHANCER ◎ - - - ○ (*2) -
Outputs sound when you connect a subwoofer and set the speaker pattern to a setting that has a subwoofer (“x.1”).
*1
Outputs sound when you connect a subwoofer, set the speaker pattern to a setting that has a subwoofer (“x.1”), and [Small] is selected for [Size]
in [Speaker Setting] menu.
*2
For DTS audio streams, no sound is output when [Speaker Pattern] is set to [5.1.2ch], and [Front Dolby Speakers], [Top Middle Speakers], or
[Surround Dolby Speakers] is selected for [Front High/Top/Dolby Speakers] in [Easy Setup].
*3
No sound is output when [Speaker Pattern] is set to [5.1.2ch], and [Front Dolby Speakers], [Top Middle Speakers], or [Surround Dolby Speakers]
is selected for [Front High/Top/Dolby Speakers] in [Easy Setup].
*4
24

Multi-channel content
-: No sound is output.
◎: Outputs sound.
○: Outputs sound depending on the speaker pattern setting and content to be played back.
Related Topic
Selecting a sound field
4-731-211-11(2) Copyright 2018 Sony Corporation
Button
Sound
field
Display
panel
Front
speakers
Center
speaker
Surround
speakers
Surround
back
speakers
Subwoofer
Height
speakers
2CH/MULTI
2ch Stereo 2CH ST. ◎ - - - - -
Multi Ch
Stereo
MULTI ST. ◎ ○ ○ ○ ○ ○ (*1)
Direct DIRECT ◎ ○ ○ ○ ○ ○ (*1)
Auto
Format
Decoding
A.F.D. ◎ ○ ○ ○ ○ ○ (*1)
MOVIE
Dolby
Surround
DSUR ◎ ○ ○ ○ ○ ○
Neural-X NEURAL-X ◎ ○ ○ ○ ○ ○ (*2)
Front
Surround
FRT SUR. ◎ - - - ○ -
MUSIC
Audio
Enhancer
ENHANCER ◎ ○ ○ ○ ○ ○ (*1)
For DTS audio streams, no sound is output when [Speaker Pattern] is set to [5.1.2ch], and [Front Dolby Speakers], [Top Middle Speakers], or
[Surround Dolby Speakers] is selected for [Front High/Top/Dolby Speakers] in [Easy Setup].
*1
No sound is output when [Speaker Pattern] is set to [5.1.2ch], and [Front Dolby Speakers], [Top Middle Speakers], or [Surround Dolby Speakers]
is selected for [Front High/Top/Dolby Speakers] in [Easy Setup].
*2
25

Help Guide
MULTI CHANNEL AV RECEIVER
STR-DH790
Enjoying clear sound at a low volume level [Night Mode]
This function allows you to retain a theater-like environment at low volume levels. When watching a movie late at night,
you will be able to hear the dialog clearly even at a low volume level. This function can be used with other sound fields.
Note
This function does not work when [Direct] is selected and an analog input is selected.
Hint
You can also set the Night Mode function on and off by using NIGHT MODE on the receiver or on the remote control.
While the Night Mode function is turned on, the bass, treble, and effect levels increase, and “D. RANGE” is automatically set to
“COMP. ON”.
4-731-211-11(2) Copyright 2018 Sony Corporation
Select [Sound Effect] - [Night Mode] from the home menu.
1
Select [On], then press
.
2
26
Help Guide
MULTI CHANNEL AV RECEIVER
STR-DH790
Selecting the Auto Calibration type [Calibration Type]
You can select a calibration type after you have performed the Auto Calibration and saved the settings.
For details on Auto Calibration, refer to the supplied Operating Instructions.
Note
This function does not work in the following cases:
[Direct] is selected and an analog input is selected.
Headphones are connected.
The receiver may play signals at a lower sampling frequency than the actual sampling frequency of the input signals, depending
on the audio format.
4-731-211-11(2) Copyright 2018 Sony Corporation
Select [Sound Effect] - [Calibration Type] from the home menu.
1
Press / to select the setting you want.
Full Flat: Makes the measurement of frequency from each speaker flat.
Engineering: Sets to “the Sony listening room standard” frequency characteristics.
Front Ref.: Adjusts the characteristics of all of the speakers to match the characteristics of the front speaker.
Off
2
27
Help Guide
MULTI CHANNEL AV RECEIVER
STR-DH790
Adjusting the equalizer [Equalizer]
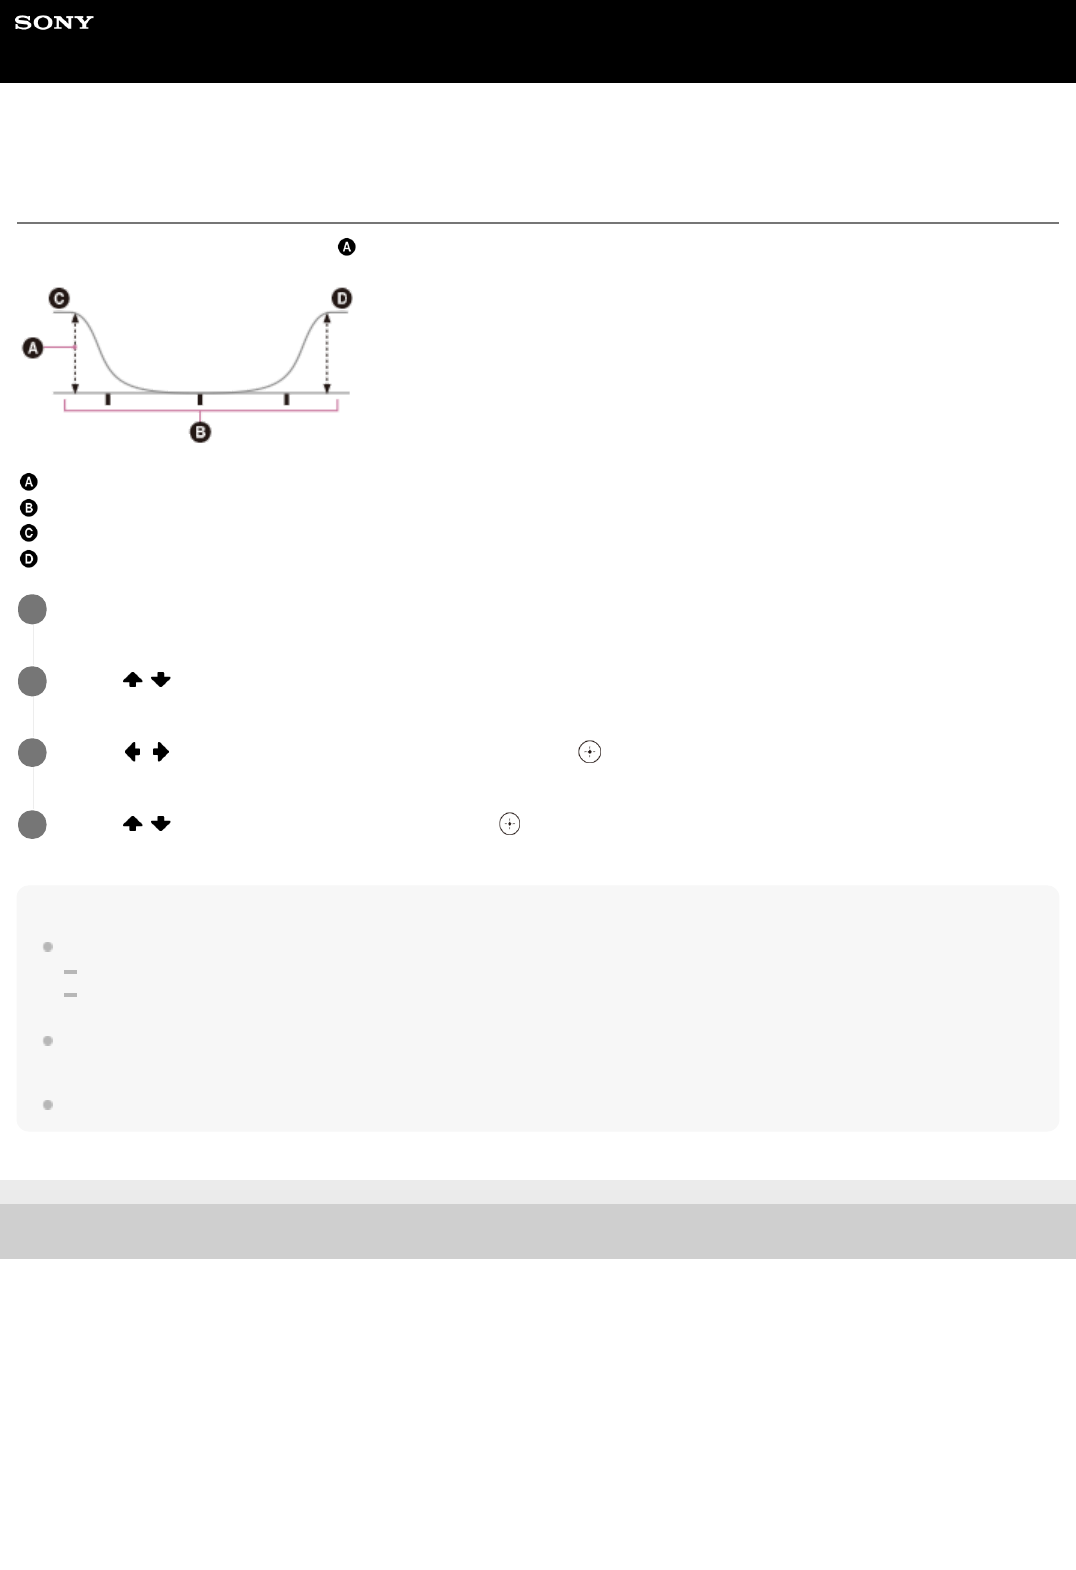
You can adjust the bass/treble level (
) of the front, center, surround/surround back and height speakers.
Level (dB)
Frequency (Hz)
Bass
Treble
Note
This function does not work in the following cases:
[Direct] is selected and an analog input is selected.
Pure Direct function is activated.
Depending on the audio format, the receiver may play signals at a lower sampling frequency than the original sampling frequency
of the input signals.
Frequencies for [Bass] and [Treble] are fixed.
4-731-211-11(2) Copyright 2018 Sony Corporation
Select [Sound Effect] - [Equalizer] from the home menu.
1
Press
/ to select the speaker whose level you want to adjust.
2
Press
/ to select [Bass] or [Treble], and then press .
3
Press
/ to adjust the level, and then press .
4
28
Help Guide
MULTI CHANNEL AV RECEIVER
STR-DH790
Enjoying high-fidelity sound [Pure Direct]
You can enjoy higher-fidelity sound from all inputs using the Pure Direct function. When the Pure Direct function is on,
the display panel is turned off to suppress noise that affects sound quality.
Canceling Pure Direct
The Pure Direct function is canceled when you perform any of the following operations:
Press PURE DIRECT on the remote control or the receiver.
Select [Off] in step 2.
Change the sound field.
Change the scene setting on the TV (Scene Select).
Change the setting of [Equalizer], [Night Mode] or “D. RANGE”.
Note
Changes to the settings for [Equalizer], [Night Mode], and “D. RANGE” are not effective while [Pure Direct] is set to [On]. These
changes will only take effect after [Pure Direct] is switched to [Off].
Hint
This operation can be performed by pressing PURE DIRECT on the front of the receiver or on the remote control.
Related Topic
Selecting a sound field
Selecting the optimum sound field automatically (Sound Mode/Scene Select function) “S.F. SYNC”
Compressing the dynamic range “D. RANGE”
4-731-211-11(2) Copyright 2018 Sony Corporation
Select [Sound Effect] - [Pure Direct] from the home menu.
1
Select [On].
The display panel turns off and the PURE DIRECT indicator lights up in amber while Pure Direct is turned on.
2
29

Help Guide
MULTI CHANNEL AV RECEIVER
STR-DH790
Resetting sound fields to the default settings
Be sure to use the buttons on the receiver to perform this operation.
4-731-211-11(2) Copyright 2018 Sony Corporation
Turn off the receiver.
1
While holding down MUSIC, press
(power) on the receiver.
“S.F. CLEAR” appears on the display panel and all sound fields are reset to their default setting.
2
30

Help Guide
MULTI CHANNEL AV RECEIVER
STR-DH790
What you can do with BLUETOOTH features
Listening to audio content from a BLUETOOTH device via this receiver
You can receive audio from a WALKMAN, smartphone, or tablet that has a BLUETOOTH function and listen to the
received audio content via this receiver.
Listening to sound from a BLUETOOTH device (Pairing operation)
See “Compatible BLUETOOTH version and profiles” for details on BLUETOOTH device versions and profiles that can be
paired.
4-731-211-11(2) Copyright 2018 Sony Corporation
31

Help Guide
MULTI CHANNEL AV RECEIVER
STR-DH790
Turning the BLUETOOTH function on/off “BT POWER”
You can turn the BLUETOOTH function on or off.
This operation is only available using the display panel on the front of the receiver.
Note
You cannot set this function when [BT] (BLUETOOTH device) is selected as the input. (“BT POWER” on the display panel will
become dimmed.)
Related Topic
List of settings that can be adjusted using the menu on the display panel
4-731-211-11(2) Copyright 2018 Sony Corporation
Press AMP MENU.
1
Select “<BT>” - “BT POWER” on the display panel.
2
Select “BT ON” or “BT OFF”.
3
32

Help Guide
MULTI CHANNEL AV RECEIVER
STR-DH790
Listening to sound from a BLUETOOTH device (Pairing operation)
Pairing is an operation where BLUETOOTH devices are registered to each other before connection. Once a pairing
operation is performed, it does not need to be performed again.
Canceling pairing operation
Select an input other than [BT].
Note
If the BLUETOOTH device does not support the AVRCP profile, you cannot perform playback or other operations on the receiver.
If a passkey is required on the display of the BLUETOOTH device in step 5, enter [0000]. The passkey may be called
“Passcode,” “PIN code,” “PIN number” or “Password.”
You can pair up to 10 BLUETOOTH devices. If a 11th BLUETOOTH device is paired, the least recently connected device will be
replaced by the new one.
Place the BLUETOOTH device within 1 meter (3.3 feet) of the receiver.
1
Press BLUETOOTH PAIRING to activate the pairing mode of the receiver.
“PAIRING” will appear on the display panel and the BLUETOOTH indicator on the front panel will flash quickly.
2
Perform pairing on the BLUETOOTH device to detect this receiver.
Perform this step within five minutes after step 2 is completed, or else pairing will be canceled. In this case, repeat
step 2.
For details, refer to the operating instructions of your BLUETOOTH device.
A list of detected devices may appear on the BLUETOOTH device display depending on the type of BLUETOOTH
device. This receiver is displayed as “STR-DH790”.
3
Select “STR-DH790” on the BLUETOOTH device display.
If “STR-DH790” is not displayed, repeat this process from step 1.
4
Make sure that the connection is completed and that the BLUETOOTH indicator has stopped flashing and
remains lit up.
The paired device name appears on the display panel.
5
Start playback on the BLUETOOTH device.
6
Adjust the volume.
Adjust the volume of the BLUETOOTH device first. If the volume level is still too low, adjust the volume level of the
receiver.
7
33

Hint
You can also activate the pairing mode of the receiver by pressing BLUETOOTH on the receiver.
On some types of BLUETOOTH devices, you can adjust the volume using the controls of the BLUETOOTH device.
You can check the BLUETOOTH device information by pressing DISPLAY repeatedly.
Each time you press DISPLAY, the display will change cyclically as follows:
BLUETOOTH - BLUETOOTH device name - BLUETOOTH device address - Sound field currently applied - Volume level
Related Topic
Setting the BLUETOOTH standby mode “BT STBY”
Setting BLUETOOTH audio codecs “BT AAC”
4-731-211-11(2) Copyright 2018 Sony Corporation
34

Help Guide
MULTI CHANNEL AV RECEIVER
STR-DH790
Compatible BLUETOOTH version and profiles
“Profile” refers to a standard set of capabilities for various BLUETOOTH product capabilities. This receiver supports the
following BLUETOOTH version and profiles:
Compatible BLUETOOTH version: BLUETOOTH Specification Version 4.2
Compatible BLUETOOTH profiles:
A2DP 1.2 (Advanced Audio Distribution Profile): Receives high-quality audio content.
AVRCP 1.6 (Audio Video Remote Control Profile): Controls audio/video devices (pausing, stopping, starting
playback, volume control, etc.)
For the latest information about compatible BLUETOOTH devices, check the websites listed under “Customer support
websites.”
Note
The functions may differ depending on the specifications of the BLUETOOTH device.
The audio playback on this receiver may be delayed from that on the BLUETOOTH device because of the characteristics of the
BLUETOOTH wireless technology.
4-731-211-11(2) Copyright 2018 Sony Corporation
35

Help Guide
MULTI CHANNEL AV RECEIVER
STR-DH790
Adjusting the speaker size [Size]
You can adjust the size of each speaker (front, center, surround and height).
Note
[Size] cannot be set when headphones are connected.
Hint
The surround back speakers will be set to the same setting as that of the surround speakers.
When the front speakers are set to [Small], the center, surround, and surround back/height speakers are also automatically set to
[Small].
If you do not use the subwoofer, the front speakers are automatically set to [Large].
You can also adjust the size of each speaker from the “<SPKR>” menu on the display panel.
Related Topic
List of settings that can be adjusted using the menu on the display panel
4-731-211-11(2) Copyright 2018 Sony Corporation
Select [Speaker Setting] from the home menu.
1
Press
, and then press / repeatedly to select [Size].
2
Press
/ to select the speaker for which you want to adjust the size, then press .
3
Press / to select the size you want, then press .
Large: If you connect large speakers that will effectively reproduce bass frequencies, select [Large]. Select
[Large] usually.
Small: If the sound is distorted or you hear a lack of surround effects when using multi channel surround sound,
select [Small]. You can activate the bass redirection circuitry and output the bass frequencies of each channel
from the subwoofer or other [Large] speakers.
4
36

Help Guide
MULTI CHANNEL AV RECEIVER
STR-DH790
Setting the crossover frequency of the speakers [Crossover Freq]
After you perform Auto Calibration, a crossover frequency is set for each speaker according to the measured results. If a
speaker is set to [Small] in the [Speaker Setting] menu, you can manually adjust the bass crossover frequency by
performing the following steps.
Note
[Crossover Freq] cannot be set when headphones are connected.
According to the Auto Calibration results, no crossover frequency is set for speakers whose size is determined to be [Large].
Additionally, [Crossover Freq] cannot be set by performing the steps above.
The surround back speakers will be set to the same setting as that of the surround speakers.
Hint
You can also set the crossover frequency of speakers from the “<SPKR>” menu on the display panel.
Related Topic
List of settings that can be adjusted using the menu on the display panel
4-731-211-11(2) Copyright 2018 Sony Corporation
Select [Speaker Setting] from the home menu.
1
Press
, and then press / repeatedly to select [Crossover Freq].
2
Press
/ to select the speaker for which you want to adjust the crossover frequency, then press .
3
Press
/ to set the crossover frequency, then press .
4
37

Help Guide
MULTI CHANNEL AV RECEIVER
STR-DH790
Adjusting the speaker level [Level]
You can adjust the level of each speaker (front left/right, center, subwoofer, surround left/right, surround back left/right
and height left/right).
Note
When [2ch Stereo] is selected as the sound field, no sound is output from the subwoofer.
When [Audio Enhancer] is selected as the sound field, no sound is output from the subwoofer if [Size] for all of the speakers are
set to [Large] in the [Speaker Setting] menu. However, sound will be output from the subwoofer if:
the digital input signal contains LFE signals.
[Size] for the front or surround speakers are set to [Small].
If headphones are connected, you can only set [Level] for [Front Left] and [Front Right].
Hint
You can also adjust the level of each speaker from the “<LEVEL>” menu on the display panel.
Related Topic
Relations between sound fields and speaker outputs
List of settings that can be adjusted using the menu on the display panel
4-731-211-11(2) Copyright 2018 Sony Corporation
Select [Speaker Setting] from the home menu.
1
Press
, and then press / repeatedly to select [Level].
2
Press
/ to select the speaker you want to adjust, then press .
3
Press
/ to adjust the level, then press .
4
38

Help Guide
MULTI CHANNEL AV RECEIVER
STR-DH790
Adjusting the speaker distance [Distance]
You can adjust the distance from listening position to each speaker (front left/right, center, subwoofer, surround left/right,
surround back left/right and height left/right).
Note
Some parameters may not be available depending on the speaker pattern setting.
[Distance] cannot be set when headphones are connected.
Hint
You can also adjust the distance of each speaker from the “<SPKR>” menu on the display panel.
You can switch the unit of measurement between “METER” and “FEET”.
Related Topic
List of settings that can be adjusted using the menu on the display panel
Selecting the unit of measurement “DIST.UNIT”
4-731-211-11(2) Copyright 2018 Sony Corporation
Select [Speaker Setting] from the home menu.
1
Press
, and then press / repeatedly to select [Distance].
2
Press
/ to select the speaker for which you want to adjust the distance from your listening position,
then press
.
3
Press
/ to adjust the distance, then press .
4
39

Help Guide
MULTI CHANNEL AV RECEIVER
STR-DH790
What is “BRAVIA” Sync?
“BRAVIA” Sync is an extended function developed by Sony based on the Control for HDMI (*1) function. By connecting
“BRAVIA” Sync-compatible devices, such as a TV or a Blu-ray Disc player, using an HDMI cable (*2) (not supplied) you
can control the devices with the TV remote control. The following functions can be used with “BRAVIA” Sync.
Turning off the receiver and connected devices simultaneously with the TV (System Power Off function) “STBY.LINK”
Enjoying TV sound from the speakers connected to the receiver (System Audio Control function)
Enjoying sound from a TV compatible with the eARC or ARC function
Enjoying an input source from a connected device immediately (One-Touch Play function)
Operating the receiver menu using the TV remote control (Remote Easy Control function)
Enjoying content of a connected device without turning on the receiver “STBY.THRU”
Selecting the optimum sound field automatically (Sound Mode/Scene Select function) “S.F. SYNC”
About Home Theatre Control function
About Language Follow function
Note
Functions such as System Power Off, System Audio Control, One-Touch Play, and Remote Easy Control may be used with
devices other than ones manufactured by Sony that support the Control for HDMI function, but operation is not guaranteed.
4-731-211-11(2) Copyright 2018 Sony Corporation
Control for HDMI is a standard used by CEC (Consumer Electronics Control) specification that enables interoperability of connected devices for
HDMI (High-Definition Multimedia Interface) connections.
*1
Sony recommends a Premium High Speed HDMI Cable with Ethernet that supports 18 Gbps.
*2
40

Help Guide
MULTI CHANNEL AV RECEIVER
STR-DH790
Preparing to use the “BRAVIA” Sync function
Turn the Control for HDMI function on to use the “BRAVIA” Sync function. The Control for HDMI function needs to be
turned on separately for the receiver and the connected device.
This operation is only available using the display panel on the front of the receiver.
Note
Perform the steps above again if you unplug the HDMI cable or change the connection.
4-731-211-11(2) Copyright 2018 Sony Corporation
Press AMP MENU.
1
Select “<HDMI>” - “CTRL.HDMI” on the display panel.
2
Select “CTRL ON”.
The Control for HDMI function of the receiver is turned on.
3
Press AMP MENU to exit the menu.
4
Select the HDMI input of the TV to the input to which the receiver is connected using the TV remote control
to display the settings menu of the TV.
5
Turn on the Control for HDMI function of the TV.
For details on settings for the TV, refer to the operating instructions supplied with the TV.
6
Turn on the Control for HDMI function of the connected devices.
For details on setting the connected device, refer to the operating instructions of the respective devices.
7
41

Help Guide
MULTI CHANNEL AV RECEIVER
STR-DH790
Turning off the receiver and connected devices simultaneously with the TV (System
Power Off function) “STBY.LINK”
You can automatically turn off the receiver and any device connected to the HDMI jack when you turn off the TV.
This operation is only available using the display panel on the front of the receiver.
Note
Depending on the status of the device, the connected device may not turn off.
The System Power Off function may work with devices other than ones manufactured by Sony, but operation is not guaranteed.
Related Topic
List of settings that can be adjusted using the menu on the display panel
4-731-211-11(2) Copyright 2018 Sony Corporation
Press AMP MENU.
1
Select “<HDMI>” - “STBY.LINK” on the display panel.
2
Select the setting you want.
AUTO: When the input of the receiver is set to [BD/DVD], [GAME], [SAT/CATV], [MEDIA BOX], or [TV], the
receiver will turn off when the TV is turned off.
ON: The receiver will turn off when the TV is turned off, regardless of the input of the receiver.
OFF: The receiver does not turn off when the TV is turned off, regardless of the input of the receiver.
3
42

Help Guide
MULTI CHANNEL AV RECEIVER
STR-DH790
Enjoying TV sound from the speakers connected to the receiver (System Audio
Control function)
If you turn on the receiver while you are watching a connected TV, the TV sound will be output from the speakers
connected to the receiver. The volume of the receiver can be adjusted using the TV remote control.
When you turn on the TV, the receiver is turned on automatically and the TV sound is output from the speakers
connected to the receiver.
Operations can also be made using the TV menu. For details, refer to the operating instructions of the TV.
Note
Depending on the TV, the number of the receiver volume level is displayed on the TV screen. The volume number displayed on
the TV may differ from the number on the display panel of the receiver.
System Audio Control function may work with devices other than ones manufactured by Sony, but operation is not guaranteed.
Depending on the settings of the TV, the System Audio Control function may not be available. For details, refer to the operating
instructions of the TV.
Depending on the TV, if the sound for the TV was output from the TV speakers the last time you used the TV, the receiver may
not turn on automatically when you turn on the TV.
If the TV does not have a System Audio Control function, press AMP MENU, and then set “<HDMI>” - “AUDIO.OUT” to
“TV+AMP” or “AMP” on the display panel.
When “<HDMI>” - “CTRL.HDMI” is set to “CTRL ON,” “<HDMI>” - “AUDIO.OUT” is set automatically according to the speaker
output settings on the connected TV.
Related Topic
Setting the HDMI audio signal output of connected devices “AUDIO.OUT”
4-731-211-11(2) Copyright 2018 Sony Corporation
43

Help Guide
MULTI CHANNEL AV RECEIVER
STR-DH790
Enjoying an input source from a connected device immediately (One-Touch Play
function)
When you play content on a device (Blu-ray Disc player, PlayStation®4, etc.) connected to the receiver, the receiver and
the TV are turned on automatically, the input of the receiver is switched to the input of the device being played, and
sound is output from the speakers connected to the receiver.
Note
If “<HDMI>” - “STBY.THRU” is set to “AUTO” or “ON,” and the TV sound was output from the TV speakers the last time you
watched the TV, the receiver may not turn on automatically, and the sound and picture may be output from the TV when you play
content on the device.
Depending on the TV, the beginning part of content being played may not play correctly.
One-Touch Play function may work with devices other than ones manufactured by Sony, but operation is not guaranteed.
Related Topic
Enjoying content of a connected device without turning on the receiver “STBY.THRU”
4-731-211-11(2) Copyright 2018 Sony Corporation
44

Help Guide
MULTI CHANNEL AV RECEIVER
STR-DH790
Selecting the optimum sound field automatically (Sound Mode/Scene Select function)
“S.F. SYNC”
The sound field are selected automatically according to the Scene Select or Sound Mode setting on your TV.
For details on this operation, refer to the operating instructions of the TV. This operation is only available using the
display panel on the front of the receiver.
The Sound Mode/Scene Select setting and the sound field setting of the receiver will change as follows.
Cinema: Dolby Surround (DSUR)
Sports: Dolby Surround (DSUR)
Music: Dolby Surround (DSUR)
Animation: Dolby Surround (DSUR)
Photo: Multi Ch Stereo (MULTI ST.)
Game: Dolby Surround (DSUR)
Graphics: Multi Ch Stereo (MULTI ST.)
News: Multi Ch Stereo (MULTI ST.)
Standard: Multi Ch Stereo (MULTI ST.)
Note
When the sound field switches according to the Scene Select or Sound Mode setting on your TV, the sound may be interrupted.
The Sound Mode/Scene Select function is a function developed by Sony, and cannot be used on devices other than ones
manufactured by Sony.
Related Topic
List of settings that can be adjusted using the menu on the display panel
4-731-211-11(2) Copyright 2018 Sony Corporation
Press AMP MENU.
1
Select “<HDMI>” - “S.F. SYNC” on the display panel.
2
Select the setting you want.
ON: A sound field is selected automatically according to the genre of the digitally broadcast TV program, or the
Scene Select or Sound Mode setting on your TV.
OFF: Sound is output according to the sound field currently applied.
3
45
Help Guide
MULTI CHANNEL AV RECEIVER
STR-DH790
About Home Theatre Control function
Setting the receiver, the sound field settings, input switching, etc., can be done by selecting the Home Theatre Control
application on the TV.
This function can be used when the TV is compatible with the Home Theatre Control application and connected to the
Internet. For details, refer to the operating instructions of the TV.
Note
The Home Theatre Control function is a function developed by Sony, and cannot be used on devices other than ones
manufactured by Sony.
4-731-211-11(2) Copyright 2018 Sony Corporation
46

Help Guide
MULTI CHANNEL AV RECEIVER
STR-DH790
Operating the receiver menu using the TV remote control (Remote Easy Control
function)
You can select the receiver by the SYNC MENU of the TV and operate the receiver. This function can be used only if the
TV supports the SYNC MENU. For details, refer to the operating instructions of the TV.
Note
The receiver is recognized as [Tuner] by the TV.
Some of the operations may not be available depending on the type of TV.
Remote Easy Control function may work with devices other than ones manufactured by Sony, but operation is not guaranteed.
4-731-211-11(2) Copyright 2018 Sony Corporation
47

Help Guide
MULTI CHANNEL AV RECEIVER
STR-DH790
About Language Follow function
The on-screen display language of the receiver may be changed simultaneously when you change the language for the
on-screen display of the TV.
Related Topic
Preparing to use the “BRAVIA” Sync function
Controlling HDMI devices “CTRL.HDMI”
4-731-211-11(2) Copyright 2018 Sony Corporation
48

Help Guide
MULTI CHANNEL AV RECEIVER
STR-DH790
Using the sleep timer
You can set the receiver to turn off automatically after a specified period of time (up to 2 hours).
Hint
To check the remaining time before the receiver turns off, press SLEEP. The remaining time appears on the display panel.
The sleep timer will be canceled if you press
(power).
4-731-211-11(2) Copyright 2018 Sony Corporation
Press SLEEP.
Each time you press SLEEP, the display changes cyclically as follows:
“0-30-00” - “1-00-00” - “1-30-00” - “2-00-00” - “OFF”
“SLEEP” lights up on the display panel when the sleep timer is activated.
1
49

Help Guide
MULTI CHANNEL AV RECEIVER
STR-DH790
Switching the brightness of the display panel
You can adjust the brightness of the display panel in three levels.
Hint
You can also use DIMMER on the receiver.
4-731-211-11(2) Copyright 2018 Sony Corporation
Press DIMMER.
Each time you press DIMMER, the display on the display panel changes cyclically as follows:
“BRIGHT” - “DARK” - no display
1
50

Help Guide
MULTI CHANNEL AV RECEIVER
STR-DH790
Saving power during standby mode
You can save power by pressing AMP MENU and setting up the receiver on the display panel as follows:
Set “<HDMI>” - “CTRL.HDMI” to “CTRL OFF”.
Set “<HDMI>” - “STBY.THRU” to “OFF”.
Set “<BT>” - “BT STBY” to “STBY OFF”.
Related Topic
Controlling HDMI devices “CTRL.HDMI”
Enjoying content of a connected device without turning on the receiver “STBY.THRU”
Setting the BLUETOOTH standby mode “BT STBY”
4-731-211-11(2) Copyright 2018 Sony Corporation
51

Help Guide
MULTI CHANNEL AV RECEIVER
STR-DH790
Viewing information on the display panel
The display panel provides various information on the status of the receiver, such as the sound field.
Note
Characters or marks in some languages may not be displayed.
4-731-211-11(2) Copyright 2018 Sony Corporation
Select the input for which you want to check information.
1
Press DISPLAY repeatedly.
Each time you press DISPLAY, the display will change cyclically as follows:
Input you have selected (*1) - Sound field currently applied (*2) - Volume level - Stream information (*3) - Index
name of the input (*4)
When listening to FM radio
Preset station name (*4) - Frequency and preset number (*5) - Sound field currently applied (*2) - Volume level
When playing back from a BLUETOOTH device
BLUETOOTH - BLUETOOTH device name - BLUETOOTH device address - Sound field currently applied - Volume
level
When receiving RDS broadcasts (for European and Asia-Pacific models only)
Program service name - Frequency and preset number (*5) - Sound field currently applied (*2) - Volume level
2
If “<INPUT>” - “IN MODE” is set to “ANALOG,” the function you have selected will be displayed.
*1
If the Pure Direct function is selected, “PURE” will appear instead of displaying sound fields.
*2
Stream information may not be displayed.
*3
An index name or preset station name will appear only if you have assigned one to the input or preset station. An index name or preset station
name will not appear if only blank spaces have been entered or the index name/preset station name is the same as the input name.
*4
A preset number will appear only if the frequency has been set in the preset memory.
*5
52

Help Guide
MULTI CHANNEL AV RECEIVER
STR-DH790
Reverting to the factory default settings
You can clear all memorized settings and restore the receiver to the factory default settings by the following procedure.
Be sure to use the buttons on the receiver to perform this operation.
Note
It takes a few minutes for the memory to be cleared completely. Do not turn the receiver off until “CLEARED *” appears on the
display panel.
4-731-211-11(2) Copyright 2018 Sony Corporation
Turn off the receiver.
1
Hold down
(power) on the receiver for 5 seconds.
“CLEARING” flashes on the display panel for a while, then changes to “CLEARED *”.
2
53

Help Guide
MULTI CHANNEL AV RECEIVER
STR-DH790
Operating the receiver with the menu on the display panel
You can operate this receiver using the display panel as well as the TV screen.
To return to the previous display
Press
or BACK.
To exit the menu
Press AMP MENU.
Note
Some parameters and settings may appear dimmed on the display panel. This means that they are either unavailable or fixed
and unchangeable.
Related Topic
Viewing information on the display panel
List of settings that can be adjusted using the menu on the display panel
4-731-211-11(2) Copyright 2018 Sony Corporation
Press AMP MENU.
The menu is displayed on the display panel of the receiver.
1
Press
/ repeatedly to select the menu you want, then press .
2
Press
/ repeatedly to select the parameter you want to adjust, then press .
3
Press
/ repeatedly to select the setting you want, then press .
4
54

Help Guide
MULTI CHANNEL AV RECEIVER
STR-DH790
List of settings that can be adjusted using the menu on the display panel
You can adjust the following settings from the setting menu on the display panel of the receiver by pressing AMP MENU.
Some settings can also be adjusted using the menu displayed on the TV screen.
Auto Calibration settings “<A. CAL>”
Auto Calibration start “START”
Auto Calibration can be performed through the steps of [Easy Setup]. For details on [Easy Setup], refer to the
Operating Instructions.
Auto Calibration type “CAL TYPE” (*1)
This setting is explained using menus on the TV screen.
Refer to “Selecting the Auto Calibration type [Calibration Type].”
Auto Phase Matching “A.P.M.”
Level settings “<LEVEL>”
Test tone “T. TONE” (*2)
The settings below are explained using menus displayed on the TV screen.
Refer to “Adjusting the speaker level [Level].”
Front left speaker level “FL LVL” (*2)
Front right speaker level “FR LVL” (*2)
Center speaker level “CNT LVL” (*2)
Surround left speaker level “SL LVL” (*2)
Surround right speaker level “SR LVL” (*2)
Surround back speaker level “SB LVL” (*2)
Surround back left speaker level “SBL LVL” (*2)
Surround back right speaker level “SBR LVL” (*2)
Height left speaker level “HTL LVL” (*2)
Height right speaker level “HTR LVL” (*2)
Subwoofer level “SW LVL” (*2)
TV volume offset “TV.OFFSET”
Speaker settings “<SPKR>”
Speaker pattern “PATTERN”
For details on the speaker pattern, refer to the Operating Instructions.
Surround back speaker assign “SB.ASSIGN”
This setting can be configured by the steps for [Easy Setup]. For details on [Easy Setup], refer to the Operating
Instructions.
Height/overhead speaker “HEIGHT”
This setting can be configured by the steps for [Easy Setup]. For details on [Easy Setup], refer to the Operating
Instructions.
Ceiling Height “CEILING.H.”
The settings below are explained using menus displayed on the TV screen.
Refer to “Adjusting the speaker size [Size].”
Front speakers size “FRT SIZE” (*2)
Center speaker size “CNT SIZE” (*2)
Surround speakers size “SUR SIZE” (*2)
Height speakers size “HT SIZE” (*2)
55

The settings below are explained using menus displayed on the TV screen.
Refer to “Adjusting the speaker distance [Distance].”
Front left speaker distance “FL DIST.” (*2)
Front right speaker distance “FR DIST.” (*2)
Center speaker distance “CNT DIST.” (*2)
Surround left speaker distance “SL DIST.” (*2)
Surround right speaker distance “SR DIST.” (*2)
Surround back speaker distance “SB DIST.” (*2)
Surround back left speaker distance “SBL DIST.” (*2)
Surround back right speaker distance “SBR DIST.” (*2)
Height left speaker distance “HTL DIST.” (*2)
Height right speaker distance “HTR DIST.” (*2)
Subwoofer distance “SW DIST.” (*2)
Distance unit “DIST.UNIT”
The settings below are explained using menus displayed on the TV screen.
Refer to “Setting the crossover frequency of the speakers [Crossover Freq].”
Front speakers crossover frequency “FRT CRS.” (*3)
Center speaker crossover frequency “CNT CRS.” (*3)
Surround speakers crossover frequency “SUR CRS.” (*3)
Height speakers crossover frequency “HT CRS.” (*3)
Input settings “<INPUT>”
Input mode “IN MODE”
Naming inputs “NAME IN”
Digital audio input assignment “A. ASSIGN”
EQ settings “<EQ>”
The settings below are explained using menus displayed on the TV screen.
Refer to “Adjusting the equalizer [Equalizer].”
Front speakers bass level “FRT BASS”
Front speakers treble level “FRT TRE”
Center speakers bass level “CNT BASS”
Center speakers treble level “CNT TRE”
Surround speakers bass level “SUR BASS”
Surround speakers treble level “SUR TRE”
Height speakers bass level “HT BASS”
Height speakers treble level “HT TRE”
Tuner settings “<TUNER>”
FM station receiving mode “FM MODE”
This setting is explained using menus displayed on the TV screen.
Refer to “Setting the FM station receiving mode [FM Mode].”
Naming preset stations “NAME IN”
This setting is explained using menus displayed on the TV screen.
Refer to “Naming preset stations [Name In].”
Audio settings “<AUDIO>”
Night Mode “NIGHT M.”
This setting is explained using menus displayed on the TV screen.
Refer to “Enjoying clear sound at a low volume level [Night Mode].”
Synchronizes audio with video output “A/V SYNC”
Digital broadcast language selection “DUAL”
Dynamic range compressor “D. RANGE”
DTS:X decoder mode “NEURAL-X” (*4)
56

DTS:X Dialog Control “DIALOG” (*5)
HDMI settings “<HDMI>”
Control for HDMI “CTRL.HDMI”
Standby Linked to TV “STBY.LINK”
eARC “EARC”
Standby Through “STBY.THRU”
HDMI Audio Out “AUDIO.OUT”
HDMI Sound Field Sync “S.F. SYNC”
HDMI Subwoofer Level “SW LVL”
HDMI Signal Format “SIG. FMT.”
For details on the HDMI Signal Format, refer to the Operating Instructions.
BLUETOOTH settings “<BT>”
BLUETOOTH Standby mode “BT STBY” (*6)
BLUETOOTH AAC “BT AAC”
BLUETOOTH Power “BT POWER”
System settings “<SYSTEM>”
Auto standby mode “AUTO.STBY”
Sleep timer “SLEEP”
USB update “UPDATE”
Version display “VER. X.XXX” (*7)
Model name display “STR-DH790”
[2ch Stereo], [Direct], [Dolby Surround], or [Front Surround] is selected.
[Pure Direct] is set to [On].
Headphones are connected.
4-731-211-11(2) Copyright 2018 Sony Corporation
You can select this setting only when you have performed Auto Calibration and saved the settings.
*1
Some parameters or settings may not be available depending on the speaker pattern setting.
*2
You can only select this parameter if the speaker is set to “SMALL”.
*3
You cannot select this setting in the following cases:
*4
You can select this setting only when DTS:X content compatible with the DTS:X Dialog Control function is being played back.
*5
You can only select this parameter when a BLUETOOTH device is paired.
*6
X.XXX represents the version number.
*7
57

Help Guide
MULTI CHANNEL AV RECEIVER
STR-DH790
Calibrating the phase characteristics of the speakers “A.P.M.” (Automatic Phase
Matching)
You can set the A.P.M. (Automatic Phase Matching) function in the Advanced D.C.A.C. (Digital Cinema Auto Calibration).
This calibrates the phase characteristics of the speakers for well-coordinated surround sound. This operation is only
available using the display panel on the front of the receiver.
Note
This function does not work in the following cases:
Headphones are connected.
Auto Calibration has not been performed.
[Pure Direct] is set to [On].
The receiver may play signals at a lower sampling frequency than the actual sampling frequency of the input signals, depending
on the audio format.
Related Topic
List of settings that can be adjusted using the menu on the display panel
4-731-211-11(2) Copyright 2018 Sony Corporation
Press AMP MENU.
1
Select “<A.CAL>” - “A.P.M.” on the display panel.
2
Select the setting you want.
A.P.M. AUTO : Switches the A.P.M. function on or off automatically.
A.P.M. OFF
3
58

Help Guide
MULTI CHANNEL AV RECEIVER
STR-DH790
Outputting a test tone from each speaker “T. TONE”
You can output a test tone from each speaker in sequence.
This operation is only available using the display panel on the front of the receiver.
Hint
To adjust the level of all speakers at the same time, press
+/–. You can also use MASTER VOLUME on the receiver. The
adjusted value is shown on the display panel during adjustment.
Related Topic
List of settings that can be adjusted using the menu on the display panel
4-731-211-11(2) Copyright 2018 Sony Corporation
Press AMP MENU.
1
Select “<LEVEL>” - “T. TONE” on the display panel.
2
Select the setting you want.
OFF
AUTO XXX (*): The test tone is output from each speaker in sequence.
If you need to adjust the speaker level according to the results of outputting a test tone, refer to “Adjusting the
speaker level [Level]” for how to adjust the level.
3
XXX represents a speaker channel (FL, CNT, FR, SR, SBR, SBL, SL, HL, HR, SW). The speaker channels that appear on the display
panel vary depending on the speaker pattern settings.
*
59

Help Guide
MULTI CHANNEL AV RECEIVER
STR-DH790
Adjusting the output level according to the connected TV “TV.OFFSET” (TV volume
offset function)
If the level of the TV sound output from speakers connected to the receiver is lower than that of other devices connected
to the receiver, you can increase the TV output sound level. This function works when you connect a TV compatible with
the eARC or ARC function to the HDMI TV OUT jack, or connect a TV to the OPTICAL IN jack or AUDIO TV IN jacks.
This operation is only available using the display panel on the front of the receiver.
Related Topic
List of settings that can be adjusted using the menu on the display panel
4-731-211-11(2) Copyright 2018 Sony Corporation
Press AMP MENU.
1
Select “<LEVEL>” - “TV.OFFSET” on the display panel.
2
Adjust the level.
You can adjust it within the range of “TV 0 dB” to “TV +6 dB”.
3
60

Help Guide
MULTI CHANNEL AV RECEIVER
STR-DH790
Setting the height from the floor to the ceiling “CEILING.H.”
Set the height from the floor to the ceiling. You can make Dolby Atmos enabled speakers work better by configuring this
setting and performing Auto Calibration.
Note
This setting is only available under the following conditions:
[Surround Dolby Speakers] or [Front Dolby Speakers] is selected for [Front High/Top/Dolby Speakers] in [Easy Setup]. For
details on [Easy Setup], refer to the Operating Instructions.
Headphones are not connected.
Related Topic
Selecting the unit of measurement “DIST.UNIT”
4-731-211-11(2) Copyright 2018 Sony Corporation
Press AMP MENU.
1
Select “<SPKR>” - “CEILING.H.” on the display panel.
2
Adjust the height.
You can adjust it within the range of “2.00M” (“6’ 6””) (*) to “10.00M” (“32’ 9””).
3
To switch the unit of measurement, see “Selecting the unit of measurement “DIST.UNIT”.”
*
61

Help Guide
MULTI CHANNEL AV RECEIVER
STR-DH790
Selecting the unit of measurement “DIST.UNIT”
You can select the unit of measurement for setting distances. This operation is only available using the display panel on
the front of the receiver.
Related Topic
List of settings that can be adjusted using the menu on the display panel
4-731-211-11(2) Copyright 2018 Sony Corporation
Press AMP MENU.
1
Select “<SPKR>” - “DIST.UNIT” on the display panel.
2
Select the setting you want.
FEET: The distance is displayed in feet.
METER: The distance is displayed in meters.
3
62

Help Guide
MULTI CHANNEL AV RECEIVER
STR-DH790
Switching between digital and analog audio “IN MODE”
When you connect devices to both digital and analog audio input jacks on the receiver, you can fix the audio input mode
to either device, or switch from one to the other, depending on the type of material you intend to watch.
This operation is only available using the display panel on the front of the receiver.
Note
Depending on the input, “IN MODE” may be dimmed on the display panel and other modes cannot be selected.
Hint
You can also use INPUT SELECTOR on the receiver to select the input in step 1.
Related Topic
List of settings that can be adjusted using the menu on the display panel
4-731-211-11(2) Copyright 2018 Sony Corporation
Press the input buttons to select the input.
1
Press AMP MENU.
2
Select “<INPUT>” - “IN MODE” on the display panel.
3
Select the setting you want.
AUTO: Gives priority to digital audio signals. If there are more than one digital connection, HDMI audio signals
have priority. If there is no digital audio signals, analog audio signals are selected. When TV input is selected,
priority is given to eARC or ARC signals. If your TV is not compatible with the eARC or ARC function, digital
optical audio signals are selected.
OPT: Specifies input of digital audio signals to the OPTICAL IN jack.
COAX: Specifies input of digital audio signals to the COAXIAL IN jack.
ANALOG: Specifies input of analog audio signals to the AUDIO IN (L/R) jacks.
4
63

Help Guide
MULTI CHANNEL AV RECEIVER
STR-DH790
Changing the name for each input “NAME IN”
You can enter up to 8 characters for each input name.
This operation is only available using the display panel on the front of the receiver.
Related Topic
List of settings that can be adjusted using the menu on the display panel
4-731-211-11(2) Copyright 2018 Sony Corporation
Select the input you want to change the name.
1
Press AMP MENU.
2
Select “<INPUT>” - “NAME IN” on the display panel.
3
Press
/ repeatedly to select a character, then press .
You can move the input position backward and forward by pressing
/ .
4
Repeat step 4 to input characters one by one, then press
.
The name you entered is registered.
5
64

Help Guide
MULTI CHANNEL AV RECEIVER
STR-DH790
Using other audio input jacks “A. ASSIGN”
You can reassign the OPTICAL/COAXIAL digital audio input jacks to other input if the default settings of the jacks do not
correspond to your connected equipment.
E.g. When connecting a DVD player to the OPTICAL TV IN jack, assign the OPTICAL TV IN jack to [BD/DVD].
This operation is only available using the display panel on the front of the receiver.
Assignable audio input jacks
OPT:
MEDIA.B, BD/DVD, SAT, GAME, SA-CD
COAX:
MEDIA.B, BD/DVD, SAT, GAME, SA-CD (*)
NONE:
MEDIA.B (*), BD/DVD (*), SAT (*), GAME (*), SA-CD
Note
When you assign the digital audio input, the “IN MODE” setting may change automatically.
One reassignment is allowed for each input.
If no sound is output from the jacks which you have assigned, also check the “IN MODE” settings.
Related Topic
List of settings that can be adjusted using the menu on the display panel
4-731-211-11(2) Copyright 2018 Sony Corporation
Select the input name you want to assign.
1
Press AMP MENU.
2
Select “<INPUT>” - “A. ASSIGN”.
3
Select the jack you want to assign to the input.
4
Default setting
*
65

Help Guide
MULTI CHANNEL AV RECEIVER
STR-DH790
Synchronizing audio with video output “A/V SYNC”
You can delay the output of audio to minimize the time gap between audio output and a visual display.
This function is useful when using a large LCD or plasma monitor or a projector. You can set the function for each input
independently.
During playback, you can also select this function from the options menu displayed by pressing OPTIONS.
This operation is only available using the display panel on the front of the receiver.
Note
The receiver may play signals at a lower sampling frequency than the actual sampling frequency of the input signals, depending
on the audio format.
Related Topic
List of settings that can be adjusted using the menu on the display panel
4-731-211-11(2) Copyright 2018 Sony Corporation
Press AMP MENU.
1
Select “<AUDIO>” - “A/V SYNC” on the display panel.
2
Select the setting you want.
0 MS – 300 MS: You can adjust the delay from 0 ms to 300 ms in 10 ms intervals.
AUTO: The time gap between the audio output and visual display of a TV connected via an HDMI connection
will be adjusted automatically. This feature is available only when the TV supports the A/V Sync function.
3
66

Help Guide
MULTI CHANNEL AV RECEIVER
STR-DH790
Selecting the language of digital broadcasts “DUAL”
You can select the language you want when listening to a digital broadcast with dual audio. This function only works for
Dolby Digital sources.
During playback, you can also select this function from the options menu displayed by pressing OPTIONS.
This operation is only available using the display panel on the front of the receiver.
Related Topic
List of settings that can be adjusted using the menu on the display panel
4-731-211-11(2) Copyright 2018 Sony Corporation
Press AMP MENU.
1
Select “<AUDIO>” - “DUAL” on the display panel.
2
Select the setting you want.
MAIN/SUB: Sound in the main language will be output through the front left speaker and sound in the sub
language will be output through the front right speaker simultaneously.
MAIN: Sound in the main language will be output.
SUB: Sound in the sub language will be output.
3
67

Help Guide
MULTI CHANNEL AV RECEIVER
STR-DH790
Compressing the dynamic range “D. RANGE”
You can compress the dynamic range of the soundtrack. This may be useful when you want to watch movies at a low
volume late at night, etc.
This function only works for Dolby Digital and Dolby TrueHD sources.
This operation is only available using the display panel on the front of the receiver.
Related Topic
List of settings that can be adjusted using the menu on the display panel
4-731-211-11(2) Copyright 2018 Sony Corporation
Press AMP MENU.
1
Select “<AUDIO>” - “D. RANGE” on the display panel.
2
Select the setting you want.
COMP. ON: The dynamic range is compressed as intended by the recording engineer.
COMP. AUTO: The dynamic range is compressed automatically when there is a flag in the sound source that
recommends using the D. RANGE function.
COMP. OFF
3
68

Help Guide
MULTI CHANNEL AV RECEIVER
STR-DH790
Switching the mode of the DTS decoder “NEURAL-X”
You can switch the DTS decoder to “Direct Mode” (“NEURAL-X” is set to “OFF”) or “Non-Direct Mode” (“NEURAL-X” is
set to “ON”).
When in “Direct Mode,” the audio is extracted and reproduced as closely as possible to what the content creator
intended. When in “Non-Direct Mode,” the audio is extracted and adapted to fit as closely as possible to the speaker
layout of the playback system (regardless of the source configuration). This function only works when the DTS stream is
input. This operation is only available using the display panel on the front of the receiver.
Note
You cannot set this function to “OFF” when “NEURAL-X” is selected as a sound field.
You cannot set this function to “ON” in the following cases:
[2ch Stereo], [Direct], [Dolby Surround] or [Front Surround] is selected.
[Pure Direct] is set to [On].
Headphones are connected.
Related Topic
List of settings that can be adjusted using the menu on the display panel
4-731-211-11(2) Copyright 2018 Sony Corporation
Press AMP MENU.
1
Select “<AUDIO>” - “NEURAL-X” on the display panel.
2
Select the setting you want.
ON: The DTS decoder is switched to “Non-Direct Mode.”
OFF: The DTS decoder is switched to “Direct Mode.”
3
69

Help Guide
MULTI CHANNEL AV RECEIVER
STR-DH790
Using the DTS:X Dialog Control function “DIALOG”
The DTS:X Dialog Control function is a function which adjusts the dialog levels during playback of the DTS:X stream.
This function enables you to increase the dialog levels in contrast with the background sound and hear dialog easily
even under noisy circumstances. This operation is only available using the display panel on the front of the receiver.
Note
This function may not work depending on the audio signals.
Related Topic
List of settings that can be adjusted using the menu on the display panel
4-731-211-11(2) Copyright 2018 Sony Corporation
Press AMP MENU.
1
Select “<AUDIO>” - “DIALOG” on the display panel.
2
Adjust the dialog level.
3
70

Help Guide
MULTI CHANNEL AV RECEIVER
STR-DH790
Controlling HDMI devices “CTRL.HDMI”
You can turn the Control for HDMI function on or off. For details, see “Preparing to use the “BRAVIA” Sync function.”
This operation is only available using the display panel on the front of the receiver.
Note
When you set “CTRL.HDMI” to “CTRL ON,” “AUDIO.OUT” setting may be changed automatically.
When the receiver is in standby mode, the
(power) indicator on the front panel lights up in red if “CTRL.HDMI” is set to “CTRL
ON”.
Related Topic
Preparing to use the “BRAVIA” Sync function
List of settings that can be adjusted using the menu on the display panel
4-731-211-11(2) Copyright 2018 Sony Corporation
Press AMP MENU.
1
Select “<HDMI>” - “CTRL.HDMI” on the display panel.
2
Select “CTRL ON” or “CTRL OFF”.
3
71

Help Guide
MULTI CHANNEL AV RECEIVER
STR-DH790
Turning off the receiver and connected devices simultaneously with the TV (System
Power Off function) “STBY.LINK”
You can automatically turn off the receiver and any device connected to the HDMI jack when you turn off the TV.
This operation is only available using the display panel on the front of the receiver.
Note
Depending on the status of the device, the connected device may not turn off.
The System Power Off function may work with devices other than ones manufactured by Sony, but operation is not guaranteed.
Related Topic
List of settings that can be adjusted using the menu on the display panel
4-731-211-11(2) Copyright 2018 Sony Corporation
Press AMP MENU.
1
Select “<HDMI>” - “STBY.LINK” on the display panel.
2
Select the setting you want.
AUTO: When the input of the receiver is set to [BD/DVD], [GAME], [SAT/CATV], [MEDIA BOX], or [TV], the
receiver will turn off when the TV is turned off.
ON: The receiver will turn off when the TV is turned off, regardless of the input of the receiver.
OFF: The receiver does not turn off when the TV is turned off, regardless of the input of the receiver.
3
72

Help Guide
MULTI CHANNEL AV RECEIVER
STR-DH790
What is eARC (Enhanced Audio Return Channel)?
The HDMI TV OUT jack of the receiver supports the eARC (Enhanced Audio Return Channel) function.
eARC is a new feature of HDMI Specification 2.1. It is designed to support the latest audio formats in addition to the
audio formats already supported by conventional ARC.
When you connect an eARC-compatible TV to the HDMI TV OUT jack of the receiver using an HDMI cable, you can
enjoy object-based audio formats such as Dolby Atmos - Dolby TrueHD, and DTS:X as well as Multi Channel Linear
PCM, which cannot be transmitted by ARC.
Related Topic
Preparing to use the eARC function
Enjoying sound from a TV compatible with the eARC or ARC function
4-731-211-11(2) Copyright 2018 Sony Corporation
73

Help Guide
MULTI CHANNEL AV RECEIVER
STR-DH790
Preparing to use the eARC function
Note
If “EARC” is not displayed in step 3, update the software of the receiver. For details, see “Updating the software “UPDATE”.”
If your TV has a similar menu for eARC, also check the relevant settings on the TV when you select “ON” for “EARC” on the
receiver. For details, refer to the operating instructions of the TV.
Related Topic
What is eARC (Enhanced Audio Return Channel)?
Enjoying sound from a TV compatible with the eARC or ARC function
4-731-211-11(2) Copyright 2018 Sony Corporation
If the HDMI TV OUT jack on your receiver is labeled “ARC,” update the software of the receiver.
For details, see “Updating the software “UPDATE”.”
If the HDMI TV OUT jack on your receiver is labeled “eARC/ARC,” its software already supports the eARC function.
1
Press AMP MENU.
2
Select “<HDMI>” - “EARC” on the display panel.
3
Select “ON”.
The eARC function becomes available. When you connect an eARC-compatible TV to the receiver, the eARC
function is activated. When you connect a TV that is compatible with ARC (but not compatible with eARC), the ARC
function is activated.
4
74

Help Guide
MULTI CHANNEL AV RECEIVER
STR-DH790
Enjoying sound from a TV compatible with the eARC or ARC function
If the receiver is connected to a TV's HDMI input jack compatible with eARC or ARC function, you can listen to TV sound
from the speakers connected to the receiver without connecting an optical digital cable or an audio cable. Set the
receiver by the following procedure to output the sound of the TV from the speakers connected to the receiver.
This operation is only available using the display panel on the front of the receiver.
If you connect to a TV that is not compatible with the eARC or ARC function or you want to select
an audio signal using a cable other than an HDMI cable (e.g. via an optical digital cable or an audio
cable)
Switch the audio input mode. For details, “Switching between digital and analog audio “IN MODE”.”
Note
ARC function may work on devices other than ones manufactured by Sony. However, operation is not guaranteed.
Be sure to turn off the volume of the TV or activate the muting function of the TV.
If your TV does not support the System Audio Control function, press AMP MENU, then set “<HDMI>” - “AUDIO.OUT” to
“TV+AMP” on the display panel to output the sound of the TV from the TV speaker and the speakers connected to the receiver.
If your TV has a similar menu for eARC or ARC, also check the relevant settings on the TV. For details, refer to the operating
instructions of the TV.
Related Topic
What is eARC (Enhanced Audio Return Channel)?
Preparing to use the eARC function
Switching between digital and analog audio “IN MODE”
Press AMP MENU.
1
Select “<HDMI>” - “CTRL.HDMI” on the display panel.
2
Select “CTRL ON”.
3
Select “EARC”.
4
Select the setting you want.
ON: The eARC function is available. When you connect an eARC-compatible TV, the eARC function is
activated. When you connect a TV that is compatible with ARC (but not compatible with eARC), the ARC
function is activated.
OFF: The ARC function is available. The eARC function is not available. When you connect a TV compatible
with eARC or ARC, the ARC function is activated.
5
Press HOME to return to the home menu, and select [Watch] - [TV].
6
75


Help Guide
MULTI CHANNEL AV RECEIVER
STR-DH790
Enjoying content of a connected device without turning on the receiver “STBY.THRU”
This function allows you to enjoy the sound and image of a connected device without turning on the receiver.
This operation is only available using the display panel on the front of the receiver.
Note
When the receiver is in standby mode, the power indicator on the front panel lights up in red if “STBY.THRU” is set to “ON” or
“AUTO”.
When “AUTO” is selected, it may take a little more time for the image and sound to be output to the TV than when “ON” is
selected.
“AUTO” may work on devices other than ones manufactured by Sony. However, operation is not guaranteed.
Related Topic
List of settings that can be adjusted using the menu on the display panel
4-731-211-11(2) Copyright 2018 Sony Corporation
Press AMP MENU.
1
Select “<HDMI>” - “STBY.THRU” on the display panel.
2
Select the setting you want.
ON: The receiver continuously outputs HDMI signals from the HDMI TV OUT jack when in standby mode. Sony
recommends this setting if you are using a TV that is not manufactured by Sony.
AUTO: The receiver outputs HDMI signals to the TV from the HDMI TV OUT jack when the TV is turned on
while the receiver is in the standby mode. This setting saves power in the standby mode compared to the “ON”
setting.
OFF: The receiver does not output HDMI signals from the HDMI TV OUT jack when in standby mode. Turn on
the receiver if you want to enjoy content of the connected device on the TV.
This setting saves power in the standby mode compared to the “ON” setting.
3
77
Help Guide
MULTI CHANNEL AV RECEIVER
STR-DH790
Setting the HDMI audio signal output of connected devices “AUDIO.OUT”
You can set the HDMI audio signal output of playback devices connected to the receiver via an HDMI connection.
This operation is only available using the display panel on the front of the receiver.
Note
Audio signals are not output from the speaker of the TV when “AUDIO.OUT” is set to “AMP”.
When “TV+AMP ” is selected, the audio formats, number of channels, sampling frequency, bit length, etc. that can be output from
the playback devices and input to the TV through the receiver are limited to those supported by the TV. If the TV only supports
stereo audio, the sound output from the receiver will also be in stereo, even if you play back a multi-channel audio source.
When you connect the receiver to a video device (projector, etc.), sound may not be output from the receiver. In this case, select
“AMP”.
When you select “TV+AMP,” only sound from the HDMI IN jacks is output from the speaker of the TV.
Related Topic
List of settings that can be adjusted using the menu on the display panel
4-731-211-11(2) Copyright 2018 Sony Corporation
Press AMP MENU.
1
Select “<HDMI>” - “AUDIO.OUT” on the display panel.
2
Select the setting you want.
AMP: HDMI audio signals from playback devices are only output to the speakers connected to the receiver.
Multi-channel sound can be played back as it is.
TV+AMP: The sound is output from the speaker of the TV and the speakers connected to the receiver.
3
78
Help Guide
MULTI CHANNEL AV RECEIVER
STR-DH790
Selecting the optimum sound field automatically (Sound Mode/Scene Select function)
“S.F. SYNC”
The sound field are selected automatically according to the Scene Select or Sound Mode setting on your TV.
For details on this operation, refer to the operating instructions of the TV. This operation is only available using the
display panel on the front of the receiver.
The Sound Mode/Scene Select setting and the sound field setting of the receiver will change as follows.
Cinema: Dolby Surround (DSUR)
Sports: Dolby Surround (DSUR)
Music: Dolby Surround (DSUR)
Animation: Dolby Surround (DSUR)
Photo: Multi Ch Stereo (MULTI ST.)
Game: Dolby Surround (DSUR)
Graphics: Multi Ch Stereo (MULTI ST.)
News: Multi Ch Stereo (MULTI ST.)
Standard: Multi Ch Stereo (MULTI ST.)
Note
When the sound field switches according to the Scene Select or Sound Mode setting on your TV, the sound may be interrupted.
The Sound Mode/Scene Select function is a function developed by Sony, and cannot be used on devices other than ones
manufactured by Sony.
Related Topic
List of settings that can be adjusted using the menu on the display panel
4-731-211-11(2) Copyright 2018 Sony Corporation
Press AMP MENU.
1
Select “<HDMI>” - “S.F. SYNC” on the display panel.
2
Select the setting you want.
ON: A sound field is selected automatically according to the genre of the digitally broadcast TV program, or the
Scene Select or Sound Mode setting on your TV.
OFF: Sound is output according to the sound field currently applied.
3
79

Help Guide
MULTI CHANNEL AV RECEIVER
STR-DH790
Setting the level of the subwoofer “SW LVL”
You can set the level of the subwoofer to 0 dB or +10 dB when PCM signals are input via an HDMI connection. The level
for each input to which an HDMI input jack is assigned can be set independently.
This operation is only available using the display panel on the front of the receiver.
Note
This setting is invalid when [FM], [BT], [SA-CD/CD] or [TV] is selected.
Related Topic
List of settings that can be adjusted using the menu on the display panel
4-731-211-11(2) Copyright 2018 Sony Corporation
Press AMP MENU.
1
Select “<HDMI>” - “SW LVL” on the display panel.
2
Select the setting you want.
SW AUTO: Automatically sets the level to 0 dB or +10 dB, depending on the audio stream.
SW +10 dB
SW 0 dB
3
80

Help Guide
MULTI CHANNEL AV RECEIVER
STR-DH790
Setting the BLUETOOTH standby mode “BT STBY”
When a BLUETOOTH device is paired, you can set the BLUETOOTH standby mode so that the receiver can be
controlled by the BLUETOOTH device even when the receiver is in the standby mode.
This operation is only available using the display panel on the front of the receiver.
Note
If “BT STBY” is set to “STBY ON” and there is a paired device, the
(power) indicator on the front panel will light up in red when
the receiver is in the standby mode.
Related Topic
List of settings that can be adjusted using the menu on the display panel
4-731-211-11(2) Copyright 2018 Sony Corporation
Press AMP MENU.
1
Select “<BT>” - “BT STBY” on the display panel.
2
Select the setting you want.
STBY ON: You can turn on the receiver from a BLUETOOTH device.
STBY OFF
3
81

Help Guide
MULTI CHANNEL AV RECEIVER
STR-DH790
Setting BLUETOOTH audio codecs “BT AAC”
You can enable and disable AAC (Advanced Audio Coding) audio.
This operation is only available using the display panel on the front of the receiver.
Note
If you change this setting, the setting is applied from the next time you connect the BLUETOOTH device.
You cannot use this function while a BLUETOOTH device is connected. In this case, “BT AAC” on the display panel is dimmed.
Hint
You can enjoy high-quality sound if AAC is enabled.
Related Topic
List of settings that can be adjusted using the menu on the display panel
4-731-211-11(2) Copyright 2018 Sony Corporation
Press AMP MENU.
1
Select “<BT>” - “BT AAC” on the display panel.
2
Select the setting you want.
AAC ON: AAC audio is available if the BLUETOOTH device supports AAC.
AAC OFF: AAC audio is not available.
3
82

Help Guide
MULTI CHANNEL AV RECEIVER
STR-DH790
Turning the BLUETOOTH function on/off “BT POWER”
You can turn the BLUETOOTH function on or off.
This operation is only available using the display panel on the front of the receiver.
Note
You cannot set this function when [BT] (BLUETOOTH device) is selected as the input. (“BT POWER” on the display panel will
become dimmed.)
Related Topic
List of settings that can be adjusted using the menu on the display panel
4-731-211-11(2) Copyright 2018 Sony Corporation
Press AMP MENU.
1
Select “<BT>” - “BT POWER” on the display panel.
2
Select “BT ON” or “BT OFF”.
3
83

Help Guide
MULTI CHANNEL AV RECEIVER
STR-DH790
Setting standby mode “AUTO.STBY”
You can set the receiver to switch to standby mode automatically when you do not operate the receiver or when no
signals are input to the receiver.
This operation is only available using the display panel on the front of the receiver.
Note
This function does not work when [FM] is selected as the input.
If you use the “AUTO.STBY” function and the sleep timer at the same time, the sleep timer has priority.
Related Topic
List of settings that can be adjusted using the menu on the display panel
4-731-211-11(2) Copyright 2018 Sony Corporation
Press AMP MENU.
1
Select “<SYSTEM>” - “AUTO.STBY” on the display panel.
2
Select the setting you want.
STBY ON: The receiver switches to standby mode after approximately 20 minutes.
STBY OFF
3
84

Help Guide
MULTI CHANNEL AV RECEIVER
STR-DH790
Updating the software “UPDATE”
Before updating, visit the customer support website to download the latest software version to your USB flash drive.
This operation is only available using the display panel on the front of the receiver.
Note
It may take about 15 minutes for the update to be completed.
Do not turn the receiver off while the software is being updated. It may cause a malfunction.
You cannot restore the old version after updating the software.
Related Topic
Customer support websites
List of settings that can be adjusted using the menu on the display panel
4-731-211-11(2) Copyright 2018 Sony Corporation
Connect the USB flash drive to the POWER SUPPLY port on the rear of the receiver.
1
Press AMP MENU.
2
Select “<SYSTEM>” - “UPDATE” on the display panel.
3
Select “START”.
“READING” will flash, and then “UPDT xxx” (*) will appear on the display panel. When the update is completed,
“COMPLETE” appears on the display panel and the receiver restarts automatically.
4
“xxx” represents a percentage of the update that is completed.
*
85

Help Guide
MULTI CHANNEL AV RECEIVER
STR-DH790
Checking the software version “VER. X.XXX”
You can display the software version information of the receiver.
This operation is only available using the display panel on the front of the receiver.
Related Topic
List of settings that can be adjusted using the menu on the display panel
4-731-211-11(2) Copyright 2018 Sony Corporation
Press AMP MENU.
1
Select “<SYSTEM>” on the display panel.
2
Press
repeatedly until “VER. X.XXX” is displayed.
Software version appears on the display panel.
3
86

Help Guide
MULTI CHANNEL AV RECEIVER
STR-DH790
PROTECT
If “PROTECT” appears on the display panel, the receiver will automatically turn off after a few seconds. Check the
following:
There may be an electrical surge or power failure. Unplug the AC power cord (mains lead) and then plug in the cord
again after 30 minutes.
The receiver may be covered and the ventilation holes are blocked. Remove the object covering the ventilation holes
of the receiver.
Disconnect all of the speakers and subwoofer.
Check that the speaker wires are tightly twisted on both ends.
Connect the front speaker first, plug in the AC power cord (mains lead) and turn on the receiver. Increase the volume
level and operate the receiver for at least 30 minutes until it completely warms up. Then, connect each additional
speaker one by one and test each additional speaker until you detect which speaker is causing the protection error.
The impedance of the connected speakers may be below the rated impedance range indicated on the back panel of
the receiver. Connect speakers whose impedance falls within the range.
After checking the above items and fixing any problems, turn on the receiver. If the problem persists, consult your
nearest Sony dealer.
4-731-211-11(2) Copyright 2018 Sony Corporation
87


Help Guide
MULTI CHANNEL AV RECEIVER
STR-DH790
The receiver is turned off automatically.
If “<SYSTEM>” - “AUTO.STBY” is set to “STBY ON” on the display panel, set it to “STBY OFF”.
The sleep timer function was activated.
“PROTECT” was activated.
Related Topic
Setting standby mode “AUTO.STBY”
Using the sleep timer
PROTECT
4-731-211-11(2) Copyright 2018 Sony Corporation
89


Help Guide
MULTI CHANNEL AV RECEIVER
STR-DH790
The receiver does not turn on even when the TV is turned on.
Press AMP MENU, then set “<HDMI>” - “CTRL.HDMI” to “CTRL ON” on the display panel. The TV must support the
Control for HDMI function. For details, refer to the operating instructions of the TV.
Check the speaker settings of the TV. The receiver power syncs with the speaker settings of the TV. For details, refer
to the operating instructions of the TV.
If sound was output from the speakers of the TV last time, the receiver does not turn on even when the TV is turned
on.
Related Topic
Preparing to use the “BRAVIA” Sync function
4-731-211-11(2) Copyright 2018 Sony Corporation
91

Help Guide
MULTI CHANNEL AV RECEIVER
STR-DH790
The receiver turns off when the TV is turned off.
Press AMP MENU, then check “<HDMI>” - “STBY.LINK” on the display panel. When the function is set to “ON,” the
receiver automatically turns off interlocked with the TV-power off operation, regardless of the input of the receiver.
Related Topic
Turning off the receiver and connected devices simultaneously with the TV (System Power Off function) “STBY.LINK”
4-731-211-11(2) Copyright 2018 Sony Corporation
92

Help Guide
MULTI CHANNEL AV RECEIVER
STR-DH790
The receiver does not turn off even when the TV is turned off.
Press AMP MENU, then set “<HDMI>” - “CTRL.HDMI” to “CTRL ON” on the display panel. The TV must support the
Control for HDMI function. For details, refer to the operating instructions of the TV.
Press AMP MENU, then check “<HDMI>” - “STBY.LINK” on the display panel. If you want the receiver to turn off
when the TV is turned off regardless of the input of the receiver, set “STBY.LINK” to “ON”. The TV must support the
Control for HDMI function. For details, refer to the operating instructions of the TV.
Related Topic
Preparing to use the “BRAVIA” Sync function
Turning off the receiver and connected devices simultaneously with the TV (System Power Off function) “STBY.LINK”
4-731-211-11(2) Copyright 2018 Sony Corporation
93

Help Guide
MULTI CHANNEL AV RECEIVER
STR-DH790
No TV sound is output from the receiver.
Check the type and connection of the HDMI cable, optical digital cable, or audio cable that is connected to the
receiver and the TV (refer to the supplied Operating Instructions).
When the receiver is connected to a TV compatible with eARC or ARC function, make sure the receiver is connected
to an HDMI jack compatible with the eARC or ARC function (refer to the supplied Operating Instructions).
If the TV is compatible with the eARC or ARC function, make sure the Control for HDMI function on the TV is turned
on.
Make sure that “<HDMI>” - “CTRL.HDMI” is set to “CTRL ON” on the display panel.
When the receiver is connected to a TV that is compatible with ARC (but not compatible with eARC), set “<HDMI>” -
“EARC” to “OFF” on the display panel.
Make sure that “<INPUT>” - “IN MODE” is set to “AUTO” on the display panel when the input of the receiver is set to
[TV].
Make sure the TV supports the System Audio Control function. Set the speaker setting of the TV (BRAVIA) to “Audio
System.” Refer to the operating instructions of your TV regarding how to set the TV.
If the TV does not have a System Audio Control function, press AMP MENU, then set on the display panel “<HDMI>”
- “AUDIO.OUT” to:
“TV+AMP” if you want to listen to the sound from the TV speaker and receiver.
“AMP” if you want to listen to the sound from the receiver only.
If the TV is not compatible with the eARC or ARC function, connect the receiver to the TV using an optical digital
cable (not supplied) or audio cable (not supplied). There will be no TV sound from the connected speakers when the
TV incompatible with the eARC or ARC function is connected via an HDMI connection.
Depending on the order in which you turn on the TV and the receiver, the receiver may be muted, in which case
“MUTING” is displayed on the display panel of the receiver. If this happens, turn on the TV first, then the receiver.
Switch input of the receiver to [TV].
Increase the volume on the receiver or cancel muting.
4-731-211-11(2) Copyright 2018 Sony Corporation
94

Help Guide
MULTI CHANNEL AV RECEIVER
STR-DH790
The sound is output from both the receiver and the TV.
Mute the sound of the receiver or the TV.
If audio signals from the connected HDMI device are output from both the speakers connected to the receiver and
the TV speakers, press AMP MENU and then set “<HDMI>” - “AUDIO.OUT” to “AMP” on the display panel. Audio
signals will be output from only the speakers connected to the receiver.
4-731-211-11(2) Copyright 2018 Sony Corporation
95

Help Guide
MULTI CHANNEL AV RECEIVER
STR-DH790
No image and/or sound is output from the TV when the receiver is in the standby
mode.
When the receiver enters the standby mode, image and/or sound from the HDMI device selected right before the
receiver entered the standby mode is output to the TV. If no image and/or sound is output, perform the following
operations:
Turn on the receiver, and then select the input to which the playback device is connected.
Press AMP MENU, then set “<HDMI>” - “CTRL.HDMI” to “CTRL ON,” and then set “<HDMI>” - “STBY.THRU” to
“AUTO” or “ON” on the display panel.
If a device that supports the Control for HDMI function but is not manufactured by Sony is connected, press AMP
MENU and set “<HDMI>” - “CTRL.HDMI” to “CTRL ON” on the display panel.
4-731-211-11(2) Copyright 2018 Sony Corporation
96

Help Guide
MULTI CHANNEL AV RECEIVER
STR-DH790
There is a time gap between the visual display on the TV and the audio output from
the speaker connected to the receiver.
Press AMP MENU and change the “A/V SYNC” settings in the “<AUDIO>” menu.
Adjust the A/V Sync settings on the TV. For details, refer to the operating instructions of the TV.
Related Topic
Synchronizing audio with video output “A/V SYNC”
4-731-211-11(2) Copyright 2018 Sony Corporation
97

Help Guide
MULTI CHANNEL AV RECEIVER
STR-DH790
The sound is interrupted while watching a TV program or content on a Blu-ray Disc,
etc.
Press AMP MENU, and then check the setting for “<HDMI>” - “S.F. SYNC” on the display panel. If the function is set
to “ON,” the sound may be interrupted when the sound field switches automatically according to the Scene Select or
Sound Mode setting on your TV. To avoid the sound being interrupted, set the function to “OFF,” and then select the
desired sound field.
Related Topic
Selecting the optimum sound field automatically (Sound Mode/Scene Select function) “S.F. SYNC”
4-731-211-11(2) Copyright 2018 Sony Corporation
98

Help Guide
MULTI CHANNEL AV RECEIVER
STR-DH790
The sound field switches automatically.
Press AMP MENU, and then check the setting for “<HDMI>” - “S.F. SYNC” on the display panel.
If the function is set to “ON,” the sound field will switch automatically according to information on the program
currently being watched or the setting for Sound Mode/Scene Select.
If you do not want to switch the sound field automatically, set the function to “OFF”. This allows you to assign a sound
field to each input of the receiver.
Related Topic
Selecting the optimum sound field automatically (Sound Mode/Scene Select function) “S.F. SYNC”
4-731-211-11(2) Copyright 2018 Sony Corporation
99

Help Guide
MULTI CHANNEL AV RECEIVER
STR-DH790
No sound or only a very low level of sound is heard, no matter which device is
selected.
Check that all connecting cables are inserted to their input/output jacks on the receiver, speakers and the devices.
Check that MASTER VOLUME on the receiver is not set to “VOL MIN”.
Press SPEAKERS repeatedly on the receiver to select a setting other than “OFF”.
Check that headphones are not connected to the receiver.
Press
to cancel the muting function.
Try pressing the input button on the remote control or turning INPUT SELECTOR on the receiver to select the input
to which you want to listen.
If the sound of a cable box or satellite box connected to the TV is not output, connect the device to an HDMI input
jack of the receiver and switch the input of the receiver to the input for the connected device (refer to the supplied
Operating Instructions).
If you want to listen to sound from the TV speaker, press AMP MENU, then set “<HDMI>” - “AUDIO.OUT” to
“TV+AMP” on the display panel. If you cannot play multi-channel audio source, set to “AMP”. However, the sound will
not be output through the TV speaker.
4-731-211-11(2) Copyright 2018 Sony Corporation
100

Help Guide
MULTI CHANNEL AV RECEIVER
STR-DH790
No sound or only a very low level of sound is heard from specific speakers.
Check that the speaker settings are appropriate by using following settings:
Perform Auto Calibration in [Easy Setup] from the home menu.
Press AMP MENU, then select “<SPKR>” - “PATTERN” on the display panel.
Then check that sound is output from each speaker correctly by pressing AMP MENU and selecting “<LEVEL>” - “T.
TONE” on the display panel.
Some discs do not have Dolby Digital Surround EX information. In this case, sound may not be output from certain
speakers.
Make sure you have turned on your subwoofer.
Check the volume level of the subwoofer.
Depending on the selected sound field, sound may not be available from the subwoofer.
When you play content in the DTS format, sound may not be output from the height speakers in the following cases:
[A.F.D.] (Auto Format Decoding) is selected as the sound field setting.
[Speaker Pattern] is set to [5.1.2ch], and [Front Dolby Speakers], [Top Middle Speakers], or [Surround Dolby
Speakers] is selected for [Front High/Top/Dolby Speakers] in [Easy Setup].
4-731-211-11(2) Copyright 2018 Sony Corporation
101

Help Guide
MULTI CHANNEL AV RECEIVER
STR-DH790
There is no sound from a specific device.
Check that the device is correctly connected to the corresponding audio input jacks.
Check that the cable(s) used for the connection is (are) fully inserted into the jacks on both the receiver and the
device.
Check that the device is correctly connected to the corresponding HDMI jack.
Check the current input settings. If the correct input mode is not selected, press AMP MENU and select “<INPUT>” -
“IN MODE” on the display panel, and then change the settings.
The HDMI settings of some playback devices need to be configured. Refer to the operating instructions supplied with
each device.
Be sure to use a High Speed HDMI Cable with Ethernet when you view images or listen to sound, especially for
1080p, Deep Color (Deep Colour), 4K or 3D transmission. Premium High Speed HDMI Cable with Ethernet that
supports 18 Gbps is required for 4K/60p 4:4:4, 4:2:2 and 4K/60p 4:2:0 10 bit etc.
Sound may not be output from the receiver while the home menu is displayed on the TV screen. Press HOME to exit
the home menu.
Audio signals (format, number of channels, sampling frequency, bit length, etc.) transmitted from an HDMI jack may
be suppressed by the connected device. Check the setup of a device connected via an HDMI cable if the image is
poor or the sound does not come out of the device.
When a connected device does not support the copyright protection technology (HDCP), the image and/or the sound
from the HDMI TV OUT jack may be distorted or may not be output. If this is the case, check the specifications of the
connected device.
Set the image resolution of the playback device to more than 720p/1080i to enjoy High Bitrate Audio (DTS-HD
Master Audio, Dolby TrueHD).
The image resolution of the playback device may need to be configured to certain settings before you can enjoy DSD
and Multi Channel Linear PCM. Refer to the operating instructions of the playback device.
When you connect the receiver to a video device (projector, etc.), sound may not be output from the receiver. In this
case, press AMP MENU, then set “<HDMI>” - “AUDIO.OUT” to “AMP” on the display panel.
You cannot listen to the sound of a device connected to the receiver while TV input is selected on the receiver. Be
sure to change the input of the receiver to HDMI if you want to watch a program on a device connected via HDMI
connection to the receiver.
When using the Control for HDMI function, you cannot control connected devices using the remote control of the TV.
Some devices and TVs need to be set up. Refer to the operating instructions supplied with each device and TV.
Change the input of the receiver to the HDMI input connected to the device.
Check that the selected digital audio input jack is not assigned to another input.
Related Topic
Setting the HDMI audio signal output of connected devices “AUDIO.OUT”
4-731-211-11(2) Copyright 2018 Sony Corporation
102


Help Guide
MULTI CHANNEL AV RECEIVER
STR-DH790
How can I enjoy Dolby Atmos playback?
To enjoy Dolby Atmos playback, perform all of the following operations:
Connect the ceiling speakers or Dolby Atmos enabled speakers to the SPEAKERS SURROUND
BACK/HEIGHT (FRONT B/BI-AMP) terminals on the rear of the receiver.
For details on speaker connections, refer to the supplied Operating Instructions.
1
When using a TV and Blu-ray Disc™ player with the receiver, connect the TV to the HDMI TV OUT
(eARC/ARC) jack, and connect the Blu-ray Disc player to the HDMI IN jack on the receiver.
Be sure to use a Premium High Speed HDMI Cable with Ethernet. For details on connecting TVs or AV devices,
refer to the supplied Operating Instructions.
2
Set the speaker pattern according to your speaker configuration.
To set the speaker pattern using the TV screen:
To set the speaker pattern using the display panel:
3
Select [Easy Setup] from the home menu.1.
Select [Assign Surround Back Terminals], and then select [Height Speakers] on the next screen.2.
Set [Speaker Pattern] to [x.x.2ch] (i.e. [5.1.2ch], [4.1.2ch], etc.).3.
Set [Front High/Top/Dolby Speakers] to [Top Middle Speakers] or [Front Dolby Speakers].4.
Complete Auto Calibration by following the on-screen instructions.5.
Press AMP MENU, and then set “<SPKR>” - “PATTERN” to “x.x.2” (i.e. “5.1.2”, “4.1.2”, etc.).1.
Set “<SPKR>” - “HEIGHT” to “TM” (top middle speakers) or “FD” (front Dolby Atmos enabled speakers).2.
Select the sound field on the receiver using either of the following operations.
Press 2CH/MULTI repeatedly on the remote control or on the receiver to select “A.F.D.”.
Select [Sound Effect] - [Sound Field] from the home menu, and then select [2CH/MULTI: Auto Format
Decoding].
For details on sound fields, see “Selecting a sound field” and “Selectable sound fields and their effects.”
4
Be sure to use a disc with a Dolby Atmos soundtrack. Movies and other content with Dolby Atmos
soundtracks are sold as Blu-ray Discs. Make sure the Dolby Atmos logo is printed on the disc you want to
watch.
5
Check the settings on the Blu-ray Disc player.
Depending on the settings of the playback device, the content may not be played back in the Dolby Atmos format. If
you are using a Blu-ray Disc player manufactured by Sony, set [Audio Settings] - [BD Audio MIX Setting] to [Off].
6
Select a Dolby Atmos-compatible audio or language setting on a Blu-ray Disc.
7
104

4-731-211-11(2) Copyright 2018 Sony Corporation
105

Help Guide
MULTI CHANNEL AV RECEIVER
STR-DH790
How can I check if Dolby Atmos content is being played?
Press DISPLAY repeatedly on the remote control or on the receiver. If Dolby Atmos content is being played back,
“ATMOS” will appear on the display panel.
4-731-211-11(2) Copyright 2018 Sony Corporation
106
Help Guide
MULTI CHANNEL AV RECEIVER
STR-DH790
Dolby Digital or DTS multi-channel sound is not reproduced.
Check that the DVD, etc., you are playing is recorded in Dolby Digital or DTS format.
When connecting the DVD player, etc., to the digital input jacks of this receiver, make sure the digital audio output
setting of the connected device is available.
Press AMP MENU, then set “<HDMI>” - “AUDIO.OUT” to “AMP” on the display panel.
You can only enjoy High Bitrate Audio (DTS-HD Master Audio and Dolby TrueHD) and object-based audio formats
(DTS:X and Dolby Atmos) and DSD and Multi Channel Linear PCM with an HDMI connection.
4-731-211-11(2) Copyright 2018 Sony Corporation
107

Help Guide
MULTI CHANNEL AV RECEIVER
STR-DH790
The surround effect cannot be obtained.
Be sure to select the optimal sound field for the content. For details on the sound fields, see “Selectable sound fields
and their effects.”
Dolby Surround and Neural:X do not work when the speaker pattern is set to “2.0” or “2.1”.
4-731-211-11(2) Copyright 2018 Sony Corporation
108

Help Guide
MULTI CHANNEL AV RECEIVER
STR-DH790
A test tone is not output from the speakers.
The speaker cables may not be connected securely. Check that they are connected securely and cannot be
disconnected by pulling on them slightly.
The speaker cables may have short-circuited.
4-731-211-11(2) Copyright 2018 Sony Corporation
109

Help Guide
MULTI CHANNEL AV RECEIVER
STR-DH790
A test tone is output from a different speaker than the speaker displayed on the
display panel.
The speaker pattern setting is incorrect. Make sure that the speaker connections and the speaker pattern match
correctly.
4-731-211-11(2) Copyright 2018 Sony Corporation
110

Help Guide
MULTI CHANNEL AV RECEIVER
STR-DH790
No image and/or sound is output from the TV when the receiver is in the standby
mode.
When the receiver enters the standby mode, image and/or sound from the HDMI device selected right before the
receiver entered the standby mode is output to the TV. If no image and/or sound is output, perform the following
operations:
Turn on the receiver, and then select the input to which the playback device is connected.
Press AMP MENU, then set “<HDMI>” - “CTRL.HDMI” to “CTRL ON,” and then set “<HDMI>” - “STBY.THRU” to
“AUTO” or “ON” on the display panel.
If a device that supports the Control for HDMI function but is not manufactured by Sony is connected, press AMP
MENU and set “<HDMI>” - “CTRL.HDMI” to “CTRL ON” on the display panel.
4-731-211-11(2) Copyright 2018 Sony Corporation
111

Help Guide
MULTI CHANNEL AV RECEIVER
STR-DH790
No image appears on the TV screen.
Try pressing the input button on the remote control or turning INPUT SELECTOR on the receiver to select the input
to which you want to watch.
Set your TV to the appropriate input mode.
Make sure that cables are correctly and securely connected to devices.
Disconnect the HDMI cable from the receiver and TV, and then reconnect the cable.
Set “SIG. FMT.” of the selected input to “STANDARD” in the “<HDMI>” menu.
Some playback devices need to be set up. Refer to the operating instructions supplied with each device.
Be sure to use a High Speed HDMI Cable with Ethernet when you view images or listen to sound, especially for
1080p, Deep Color (Deep Colour), 4K or 3D transmission. Premium High Speed HDMI Cable with Ethernet, which
can support bandwidths up to 18 Gbps, is required for 4K/60p 4:4:4, 4:2:2 and 4K/60p 4:2:0 10 bit, etc.
If you want to play HDCP 2.2 content, connect the receiver to an HDMI input jack of a TV that is compatible with
HDCP 2.2.
4-731-211-11(2) Copyright 2018 Sony Corporation
112

Help Guide
MULTI CHANNEL AV RECEIVER
STR-DH790
No 4K content appears on the TV screen.
Depending on the TV or the video device, 4K content may not be displayed. Check the video capability and settings
of your TV and video device.
Be sure to use a High Speed HDMI Cable with Ethernet. When you use high bandwidth video formats such as
4K/60p 4:4:4, 4:2:2 and 4K/60p 4:2:0 10 bit, a Premium High Speed HDMI Cable with Ethernet, which can support
bandwidth up to 18 Gbps, is required.
If your TV has similar menu for high bandwidth video format, check the setting on the TV menu when you set “SIG.
FMT.” to “ENHANCED” on this receiver (refer to the Operating Instructions). For details on the setting of the TV
menu, refer to the operating instructions of the TV.
Be sure to connect the receiver to an HDMI input jack of a TV or video device that supports 4K. You have to connect
an HDMI cable to an HDMI jack that supports HDCP 2.2 when you use a playback device for 4K resolution video
content, etc.
4-731-211-11(2) Copyright 2018 Sony Corporation
113

Help Guide
MULTI CHANNEL AV RECEIVER
STR-DH790
No image and/or sound is output from the TV when the receiver is in the standby
mode.
When the receiver enters the standby mode, image and/or sound from the HDMI device selected right before the
receiver entered the standby mode is output to the TV. If no image and/or sound is output, perform the following
operations:
Turn on the receiver, and then select the input to which the playback device is connected.
Press AMP MENU, then set “<HDMI>” - “CTRL.HDMI” to “CTRL ON,” and then set “<HDMI>” - “STBY.THRU” to
“AUTO” or “ON” on the display panel.
If a device that supports the Control for HDMI function but is not manufactured by Sony is connected, press AMP
MENU and set “<HDMI>” - “CTRL.HDMI” to “CTRL ON” on the display panel.
4-731-211-11(2) Copyright 2018 Sony Corporation
114

Help Guide
MULTI CHANNEL AV RECEIVER
STR-DH790
The home menu does not appear on the TV screen.
Disconnect the HDMI cable from the receiver and TV and then reconnect the cable.
Press HOME to display the home menu.
Check that the appropriate input is selected on the TV. Select the HDMI input to which the receiver is connected.
The home menu may take some time to appear on the TV screen depending on the TV.
4-731-211-11(2) Copyright 2018 Sony Corporation
115

Help Guide
MULTI CHANNEL AV RECEIVER
STR-DH790
Display does not appear on the display panel.
If the PURE DIRECT indicator on the front panel lights up, press PURE DIRECT on the receiver or on the remote
control to turn off this function.
Press DIMMER on the receiver or on the remote control to select “BRIGHT” or “DARK”.
Related Topic
Enjoying high-fidelity sound [Pure Direct]
Switching the brightness of the display panel
4-731-211-11(2) Copyright 2018 Sony Corporation
116

Help Guide
MULTI CHANNEL AV RECEIVER
STR-DH790
When the language for the on-screen display of the TV is changed, the on-screen
display language of the receiver is changed simultaneously.
Press AMP MENU, then check “<HDMI>” - “CTRL.HDMI” on the display panel. If “CTRL.HDMI” is set to “CTRL ON,”
the on-screen display language of the receiver may be changed simultaneously when you change the language for
the on-screen display of the TV. Select the language on the receiver again to return to the previous setting.
4-731-211-11(2) Copyright 2018 Sony Corporation
117


Help Guide
MULTI CHANNEL AV RECEIVER
STR-DH790
You cannot tune to radio stations.
The signal of the stations is too weak for automatic tuning. Use direct tuning.
No stations have been preset or the preset stations have been cleared (when tuning by scanning preset stations is
used). Preset the stations.
Press DISPLAY repeatedly so that the frequency appears on the display panel.
4-731-211-11(2) Copyright 2018 Sony Corporation
119

Help Guide
MULTI CHANNEL AV RECEIVER
STR-DH790
RDS does not work (for European and Asia-Pacific models only).
Make sure that you are tuned to an FM RDS station.
The service may be temporarily out of order. Contact the radio station and find out whether they actually provide the
service in question.
Select a stronger FM station.
The station you tuned to is not transmitting the RDS signal or the signal is weak.
4-731-211-11(2) Copyright 2018 Sony Corporation
120

Help Guide
MULTI CHANNEL AV RECEIVER
STR-DH790
Pairing cannot be done.
Move the BLUETOOTH device closer to the receiver.
Pairing may not be possible if there are other BLUETOOTH devices near the receiver. In this case, turn off the other
BLUETOOTH devices.
If you are prompted to enter a passkey during the pairing operation, enter [0000].
4-731-211-11(2) Copyright 2018 Sony Corporation
121

Help Guide
MULTI CHANNEL AV RECEIVER
STR-DH790
Cannot make a BLUETOOTH connection.
The BLUETOOTH device you attempted to connect does not support the A2DP profile, and cannot be connected
with the receiver.
Press BLUETOOTH on the receiver to connect to the last connected BLUETOOTH device.
Turn on the BLUETOOTH function of the BLUETOOTH device.
Establish a connection from the BLUETOOTH device.
The pairing registration information has been erased. Perform the pairing operation again.
While connected to a BLUETOOTH device, this receiver cannot be detected by other BLUETOOTH devices.
Erase the pairing registration information of the BLUETOOTH device and perform the pairing operation again.
4-731-211-11(2) Copyright 2018 Sony Corporation
122

Help Guide
MULTI CHANNEL AV RECEIVER
STR-DH790
The sound skips or fluctuates, or the connection is lost.
The receiver and the BLUETOOTH device are too far apart.
If there are obstructions between the receiver and your BLUETOOTH device, remove these or move the receiver
and/or the BLUETOOTH device away from the obstructions.
If there is a device that generates electromagnetic radiation, such as a wireless LAN, other BLUETOOTH device, or
a microwave oven nearby, move it away.
4-731-211-11(2) Copyright 2018 Sony Corporation
123

Help Guide
MULTI CHANNEL AV RECEIVER
STR-DH790
The sound of your BLUETOOTH device cannot be heard on the receiver.
Turn up the volume on your BLUETOOTH device first, and then adjust the volume using
+ on the remote control
(or MASTER VOLUME on the receiver).
4-731-211-11(2) Copyright 2018 Sony Corporation
124

Help Guide
MULTI CHANNEL AV RECEIVER
STR-DH790
Severe humming or noise.
If there are obstructions between the receiver and your BLUETOOTH device, remove them or move the receiver
and/or the BLUETOOTH device away from the obstructions.
If there is a device that generates electromagnetic radiation, such as a wireless LAN, other BLUETOOTH device, or
a microwave oven nearby, move it away.
Turn down the volume of the connected BLUETOOTH device.
4-731-211-11(2) Copyright 2018 Sony Corporation
125

Help Guide
MULTI CHANNEL AV RECEIVER
STR-DH790
The Control for HDMI function does not work properly.
Check the HDMI connection with the receiver (refer to the supplied Operating Instructions).
Enable the Control for HDMI function on the TV. For details, refer to the operating instructions of the TV.
Wait for a while, and then try again. If you unplug the receiver, it will take a while before the operation is completed.
Wait for 15 seconds or longer, and then try again.
If you unplug the HDMI cable or change the connection, repeat the procedures of “Preparing to use the “BRAVIA”
Sync function.”
Make sure your TV is connected to the HDMI TV OUT jack of the receiver.
Press AMP MENU, then set “<HDMI>” - “CTRL.HDMI” to “CTRL ON” on the display panel.
Make sure the connected device supports the Control for HDMI function.
Enable the Control for HDMI function on the connected device. For details, refer to the operating instructions of the
connected device.
The types and number of devices that can be controlled by the “BRAVIA” Sync feature are restricted by the HDMI
CEC standard as follows:
Recording devices (Blu-ray Disc recorders, DVD recorders, etc.): up to 3 devices
Playback devices (Blu-ray Disc players, DVD players, etc.): up to 3 devices
Tuner-related devices: up to 4 devices (one of them is used by this receiver)
Audio system (receiver/headphones): up to 1 device (used by this receiver)
4-731-211-11(2) Copyright 2018 Sony Corporation
126

Help Guide
MULTI CHANNEL AV RECEIVER
STR-DH790
The remote control does not function.
Point the remote control at the remote control sensor on the receiver.
Remove any obstructions between the remote control and the receiver.
Replace both of the batteries in the remote control with new ones if they are weak.
4-731-211-11(2) Copyright 2018 Sony Corporation
127

Help Guide
MULTI CHANNEL AV RECEIVER
STR-DH790
Reverting to the factory default settings
You can clear all memorized settings and restore the receiver to the factory default settings by the following procedure.
Be sure to use the buttons on the receiver to perform this operation.
Note
It takes a few minutes for the memory to be cleared completely. Do not turn the receiver off until “CLEARED *” appears on the
display panel.
4-731-211-11(2) Copyright 2018 Sony Corporation
Turn off the receiver.
1
Hold down
(power) on the receiver for 5 seconds.
“CLEARING” flashes on the display panel for a while, then changes to “CLEARED *”.
2
128

Help Guide
MULTI CHANNEL AV RECEIVER
STR-DH790
Resetting sound fields to the default settings
Be sure to use the buttons on the receiver to perform this operation.
4-731-211-11(2) Copyright 2018 Sony Corporation
Turn off the receiver.
1
While holding down MUSIC, press
(power) on the receiver.
“S.F. CLEAR” appears on the display panel and all sound fields are reset to their default setting.
2
129

Help Guide
MULTI CHANNEL AV RECEIVER
STR-DH790
Customer support websites
Refer to the following websites for the latest information on the receiver.
For customers in the USA:
http://esupport.sony.com/
For customers in Canada:
http://esupport.sony.com/CA/
For customers in Europe:
www.sony.eu/support
For customers in Asia-Pacific countries and regions:
http://www.sony-asia.com/support
4-731-211-11(2) Copyright 2018 Sony Corporation
130

Help Guide
MULTI CHANNEL AV RECEIVER
STR-DH790
Trademarks
This receiver incorporates Dolby (*1) Digital Surround and the DTS (*2) Digital Surround System.
The terms HDMI and HDMI High-Definition Multimedia Interface, and the HDMI Logo are trademarks or registered
trademarks of HDMI Licensing Administrator, Inc. in the United States and other countries.
“BRAVIA” is a trademark of Sony Corporation.
“PlayStation” is a registered trademark or trademark of Sony Interactive Entertainment Inc.
WALKMAN® and WALKMAN® logo are registered trademarks of Sony Corporation.
The BLUETOOTH® word mark and logos are registered trademarks owned by the Bluetooth SIG, Inc. and any use
of such marks by Sony Corporation is under license. Other trademarks and trade names are those of their respective
owners.
All other trademarks and registered trademarks are of their respective holders. In this manual, ™ and ® marks are
not specified.
4-731-211-11(2) Copyright 2018 Sony Corporation
Manufactured under license from Dolby Laboratories. Dolby, Dolby Atmos, Dolby Audio, Dolby Vision, and the double-D symbol are
trademarks of Dolby Laboratories.
*1
For DTS patents, see http://patents.dts.com. Manufactured under license from DTS, Inc. DTS, the Symbol, DTS and the Symbol together,
DTS:X, and the DTS:X logo are registered trademarks or trademarks of DTS, Inc. in the United States and/or other countries. © DTS, Inc.
All Rights Reserved.
*2
131
