
aveva.com
AVEVA™
formerly Wonderware
Historian Administration Guide

© 2021 AVEVA Group plc and its subsidiaries. All rights reserved. Page 2
© 2021 AVEVA Group plc and its subsidiaries. All rights reserved.
No part of this documentation shall be reproduced, stored in a retrieval system, or transmitted by any means,
electronic, mechanical, photocopying, recording, or otherwise, without the prior written permission of AVEVA.
No liability is assumed with respect to the use of the information contained herein.
Although precaution has been taken in the preparation of this documentation, AVEVA assumes no responsibility
for errors or omissions. The information in this documentation is subject to change without notice and does not
represent a commitment on the part of AVEVA. The software described in this documentation is furnished under
a license agreement. This software may be used or copied only in accordance with the terms of such license
agreement.
ArchestrA, Avantis, Citect, DYNSIM, eDNA, EYESIM, InBatch, InduSoft, InStep, IntelaTrac, InTouch, OASyS,
PIPEPHASE, PRiSM, PRO/II, PROVISION, ROMeo, SIM4ME, SimCentral, SimSci, Skelta, SmartGlance, Spiral
Software, WindowMaker, WindowViewer, and Wonderware are trademarks of AVEVA and/or its subsidiaries. An
extensive listing of AVEVA trademarks can be found at: https://sw.aveva.com/legal. All other brands may be
trademarks of their respective owners.
Publication date: Monday, September 27, 2021
Contact Information
AVEVA Group plc
High Cross
Madingley Road
Cambridge
CB3 0HB. UK
https://sw.aveva.com/
For information on how to contact sales and customer training, see https://sw.aveva.com/contact.
For information on how to contact technical support, see https://sw.aveva.com/support.
To access the AVEVA Knowledge and Support center, visit https://softwaresupport.aveva.com.

© 2021 AVEVA Group plc and its subsidiaries. All rights reserved. Page 3
Welcome ............................................................................................................ 12
AVEVA Historian Documentation Set ................................................................................................... 12
Chapter 1 Getting Started ................................................................................ 14
About AVEVA Historian Licensing ........................................................................................................ 14
Viewing License Information ...................................................................................................................... 14
Refreshing the License Information ........................................................................................................... 15
Registering AVEVA Historian Servers ................................................................................................... 15
Registering an AVEVA Historian ................................................................................................................. 17
Editing Registration Properties .................................................................................................................. 18
Deleting a Registered Historian .................................................................................................................. 18
Moving a Registered Server to a Different Group ...................................................................................... 19
About Administrative Tools ................................................................................................................. 19
About the System Management Console .................................................................................................. 19
About the Management Console ........................................................................................................... 21
About the Configuration Editor .............................................................................................................. 22
System Management Console Menu Commands .................................................................................. 24
Microsoft SQL Server Management Studio ................................................................................................ 25
Registering a Server in Microsoft SQL Server Management Studio ....................................................... 26
Navigating in Microsoft SQL Server Management Studio ...................................................................... 26
About AVEVA Historian Insight ............................................................................................................ 26
Starting AVEVA Historian Insight ................................................................................................................ 26
Starting and Stopping AVEVA Historian ............................................................... 28
About the Startup Process ................................................................................................................... 28
Starting the AVEVA Historian ..................................................................................................................... 28
About Connecting to SQL Server ............................................................................................................ 29
Manually Starting SQL Server ................................................................................................................. 29
Stopping the AVEVA Historian .................................................................................................................... 30
Starting and Stopping Modules .................................................................................................................. 30
Closing the System Management Console ................................................................................................. 32
Configuring General Startup Options ......................................................................................................... 32
Shutting Down the Entire AVEVA Historian ............................................................................................... 33
Contents

© 2021 AVEVA Group plc and its subsidiaries. All rights reserved. Page 4
Creating Server Groups ....................................................................................................................... 34
Adding a Server Group ............................................................................................................................... 34
Renaming a Server Group .......................................................................................................................... 35
Deleting a Server Group ............................................................................................................................. 35
About System-Level Consistency ......................................................................................................... 35
Time Handling ............................................................................................................................................ 35
System Parameters .................................................................................................................................... 36
System Messages ....................................................................................................................................... 40
AVEVA Historian Processes ........................................................................................................................ 41
About System Driver and System Tags ....................................................................................................... 43
Error Count Tags ..................................................................................................................................... 43
Date Tags ................................................................................................................................................ 44
Time Tags ................................................................................................................................................ 44
Storage Space Tags ................................................................................................................................. 44
I/O Statistics Tags ................................................................................................................................... 44
System Monitoring Tags ......................................................................................................................... 46
Miscellaneous (Other) Tags .................................................................................................................... 47
Classic Event Subsystem Tags ................................................................................................................. 48
Replication Subsystem Tags ................................................................................................................... 48
Performance Monitoring Tags ................................................................................................................ 49
Defining Tags ...................................................................................................... 53
About Tags ......................................................................................................................................... 53
Tag Naming Conventions ........................................................................................................................... 53
Tag Properties (Tag Metadata)................................................................................................................... 54
Tag Configuration Versioning ................................................................................................................. 55
About Floating-Point Values ....................................................................................................................... 55
Viewing and Configuring Tags .............................................................................................................. 56
Configuring Analog Tags ............................................................................................................................. 57
Adding an Analog Tag ............................................................................................................................. 57
Editing General Information for an Analog Tag ...................................................................................... 61
Editing Acquisition Information for a Tag ............................................................................................... 62
Editing Storage Information for an Analog Tag ...................................................................................... 64
Editing Limit Information for an Analog Tag........................................................................................... 65
Editing Summary Information for an Analog Tag ................................................................................... 68
Editing Extended Properties for an Analog Tag ...................................................................................... 68
Configuring the Engineering Units Catalog ............................................................................................. 70
Configuring Engineering Units ................................................................................................................ 81
Configuring Discrete Tags ........................................................................................................................... 84
Adding a Discrete Tag ............................................................................................................................. 84
Editing General Information for a Discrete Tag ...................................................................................... 84
Editing Storage Information for a Discrete Tag ...................................................................................... 85
Editing Extended Properties for a Discrete Tag ...................................................................................... 86
Configuring Message Pairs...................................................................................................................... 88
Configuring String Tags ............................................................................................................................... 90
Adding a String Tag ................................................................................................................................. 90

© 2021 AVEVA Group plc and its subsidiaries. All rights reserved. Page 5
Editing General Information for a String Tag .......................................................................................... 91
Editing Storage Information for a String Tag .......................................................................................... 91
Editing Extended Properties for a String Tag .......................................................................................... 92
Configuring Event Tags ............................................................................................................................... 94
Adding an Event Tag ............................................................................................................................... 95
Copying Tag Definitions .............................................................................................................................. 97
Deleting a Tag ............................................................................................................................................. 97
Organizing Tags into Groups ...................................................................................................................... 98
Adding a Group ....................................................................................................................................... 98
Renaming a Group .................................................................................................................................. 99
Adding a Tag to a Group ......................................................................................................................... 99
Deleting a Group or Tag Reference ...................................................................................................... 100
Filtering Tags in the SMC Details Pane ..................................................................................................... 100
Applying a Filter .................................................................................................................................... 101
Disabling or Removing a Filter .............................................................................................................. 102
Importing and Exporting Tag Configurations ...................................................................................... 102
Importing an InTouch Data Dictionary ..................................................................................................... 103
Before You Import ................................................................................................................................ 103
Importing or Reimporting a Dictionary ................................................................................................ 106
Viewing Tags Associated with an InTouch Node .................................................................................. 114
Importing or Exporting Tag Information .................................................................................................. 115
Encoding Formats for Configuration Exports ....................................................................................... 116
Configuration Exporter Error Log ......................................................................................................... 116
Exporting a Configuration ..................................................................................................................... 117
Importing a Configuration .................................................................................................................... 123
Editing the Configuration Text File ....................................................................................................... 126
Configuring Data Acquisition............................................................................. 130
About the Data Acquisition Subsystem .............................................................................................. 130
Data Acquisition Components .................................................................................................................. 130
I/O Server Addressing ............................................................................................................................... 131
I/O Server Redundancy ............................................................................................................................ 132
Redirecting I/O Servers to InTouch HMI Software ................................................................................... 132
Time Synchronization for Data Acquisition .............................................................................................. 132
Viewing Data Acquisition Information ............................................................................................... 134
Configuring IDASs ............................................................................................................................. 135
About IDASs .............................................................................................................................................. 135
IDAS Configuration ............................................................................................................................... 135
IDAS Data Processing ............................................................................................................................ 136
IDAS Security and Firewalls .................................................................................................................. 136
IDAS Error Logging ................................................................................................................................ 138
IDAS Store-and-Forward Capability ...................................................................................................... 138
IDAS Redundancy .................................................................................................................................. 139
IDAS Autonomous Startup .................................................................................................................... 139
Adding an IDAS ......................................................................................................................................... 139
Editing General Information for an IDAS .................................................................................................. 141

© 2021 AVEVA Group plc and its subsidiaries. All rights reserved. Page 6
Editing Advanced Information for an IDAS .............................................................................................. 142
Setting a remote IDAS to "Classic" ........................................................................................................... 144
Deleting an IDAS ....................................................................................................................................... 144
Configuring I/O Server Types ............................................................................................................. 144
Adding an I/O Server Type ....................................................................................................................... 144
Editing I/O Server Type Properties ........................................................................................................... 145
Deleting an I/O Server Type ..................................................................................................................... 146
Configuring I/O Servers ..................................................................................................................... 146
Adding an I/O Server ................................................................................................................................ 147
Editing General Information for an I/O Server ......................................................................................... 147
Editing Storage Rule Information for an I/O Server ................................................................................. 148
Deleting an I/O Server .............................................................................................................................. 150
Configuring Topics ............................................................................................................................ 151
Adding a Topic .......................................................................................................................................... 151
Editing General Information for a Topic ................................................................................................... 152
Editing Storage Rules for a Topic .............................................................................................................. 153
Deleting a Topic ........................................................................................................................................ 155
Reinitializing I/O Topics ............................................................................................................................ 155
Managing Data Storage ..................................................................................... 157
About Data Storage ........................................................................................................................... 157
About Data Storage Subsystem Processes ............................................................................................... 158
Integration with Microsoft SQL Server ..................................................................................................... 158
About Delta Storage Mode ................................................................................................................ 158
Time and Value Deadbands for Delta Storage ......................................................................................... 159
Swinging Door Deadband for Delta Storage ............................................................................................ 160
Benefits of the Swinging Door Deadband............................................................................................. 161
Additional Options that Affect the Swinging Door Deadband ............................................................. 162
Swinging Door Deadband Examples ..................................................................................................... 163
Managing the AVEVA Historian Runtime Database ............................................................................ 167
Changing the Properties for the Runtime Database ................................................................................ 167
Managing the Runtime Database ............................................................................................................. 169
Backing Up the Runtime Database ........................................................................................................... 169
Backing Up the Database ...................................................................................................................... 169
Restoring the Database ........................................................................................................................ 171
Managing a Runtime Database Object ..................................................................................................... 172
Space Management for Event and Summary History .............................................................................. 173
Managing Partitions and History Blocks ............................................................................................. 173
Storage Partition Locations ...................................................................................................................... 173
Circular Storage .................................................................................................................................... 174
Alternate Storage .................................................................................................................................. 174
Permanent Storage ............................................................................................................................... 175
Buffer Storage ....................................................................................................................................... 175
About the Auto-Summary Partition ......................................................................................................... 175
About Block Gaps ..................................................................................................................................... 175
Viewing Storage and Auto-Summary Partitions ....................................................................................... 177

© 2021 AVEVA Group plc and its subsidiaries. All rights reserved. Page 7
Viewing History Blocks ............................................................................................................................. 179
History Block Notation and Creation .................................................................................................... 180
Automatic Deletion of History Blocks ................................................................................................... 180
Backing Up History Blocks .................................................................................................................... 181
About VSS-Aware Backups ................................................................................................................... 181
Backing Up Data Stored on Network Shares ............................................................................................ 182
Adding History Blocks from Prior Versions to the System ....................................................................... 182
Importing, Inserting, or Updating History Data ................................................. 183
Ways to Acquire History Data ............................................................................................................ 183
Guidelines for Importing, Inserting, and Updating History Data ............................................................. 183
Importing History Data ...................................................................................................................... 184
Importing Data from an InTouch History File ........................................................................................... 186
Importing Data from CSV Files ................................................................................................................. 187
Predefined CSV File Import Folders ...................................................................................................... 188
About Normal CSV File Imports ............................................................................................................ 189
About Fast Load CSV File Imports ......................................................................................................... 189
General File Format for a CSV Import ................................................................................................... 190
Formatting the CSV File for a Normal Import ....................................................................................... 190
Formatting the CSV File for a Fast Load Import.................................................................................... 192
Handling of NULL Values in CSV Files ................................................................................................... 193
Copying a CSV File into an Import Folder ............................................................................................. 193
Running the Historian Data Importer from a Command Prompt ............................................................ 194
Inserting or Updating Data with Transact-SQL Statements ................................................................. 194
INSERT ... VALUES Syntax ......................................................................................................................... 195
Using the wwVersion Parameter for INSERTs .......................................................................................... 196
Inserting Real-time Original Data ......................................................................................................... 196
Inserting Original Non-Streamed Data ................................................................................................. 197
Inserting Latest Revision Data .............................................................................................................. 197
UPDATE Syntax ......................................................................................................................................... 197
Renaming Tags .................................................................................................................................. 199
About Historian Tag Ownership ............................................................................................................... 199
Preparing to Rename Application Server Tags ......................................................................................... 200
Renaming Tags Using the Tag Rename Utility .......................................................................................... 200
Updating Replicated Data.................................................................................................................. 202
Managing and Configuring Replication .............................................................. 204
About Replication ............................................................................................................................. 204
Replication Schedules............................................................................................................................... 204
Replication Schedules and Daylight Savings Time ................................................................................ 205
Replication Groups ................................................................................................................................... 206
How Replication is Handled for Different Types of Data ......................................................................... 207
Streaming Replication ........................................................................................................................... 207
Queued Replication .............................................................................................................................. 208
Tag Configuration Synchronization between Tiered Historians ............................................................... 208

© 2021 AVEVA Group plc and its subsidiaries. All rights reserved. Page 8
Replication Run-time Operations ............................................................................................................. 209
Replication Latency ............................................................................................................................... 209
Replication Delay for "Old" Data .......................................................................................................... 209
Continuous Operation .......................................................................................................................... 209
Overflow Protection ............................................................................................................................. 210
Security for Data Replication .................................................................................................................... 210
Adding a Replication Server............................................................................................................... 210
Adding AVEVA Insight as a Replication Server ......................................................................................... 214
Specifying Naming Schemes for Replication ............................................................................................ 219
Editing Replication Server Properties ....................................................................................................... 223
Deleting a Replication Server ................................................................................................................... 225
Configuring Tags to Be Replicated ...................................................................................................... 226
Adding a Single Tag for Simple Replication .............................................................................................. 226
Adding Multiple Tags for Simple Replication ........................................................................................... 227
Editing Simple Replication Tag Properties ............................................................................................... 228
Deleting a Simple Replication Tag ............................................................................................................ 229
Adding a Replication Schedule ........................................................................................................... 230
Editing Replication Schedule Properties .................................................................................................. 231
Deleting a Replication Schedule ............................................................................................................... 232
Adding a Replication Group ............................................................................................................... 232
Editing Replication Group Properties ....................................................................................................... 233
Deleting a Replication Group ................................................................................................................... 234
Creating a Replication Group for Multiple Servers .................................................................................. 235
About Summary Replication .............................................................................................................. 235
About Analog Summary Replication ........................................................................................................ 236
About State Summary Replication ........................................................................................................... 236
Adding a Summary Tag ............................................................................................................................. 237
Finding Source Tags .................................................................................................................................. 238
Adding Multiple Summary Tags ............................................................................................................... 241
Creating a Summary Tag Quickly Using Default Settings ......................................................................... 242
Editing Summary Tag Properties .............................................................................................................. 243
Deleting Replication for a Summary Tag .................................................................................................. 244
Viewing Source Details for a Summary Tag ........................................................................................ 245
Viewing the List of Associated Replicated Tags for a Tag .................................................................... 246
Managing Security ............................................................................................ 248
About Security .................................................................................................................................. 248
Windows Operating System Security ....................................................................................................... 248
Default Windows User Account for AVEVA Historian Services ............................................................ 249
SQL Server Security .................................................................................................................................. 249
Authentication ...................................................................................................................................... 249
Default Windows Security Groups ........................................................................................................ 250
AVEVA Historian Default Logins............................................................................................................ 250
Database Authorization ........................................................................................................................ 251
AVEVA Historian Default Users and Roles ............................................................................................ 252

© 2021 AVEVA Group plc and its subsidiaries. All rights reserved. Page 9
Default SQL Server Login for AVEVA Historian Services ....................................................................... 253
Management Console Security ................................................................................................................ 254
Verifying the Authentication Mode for a SQL Server .......................................................................... 254
Managing Logins ............................................................................................................................... 255
Viewing Login Properties .......................................................................................................................... 256
Adding a Login .......................................................................................................................................... 256
Local Times and System Times ........................................................................................................... 259
Managing Users and Roles using the Configurator.............................................................................. 260
Viewing All Users and Role Assignments ................................................................................................. 261
Adding Users and Assigning Roles ............................................................................................................ 262
Managing Users and Roles using SQL Server Management Studio ...................................................... 264
Viewing All Users and Roles for a Database ............................................................................................. 265
Adding a New Database User ................................................................................................................... 265
Adding a User to a Role ............................................................................................................................ 266
Managing Permissions ...................................................................................................................... 267
Setting Object Permissions ....................................................................................................................... 267
Setting Statement Permissions ................................................................................................................ 269
Managing Passwords ........................................................................................................................ 270
Adding a User to a Windows Operating System Group ....................................................................... 271
Viewing or Changing System-Wide Properties .................................................. 275
About the Configuration Subsystem .................................................................................................. 275
Configuration Subsystem Components .................................................................................................... 275
About the Runtime and Holding Databases ............................................................................................. 276
Runtime Database ................................................................................................................................ 276
Holding Database .................................................................................................................................. 277
About the Configuration Service .............................................................................................................. 277
Dynamic Configuration ............................................................................................................................. 277
Effects of Configuration Changes on the System ................................................................................. 278
Cases in Which Configuration Changes Are Not Committed ................................................................ 279
Viewing Properties for System Parameters ........................................................................................ 279
Editing System Parameters ...................................................................................................................... 279
Adding a System Parameter ................................................................................................................. 280
Committing Configuration Changes ................................................................................................... 281
Tracking Modifications ...................................................................................................................... 282
About Modification Tracking for Configuration Changes......................................................................... 283
About Modification Tracking for Historical Data Changes ....................................................................... 283
Turning Modification Tracking On/Off ..................................................................................................... 284
Viewing Database Modifications .............................................................................................................. 284
Viewing the Runtime Database Report .............................................................................................. 287
Using a Redundant Historian ............................................................................................................. 287
Changing the Default Network Protocol ............................................................................................. 288
Configuring a Custom TCP Port .......................................................................................................... 288

© 2021 AVEVA Group plc and its subsidiaries. All rights reserved. Page 10
Historian Client Web Customization .................................................................................................. 290
White Labeling .......................................................................................................................................... 290
Configuring Customizable White Label Settings ................................................................................... 290
CORS Whitelisting ..................................................................................................................................... 292
Configuring the CORS Whitelist ............................................................................................................ 292
Export Data to Excel Online ...................................................................................................................... 293
Minimum Supported Versions of Microsoft Excel ................................................................................ 294
Registering and Installing the Excel Add-In .......................................................................................... 294
Applying the Add-In to a Workbook ..................................................................................................... 296
Monitoring the System ..................................................................................... 298
Monitoring the General Status of AVEVA Historian ............................................................................ 298
Viewing the Current System Status .......................................................................................................... 299
Resetting Error Counts .......................................................................................................................... 300
Viewing the Status of System Modules .................................................................................................... 301
Viewing System Status Messages ............................................................................................................. 302
Viewing Status Information ............................................................................................................... 302
Monitoring Data Acquisition ............................................................................................................. 303
Monitoring Replications .................................................................................................................... 304
Monitoring Client Connections .......................................................................................................... 305
Monitoring System Messages ............................................................................................................ 305
Viewing Errors in the Windows Event Viewer .................................................................................... 306
Monitoring System Tags from within InTouch HMI Software .............................................................. 308
Using Windows Performance Logs and Alerts .................................................................................... 308
Browsing the ArchestrA Model View Using Historian Clients ............................ 309
Model View Representation in the Historian Namespace ................................................................... 309
Model View Replication to the Historian ........................................................................................... 310
Replication Configuration using the IDE ............................................................................................. 311
Configuring Replication for a WinPlatform .............................................................................................. 311
Configuring Replication for an AppEngine ............................................................................................... 312
Enabling Replication at Runtime ........................................................................................................ 313
Viewing Historized Attributes in the AVEVA Historian Configuration Editor ........................................ 314
Browsing the Model Hierarchy in a Historian Client ........................................................................... 314
Legacy Features ................................................................................................ 317
Classic Storage Subsystem ................................................................................................................. 317
Memory Management for Retrieval of Classic Storage Data ................................................................... 318
About the Real-Time Data Window ......................................................................................................... 319
Determining If the Real-Time Window Is Configured Appropriately for a Swinging Door Deadband . 320
Classic Event Subsystem .................................................................................................................... 320
Classic Event Subsystem Components ..................................................................................................... 321

© 2021 AVEVA Group plc and its subsidiaries. All rights reserved. Page 11
Uses for the Classic Event Subsystem ...................................................................................................... 322
Classic Event Subsystem Features and Benefits ....................................................................................... 323
Classic Event Subsystem Performance Factors ........................................................................................ 323
Event Tags ................................................................................................................................................ 324
Event Detectors ........................................................................................................................................ 324
SQL-Based Detectors ............................................................................................................................ 325
Schedule Detectors ............................................................................................................................... 326
External Detectors ................................................................................................................................ 327
Event Actions ............................................................................................................................................ 327
Generic SQL Actions .............................................................................................................................. 327
Snapshot Actions .................................................................................................................................. 328
E-mail Actions ....................................................................................................................................... 328
Deadband Actions ................................................................................................................................. 328
Summary Actions .................................................................................................................................. 329
Event Action Priorities .......................................................................................................................... 330
Classic Event Subsystem Resource Management .................................................................................... 330
Detector Thread Pooling ....................................................................................................................... 330
Action Thread Pooling .......................................................................................................................... 331
Classic Event Subsystem Database Connections .................................................................................. 332
Handling of Event Overloads and Failed Queries ................................................................................. 333
Classic Event Subsystem Variables ........................................................................................................... 334
Classic Event Subsystem Tags................................................................................................................... 334
Configuring Classic Events ........................................................................................................................ 335
Accessing Event Information ................................................................................................................ 335
Adding an Event Tag ............................................................................................................................. 336
Editing General Information for an Event Tag ...................................................................................... 339
Configuring Detectors ........................................................................................................................... 340
Configuring Actions............................................................................................................................... 343
Using the Tag Finder ............................................................................................................................. 354
Retrieving Logged Event Data ............................................................................................................... 357
Viewing Summary Information ............................................................................................................. 357
Using ActiveEvent ................................................................................................................................. 360
History Block Storage for Alarms and Events ........................................................................................... 368
A2ALMDB Database .......................................................................................................................... 368
Configuring Purge or Archive Settings ..................................................................................................... 369
Configuring the Database Connection .................................................................................................. 370
Configuring How Much Data to Purge from the Server ....................................................................... 371
Configuring the Archive of Purged Data ............................................................................................... 372
Configuring Log File Settings ................................................................................................................ 373
Manually Purging and Archiving the Database ..................................................................................... 374
Setting a Schedule for Automatic Purging ............................................................................................ 376
Restoring the Alarm Database ................................................................................................................. 377
Configuring the Database Connection .................................................................................................. 378
Configuring Which Files to Restore ...................................................................................................... 378
Starting a Database Restore Operation ................................................................................................ 380
Migrating Data from the A2ALMDB Database to History Blocks ............................................................. 380

© 2021 AVEVA Group plc and its subsidiaries. All rights reserved. Page 12
This guide provides information about administering and maintaining installed AVEVA Historian servers. This
guide describes the tools to administer the historian, as well as how to configure the system to start storing
plant data. This guide also describes administrative tasks such as changing the default security, configuring
system-wide parameters, and monitoring the system.
The AVEVA Historian software is tightly integrated with Microsoft products. A working knowledge of both
Microsoft SQL Server and Microsoft Windows operating systems is required. You should be familiar with
administering Microsoft SQL Server and understand how to use the administrative tools provided with Microsoft
Windows operating systems.
For more information on Microsoft SQL Server or the Microsoft Windows operating system, see your Microsoft
documentation.
AVEVA Historian Documentation Set
The AVEVA Historian documentation set includes the following guides:
AVEVA System Platform Installation Guide
This guide provides information on installing the AVEVA Historian, including hardware and software
requirements and migration instructions.
AVEVA Historian Concepts Guide
This guide provides an overview of the entire AVEVA Historian system and its key components.
AVEVA Historian Scenarios Guide
This guide discusses how to use AVEVA Historian to address some common customer scenarios.
AVEVA Historian Administration Guide
This guide describes how to administer and maintain an installed AVEVA Historian, such as configuring data
acquisition and storage, managing security, and monitoring the system.
AVEVA Historian Retrieval Guide
This guide describes the retrieval modes and options that you can use to retrieve your data.
AVEVA Historian Database Reference
This guide provides documentation for all of the AVEVA Historian database entities, such as tables, views,
and stored procedures.
AVEVA Historian Glossary
This guide provides definitions for terms used throughout the documentation set.
Welcome

AVEVA™ Historian Administration Guide
Welcome
© 2021 AVEVA Group plc and its subsidiaries. All rights reserved. Page 13
In addition, the AVEVA License Manager Guide describes the AVEVA License Manager and how to use it to
install, maintain, and delete licenses and license servers on local and remote computers.

© 2021 AVEVA Group plc and its subsidiaries. All rights reserved. Page 14
About AVEVA Historian Licensing
You must have a license to run AVEVA Historian. Your license allows for a certain number of tags on your server.
For example, you may have a 5,000-tag license. As you add tags, the License Server activates a portion of the
license, in 50-tag increments. For example, if you initially add 120 tags to AVEVA Historian, License Server
activates three 50-tag increments.
If you have used the full number of tags allowed by your license, you can add an incremental license (for
example, to add another 25,000 tags) to your existing license.
If your AVEVA Historian server is an Enterprise Server that you are also using as a replication (tier-2) server for
another historian, all of the replicated tags stored on this server count against this server’s license.
Your AVEVA Historian license does not limit the number of these types of tags on your server:
Locally replicated tags (that is, the original tag is on the same server)
Auto-summary tags
If your license expires, or you don’t yet have a license, you can still:
Continue acquiring and storing tags indefinitely
Retrieve values for up to 32 tags for the last 7 days
For more information about licensing AVEVA Historian and other AVEVA products, see the AVEVA Licensing
Guide.
Viewing License Information
To view license information
1. In the System Management Console, expand a server group, then expand a server.
2. Right-click Management Console, point to All Tasks, and then click View License Information. The License
Information dialog box appears.
Chapter 1
Getting Started

AVEVA™ Historian Administration Guide
Chapter 1 – Getting Started
© 2021 AVEVA Group plc and its subsidiaries. All rights reserved. Page 15
This dialog box shows the type of license and, if
applicable, the expiration date of the license for your
AVEVA Historian.
Depending on the license you have, your system is
allocated a certain number these resources:
Tag Count -- Shows the total number of tags you
can configure for data retrieval in AVEVA
Historian. The Used column shows how many
tags you are currently using.
History Duration (Days) -- Shows the maximum
number of days for which historical data can be
retrieved.
Replication -- Indicates whether data replication
is allowed for this system.
Note: The license status and license tag count (allocated and used) also display in the system status window. See
Viewing the Current System Status on page 299.
Refreshing the License Information
The Configuration Manager provides updated license information according to the license refresh rate (once an
hour for server features). However, you can manually force the Configuration Manager to read the license file
and refresh the license information. For example, if you recently added incremental tags to your license, you can
manually refresh the license information to show that update.
To refresh the license information
1. In the System Management Console, expand a server group, then expand a server.
2. Right-click Management Console, point to All Tasks, and then click Refresh License Information. A
confirmation dialog box appears.
3. Click OK.
Registering AVEVA Historian Servers
When you install AVEVA Historian, it registers the local machine as a historian server. If you want to administer
remote historian servers, you must first register them within the console. When you register a server, you are
giving the System Management Console a logical name and login IDs to connect to both:
The AVEVA Historian Configuration Manager.
The Microsoft SQL Server database.
You can register and administer multiple historians from within a single instance of the console. When
registering a server, a list of your previously registered servers is available for selection.

AVEVA™ Historian Administration Guide
Chapter 1 – Getting Started
© 2021 AVEVA Group plc and its subsidiaries. All rights reserved. Page 16
To be able to administer the historian (for example, start and stop the server), you must provide a Windows
security login that has administrative rights on the AVEVA Historian computer. You also must be logged in as a
Historian administrator, with the aaAdministrators database role enabled. If you are using the console remotely
for the AVEVA Historian, you do not need to be an administrator on the computer on which you are using the
console on.
If you do not supply the login when you register the server, you are prompted to supply it when you attempt to
execute an administrative command. If the login you supply does not have administrative permissions, the
Management Console is set to read-only mode.
The SQL Server login you use must have the "aaAdministrators" database role to make changes to the historian
system configuration, as it is stored in the Runtime database. By default, Windows accounts that are members
of the local Windows "aaAdministrator" group are assigned this role. If you do not log in with the SQL Server
administrative permissions, functionality is restricted. You must have aaPowerUsers capability enabled to make
tag-level changes.
All registration information associated with a particular server name is stored in the Windows registry on the
computer running the System Management Console, not in the console file (.MSC). In addition, all registration
information is stored according to the current user. This has the following implications:
If you register the same historian in multiple console files (.MSC), and you then edit the status or
configuration for the historian in one .MSC file, the status and configuration is reflected in the other .MSC
files in which that historian appears.
If you copy a saved .MSC file from one computer to another, the registration properties for a particular
historian are not copied with the .MSC file.
The same historian can have different registration properties for each user who logs on to the System
Management Console computer, even though all users may be using the same .MSC file.

AVEVA™ Historian Administration Guide
Chapter 1 – Getting Started
© 2021 AVEVA Group plc and its subsidiaries. All rights reserved. Page 17
Registering an AVEVA Historian
To register an AVEVA Historian:
1. In the System Management Console tree, right-click the server (or group) and then click New Historian
Registration. The Registered Historian Properties dialog box appears.
2. In the Historian box, either type the name of a new server to register or select a previously registered server
from the list. If you select a previously registered server, all options saved for that server appear in the
dialog box. If you edit these options and click OK, the new settings are saved.
3. In the Management Console - Windows Login Information area, enter the Windows login information that
the Management Console uses to connect to the Configuration Manager. The Configuration Manager runs
as a Windows service on the historian computer.
Domain
Name of the Windows domain in which the login is validated. A domain is a group of computers that share a
central database for security authentication.
Login Name
Valid login name for Windows.
Password
Valid login password for Windows.
Always prompt for login information
If selected, stored login information is not used and, instead, a login prompt appears each time access is
required.
4. In the Configuration Editor - SQL Server Login Information area, configure the login that the Configuration
Editor uses to authenticate to the associated Microsoft SQL Server.

AVEVA™ Historian Administration Guide
Chapter 1 – Getting Started
© 2021 AVEVA Group plc and its subsidiaries. All rights reserved. Page 18
Note: Use the correct case for login IDs and passwords if your database is case-sensitive.
To use a valid Windows login, click Use Windows authentication. The login that you specified in step 3 is
used. Also, make sure that the current Windows user is a valid user on the AVEVA Historian computer and
that the user account is assigned to the proper Runtime database roles.
To use a valid SQL Server login, click Use SQL Server authentication. The following options become
available:
Login Name
Valid login ID for the SQL Server.
Password
Valid login password for the SQL Server.
Always prompt for login information
If selected, stored login information is not used and, instead, a login prompt appears each time access is
required.
Important: SQL Server authentication is provided for backward compatibility only. For improved security, we
recommend that you use Windows authentication.
5. Click Display Historian state in console to show AVEVA Historian information in the status window of the
System Management Console.
6. In the Refresh Rate box, type the rate at which the status, client connections, and data acquisition
information are refreshed in the details pane. You can specify a value of 0 or between 500 ms and
86,400,000 ms. If you set this rate to 0, the server status is checked one time when the console opens. After
that, you need to manually refresh the details pane.
7. Click OK.
Editing Registration Properties
To edit registration properties for a historian
1. In the System Management Console tree, right-click the server, and then click Edit Historian Registration
Properties. The Registered Historian Properties dialog box appears.
For information on the options in this dialog box, see Registering an AVEVA Historian on page 17.
2. Edit the properties and then click OK.
Deleting a Registered Historian
Deleting a registered historian server simply removes it from the System Management Console list. All
registration options are stored along with the server name in case you want to register it again later.
To delete a registered historian
1. In the System Management Console tree, right-click the server and then click Delete. You are prompted to
confirm the deletion.
2. Click Yes.

AVEVA™ Historian Administration Guide
Chapter 1 – Getting Started
© 2021 AVEVA Group plc and its subsidiaries. All rights reserved. Page 19
Moving a Registered Server to a Different Group
Moving a server to a different group within the console requires deleting it and then registering it again under
the target group.
To move a registered server to a different server group
1. In the console tree, delete the server you want to move. For more information, see Deleting a Registered
Historian on page 18.
2. Right-click the group to which you want to move the server, and then click New Historian Registration. The
Registered Historian Properties dialog box appears.
3. In the Historian box, select the server you just deleted from the list.
4. Click OK.
About Administrative Tools
This section describes key administrative tools that you will use with AVEVA Historian:
System Management Console, which includes the Management Console and Configuration Editor
SQL Server Management Studio
AVEVA Historian also includes some data import tools. For more information, see AVEVA Historian Database
Export/Import Utility (see "Importing or Exporting Tag Information" on page 115) and Historian Data Importer
(see "Importing History Data" on page 184).
In addition, see Microsoft documentation for administrative tools included with the Windows operating system
and SQL Server.
About the System Management Console
With the System Management Console, you can:
Start and stop the AVEVA Historian software
Monitor the system
Make configuration changes
The System Management Console is a saved Microsoft Management Console (MMC) file, which has an .msc
extension. Microsoft Management Console is a container application that can host one or more third-party
snap-in applications.
The snap-in for the historian includes a main console tree to add one or more servers that can be administered.
The console tree functions like Windows Explorer or the folder view in Internet Explorer. The snap-in also
includes areas for monitoring and controlling each historian in the console tree, as well as for configuring each
server.
The System Management Console can be installed on a different computer than the historians you want to
administer. You can perform all monitoring and administrative tasks from a single computer anywhere on your
network.

AVEVA™ Historian Administration Guide
Chapter 1 – Getting Started
© 2021 AVEVA Group plc and its subsidiaries. All rights reserved. Page 20
Some of the general functionality of the System Management Console is provided by the MMC container. See
the Microsoft Management Console documentation for for more detailed information on using the MMC.
Note: The System Management Console is different from regular consoles in that you can alter the position of
the first column. Also, when you shut down the console and restart it, any changes to the column layout are not
persistent.
The System Management Console window consists of two main areas: the console tree and the details pane.
The console tree (also called the scope pane) contains all items available within the console. For the AVEVA
Historian software, this includes the registered servers, the Management Console, and the Configuration Editor.
Additional ArchestrA consoles, such as the Log Viewer, may appear in the ArchestrA System Management
Console.
If the System Management Console is installed on the same computer as the historian, the server is
automatically registered and appears under the default Historian Group item in the console tree. However, if
the System Management Console is installed on a remote computer, you must register a historian. For more
information, see Registering AVEVA Historian Servers on page 15.

AVEVA™ Historian Administration Guide
Chapter 1 – Getting Started
© 2021 AVEVA Group plc and its subsidiaries. All rights reserved. Page 21
The details pane (also called the results pane) shows the relevant data pertaining to the item currently selected
in the console tree.
If you double-click an item in the details pane, a Properties dialog box appears, if applicable.
For some of the tree items, you can export all associated information shown in the details pane to a text file.
Exported items include History Blocks and anything under the Configuration Editor item. You can save a
particular sub-range of rows by first highlighting them with the mouse. To export, right-click the parent item in
the console tree pane and then click Export List. You can open the file using any text editor and then print the
data.
About the Management Console
You can use the Management Console portion of the main console tree to start and stop the AVEVA Historian, as
well as perform some system-level tasks, such as monitoring the status of the server and resetting error counts.
If you have multiple historian servers registered in the console, make sure that you select the server you want to
manage before you right-click in the tree to select a short-cut menu command.

AVEVA™ Historian Administration Guide
Chapter 1 – Getting Started
© 2021 AVEVA Group plc and its subsidiaries. All rights reserved. Page 22
Note: Before you can use the System Management Console to administer an AVEVA Historian, the historian
server must be registered within the application. You can add and register any server that you can connect to on
the network. Also, if you are administering many servers, you can organize them into groups in the console tree.
About the Configuration Editor
Use the Configuration Editor portion of the console tree to configure the AVEVA Historian.
For example, the Configuration Editor allows you to:
Import a tag data dictionary from an InTouch application. For more information, see Importing an InTouch
Data Dictionary on page 103.
Add, edit, and delete tags. For more information, see Defining Tags on page 53.
Configure data acquisition, such as I/O Servers, topics, and tags. For more information, see Configuring Data
Acquisition on page 130.
Configure paths to storage locations. For more information, see Managing Data Storage on page 157.
Administer system-wide properties, such as modification tracking. For more information, see Viewing or
Changing System-Wide Properties on page 275.
Configure replication servers, groups, and tags. For more information, see Managing and Configuring
Replication on page 204.
Create groups in the public and private folders. For more information, see Creating Server Groups on page
34.
Note: You can also manage classic event definitions from here. For more information, see Configuring Classic
Events on page 335 in the AVEVA Historian Supplemental Reference.
Configuration Editor Toolbar Buttons
Toolbar buttons specific to the Configuration Editor are:

AVEVA™ Historian Administration Guide
Chapter 1 – Getting Started
© 2021 AVEVA Group plc and its subsidiaries. All rights reserved. Page 23
Button
Description
Add a new item under the currently selected item in the console tree.
Open a Properties dialog box for the currently selected item in the details pane.
Delete the currently selected item.
Start the wizard to add an analog tag.
Start the wizard to add a discrete tag.
Start the wizard to add an event tag.
Start the wizard to add a string tag.
Commit database changes to the system. For more information, see Dynamic
Configuration on page 277.
Start the Tag Importer wizard. For more information, see Importing an InTouch
Data Dictionary on page 103.
Open a dialog box to search for database modifications. For more information, see
Tracking Modifications on page 282.
Open the Tag Finder dialog box to search for tags to add to a tag grouping in the
console tree. For more information, see Using the Tag Finder on page 354.
MMC toolbars are not moveable or redockable.
Determining the Configuration Editor Version
The version of the Configuration Editor that you are using must be the same version as the AVEVA Historian that
you want to manage.
To determine the Configuration Editor version
1. In the System Management Console tree, expand a server group and then expand a server.
2. Click Configuration Editor.
3. On the Help menu, click About AVEVA Historian Configuration Editor. The About AVEVA Historian
Configuration Editor dialog box appears, showing the current version.

AVEVA™ Historian Administration Guide
Chapter 1 – Getting Started
© 2021 AVEVA Group plc and its subsidiaries. All rights reserved. Page 24
4. Click OK.
System Management Console Menu Commands
The following commands appear on both the Action menu and on the shortcut menu that can be accessed by
right-clicking an item in the console tree. The appearance of certain menu commands depends on which item is
selected from the tree. Also, the same menu command may appear for multiple tree items.
This table does not describe standard menu commands such as Copy and Delete.
Command
Description
New Historian Group
Add a new server group to the console tree.
New Historian Registration
Register an AVEVA Historian for use with the console.
Edit Historian Registration
Properties
Change the registration properties for the selected historian.
Start Historian/Stop Historian
Start or stop the historian.
Start Module/Stop Module
Start or stop individual modules that are a part of the historian.
Server Startup Options
Configure optional modules to start when the historian starts.
Reset Error Counts
Reset the number of errors and warnings back to 0.
View License Information
View licensing details for the historian.
Refresh License Information
Update the licensing information.
Reinitialize Topic/All Topics
Disconnect and then reconnect to one or more topics.
Load Messages
Change the language in which system messages appear. This command
only appears if you have existing error logs from versions prior to the
IndustrialSQL Server version 9.0 historian.
Track Modifications
Show a list of modifications to the system.
Commit Pending Changes
Commit changes to the system configuration.
Import Tags
Import tag definitions from an InTouch application into the historian.
New IDAS
Add a new IDAS.
New I/O Server Type
Add a new I/O Server type.
New I/O Server
Add a new I/O Server.
New Topic
Add a new topic.

AVEVA™ Historian Administration Guide
Chapter 1 – Getting Started
© 2021 AVEVA Group plc and its subsidiaries. All rights reserved. Page 25
Command
Description
New Analog Tag
Add a new analog tag.
New Discrete Tag
Add a new discrete tag.
New String Tag
Adding a new string tag.
New Event Tag
Add a new event tag.
New Message
Add a new message.
New Engineering Unit
Add a new engineering unit.
New Tag
Add a new tag for the type you select in the console tree.
New Group
Add a new tag grouping in the Public Groups or Private Groups area of
the console tree.
Add Tags to Group
Access the Tag Finder dialog box to search for tags to add to a tag
group.
Filter
Apply a filter to the list of tags in the details pane.
Add Replication Schedule
Add a new replication schedule.
Create Replication Groups
Add new replication groups.
New Replication Server
Add a new replication server.
Add Single Tag
Add a single tag for replication.
Add Multiple Tag
Add multiple tags for replication.
Microsoft SQL Server Management Studio
As an administrator, you will probably spend the majority of your time interacting with Microsoft SQL Server
through the Microsoft SQL Server Management Studio, in which you can manage the Microsoft SQL Server areas
of AVEVA Historian Server.
Using Microsoft SQL Server Management Studio, you can perform the following database functions (including
the Runtime database):
Register servers
Manage backups
Manage databases
Manage devices
Manage logins and permissions
Manage replication

AVEVA™ Historian Administration Guide
Chapter 1 – Getting Started
© 2021 AVEVA Group plc and its subsidiaries. All rights reserved. Page 26
Manage objects, such as tables, views, stored procedures, triggers, indexes, rules, defaults, and user-defined
data types
Schedule tasks
Drag-and-drop objects from one server to another or within a server
Generate SQL scripts
To start Microsoft SQL Server Management Studio, on the Start menu of the Windows Taskbar, point to the
Microsoft SQL Server program group, and then click SQL Server Management Studio.
Registering a Server in Microsoft SQL Server Management Studio
The first time the Microsoft SQL Server Management Studio starts, the Local server node is added by default. To
manage a remote server using Microsoft SQL Server Management Studio, you must first register it. When you
register a server, you are giving the Microsoft SQL Server Management Studio a logical name and user account
to log on to the Microsoft SQL Server database.
The instructions for registering a server vary depending on which version of Microsoft SQL Server you are using.
See your Microsoft documentation for information on how to start the registration wizard.
Navigating in Microsoft SQL Server Management Studio
You must be connected to a server to manage it in Microsoft SQL Server Management Studio.
After you connect to the server, you can view the entire console tree associated with the server, including all of
the devices and databases. You can expand folders just as you do in Windows Explorer.
About AVEVA Historian Insight
AVEVA Historian Insight is a browser client included as part of AVEVA Historian. It is the on-premises version of
AVEVA Insight. This product gives you instant access to all of your organization's production and performance
data any way you want it.
Historian Insight provides an easy-to-use graphical interface for analyzing data, creating charts, and compiling
dashboards of related information. Once you save your content, you can share it with other team members or
reuse it in other documents.
Note: AVEVA Historian Insight supports Google Chrome, Microsoft Internet Explorer 11, Microsoft Edge on
Surface with Windows 10, Mozilla Firefox, and Safari on iPad with Retina display (in landscape mode).
Starting AVEVA Historian Insight
To open and use AVEVA Historian Insight in IE or Chrome:
1. Open Internet Explorer or Chrome, and then type the following URL:
http://<servername>:32569
where servername is the name of the AVEVA Historian server.
2. Select and then select Help for more information.

AVEVA™ Historian Administration Guide
Chapter 1 – Getting Started
© 2021 AVEVA Group plc and its subsidiaries. All rights reserved. Page 27
To open and use AVEVA Historian Insight in Firefox
1. Open Firefox and, in the address bar, type:
about:config
2. If prompted, agree to the caution statement from Firefox3.x or later.
3. After the configuration page loads, in the filter box type:
network.negotiate-auth
4. Edit the value for "network.negotiate-auth.trusted-uris" by double-clicking the row and typing the following
:
<servername>
Examples: "historiansvr01" or "localhost"

© 2021 AVEVA Group plc and its subsidiaries. All rights reserved. Page 28
About the Startup Process
When AVEVA Historian is started, these things happen:
Start the associated Microsoft SQL Server database, if not already running.
Verify start information stored in the SQL Server and the registry.
Start each historian process.
Create a new history block on disk to store data.
Start communication with the data sources (IDASs).
Begin storing data.
Starting the AVEVA Historian
To start the historian
1. Start the System Management Console. (From the Windows Start menu, point to Programs, AVEVA, and
then click the System Management Console icon .)
2. In the System Management Console tree, expand a server group and then expand a server.
3. Right-click Management Console and then click Start Historian. If the login credentials were not already
saved, the standard login screen displays.
Chapter 2
Starting and Stopping AVEVA Historian

AVEVA™ Historian Administration Guide
Chapter 2 – Starting and Stopping AVEVA Historian
© 2021 AVEVA Group plc and its subsidiaries. All rights reserved. Page 29
4. Enter the domain and the login name and password. The domain can be "." to identify the local computer.
5. Click OK.
Note: You cannot start the system if there is insufficient space in the circular storage location (less than 50
percent of the minimum threshold).
For the historian to start, TCP/IP must be enabled for the SQL Server. The following error message appears if
TCP/IP is not enabled: "Fatal initialization error - unable to start. (Failed to open connection to configuration
database)." By default, SQL Server Express and Developer Edition do not have TCP/IP enabled.
About Connecting to SQL Server
The Configuration Editor requires a valid Windows or SQL Server login account to connect to the AVEVA
Historian. You can specify this account when you register a server. If you did not configure the account upon
registration, or if you selected to display a logon prompt, you need to provide a login account as soon as you
click the Configuration Editor item in the console tree.
For more information on SQL Server logins, see SQL Server Security on page 249.
When a connection is established, the Configuration Editor must evaluate the user permissions. If SQL Server
authentication is used, the user is a member of the aaAdministrators or aaPowerUsers group, and full
permissions are available. In all other cases, read-only permissions are applied.
Manually Starting SQL Server
The System Management Console, used to start the AVEVA Historian, also starts the Microsoft SQL Server.
Alternatively, you can manually start the Microsoft SQL Server with the SQL Server Configuration Manager. This
application is loaded as part of the Microsoft SQL Server installation.
To start SQL Server with Configuration Manager
1. On the Start menu, point to the Microsoft SQL Server program group, then open the Configuration Tools
folder, and click SQL Server Configuration Manager. The SQL Server Configuration Manager window
appears.

AVEVA™ Historian Administration Guide
Chapter 2 – Starting and Stopping AVEVA Historian
© 2021 AVEVA Group plc and its subsidiaries. All rights reserved. Page 30
2. In the Server list, click the default server name for Microsoft SQL Server. The services appear in the details
pane.
3. Right-click the service you want to start and select Start to start the service. The status of the service
appears at the bottom of the window.
Stopping the AVEVA Historian
When you stop the historian, it stops storing new data. However, it still functions as a data provider to clients.
Services such as HCAP, retrieval, indexing, and the OLE DB provider are left running. To completely stop these
services, shut down and disable the historian. For more information, see Shutting Down the Entire AVEVA
Historian on page 33.
To stop the historian
1. In the System Management Console tree, expand a server group and then expand a server.
Right-click Management Console and then click Stop Historian. If the login credentials were not already
saved, the standard login screen appears.
2. Enter the domain (if necessary) and the login name and password. You can optionally select to not stop
IDASs configured for store-and-forward.
3. Click OK.
Starting and Stopping Modules
Some of the components that make up the AVEVA Historian can be stopped and started individually without
affecting data acquisition, storage, and retrieval. These modules include the event subsystem and the AVEVA
Historian I/O Server (aahIOSvrSVC).
To start a module
1. In the console tree, expand a server group and then expand a server.

AVEVA™ Historian Administration Guide
Chapter 2 – Starting and Stopping AVEVA Historian
© 2021 AVEVA Group plc and its subsidiaries. All rights reserved. Page 31
2. Right-click Management Console, point to All Tasks, and then click Start Module. The Select Modules to
Start dialog box appears.
The Server box shows the name of the AVEVA Historian to which the options apply.
3. In the Modules window, click to select the optional modules to start or stop. (Only those modules that are
currently stopped appear in the Modules window.)
For more information about the Classic Event subsystem, see the the AVEVA Historian Supplemental Guide.
For more information about the AVEVA Historian I/O Server (aahIOSvrSVC), see AVEVA Historian Processes
on page 41.
For more information about system modules related to the client access point, see Data Acquisition
Components on page 130.
To select all of the modules, click Select All. To cancel the selection of all of the modules, click Select None.
4. Click OK.
To stop a module
1. In the console tree, expand a server group and then expand a server.

AVEVA™ Historian Administration Guide
Chapter 2 – Starting and Stopping AVEVA Historian
© 2021 AVEVA Group plc and its subsidiaries. All rights reserved. Page 32
2. Right-click Management Console, point to All Tasks, and then click Stop Module. The Select Modules to
Stop dialog box appears.
The Server box shows the name of the AVEVA Historian to which the options apply.
3. In the Modules window, click to select the optional modules to start or stop. (Only those modules that are
currently started appear in the Modules list.)
For more information about the Classic Event subsystem, see the the AVEVA Historian Supplemental Guide.
For more information about the AVEVA Historian I/O Server (aahIOSvrSVC), see AVEVA Historian Processes
on page 41.
For more information about system modules related to the client access point, see Data Acquisition
Components on page 130.
To select all of the modules, click Select All. To cancel the selection of all of the modules, click Select None.
4. Click OK.
Closing the System Management Console
If you made any changes to the System Management Console, such as making server registration changes or
adding tag groups, you are prompted to save those changes when you close the console.
Configuring General Startup Options
You can configure the AVEVA Historian to automatically start when the computer starts. In addition, you can
configure the optional modules to automatically start when the main historian subsystems start. These modules
can be stopped and started individually without affecting data acquisition, storage, and retrieval.
To configure general startup options
1. In the console tree, expand a server group and then expand a server.
2. Right-click Management Console, point to All Tasks, and then click Server Startup Options. The standard
login screen appears.

AVEVA™ Historian Administration Guide
Chapter 2 – Starting and Stopping AVEVA Historian
© 2021 AVEVA Group plc and its subsidiaries. All rights reserved. Page 33
3. Enter the domain, ID, and password in the dialog box and click OK. The Set Historian Startup Options dialog
box appears.
The Server box shows the node name of the computer hosting AVEVA Historian to which the options apply.
4. To automatically start one or more optional modules when the AVEVA Historian starts, click to select the
modules in the Startup Modules window.
To select all modules, click Select All. To cancel the selection of all modules, click Select None.
For more information about the Classic Event subsystem, see Classic Event Subsystem on page 320.
For more information about the AVEVA Historian I/O Server (aahIOSvrSVC), see AVEVA Historian Processes
on page 41.
For more information about system modules related to the client access point, see Data Acquisition
Components on page 130.
5. Click OK.
Shutting Down the Entire AVEVA Historian
During a normal start and stop of the AVEVA Historian, the Configuration Manager service, the retrieval service,
and the OLE DB provider are not shut down and they continue to run. A complete shutdown stops the entire
system, including these services. Also, the Configuration Manager service is disabled so that it cannot be
restarted.
Note: The Configuration Manager service is different than the Configuration Editor portion of the System
Management Console management tool.
To shut down the entire system
1. In the console tree, expand a server group and then expand a server.
2. Right-click Management Console, point to All Tasks, and then click Shutdown (and disable) Historian.
3. Enter the domain, ID, and password in the dialog box and click OK.
4. You are prompted to verify the shutdown.

AVEVA™ Historian Administration Guide
Chapter 2 – Starting and Stopping AVEVA Historian
© 2021 AVEVA Group plc and its subsidiaries. All rights reserved. Page 34
5. Click OK.
When the shutdown is complete, “Disconnected” appears for the system status.
WARNING! If the shutdown -s -t 0 command is used to force a shutdown on the historian server or if the
server is powered off by unplugging the power cord, data loss will occur at the Shutdown/PowerOff time point.
To start the system again, you first need to start the Configuration Manager service and then restart the
historian.
To start the entire system
1. In the console tree, expand a server group and then expand a server.
2. Right-click Management Console, point to All Tasks, and then click Enable (allow to run) Historian. A
confirmation dialog box appears.
3. Click OK.
4. Right-click Management Console and then click Start Historian. The standard login screen appears.
5. Enter the domain (if necessary) and the login name and password.
6. Click OK.
Creating Server Groups
In the System Management Console, you can organize multiple AVEVA Historian instances into groups. A default
group, called "Historian Group," is created for you. You can add servers to this existing group, delete or rename
the group, and add other groups.
Adding a Server Group
To add a server group
1. In the System Management Console tree, right-click Historian and then click New Historian Group. The Add
Server Group dialog box appears.

AVEVA™ Historian Administration Guide
Chapter 2 – Starting and Stopping AVEVA Historian
© 2021 AVEVA Group plc and its subsidiaries. All rights reserved. Page 35
2. In the New Historian Group Name box, type the name of the group. The group name must contain no more
than 40 characters.
3. Click OK.
Renaming a Server Group
To rename a server group
1. In the System Management Console tree, right-click the server group and then click Rename.
2. In the box that appears, type a new name for the server group. The group name must contain no more than
40 characters.
Deleting a Server Group
WARNING! When you delete a server group, you delete all server registrations within that group.
To delete a server group
In the System Management Console tree, right-click the server group and then click Delete.
About System-Level Consistency
AVEVA Historian includes these features for system-level consistency:
Time handling
System parameters
System message
System processes
System driver
System tags
Time Handling
Timestamps for all data are stored in Coordinated Universal Time (UTC). The current UTC time is derived from
the current local time and the time zone setting in the operating system of the computer on which the AVEVA
Historian is running. During data retrieval, timestamps are returned in local time, by default. You can convert the
timestamps so that they are shown in local time by using a special query parameter.
You should use the international date/time format for all timestamps used in queries. The format is:
YYYYMMDD HH:MM:SS.000
where:
YYYY = year
MM = month
DD = day

AVEVA™ Historian Administration Guide
Chapter 2 – Starting and Stopping AVEVA Historian
© 2021 AVEVA Group plc and its subsidiaries. All rights reserved. Page 36
HH = hour
MM = minutes
SS = seconds
000 = milliseconds
The format for timestamps returned from queries is controlled by the default language settings of the SQL
Server login. Make sure that you configure the default language setting for SQL Server logins correctly, especially
in environments with mixed languages/regional settings.
If you have multiple historians and/or are using remote data sources, it is very important that you synchronize
the time between the computers. For more information, see Time Synchronization for Data Acquisition on page
132.
Make sure that you have selected the operating system setting to automatically adjust time for daylight savings,
if the time zone in which the computer is located observes daylight savings time.
System Parameters
A system parameter is a parameter that controls some aspect of the overall AVEVA Historian behavior. The
following table describes the default system parameters:
Name
Description
AllowOriginals
Used to allow the insertion of original data for I/O Server tags.
You must set this parameter to 1 before importing .lgh original
data. For more information, see Importing, Inserting, or
Updating History Data on page 183.
AnalogSummaryTypeAbbreviation
Abbreviation used when generating analog summary
tagnames. For more information, see Specifying Naming
Schemes for Replication on page 219.
AutoSummary
Used for auto-summarization of tag values.
ConfigEditorVersion
(Not editable.) The minimum version number of the
Configuration Editor that can edit the Runtime database. Used
internally by the system.
CounterDeadband
Percentage (0-100) of the rollover value used to distinguish
resets and reversals from rollovers.
DatabaseVersion
(Not editable.) Current version number of the Runtime
database.

AVEVA™ Historian Administration Guide
Chapter 2 – Starting and Stopping AVEVA Historian
© 2021 AVEVA Group plc and its subsidiaries. All rights reserved. Page 37
Name
Description
DataImportPath
Path to the CSV file for an import of external data. For more
information, see Importing Data from CSV Files on page 187.
DBID
(Not editable.) Identifier for the Runtime database.
EventStorageDuration
Maximum duration, in hours, that event records are stored in
the EventHistory table.
EventStorageLogPath
Path for storing logs for event tag data.
Future Time Threshold
Specifies a time threshold in minutes, after which streamed
data values will be re-timestamped. If 0, then no future time
threshold is applied.
GatewayTcpPort
Specifies the TCP port used for gateway communication.
GroupedPrivateNamespace
Specifies whether domain user accounts can have private
namespaces can be created for domain user accounts. 1 =
Domain users are used; 0 = Domain users are not used.
HistorianPartner
The computer name of a partner historian. You can use either
the host name, fully qualified name, or an IP address. Leading
backslashes are optional. The name/IP used must be one that
can be correctly resolved by all of the AppEngine and Historian
Client computers that will connect to the partner. For more
information, see Using a Redundant Historian on page 287.
HistorianVersion
(Not editable.) Current version number and build number of
the AVEVA Historian. The value for this parameter is
automatically supplied when the system starts.
HistoryCacheSize
Allocation of system memory, in MB, of data collected by the
Classic Storage subsystem from AVEVA Historian version 11.5
or earlier. The default is 0.
For more information, see Memory Management for Retrieval
of Classic Storage Data on page 318 in the AVEVA Historian
Supplemental Guide.

AVEVA™ Historian Administration Guide
Chapter 2 – Starting and Stopping AVEVA Historian
© 2021 AVEVA Group plc and its subsidiaries. All rights reserved. Page 38
Name
Description
HistoryDaysAlwaysCached
The duration, in days, for which history block information is
always loaded in memory. The default is 0.
Applicable only for tag information of data collected by the
Classic Storage subsystem from AVEVA Historian version 11.5
or earlier.
InterpolationTypeInteger
The type of interpolation for data values of type integer.
0=Stair-step; 1=Linear. The default is 0. For more information
on interpolation, see Interpolation Type
(wwInterpolationType) in the AVEVA Historian Retrieval Guide.
InterpolationTypeReal
The type of interpolation for data values of type real.
0=Stair-step; 1=Linear. The default is 1.
LicenseServer
Provides the name and port for the License Servers from which
the license is acquired.
LicenseTagCount
(Not editable.) The number of licensed tags allocated to the
system, in 500-tag increments.
MaxCyclicStorageTimeout
Controls the amount of time, in seconds, that AVEVA Historian
waits for new values of cyclically stored tags before storing the
previous one and making it available for retrieval. This
parameter is used to balance three things:
Source latency -- the difference in the source-supplied
timestamp and when the value is received by the historian
Data rate -- the rate at which delta values are reported by
the source
Storage latency -- the amount of time that the Storage
subsystem must wait before it ends a cycle and assigns a
value to it
Setting this parameter to a value other than 0 ensures that the
storage subsystem is not waiting indefinitely to confirm a final
value for the cycle.
ModLogTrackingStatus
Turns modification tracking on or off. The value you specify
will determine what modifications are tracked. For more
information, see Turning Modification Tracking On/Off on
page 284.

AVEVA™ Historian Administration Guide
Chapter 2 – Starting and Stopping AVEVA Historian
© 2021 AVEVA Group plc and its subsidiaries. All rights reserved. Page 39
Name
Description
OldDataSynchronizationDelay
Time delay, in seconds, between when changes for "old" data
(inserts, updates, and store-and-forward data) must be sent
from the tier-1 historian to the tier-2 historian.
QualityRule
Indicates whether the system should use values having a
quality of Good and Uncertain, or having only a quality of
Good. 0 = Good and Uncertain; 1 = Good only. The default is 0.
For more information on the quality rule, see Quality Rule
(wwQualityRule) in the AVEVA Historian Retrieval Guide.
RealTimeWindow
The maximum delay, in seconds, for which data is considered
real-time data applying the swinging door deadband. The
delay is relative to the current time. Valid values are between
30 and 300 milliseconds. The default is 60. For more
information, see About the Real-Time Data Window on page
319 in the AVEVA Historian Server Reference.
ReplicationConcurrentOperations
Limits the total number of retrieval client objects performing
calculations in a retrieval based calculations for a time cycle.
ReplicationDefaultPrefix
The default prefix for replication tags on the tier-2 historian. If
you change ReplicationDefaultPrefix system parameter, all
replication tags that use the old prefix are not updated to use
the newer prefix. For more information, see Specifying
Naming Schemes for Replication on page 219.
ReplicationTcpPort
The TCP port number the Historian Client Access Port (HCAP)
service listens on for any incoming-connection requests from
an HCAL-enabled client. It must match the port number the
HCAL-enabled client is using for communication with the
historian. When modifying this system parameter on an
historian node, you must also modify the port number in the
Windows Firewall exception list for the historian replication
service or another HCAL-enabled client to the same value. This
port number must be unique on the historian node; that is, no
other applications on the historian node should be listening on
this port number.
SimpleReplicationNamingScheme
The default naming scheme used for configuring simple
replication tags. For more information, see see Specifying
Naming Schemes for Replication on page 219.

AVEVA™ Historian Administration Guide
Chapter 2 – Starting and Stopping AVEVA Historian
© 2021 AVEVA Group plc and its subsidiaries. All rights reserved. Page 40
Name
Description
StateSummaryTypeAbbreviation
Abbreviation used when generating state summary tagnames.
For more information, see see Specifying Naming Schemes for
Replication on page 219.
SuiteLinkTimeSyncInterval
Frequency, in minutes, that IDASs will attempt to
synchronize the timestamping mechanism for associated I/O
Servers. If this parameter is set to 0, no time synchronization
will occur. For more information, see Time Synchronization for
Data Acquisition on page 132.
SummaryCalculationTimeout
The maximum expected delay, in minutes, for calculating
summary data for replicated tags. Setting this parameter too
high will delay associated summary calculations unnecessarily.
Setting it too low will cause the system to prematurely
calculate summaries and then later require additional
processing to correct those calculations.
SummaryReplicationNamingScheme
The default naming scheme used for configuring summary
replication tags. For more information, see see Specifying
Naming Schemes for Replication on page 219 .
SummaryStorageDuration
Maximum duration, in hours, that summary records will be
stored in the legacy SummaryHistory table.
SysPerfTags
Used to turn on performance monitoring tags for the AVEVA
Historian system. 0 = Off; 1 = On. The default is 1. For more
information, see Performance Monitoring Tags on page 49.
TimeStampRule
Used to determine which timestamp within a retrieval cycle to
use for a data value. 0 = Use the timestamp at the start of the
cycle; 1 = Use the timestamp at the end of the cycle. The
default is 1. For more information, see TimeStamp Rule
(wwTimeStampRule) in the AVEVA Historian Retrieval Guide.
TimeSyncIODrivers
If enabled, the AVEVA Historian will send time synchronization
commands to all associated remote IDASs. For more
information, see Time Synchronization for Data Acquisition on
page 132.
System Messages
System messages include error messages and informational messages about the state of the AVEVA Historian as
a whole or for any of the internal subsystems and individual processes.
AVEVA™ Historian Administration Guide
Chapter 2 – Starting and Stopping AVEVA Historian
© 2021 AVEVA Group plc and its subsidiaries. All rights reserved. Page 41
System messages are logged to these places:
ArchestrA Logger
Windows Event Log
You can view this log with the Windows Event Viewer. Not all messages are logged to the Windows event
log. In general, only user actions and exceptional events are written to this log. The messages are logged
with the "Historian" or the name of the AVEVA Historian service as the source.
System messages are divided into the following categories:
Category
Description
FATAL
The process cannot continue. An error of this severity results in a system shutdown.
CRITICAL
These types of errors will cause malfunctions in the data storage or retrieval systems,
such as data loss or corruption.
ERROR
General errors. For example, address validation errors during system startup. These
errors may result in an orderly shutdown of the system, but will not preclude system
operation in most cases.
WARNING
Messages that simply notify the operator of parameter settings or events that have
occurred. For example, failure to link a dynamically-linked procedure entry point for a
non-obligatory function will be logged as a warning.
INFO
Messages relating to startup progress or the commencement of active data storage.
DEBUG
Debugging messages, which will not typically appear in released versions of the
system.
AVEVA Historian messages are logged to the Log Viewer as follows:
Critical, fatal, and error messages are logged as "Error" messages. The appropriate indicator, either
"CRITICAL," FATAL," or "ERROR," will be prefixed to message.
Warnings will be logged as "Warning" message, with no prefix.
Informational messages will be logged as "Info" messages, with no prefix.
Debug messages will be logged as "Trace" messages, with no prefix.
For information on monitoring the system, see Monitoring the System.
AVEVA Historian Processes
The following table describes the AVEVA Historian processes:

AVEVA™ Historian Administration Guide
Chapter 2 – Starting and Stopping AVEVA Historian
© 2021 AVEVA Group plc and its subsidiaries. All rights reserved. Page 42
Service/Process Name
Executable Name
Description
AVEVA Historian Client
Access Point
(aahClientAccessPoint)
aahClientAccessPoint.exe
Manages communication from HCAL clients
to the historian . For more information, see
Configuring Data Acquisition on page 130.
AVEVA Historian
Configuration
(InSQLConfiguration)
aahCfgSvc.exe
Handles all configuration requests, as well as
hosts the interfaces for manual data input
and retrieval. For more information, see
About the Configuration Subsystem on page
275.
AVEVA Historian Event
Storage Process
aahEventStorage.exe
Manages the storage of alarms and events
to history blocks.
AVEVA Historian Classic Event
System (InSQLEventSystem)
aahEventSvc.exe
Searches through history data and
determines if specific events have occurred.
For more information, see Classic Event
Subsystem on page 320 in the AVEVA
Historian Supplemental Guide
AVEVA Historian Indexing
(InSQLIndexing)
aahIndexSvc.exe
Manages the internal indexing of history
data that was stored by AVEVA Historian
prior to 2014 R2.
AVEVA Historian IOServer
(InSQLIOServer)
aahIOSvrSvc.exe
Provides realtime data values from the
historian to network clients. For more
information, see the AVEVA Historian
Retrieval Guide.
Data Import Subsystem
(InSQLManualStorage)
aahManStSvc.exe
Accepts incoming data from CSV files and
store-and-forward history blocks from
Classic IDASs (shipped with AVEVA Historian
prior to 2017). Stores the data in history
blocks.
AVEVA Historian OData/REST
web service
aahOWINHostLocal.exe
Retrieves alarm and event data from history
block storage.
Classic Data Redirector
Subsystem (InSQLStorage)
aahStoreSvc.exe
Accepts incoming real-time data from Classic
IDASs and redirects it to AVEVA Historian
storage.
AVEVA Historian Storage
Process
aahStorage.exe
Storage process. Accepts incoming plant
data and stores it to history blocks. Not a
system service. For more information, see
About Data Storage on page 157.

AVEVA™ Historian Administration Guide
Chapter 2 – Starting and Stopping AVEVA Historian
© 2021 AVEVA Group plc and its subsidiaries. All rights reserved. Page 43
Service/Process Name
Executable Name
Description
AVEVA Historian System
Driver (InSQLSystemDriver)
aahDrvSvc.exe
Generates data values for various system
monitoring tags. For more information, see
About System Driver and System Tags on
page 43.
AVEVA Historian Metadata
Server
aahMetadataServer.exe
Maintains the tag metadata cache for tags
stored by the storage process. Not a system
service.
AVEVA Historian Search
HistorianSearch-x64.exe
Search process. Used to store and retrieve
tags, saved content and keywords.
Note: The search process has a fixed
minimum overhead of 500 MB of memory
usage. If a large number of tags are involved
in a search, it is not unusual for the process
to consume up to 1 GB of memory.
For more information on Windows services, see your Microsoft documentation.
About System Driver and System Tags
The system driver is an internal process that monitors key variables within an operating AVEVA Historian and
outputs the values by means of a set of system tags. The system driver runs as a Windows service and starts
automatically when the historian is started.
The system tags are automatically created when you install the historian. Also, additional system tags are
created for each IDAS and replication server you configure.
The current value for an analog system tag is sent to the Storage subsystem according to a specified rate, in
milliseconds. All date/time tags report the local time for the historian.
Legacy tags from upgraded systems may be retained.
Error Count Tags
The following analog tags have a storage rate of 1 minute (60000 ms). All error counts are since the AVEVA
Historian is restarted or since or the last error count reset.
TagName
Description
SysCritErrCnt
Number of critical errors
SysErrErrCnt
Number of non-fatal errors
SysFatalErrCnt
Number of fatal errors
SysWarnErrCnt
Number of warnings

AVEVA™ Historian Administration Guide
Chapter 2 – Starting and Stopping AVEVA Historian
© 2021 AVEVA Group plc and its subsidiaries. All rights reserved. Page 44
Date Tags
The following analog tags have a storage rate of 5 minutes (300000 ms).
TagName
Description
SysDateDay
Day of the month
SysDateMonth
Month of the year
SysDateYear
Four-digit year
Time Tags
All of the following tags are analog tags. Each value change is stored (delta storage).
TagName
Description
SysTimeHour
Hour of the day
SysTimeMin
Minute of the hour
SysTimeSec
Second of the minute
Storage Space Tags
The following analog tags have a storage rate of 5 minutes (300000 milliseconds). Space remaining is measured
in MB.
TagName
Description
SysSpaceAlt
Space left in the alternate storage path
SysSpaceBuffer
Space left in the buffer storage path
SysSpaceMain
Space left in the circular storage path
SysSpacePerm
Space left in the permanent storage path
I/O Statistics Tags
The following analog tags can be used to monitor key I/O information.
TagName
Description
SysDataAcqNBadValues*
Number of data values with bad quality received. This tag has a

AVEVA™ Historian Administration Guide
Chapter 2 – Starting and Stopping AVEVA Historian
© 2021 AVEVA Group plc and its subsidiaries. All rights reserved. Page 45
TagName
Description
storage rate of 5 seconds. The maximum is 1,000,000.
SysDataAcqNOutsideRealtime*
The number of values per second that were discarded because
they arrived outside of the real-time data window. This tag has
a storage rate of 5 seconds. The maximum is 1,000,000.
This tag has been deprecated and will only be available in
systems migrated from AVEVA Historian 2014 and earlier.
SysDataAcqOverallItemsPerSec
The number of items received from all data sources, including
HCAP. This tag has a storage rate of 10 seconds. The maximum
is 100,000.
SysDataAcqRxItemPerSecN*
Tag value update received per second. This tag has a storage
rate of 10 seconds.
SysDataAcqRxTotalItemsN*
Total number of tag updates received since last startup for this
IDAS. This tag has a storage rate of 10 seconds.
SysPerfDataAcqNBadValues*
Number of data values with bad quality received. This tag has a
storage rate of 5 seconds. The maximum is 1,000,000.
SysStatusAverageEventCommitSize
Number of events written to the A2ALMDB database per
minute.
SysStatusAverageEventCommitTime
Average time, in seconds, it takes to write events to the
A2ALMDB database.
SysStatusEventCommitPending
Number of events that have not yet been written to the
A2ALMDB database.
SysStatusRxEventsPerSec
Number of events received per second, calculated every 10
seconds.
SysStatusRxItemsPerSec
Tag value update received per second for the system driver.
This tag has a storage rate of 10 seconds.
SysStatusRxTotalDuplicateEvents
Total number of duplicate events received through different
channels since startup (and discarded as duplicates).
SysStatusRxTotalEvents
Total number of events received since startup.
SysStatusRxTotalItems
Total number of tag updates received since last startup for the
system driver. This tag has a storage rate of 10 seconds.
SysStatusTopicsRxData
Total number of topics receiving data. Each active IDAS "topic"
and each active HCAL connection are counted. Note that
process and event history, even from the same source, count as
separate connections.

AVEVA™ Historian Administration Guide
Chapter 2 – Starting and Stopping AVEVA Historian
© 2021 AVEVA Group plc and its subsidiaries. All rights reserved. Page 46
*This status tag will exist for each defined IDAS. The identifying number (N) in the is the IODriverKey from the
IODriver table. The number 0 designates MDAS and only applies to the SysDataAcqNBadValues and
SysDataAcqNOutsideRealtime tags.
System Monitoring Tags
Unless otherwise noted, for the following discrete tags, 0 = Bad; 1 = Good.
Tag
Description
SysClassicManual Storage
Status of the data import service (aahManStSvc.exe).
SysClassicStorage
Status of the classic data redirector service (aahStoreSvc.exe).
SysClientAccessPoint
Status of the Client Access Point service (aahClientAccessPoint.exe).
SysConfiguration
Status of the configuration service (aahCfgSvc.exe). This parameter is
set to 1 as long as a dynamic configuration is required or in progress.
SysDataAcqN*
Status of the IDAS service (aahIDASSvc.exe).
SysEventStorage
Status of the event storage service (aahEventStorage.exe).
SysEventSystem
Status of the classic event system service (aahEventSvc.exe).
SysIndexing
Status of the indexing service (aahIndexSvc.exe).
SysInSQLIOS
Status of the AVEVA Historian I/O Server (aahIOSvrSvc.exe).
SysMetadataServer
Status of the metadata server process (aahMetadataServer.exe)
SysOLEDB
Status of the OLE DB provider (loaded by SQL Server).
SysPulse
Discrete "pulse" tag that changes every minute.
SysReplication
Status of Replication service (aahReplSvc.exe).
SysRetrieval
Status of the retrieval service (aahRetSvc.exe).
SysStatusSFDataPending
Discrete tag indicating if one or more HCAL clients have
store-and-forward data that needs to be sent to the historian. NULL =
Unknown; 0 = No store-and-forward data; 1 =At least one HCAL client
has data.
SysStorage
Status of the storage process (aahStorage.exe).
SysSystemDriver
Status of the system driver (aahDrvSvc.exe).
SysStatusMode
Analog tag indicating the operational state of the historian. If the
value is NULL, the historian is stopped. 0 = Read-only mode. 1 =
Read/write mode.

AVEVA™ Historian Administration Guide
Chapter 2 – Starting and Stopping AVEVA Historian
© 2021 AVEVA Group plc and its subsidiaries. All rights reserved. Page 47
*This status tag will exist for each defined IDAS. The identifying number (N) appended to the end of the tag is
the IODriverKey from the IODriver table.
Miscellaneous (Other) Tags
The following table describes miscellaneous tags.
TagName
Description
SysConfigStatus
Number of database items affected by a dynamic configuration
(that is, the number of entries in the ConfigStatusPending table
when the commit is performed). This value is cumulative and
not reset until the system is completely restarted.
SysHistoryCacheFaults
The number of history blocks loaded from disk per minute. The
maximum value is 1,000. The storage rate for this analog tag is
60 seconds. For more information on the history cache, see
Memory Management for Retrieval of Classic Storage Data on
page 318 in the AVEVA Historian Supplemental Guide.
SysHistoryCacheUsed
Number of bytes used for history block information. The
maximum value is 3,000,000,000. The storage rate for this
analog tag is 30 seconds.
SysHistoryClients
The number of clients that are connected to the Indexing
service. The maximum value is 200. The storage rate for this
analog tag is 30 seconds.
SysMinutesRun
Minutes since the last startup. The storage rate is 60 seconds
for this analog tag.
SysRateDeadbandForcedValues
The total number of values that were forced to be stored as a
result of using a swinging door storage deadband. This number
reflects all forced values for all tags since the system was
started.
SysString
String tag whose value changes every hour.
SysTagHoursQueried
A floating point value updated every minute that indicates the
total number of "tag retrieval hours" queried by all client
applications during that minute. For example, if a single trend
queries four tags for a 15-minute period, that is "1.0 tag
retrieval hours".
All tags, including replication sync queue tags and non-existent
tags, are counted.
Unlicensed tags are not counted.

AVEVA™ Historian Administration Guide
Chapter 2 – Starting and Stopping AVEVA Historian
© 2021 AVEVA Group plc and its subsidiaries. All rights reserved. Page 48
Classic Event Subsystem Tags
The following table describes the Classic Event subsystem tags.
TagName
Description
SysEventCritActionQSize
Size of the critical action queue. For more information, see -old-Action
Thread Pooling in the AVEVA Historian Supplemental Guide.
SysEventDelayedActionQSize
Number of entries in the delayed action queue.
SysEventNormActionQSize
Size of the normal action queue.
SysEventSystem
A discrete tag that indicates the status of the event system service
(aahEventSvc.exe). 0 = Bad; 1 = Good.
SysStatusEvent
Snapshot event tag whose value changes every hour.
Replication Subsystem Tags
The Replication Service collects the following custom performance counters about its own operation, where N is
a primary key of the tier-2 historian in the Runtime database of the tier-1 historian. These values are stored
cyclically every 10 seconds.
TagName
Description
SysReplicationSummaryCalcQueueItemsTotal
Current number of summary calculations stored
in the summary calculation queue of all tier-2
historians.
SysReplicationSummaryClientsTotal
Current number of concurrent retrieval clients
performing summary calculations on the tier-1
historian for all tier-2 historians.
SysReplicationSyncQueueItemsN
Current number of items stored in the
synchronization queue on the tier-2 historian of
key N.
SysReplicationSyncQueueItemsTotal
Current number of items stored in the
synchronization queue on the tier-1 for all tier-2
historians.
SysReplicationSyncQueueValuesPerSecN
Average synchronization queue values per
second sent to the tier-2 historian of key N.
SysReplicationSyncQueueValuesPerSecTotal
Average values processed by the replication
synchronization queue processor for all tier-2
historians.
SysReplicationTotalTagsN
Total number of tags being replicated to the
tier-2 historian of key N.

AVEVA™ Historian Administration Guide
Chapter 2 – Starting and Stopping AVEVA Historian
© 2021 AVEVA Group plc and its subsidiaries. All rights reserved. Page 49
TagName
Description
SysReplicationTotalValuesN
Total number of values sent to the tier-2
historian of key N since the startup of the
replication service.
SysReplicationTotalValuesTotal
Total number of values sent to all tier-2
historians since the startup of the replication
service.
SysReplicationValuesPerSecN
Average values per second sent to the tier-2
historian of key N.
SysReplicationValuesPerSecTotal
Average values per second sent to all tier-2
historians.
Performance Monitoring Tags
You use performance monitoring tags to monitor CPU loading and other performance parameters for various
AVEVA Historian processes. (All of these values map to equivalent counters that are used in the Microsoft
Performance Logs and Alerts application.)
The following tags allow you to monitor the percentage CPU load for all processors:
System Tag
Description
SysPerfAvailableBytes
Amount of free memory (RAM). If the amount of available memory
is over 4,294,967,296, then the tag shows the remainder of the
amount of memory divided by 4,294,967,296.
SysPerfAvailableMBytes
Amount of free memory (RAM). Use this tag to monitor systems
that have a larger amount of memory. The value for this tag is the
amount of available memory divided by 1 million.
SysPerfCPUMax
The highest CPU load of any single core, expressed as a percentage
(0-100). For example, on a quad core system where the current
loads for each core are 25%, 40%, 60% and 10%, this tag will be
"60".
SysPerfCPUTotal
The overall processor load as a percentage of all cores (0-100).

AVEVA™ Historian Administration Guide
Chapter 2 – Starting and Stopping AVEVA Historian
© 2021 AVEVA Group plc and its subsidiaries. All rights reserved. Page 50
System Tag
Description
SysPerfDiskTime
Percentage of elapsed time that the disk drive was busy servicing
read or write requests.
SysPerfMemoryPages
Rate at which pages are read from or written to disk to resolve hard
page faults.
The remaining system tags are used to monitor performance for each historian service or process and for the
Microsoft SQL Server service. For more information on services, see AVEVA Historian Processes on page 41.
There are six system performance tags per each service or process. These tags adhere to the following naming
convention:
SysPerf<service>CPU
SysPerf<service>HandleCount
SysPerf<service>PageFaults
SysPerf<service>PrivateBytes
SysPerf<service>PrivateMBytes
SysPerf<service>ThreadCount
SysPerf<service>VirtualBytes
SysPerf<service>VirtualMBytes
where <service> can be any of the following:
ClassicManualStorage
ClassicStorage
ClientAccessPoint
Config
DataAcq
EventStorage
EventSys
Indexing
InSQLIOS
MetadataServer
Replication
Retrieval
SQLServer
Storage
SysDrv
These tags have a cyclic storage rate of 5 seconds.
Note: The six performance tags will exist for each defined IDAS. The identifying number (N) appended to the
end of the "DataAcq" portion of the tagname is the IODriverKey from the IODriver table. For example,
'SysPerfDataAcq1CPU'.
The following table describes the suffixes assigned to the names of system performance tags:

AVEVA™ Historian Administration Guide
Chapter 2 – Starting and Stopping AVEVA Historian
© 2021 AVEVA Group plc and its subsidiaries. All rights reserved. Page 51
Suffix
Description
CPU
Current percentage load on the service, expressed as a percentage of total CPU
load. For example, on a quad core system, if the service is using 20% of one core,
40% of another core, and 0% of the other two cores, this tag will be 15%.
HandleCount
Total number of handles currently open by each thread in the service. A handle is
a identifier for a particular resource in the system, such as a registry key or file.
PageFaults
Rate, per second, at which page faults occur in the threads executing the service.
A page fault will occur if a thread refers to a virtual memory page that is not in its
working set in main memory. Thus, the page will not be fetched from disk if it is
on the standby list (and already in main memory) or if it is being used by another
process.
PrivateBytes
Current number of bytes allocated by the service that cannot be shared with any
other processes. If the amount is over 4,294,967,296, then the tag shows the
remainder of the amount divided by 4,294,967,296.
PrivateMBytes
Current number of Mbytes allocated by the service that cannot be shared with
any other processes.
ThreadCount
Current number of active threads in the service. A thread executes instructions,
which are the basic units of execution in a processor.
VirtualBytes
Current size, in bytes, of the virtual address space that is being used by the
service. If the amount is over 4,294,967,296, then the tag shows the remainder of
the amount divided by 4,294,967,296.
VirtualMBytes
Current size, in Mbytes, of the virtual address space that is being used by the
service.
Important: You need to ensure that the memory that SQL Server reserves for the AVEVA Historian is adequate
for the expected load. Based on your particular environment, you may need to adjust the SQL Server
MemToLeave allocation. For more information on MemToLeave, see the Microsoft documentation.

AVEVA™ Historian Administration Guide
Chapter 2 – Starting and Stopping AVEVA Historian
© 2021 AVEVA Group plc and its subsidiaries. All rights reserved. Page 52

© 2021 AVEVA Group plc and its subsidiaries. All rights reserved. Page 53
About Tags
A tag is a variable in AVEVA Historian that represents a parameter or plant data point. For a tag, real-time or
historical data is stored by the AVEVA Historian Storage subsystem, and then retrieved, or read back, by the
Data Retrieval subsystem.
Each tag in the system is identified by a unique name. You can configure the following types of tags:
Analog
Discrete
String
Event
Analog summary
State summary
Note: Analog summary and state summary tags are discussed in Managing and Configuring Replication on page
204.
Configuration information for each type of tag is stored in the historian, as well as the history for tags over time.
Event tags do not store values, but rather definitions for events to be detected by the system and the
subsequent actions to be triggered.
Using the Configuration Editor, you can view or edit information for existing tag definitions, create definitions
for new tags, or delete existing tags.
Note: If you already have tags defined for an InTouch application, you can import the definitions using the Tag
Importer. For more information, see Importing an InTouch Data Dictionary on page 103.
Tag Naming Conventions
Tag names may contain :
Letters
Any letter as defined by the Unicode Standard. The Unicode definition of letters includes Latin characters
from a through z and from A through Z, in addition to letter characters from other languages.
Digits
Any numerical character.
Special characters
Any graphics character.
Chapter 3
Defining Tags

AVEVA™ Historian Administration Guide
Chapter 3 – Defining Tags
© 2021 AVEVA Group plc and its subsidiaries. All rights reserved. Page 54
These special characters may NOT be used in tag names:
o Characters whose ASCII table code is 0 through 32 -(non-graphic characters)
o + - * / \ = ( ) ` ~ ! ^ & @ [ ] { } | : ; ’ , < > ? " space
It is highly recommended that you adhere to the rules for SQL Server identifiers as well.
For "conventional" tag names, the first character may be a:
Letter
Digit
Dollar sign ( $ ) or pound sign ( # )
Subsequent characters may be:
A digit, but then the tagname must contain at least one letter
Any of the supported special characters.
Due to storage formatting requirements, you cannot use either a quotation mark ( " ) or one or more single
quotation marks ( ' ) at the beginning or at the end of a tag name.
Tag names that do not comply with these rules are regarded as "unconventional."
In a SQL query against a wide table, unconventional tag names must be delimited with brackets ( [ ] ), because
the tag name is used as a column name.
Tag Properties (Tag Metadata)
Every AVEVA Historian tag is associated with one or more tag metadata instances. A tag metadata instance is a
set of properties identified by a unique TagId. The TagId is a 16-byte globally unique identifier (GUID). Tag
metadata properties include tag name, description, tag type, storage type, creation time, and so on.
Tag metadata properties describe what the tag is, where the data for that tag is coming from, how the
timestamped data values(VTQs) of that tag should be stored, and how they should be retrieved and displayed by
client applications. The following table describes the most important tag metadata properties:
Property
Description
TagName
A Unicode string (UTF-16) of up to 256 characters.
TagId
A 16-byte GUID.
DateCreated
The UTC timestamp when the tag metadata instance was created.
CreatedBy
The name of the user or application created the tag metadata instance.
TagType
The type of tag: analog, discrete, string, event, or summary. For more information,
see Types of Tags in the AVEVA Historian Concepts Guide.

AVEVA™ Historian Administration Guide
Chapter 3 – Defining Tags
© 2021 AVEVA Group plc and its subsidiaries. All rights reserved. Page 55
Property
Description
AcquisitionType
The method by which the tag's values are acquired.
StorageType
The method of storing the tag's values.
Depending on values of these properties, additional properties provide more specific details. For example if a
tag is an analog tag—that is, it represents a variable measuring a continuous physical quantity such as the
temperature of a boiler—the tag metadata property RawType specifies what kind of numeric type is used, either
float or integer. If it is an integer, the IntegerSize property specifies the number of bits in that integer, and so on.
Note: The ability to set up an alternate file storage location for tag metadata is possible to ensure it is available
should the primary location become corrupt or not accessible.
For the full list of tag metadata properties, see the tag-related tables in the Tables chapter in the AVEVA
Historian Database Reference.
Tag Configuration Versioning
Each time there is a change to a tag property -- description, engineering unit, minimum/maximum range, etc. --
a new tag metadata instance is created with a unique TagId. This allows AVEVA Historian to preserve the tag
configuration history when different types of data is stored for the same tag over time.
Note: Because each new tag metadata instance consumes system resources, it's best to limit these types of
updates. AVEVA Historian does not impose a strict limit on the number of metadata instances per tag, but
recommends keeping that number under 200 to avoid performance degradation and instability.
Several different tag metadata instances can share the same tag name, resulting in several versions of the same
tag. The most recently created tag metadata instance is known as the current version of that tag.
Here is an example:
You create a tag named MyTag. It stores 16-bit integer values from some device. A new tag metadata instance
with a TagId -- 883DDAE3-E3F5-441C-A5FD-38AD97DEC070 -- gets created and then some data values get
stored.
Several months later, the device is upgraded to generate 32-bit integer values. So, you reconfigure MyTag to
store 32-bit integers. During that tag reconfiguration, a new tag metadata instance with another TagId --
FFA0E74C-12FD-49A6-8EBA-B30AFAEF55DA -- is created. When new 32-bit values are stored, they are
associated with that new TagId.
Now although the current version of the MyTag references it as a 32-bit integer, the older 16-bit values are still
accessible because they are associated with the older tag metadata instance preserved in the history.
About Floating-Point Values
Like most software, AVEVA Historian uses floating-point arithmetic. Single-precision floating-point values in
AVEVA Historian are generally accurate to six decimal places and double-precision values are accurate to 15
decimal places.

AVEVA™ Historian Administration Guide
Chapter 3 – Defining Tags
© 2021 AVEVA Group plc and its subsidiaries. All rights reserved. Page 56
Sometimes casting a single-precision floating point value as double-precision, or the reverse, means that the
revision does not match the original value.
Internally, AVEVA Historian uses double precision for all calculations. This can lead to slight differences in the
way results are displayed.
Standard computer representations (using IEEE 754) are stored as binary and don’t precisely match
human-readable representations. Because of this, rounding for a value may not be obvious to users. For
example, "230.4" may be rounded to a binary number that displays as "230.39999389648437".
For more details, refer to this Wikipedia article on the IEEE 754 standard for floating-point numbers in
computers: https://en.wikipedia.org/wiki/IEEE_754-1985 https://en.wikipedia.org/wiki/IEEE_754-1985.
Viewing and Configuring Tags
You can view, add, and configure tags using the System Management Console.
To view tag information
1. Open the System Management Console.
2. In the console tree area, expand a server group and then expand a server.
3. Expand Configuration Editor, expand System Configuration, and then expand Tag Configuration.
4. Select one of these tag categories to view the tags in that category:
Analog Tags
Discrete Tags
State Summary Tags

AVEVA™ Historian Administration Guide
Chapter 3 – Defining Tags
© 2021 AVEVA Group plc and its subsidiaries. All rights reserved. Page 57
Analog Summary Tags
String Tags
Event Tags
To see details about a particular tag
In the right pane, double-click the tag name.
Configuring Analog Tags
You can configure general information, acquisition details, storage details, limit information, and summary setup
information for a selected analog tag, as well as add new analog tags to the system.
Adding an Analog Tag
Be sure that you do not exceed your licensed tag count by adding another tag.
To add an analog tag
1. In the System Management Console, expand a server group and then expand a server.
2. Expand Configuration Editor, expand System Configuration, and then expand Tag Configuration.
3. Right-click Analog Tags, and then click New Tag. The New Analog Tag wizard displays.
4. Enter a unique name for the analog tag. For information on allowable tag names, see Tag Naming
Conventions on page 53.

AVEVA™ Historian Administration Guide
Chapter 3 – Defining Tags
© 2021 AVEVA Group plc and its subsidiaries. All rights reserved. Page 58
5. Click Next. The General information dialog of the wizard displays.
6. In the Description box, type a description of the tag.
7. In the Engineering Unit list, select the unit of measure. Examples are mph, grams, and pounds.
For information on adding an engineering unit to the system, see Configuring Engineering Units on page 81.
8. In the Min Value box, type the minimum value of the tag, measured in engineering units.
9. In the Max Value box, type the maximum value of the tag, measured in engineering units.
In the Current Editor group, specify which application or editing environment controls the tag definition.
Tags imported from the InTouch HMI software use InTouch as the current editor. If modifications are made
to an imported tag in the historian Configuration Editor, then the current editor for the tag is changed to
AVEVA Historian. If a reimport is performed, any modifications made using the Configuration Editor are
preserved. You can manually maintain InTouch as the current editor for reimporting; however, all changes
made to the tag using the Configuration Editor are lost during the reimport. Tags (attributes) that are
initially configured using AVEVA Application Server use the ArchestrA Integrated Development Environment
(IDE) as the current editor. If you modify an Application Server tag using the historian Configuration Editor,
then the current editor for the tag is changed to AVEVA Historian. However, the next time you redeploy the
engine, the changes are not preserved.
10. In the Interpolation Type group, type the analog value to use as the last point of the retrieval cycle.
For more information, see Interpolated Retrieval in the AVEVA Historian Retrieval Guide.
o Linear
The system will calculate a new value at the given cycle time using linear interpolation.
o Stair Step
The last known point is returned with the given cycle time.
o System Default
The settings of both the InterpolationTypeReal and InterpolationTypeInteger system parameters are
used.
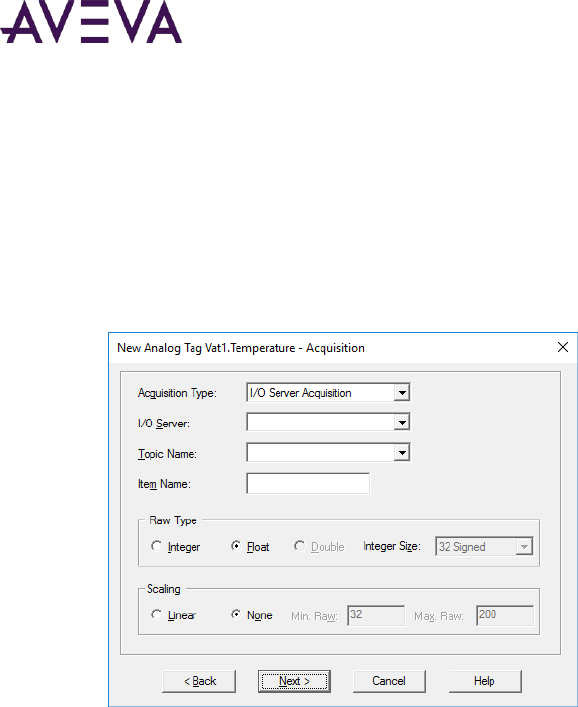
AVEVA™ Historian Administration Guide
Chapter 3 – Defining Tags
© 2021 AVEVA Group plc and its subsidiaries. All rights reserved. Page 59
In the Rollover Value box, type the rollover value if this tag is a counter-type tag. (A typical example is for a
flowmeter measuring flow or an integer counter, such as those used on a packing line.) The rollover value is
the first value that causes the counter to "roll over." This rollover value is used by the "counter" retrieval
mode. For example, a counter that counts from 0 to 9999, the counter rolls over back to 0 for the 10,000th
value it receives. Therefore, set the rollover value to 10,000.
11. For more information, see Counter Retrieval in the AVEVA Historian Retrieval Guide.
12. Click Next. The Acquisition information dialog of the wizard displays.
13. In the Acquisition Type list, select the method by which the tag's value is acquired. If the tag value is
acquired from an I/O Server, specify the name of the I/O Server, topic, and item.
14. In the I/O Server list, select the application name of the I/O Server. This name is usually the same as the
executable file name. The list includes all I/O Servers defined in the system.
15. In the Topic Name list, select the name of the topic. The list includes all topics defined for the selected I/O
Server.
16. In the Item Name box, type the address string of the tag.
17. If you are editing a discrete or string tag, click OK. Otherwise, continue with the next step.
18. In the Raw Type group, select the numeric type that matches the raw value as it is acquired.
o Integer
Integer value. If you select this option, a list appears in which you can select the integer size, in bits, and
whether it is signed or unsigned.
o Float
IEEE single-precision floating (decimal) point value, which supports approximately 7 decimal places. All
floating point calculations are performed with 64-bit resolution, but the result is stored as a 32-bit
number. Note that IDAS/SuiteLink can only send single-precision values.
o Double
IEEE double-precision floating (decimal) point value, which supports approximately 13 decimal places.
The data is stored with 64-bit resolution. Note that if the source can only send single-precision values,
storing as a double with a higher resolution consumes space with no added benefit.

AVEVA™ Historian Administration Guide
Chapter 3 – Defining Tags
© 2021 AVEVA Group plc and its subsidiaries. All rights reserved. Page 60
Note: For Float and Double types, some values may vary slightly from those shown in the source. See About
Floating-Point Values on page 55 for more information.
19. In the Scaling group, select the type of algorithm used to scale raw values to engineering units. For linear
scaling, the result is calculated using linear interpolation between the end points. The following options are
required for linear scaling.
o Min Raw
The minimum value of the raw acquired value.
o Max Raw
The maximum value of the raw acquired value.
20. Click Next. The Storage information dialog of the wizard displays.
21. In the Storage Method area, select the way in which values for the tag will be stored.
o Rate
The rate at which the tag is stored if the storage type is cyclic.
22. In the Deadband area, configure details for how the tag value is stored. The availability of options in this
group depends on which storage method you selected.
o Time and Value
A time deadband is the minimum time, in milliseconds, between stored values for a single tag. Any value
changes that occur within the time deadband are not stored. The time deadband applies to delta
storage only. A time deadband of 0 indicates that the system will store the value of the tag each time it
changes. In the Time box, type the time to use for this deadband.
A value deadband is the percentage of the difference between the minimum and maximum engineering
units for the tag. Any data values that change less than the specified deadband are not stored. The value
deadband applies to delta storage only. A value of 0 indicates that a value deadband will not be applied.
In the Value box, type the value to use for this deadband.

AVEVA™ Historian Administration Guide
Chapter 3 – Defining Tags
© 2021 AVEVA Group plc and its subsidiaries. All rights reserved. Page 61
o Swinging Door
A swinging door deadband is the percentage of deviation in the full-scale value range for an analog tag.
The swinging door (rate) deadband applies to delta storage only. Time and/or value deadbands can be
used in addition to the swinging door deadband. Any value greater than 0 can be used for the deadband.
A value of 0 indicates that a swinging door deadband will not be applied. In the Rate box, type the rate
to use for this deadband.
23. When you are done defining the new analog tag, click Finish.
Editing General Information for an Analog Tag
To edit general information for an analog tag
1. In the System Management Console, expand a server group, and then expand a server.
2. Expand Configuration Editor, expand System Configuration, and then expand Tag Configuration.
3. Select Analog Tags.
4. In the details pane, double-click the analog tag you want to edit. The Properties dialog displays.
5. Select the General tab.
6. In the Description box, type a description of the tag.
7. From the Engineering Unit list, select the unit of measure. Examples are mph, grams, and pounds.
For information on adding an engineering unit to the system, see Configuring Engineering Units on page 81.
Note: If the tag is initially configured using AVEVA Application Server, changes made to the engineering unit
are not preserved. Instead, you must change the engineering unit at the source, and then redeploy the
engine.
8. In the Min Value box, type the minimum value of the tag, measured in engineering units.
9. In the Max Value box, type the maximum value of the tag, measured in engineering units.

AVEVA™ Historian Administration Guide
Chapter 3 – Defining Tags
© 2021 AVEVA Group plc and its subsidiaries. All rights reserved. Page 62
In the Current Editor group, specify which application or editing environment controls the tag definition.
Tags imported from the InTouch HMI software use InTouch as the current editor. If modifications are made
to an imported tag in the historian Configuration Editor, then the current editor for the tag is changed to
AVEVA Historian. If a reimport is performed, any modifications made using the Configuration Editor are
preserved. You can manually maintain InTouch as the current editor for reimporting; however, all changes
made to the tag using the Configuration Editor are lost during the reimport. Tags (attributes) that are
initially configured using AVEVA Application Server use the ArchestrA Integrated Development Environment
(IDE) as the current editor. If you modify an Application Server tag using the historian Configuration Editor,
then the current editor for the tag is changed to AVEVA Historian. However, the next time you redeploy the
engine, the changes are not preserved.
10. In the Interpolation Type group, type the analog value to use as the last point of the retrieval cycle.
For more information, see Interpolated Retrieval in the AVEVA Historian Retrieval Guide.
o Linear
The system will calculate a new value at the given cycle time using linear interpolation.
o Stair Step
The last known point is returned with the given cycle time.
o System Default
The settings of both the InterpolationTypeReal and InterpolationTypeInteger system parameters are
used.
In the Rollover Value box, type the rollover value if this tag is a counter-type tag. (A typical example is for a
flowmeter measuring flow or an integer counter, such as those used on a packing line.) The rollover value is
the first value that causes the counter to "roll over." This rollover value is used by the "counter" retrieval
mode. For example, a counter that counts from 0 to 9999, the counter rolls over back to 0 for the 10,000th
value it receives. Therefore, set the rollover value to 10,000.
11. For more information, see Counter Retrieval in the AVEVA Historian Retrieval Guide.
12. Click OK.
Editing Acquisition Information for a Tag
The Acquisition tab contains basically the same configuration information for analog, discrete, and string tags.
However, the tabs for string and discrete tags do not include the Raw Type group or Scaling group.
For information on data acquisition, see Configuring Data Acquisition on page 130.
If you change the configuration, then the changes are applied only to data with timestamps that are equal to or
greater than the timestamp of the configuration change.
To edit acquisition information for a tag
1. In the System Management Console, expand a server group and then expand a server.
2. Expand Configuration Editor, expand System Configuration, and then expand Tag Configuration.
3. Select the type of tag for which you want to edit the acquisition properties.

AVEVA™ Historian Administration Guide
Chapter 3 – Defining Tags
© 2021 AVEVA Group plc and its subsidiaries. All rights reserved. Page 63
4. In the details pane, double-click the tag to edit. The Properties dialog displays.
5. Select the Acquisition tab.
6. In the Acquisition Type list, select the method by which the tag's value is acquired. If the tag value is
acquired from an I/O Server, specify the name of the I/O Server, topic, and item.
7. In the I/O Server list, select the application name of the I/O Server. This name is usually the same as the
executable file name. The list includes all I/O Servers defined in the system.
8. In the Topic Name list, select the name of the topic. The list includes all topics defined for the selected I/O
Server.
9. In the Item Name box, type the address string of the tag.
10. If you are editing a discrete or string tag, click OK. Otherwise, continue with the next step.
11. In the Raw Type group, select the numeric type that matches the raw value as it is acquired.
o Integer
Integer value. If you select this option, a list appears in which you can select the integer size, in bits, and
whether it is signed or unsigned.
o Float
IEEE single-precision floating (decimal) point value, which supports approximately 7 decimal places. All
floating point calculations are performed with 64-bit resolution, but the result is stored as a 32-bit
number. Note that IDAS/SuiteLink can only send single-precision values.
o Double
IEEE double-precision floating (decimal) point value, which supports approximately 13 decimal places.
The data is stored with 64-bit resolution. Note that if the source can only send single-precision values,
storing as a double with a higher resolution consumes space with no added benefit.
Note: For Float and Double types, some values may vary slightly from those shown in the source. See About
Floating-Point Values on page 55 for more information.
12. In the Scaling group, select the type of algorithm used to scale raw values to engineering units. For linear
scaling, the result is calculated using linear interpolation between the end points. The following options are
required for linear scaling.
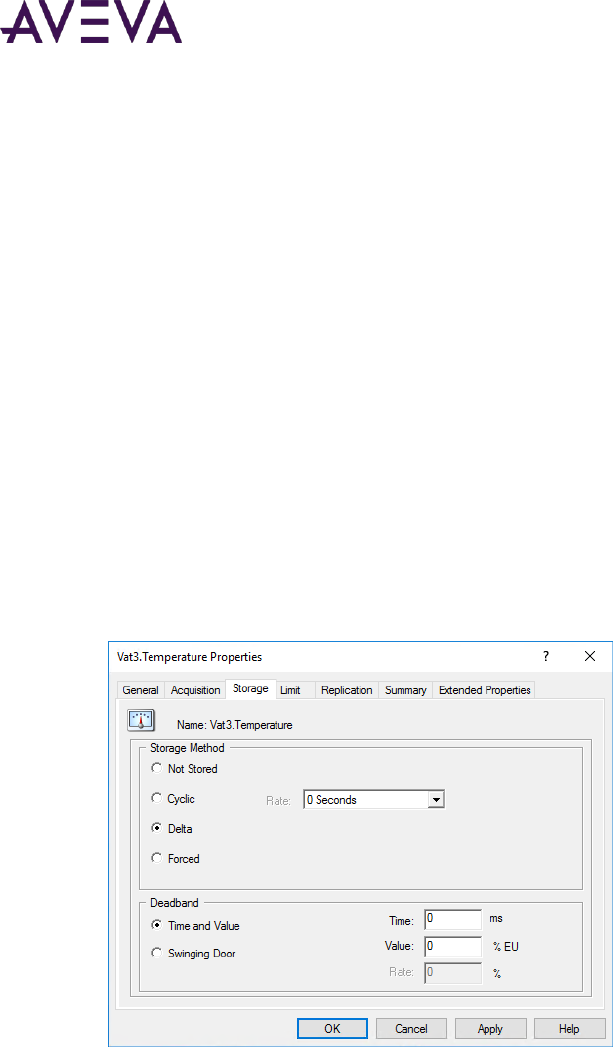
AVEVA™ Historian Administration Guide
Chapter 3 – Defining Tags
© 2021 AVEVA Group plc and its subsidiaries. All rights reserved. Page 64
o Min Raw
The minimum value of the raw acquired value.
o Max Raw
The maximum value of the raw acquired value.
13. Click OK.
Editing Storage Information for an Analog Tag
For more information on storage, see Managing Data Storage on page 157.
If you change the configuration, then the changes are applied only to data with timestamps that are equal to or
greater than the timestamp of the configuration change.
To edit storage information for an analog tag
1. In the System Management Console, expand a server group and then expand a server.
2. Expand Configuration Editor, expand System Configuration, and then expand Tag Configuration.
3. Select Analog Tags.
4. In the details pane, double-click the analog tag to edit. The Properties dialog displays.
5. Select the Storage tab.
6. In the Storage Method area, select the way in which values for the tag will be stored.
o Rate
The rate at which the tag is stored if the storage type is cyclic.
7. In the Deadband area, configure details for how the tag value is stored. The availability of options in this
group depends on which storage method you selected.
o Time and Value
A time deadband is the minimum time, in milliseconds, between stored values for a single tag. Any value
changes that occur within the time deadband are not stored. The time deadband applies to delta
storage only. A time deadband of 0 indicates that the system will store the value of the tag each time it
changes. In the Time box, type the time to use for this deadband.

AVEVA™ Historian Administration Guide
Chapter 3 – Defining Tags
© 2021 AVEVA Group plc and its subsidiaries. All rights reserved. Page 65
A value deadband is the percentage of the difference between the minimum and maximum engineering
units for the tag. Any data values that change less than the specified deadband are not stored. The value
deadband applies to delta storage only. A value of 0 indicates that a value deadband will not be applied.
In the Value box, type the value to use for this deadband.
o Swinging Door
A swinging door deadband is the percentage of deviation in the full-scale value range for an analog tag.
The swinging door (rate) deadband applies to delta storage only. Time and/or value deadbands can be
used in addition to the swinging door deadband. Any value greater than 0 can be used for the deadband.
A value of 0 indicates that a swinging door deadband will not be applied. In the Rate box, type the rate
to use for this deadband.
8. Click OK.
Editing Limit Information for an Analog Tag
To edit limit information for an analog tag
1. In the System Management Console, expand a server group and then expand a server.
2. Expand Configuration Editor, expand System Configuration, and then expand Tag Configuration.
3. Select Analog Tags.
4. In the details pane, double-click the analog tag to edit. The Properties dialog displays.
5. Select the Limit tab. The following information about limits for the tag appears:
o Context
The description of the context.
o Limit Name
The name for the limit.
o Value
The value that is used as a specific limit for a tag. In theory, a tag can have an infinite number of limits
defined.

AVEVA™ Historian Administration Guide
Chapter 3 – Defining Tags
© 2021 AVEVA Group plc and its subsidiaries. All rights reserved. Page 66
o Type
The type of limit; that is, whether it is a rising (up) or falling (down) limit.
o Checked
Used to specify whether a tag imported from InTouch is configured for automatic limit checking. Only
checked limits are imported.
o Priority
The priority for the limit. Priorities can range from 1 to over 2 billion, with 1 being the highest priority.
o Description
The description of the limit.
6. To add a limit, click Add. The Limit Properties dialog box appears. For more information, see Configuring
Limits on page 66
7. To view properties for a limit, click Properties. The Limit Properties dialog box appears. For more
information, see Configuring Limits on page 66.
8. To delete a limit, select the limit in the window and then click Delete.
9. To view or add context definitions, click Contexts. For more information, see Configuring Context Definitions
on page 67.
10. To view or add a limit names, click Limit Names. For more information, see Configuring Limit Names on page
67.
11. Click OK.
Configuring Limits
Before you add a new limit, you must first add a limit name and a context. For more information, see
Configuring Limit Names on page 67 and Configuring Context Definitions on page 67.
To add a limit or view properties for a limit
1. On the Limit tab of the analog tag Properties dialog box, click Add or Properties. The Limit Properties dialog
box appears.
2. In the Context list, select the description of the context.
3. In the Limit Name list, select the name for the limit.
4. In the Value box, type the value that is used as a specific limit for a tag. In theory, a tag can have an infinite
number of limits defined.
5. In the Type list, select the type of limit; that is, whether it is a rising (up) or falling (down) limit.

AVEVA™ Historian Administration Guide
Chapter 3 – Defining Tags
© 2021 AVEVA Group plc and its subsidiaries. All rights reserved. Page 67
6. In the Priority box, type the priority for the limit. Priorities can range from 1 to over 2 billion, with 1 being
the highest priority.
7. Select the Checked check box to enable automatic limit checking.
8. In the Description box, type the description of the limit.
9. Click OK.
Configuring Context Definitions
To add or view context definitions
1. On the Limit tab of the analog tag Properties dialog box, click Contexts. The Context Definitions dialog box
appears.
All defined contexts are listed in the window.
2. To add a context, click Add and then type the name of the new context in the dialog box that appears. Click
OK.
3. To change the context name, select a context in the window, and then click Properties. Type the new name
in the dialog box that appears. Click OK.
4. To delete a context, select the context in the window and then click Delete.
5. Click OK.
Configuring Limit Names
To add or view limit names
1. On the Limit tab of the analog tag Properties dialog box, click Limit Names. The Limit Name Definitions
dialog box appears.
All defined limits are listed.

AVEVA™ Historian Administration Guide
Chapter 3 – Defining Tags
© 2021 AVEVA Group plc and its subsidiaries. All rights reserved. Page 68
2. To add a limit name, click Add and then type the name of the new limit. Click OK.
3. To change a limit name, select a limit, click Properties, and then type in a new name. Click OK.
4. To delete a limit, select a limit and then click Delete.
5. Click OK.
Editing Summary Information for an Analog Tag
Summaries are aggregation operations that can be set up to be automatically performed for analog tags.
To edit summary information for a tag
1. In the System Management Console, expand a server group and then expand a server.
2. Expand Configuration Editor, expand System Configuration, and then expand Tag Configuration.
3. Select Analog Tags.
4. In the details pane, double-click the analog tag you want to edit. The Properties dialog displays.
5. Select the Summary tab.
A check mark appears in the Frequency column of the summary operation in which the selected analog tag
is included.
6. To remove the selected analog tag from an operation, clear the checkbox in the Frequency column.
7. To add the analog tag to any summary operation, select the check box in the Frequency column for the
desired operation.
8. Click OK.
Editing Extended Properties for an Analog Tag
Extended properties can be used to add application-specific metadata to tags. When you search for tags in
AVEVA Historian Client Web or AVEVA Insight, you can locate tags based on these property values. Likewise,
with SQL queries you can select tags based on these property values without needing to know the tag name.

AVEVA™ Historian Administration Guide
Chapter 3 – Defining Tags
© 2021 AVEVA Group plc and its subsidiaries. All rights reserved. Page 69
The following extended properties are predefined by the system, and can be added to any analog tags:
Alias - Used as the tag's preferred label in charts.
Dimension - Groups analog tags together by related engineering units.
Location - Places the tag within the asset model of AVEVA Insight.
You can define your own custom extended properties by using the database import/export feature. See Adding
New Tag Extended Property Values on page 128 for more information.
To edit extended property information for an analog tag:
1. In the System Management Console, expand a server group and then expand a server.
2. Expand Configuration Editor, expand System Configuration, and then expand Tag Configuration.
3. Select Analog Tags.
4. In the details pane, double-click the analog tag you want to edit. The Properties dialog displays.
5. Select the Extended Properties tab.
6. To edit an existing property value, select the property in the list and click Edit Extended Property.... The
Extended Properties dialog displays.
7. Enter a new Value for the property, then click OK.

AVEVA™ Historian Administration Guide
Chapter 3 – Defining Tags
© 2021 AVEVA Group plc and its subsidiaries. All rights reserved. Page 70
8. To add a property to a tag, click Add Extended Property.... The Extended Properties dialog displays.
9. Select the Name of the extended property from the drop-down list. The list contains all editable extended
properties that are not already present on the tag.
Note: You can add new extended properties by exporting a configuration text file, adding new
TagExtendedPropertyName entries, and importing the modified file. For more information, see Importing or
Exporting Tag Information on page 115 and Editing the Configuration Text File on page 126.
10. Enter a Value for the property, then click OK. The new property is added to the list.
11. To remove a property from a tag, select the property and click Delete Extended Property. The property is
removed from the list.
12. Click OK or Apply to save your changes.
Configuring the Engineering Units Catalog
Engineering units can be application-specific, so AVEVA Historian must know how to relate these units to
canonical definitions of engineering units. The Engineering Units Catalog is used to define the relationships
between different units of measure, enabling support for converting between related units of measure.
Using the Engineering Units Catalog, you can define dimensions, unit systems, and how to convert between
units within the same dimension. Defining these entries and correctly specifying unit conversions can take some
care, so AVEVA Historian has preconfigured the catalog with the entries we expect most applications will need.

AVEVA™ Historian Administration Guide
Chapter 3 – Defining Tags
© 2021 AVEVA Group plc and its subsidiaries. All rights reserved. Page 71
You can hide units for unit systems and dimensions that aren't used at your site, making it easier to configure
the association between engineering units and their canonical units in the catalog.
Adding a Catalog Unit
Although you can add custom units to the catalog, before doing so you should make sure the required unit is not
already defined. Dimensions can have multiple valid names, so you should check under alternate dimension
names before creating a new unit. For example, length and distance are different names for the same
dimension, as are voltage and electric potential.
To add an engineering catalog unit:
1. In the System Management Console, expand a server group and then expand a server.
2. Expand Configuration Editor, expand System Configuration, and then expand Tag Configuration.
3. Right-click Engineering Units Catalog, and then click New Engineering Unit Catalog.... The New Catalog Unit
dialog displays.
4. For the unit's Symbol, enter Formal and Basic values.
If the Basic value is blank, it is automatically populated with the Formal value.
The Basic value is displayed as the unit's symbol by default.

AVEVA™ Historian Administration Guide
Chapter 3 – Defining Tags
© 2021 AVEVA Group plc and its subsidiaries. All rights reserved. Page 72
Notes: Unit symbols are case-sensitive and unique.
In many cases, the formal and basic symbols are identical. In some cases, such as when extended characters
are part of the symbol, it is appropriate to use the formal field for those values.
5. Enter a Name to describe the unit.
6. Selecting Visible allows this unit to be used as a canonical unit when creating an engineering unit. See
Adding an Engineering Unit on page 82 for more information.
7. Select the Dimension and unit System this unit is associated with. See Managing Dimensions, Unit Systems,
and Catalog Unit Visibility on page 77 for more information.
8. If the selected dimension does not already have a base unit defined for the selected unit system, select Base
to define this new unit as the base unit. If the dimension already has a base unit defined, this box is disabled.
9. Select OK to save the unit.
See Editing a Catalog Unit on page 72 for more information.
Editing a Catalog Unit
To edit an engineering catalog unit
1. In the System Management Console, expand a server group and then expand a server.
2. Expand Configuration Editor, expand System Configuration, and then expand Tag Configuration.
3. Select Engineering Units Catalog.
4. In the details pane, double-click the engineering unit catalog you want to edit. The Properties dialog
displays.

AVEVA™ Historian Administration Guide
Chapter 3 – Defining Tags
© 2021 AVEVA Group plc and its subsidiaries. All rights reserved. Page 73
Note: Modifying a system-defined catalog is not recommended. If you select a system-defined catalog, a
warning message displays. Click Yes to continue to the Properties dialog.
5. For the unit's Symbol, enter Formal and Basic values.
If the Basic value is blank, it is automatically populated with the Formal value.
The Basic value is displayed as the unit's symbol by default.
Note: Unit symbols are case-sensitive and unique.
In many cases, the formal and basic symbols are identical. In some cases, such as when extended characters
are part of the symbol, it is appropriate to use the formal field for those values.
6. Enter a Name to describe the unit.
7. Selecting Visible allows this unit to be used as a canonical unit when creating an engineering unit. See
Adding an Engineering Unit on page 82 for more information.
8. Select the Dimension and unit System this unit is associated with. See Managing Dimensions, Unit Systems,
and Catalog Unit Visibility on page 77 for more information.

AVEVA™ Historian Administration Guide
Chapter 3 – Defining Tags
© 2021 AVEVA Group plc and its subsidiaries. All rights reserved. Page 74
9. If the selected dimension does not already have a base unit defined for the selected unit system, select Base
to define this new unit as the base unit. If the dimension already has a base unit defined, this box is disabled.
10. The remaining fields are used to define the relationship between this unit and the other units in this
dimension.
Select a Reference Unit from the list. The list contains all visible units for the selected dimension, in the
following format:
Unit Name (Formal Symbol) - Unit System
The fields in the Test section are labeled with the formal symbol for this unit, and the selected Reference
Unit. Selecting To converts from this unit to the selected reference unit, while selecting From converts from
the selected reference unit to this unit. Changing the value in one of the test fields changes the value in the
other field based on this formula:
new value = ( original value / factor ) - offset
Change the values of Offset and Factor to define how to convert the new unit to the reference unit. You can
use the Test fields to verify the results. See Example: Adding a Catalog Unit on page 74 for more
information.
11. Enter the Time Base of Unit. When converting rates to accumulated quantities, for example "liters/minute"
to "liters", or "kilometers/hour" to "kilometers", Historian must know the time basis of the rate
measurement to calculate the quantity. For units that do not measure rates, you can leave this set to the
default value of "seconds". For units that do measure rates (e.g. "per minute", "per hour", etc.) be sure to
select an appropriate value. The most commonly used values are listed in the drop-down list, but you can
set a custom value if the provided options do not meet your needs. For example, if the rate is measured in
units/week, select Custom and enter 604800, as 1 week = 604800 seconds.
12. Select OK or Apply to save your changes.
Note: The values of the Reference Unit, To, From, and Test fields are only used for displaying the unit
conversion calculations, and are not persisted to the database.
Example: Adding a Catalog Unit
This example demonstrates adding millimeters as a catalog unit.
To add a catalog unit:
1. In the System Management Console, expand a server group and then expand a server.
2. Expand Configuration Editor, expand System Configuration, and then expand Tag Configuration.
3. Right-click Engineering Units Catalog, and then click New Engineering Unit Catalog.... The New Catalog Unit
dialog displays.
4. Enter the following values:
o Name: millimeters
o Symbol (Formal and Basic): mm
o Dimension: Length
o System: SI

AVEVA™ Historian Administration Guide
Chapter 3 – Defining Tags
© 2021 AVEVA Group plc and its subsidiaries. All rights reserved. Page 75
o Reference Unit: meters (m) - SI
5. A meter is equal to 1000 millimeters. To define this, select From as the convert option, and enter 1000 for
the Factor.

AVEVA™ Historian Administration Guide
Chapter 3 – Defining Tags
© 2021 AVEVA Group plc and its subsidiaries. All rights reserved. Page 76
You can also define the conversion in the opposite direction. In this case, a millimeter is equal to 0.001
meters. To define this, select To as the convert option, and enter 0.001 for the Factor.
6. You can now use the Test fields to verify the conversion factor and offset are set correctly by changing the
value of the m or mm fields, and seeing how the other is affected. For example, entering 5 in the m field
calculates the number of mm as 5000.
7. When you are satisfied the conversion values are correct, select OK to save the unit.

AVEVA™ Historian Administration Guide
Chapter 3 – Defining Tags
© 2021 AVEVA Group plc and its subsidiaries. All rights reserved. Page 77
Note: Before the new catalog unit can be used for unit conversion, a corresponding engineering unit must
be added and mapped to the catalog unit. See Configuring Engineering Units on page 81 for more
information.
Managing Dimensions, Unit Systems, and Catalog Unit Visibility
To manage dimensions, unit systems, and the visibility of catalog units:
1. In the System Management Console, expand a server group, and then expand a server.
2. Expand Configuration Editor, expand System Configuration, and then expand Tag Configuration.
3. Right-click Engineering Units Catalog, and then select Unit Dimensions and Systems.... The Canonical Unit
Dimension and System dialog displays.
Dimensions are listed in the left column, and the remaining column headers indicate the unit systems. The
presence of a checkbox at the intersection of a dimension and unit system indicates that there is at least one
catalog unit defined for that dimension/unit system combination, and the state of the checkbox indicates
the visibility of the defined catalog units.
A checked box indicates all units are visible.
A checked box with a grey background indicates at least one unit is visible.
A cleared box indicates no units are visible.
4. Select New Dimension... to add a new dimension. See Adding or Editing a Dimension on page 78 for more
information.

AVEVA™ Historian Administration Guide
Chapter 3 – Defining Tags
© 2021 AVEVA Group plc and its subsidiaries. All rights reserved. Page 78
5. Select New Unit System... to add a new unit system. See Adding a Unit System on page 80 for more
information.
6. Select Remove Unused to delete any dimensions and unit systems for which there are no catalog units
defined.
7. Double-click the name of a dimension in the Dimensions column to edit an existing dimension.
8. Select individual checkboxes to toggle visibility for dimension/unit system combinations. You can also click a
column header to toggle every checkbox in that column on or off.
9. Select OK to save any visibility changes, or Cancel to close the dialog without saving.
Adding or Editing a Dimension
To add or edit a dimension:
1. In the System Management Console, expand a server group, and then expand a server.
2. Expand Configuration Editor, expand System Configuration, and then expand Tag Configuration.
3. Right-click Engineering Units Catalog, and then select Unit Dimensions and Systems.... The Canonical Unit
Dimension and System dialog displays.

AVEVA™ Historian Administration Guide
Chapter 3 – Defining Tags
© 2021 AVEVA Group plc and its subsidiaries. All rights reserved. Page 79
4. Select New Dimension... to create a new dimension, or double-click the name of a dimension in the
Dimensions column to edit it. The dimension properties dialog displays.
5. If you are creating a new dimension, enter a name in the Dimension field. If you are editing an existing
dimension, you cannot change the name and this field is read-only.
6. If the dimension has a corresponding integral or derivative dimension, select the Time Integral dimension
and/or Time Derivative dimension from the list. Otherwise, choose N/A. The time integral dimension is
appropriate for converting a dimension that measures a rate, while the time derivative is appropriate for
converting a dimension that measures a quantity.
For example, the "Length" dimension's time derivative is speed.
Likewise, the "Speed" dimension's time integral is length.
Note: Time integrals and time derivatives can be used in "integral" or "rate of change" queries to request
data in alternate units. For example, a "meters/second" tag can be used to query the distance traveled over
a period of time.
7. Select OK when you are done editing.

AVEVA™ Historian Administration Guide
Chapter 3 – Defining Tags
© 2021 AVEVA Group plc and its subsidiaries. All rights reserved. Page 80
Adding a Unit System
To add a new unit system:
1. In the System Management Console, expand a server group, and then expand a server.
2. Expand Configuration Editor, expand System Configuration, and then expand Tag Configuration.
3. Right-click Engineering Units Catalog, and then select Unit Dimensions and Systems.... The Canonical Unit
Dimension and System dialog displays.
4. Select New Unit System.... The New System dialog displays.
5. In the System field, enter a name for the new unit system.
Select OK to create the new system.

AVEVA™ Historian Administration Guide
Chapter 3 – Defining Tags
© 2021 AVEVA Group plc and its subsidiaries. All rights reserved. Page 81
6. The new unit system displays as the final column in the Canonical Unit Dimension and System dialog.
Configuring Engineering Units
An engineering unit is the unit of measure for an analog tag. Examples of engineering unit types are CPS,
pounds, or degrees.
Note: Engineering units are case-sensitive. That means that AVEVA Historian differentiates between ml
(milliliters) and ML (megaliters), for example.
A tag's engineering unit displays in charts or reports where the tag is used. The Historian can only convert data
between units defined in the engineering units catalog. To use your own familiar labels, you can create
engineering units and map them to canonical units in the engineering units catalog. See Configuring the
Engineering Units Catalog on page 70 for more information.
Viewing Defined Engineering Units
Engineering units are configured for a single server. Any defined engineering unit can be used when adding or
editing an analog tag.
To view defined engineering units
1. In the System Management Console, expand a server group and then expand a server.
2. Expand Configuration Editor, expand System Configuration, and then expand Tag Configuration.
3. Expand Engineering Units to view all currently-defined engineering units.

AVEVA™ Historian Administration Guide
Chapter 3 – Defining Tags
© 2021 AVEVA Group plc and its subsidiaries. All rights reserved. Page 82
Note: Engineering units are case-sensitive. That means AVEVA Historian differentiates between ml
(milliliters) and ML (megaliters), for example.
4. When you select an engineering unit in the tree, a list of tags that make use of that engineering unit appears
in the details pane.
Adding an Engineering Unit
After you add an engineering unit, you can configure both existing and new analog tags to use the new
engineering unit.
Note: Engineering units are case-sensitive. That means AVEVA Historian differentiates between ml (milliliters)
and ML (megaliters), for example.
To add an engineering unit
1. In the System Management Console, expand a server group and then expand a server.
2. Expand Configuration Editor, expand System Configuration, and then expand Tag Configuration.
3. Right-click Engineering Units, and then click New Engineering Unit. The New Engineering Unit wizard
displays.
4. Enter the Unit Name.
5. In the Tag Rate box, enter the default rate, in milliseconds, at which tags are cyclically stored, based on
engineering units. Although the system does not make use of this engineering unit based tag rate, you can
reference this value in custom SQL scripts. The value you enter for this tag rate does not affect the default
storage rate set for the tag.
6. Select the appropriate Dimension for the engineering unit. The values displayed in this list are a
combination of the available dimensions from the database, and the unit system in parentheses.
7. Select a Canonical Unit for the engineering unit. This list contains all visible units from the Engineering Units
Catalog corresponding with the selected dimension. See Configuring the Engineering Units Catalog on page
70 for more information.

AVEVA™ Historian Administration Guide
Chapter 3 – Defining Tags
© 2021 AVEVA Group plc and its subsidiaries. All rights reserved. Page 83
Notes: Some units with the same name or symbol may have different definitions in different unit systems,
so take care to select the correct unit. For example, the U.S. gallon and imperial gallon have different
volumes.
While it is possible to map multiple engineering units to the same canonical unit, to avoid confusion it is not
recommended. For example, you could choose to create three engineering units named liters, litres, and L,
and map them all to L in the engineering units catalog.
8. Click Finish.
Editing an Engineering Unit
If you make changes to an engineering unit, the changes are applied to all tags in the system that are currently
using that engineering unit.
Note: Engineering units are case-sensitive. That means AVEVA Historian differentiates between ml (milliliters)
and ML (megaliters), for example.
To edit an engineering unit
1. In the System Management Console, expand a server group and then expand a server.
2. Expand Configuration Editor, expand System Configuration, and then expand Tag Configuration.
3. Select Engineering Units.
4. In the details pane, double-click the engineering unit to edit. The Properties dialog box displays.
5. In the Tag Rate box, enter the default rate, in milliseconds, at which tags are cyclically stored, based on
engineering units. Although the system does not make use of this engineering unit based tag rate, you can
reference this value in custom SQL scripts. The value you enter for this tag rate does not affect the default
storage rate set for the tag.
6. Select a Canonical Unit for the engineering unit. This list contains all visible units from the Engineering Units
Catalog corresponding with the selected dimension. See Configuring the Engineering Units Catalog on page
70 for more information.
7. Click OK.

AVEVA™ Historian Administration Guide
Chapter 3 – Defining Tags
© 2021 AVEVA Group plc and its subsidiaries. All rights reserved. Page 84
Configuring Discrete Tags
You can configure general information and acquisition details for a selected discrete tag, as well as add new
discrete tags to the system.
Adding a Discrete Tag
Be sure that you do not exceed your licensed tag count by adding another tag.
To add a discrete tag
1. In the System Management Console, expand a server group and then expand a server.
2. Expand Configuration Editor, expand System Configuration, and then expand Tag Configuration.
3. Right-click Discrete Tags, and then click New Tag. The New Discrete Tag wizard displays.
4. Type a unique name for the discrete tag and click Next. For information on allowable tag names, see Tag
Naming Conventions on page 53.
5. You are then prompted to define general, acquisition, and storage information for the tag.
o For more information on configuring general properties, see Editing General Information for a Discrete
Tag on page 84.
o For more information on configuring acquisition, see Editing Acquisition Information for a Tag on page
62.
o For more information on configuring storage, see Editing Storage Information for a Discrete Tag on page
85.
6. When you are finished defining the new discrete tag, click Finish.
Editing General Information for a Discrete Tag
To edit general information for a discrete tag:
1. In the System Management Console, expand a server group and then expand a server.
2. Expand Configuration Editor, expand System Configuration, and then expand Tag Configuration.
3. Select Discrete Tags.

AVEVA™ Historian Administration Guide
Chapter 3 – Defining Tags
© 2021 AVEVA Group plc and its subsidiaries. All rights reserved. Page 85
4. In the details pane, double-click the discrete tag to edit. The Properties dialog displays.
5. Select the General tab.
6. In the Description box, type a description of the tag.
7. In the Message Pair list, select the message pair to associate with the FALSE/TRUE states of the discrete tag.
For information on adding a message pair to the system, see Configuring Message Pairs on page 88.
8. In the Current Editor group, specify which application or editing environment controls the tag definition.
Tags imported from the InTouch HMI software use InTouch as the current editor. If modifications are made
to an imported tag in the historian Configuration Editor, then the current editor for the tag is changed to
AVEVA Historian. If a reimport is performed, any modifications made using the Configuration Editor are
preserved. You can manually maintain InTouch as the current editor for reimporting; however, all changes
made to the tag using the Configuration Editor are lost during the reimport. Tags (attributes) that are
initially configured using AVEVA Application Server use the ArchestrA Integrated Development Environment
(IDE) as the current editor. If you modify an Application Server tag using the historian Configuration Editor,
then the current editor for the tag is changed to AVEVA Historian. However, the next time you redeploy the
engine, the changes are not preserved.
9. Click OK.
Editing Storage Information for a Discrete Tag
If you change a tag's configuration, the changes are applied only to data with timestamps that are equal to or
greater than the timestamp of the configuration change.
For related information about data storage, see Managing Data Storage on page 157.
To edit storage information for a discrete tag
1. In the System Management Console, expand a server group and then expand a server.
2. Expand Configuration Editor, expand System Configuration, and then expand Tag Configuration.
3. Select Discrete Tags.

AVEVA™ Historian Administration Guide
Chapter 3 – Defining Tags
© 2021 AVEVA Group plc and its subsidiaries. All rights reserved. Page 86
4. In the details pane, double-click the discrete tag to edit. The Properties dialog displays.
5. Select the Storage tab.
6. In the Storage Method area, select the way in which values for the tag are stored.
7. In the Deadband group, configure details for how the tag value are stored. The availability of this group
depends on which storage method you select.
o Time Deadband
A time deadband is the minimum time, in milliseconds, between stored values for a single tag. Any value
changes that occur within the time deadband are not stored. The time deadband applies to delta
storage only. A time deadband of 0 indicates that the system will store the value of the tag each time it
changes.
8. Click OK.
Editing Extended Properties for a Discrete Tag
Extended properties can be used to add application-specific metadata to tags. When you search for tags in
AVEVA Historian Client Web or AVEVA Insight, you can locate tags based on these property values. Likewise,
with SQL queries you can select tags based on these property values without needing to know the tag name.
The following extended properties are predefined by the system, and can be added to any discrete tags:
Alias - Used as the tag's preferred label in charts.
Location - Places the tag within the asset model of AVEVA Insight.
You can define your own custom extended properties by using the database import/export feature. See Adding
New Tag Extended Property Values on page 128 for more information.
To edit extended property information for a discrete tag:
1. In the System Management Console, expand a server group and then expand a server.
2. Expand Configuration Editor, expand System Configuration, and then expand Tag Configuration.
3. Select Discrete Tags.

AVEVA™ Historian Administration Guide
Chapter 3 – Defining Tags
© 2021 AVEVA Group plc and its subsidiaries. All rights reserved. Page 87
4. In the details pane, double-click the discrete tag you want to edit. The Properties dialog displays.
5. Select the Extended Properties tab.
6. To edit an existing property value, select the property in the list and click Edit Extended Property.... The
Extended Properties dialog displays.
7. Enter a new Value for the property, then click OK.
8. To add a property to a tag, click Add Extended Property.... The Extended Properties dialog displays.
9. Select the Name of the extended property from the drop-down list. The list contains all editable extended
properties that are not already present on the tag.

AVEVA™ Historian Administration Guide
Chapter 3 – Defining Tags
© 2021 AVEVA Group plc and its subsidiaries. All rights reserved. Page 88
Note: You can add new extended properties by exporting a configuration text file, adding new
TagExtendedPropertyName entries, and importing the modified file. For more information, see Importing or
Exporting Tag Information on page 115 and Editing the Configuration Text File on page 126.
10. Enter a Value for the property, then click OK. The new property is added to the list.
11. To remove a property from a tag, select the property and click Delete Extended Property. The property is
removed from the list.
12. Click OK or Apply to save your changes.
Configuring Message Pairs
A message pair consists of the messages associated with the FALSE or TRUE state of the discrete tag. A discrete
tag set to 0 is in the FALSE, or OFF, state. A discrete tag set to 1 is in the TRUE, or ON, state.
Viewing the Current Message Pairs for a Server
Message pairs are configured for a single server. Any defined message pair can be used when defining or editing
a discrete tag.
To view all message pairs
1. In the System Management Console, expand a server group and then expand a server.
2. Expand Configuration Editor, expand System Configuration, and then expand Tag Configuration.
3. Select Messages to view all currently-defined message pairs in the details pane.
If you expand Messages and then select a message in the console tree, a list of tags that make use of that
message appears in the details pane.
Editing a Message Pair
If you make changes to a message pair, that change is applied to all tags in the system that are currently using
that message pair.
To edit a message pair
1. In the System Management Console, expand a server group and then expand a server.

AVEVA™ Historian Administration Guide
Chapter 3 – Defining Tags
© 2021 AVEVA Group plc and its subsidiaries. All rights reserved. Page 89
2. Expand Configuration Editor, expand System Configuration, and then expand Tag Configuration.
3. Select Messages.
4. In the details pane, double-click the message to edit. The Properties dialog box appears.
5. In the Message0 box, type the message associated with the FALSE state of the discrete tag. The maximum
number of characters is 64. A discrete tag set to 0 is in the FALSE state.
6. In the Message1 box, type the message associated with the TRUE state of the discrete tag. The maximum
number of characters is 64. A discrete tag set to 1 is in the TRUE state.
7. Click OK.
Adding a Message Pair
If you add a message pair, you can configure both existing and new discrete tags to use the new message pair.
To add a message pair
1. In the System Management Console, expand a server group and then expand a server.
2. Expand Configuration Editor, expand System Configuration, and then expand Tag Configuration.
3. Right-click Messages, and then click New Message. The New Message wizard appears.
4. In the Message0 box, type the message associated with the FALSE state of the discrete tag. The maximum
number of characters is 64. A discrete tag set to 0 is in the FALSE state.

AVEVA™ Historian Administration Guide
Chapter 3 – Defining Tags
© 2021 AVEVA Group plc and its subsidiaries. All rights reserved. Page 90
5. In the Message1 box, type the message associated with the TRUE state of the discrete tag. The maximum
number of characters is 64. A discrete tag set to 1 is in the TRUE state.
6. Click Finish.
Configuring String Tags
You can configure general information and acquisition details for a selected string tag, as well as add new string
tags to the system.
Adding a String Tag
Be sure that you do not exceed your licensed tag count by adding another tag.
To add a string tag
1. In the System Management Console, expand a server group and then expand a server.
2. Expand Configuration Editor, expand System Configuration, and then expand Tag Configuration.
3. Right-click String Tags, and then click New Tag. The New String Tag wizard displays.
4. Type a unique name for the string tag and click Next. For information on allowable tag names, see Tag
Naming Conventions on page 53.
5. You are then prompted to define general, acquisition, and storage information for the tag.
o For more information on configuring general properties, see Editing General Information for a String Tag
on page 91.
o For more information on configuring acquisition, see Editing Acquisition Information for a Tag on page
62.
o For more information on configuring storage, see Editing Storage Information for a String Tag on page
91.
6. Click Finish.

AVEVA™ Historian Administration Guide
Chapter 3 – Defining Tags
© 2021 AVEVA Group plc and its subsidiaries. All rights reserved. Page 91
Editing General Information for a String Tag
To edit general information for a string tag
1. In the System Management Console, expand a server group and then expand a server.
2. Expand Configuration Editor, expand System Configuration, and then expand Tag Configuration.
3. Select String Tags.
4. In the details pane, double-click the string tag to edit. The Properties dialog displays.
5. In the Description box, type a description of the tag.
6. In the Maximum Length list, select the maximum number of characters for the string.
Note: If the maximum length specified is 131 or more characters, the string is considered variable length. If
you create a new string tag, it's best to set its maximum length to 131 characters and not use other values,
which are provided only for backward compatibility. The variable-length string tags values are internally
limited by 512 characters.
7. In the Current Editor group, specify which application or editing environment controls the tag definition.
Tags imported from the InTouch HMI software use InTouch as the current editor. If modifications are made
to an imported tag in the historian Configuration Editor, then the current editor for the tag is changed to
AVEVA Historian. If a reimport is performed, any modifications made using the Configuration Editor are
preserved. You can manually maintain InTouch as the current editor for reimporting; however, all changes
made to the tag using the Configuration Editor are lost during the reimport. Tags (attributes) that are
initially configured using AVEVA Application Server use the ArchestrA Integrated Development Environment
(IDE) as the current editor. If you modify an Application Server tag using the historian Configuration Editor,
then the current editor for the tag is changed to AVEVA Historian. However, the next time you redeploy the
engine, the changes are not preserved.
8. Click OK.
Editing Storage Information for a String Tag
For more information on storage, see Managing Data Storage on page 157.

AVEVA™ Historian Administration Guide
Chapter 3 – Defining Tags
© 2021 AVEVA Group plc and its subsidiaries. All rights reserved. Page 92
If you change the configuration, then the changes are applied only to data with timestamps that are equal to or
greater than the timestamp of the configuration change.
To edit storage information for a string tag
1. In the System Management Console, expand a server group and then expand a server.
2. Expand Configuration Editor, expand System Configuration, and then expand Tag Configuration.
3. Select String Tags.
4. In the details pane, double-click the string tag to edit. The Properties dialog displays.
5. In the Storage Method group, select the way in which values for the tag are stored.
6. In the Deadband group, configure details for how the tag value is stored. The availability of this group
depends on which storage method you select.
Time Deadband
A time deadband is the minimum time, in milliseconds, between stored values for a single tag. Any value
changes that occur within the time deadband are not stored. The time deadband applies to delta storage
only. A time deadband of 0 indicates that the system will store the value of the tag each time it changes.
Select the Double-Byte Storage check box to store the string as a double-byte UTF-16 Unicode string using 2
bytes per character. If you create a new string tag, it is recommended to select Double-Byte Storage for
better compatibility with the Historian SDK.
7. Click OK.
Editing Extended Properties for a String Tag
Extended properties can be used to add application-specific metadata to tags. When you search for tags in
AVEVA Historian Client Web or AVEVA Insight, you can locate tags based on these property values. Likewise,
with SQL queries you can select tags based on these property values without needing to know the tag name.
The following extended properties are predefined by the system, and can be added to any analog tags:
Alias - Used as the tag's preferred label in charts.

AVEVA™ Historian Administration Guide
Chapter 3 – Defining Tags
© 2021 AVEVA Group plc and its subsidiaries. All rights reserved. Page 93
Location - Places the tag within the asset model of AVEVA Insight.
You can define your own custom extended properties by using the database import/export feature. See Adding
New Tag Extended Property Values on page 128 for more information.
To edit extended property information for a string tag:
1. In the System Management Console, expand a server group and then expand a server.
2. Expand Configuration Editor, expand System Configuration, and then expand Tag Configuration.
3. Select String Tags.
4. In the details pane, double-click the discrete tag you want to edit. The Properties dialog displays.
5. Select the Extended Properties tab.
6. To edit an existing property value, select the property in the list and click Edit Extended Property.... The
Extended Properties dialog displays.
7. Enter a new Value for the property, then click OK.

AVEVA™ Historian Administration Guide
Chapter 3 – Defining Tags
© 2021 AVEVA Group plc and its subsidiaries. All rights reserved. Page 94
8. To add a property to a tag, click Add Extended Property.... The Extended Properties dialog displays.
9. Select the Name of the extended property from the drop-down list. The list contains all editable extended
properties that are not already present on the tag.
Note: You can add new extended properties by exporting a configuration text file, adding new
TagExtendedPropertyName entries, and importing the modified file. For more information, see Importing or
Exporting Tag Information on page 115 and Editing the Configuration Text File on page 126.
10. Enter a Value for the property, then click OK. The new property is added to the list.
11. To remove a property from a tag, select the property and click Delete Extended Property. The property is
removed from the list.
12. Click OK or Apply to save your changes.
Configuring Event Tags
Event tags are a special tag type that allow you to track when a condition or other specific event happens in
relation to one or more specified tags. For example, you could create an event tag to indicate when a
temperature control (represented by a certain analog tag) registers 100 degrees or more. Or, you could create
an event tag to track each time a particular discrete tag registered "Jam" as the reason why a component
stopped running.
Be sure that you do not exceed your licensed tag count when adding event tags.

AVEVA™ Historian Administration Guide
Chapter 3 – Defining Tags
© 2021 AVEVA Group plc and its subsidiaries. All rights reserved. Page 95
Note: For information about managing event tags that you created event tags through the Classic Event
subsystem, see Configuring Classic Events on page 335 in the AVEVA Historian Supplemental Reference.
Adding an Event Tag
To add an event tag
1. In the System Management Console, expand a server group and then expand a server.
2. Expand Configuration Editor, expand System Configuration, and then expand Tag Configuration.
3. Right-click Events Tags, and then click New Tag.
4. The New Event Tag wizard appears. Type a unique name for the event, and click Next.
5. Type a description and click Next.
6. Use the Tag Finder to locate the tag or tags associated with this event.
a. Type search criteria in the TagName and Description fields and click Find Now.

AVEVA™ Historian Administration Guide
Chapter 3 – Defining Tags
© 2021 AVEVA Group plc and its subsidiaries. All rights reserved. Page 96
b. From the Found Tags box, mark the tag(s) you want to associate with this event, and click the > button
to move them to the Target Tags box. Click OK.
7. From the Detection Type dropdown, select a detector type for this event. Apply a time interval, edge
detection, and other criteria as appropriate. Click Next.

AVEVA™ Historian Administration Guide
Chapter 3 – Defining Tags
© 2021 AVEVA Group plc and its subsidiaries. All rights reserved. Page 97
8. From the Action Type dropdown, select the action that Historian will take as a result of this event. Click
Finish.
9. When you are done defining the new analog tag, click Finish.
Copying Tag Definitions
You can use an existing tag definition as the basis for additional tag definitions.
To copy a tag definition
1. In the System Management Console, expand a server group and then expand a server.
2. Expand Configuration Editor, expand System Configuration, and then expand Tag Configuration.
3. Select the appropriate tag type folder (for example, Analog Tags) so that the list of available tags appears in
the details pane.
4. Perform any of the following:
o Right-click the tag to copy in the details pane and click Copy. Then, right-click the tag type folder and
click Paste.
o Select the tag to copy and then drag it onto the tag type folder.
The new tag wizard appears with the definition options of the copied tag set as defaults. The name of the
new tag is the name of the copied tag, appended with a number. For example, "MyTag2."
5. Use the wizard to change any of the options for the new tag.
o To change an analog tag, see Adding an Analog Tag on page 57.
o To change a discrete tag, see Adding a Discrete Tag on page 84.
o To change a string tag, see Adding a String Tag on page 90.
o To change an event tag, see Adding an Event Tag on page 336.
Deleting a Tag

AVEVA™ Historian Administration Guide
Chapter 3 – Defining Tags
© 2021 AVEVA Group plc and its subsidiaries. All rights reserved. Page 98
To delete a tag
1. In the System Management Console, expand a server group and then expand a server.
2. Expand Configuration Editor, expand System Configuration, and then expand Tag Configuration.
3. Select the tag in the details pane and perform any of the following:
o Click the Delete button on the toolbar.
o On the Action menu, click Delete.
o Right-click the tag and then click Delete.
Organizing Tags into Groups
In the System Management Console, tags are organized into two main groups:
Public Groups folder
The Public Groups folder contains all objects that are visible to all clients. If you have administrative
permissions, you can create, rename, and delete groups in the Public Groups folder.
You cannot change the following default groups:
o All Analog Tags
o All Discrete Tags
o All String Tags
o All Event Tags
o InTouch Nodes
o System Status Tags
Private Groups folder
The Private Groups folder contains all objects that are visible to the database user that is currently logged
on. In SQL Server, database user accounts and Windows user accounts are mapped to login IDs. Users can
create, rename, and delete groups in their Private Groups folder. Also, by default, every domain user can
have their own private namespace and data annotation entries. You can turn off this functionality using the
GroupedPrivateNamespace system parameter.
The console tree shortcut menu contains commands for adding groups in the hierarchy and adding tags to them.
Open the shortcut menu by right-clicking on the item in the console tree. Add a group just as you add a new
folder in the Windows Explorer. For example, create the "BoilerTags" group under the existing "Private Groups"
group.
When you add tags to a new group, the original reference still appears in the default system group under Tag
Configuration in the console tree. Any tag can belong to any number of groups, and any group can contain any
number of tags.
Adding a Group
To add a group
1. In the System Management Console, expand a server group and then expand a server.
2. Expand Configuration Editor, and then expand Public Groups.
3. Select the folder under which you want to create a group.
4. Perform any of the following:

AVEVA™ Historian Administration Guide
Chapter 3 – Defining Tags
© 2021 AVEVA Group plc and its subsidiaries. All rights reserved. Page 99
o On the Action menu, click New Group.
o Right-click and then click New Group.
o Click the Add button on the toolbar.
The New Group dialog box appears.
5. In the Group Name box, type a name for the new group. The group name can be up to 255 characters and
must be unique.
6. Click Finish.
Renaming a Group
You can rename any group that you have created in the console tree, except for public folders or tag references.
To rename a group
1. Select the group in the console tree.
2. Press F2 on your keyboard.
3. Type a new name for the folder and press Enter.
Adding a Tag to a Group
If you are a member of the aaUsers group, you can only add tags to a private group.
To add a tag to a group
1. Select the group to which you want to add a tag.
2. Do any of the following:
o Drag the tag from the details pane into the folder.
o Right-click and then click Add Tags to Group. The Tag Finder dialog box appears, in which you can search
for and select tags to add.
o Click the Tag Finder button on the toolbar to open the Tag Finder.

AVEVA™ Historian Administration Guide
Chapter 3 – Defining Tags
© 2021 AVEVA Group plc and its subsidiaries. All rights reserved. Page 100
For more information on the Tag Finder, see Using the Tag Finder on page 354.
Deleting a Group or Tag Reference
To delete a tag from the AVEVA Historian, you must select the tag in the appropriate folder under Tag
Configuration. After a tag is deleted, all references to it anywhere in the public or private folders are also
deleted. For more information, see Deleting a Tag on page 97.
When you delete a private group, the group folder and all references to tags are deleted. The tags themselves
are not deleted, and the original reference still appears in the default system group. You cannot delete public
folders or the tag references contained in them.
To delete a group or tag reference
1. In the System Management Console, expand a server group, and then expand a server.
2. Expand Configuration Editor, and then expand Public Groups or Private Groups.
3. Select the group in the console tree.
4. Delete the item by doing one of the following:
o On the Action menu, click Delete.
o Right-click the group or tag, and then click Delete.
o Click the Delete toolbar button .
Filtering Tags in the SMC Details Pane
In the System Management Console, you can select certain items in the console tree, a list of associated tags
appears in the details pane. For example, if you click the All Analog Tags item in the Public Groups folder, a list
of all analog tags in the system appears. If you click a specific message pair in the Messages folder, a list of tags
that use that message pair appears.
You can apply simple filtering to any list of tags that appears in the details pane. Also, you can configure a
different filter for each tag list. A particular filter will remain associated with a list until you remove the filter.

AVEVA™ Historian Administration Guide
Chapter 3 – Defining Tags
© 2021 AVEVA Group plc and its subsidiaries. All rights reserved. Page 101
Applying a Filter
To apply a filter
1. In System Management Console, expand the console tree.
2. Right-click in the tag list in the details pane and click Filter. The <item name> - Filter dialog box appears.
3. Select the Enable Filter check box.
4. In the Tagname Like box, type the filter string. The maximum length of the filter string is 100 alphanumeric
characters.
When filtering tags, use the percentage sign (%) as a wildcard character for any portion of the filter. For
example, "SysDate%" or "SysPerf%ThreadCount."
Case-sensitivity for the filter depends on the SQL Server settings. If the SQL Server is case-sensitive, then the
filter is case-sensitive; if the SQL Server is case-insensitive, then the filter is case-insensitive. Also, the string
you use is not validated.
5. Click OK.
The details pane refreshes automatically. The word "Filtered" appears in the bottom right corner of the details
pane along with the number of tags that matches the filter string.
The filter remains in effect until you disable it or remove it, even if you close the System Management Console
without saving your changes to the .msc file.

AVEVA™ Historian Administration Guide
Chapter 3 – Defining Tags
© 2021 AVEVA Group plc and its subsidiaries. All rights reserved. Page 102
Disabling or Removing a Filter
Disabling the filter allows you to turn the filtering off without completely removing the last filter string you
applied.
To disable the current filter
1. In System Management Console, expand the console tree.
2. Right-click in the tag list in the details pane and click Filter. The <item name> - Filter dialog box appears.
3. Click to clear the Enable Filter check box.
4. Click OK. Notice that the filter string remains in the Tagname Like box.
To remove a filter
1. Right-click in the tag list in the details pane and click Filter. The <item name> - Filter dialog box appears.
2. Click Remove.
Importing and Exporting Tag Configurations
For the AVEVA Historian, configuration information includes all of the definitions for entities within the system,
such as tags, I/O Servers, and summary operations.
You can import information from an InTouch data dictionary (Tagname.x) using the Tag Importer wizard
available from within the System Management Console application.
Also, you can export all of the configuration information from a historian to a text file. This allows for making
bulk additions or modifications using third-party tools, such as Microsoft Excel. The modified text file can be
imported into the same or a different historian.

AVEVA™ Historian Administration Guide
Chapter 3 – Defining Tags
© 2021 AVEVA Group plc and its subsidiaries. All rights reserved. Page 103
Importing an InTouch Data Dictionary
You can import an InTouch tag name database, also called the data dictionary, and use it to configure most of
the AVEVA Historian. Importing a tag name database eliminates the need to manually configure I/O Server and
tag definitions for both the InTouch HMI software and the historian. Information in the tag name database is
automatically mapped to the appropriate tables within the historian Runtime database as part of the import
process.
You can import tag name databases from multiple InTouch nodes, but you can only import one application from
each node. Tag name databases from InTouch HMI software 6.0 or later can be imported.
To perform an import, you must have administrative permissions for the historian Runtime and Holding
databases, (for example, be a member of the sysadmin or wwAdministrators roles or be in the Runtime and
Holding db_owner roles).
However, to perform a delta import, you must be importing from an InTouch 7.1 or later tagname database. For
more information, see Reimporting on page 105.
After you configure your system by importing I/O Server and tag definitions and then commit the changes, the
historian acquires data for these tags. After the history data is being stored in the Runtime database, it can be
manipulated using any SQL method for retrieving data supported by the historian. Functions specific to the
historian, such as setting the resolution for a query, can be applied to the data, and the data can be retrieved
from client applications, including InTouch HMI software.
InTouch user-defined tags are supported in the public namespace. For more information on user-defined tags,
see the InTouch HMI Data Management Guide.
Before You Import
Using the tag importer functionality from within the System Management Console, you can import topic and
other configuration data from one or more InTouch nodes. There are several factors that contribute to
effectively importing tags from multiple InTouch nodes into the AVEVA Historian database.
Determining import order
Duplicate tags or addresses
Import limitations for topic names
Editing machine names
Reimporting
Importing information for DDE I/O Servers
Holding database
The AllowOriginals system parameter needs to be set to 1 before importing .lgh original data.
Be sure to close InTouch WindowMaker before importing the Tagname.x file.
Note: Copying or moving an InTouch application in edited mode from one node to another node causes the
application to be locked.

AVEVA™ Historian Administration Guide
Chapter 3 – Defining Tags
© 2021 AVEVA Group plc and its subsidiaries. All rights reserved. Page 104
Although you can import from multiple InTouch nodes, only one application from each InTouch node may be
imported. That is, you cannot import an InTouch node with the same computer name as one you have already
imported. However, you can import a Tagname.x from a repository and then edit the node name location. If you
delete the application from the historian, you can import a different application from the same InTouch node.
When you delete an application from the historian, all tag information, annotations, snapshots, and summaries
are deleted. Although the stored history data is not deleted from the history blocks, it is no longer accessible. If
you perform a reimport, the existing history data already in the historian is accessible again.
Determining Import Order
If you are importing from more than one InTouch node, the following scenarios can exist:
You have more than one InTouch node retrieving values from the same I/O tag, which is receiving values
from the same point on a factory device.
You have an InTouch node retrieving values from an I/O tag on another InTouch node, which is receiving its
data value from a point on a factory device.
All of your InTouch nodes are retrieving values from I/O tags on a dedicated InTouch node, which is
receiving its data values from a point on a factory device. In this case, the dedicated InTouch node is set up
to function as a "tag server."
When you import tagname dictionaries from multiple InTouch nodes, avoid importing duplicate I/O tags. To
maximize the efficiency of importing data, first import the InTouch node that is functioning as the tag server or
that contains the highest number of tags that have direct access to the data points from the factory floor
devices.
As you import multiple nodes, always import a node with more tags having direct access, before importing a
node having fewer tags with direct access.
Duplicate Tags or Tag Addresses
If the Tag Importer encounters a tag that already exists in the AVEVA Historian database, it can optionally add a
string to the beginning or end of the tag name to make it unique within the historian. During the import, you can
select:
Whether or not you want a string to be added.
The string to add.
The placement of the string, either at the beginning or the end of the tag name.
Whether to add a string to all tag names from that node, regardless if they are duplicates or not, or to only
add a string when a duplicate tag is detected.
If, by adding a string, you create a duplicate tag during the importing process, the Tag Importer does not import
that tag. For example, you choose to prefix all tags from a particular node with the letter "B," and you are
importing a tag named "TestTag." However, a tag named "BTestTag" already exists in the historian. The Tag
Importer does not import potential duplicate tags. To solve the problem of potential duplicate tags, change the
names of these tags in InTouch HMI software to avoid the duplication and then try importing a second time.
If the Tag Importer encounters a duplicate address (consisting of the application, topic, and item) for one or
more tags, the information is still imported. However, if you are using DDE and have duplicate addresses, only
the first tag (per tagname order) actually receives data. This is a DDE limitation.

AVEVA™ Historian Administration Guide
Chapter 3 – Defining Tags
© 2021 AVEVA Group plc and its subsidiaries. All rights reserved. Page 105
Import Limitations for Topic Names
If the InTouch application you are importing contains topic names that are longer than 50 characters, the
application is not imported.
Editing Computer Names
During an import, you are prompted to verify the InTouch computer name and the path to the InTouch
application.
Normally, you should not change these default values. However, you need to change the InTouch computer
name if you are importing multiple applications from the same InTouch computer. For example, perhaps you
have a dedicated "application repository" computer on which you develop all of your InTouch applications. You
then publish these applications to the actual production computers on which they will run. In this case, you can
import all of the InTouch applications from the repository computer, but during the import process you need to
change the InTouch computer name to the corresponding production computer name. The import wizard checks
for duplicate InTouch nodes, but not until after you have the opportunity to rename the InTouch computer.
You cannot change the InTouch computer name and the path to the InTouch application during a reimport.
However, you can manually edit this information in the InTouchNode table using SQL Server Query Analyzer (or
any other query tool) before the reimport. When the reimport is performed, the new information will be used.
Reimporting
"Reimporting" means that all of the tag name dictionary information is imported, regardless of whether the
information changed. No special configuration is required for reimporting an InTouch data dictionary. You may
only perform a reimport procedure for the same InTouch node. The steps for performing a reimport procedure
are basically the same as an initial import, with a few differences. For instructions on importing, see Importing or
Reimporting a Dictionary on page 106.
Note: Back up the Runtime database before you reimport.
If you are reimporting and you do not choose to reimport all topics, only the tags for the topics you select are
updated in the AVEVA Historian. All other topics remain unchanged.
You can also just reimport those tags that changed for a particular InTouch node since the last import. This is
called "delta reimport," as opposed to the full reimport procedure . A delta reimport is usually faster than a full
reimport procedure because only those tags that have changed since the last import are updated in the
historian.
However, the delta reimport procedure does not provide the flexibility of the full reimport procedure. You
cannot import a subset of the changed tags, nor can you edit the cyclic storage rate. For these capabilities,
perform a full reimport procedure . For example, if you initially imported Topic A but not Topic B, a full reimport
procedure is required to add Topic B to the historian database.
Any existing uniqueness settings and cyclic storage parameters (specified during the original import) will be
retained for the delta reimport procedure.
Note: Delta reimport is only supported for InTouch HMI software 7.1 and later.

AVEVA™ Historian Administration Guide
Chapter 3 – Defining Tags
© 2021 AVEVA Group plc and its subsidiaries. All rights reserved. Page 106
Importing Information for DDE I/O Servers
If you are importing configuration information for remote I/O Servers that use DDE, you must first configure
shares for these I/O Servers and then import the tagname database into AVEVA Historian. You do not need to
configure shares for local DDE Servers.
When you import I/O Server configuration information from InTouch HMI software, the default protocol for all
I/O Servers is set to SuiteLink. If you imported a DDE I/O Server(s), use the System Management Console to
change the default protocol back to DDE for the server(s).
Holding Database
The Holding database temporarily stores topic and configuration data that has been imported from an InTouch
node. When you import data from InTouch HMI software, the data is first mapped to table structures in the
Holding database. Then, the data is moved into the Runtime database.
Importing or Reimporting a Dictionary
The Tag Importer allows you to select an InTouch tagname database (Tagname.x) and import all information
from an InTouch application into the AVEVA Historian Runtime database.
To import from a Tagname.x file
1. In the System Management Console tree, expand a server group and then expand a server.
2. Click Configuration Editor.
3. Start the Tag Importer wizard by doing any of the following:
o Right-click Configuration Editor, and then click Import Tags.
o On the Action menu, click Import Tags.
o Select the Import Tags button on the toolbar.
4. The Welcome dialog box appears. Click Next to start the import.
The Imported InTouch Nodes dialog box appears. If there are no imported nodes currently in the AVEVA
Historian, only the Add, Cancel, and Help buttons are available in the dialog box, and the dialog box only
contains informational text.
5. Do any of the following:

AVEVA™ Historian Administration Guide
Chapter 3 – Defining Tags
© 2021 AVEVA Group plc and its subsidiaries. All rights reserved. Page 107
o To import an InTouch node and its associated tags, click Add. In the Select Tagname.x dialog box that
appears, browse for the Tagname.x file (InTouch HMI software version 6.0 or later) that you want to
import and then click Open. If you are importing for the first time, you are prompted to verify the
import.
o To reimport a node, select that node and click Full ReImport. For more information, see Reimporting on
page 105.
o To reimport only those tags that changed for a node, select the desired node and click Delta ReImport.
o To delete a node and all its associated tags, select the desired node and click Delete. A warning box
appears so that you can confirm the deletion.
After a script runs, the InTouch Node Information dialog box appears.
6. Verify the InTouch machine name and the path to the InTouch application.
Options in this dialog box are unavailable during a reimport.
The current InTouch machine name and the path to the current InTouch application are shown as defaults.
For more information on changing the default machine name, Editing Computer Names on page 105.
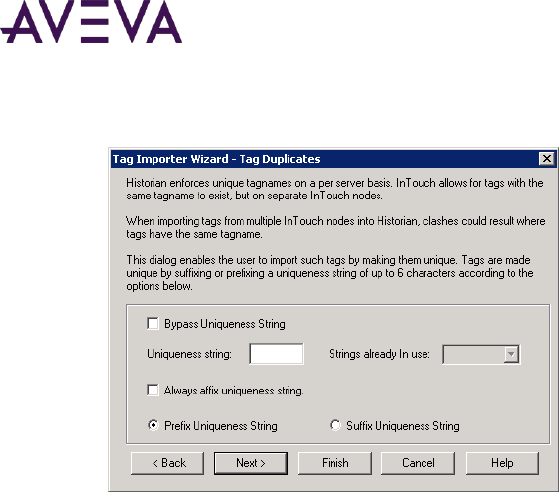
AVEVA™ Historian Administration Guide
Chapter 3 – Defining Tags
© 2021 AVEVA Group plc and its subsidiaries. All rights reserved. Page 108
7. Click Next. The Tag Duplicates dialog box appears.
8. Configure how the Tag Importer handles duplicate tags. Options in this dialog box are unavailable if you are
reimporting.
Bypass Uniqueness String
Select to not append a uniqueness string to any duplicate tagnames. The Tag Importer does not import
these duplicate tagnames.
Uniqueness String
The characters to add to the tagname to make it unique, if the Tag Importer determines that it is a
duplicate. You can use up to 6 characters for the uniqueness string. You cannot leave the uniqueness string
blank, and you cannot use a string that you used before. For information on allowable tagnames, see Tag
Naming Conventions on page 53 .
Strings already in use
The strings that are already appended to tagnames in the system.
Always affix uniqueness string
Used to append the uniqueness string to all imported tagnames from the selected node, regardless of
whether they are duplicates. However, if affixing a string creates a duplicate tagname, the Tag Importer will
not import that tag.
Prefix Uniqueness String
Select to append the string to the beginning of the tagname.
Suffix Uniqueness String
Select to append the string to the end of the tagname.

AVEVA™ Historian Administration Guide
Chapter 3 – Defining Tags
© 2021 AVEVA Group plc and its subsidiaries. All rights reserved. Page 109
9. Click Next. The Filter Tags dialog box appears.
10. Check the category or categories for the tags that you want to import:
All
Import all tag information from the data dictionary. If you select this option, all tag information from the
other categories is automatically included.
Plant I/O
Import only tags receiving data from I/O Servers, including I/O discrete, I/O integer, I/O real, and I/O
message tags.
Memory
Import only InTouch memory tags, including memory discrete, memory integer, memory real, and memory
message.
System
Import only InTouch system tags ($<name>).
11. In the Logged Only For Category group, select whether to include only those tags that were configured in
the InTouch HMI software to be logged, or all the tags for that category. These options are available if you
selected All, Plant I/O, or Memory tags.

AVEVA™ Historian Administration Guide
Chapter 3 – Defining Tags
© 2021 AVEVA Group plc and its subsidiaries. All rights reserved. Page 110
12. If you selected All tags or Plant I/O tags, you can individually specify which plant I/O topics you want to
import. To do this, click Topics. The Select Topics dialog box appears.
13. Using the right and left arrow buttons, move the topics that you want to import into the To Be Imported
window. Click OK.
14. Click Next. The Tag Storage dialog box appears.
For more information on storage, see Managing Data Storage on page 157.
15. To use cyclic storage, select Use Cyclic Storage For All Topics. The Cyclic Storage For All Topics area
becomes available. In the Storage Rate list, select the desired rate. The cyclic storage rate is the time
interval between consecutive stored values.
16. To use delta storage, select Use Delta Storage For All Topics. The Delta Storage For All Topics area becomes
available. Select from the following options:
No Deadband
All changed values for a tag are stored.
InTouch Deadband
The time interval for storing a tag, as it was defined in the InTouch HMI software.
AVEVA Historian Specific Deadband

AVEVA™ Historian Administration Guide
Chapter 3 – Defining Tags
© 2021 AVEVA Group plc and its subsidiaries. All rights reserved. Page 111
Allows you to specify a time and value deadband or a swinging door deadband.
A time deadband is the minimum time, in milliseconds, between stored values for a single tag. Any value
changes that occur within the time deadband are not stored. The time deadband applies to delta storage
only. A time deadband of 0 indicates that the system will store the value of the tag each time it changes.
A value deadband is the percentage of the difference between the minimum and maximum engineering
units for the tag. Any data values that change less than the specified deadband are not stored. The value
deadband applies to delta storage only. A value of 0 indicates that a value deadband will not be applied.
A swinging door deadband is the percentage of deviation in the full-scale value range for an analog tag. The
swinging door (rate) deadband applies to delta storage only. Time and/or value deadbands can be used in
addition to the swinging door deadband. Any value greater than 0 can be used for the deadband. A value of
0 indicates that a swinging door deadband will not be applied.
17. To use forced storage, select Use Forced Storage For All Topics.
18. To assign the storage paradigm on a per-topic basis, select Per Topic Storage Selection and then click the
Topics button. The Topic Configuration dialog box appears.
19. Configure the storage method for a topic. These options are similar to that of the Tag Storage dialog box.
Click Apply to apply the new storage method.
Note: If you do not click Apply, the storage rule options revert back to their previous settings.
20. Click OK to return to the Tag Storage dialog box.
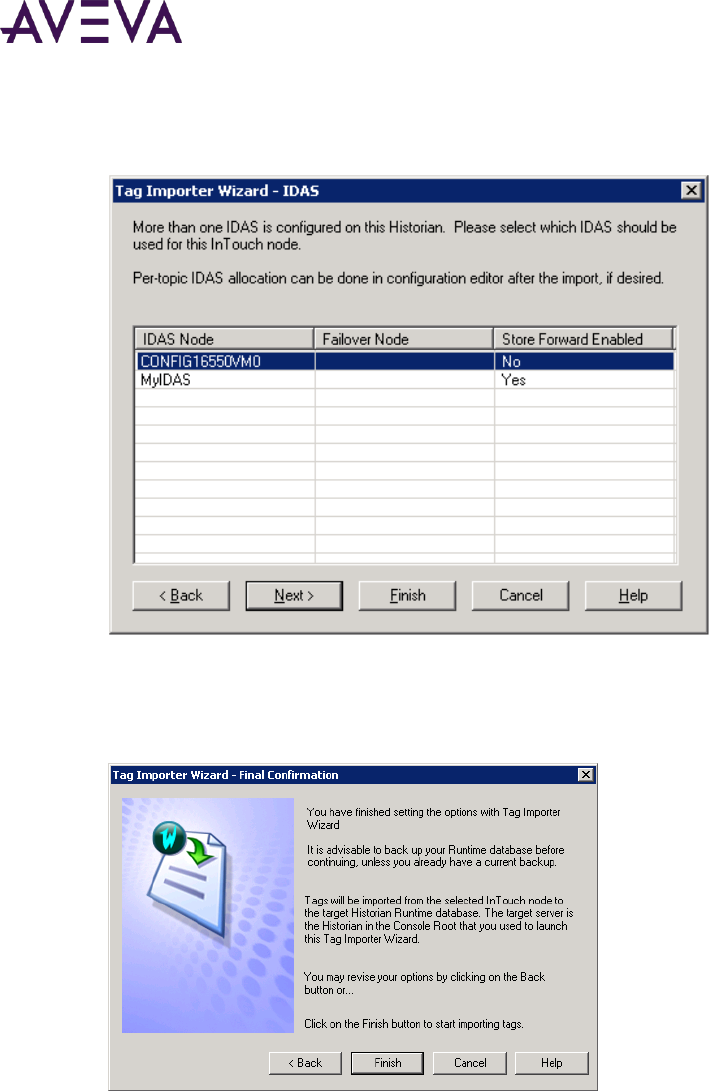
AVEVA™ Historian Administration Guide
Chapter 3 – Defining Tags
© 2021 AVEVA Group plc and its subsidiaries. All rights reserved. Page 112
21. Click OK. If you have more than one IDAS on the computer from which you are importing, the IDAS dialog
box appears.
22. Select the IDAS that supplies the data values for the InTouch node.
For information on IDASs, including failover and store-and-forward options, see About IDASs on page 135.
23. Click Finish to start the import options. The Final Confirmation dialog box appears.

AVEVA™ Historian Administration Guide
Chapter 3 – Defining Tags
© 2021 AVEVA Group plc and its subsidiaries. All rights reserved. Page 113
24. Click Finish. The Tag Importer Status dialog box appears.
25. If you click Hide, the dialog box closes, and the import process continues. The dialog box reappears when
the import is complete.
Note: For a reimport, only the tags for the topics you select are updated in the historian. Topics from the
previous import remain unchanged.
26. When the import is complete, click OK.
27. Commit the changes to the system.
Viewing Properties for an Imported InTouch Node
In the System Management Console, you can view details for all imported InTouch nodes, as well as a list of tags
associated with each node.
To view properties for an imported InTouch node
1. In the System Management Console, expand a server group and then expand a server.
2. Expand Configuration Editor, expand System Configuration, and then expand Storage.
3. Expand Imported Nodes.
4. Right-click an InTouch node, and then click Properties. The InTouch Node Properties dialog box appears.
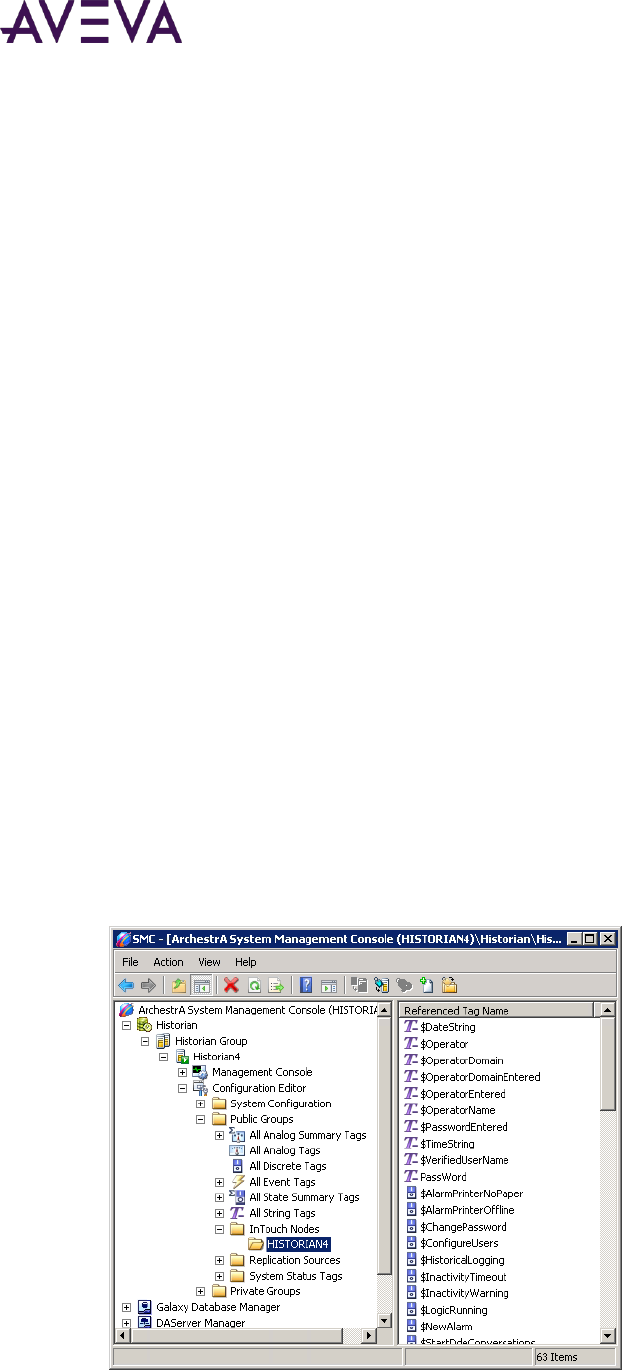
AVEVA™ Historian Administration Guide
Chapter 3 – Defining Tags
© 2021 AVEVA Group plc and its subsidiaries. All rights reserved. Page 114
5. The read-only properties are as follows:
Machine Name
The name of the computer on which the InTouch application resides.
Path
The UNC path to the InTouch Tagname.X file.
InTouch Node Key
The unique numerical identifier for the named InTouch node.
Duplicate Char
The string that was added to a tag name as a prefix or suffix to make it unique.
Prefix or Suffix
Used to indicate whether unique tags were created by prefixing or suffixing the unique string for the node.
6. Click OK.
Viewing Tags Associated with an InTouch Node
In the Public Groups folder of the System Management Console tree, you can view a list of tags that have been
imported from an InTouch node. You can also view the list of tags under the System Configuration folder, but
with more details.
To view a list of tags in the public group
1. In the System Management Console, expand a server group and then expand a server.
2. Expand Configuration Editor, expand Public Groups, and then expand InTouch Nodes.
3. Select the InTouch node for which you want to view a list of tags.
4. The tag list appears in the details pane.
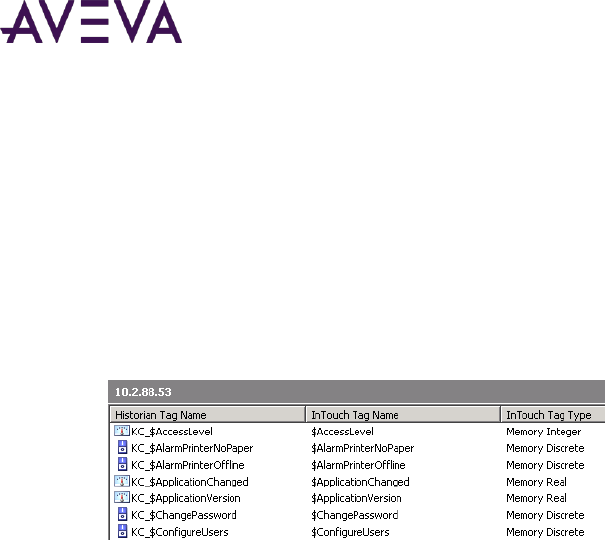
AVEVA™ Historian Administration Guide
Chapter 3 – Defining Tags
© 2021 AVEVA Group plc and its subsidiaries. All rights reserved. Page 115
5. You can right-click any tag to access the Properties dialog box for that tag.
To view a list of tags under the system configuration
1. In the System Management Console, expand a server group and then expand a server.
2. Expand Configuration Editor, expand System Configuration, and then expand Storage.
3. Expand Imported Nodes.
4. Select the InTouch node for which you want to view a list of tags.
5. The tag list appears in the details pane.
The columns shown are:
AVEVA Historian Tag Name
The unique name of the tag within the AVEVA Historian system.
InTouch Tag Name
The original tag name in an InTouch application. The tag name may be different than the AVEVA Historian
tag name if a new name was generated to ensure uniqueness.
InTouch Tag Type
The type of tag in an InTouch application. For more information about InTouch tag types, see your InTouch
documentation.
Importing or Exporting Tag Information
The Historian Database Export/Import Utility (aahDBDump.exe) is a standalone utility to export or import AVEVA
Historian configuration information with a text file. Exporting and importing data are two independent
operations.
The Historian Database Export/Import Utility is useful when you want to make bulk modifications to the
configuration, instead of using the Configuration Editor to edit a single database entity at a time. You would
simply export the text file, make the modifications, and then import the changes back to the historian. The
utility is also useful for transferring configuration information from one historian to another.
You can also use the Export/Import Utility to export the Tag History table. This allows you to view different
versions – and corresponding configurations – of the same tag.
You can export/import the configuration information for one or more of the following entities. For some of the
entities, the utility supports additional filtering.

AVEVA™ Historian Administration Guide
Chapter 3 – Defining Tags
© 2021 AVEVA Group plc and its subsidiaries. All rights reserved. Page 116
Analog tags
Discrete tags
String tags
Event tags
IDASs
I/O Servers
Topics
System parameters
Storage locations
Engineering units
Messages
Summary operations
Snapshot tags
Summary tags
Replication servers
Replication schedules
Replication groups
Replication tag entities
Tag History
Tag Extended Properties
The Historian Database Export/Import Utility does not export:
InTouch node information. If you import tag definitions using the Tag Importer, and then export the
database configuration, the node information is not included. If, after exporting, you rebuild the AVEVA
Historian database, or want to import the database configuration into a different AVEVA Historian, you must
first reimport the tag definitions for the InTouch application before you import the database configuration.
Tags that have their current editor set to be AVEVA Application Server.
Starting with AVEVA Historian 2012 R2, the Tag table includes the AIHistory and ChannelStatus columns, which
were not available in previous versions. If you import a configuration file that was exported using AVEVA
Historian 2012 or earlier, the following values are used for these column settings:
AIHistory = 1
ChannelStatus = 1
The Historian Database Export/Import Utility requires a client connection to the SQL Server used by the historian
to perform the export and import tasks. However, the historian does not need to be running.
The Historian Database Export/Import Utility does not maintain spaces in tag names during an export.
Encoding Formats for Configuration Exports
When you export configuration information, you can specify either Unicode or ASCII as the preferred encoding
format for the text file. Select Unicode if you are exporting any information that uses double-byte characters (for
example, Japanese tag names).
When importing a text file, the Historian Database Export/Import Utility automatically detects the encoding of
the file and converts all text to Unicode, if needed, before populating the AVEVA Historian database.
Configuration Exporter Error Log
The Historian Database Export/Import Utility keeps track of errors that occur during an import, on a line by line
basis. When an error is encountered, you are prompted to stop the import or continue and process as much of
the import as possible.

AVEVA™ Historian Administration Guide
Chapter 3 – Defining Tags
© 2021 AVEVA Group plc and its subsidiaries. All rights reserved. Page 117
The utility logs progress and any errors encountered during the import to an error log file, named
aahDBDumpLog.Txt. The error log file resides in the same folder as the utility executable and can be viewed with
any program capable of reading text files, such as Notepad or Microsoft Excel. The error log file contains the:
Date and time.
Name of the input file.
Line numbers of the input file where errors occurred.
SQL Server error messages reported when processing that line.
Each subsequent export or import operation appends to the log file. You should periodically delete older records
to prevent the log file from becoming too large.
Exporting a Configuration
To export configuration information
1. From the Windows Start menu, expand AVEVA Historian, and then click Configuration Export and Import.
The Historian Database Export/Import Utility Wizard displays.
2. Select Export from Historian to a text file.

AVEVA™ Historian Administration Guide
Chapter 3 – Defining Tags
© 2021 AVEVA Group plc and its subsidiaries. All rights reserved. Page 118
3. Click Next. The Connect dialog displays.
4. In the Server name box, type the name of the AVEVA Historian for which you want to export configuration
information.
5. Provide a login for the historian.
Select Use Windows authentication to use your Windows logon account to connect to the AVEVA Historian.
Select Use SQL Server authentication to use a SQL Server login. Enter a valid SQL Server username and
password.
Important: SQL Server authentication is provided for backward compatibility only. For improved security, we
recommend that you use Windows authentication.
6. In the File name box, type the path for the text file to export, or click to browse to the location.
7. If you are exporting and want to encode the data as Unicode, select the Save file as Unicode check box. For
more information, see Encoding Formats for Configuration Exports on page 116.
8. To export configuration information for all database entities (for example, tags, engineering units, summary
operations, and so on), select Export all objects. Skip to Step 17.

AVEVA™ Historian Administration Guide
Chapter 3 – Defining Tags
© 2021 AVEVA Group plc and its subsidiaries. All rights reserved. Page 119
9. Click Next. (If you are exporting a file, and the file already exists at the location, you will be prompted to
overwrite it.) The Select Objects dialog displays.
10. In the Data acquisition and miscellaneous group, select one or more groups of definitions to export.
IDAS
An AVEVA Historian Data Acquisition Service (IDAS) is a software application that accepts data values coming
from one or more I/O Servers and forwards them to a historian. For more information, see About IDASs on
page 135.
I/O servers
An I/O Server is an application that provides data to a client over a network.
Topics
A topic is an application-specific subgroup of data elements. For more information, see I/O Server
Addressing on page 131.
System parameters
A system parameter is a numeric or string value used for system configuration. System parameters are
stored in the System Parameter table in the AVEVA Historian database. For more information, see
SystemParameter in the Historian Database Reference.
Storage locations
The storage location is the directory in which historical data files are stored. Storage locations are stored in
the StorageLocation table in the AVEVA Historian database. For more information, see StorageLocation in
the Historian Database Reference.
Engineering units
An engineering unit is the unit of measure for an analog tag. For example, RPMs, milliseconds, degrees.
Extended Property Names

AVEVA™ Historian Administration Guide
Chapter 3 – Defining Tags
© 2021 AVEVA Group plc and its subsidiaries. All rights reserved. Page 120
The names of the extended properties associated with a tag. For example, Alias, Location.
Messages
Messages are the string values associated with the TRUE (ON) or FALSE (OFF) states of a discrete value.
Snapshot tags
Tags that are defined to have value snapshots saved by the system.
Summary operations
Aggregation calculations that are used to create summary values. See About Summary Replication on page
235.
Summary tags
Tag summaries.
Replication servers
A list of the replication servers that are configured for this instance of the historian. For information on
adding and maintaining replication groups, see Managing and Configuring Replication on page 204.
Replication schedules
A list of the replication schedules that are configured for this instance of the historian.
Extended Property Values
The current stored values of the extended properties associated with a tag.
Replication groups
A list of the replication groups that are configured for this instance of the historian.
Replication tag entities
A list of the replication tags that are configured for this instance of the historian. This is the replication
configuration for individual tags (simple or summary).
TagHistory
A list of different versions and corresponding configurations, including the unique Tag ID for each version, of
the same tag.
Structure Tag
Tags from the StructureType and StructureAttribute tables.
AutoTag
Tags generated by Historian’s auto-summary functionality.
AutoTag History
Tag history.
Note: If the DestinationTagId is empty, a new ID will be generated. If you copy a row to create a new tag
entity, either leave the column empty or specify a unique ID.
11. To export analog tag definitions, select Include Analog Tags. System tags are not included.

AVEVA™ Historian Administration Guide
Chapter 3 – Defining Tags
© 2021 AVEVA Group plc and its subsidiaries. All rights reserved. Page 121
12. In the Where tagname like box, type a string value in order to filter the tags by name. To include all
tagnames, leave this option blank or use the wildcard symbol (%). The exporter recognizes all SQL Server
wildcard characters. For example, to select all analog tags that have names starting with "MyTag", type
"MyTag%".
13. In the Acquisition type list, select the filter for the source of the tag values.
All acquisition types
No filter set. The export file includes all tag definitions (that is, I/O tags, MDAS or HCAL tags, and tags for
which values are not acquired).
IOServer only
Select to only include tag definitions that specify an I/O Server as the data source.
Manual only
Select to only include tag definitions that specify MDAS, HCAL, or manual data acquisition as the data
source. For example, values from MDAS, HCAL, or Transact-SQL statements.
For more information on acquisition, see Configuring Data Acquisition on page 130.
14. In the Storage type list, select the filter for the storage type. The storage type determines how often the
value for an analog tag is stored. An analog value can be stored either by time interval (cyclic) or when the
value changes (delta).
All storage types
Specifies no filter. Cyclic, delta, and unstored tags are selected for export.
Cyclic only
Only include tag definitions that specify cyclic storage. If you select this option, you can set an additional
filter on the storage rate in the Storage rate list. Otherwise, click All storage rates.
Delta only
Only include tag definitions that specify delta storage.
For more information on storage types and rates, see Storage modes in the AVEVA Historian Concepts
Guide.

AVEVA™ Historian Administration Guide
Chapter 3 – Defining Tags
© 2021 AVEVA Group plc and its subsidiaries. All rights reserved. Page 122
15. Click Next. The Select Objects dialog displays.
16. Configure the filters for discrete, string, and event tag definitions. System tags are not included. These
options are the same as for analog tags.
17. Click Next. The Confirm dialog displays.

AVEVA™ Historian Administration Guide
Chapter 3 – Defining Tags
© 2021 AVEVA Group plc and its subsidiaries. All rights reserved. Page 123
18. Click Next to start the export. The Status dialog box appears, showing the results of the export. The number
of objects exported is reported.
19. Click Finish to exit the wizard.
Importing a Configuration
Important: The Historian Database Export/Import Utility offers considerable flexibility for modifying the
contents of the Runtime database. However, after an import is complete, there is no rollback or "undo"
capability. It is highly recommended that you make a backup of the Runtime database before performing an
import.

AVEVA™ Historian Administration Guide
Chapter 3 – Defining Tags
© 2021 AVEVA Group plc and its subsidiaries. All rights reserved. Page 124
To import configuration information
1. From the Windows Start menu, expand AVEVA Historian, and then click Configuration Export and Import.
The Historian Database Export/Import Utility Wizard displays.
2. Select Import from a text file to Historian.
3. Click Next. The Connect dialog displays.
4. In the Server name box, type the node name of the computer hosting AVEVA Historian for which you want
to import configuration information.
5. Provide a login for the historian.

AVEVA™ Historian Administration Guide
Chapter 3 – Defining Tags
© 2021 AVEVA Group plc and its subsidiaries. All rights reserved. Page 125
o Select Use Windows authentication to use your Windows logon account to connect to the AVEVA
Historian.
o Select Use SQL Server authentication to use a SQL Server login. Enter a valid SQL Server username and
password.
Important: SQL Server authentication is provided for backward compatibility only. For improved security, we
recommend that you use Windows authentication.
6. In the File name box, type the path for the text file to import, or click the ellipsis button to browse to the
location.
7. Click Next. The Confirm dialog box appears.
8. Click Next to start the import.
Note: If you are importing a text file that includes one or more delete mode indicators, the utility prompts
you to verify each entity to delete, unless you select to turn off subsequent delete warnings.

AVEVA™ Historian Administration Guide
Chapter 3 – Defining Tags
© 2021 AVEVA Group plc and its subsidiaries. All rights reserved. Page 126
9. The Status dialog box displays, showing the results of the import. The number of objects imported is
reported.
10. Click Finish to exit the wizard.
Editing the Configuration Text File
By editing a configuration text file, you can insert new objects into the database, modify existing objects, and
delete existing objects. For example, you can add 10 new engineering units simply by adding 10 lines under the
Engineering Unit entity line and then importing the configuration file into the AVEVA Historian. You can also
ignore any changes to existing objects by skipping portions of the text file when importing.
Important: The order in which entities appear in the text file is important to ensure successful importing of
the file. For example, if an analog tag is defined in the file, and the tag requires a new engineering unit, the new
engineering unit should appear in the text file before the analog tag. The Historian Database Export/Import
Utility scans the file once from top to bottom and makes no attempt at resolving ordering conflicts. As a general
rule, the following order of entities in the text file should be maintained: IDAS, IOServer, Topics, System
Parameter, Storage Location, EngineeringUnits, Messages, AnalogTags, DiscreteTags, StringTags, EventTags,
SnapshotTags, SummaryOperations, SummaryTags, ReplicationSchedules, Replication Servers, Replication
Groups, Replication Tag Entities, TagExtendedPropertyNames, and TagExtendedPropertyValues.

AVEVA™ Historian Administration Guide
Chapter 3 – Defining Tags
© 2021 AVEVA Group plc and its subsidiaries. All rights reserved. Page 127
The following is an example of a configuration text file. All values must be separated by a tab stop.
Mode Indicators
The mode indicator determines whether the data is inserted, updated, deleted, or ignored. Valid values for the
mode indicator are:
Value
Description
update:
If the line being imported corresponds to an existing entity in the database, the entity is
updated with the contents of the line in the file. If the entity does not exist in the database,
it is inserted.
insert:
If the line being imported corresponds to an existing entity in the database, that entity is
left unmodified in the database. Only non-existing database entities are added when this
value is specified for the mode indicator.
delete:
If the line being imported corresponds to an existing entity in the database, that entity is
deleted; otherwise, nothing is done.
ignore:
The line in the text file is essentially ignored. This is useful for skipping portions of the text
file when importing.
The very first line in the text file must be a valid mode indicator; otherwise, the importer reports an error and
stops importing the file. Mode indicators can appear anywhere in the file and remain effective until the next
mode indicator or the end of the file is encountered.

AVEVA™ Historian Administration Guide
Chapter 3 – Defining Tags
© 2021 AVEVA Group plc and its subsidiaries. All rights reserved. Page 128
Line Entries
The text file contains header lines to indicate the type of database object referenced by the actual data lines
following the header line. The header line consists of an entity name (shown within parentheses) followed by a
series of attribute identifiers. The entity name loosely corresponds to a table (or tables) in the database, while
the attribute identifiers resemble the column names in the tables. Note, however, that there is no strict
correspondence between database tables and header lines. For example, a line in the text file related to an
analog tag contains all the fields necessary to populate the Tag, AnalogTag, and other tables.
In the text file, a header line is followed by one or more lines containing actual data for the entity shown in the
header line. Any particular entity can be repeated in the text file as many times as needed. For example, you can
have a set of new analog tags inserted at the beginning of the file, and another set of analog tags deleted later in
the file.
When you add lines to the end of the export file, make sure that the last line in the file is terminated by a
carriage return/line feed. You can do this by pressing the Enter key on your keyboard at end of the line.
The value of the DefaultTagRate for an engineering unit must be one of the valid cyclic rates for analog tags. For
more information, see Understanding Retrieval Options in the AVEVA Historian Retrieval Guide.
Note: The name "$local" appears in the export file, instead of the real computer name, for any object that has a
computer name that refers to the local computer. When an import is performed, "$local" is translated into the
name of the computer that is the target of the import.
Adding New Tag Extended Property Values
Line entries for tag extended property values use a different format, where each line contains all the extended
property values for a specific tag.
The following example illustrates adding new tag extended properties, and setting extended property values for
a single tag.
Two new extended properties, NewStringProperty and NewIntProperty, are defined by adding lines to the
TagExtendedPropertyName section.
The TagExtendedPropertyValue header line begins with the TagName, followed by the system-defined
extended properties Alias, Dimension, HierarchicalName, Location, and Namespace. The remainder of the line
contains the property names defined in the TagExtendedPropertyName section, in this case NewStringProperty
and NewIntProperty.
The remainder of the TagExtendedPropertyValue section consists of one line per tag, with each line containing
all the extended property values for the specified tag, tab-delimited. In this example, the tag MyStringTag is
assigned extended property values for Alias, Location, NewStringProperty, and NewIntProperty. The remaining
properties are left blank.

AVEVA™ Historian Administration Guide
Chapter 3 – Defining Tags
© 2021 AVEVA Group plc and its subsidiaries. All rights reserved. Page 129
Limitations
The maximum number of extended properties that can be defined is 10, including the 5 system-defined
properties, Alias, Dimension, HierarchicalName, Location, and Namespace. This means that you can define up to
5 custom extended properties.
When you are using an SDK application, if more than 10 extended properties are defined, tag extended
properties are not stored, and database warning messages are logged similar to the following example:
Main Metadata Server COM Exception caught, error = 38 (Database error)
When this occurs, the SDK application will continue retrying (and failing) until the application is closed.

© 2021 AVEVA Group plc and its subsidiaries. All rights reserved. Page 130
About the Data Acquisition Subsystem
The purpose of the Data Acquisition subsystem is to accept and process incoming data that originates from data
sources. One data source is an AVEVA-compatible I/O Server. An I/O Server is an application that provides
factory data to a client by a specific protocol. An IDAS (Industrial Data Acquisition Service) is a component of the
AVEVA Historian that accepts data values from an I/O Server and forwards them to the storage subsystem,
which stores the data to disk.
You can also batch import existing history data into the system by means of a CSV file or by using the Historian
Data Importer. For more information, see Importing, Inserting, or Updating History Data on page 183.
For information about monitoring data acquisition, see Monitoring Data Acquisition on page 303.
Data Acquisition Components
This table describes the components of the Data Acquisition subsystem. Many of the components run as
Windows Services.
Component
Description
I/O Server
(DAServer)
AVEVA-compatible software application that reads values from
PLCs and other factory devices and forwards the real-time data
to AVEVA applications.
Query Tools
Any database query tool capable of issuing Transact-SQL
INSERT or UPDATE statements; for example, Microsoft SQL
Server Query Analyzer.
Data Import Folder
Defined file folder to batch import tag values to the historian.
Historian Data
Importer
Utility to import data from one or more CSV files or InTouch
history files (.lgh). For more information, see Importing History
Data on page 184.
Chapter 4
Configuring Data Acquisition

AVEVA™ Historian Administration Guide
Chapter 4 – Configuring Data Acquisition
© 2021 AVEVA Group plc and its subsidiaries. All rights reserved. Page 131
Component
Description
Historian Client
Access Layer (HCAL)
Process that can send non-I/O Server data to the historian to
be historized. HCAL is used by Application Server 2012 R2 or
later and custom client applications built with Historian SDK
2012 R2 or later.
Historian Client
Access Point (HCAP)
Process that can accept non-I/O Server data and send it to the
historian to be historized. HCAP is used by Application Server
2012 R2 or later and custom client applications built with
Historian SDK 2012 R2 or later.
System Driver
Service
Internal process that monitors the entire historian system and
reports the status with a set of system tags. The system driver
also sends data values to the Storage subsystem for the current
date and time, as well as for predefined "heartbeat" tags, such
as a discrete system pulse. For more information, see About
System Driver and System Tags on page 43.
I/O Server Addressing
All AVEVA-compatible I/O Servers use DDE addressing, which includes the following distinct parts:
Computer name
This is the node name of the computer running I/O Server software.
Application name
This is the name of the application supplying data. The application name can include the name of the
computer on which the application is running.
Topic name
A topic is an application-specific subgroup of data elements.
Item name
An item is a data value placeholder.
The format for the addressing is as follows:
\\<computername>\<applicationname>\<topicname>!<itemname>
The following table provides some examples of DDE addressing.
Address
Information
I/O Server
InTouch
Microsoft Excel
application name
\\Computer1\Modbus
\\Computer1\VIEW
\\Computer1\Excel

AVEVA™ Historian Administration Guide
Chapter 4 – Configuring Data Acquisition
© 2021 AVEVA Group plc and its subsidiaries. All rights reserved. Page 132
Address
Information
I/O Server
InTouch
Microsoft Excel
topic name
ModMachine5
Tag name
Spreadsheet1
item name
Status
ReactLevel
A1 (cell name)
For the AVEVA Historian to acquire data from an I/O Server, the I/O Server addressing information must be
added to the overall system configuration. You can use the System Management Console to manually add I/O
Server definitions to the system, or you can import I/O Server definitions from existing InTouch applications.
For more information about manually adding I/O Server definitions, see Configuring I/O Servers on page 146.
For more information on importing I/O Server definitions from InTouch HMI software, see Importing and
Exporting Tag Configurations on page 102.
I/O Server Redundancy
You can edit an I/O Server definition to include a "failover" I/O Server. This alternate I/O Server can be installed
on the same computer as the primary IDAS or on another computer. If the network connection between the
primary I/O Server and the IDAS fails, the IDAS automatically switches to the alternate I/O Server, provided that
the alternate I/O Server is running. The switch may take some short period of time, and some data points may
be lost during the transition.
Redirecting I/O Servers to InTouch HMI Software
When you redirect an I/O Server to InTouch HMI software, you are specifying to acquire tag values from a
particular InTouch node that is using an I/O Server, instead of acquiring them directly from the I/O Server. This
feature is useful when you need to reduce the loading on the I/O Server, or if the InTouch node is more
accessible on the network.
When you redirect the I/O Server, the computer name and I/O Server type will reflect the InTouch node as the
I/O Server from which data is acquired. For example, suppose you were using the a Modicon Modbus I/O Server
on computer "I23238." The application name for the I/O Server address appeared as \\I23238\modbus. If you
redirect this I/O Server to the InTouch node "InTouchNode1," then the address will be modified to reflect
\\InTouchNode1\view.
Time Synchronization for Data Acquisition
All I/O Servers that support the SuiteLink protocol add a timestamp and quality stamp to plant data as the data
is acquired.
It is important to understand how synchronization is handled between the timestamps for I/O Server, the
computer clock for the IDAS(s), and the computer clock for the AVEVA Historian(s).
Note: This historian-controlled time synchronization method is not recommended on slow networks. If you are
running AVEVA Historian on a slow network, please use a tool suited for your network configuration to
synchronize your clocks.

AVEVA™ Historian Administration Guide
Chapter 4 – Configuring Data Acquisition
© 2021 AVEVA Group plc and its subsidiaries. All rights reserved. Page 133
How time synchronization works
1. If you have multiple historians on your network, you should synchronize all computer clocks to a single
master time server using standard Windows functionality.
2. Periodically, a historian automatically synchronizes the computer clock of any remote IDASs to its own
computer clock. The IDAS synchronization is enabled by means of the TimeSyncIODrivers system parameter.
3. Every hour, an IDAS automatically synchronizes the timestamping mechanism of any associated I/O Servers
with its own computer clock. This does not actually change the system clocks of any I/O Server computers.
Instead, the difference in the system clocks on the two computers (I/O server and Historian) are
determined, and a bias is calculated that is then applied to all values from that I/O server computer. For
example, if the historian clock is seven seconds ahead of the I/O Server computer's clock, SuiteLink adds
seven seconds to every timestamp from the I/O Server. If a topic is disconnected/reconnected due to a topic
time-out or other communications failure, the I/O Server timestamping is not updated until the time
synchronization interval has passed. You can change the frequency of the synchronization using the
SuiteLinkTimeSyncInterval system parameter.
The SuiteLink protocol also does some time adjustments to keep timestamps consistent across nodes.
SuiteLink bases this adjustment on the time difference detected at startup and each hour. For example,
NodeA and NodeB have a time difference of 17 seconds. The I/O Server is on NodeA, and the IDAS is on
NodeB (either local to the historian or a remote IDAS for a historian on another NodeC). When the I/O
Server on NodeA timestamps a value at 12:00:00.000, it is transmitted to NodeB with an adjusted
timestamp of 12:00:17.000. If the historian is configured to timestamp at the source, this value is stored
with a timestamp of 12:00:17.000. If, instead, the historian is configured to timestamp at the server, and
there is a two-second communications latency, then the value is stored with a timestamp of 12:00:19.000.
For normal operations on systems with synchronized clocks, there is no adjustment made by SuiteLink and
everything operates as expected. However, when either the systems are out of sync, or even were out of
sync when SuiteLink communications between the nodes started, the timestamps will be adjusted. Because
of the way SuiteLink adjusts timestamps, it is easy to produce misleading results if system tests involve
adjusting system clocks on the systems, because SuiteLink does not immediately update its time skew.
Note: Time synchronization does not apply to I/O Servers that use DDE because these servers do not perform
timestamping. The time of the IDAS computer is always used for data coming from DDE from I/O Servers.
For more information on setting system parameters, see Editing System Parameters on page 279.

AVEVA™ Historian Administration Guide
Chapter 4 – Configuring Data Acquisition
© 2021 AVEVA Group plc and its subsidiaries. All rights reserved. Page 134
The following diagram shows an example of how computers can be synchronized to a single time:
For an MDAS-enabled or HCAL-enabled client application, you can use the net time command (for the Windows
operating system) to synchronize the client computer's clock to your master historian.
Viewing Data Acquisition Information
To view data acquisition information
1. Open the System Management Console.
2. In the console tree area, expand a server group and then expand a server.
3. Expand Configuration Editor, expand Management Console, and then click Data Acquisition.

AVEVA™ Historian Administration Guide
Chapter 4 – Configuring Data Acquisition
© 2021 AVEVA Group plc and its subsidiaries. All rights reserved. Page 135
Note: If you have configured an IDAS, you will see both SuiteLink and HCAL connections used by the IDAS.
Configuring IDASs
Each AVEVA Historian server must have at least one IDAS (Industrial Data Acquisition Service) configured.
You can use the System Management Console to configure IDASs.
About IDASs
An IDAS (Industrial Data Acquisition Service) accepts data from one or more I/O Servers or other data source and
sends it to AVEVA Historian for storage. If the connection to the historian is not available, IDAS caches the data
locally and forwards it later when the server is back online.
Note: IDAS configuration information is stored in the IODriver table in the Runtime database.
When you add an I/O Server definition to the historian, a topic object is created in the associated IDAS. A
separate topic object exists for each unique combination of I/O Server computer, application, and topic. Each
topic object maintains its own state: idle, connecting, connected, disconnecting, disconnected, overloaded, or
receiving. Also, each topic object is assigned a data time-out value based on your assessment of how often data
changes for that particular topic.
An IDAS can accept data from one or more I/O Servers, but sends data only to a single historian.
An IDAS can run on the same physical computer as the historian, or on a remote computer. Use the Ping
command to check the availability of the remote IDAS or historian computers.
IDAS seamlessly handles data values, irrespective of their time. For each data point acquired by IDAS, the
timestamp, value, and quality are historized in accordance with the storage rules for the tag to which the data
value belongs.
For information on configuring an IDAS, see Configuring Data Acquisition on page 130.
IDAS Configuration
During normal operation, when the historian is started, it configures an IDAS by sending it information about the
tags (including their data sources) for which the IDAS is to acquire data. When the historian Storage subsystem is
ready to accept data, IDAS automatically connects to its data sources, starts acquiring data, and sends the data
to the historian Storage subsystem for historization.
The primary purpose for IDAS configuration files is to minimize network traffic and provide information for IDASs
configured for autonomous startup. For more information on autonomous startup, see IDAS Autonomous
Startup on page 139.
The IDAS saves configuration information to a file on the local hard drive in the following folder of the IDAS
computer: Document and Settings\All Users\Application Data\ArchestrA\Historian\IDAS\Configurations.
The IDAS configuration file is named as follows:
idascfg_SERVERNAME_IDASKEY.dat
where:

AVEVA™ Historian Administration Guide
Chapter 4 – Configuring Data Acquisition
© 2021 AVEVA Group plc and its subsidiaries. All rights reserved. Page 136
SERVERNAME is the NetBIOS name of the historian computer
IDASKEY is the value of the IODriverKey column for the IDAS in the Runtime database
You can change the IDAS configuration from the System Management Console. The historian dynamically
reconfigures itself. If the IDAS is on a remote computer, the historian sends the updated configuration
information to the IDAS. The IDAS reconfigures itself and updates the local configuration file. The IDAS
continuously acquires and sends data during the reconfiguration process. The historian saves its copy of the
updated IDAS configuration file in the following folder of the historian computer: Document and Settings\All
Users\Application Data\ArchestrA\Historian\Configuration\IDAS Configurations.
After a successfully configuring IDAS, a copy of the IDAS configuration file is stored on the historian computer.
The IDAS configuration file stored on the IDAS computer is identical.
Important: IDAS configuration files have a proprietary binary format. Do not modify these files.
If there is more than one autonomous configuration file on the IDAS computer (for example, if you deleted an
IDAS on a node while it was disconnected and then added one again), only the newest file is used. A warning is
logged on the IDAS computer. For more information on autonomous startup, see IDAS Autonomous Startup on
page 139.
IDAS Data Processing
After receiving data from an I/O server, IDAS converts data values into storage data types, depending on the
type of the tag associated with the value. For example, if the data value is associated with a floating point analog
tag, the incoming value is converted to a floating point value before transmission to the Storage subsystem.
However, no timestamp conversion is applied because both the I/O Servers and the AVEVA Historian Storage
subsystem base time on Universal Time Coordinated (UTC).
In Historian 2017 and later versions, IDAS uses the HCAL infrastructure for data delivery to the Historian server.
This means that the storage rules such as DELTA or CYCLIC are applied on the client side to reduce the network
traffic.
IDAS Security and Firewalls
Remote IDAS uses two-way communication:
The Historian server sends configuration information to the remote IDAS.

AVEVA™ Historian Administration Guide
Chapter 4 – Configuring Data Acquisition
© 2021 AVEVA Group plc and its subsidiaries. All rights reserved. Page 137
The remote IDAS sends data collected from device interfaces to the Historian server.
AVEVA Historian provides two ways to authorize access:
Integrated security. IDAS computers in the same domain as the historian can be configured with integrated
security. Using this model, all users and computers that access historian data are assigned membership to
one of three user groups:
o Administrators (aaAdministrators)
o Power Users (aaPowerUsers)
o Users (aaUsers)
Workgroup security. IDAS computers outside of the historian's domain can use username and password as
security. This username and password must match a local user on the remote IDAS computer.
When the IDAS is configured with this type of security, an authentication token and is defined and
forwarded to the remote IDAS computer. Each time the remote computer accesses the historian, it will use
the token and the historian will use it to authenticate the remote computer before allowing access.
The Historian server must be able to communicate with the remote IDAS using its HCAL TCP port (by default,
port 32568). The Remote IDAS must be able to communicate with the Historian server’s HCAL TCP port (by
default, port 32568).
For a Classic remote IDAS (from an AVEVA Historian version before 2017), requirements are different. A legacy
remote IDAS supports only Windows integrated security. It requires consistent accounts on the Historian server
and the remote IDAS:
On the remote IDAS, this is configured using the ArchestrA Network User utility.
On the Historian server, this is configured by setting the identity of the aahConfigSvc service from the
Windows Services Console. The Historian server must also be able to communicate with the Remote IDAS
machine using TCP/UDP ports 135 through 139 and 445.
For more information on IDAS file sharing requirements, see IDAS Store-and-Forward Capability on page 138.

AVEVA™ Historian Administration Guide
Chapter 4 – Configuring Data Acquisition
© 2021 AVEVA Group plc and its subsidiaries. All rights reserved. Page 138
IDAS Error Logging
An IDAS logs all errors to the ArchestrA Logger Service. If the IDAS is installed on a remote computer, the
ArchestrA Logger Service will also be installed on the remote computer. During normal operation, remote IDAS
errors are logged to both the local logger and the logger on the AVEVA Historian computer.
If the network connection between the remote IDAS and the historian fails, no error messages are sent to the
logger on the historian computer. Therefore, you should periodically use the System Management Console to
check the log on the remote IDAS computer to ensure that no problems occurred. After the network connection
is restored, error messages are not forwarded to historian computer.
IDAS Store-and-Forward Capability
IDAS includes "store-and-forward" capability, which protects against a temporary loss of data in the event that a
remote IDAS cannot communicate with the AVEVA Historian.
Note: The store-and-forward option is not available if you have specified a failover IDAS.
If the remote IDAS cannot communicate with the historian, all data currently being processed can be stored
(cached) locally on the computer running IDAS. This hard drive location is called the store-and-forward path and
is configurable using the System Management Console.
Note: Be sure to specify a valid Store Forward Path path. If the path is not valid and accessible, the
store-and-forward functionality will fail.
If the IDAS is unable to send the data to the historian, data is written to this path until the minimum threshold
for the cache is reached, at which point no more data is stored. An error message is logged. Remote
store-and-forward paths are not supported.
The following actions occur after the historian becomes available again:
The historian verifies that the IDAS configuration information did not change while the IDAS was
disconnected. The historian attempts to restore data transmission from the IDAS. The IDAS stops local data
caching and resumes sending data acquired from its data sources to the historian.
If historian detects a difference between its version of the IDAS configuration, and the IDAS version, it
dynamically reconfigures the IDAS to synchronize configuration information. The IDAS applies the changes
and updates its local IDAS configuration file. Then, the historian requests restoring data transmission from
the IDAS.
When the IDAS detects availability of the running historian, it sends the store-and-forward data to the
historian at the same time it is sending real-time data.
After data from the store-and-forward cache is sent to the historian, the cache is deleted from the IDAS
computer.
Enabling IDAS store-and-forward mode increases system resources used by the IDAS service because the
Store-and-Forward subsystem must be initialized and then maintained in standby mode, ready to accept data.
If the historian computer has sufficient system resources, it is recommended to configure the local IDAS for
store/forward as well. The local IDAS to continue store-and-forward data collection even if the other Historian
subsystems are stopped.

AVEVA™ Historian Administration Guide
Chapter 4 – Configuring Data Acquisition
© 2021 AVEVA Group plc and its subsidiaries. All rights reserved. Page 139
IDAS Redundancy
For each IDAS that you define for the system, you can specify a "failover" IDAS. If the AVEVA Historian stops
receiving data from the primary IDAS, it automatically switches to the failover IDAS. The switch may take some
short period of time, and some data may be lost during the transition.
Note: You cannot specify a failover IDAS for an IDAS that has store-and-forward functionality enabled. These
two features are mutually exclusive. Applications that require both failover and store-and-forward functionality
should use a redundant Application Server with RedundantDIObjects.
IDAS Autonomous Startup
Normally, the AVEVA Historian Configuration Service starts an IDAS. However, a remote IDAS that is enabled for
store-and-forward can be configured to start independently of the historian. Autonomous startup is useful when
the historian is unavailable due to a network failure or when the historian is not running when the remote IDAS
computer starts. Using autonomous startup, the IDAS starts caching store-and-forward data without waiting for
a command from the historian.
For an IDAS to autonomously start, it must be configured to acquire data from at least one data source. During
the configuration process, the IDAS must be connected to the historian to ensure that the configuration file is
created on the local IDAS computer. An autonomous startup requires an existing local IDAS configuration file on
the IDAS computer, so that it has all of the information it needs to begin acquiring data. For more information,
see IDAS Configuration on page 135.
When an IDAS starts, it attempts to load the configuration information from the local configuration file. If it is
able to do so, the IDAS uses that information to connect to its data sources and start acquiring data. As soon as
the internal IDAS data buffers are full, the IDAS switches to store-and-forward mode and stores data to the local
hard drive.
If there is more than one autonomous configuration file on the IDAS computer (for example, if you deleted an
IDAS on a node while it was disconnected and then added one again), only the newest file is used. A warning is
logged on the IDAS computer.
If the local configuration information cannot be loaded, the IDAS remains in an idle state until contacted by the
historian. If the IDAS is not contacted by the historian within the default start time-out of 60 seconds, the IDAS
shuts down. Note that the IDAS startup time-out is different than the time-out used by the IDAS during
autonomous startup. Information on changing the default IDAS startup time-out is provided in a TechNote,
which is available from technical support.
When the historian becomes available, data transmission from the IDAS will be restored. For more information,
see IDAS Store-and-Forward Capability on page 138.
Adding an IDAS
If you are adding a remote IDAS, install the IDAS software on the remote computer before setting up the IDAS
configuration in the System Management Console. During the installation, you are prompted to specify the
network account that will be used by a remote IDAS and the historian for communication. This account must
belong to the Windows Administrators group on both computers.
To add an IDAS
1. In the System Management Console tree, expand a server group and then expand a server.

AVEVA™ Historian Administration Guide
Chapter 4 – Configuring Data Acquisition
© 2021 AVEVA Group plc and its subsidiaries. All rights reserved. Page 140
2. Expand Configuration Editor, expand System Configuration.
3. Right-click Data Acquisition and then click New IDAS.
4. Enter the configuration information for the new IDAS.
Note: Be sure the value for Store Forward Path is correct and accessible. If not, the store-and-forward
functionality will fail.
For more information on these options, see Editing General Information for an IDAS on page 141.
5. Click Next.
6. Enter the advanced information for the new IDAS.
For more information on these options, see Editing Advanced Information for an IDAS on page 142.
7. Click Finish.
The right pane of the System Management Console displays both the SuiteLink and HCAL connections for your
new IDAS.

AVEVA™ Historian Administration Guide
Chapter 4 – Configuring Data Acquisition
© 2021 AVEVA Group plc and its subsidiaries. All rights reserved. Page 141
Editing General Information for an IDAS
To edit general information
1. In the System Management Console tree, expand a server group, and then expand a server.
2. Expand Configuration Editor, expand System Configuration, and then expand Data Acquisition.
3. Right-click the name of the IDAS to edit, and then click Properties. The Properties dialog box appears.
4. Click the General tab.
5. To change the name of the computer on which the IDAS runs, click Modify and then type the new name in
the IDAS Node box. If you are creating a new IDAS definition or modifying an existing one, make sure that
the IDAS software is installed on the target computer.
6. Specify a failover option:
o To disable failover or store-and-forward, select No Failover or Store/Forward.
o To specify a backup IDAS, select Failover Node.
In the adjacent box, type the name of the computer on which an optional, redundant IDAS runs. You
must use the fully qualified name of the computer. You could also use the IP address. This should be set
to an empty string if no redundant IDAS is specified. Make sure that the IDAS software is installed on the
target failover computer. If the failure of the primary IDAS is detected by the system, the failover IDAS is
automatically started. The failover IDAS is shut down after the primary IDAS is back online.
o To enable store-and-forward, select Store/Forward Path.
Type the path for the IDAS data buffer on the local hard drive of the IDAS computer. The path should be
absolute (for example, C:\IDASBuffer). Data is written to this path until the minimum threshold for the
buffer is reached. Remote buffer paths are not supported.

AVEVA™ Historian Administration Guide
Chapter 4 – Configuring Data Acquisition
© 2021 AVEVA Group plc and its subsidiaries. All rights reserved. Page 142
Note: Be sure the value for Store/Forward Path is correct and accessible. If not, the store-and-forward
functionality will fail.
7. If your the IDAS is on the same domain as the historian, mark the Use Integrated Security check box to use
integrated security.
If the IDAS is not in the same domain, or if your server is part of a workgroup, use Windows or SQL
authentication instead. Type a login username and password.
Note: This check box and login fields do not display for a classic IDAS. A classic IDAS is one that existed
before installing Historian 2017.
8. Accept or edit the default TCP port shown.
9. Click OK.
Editing Advanced Information for an IDAS
To edit advanced information
1. In the System Management Console tree, expand a server group and then expand a server.
2. Expand Configuration Editor, expand System Configuration, and then expand Data Acquisition.
3. Right-click the name of the IDAS to edit, and then click Properties. The Properties dialog box appears.
4. Click the Advanced tab.
5. Mark the IDAS Enabled check box to allow the system to use the IDAS.
6. Configure store-and-forward options:

AVEVA™ Historian Administration Guide
Chapter 4 – Configuring Data Acquisition
© 2021 AVEVA Group plc and its subsidiaries. All rights reserved. Page 143
o In Min Store/Forward Duration, specify the minimum duration, in seconds, for the IDAS to function in
store-and-forward mode. The IDAS functions in store-and-forward mode for this length of time even if
the condition that caused IDAS to function in store-and-forward mode no longer exists. The maximum
duration is 3600 seconds, and the minimum is 0 seconds.
o In Buffer Count, specify the number of 64 KB buffers pre-allocated for buffering data. This number may
need to be increased to accommodate high data rates.
o In Store/Forward Free Space, specify the minimum amount of free disk space, in megabytes, at which
IDAS stops collecting data in the store-and-forward buffer
o Mark the Compression Enabled check box to allow data compression.
o In Connection Timeout, specify amount of time, in seconds, that the Configuration service attempts to
communicate with an IDAS for configuration/reconfiguration. If this timeout elapses, the Configuration
service assumes that the IDAS connection has been dropped. This number may need to be increased to
accommodate slower networks.
For more information on store-and-forward, see IDAS Store-and-Forward Capability on page 138.
7. Configure the IDAS for autonomous startup:
o Mark the Autonomous Startup check box to enable the IDAS to start itself, even if the historian is
unavailable.
o In Autonomous Startup Timeout, specify the amount of time, in seconds, that the autonomous IDAS
should wait for configuration commands when started by the Configuration service before going to the
autonomous mode. This timeout may need to be increased only if you have a large number of IDASs
configured as autonomous on a slow network.
For more information on autonomous startup, see IDAS Autonomous Startup on page 139.
8. To revoke an IDAS connection and generate a new token, click the Generate new connection token button.
This adds a new encrypted connection token in the database. This token is used to allow the remote IDAS to
connect to Historian.
9. If you are configuring a classic IDAS (that is, one that existed before installing Historian 2017), configure the
classic IDAS options:
o In File Chunk Size, specify the number of bytes for the data "chunks" that are sent to the historian when
store-and-forward data is forwarded. The size of the chunks can be decreased to accommodate slower
networks. Decrease this number only if the forwarding delay is greater than zero.
o In Forwarding Delay, specify the interval, in milliseconds, at which "chunks" of store-and-forward data
are forwarded to the historian. The length of the interval may need to be increased to accommodate
slower networks.
10. Click OK.

AVEVA™ Historian Administration Guide
Chapter 4 – Configuring Data Acquisition
© 2021 AVEVA Group plc and its subsidiaries. All rights reserved. Page 144
Setting a remote IDAS to "Classic"
When the Historian Server is upgraded from prior version, all existing remote IDASes are set to "Classic". (That
is, Classic =1 in _IODriver table).
If a remote IDAS is added after installation, it is created as a new IDAS. But if it is used for data exchange with a
legacy system, it should be explicitly set to "Classic".
To set a remote IDAS to "Classic"
1. In SQL Server Management Studio, type this query:
Select * from _IODriver
2. This lists each IDAS on the computer. Notice that Classic IDAS shows "0" in the Classic column.
3. To change a Classic IDAS to a New IDAS, type this query (where the _IODriverKey is the unique key for the
IDAS you want to change):
Update _IODriver
SET
Classic = 1
WHERE _IODriverKey = 3
If the legacy remote IDAS is later upgraded to Historian 2017, you can run a similar Transact-SQL script, but with
"SET Classic = 0" to indicate that the IDAS is no longer part of a legacy system.
Deleting an IDAS
An IDAS cannot be deleted if topics and/or I/O Servers are still associated with it. Also, at least one IDAS must
exist. It is recommended that you delete a remote IDAS when it is connected to the historian. This ensures that
the temporary configuration files on the remote computer are deleted.
Configuring I/O Server Types
The System Management Console lists every supported AVEVA I/O Server type that is available at the time that
AVEVA Historian is shipped. You can add new I/O Server types at any time. Before you add an I/O Server, make
sure that its associated type is available in the system for selection.
Adding an I/O Server Type
1. In the System Management Console tree, expand a server group and then expand a server.
2. Expand Configuration Editor, expand System Configuration, and then expand Data Acquisition.

AVEVA™ Historian Administration Guide
Chapter 4 – Configuring Data Acquisition
© 2021 AVEVA Group plc and its subsidiaries. All rights reserved. Page 145
3. Right-click I/OServer Types and then click New I/O Server Type.
4. Configure the options.
Application Name
The application name of the I/O Server. This name is usually the same as the executable file name.
Exe Name
The name of the I/O Server's executable file.
5. In the Description box, type the description of the I/O Server type.
6. In the Revision box, type the revision number for the I/O Server.
Note: The values for the Description and Revision options are not used by the AVEVA Historian.
7. Click Finish.
Editing I/O Server Type Properties
To edit properties for an I/O Server type
1. In the System Management Console tree, expand a server group and then expand a server.
2. Expand Configuration Editor, expand System Configuration, and then expand Data Acquisition.
3. Click I/O Server Types. A list of types appears in the details pane.

AVEVA™ Historian Administration Guide
Chapter 4 – Configuring Data Acquisition
© 2021 AVEVA Group plc and its subsidiaries. All rights reserved. Page 146
4. Right-click the I/O Server type and then click Properties. The Properties dialog box appears.
5. You can only edit the description, revision letter, and platform for an I/O Server type. For information on
these options, see Adding an I/O Server Type on page 144.
6. Click OK.
Deleting an I/O Server Type
To delete an I/O Server type
1. In the System Management Console tree, expand a server group and then expand a server.
2. In the Configuration Editor, expand System Configuration, and then expand Data Acquisition.
3. Click I/O Server Types. A list of types appears in the details pane.
4. Right-click the I/O Server type and then click Delete.
Configuring I/O Servers
I/O Servers and their associated topics can be imported from InTouch HMI software or added manually using the
System Management Console.
In the System Management Console tree, selecting the Data Acquisition item shows a list of the configured I/O
Servers in the details pane. Using the System Management Console, you can view, edit, and delete existing I/O
Servers and their associated topics. You can also add new I/O Servers and topics. You cannot create an I/O
Server tag unless an I/O Server and an associated topic are available.
If you edit I/O Server information and then reimport a tagname database using the Tag Importer wizard, the
changes you made to the I/O Server will not be preserved.

AVEVA™ Historian Administration Guide
Chapter 4 – Configuring Data Acquisition
© 2021 AVEVA Group plc and its subsidiaries. All rights reserved. Page 147
Adding an I/O Server
To add an I/O Server
1. In the System Management Console tree, expand a server group and then expand a server.
2. Expand Configuration Editor, expand System Configuration, and then expand Data Acquisition.
3. Right-click the IDAS to which you want to add the I/O Server, and then click New I/O Server.
4. Enter the configuration information for the new I/O Server.
For more information on these options, see Editing General Information for an I/O Server on page 147.
5. Click Finish.
Editing General Information for an I/O Server
To edit general information
1. In the System Management Console tree, expand a server group and then expand a server.
2. In the Configuration Editor, expand System Configuration, and then expand Data Acquisition.
3. Expand the IDAS associated with the I/O Server.

AVEVA™ Historian Administration Guide
Chapter 4 – Configuring Data Acquisition
© 2021 AVEVA Group plc and its subsidiaries. All rights reserved. Page 148
4. Right-click the name of the I/O Server to edit, and then click Properties. The Properties dialog box appears.
5. In the I/O Server Location box, type the name of the computer on which the I/O Server runs.
6. In the I/O Server Type list, select the application name of the I/O Server. This name is usually the same as
the executable file name.
7. In the Description box, type a description of the I/O Server.
8. In the Protocol Type group, select the protocol that the I/O Server uses to send data to the AVEVA Historian.
For more information, see Supported Protocols in the AVEVA Historian Concepts Guide.
Note: DDE is not supported if the historian is running on the Windows Server 2003, Windows Server 2008,
or Windows Vista operating system.
9. In the Alt. Server Location box, type the name of the computer on which an optional, failover I/O Server
runs. The failover I/O Server must be running in order for the switch to be made.
10. Click OK.
Editing Storage Rule Information for an I/O Server
When you set storage rules for a particular I/O Server, the rules apply to all tag values originating from that I/O
Server.
To edit storage rules
1. In the System Management Console tree, expand a server group and then expand a server.
2. In the Configuration Editor, expand System Configuration, and then expand Data Acquisition.

AVEVA™ Historian Administration Guide
Chapter 4 – Configuring Data Acquisition
© 2021 AVEVA Group plc and its subsidiaries. All rights reserved. Page 149
3. Expand the IDAS associated with the I/O Server.
4. Right-click the name of the I/O Server to edit, and then click Properties. The Properties dialog box appears.
5. Click the Set Storage Rules tab.
6. To redirect the I/O Server to InTouch HMI software, click Redirect to InTouch. This button is only available if
at least one I/O Server type is "VIEW." The Select InTouch Node dialog box appears.
In the Computer name of InTouch system list, select the name of the InTouch node from which you want to
acquire tag values. If more than one InTouch nodes are imported, be sure to select the InTouch node that
receives data from the I/O Server you are redirecting.
For more information, see Redirecting I/O Servers to InTouch HMI Software on page 132.
Important: After you redirect an I/O Server, you cannot undo.

AVEVA™ Historian Administration Guide
Chapter 4 – Configuring Data Acquisition
© 2021 AVEVA Group plc and its subsidiaries. All rights reserved. Page 150
Click OK to redirect the I/O Server.
7. In the Storage Type group, configure the storage rule for all the tags associated with the I/O Server:
Unchanged
No storage rule is applied at the I/O Server level.
Delta
Tag values are stored only if they have changed.
Cyclic
Tag values are stored according to a fixed rate, which you can select from the Storage Rate list.
None
Tag values from this I/O Server are not stored into history.
Forced
All values received from this I/O Server are stored.
8. In the Deadband group, configure the deadband. Options in this group are only available if delta storage is
selected in the Storage Type group. For the deadband type you select, configure the appropriate options.
Unchanged
No storage rule is applied at the I/O Server level.
Time and/or Value
A time deadband is the minimum time, in milliseconds, between stored values for a single tag. Any value
changes that occur within the time deadband are not stored. The time deadband applies to delta storage
only. A time deadband of 0 indicates that the system will store the value of the tag each time it changes.
A value deadband is the percentage of the difference between the minimum and maximum engineering
units for the tag. Any data values that change less than the specified deadband are not stored. The value
deadband applies to delta storage only. A value of 0 indicates that a value deadband will not be applied.
Swinging Door
A swinging door deadband is the percentage of deviation in the full-scale value range for an analog tag. The
swinging door (rate) deadband applies to delta storage only. Time and/or value deadbands can be used in
addition to the swinging door deadband. Any value greater than 0 can be used for the deadband. A value of
0 indicates that a swinging door deadband will not be applied.
9. In the Set Acquisition box, select whether or not to turn data acquisition from the I/O Server either on or
off. The Unchanged option allows you to leave current acquisition settings unchanged, which is useful if you
have a mix of acquired and not acquired tags on the I/O Server and do not want to go through all of them.
10. Click OK.
Deleting an I/O Server

AVEVA™ Historian Administration Guide
Chapter 4 – Configuring Data Acquisition
© 2021 AVEVA Group plc and its subsidiaries. All rights reserved. Page 151
If you delete an I/O Server and then reimport the tagname database that contained the I/O Server definition
using the Tag Importer wizard, the I/O Server is added again. An I/O Server cannot be deleted if there are still
topics associated with it.
Configuring Topics
A topic is a logical block of data from an I/O Server. Both the DDE and SuiteLink protocols use topics to locate
information coming from I/O Servers.
Adding a Topic
When you add a new topic for an I/O Server, a new row is added to the Topic table in the Runtime database.
Topic names must be unique for the I/O Server, not for the global system. You can have two topics with identical
names, as long as they are on different I/O Servers.
To add a topic
1. In the System Management Console tree, expand a server group and then expand a server.
2. Expand Configuration Editor, expand System Configuration, and then expand Data Acquisition.
3. Expand the IDAS that contains the I/O Server.
4. Right-click the I/O Server, and then click New Topic. The New Topic wizard appears.
Note: If you are configuring a topic for a classic IDAS (that is, an IDAS that existed before installing Historian
2017), you'll also see fields for setting the idle duration and processing interval.
5. Enter the configuration information for the new topic. For more information on these options, see Editing
General Information for a Topic on page 152 and Editing Storage Rules for a Topic on page 153.
You can set storage properties for a topic after you add it to the system.
6. Click Finish.

AVEVA™ Historian Administration Guide
Chapter 4 – Configuring Data Acquisition
© 2021 AVEVA Group plc and its subsidiaries. All rights reserved. Page 152
Editing General Information for a Topic
To edit general topic information
1. In the System Management Console tree, expand a server group and then expand a server.
2. Expand Configuration Editor, expand System Configuration, and then expand Data Acquisition.
3. Expand the IDAS and then the I/O Server that contains the topic to edit.
4. Right-click the topic, and then click Properties. The Properties dialog box appears.
5. In the Topic Name list, type the name of the topic.
6. In the Time Out box, enter the time span, in milliseconds, in which a data point must be received on the
topic. If no data point is received in this time span, the topic is considered "dead." The historian disconnects
and then attempts to reconnect to the topic. The default is 60000 milliseconds.
Note: You can also manually force a reconnect for one or all of the topics in the system. For more
information, see Reinitializing I/O Topics on page 155.
7. To disable the time out, mark the Set to No Time Out check box.
You might want to disable the time out if the topic has data values that are not changing at all or changing
very slowly. If you have a slow-changing tag for which a time out is occurring frequently, you will see periods
of NULL data in history, as a result of the historian disconnecting and reconnecting. Disabling the time out
prevents the historian from disconnecting, so that valid data is always being logged.
The topic timeout is automatically set to 0 and disabled if you enable late data for the topic (configurable on
the Set Storage Rules tab).
To allow acquisition of "late" data, mark the Enable Late Data check box.
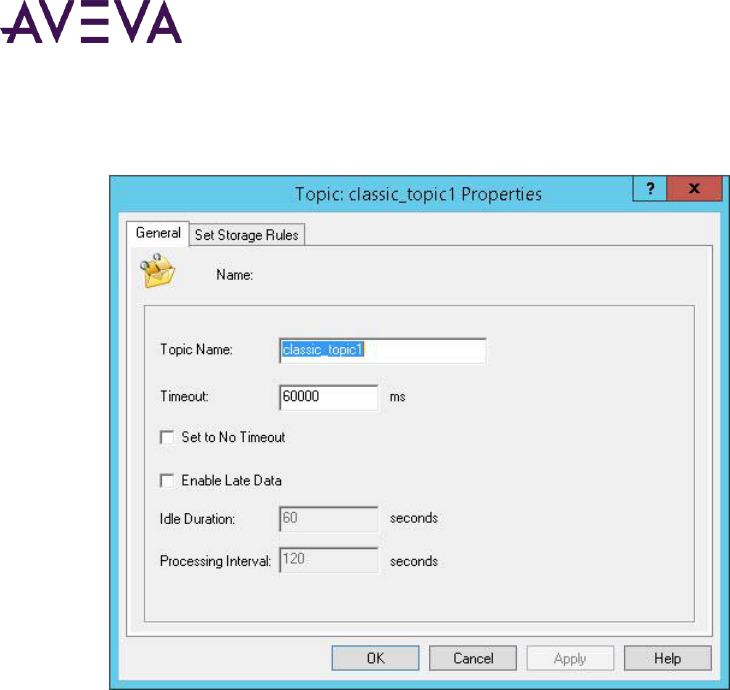
AVEVA™ Historian Administration Guide
Chapter 4 – Configuring Data Acquisition
© 2021 AVEVA Group plc and its subsidiaries. All rights reserved. Page 153
8. If you are configuring a topic for a classic IDAS (that is, an IDAS that existed before installing Historian 2017),
configure these options:
o For Idle Duration, specify the amount of time, in seconds, before data is processed from the I/O
Server. For example, if you set this value to 60 seconds, data from this I/O Server is cached and only
processed by the storage engine after no more data has been received from the I/O Server for at least
60 seconds.
o For Processing Interval, specify the amount of time, in seconds, after which late data from the I/O
Server is processed, regardless of the idle duration. If the nature of the data is such that the idle
duration is never satisfied, the historian storage engine processes data from the topic at least one time
every processing interval. The processing interval defaults to twice the idle duration and cannot be set
to a value less than the idle duration.
9. Click OK.
Editing Storage Rules for a Topic
To edit storage rules for a topic
1. In the System Management Console tree, expand a server group and then expand a server.
2. Expand Configuration Editor, expand System Configuration, and then expand Data Acquisition.
3. Expand the IDAS and then the I/O Server that contains the topic to edit.
4. Right-click the topic to edit, and then click Properties. The Properties dialog box appears.

AVEVA™ Historian Administration Guide
Chapter 4 – Configuring Data Acquisition
© 2021 AVEVA Group plc and its subsidiaries. All rights reserved. Page 154
5. Click the Set Storage Rules tab.
6. In the Set Time Stamp of list, select the whether the timestamp of the data source or the historian server
(specifically, HCAL) should be used. Choosing the server option is useful if the source-supplied timestamp is
unreliable. Note that the historian handles incoming data that has a timestamps in the future.
Note: If a fast-changing tag is configured to use server timestamping, the packet of data that is sent to the
storage subsystem may contain multiple data values with the same timestamp, which may affect data
calculations, such as for swinging door storage.
7. In the Storage Type group, configure the storage rule for all the tags associated with the topic:
o Unchanged -- Use this if no storage rule is applied at the topic level.
o Delta -- Use this if tag values are stored only if they have changed.
o Cyclic -- Use this if tag values are stored according to a fixed rate, which you can select from the Storage
Rate list.
o None -- Use this if tag values from this topic are stored are not stored into history.
o Forced -- Use this if all values received from this topic are stored.
8. In the Deadband group, configure the deadband. Options in this group are only available if delta storage is
selected in the Storage Type group. For the deadband type you select, configure the appropriate options.
o Unchanged -- Use this if no storage rule is applied at the topic level.
o Time and/or Value -- A time deadband is the minimum time, in milliseconds, between stored values for
a single tag. Any value changes that occur within the time deadband are not stored. The time deadband
applies to delta storage only. A time deadband of 0 indicates that the system will store the value of the
tag each time it changes.

AVEVA™ Historian Administration Guide
Chapter 4 – Configuring Data Acquisition
© 2021 AVEVA Group plc and its subsidiaries. All rights reserved. Page 155
A value deadband is the percentage of the difference between the minimum and maximum engineering
units for the tag. Any data values that change less than the specified deadband are not stored. The value
deadband applies to delta storage only. A value of 0 indicates that a value deadband will not be applied.
o Swinging Door -- A swinging door deadband is the percentage of deviation in the full-scale value range
for an analog tag. The swinging door (rate) deadband applies to delta storage only. Time and/or value
deadbands can be used in addition to the swinging door deadband. Any value greater than 0 can be
used for the deadband. A value of 0 indicates that a swinging door deadband will not be applied.
9. If you specify a Delta storage type, mark the corresponding check box and specify the parameters for the
deadband type you selected:
o Apply Time Deadband -- Specify time in milliseconds.
o Apply Value Deadband -- Specify value as a percentage of the engineering unit for that tag.
o Apply Rate Deadband -- Specify rate as a percentage.
10. In the Set Acquisition box, specify whether to turn data acquisition from the topic on or off. The Unchanged
option allows you to leave current acquisition settings unchanged, which is useful if you have a mix of
acquired and not acquired tags on the topic and do not want to go through all of them.
11. Click OK.
Deleting a Topic
If you delete a topic and then reimport the tagname database that contained the I/O Server definition using the
System Management Console, the topic definition is added again to the database. A topic cannot be deleted if
tags are still associated with it.
Reinitializing I/O Topics
You can manually reinitialize I/O conversations for topics using the System Management Console. When you
reinitialize a topic, the existing I/O conversation is closed and the entire process for setting up the I/O
conversation restarts. All I/O points associated with that topic are affected when the reinitialization occurs. You
can either reinitialize all of the topics or a single topic.
Note: You can also enable an automatic topic time out, in which the AVEVA Historian issues a disconnect and
reconnect for a topic that has not provided data within a specified time span. For more information, see Editing
General Information for a Topic on page 152.
To reinitialize all topics
1. In the System Management Console tree, expand a server group and then expand a server.
2. Expand Management Console.
3. Right-click Data Acquisition, point to All Tasks, and then click Reinitialize All Topics. The Reinitialize All
Topics dialog box appears.
4. Click OK.

AVEVA™ Historian Administration Guide
Chapter 4 – Configuring Data Acquisition
© 2021 AVEVA Group plc and its subsidiaries. All rights reserved. Page 156
To reinitialize a single topic
1. Click Data Acquisition.
2. In the details pane, right-click the topic you want to reinitialize, and then click Reinitialize Topic. The
Reinitialize One Topic dialog box appears.
3. Click OK.

© 2021 AVEVA Group plc and its subsidiaries. All rights reserved. Page 157
About Data Storage
AVEVA Historian uses these structures to store data:
SQL Server database file (.mdf)
Configuration information and classic event data is stored in a SQL Server database file (.mdf). When you
install the historian, this database file is created for you and is named Runtime. The Runtime database file is
named according to this convention: RuntimeDat_<version_number>_<original_server_name>.Mdf. The
transaction log is named: RuntimeLog_<version_number>_<original_server_name>.Ldf. For general
information on database files, see your Microsoft SQL Server documentation.
Note: The Holding database is used internally by the historian if you import a tag database from an InTouch
application. The file names for the Holding database are
HoldingDat_<version_number>_<original_server_name>.Mdf and
HoldingLog_<version_number>_<original_server_name>.Ldf.
History blocks
Processing data (including alarms and events), replication data (if configured), and auto-summary data in
history blocks. A history block is a folder containing data files of a proprietary format and, possibly,
subfolders. Every history block is bound to a fixed time interval specified at its creation. History block time
intervals within the same storage partition do not overlap.
If no data is acquired, or if a block is deleted, for a certain time period, there may be gaps in the history
blocks. These are also known as block gaps.
Storage Partitions
A Historian server can be configured to run multiple storage instances at the same time, where each
instance is associated with a storage partition (also called a storage shard). A storage partition is a set of
folders with history blocks not overlapping in time. Currently two types of storage partition are supported -
the Main storage partition for primary data, and Auto Summary (see "About the Auto-Summary Partition" on
page 175) storage partition for calculated summaries.
For backward compatibility, AVEVA Historian also supports these data storage structures:
A2ALMDB database
Since the release of Historian 2017, alarms and events are stored in historian data blocks by default.
Available since AVEVA Historian 2014 R2 release, you have the option of changing this default (when
configuring the historian) to use the legacy A2ALMDB (SQL) database.
Chapter 5
Managing Data Storage

AVEVA™ Historian Administration Guide
Chapter 5 – Managing Data Storage
© 2021 AVEVA Group plc and its subsidiaries. All rights reserved. Page 158
About Data Storage Subsystem Processes
The Data Storage subsystem consists of one or more processes named aahStorage.exe. The Main and
Auto-Summary storage instances are child processes. Therefore, in the Windows Task Manager you can see
several instances of the aahStorage.exe process that are differentiated by their command lines.
The Storage subsystem is available in 32 and 64-bit versions. If you install AVEVA Historian on a 64-bit operating
system, the Storage subsystem always runs as native 64-bit application. However, if an AVEVA Application
Server engine was deployed in a 32-bit mode, the store-and-forward storage engine on that computer will also
be 32-bit if there was no prior historian installation on the computer. The Storage subsystem also includes the
Metadata Server process (aahMetadataServer.exe) responsible for caching Storage tag metadata persisted in
the Runtime database.
The Classic Data Redirector service (aahStoreSvc.exe) is responsible for redirecting to storage any streamed data
coming from classic IDASs (version 2014 R2 or earlier) and the system driver. The aahManStSvc.exe service
handles data that is imported from CSV files and store-and-forward data from IDASs from version 2014 R2 or
earlier.
Integration with Microsoft SQL Server
While AVEVA Historian distinguishes itself in how it uniquely manages time-based data, it relies on SQL Server
for certain foundational functionality.
Static Data Management
The SQL Server Runtime database easily manages relatively static data, like configuration data which does not
change at a real-time rate. Over the life of a site, tags are added and deleted, descriptions are changed, and
engineering ranges are altered. The Runtime database stores this type of information.
Runtime Database Structure
The Runtime database is the SQL Server online database for the entire AVEVA Historian. The Runtime database
is shipped with a set of standard database entities, such as tables, views, and stored procedures to store
configuration data for a typical factory. You can use the Configuration Editor within the System Management
Console to easily add configuration data to the Runtime database that reflects your factory environment.
OLE DB Interface
Microsoft SQL Server Object Linking and Embedding for Databases (OLE DB) is used to access the time-based
data that the historian stores outside of the SQL Server database. You can query the Microsoft SQL Server for
both configuration information in the Runtime database and historical data on disk, and the integration appears
seamless.
Historian also leverages SQL Server features such as database security, replication, and backups.
About Delta Storage Mode
AVEVA Historian supports four storage modes:
No storage - No data values are stored.
Forced storage - All collected data values are stored.

AVEVA™ Historian Administration Guide
Chapter 5 – Managing Data Storage
© 2021 AVEVA Group plc and its subsidiaries. All rights reserved. Page 159
Cyclic storage - Only data values that occur at a specified time interval are stored.
Delta storage - Only changed data values are stored.
Using delta storage mode, the historian stores data based on a change in a value. Delta storage writes a
historical record only if the current value changes from the previous value. Delta storage is also called "storage
by exception." Delta storage is typically used to store discrete values, string values, and analog values that
remain constant for long periods of time. For example, you don’t want to store the value of the discrete tag
"PUMPON" every ten seconds if the pump usually stays on for months at a time. The value is stored along with a
timestamp of when the change occurred, to an accuracy of 1 ms.
The following types of deadbands can be applied for delta storage:
Time deadband
Value deadband
Rate of change (swinging door) deadband
Time and Value Deadbands for Delta Storage
To further decrease the resolution of tag values stored in delta mode, use a time deadband or a value deadband.
A time deadband is the minimum time, in milliseconds, between stored values for a single tag. Any value
changes that occur within the time deadband are not stored.
This illustration shows an example of applying a time deadband:
Data is stored for the time period starting with TS and ending with TE. All points in the graphic represent
data values for a given tag over time. The grey areas represent the time deadband, which starts anew with
every returned value. Only the green points (P2, P4, P7, P8, P9, P11) are stored. The other points are not
stored because they fall within a deadband.
The time deadband applies to delta storage only. A time deadband of 0 indicates that the system will store
the value of the tag each time it changes.
A value deadband is the percentage of the difference between the minimum and maximum engineering
units for the tag. Any data values that change less than the specified deadband are not stored.

AVEVA™ Historian Administration Guide
Chapter 5 – Managing Data Storage
© 2021 AVEVA Group plc and its subsidiaries. All rights reserved. Page 160
This illustration shows an example of applying a value deadband:
Data is stored for the time period starting with TS and ending with TE. All points in the graphic represent
data values for a given tag over time. The grey areas represent the value deadband, which starts anew with
every returned value. Only the green points (P2, P5, P6, P7, P10, P11) are stored. The other points are not
stored because they fall within a deadband. P9 is not stored because P8 was discarded and it is within the
percentage deviation.
The value deadband applies to delta storage only. A value of 0 indicates that a value deadband will not be
applied.
Swinging Door Deadband for Delta Storage
A swinging door deadband is the percentage of deviation in the full-scale value range for an analog tag. The
swinging door (rate) deadband applies to delta storage only. Time and/or value deadbands can be used in
addition to the swinging door deadband. Any value greater than 0 can be used for the deadband. A value of 0
indicates that a swinging door deadband will not be applied.
The swinging door deadband is essentially a rate of change deadband, based on changes in the slope of the
incoming data values. For example, specifying a swinging door deadband value of 10 percent means that points
will be stored if the percentage change in slope of the consecutive data values exceeds 10 percent. The
percentage of allowable "swing" in the data values gives this type of deadband its name.

AVEVA™ Historian Administration Guide
Chapter 5 – Managing Data Storage
© 2021 AVEVA Group plc and its subsidiaries. All rights reserved. Page 161
Benefits of the Swinging Door Deadband
One benefit of using a swinging door deadband is that it reduces the disk space required to store data. However,
because the storage system already provides a good compression ratio, the amount of disk space that is saved
by applying this type of deadband for slow-changing tags (changing less than twice in a 15-minute interval) is
negligible. For example, a tag that changes 12 times per hour will use 2K bytes of disk space in a 24-hour period.
Even if only every fifth point is stored, the savings is only 1.5K bytes per day.
Another benefit of the swinging door deadband is that it captures the data value before the rate change, which
is something that a value deadband does not do. If you trend data, the peaks and valleys of the trend curve are
more defined to provide a more accurate picture of what is happening in your plant.
Generally, using a swinging door (rate) deadband provides better representation of the value change curve with
the same or less number of values stored than regular value or time deadbands for delta storage.
The following graphics compare the trend curves of the same raw data, but with different deadbands applied.
The following graph shows the trend of the actual raw data values:
The following graph shows the trend of the data values with a value deadband applied. Notice how only the first
data value that deviates by the deadband from the previous value will be stored, and not any of the values
between the starting value and the first deviating value.

AVEVA™ Historian Administration Guide
Chapter 5 – Managing Data Storage
© 2021 AVEVA Group plc and its subsidiaries. All rights reserved. Page 162
The following graph shows the data values that will be stored for both a value deadband and a swinging door
deadband. Notice how the swinging door deadband captures data before the deadband change, allowing for a
more complete view of the data.
A swinging door deadband is most useful for tags that have a steady increase and decrease in slope, such as a
tank level or tank temperature that rises and falls. A swinging door deadband may not be appropriate for "noisy"
signals, in which the value of the tag constantly fluctuates around a certain point for long periods of time. Also,
the reduction in storage requirements offered by the swinging door deadband may not have much of an impact
if you have an application with a small tag count (for example, 500 tags). In this case, it may not be necessary to
use a deadband at all.
A swinging door deadband is applicable for analog tags that receive data from the following sources:
Real-time data values from I/O Servers, MDAS, or HCAL
Store-and-forward data from a remote IDAS
Late data from an I/O Server topic that was configured for late data
A "fast load" CSV import
Real-time inserts of data using a Transact-SQL statement
A swinging door deadband is not applicable for manual inserts of data through a CSV import of a Transact-SQL
statement.
To best visualize the tag that uses swinging door storage, plot a trend using the Historian Client Trend
application and set the plot type from to "line" (rather than "step-line").
Additional Options that Affect the Swinging Door Deadband
The swinging door deadband (the rate deadband) can optionally be combined with a value deadband and/or a
deadband override period. This combination will affect which values are actually stored.
If the data is store-and-forward data from a remote IDAS, the behavior of the swinging door algorithm also
depends on the value of the real-time window in the AVEVA Historian, as specified by the RealTimeWindow
system parameter.
Value deadband
When combined with rate deadband (with or without a deadband override period), the value deadband is
always applied first, followed by the other deadbands. For the value deadband, the system checks the
difference in value between the received point from the value of the last stored point. Only when this
difference exceeds the value deadband does the system consider the point for rate evaluation.

AVEVA™ Historian Administration Guide
Chapter 5 – Managing Data Storage
© 2021 AVEVA Group plc and its subsidiaries. All rights reserved. Page 163
Deadband "override" period
If the elapsed time since the last stored point exceeds the deadband override period, the last received point
before the time at which the deadband override period expired is stored, regardless of value and rate
deadband.
Real-time window (Classic Storage subsystem)
The real-time window setting for IDAS store-and-forward data (RealTimeWindow system parameter) allows
for the expansion of the time window for which the storage system considers data to be "real-time." The
real-time window is important for swinging door deadbanding because it determines the maximum length
of time that a point will be "held" by the storage system without storing it, while waiting for the next point.
For more information, see About the Real-Time Data Window on page 319 in the AVEVA Historian
Supplemental Guide.
Real-time window and deadband override periods are two independent modifiers that force the storage of
received points that may have otherwise been discarded due to the setting of either the rate deadband or the
value deadband.
The real-time window specification is more likely to select points for storage when the time period between
points received from the source is less than the real-time window, but the slope of the incoming data values is
such that the rate deadband excludes the points from being stored.
The deadband override period is more likely to select points for storage if the rate at which points are received
from the data source is slow (slower than the real-time window) and the rate deadband excludes the points
from being stored.
For an illustration of how these factors work together to determine the actual values to be stored, see Swinging
Door Deadband Examples on page 163.
Whatever the combination of rate deadband, value deadband, and deadband override period specified, only
points actually received from the data source are stored on disk. That is, points to be stored on disk are never
"manufactured" by the swinging door algorithm. This is particularly relevant in understanding the behavior
implied by specifying the real-time window and the deadband override period.
Swinging Door Deadband Examples
The effects of the different swinging door options can be illustrated using these three examples:
Swinging Door Deadband: Rate Only on page 164
Swinging Door Deadband: Rate and Value on page 165
Swinging Door Deadband: Rate, Value, and Deadband Override Period on page 166

AVEVA™ Historian Administration Guide
Chapter 5 – Managing Data Storage
© 2021 AVEVA Group plc and its subsidiaries. All rights reserved. Page 164
All of the examples are based on the following raw data. The numbered points represent actual values received
from a data source.
Swinging Door Deadband: Rate Only
The following diagram depicts an ideal case, where the incoming signal is noise-free and with a proper rate
deadband specification only (no value deadband or deadband override period).
Assume point 0 has been stored on disk. The system waits for point 2 to arrive before making its next storage
decision. When point 2 is received, the storage engine calculates the change in slope as follows:
Slope0_1 is considered the base slope, and Slope1_2 is considered the current slope.
Slope0_1 = (Value1 - Value0) / (Time1 - Time0)
Slope1_2 = (Value2 - Value1) / (Time2 - Time1)
Slope_Change_Percent = 100* | (Slope1_2 - Slope0_1) / Slope0_1 |
If
Slope_Change_Percent > Rate_Deadband_Specified
In other words, if the percentage change in slope is greater than the specified rate deadband, the storage engine
goes ahead and stores point 1 on disk. Next, it receives point 3. The base slope for point 2 will be the slope
between points 1 and 2. The current slope will be the slope between points 2 and 3 only if point 1 was stored. If
point 1 was not stored, then the base slope for point 2 will be the slope between points 0 and 1, and the current
slope will be the slope between points 2 and 3.

AVEVA™ Historian Administration Guide
Chapter 5 – Managing Data Storage
© 2021 AVEVA Group plc and its subsidiaries. All rights reserved. Page 165
The base slope for an evaluation point is not changed unless the previous point is stored; otherwise, the base
slope will be the last known current slope that caused a point to be stored on disk.
Assuming point 1 is stored, because the slope between points 2 and 3 is about the same as the slope between
points 1 and 2, the rate deadband criterion is not satisfied, and point 2 is discarded. When point 4 is received,
the slope change calculation results in point 3 being discarded, and so on until point 6 arrives. Now the rate
deadband criterion is satisfied (slope change between points 5 and 6 and points 1 and 2 is greater than the rate
deadband specified), and point 5 is stored on disk.
The arrival of point 7, likewise, discards point 6 even though the actual slope between point 6 and point 7 may
be quite high, and may even be higher than the rate deadband specified, it is not sufficiently different from the
slope between points 5 and 6 to qualify point 6 to be stored. Following this logic through until point 12 is
received results in the storage on disk of points 10 and 11, discarding all the other points in between.
Point 13 illustrates the effect of the real-time window setting. Under normal circumstances, point 12 would not
qualify to be stored. If, however, the elapsed time between receiving point 12 and point 13 exceeds the time
window in which the storage engine is able to store point 12 as a real-time point, point 12 is stored anyway, and
the value of the SysRateDeadbandForcedValues system tag is incremented. In other words, if, while the system
waits for point 13 to arrive, the timestamp of point 12 becomes so old that it reaches the limit for the real-time
window, point 12 is stored regardless of whether it is outside the deadband.
The SysRateDeadbandForcedValues system tag counts the number of "extra" points stored as a result of an
insufficient real-time window for swinging door storage.
When point 14 arrives, the base slope for evaluating point 13 is between points 11 and 12, and not between
points 12 and 13, because point 12 was stored due to the real-time window expiration. A point stored due to the
real-time window does not re-establish the base slope; only points stored due to exceeding the rate change
causes the base slope to be re-established. Then "normal" rate change evaluation resumes, resulting in point 13
being stored, and so on.
Swinging Door Deadband: Rate and Value
In the following diagram, a signal with some "noise" is shown. The effect of applying both a rate and value
deadband to swinging door storage is illustrated. The value deadband is indicated by two horizontal dashed
lines.

AVEVA™ Historian Administration Guide
Chapter 5 – Managing Data Storage
© 2021 AVEVA Group plc and its subsidiaries. All rights reserved. Page 166
Assume that point 1 has been stored to disk. Point 3 passes the value deadband check, allowing points 2 and 3
to be evaluated for rate change. Assuming that the point exceeds the rate change requirement, then point 2 is
stored. Until point 13 is received, all intermediate points are discarded by the value deadband filter. In this
example, it is assumed that the change in slope between points 2 through 3 and points 12 through 13 is greater
than the rate deadband, so point 12 is stored on disk. When point 14 is received, the normal operation begins.
If a rate deadband is applied without a value deadband, all of the "noisy" points (3 through 11) would have been
stored, because the slope of the signal changes radically between successive points. The value deadband
removes the noise, but also introduces some amount of distortion in the resultant signal.
Swinging Door Deadband: Rate, Value, and Deadband Override Period
The following graphic illustrates the effect of a rate deadband combined with a value deadband and a deadband
override period.
Assume point 1 is stored to disk. Point 3 makes it through the value deadband check, allowing points 2 and 3 to
be evaluated for rate change. Assuming the point exceeds the rate change requirement, then point 2 is stored.
Adding a value deadband alone could result in distortion of the stored data.
For example, suppose that the rate deadband is specified such that point 12 does not get stored. That is, the
change in slope between points 2 through 3 and points 12 through 13 is not greater than the rate deadband. In
that case, the data representation (points 1, 2, and 15) is grossly distorted because the value deadband is
discarding key points.
To allow for better representation, a deadband override period may optionally be specified. If the elapsed time
between the last stored point and the currently received point is more than the specified deadband, then the
point immediately prior to the currently received point is stored. In this example, the elapsed time between
point 2 and point 10 is more than the deadband, so point 9 is stored. The data actually stored to disk (points 1,
2, 9, and 15) is a better approximation of the original data.
It is important to note that after point 9 is stored, subsequent rate calculations use the slope between points 2
and 3 as the baseline for subsequent storage decisions because point 2 was last point that was stored normally
by storage.
The deadband override period can have any value and is not related to the real-time window value.

AVEVA™ Historian Administration Guide
Chapter 5 – Managing Data Storage
© 2021 AVEVA Group plc and its subsidiaries. All rights reserved. Page 167
Managing the AVEVA Historian Runtime Database
The Runtime database is a SQL Server database and can be managed with SQL Server Management Studio. The
Runtime database stores relatively static information about how the AVEVA Historian is configured, such as tag
definitions and I/O Server definitions.
Although the Runtime database does not store historical plant data, it stores other types of system-generated
data that impacts the size of the database file. For example, information is added to the database file if you:
Turned on modification tracking, because a record is stored for each modification made. For more
information, see Tracking Modifications on page 282.
Defined any events in the classic event system. Each detected event is logged in the Runtime database. If
you configured any summary actions, the summarized values are stored in the Runtime database. Also, if
you set up event snapshot actions, the values for the snapshots are logged in the database. For more
information, see the Classic Event Subsystem on page 320 chapter in the AVEVA Historian Supplemental
Reference.
Be sure that you have enough disk space to accommodate a growing Runtime database file. By default, the
Runtime database is configured to expand automatically when required.
Changing the Properties for the Runtime Database
You can view or change the properties for the Runtime database, such as the paths to the database files and
transactions logs and the permissions on the database.
To view/change the Runtime database properties
1. In Microsoft SQL Server Management Studio, expand the AVEVA Historian, and then expand Databases.

AVEVA™ Historian Administration Guide
Chapter 5 – Managing Data Storage
© 2021 AVEVA Group plc and its subsidiaries. All rights reserved. Page 168
2. Right-click the Runtime database and then click Properties. The Database Properties dialog box appears.
3. To view directory in which the database file and transaction log resides, as well as view the current size of
the file and log, in the Select a page pane, click Files.
Note: To see the database file in the Windows Explorer, look in the \DATA directory of the main Microsoft
SQL Server directory.
4. Using the options in the Runtime Properties dialog box, you can recalculate the space available in the
database or the transaction log. You can also set database options and grant and revoke statement
permissions for database users and groups.
Important: Do not modify the default permissions for the default historian logins and users, as this
negatively affects the system.
For more information on managing databases, see your Microsoft SQL Server Management Studio
documentation.
5. Click OK.

AVEVA™ Historian Administration Guide
Chapter 5 – Managing Data Storage
© 2021 AVEVA Group plc and its subsidiaries. All rights reserved. Page 169
Managing the Runtime Database
Managing a database involves procedures such as performing backups or exporting data.
Note: You should not edit any of the pre-configured tables, stored procedures, or views that are shipped with
the AVEVA Historian.
To manage the Runtime database
1. In Microsoft SQL Server Management Studio, expand the AVEVA Historian, and then expand Databases.
2. Right-click the Runtime database, point to Tasks, and then select the menu command for the task you want
to perform.
For more information on managing databases, see your Microsoft SQL Server Management Studio
documentation.
Backing Up the Runtime Database
We recommend that you back up all AVEVA Historian and SQL databases:
Before you make any changes to the database, in case you want to return to the original configuration.
On a regular schedule, to minimize data loss in the event of a disk failure. The best way to perform database
backups is to set up automatic backups using SQL Server Management Studio. You should back up your
database at least once a week.
When you perform a database backup, all system tables, user-defined objects, and data are copied to a separate
file located on a backup device. Backup devices include disk files, floppy diskettes, zip disks, and tape drives.
Backups can be easily managed using the SQL Server Management Studio.
You should not back up the current history block.
The master and msdb databases should be on the same backup schedule as the Runtime database.
Backing Up the Database
Note: Any transactions that are in progress when the backup is performed are rolled back if that backup is
later restored.
To backup the database
1. In Microsoft SQL Server Management Studio, expand the AVEVA Historian, and then expand Databases.

AVEVA™ Historian Administration Guide
Chapter 5 – Managing Data Storage
© 2021 AVEVA Group plc and its subsidiaries. All rights reserved. Page 170
2. Right-click the Runtime database, point to Tasks, and then click Back Up. The SQL Server Backup dialog box
appears.
3. Click General.
4. In the Database box, select Runtime.
5. To use an existing backup device or file for the backup, select the destination in the Destination window and
then click OK to begin the backup.
Note: For details on a particular backup destination, select the destination in the list and then click
Contents.
6. If you do not have a backup destination defined, click Add to add a new destination. The Select Backup
Destination dialog box appears.

AVEVA™ Historian Administration Guide
Chapter 5 – Managing Data Storage
© 2021 AVEVA Group plc and its subsidiaries. All rights reserved. Page 171
7. Select to back up to either a file or device.
File name
Type or browse to a path for the location of the backup file. Be sure that you have enough free disk space to
store the backup.
Backup device
Select an existing backup device or select <New Backup Device>. The Backup Device Properties dialog box
appears. In the File name box, type a name for the device. As you type the name, the path for the backup
will be modified. Verify that the path for the backup is correct. When you are done, click OK to create the
backup device.
8. Click OK to close the Select Backup Destination dialog box.
9. The newly-created backup device now appears in the Destination window of the SQL Server Backup dialog
box. Select the new backup device.
10. Click OK to perform the backup.
You can configure various options for database backups, such as an expiration date for a backup. You can also
schedule automatic backups.
For a complete description of database backup and restoration using SQL Server Management Studio, including
scheduling recommendations and transaction log backup, see your SQL Server Management Studio
documentation.
Restoring the Database
When you restore a database from backup, any information saved to the database since the backup was
performed is overwritten with the restored information. All changes to the database since the backup are lost.
Also, any transactions in progress when the backup was performed are rolled back.
To restore the database
1. In Microsoft SQL Server Management Studio, expand the AVEVA Historian, and then expand Databases.

AVEVA™ Historian Administration Guide
Chapter 5 – Managing Data Storage
© 2021 AVEVA Group plc and its subsidiaries. All rights reserved. Page 172
2. Right-click the Runtime database, point to Tasks, and then click Restore. The Restore Database dialog box
appears.
3. Click General.
4. In the Restore as database list, select the Runtime database.
5. Select Database from the Restore options.
6. In the First backup to restore list, select the desired backup.
7. Click OK. The information is restored.
You can configure various options for database restoration. For more information on restoring from a backup
using SQL Server Management Studio, see your SQL Server Management Studio documentation.
Managing a Runtime Database Object
A database object is a component of a database: table, index, trigger, view, key, constraint, default, rule,
user-defined data type, or stored procedure. Anything that has a name and consumes space in a database is an
object.
Note: Do not edit any of the pre-configured tables, stored procedures, or views that are shipped with AVEVA
Historian.
To manage database objects
1. In Microsoft SQL Server Management Studio, expand the AVEVA Historian, and then expand Databases.
2. Expand the Runtime database.

AVEVA™ Historian Administration Guide
Chapter 5 – Managing Data Storage
© 2021 AVEVA Group plc and its subsidiaries. All rights reserved. Page 173
3. All of the object groups in the database appear under the Runtime folder.
4. To manage any database object, simply right-click the object to open the Properties dialog box for that
object.
5. Click OK.
For more information on managing database objects, see your Microsoft SQL Server documentation.
Space Management for Event and Summary History
If you configured AVEVA Historian to detect events using the Classic Event subsystem, each detected event is
logged into the EventHistory table of the Runtime database. If you configured summary actions, the aggregated
values are stored in the SummaryHistory table. The duration for which event and summary history are kept are
specified by the EventStorageDuration and SummaryStorageDuration system parameters, respectively.
Duration defaults are as follows:
History
Duration
Event
7 days (168 hours)
Summary
14 days (336 hours)
For information on changing the value of a system parameter, see Editing System Parameters on page 279.
For more information on the Classic Event subsystem, see Classic Event Subsystem on page 320.
Managing Partitions and History Blocks
Historical tag values from your facilities are stored to disk in directories containing special sets of files. These
directories are called history blocks. Sets of history blocks are stored in a particular partition on the disk.
Normal tags are stored in one partition, and a second partition contains auto-summary data. See About the
Auto-Summary Partition on page 175 for more information.
You can use the System Management Console to view and manage partitions and history blocks.
For more about history blocks, see History Blocks in the AVEVA Historian Concepts Guide.
Storage Partition Locations
Every storage partition consists of up to four storage locations:
Circular (mandatory)
Alternate (optional)
Buffer (optional, used for backward compatibility only)
Permanent (optional, used for backward compatibility only)

AVEVA™ Historian Administration Guide
Chapter 5 – Managing Data Storage
© 2021 AVEVA Group plc and its subsidiaries. All rights reserved. Page 174
The paths to the circular, buffer, and permanent storage partitions are initially defined during installation. The
alternate storage partition can be defined later using the System Management Console.
Certain restrictions apply when specifying a path to the storage partition. The circular storage partition must be
a local drive on the server, and the path must be specified using normal drive letter notation (for example,
c:\Historian\Data\Circular). While the alternate, buffer, and permanent storage partitions can be anywhere on
the network, it is strongly recommended to have the alternate storage partition configured on a dedicated
physical drive locally attached by a high-speed interface to the Historian Server or configured to be on a
different internal hard drive. If you use a network location, then the ArchestrA user must have full access to the
network location. The partition locations must be specified using UNC notation. Mapped drives are not
supported.
When planning your storage strategy, be sure to allow enough disk space for storing your plant data for the
required length of time.
Circular Storage
Circular storage is used for the main historical data storage. The Storage subsystem creates history blocks of the
configured default duration when the data falling into the corresponding time interval needs to be written to
disk.
The circular storage location is used to write data in a "circular buffer" fashion. When the free disk space on the
disk containing the circular storage location drops below a minimum threshold or when the data is of a specified
age, the history block in that storage location is moved to the alternate storage location, and new history blocks
get created when necessary. You can also limit the size of the circular storage location. When the contents of
the circular storage location reach or exceed this limit, the oldest data will be moved to the alternate storage
location. If no alternate storage location is configured, the data is deleted instead of being moved. For more
information, see Automatic Deletion of History Blocks on page 180.
It is the responsibility of the system administrator to monitor disk space and back up history blocks to a safe
location on a periodic basis.
Alternate Storage
When the free disk space in the circular storage location goes below the defined threshold, the circular directory
exceeds the specified maximum size, or the blocks reach a certain age, the Storage subsystem will start moving
the oldest history blocks to the alternate location, if configured.
History blocks in the alternate storage location are managed in the same way as the blocks in the circular
storage location. However, blocks will not be deleted based on age until the sum of the specified ages for both
the circular and alternate storage has passed. For example, if circular is set to 60 days, and alternate is set to 90
days, a block is deleted after 150 days.
If the alternate storage location reaches its deletion threshold limit, or configured maximum size, or age, the
oldest history blocks are deleted.
A physical drive is strongly recommended, and cannot be the same drive used for circular storage. This storage
location is optional.

AVEVA™ Historian Administration Guide
Chapter 5 – Managing Data Storage
© 2021 AVEVA Group plc and its subsidiaries. All rights reserved. Page 175
Permanent Storage
Permanent storage locations are used to store critical data (for example, reactor trips) which must be excluded
from the "circular buffer" management, so the Storage subsystem will never try to delete or move to the
alternate location the permanent history blocks. This, however, may break the continuity of the history timeline
in certain scenarios, and should be used with care, especially when data revision operations can be performed
across time intervals overlapping with history blocks stored in the permanent storage location. For that reason,
this storage location is supported only for backward compatibility, and it is recommended to use a larger
alternate location instead to ensure that important blocks are never deleted..
Data in a permanent storage location can be accessed and viewed along with the data stored in the circular
storage location.
Buffer Storage
Buffer partitions are used for temporary purposes, such as retrieval from a data archive. This storage partition
can reside on the same hard disk as the circular storage location or on a different disk. Data stored in the buffer
storage partition can be accessed and viewed along with the data stored in the circular storage partition. Data is
never deleted from this partition by the Storage subsystem.
About the Auto-Summary Partition
AVEVA Historian maintains a separate auto-summary partition for storing automatically generated summaries
used for faster retrieval over long time intervals. There, Historian generates a local replication entity and a
one-hour summary tag for every analog tag in the system. As values arrive for an analog tag, Historian
automatically computes and records a summary.
Auto-summary values are stored in their own history blocks within the auto-summary partition. With
auto-summarization, Historian can quickly and efficiently retrieve large-volume data for a long duration, even
months or years.
Note: The auto-summary feature was available beginning with AVEVA Historian 2017. From the time you
installed or upgraded to AVEVA Historian 2017, the system has been creating auto-summary values for your
analog tags. To backfill values for time before that installation or upgrade, you can use the Replication Backfill
Manager.
About Block Gaps
AVEVA Historian is designed to store data in a contiguous series of history blocks. But there are two cases that
may result in block gaps -- that is, gaps between the history blocks:
If no data was acquired for the timeframe corresponding to a particular history block, that block will not be
created.
If a history block is deleted for whatever reason, a block gap will result.
By default, gaps in data are charted (for example, by Trend and InSight) as straight lines. If you want data gaps to
display as empty, you can change the Windows Registry settings.
To change Windows Registry settings to show block gaps
1. From the Start menu, run RegEdit.

AVEVA™ Historian Administration Guide
Chapter 5 – Managing Data Storage
© 2021 AVEVA Group plc and its subsidiaries. All rights reserved. Page 176
2. Navigate to:
HKEY_LOCAL_MACHINE -> SOFTWARE -> ArchestrA -> Historian -> Programs -> aahRetrieval
3. Create a DWORD Value called UseBlockGaps and set it to "1".
a. Right-click aahRetrieval, select New, and then select DWORD.
b. Type "UseBlockGaps" as the name of the new item.
c. Right-click UseBlockGaps and select Modify.
d. In Value data, type "1".
4. Exit RegEdit.

AVEVA™ Historian Administration Guide
Chapter 5 – Managing Data Storage
© 2021 AVEVA Group plc and its subsidiaries. All rights reserved. Page 177
Note: If data is later inserted (for example, using a data update process) in a gap, the history block(s) will be
created or recreated. In that case, the Block Gap option is set to OFF, and any tags that were not updated will
show as flatlined data.
Viewing Storage and Auto-Summary Partitions
To view the storage partitions for your system
1. In the System Management Console, expand a server group and then expand a server.
2. Expand Configuration Editor, expand System Configuration, and then expand Storage.
3. Select Storage Partitions.
4. Select Auto Summary to see the auto-summary partition.
Or, select Main to see all of the regular data partitions.
For more information about the storage location types included in each partition, see Storage Partition
Locations on page 173.
Storage partitions and the history blocks they contain can be designated as circular, permanent, buffer, or
alternate. Paths to these storage partitions are specified when the historian is installed.
With the exception of the circular path, all data path changes are dynamic. Only changes to the circular path
require reinitializing the system (that is, a complete shutdown and restart of the historian). Also, if a change is
made to the default data paths, these directories must be manually created. The System Management Console
validates the path you specify.
To edit storage partition properties
1. In the System Management Console, expand a server group and then expand a server.
2. Expand Configuration Editor, expand System Configuration, and then expand Storage.
3. Select Storage Partitions, and then click either Auto Summary or Main. All defined storage locations appear
in the details pane.

AVEVA™ Historian Administration Guide
Chapter 5 – Managing Data Storage
© 2021 AVEVA Group plc and its subsidiaries. All rights reserved. Page 178
4. Right-click a storage partition, and then click Properties. The Properties dialog box appears.
5. In the Path box, type the path to the storage location. The circular storage location must be a local drive on
the server machine, and the path must be specified using normal drive letter notation (for example,
c:\Historian\Data\Circular). While the alternate, buffer, and permanent storage locations can be anywhere
on the network, it is strongly recommended to have the alternate storage location configured on a
dedicated physical drive locally attached by a high-speed interface to the Historian Server or configured to
be on a different internal hard drive. If you use a network location, then the ArchestrA user must have full
access to the network location. The locations must be specified using UNC notation. Mapped drives are not
supported. If the path you specify does not currently exist, it is created.
Note: The paths to the storage areas are relative to the computer on which the historian is running. If you
are running System Management Console on a separate network computer than the historian, the paths
may not be same.
6. To disable the use of this path, click Path is Disabled. This option is not available for the circular storage
location.
7. In the Deletion Threshold box, type the minimum amount of disk space, in megabytes, at which the system
attempts to start freeing up space. The threshold applies to circular and alternate storage only. Typically,
you should multiply the size of the average history block (before any compression) by 1.5 to determine the
minimum threshold.
8. In the Maximum Size box, type the limit, in megabytes, for the amount of data to be stored to the specified
location. The maximum size applies to circular and alternate storage only. If the maximum size is set to 0, all
available space at the storage location is used.
9. In the Maximum Age box, type the age, in days, of data that will be deleted by system to free up disk space.
The threshold applies to circular and alternate storage only. The minimum age is 2 days. A value of 0
indicates that no age threshold is applied.
Note: The Deletion Threshold, Maximum Size, and Maximum Age options are unavailable for the
permanent and buffer storage areas.

AVEVA™ Historian Administration Guide
Chapter 5 – Managing Data Storage
© 2021 AVEVA Group plc and its subsidiaries. All rights reserved. Page 179
10. Click OK.
Viewing History Blocks
You can view details, such as the start and end time, for history blocks.
To view history block information
1. In the System Management Console tree, expand a server group and then expand a server.
2. Expand Management Console and then select History Blocks. The history block information appears in the
details pane.
Column descriptions are as follows:
Start Time
The starting timestamp for the history block.
End Time
The ending timestamp for the history block.
Location
The path to the storage location. The circular storage location must be a local drive on the server, and the
path must be specified using normal drive letter notation (for example, c:\Historian\Data\Circular). While
the alternate, buffer, and permanent storage locations can be anywhere on the network, it is strongly
recommended to have the alternate storage location configured on a dedicated physical drive locally
attached by a high-speed interface to the historian server or configured to be on a different internal hard
drive. If you use a network location, the historian computer's Configuration service account should have full
access to that network path. The locations must be specified using UNC notation. Mapped drives are not
supported.
Duration
The time span for the history block.
TimeZone
The time zone of the history block.
UTC Bias
The time offset from Coordinated Universal Time.
The data shown in the details pane is not automatically refreshed. To refresh the list from the history block
information held by the Configuration Manager, right-click History Blocks in the console tree and then click
Refresh. In most cases, this type of refresh is all that is needed.

AVEVA™ Historian Administration Guide
Chapter 5 – Managing Data Storage
© 2021 AVEVA Group plc and its subsidiaries. All rights reserved. Page 180
History Block Notation and Creation
Each history block is contained in a single subdirectory in the circular storage directory.
The subdirectory name includes the date stamp of the AVEVA Historian computer at the time the block was
created.
For example, this is a typical history block name. It has three parts:
"A" is used by the system.
"170221" matches the timestamp of the data it contains.
"_001" is the numerical suffix that identifies this history block as the
first block created that day. The block number increments if there are
multiple blocks created on the same day.
A new history block is created when corresponding data is received that day. After that, new history block are
automatically created with a time duration specified for that storage partition. .
History blocks can be created for data with timestamps in the future or the past.
Changing the history block time span does not take effect until after any previously-started blocks complete,
even if a previously-started block is holding data with timestamps in the future. For example, if the time span is
changed from "daily" to "hourly", the first hourly block will be for 12:00 AM to 1:00 AM on the following day.
Automatic Deletion of History Blocks
History blocks in the circular and alternate storage locations may be automatically deleted to make room for
new history blocks. Whether or not the blocks are deleted is determined by the minimum threshold and the
maximum size and/or age specified for the storage location.
The history block management system will check for available space in the circular and alternate locations if it
detects any changes made by other subsystems or the user in controlled directories.
The history block management system computes the sum of the sizes of all history blocks (including the current
one) in the circular storage location and determines if there is enough space on the drive to hold all of the
blocks.
If the space available on the storage location drive is below a certain threshold, the Storage subsystem will
delete enough of the oldest history blocks to bring the available disk drive space back to a positive value and
then move the new history block in.

AVEVA™ Historian Administration Guide
Chapter 5 – Managing Data Storage
© 2021 AVEVA Group plc and its subsidiaries. All rights reserved. Page 181
If an alternate storage location exists, the older block(s) will be moved there instead of being deleted. The
alternate storage location functions exactly like the circular storage location. However, when the blocks exceed
the set limits (minimum threshold, maximum size, or maximum age), the oldest blocks will be deleted from disk.
To avoid this loss of data, it is important that the system administrator regularly monitors the disk availability
and periodically backs up old blocks to long term storage before they are deleted.
For example, a history block is stored in the circular storage location. The maximum size of the disk drive for
circular storage is 120 MB. In addition to the circular storage location, an alternate location with a maximum
disk drive size of 120 MB is defined. For both locations, the minimum threshold value is 50 MB. Essentially, this
means that there is 70 MB of actual storage space.
Note: The sizes in this example are purposely small; the disk drives for storage locations should be much
larger.
You should typically set the minimum threshold to a value that is 3 times larger than the size of the biggest
history block. This will provide the history block management system enough time to copy oldest history block
from the circular location to the alternate, and then delete block from the circular location.
If you monitor the disk drive space available in the circular or alternate storage location over time, the value will
fluctuate between the threshold value and the maximum size of the location, with sharp increases when blocks
are moved out. While the system is moving a block(s) out, the space available will dip just below the threshold
value before the increase.
If the maximum threshold is reached before the age of the block reaches the specified limit, the block is moved
or deleted. A block will be moved or deleted within one history block duration of it reaching the age limit. If, for
any reason, the system is unable to move a block that is past the age limit, the block will not be deleted until the
size or space limit is reached.
Backing Up History Blocks
It is highly recommended that you back up the history blocks to long-term storage media to avoid data loss due
to media failure. You can perform backups using the Windows Backup utility or other backup tool. See the
Microsoft Windows documentation for details.
About VSS-Aware Backups
The storage and event storage services coordinate with the Microsoft Windows Volume Shadow Copy Service
(VSS) to enable consistent backups of history blocks while the Historian continues running. This means you do
not need to shut down the Historian before performing a backup of history blocks.

AVEVA™ Historian Administration Guide
Chapter 5 – Managing Data Storage
© 2021 AVEVA Group plc and its subsidiaries. All rights reserved. Page 182
Notes: You must shut down the Historian before restoring history blocks from backup.
Circular and alternate storage locations can be backed up independently of each other.
Backing Up Data Stored on Network Shares
If you are backing up data from a network share, VSS-aware backups are not available for this location from the
Historian server.
For example, if your alternate storage location is on a network share instead of a local drive, you must manage
backups of the alternate location from the server hosting the network share. Because this location is
independent of the Historian server, the consistency of these backups cannot be guaranteed. See Storage
Partition Locations on page 173 for recommended best practices.
Adding History Blocks from Prior Versions to the System
You can add existing history blocks from prior versions to the system.
To add a history block
1. Shutdown and disable AVEVA Historian.
2. While being sure to avoid time intersections, copy the old history blocks to the appropriate subdirectory for
the current AVEVA Historian system.
3. For old tags created by Classic Storage, be sure to set AITag=1.
4. Enable and start Historian.

© 2021 AVEVA Group plc and its subsidiaries. All rights reserved. Page 183
Ways to Acquire History Data
You can import, insert, and update history data in various ways.
Import InTouch history data with Historian Data Importer
If you have existing InTouch history data, you can easily import it into the AVEVA Historian extension tables
using the Historian Data Importer utility. See Importing Data from an InTouch History File (see "Importing
Data from an InTouch History File" on page 186).
Import a CSV file with Historian Data Importer
You can create a CSV file for the data and then use the following methods to import it. See Importing Data
from CSV Files on page 187.
o Use the Historian Data Importer to select and import the CSV file.
o Use the Historian Data Importer to create a "watch" folder that you drop CSV files into. For more
information, see Encoding Formats for Configuration Exports on page 116.
o Drop CSV files into the predefined \DataImport watch folder.
Insert or update history data with Transact-SQL statements
With INSERT and UPDATE statements, you can insert or update history data in the AVEVA Historian
extension tables. See Inserting or Updating Data with Transact-SQL Statements (see "Inserting or Updating
Data with Transact-SQL Statements" on page 194).
Rename tags with Tag Rename utility
With this tool, you can rename tags. See Renaming Tags (see "Renaming Tags" on page 199).
You can track modifications to history data. For more information, see Modification Tracking for Historical Data
Changes.
Guidelines for Importing, Inserting, and Updating History Data
Use the following guidelines to help you decide the best way to import or insert data into history. Each method
has its strengths for certain applications, and often you will need to balance the need for speed against some
limitations.
Chapter 6
Importing, Inserting, or Updating History
Data

AVEVA™ Historian Administration Guide
Chapter 6 – Importing, Inserting, or Updating History Data
© 2021 AVEVA Group plc and its subsidiaries. All rights reserved. Page 184
For a standard CSV import (as opposed to a "fast load" CSV import), the CSV file format and the format of the
data contained within the file is very flexible. However, this flexibility requires the system to perform a large
amount of processing on the data before it can be imported. Thus, there is an inverse relationship between
amount of data to process and import speed. The time required to process a file is at least exponentially related
to the number of values contained in the file.
Additional factors for a normal import are:
If multiple files are to be processed at the same time, the total size of the CSV file is limited to less than 4
MB.
The CSV file cannot contain more than 100,000 data values.
The number of tags represented in the file cannot exceed 1024.
Single files of up to 6 MB will be processed, provided that it does not exceed the file data and tag limits.
Performing a non-real-time insert with a Transact-SQL statement also requires a large amount of data
processing.
The fastest way to insert/import data into the system is to use one of the methods that employs the real-time
storage service to get the data into the history blocks. These include real-time inserts by Transact-SQL
statements and "fast load" CSV imports. Real-time inserts can occur at a fairly high speed, so use this method
when possible. Performing a "fast load" CSV import is also a high-speed option. To do a "fast load" import,
however, the data must be in time-series order.
In general, choose to use the fast load import if:
It is not is not feasible to perform a normal CSV import.
You need to import very large CSV files.
You want storage rules applied to the data you are importing. A normal CSV import does not apply storage
rules; everything is stored as a delta.
Also, do not import fast load data for a tag if there is existing stored data for that tag in the same time range.
Importing History Data
You can use the Historian Data Importer (aahImport.exe) to import history data from these types of files:
InTouch history (LGH) file
Before you perform the import, review the requirements in Importing Data from an InTouch History File on
page 186.
CSV file
You must format the CSV file according to the "FastLoad" format. For more information, see Importing Data
from CSV Files on page 187.
You can run the Historian Data Importer from a command prompt. For more information, see Running the
Historian Data Importer from a Command Prompt on page 194.

AVEVA™ Historian Administration Guide
Chapter 6 – Importing, Inserting, or Updating History Data
© 2021 AVEVA Group plc and its subsidiaries. All rights reserved. Page 185
To import history data
1. On the Windows Start menu, point to Programs, point to AVEVA, point to AVEVA Historian, and then click
Data Import. The Historian Data Importer dialog box appears.
2. In the Historian server box, type the name of the historian into which you want to import history data.
3. In the Security area, provide a logon account that is an administrator for the AVEVA Historian.
o Click Current User to use the account of the currently logged on Windows user to connect to the AVEVA
Historian.
o Click Alternate remote user to use a different Windows account to connect to the AVEVA Historian.
4. In the Path usage area, specify the location of the files to import.
a. To import a single file, click Single file import and then click Browse to select the file.
b. To import multiple files, click Import all files added to folder and then click Browse to select the folder
that contains all of the files.
The folder you select becomes a "watched folder." Any files you place in the folder at any time are
automatically processed until you change the folder configuration or change to a single file import.
c. If you are importing .lgh files, select the Import LGH files for the InTouch application on node check box
and then select the name of the InTouch node (computer) from which you want to import data.
Note: If the desired node is not listed, you need to first import the tagname database. For more information,
see Importing an InTouch Data Dictionary on page 103.

AVEVA™ Historian Administration Guide
Chapter 6 – Importing, Inserting, or Updating History Data
© 2021 AVEVA Group plc and its subsidiaries. All rights reserved. Page 186
5. In the Import Method area, specify how to integrate the data into storage.
Append new values (streamed)
The data in the import file must be ordered according to timestamp. If you are importing multiple files, you
must start with the oldest first. That is, if there are two files containing data for the same tags, but from
different time periods, the file with the oldest data must be imported first, followed by the newer data.
Other data collection mechanisms (for example, SQL INSERTs, data sent from Application Server, or from a
Historian SDK application) may interfere with streamed imports if they ever supply values newer than the
file data.
When it is processed on the historian server, streamed data is exposed through the SuiteLink server
(aahIOSvrSvc) and through the Live extension table, as well as from the History table and other extension
tables.
Insert missing values in the past (non-streamed)
The data in the import file must be ordered according to timestamp. However, if you are importing multiple
files, you can import the files in any order.
Non-streamed data will not be reflected in the SuiteLink server or in the Live extension table, but can be
queried from the History table and other extension tables.
For more information on the different categories of data, see Data categories in the AVEVA Historian
Concepts Guide.
6. For the Store Forward Path box, click Browse to select a folder in which processed data collects if a
disconnect to the historian occurs after the data transfer to storage starts. After the connection is restored,
the data transfer resumes.
7. Click Process.
The results of the import are shown in the Log window. Errors are logged to the ArchestrA Logger. If the
utility can’t process a file, the file moves into a support folder that is automatically created.
Note: The history importer does not report whether the data in the resultant CSV files is successfully
imported into the AVEVA Historian extension tables.
8. Click Close.
Importing Data from an InTouch History File
The Historian Data Importer (aahImport.exe) is a stand-alone utility that allows you to import existing InTouch
history data into the AVEVA Historian history blocks. InTouch history data is stored in one or more .lgh files
located in the InTouch application folder.
Before you start the import, be sure that:
You can access the LGH files (that is, files having an .lgh filename extension). The InTouch HMI software is
not required to be installed on the same computer as the InTouch History Importer, and InTouch is not
required to be running. The importer can import history data generated with InTouch HMI software version
7.0 or later.
The tag definitions already exist in the AVEVA Historian database. The easiest way to make sure that you
have all of the definitions is to use the AVEVA Historian Tag Importer to import the contents of the InTouch
tag database. For more information, see Importing an InTouch Data Dictionary on page 103.

AVEVA™ Historian Administration Guide
Chapter 6 – Importing, Inserting, or Updating History Data
© 2021 AVEVA Group plc and its subsidiaries. All rights reserved. Page 187
You can log on to the AVEVA Historian. The InTouch History Importer requires a logon account to the
historian to retrieve a list of all currently imported InTouch nodes.
The full path to the InTouch LGH files (including the name of the actual LGH file) is not longer than 64
characters. This limitation is inherent in the underlying InTouch infrastructure used to access LGH files. If the
path is longer than 64 characters, the importer produces an error message and prevents the import from
continuing. If necessary, use a mapped drive or a drive substitution to shorten the name of the path.
The InTouch application is not currently storing data to the LGH file that you plan to import.
You change the value of the AllowOriginals system parameter to 1. This allows you to insert original data for
I/O Servers. For more information on editing system parameters, see Editing System Parameters on page
279.
The data you want to import does not interfere with data in the current history block for the same tags. For
example, suppose you import tag definitions from an InTouch application and are currently storing the tag
values received from the I/O Server in the historian. If you attempt to import existing InTouch data for these
same tags, and the timestamps of the data to be imported fall within the current history block, the import
may produce unexpected results. Wait until the next history block is created before attempting to import
existing InTouch data.
If you have a large amount of data to import, process the data in batches, starting from the most recent data
to the oldest data. For example, you want to import one year's worth of InTouch history. Divide up the data
so that one month of data is included in a batch. When you import the most recent batch, the utility
automatically starts with the most recent block and then proceeds backwards. Then, import the
second-most recent batch, and so on.
The fast load import mechanism used by the InTouch History Importer is intended for importing data into
history for periods where no data for the tags currently exists. For delta stored tags, importing into a region
where data already exists results in the addition of the new points. For cyclically stored values, however, the
new points are imported on top of the existing cyclic values. For more information on fast load imports, see
About Fast Load CSV File Imports on page 189.
Importing Data from CSV Files
You can import data into the history blocks, as long as the data is formatted according to a specific
comma-separated values (CSV) format. The basic steps for importing data are:
1. Configure the data import folder, which is where you will put your formatted CSV files.
For more information, see Predefined CSV File Import Folders on page 188.
2. Add tag definitions to the AVEVA Historian database for all data values you plan to import. Importing data
for a tag that is not defined results in an error. If you are importing legacy InTouch data, you can use the Tag
Importer to import a tagname database, which contains the tag definitions. Otherwise, you must manually
add the tag definitions.
For information on importing an InTouch tagname database, see Importing an InTouch Data Dictionary on
page 103.
For information on adding tag definitions manually, see Defining Tags on page 53.
3. Determine the type of import, either normal or "fast load."

AVEVA™ Historian Administration Guide
Chapter 6 – Importing, Inserting, or Updating History Data
© 2021 AVEVA Group plc and its subsidiaries. All rights reserved. Page 188
For more information, see About Normal CSV File Imports on page 189 and About Fast Load CSV File Imports
on page 189.
4. Determine if you want to insert original data for I/O Server tags. By default, the system does not insert
original data for I/O Server tags by a CSV file. However, you can change this setting by changing the value of
the AllowOriginals system parameter to 1.
For more information on editing system parameters, see Editing System Parameters on page 279.
5. Format the CSV file according to the import type.
For more information, see Formatting the CSV File for a Normal Import on page 190 or Formatting the CSV
File for a Fast Load Import on page 192.
6. Place the file into the appropriate data import folder, where it is automatically processed by the system.
For more information, see Copying a CSV File into an Import Folder on page 193.
For a comparison of the various import methods, see Guidelines for Importing, Inserting, and Updating History
Data on page 183.
Predefined CSV File Import Folders
By default, import folders are created in the main AVEVA Historian data folder when the product is installed. For
example, if you specified D:\Historian\DATA\Circular as the circular data folder, the CSV data import folder is
D:\Historian\DATA\DataImport,.
Important: If you leave the data import path at the default location (on the drive hosting the circular data
folder), placing large CSV files in a data import folder may prompt the AVEVA Historian disk management
subsystem to immediately start moving or deleting history blocks to maintain the configured amount of required
free space on the disk. It is highly recommended to change the data import folder to a different drive than your
circular storage.
The different import folders are described in the following table:
Import Folder
Description
\DataImport
Used for normal CSV import files.
\FastLoad
Used for "fast load" CSV import files. Files in this folder are processed one at a time,
in the order that they appear in Windows Explorer as you are viewing the folder
contents.
\Manual
Used by MDAS for tags. If the amount of data spans multiple 64 KB chunks, files are
collected in the \Support subdirectory until all of the data is received. The files are
then copied to the \Manual folder for inclusion into history.
To manually change the predefined import folder
1. Use Windows Explorer to create the new folder.

AVEVA™ Historian Administration Guide
Chapter 6 – Importing, Inserting, or Updating History Data
© 2021 AVEVA Group plc and its subsidiaries. All rights reserved. Page 189
Note: Be sure that you maintain the \Manual\Support subfolder and optional \FastLoad subfolder. You
cannot change the name of the \FastLoad or the \Support folder to another name.
2. Edit the DataImportPath system parameter to specify the new data import folder.
For more information on editing system parameters, see Editing System Parameters on page 279.
3. Restart the AVEVA Historian.
About Normal CSV File Imports
Use the normal import mechanism if you primarily want to modify a small amount of existing data stored in the
AVEVA Historian or store a small amount of new values. The insert of an entire CSV file results in a single new
version of the data. If an inserted data point falls exactly on an existing timestamp, the data value is added to
history. The existing data is maintained in history.
For guidelines on using this import method versus other import methods, see Guidelines for Importing, Inserting,
and Updating History Data on page 183.
About Fast Load CSV File Imports
Using the "fast load" CSV import mechanism, you can import original data very quickly, using essentially the
same CSV file format as for a normal import, with some modifications.
A "fast load" import is much faster than a normal CSV import. For example, a CSV file that is 4 MB imports
approximately 100 times faster. For larger files, the speed improvement gets substantially better. Also, there are
no restrictions on the size of the file to import, or the number of tags or data values in the file. However, the
data that is contained in the CSV file for a fast load import must be formatted in time sequential order. It is this
ordering that allows the system to process a fast load CSV file more quickly than a normal CSV file.
Put a formatted CSV file into a special \FastLoad import folder.
A fast load import can only be applied where there is no existing stored data.
For guidelines on using this import method versus other import methods, see Guidelines for Importing, Inserting,
and Updating History Data on page 183.

AVEVA™ Historian Administration Guide
Chapter 6 – Importing, Inserting, or Updating History Data
© 2021 AVEVA Group plc and its subsidiaries. All rights reserved. Page 190
General File Format for a CSV Import
The CSV file format for imports is as follows.
Formatting the CSV File for a Normal Import
To import external data into the history blocks, you must format your data according to the CSV file format as
outlined in the following table. For a general illustration of the format, see General File Format for a CSV Import
on page 190.
You can name the CSV file anything you want. For the format, note that:
Only one operation type per line is allowed.
Multiple records per line of the same operation type is allowed.
A multipoint update is a sequence of updates where the beginning of an update period is the end of the
previous update. A multipoint update is faster than a simple sequence of inserts because a single version is
used for all values. Use a multipoint update to mask underlying data with a new set of values for the
specified time period.
o Fields 3 and 4 of the values are used in single point update only and must be excluded from the record
for a multipoint update. A single point update refers to the situation when an update value is assigned
to a time period specified by the start date/time and end date/time. A multipoint update can replace a
single or multiple previous points. It represents, like a single point update, a span of time that starts with
the current row date/time and ending at the next row date/time. The value specified in each record is
held as the latest value until the next record. The last record is ignored in a multipoint update.

AVEVA™ Historian Administration Guide
Chapter 6 – Importing, Inserting, or Updating History Data
© 2021 AVEVA Group plc and its subsidiaries. All rights reserved. Page 191
o The last record (time wise) will indicate the end of the previous update period. The value will be ignored.
If two multipoint update CSV files for the same tag are simultaneously copied to the \DataImport directory, the
update spans across the total time for the two files. A query returning latest data hides (masks) the original
version of the data from the end of the first file to the start of the second file.
For example, if the update in one file ranges from 00:00:00 to 00:05:00, and the other ranges from 00:10:00 to
00:15:00, the result is an update starting at 00:00:00 and ending at 00:15:00 ("latest"); the original data from
00:05:00 to 00:10:00 is masked as "original" data. No data is lost. To view either data from a query, use the
wwVersion column to specify either "original" or "latest." By default, the latest data is shown. To prevent the
masking of the original data, process the CSV files one at a time.
It is recommended not to use both inserts and original inserts for the same tag in the same file or files processed
together.
When configuring the scaling setting (field 6), keep in mind that the data conversion to engineering units (a
setting of 0) is performed before the value is stored. The reverse of the scaling formula for the tag is used to
convert the data before storage. During retrieval, the scaling formula is applied so that the original inserted
values are returned. For integer type tags, if the value after the conversion is not an integer value, it is rounded
off. The rounding off can change the value to be exactly the same as the previous value, and thus the rounded
off value is not stored to disk if delta storage is used. If the tag is a real type tag, the rounding off does not occur,
and all values are stored.
The value to insert can be a NULL. For more information, see Handling of NULL Values in CSV Files on page 193.
For a fast load CSV import, the end time of the current block in the block80.inf file is considered to be the
current time, not the current system time stamp. The end time in the .inf file is updated by the storage
subsystem every 20 seconds.
Example CSV Files for a Normal Import
The following is an example of an insert of data values for a single tag, "ReactTemp." The pipe ( | ) is used as a
delimiter.
The following is an example of an update of data values for a single tag, "Man1." A comma ( , ) is used as a
delimiter.

AVEVA™ Historian Administration Guide
Chapter 6 – Importing, Inserting, or Updating History Data
© 2021 AVEVA Group plc and its subsidiaries. All rights reserved. Page 192
The following is an example of a multipoint update of data values for a single tag. A comma ( , ) is used as a
delimiter. The last value is ignored.
Formatting the CSV File for a Fast Load Import
Important: The data points must be sorted in time sequential order for a successful "fast load" import.
The format for the fast load CSV file is essentially the same as the normal format, with a few exceptions.
For a general illustration of the CSV format, see General File Format for a CSV Import on page 190. For a detailed
description of the normal format, see Formatting the CSV File for a Normal Import on page 190.
The fast load format exceptions are:
All data in the file is treated as original data. The Operation Type field in the file header is ignored.
The actual data values in the file must be in time sequential order, starting at the top of the file. This is the
most important requirement. Values that have out-of-sequence timestamps are ignored. If a data value in
the file has a timestamp that is earlier than the timestamp in the previous line in the file, the data value is
discarded, regardless of whether it belongs to the same tag or a different tag.
The file should contain only one data value per line.
Example CSV Files for a Fast Load Import
The following is an example of an insert of original data values for a single tag, "Manual_01." The pipe ( | ) is
used as a delimiter.
ASCII
|
RolandoM|1|Server Local|10|0
Manual_01|0|2004/12/08|04:00:17.000|0|22|192
Manual_01|0|2004/12/08|04:01:17.000|0|23|192
Manual_01|0|2004/12/08|04:02:17.000|0|24|192
Manual_01|0|2004/12/08|04:03:17.000|0|25|192
Manual_01|0|2004/12/08|04:04:17.000|0|26|192
Manual_01|0|2004/12/08|04:05:17.000|0|27|192
Manual_01|0|2004/12/08|04:06:17.000|0|28|192
Manual_01|0|2004/12/08|04:07:17.000|0|29|192
Manual_01|0|2004/12/08|04:08:17.000|0|30|192
Manual_01|0|2004/12/08|04:09:17.000|0|31|192

AVEVA™ Historian Administration Guide
Chapter 6 – Importing, Inserting, or Updating History Data
© 2021 AVEVA Group plc and its subsidiaries. All rights reserved. Page 193
The following example shows an insert of original data values for a single tag, identified by a wwTagKey of 777. A
comma ( , ) is used as a delimiter. The file is saved as UNICODE, where every character is represented by two
bytes.
UNICODE
,
MikeA,1,Server Local,11,2
777,0,2004/12/09,12:05:24.000,0,100,192
777,0,2004/12/09,12:48:36.000,0,101,192
777,0,2004/12/09,13:31:48.000,0,102,192
777,0,2004/12/09,14:15:00.000,0,103,192
777,0,2004/12/09,14:58:12.000,0,104,192
777,0,2004/12/09,15:41:24.000,0,105,192
777,0,2004/12/09,16:24:36.000,0,106,192
777,0,2004/12/09,17:07:48.000,0,107,192
777,0,2004/12/09,17:51:00.000,0,108,192
Handling of NULL Values in CSV Files
The value to insert can be a NULL.
If the OPC Quality in the CSV file is between 0 to 63, then:
The NULL value is stored.
The Quality Detail is set to 249 (not a number).
The OPC Quality is what was specified in the CSV file.
If the OPC Quality in the CSV file is greater than 63, then:
The value that was specified in the CSV file is stored.
The Quality Detail is set to 192 (unless the value specified is NULL in the CSV file, in which case the Quality
Detail is set to 249).
The OPC Quality is what was specified in the CSV file (unless the value specified is NULL in the CSV file).
If the value is not NULL, but the OPC Quality is less than 63, then:
A NULL value is stored.
The Quality Detail is set to 249 (not a number).
The OPC Quality is what was specified in the CSV file.
Copying a CSV File into an Import Folder
After you copy one or more CSV files to an import folder, the AVEVA Historian attempts to read the file(s) only
one time. If the read is successful, the data is automatically converted and merged in with the appropriate
history block according to the date range provided in the CSV file. The CSV file is then deleted from the
directory. If an error occurs during the import, the CSV file is moved to the \Support folder. A message is also
posted in the error log.
At any given time, the manual storage service processes either fast load CSV files or normal CSV files; the two
types are not processed concurrently.

AVEVA™ Historian Administration Guide
Chapter 6 – Importing, Inserting, or Updating History Data
© 2021 AVEVA Group plc and its subsidiaries. All rights reserved. Page 194
Do not attempt a CSV file import if the manual storage process is initializing, as indicated by the icon in the
status display of the Management Console.
Be sure that the access for the history blocks is read/write (if you copy them from a CD or DVD, for example,
they are read-only).
Running the Historian Data Importer from a Command Prompt
You can run the Historian Data Importer in console mode from a command prompt to process CSV files.
The following table describes the command line arguments when running the utility in console mode. All the
arguments are case-insensitive. The utility returns a 0 or a non-zero integral value, where 0 indicates success
and a non-zero value indicates an error code.
Argument
Description
Optional?
Example
-? or -help
Shows the help.
Yes
aahimport.exe -?
aahimport.exe -help
-f
Name of a single CSV file to process.
No
aahimport.exe -f
"C:\CSVFiles\201312021201.
csv"
-h
Name of the historian node on which
the utility is running.
No
aahimport.exe -h HistNode
-e
This is the file encoding type to use.
Valid values are: ASCII, UNICODE, or
UTF-8.
Yes
aahimport.exe -e ASCII
-fs
Specifies that data should be processed
as streamed values.
Yes
aahimport.exe -f
"C:\CSVFiles\201312021201.
csv" -fs
-u and -p
Administrative security credentials for
logging on to the Historian computer.
Yes
aahimport.exe -u
"username" -p "password"
-fw
Specifies for the utility to "watch" the
folder and process any valid CSV file that
is placed there.
Yes
aahimport.exe -fw
"C:\CSVFiles" -h HistNode
Inserting or Updating Data with Transact-SQL Statements
Using the Transact-SQL INSERT and UPDATE statements, you can insert or update data in the AnalogHistory,
DiscreteHistory, StringHistory, and History tables (Value and OPCQuality only).
The AVEVA Historian uses the same security defined for SQL Server for inserting and updating data. However, as
with a CSV file, you cannot delete any data value from storage.

AVEVA™ Historian Administration Guide
Chapter 6 – Importing, Inserting, or Updating History Data
© 2021 AVEVA Group plc and its subsidiaries. All rights reserved. Page 195
If you are attempting to insert or update values whose time period spans across missing history blocks, the
necessary history block(s) are recreated for the duration of the data.
For guidelines on using this import method versus other import methods, see Guidelines for Importing, Inserting,
and Updating History Data on page 183.
INSERT ... VALUES Syntax
An INSERT statement with a VALUES clause is supported only if you use the four-part syntax.
Syntax
INSERT [INTO] {table_name | view_name} (column_list)
VALUES ({DateTime: constant | variable},
{TagName: constant | variable},
{Value: constant | variable}
[, {OPCQuality: constant | variable}]
[, {wwTimeZone: constant | variable}]
[, {wwVersion: constant | variable}] )
Using variables in the VALUES clause is permitted only with four-part naming. For more information, see "Using
the Four-Part Naming Convention" in Chapter 6, "Data Retrieval Subsystem," in the AVEVA Historian Concepts
Guide.
Arguments
table_name
The name of the extension table into which you want to insert the data. Valid values are: AnalogHistory,
DiscreteHistory, StringHistory or History.
view_name
The corresponding view name for an extension table. Valid values are: v_AnalogHistory, v_DiscreteHistory,
v_StringHistory or v_History.
column_list
Mandatory columns are DateTime, TagName and Value. OPCQuality, wwTimeZone, and wwVersion are
optional columns. If the OPCQuality column is omitted in an INSERT … VALUES statement, an OPCQuality
value of 192 (Good) is inserted automatically. If the wwTimeZone column is omitted, the time zone of the
server is assumed. The wwVersion column defaults to 'original' for non-I/O Server tags and for I/O Server
tags.
Due to a restriction on the vValue (variant) column in Microsoft SQL Server, any string data inserted or updated
must be done to the StringHistory table, not the History table.
The column_list parameter, which is optional in a regular SQL INSERT … VALUES statement, is mandatory for the
AVEVA Historian INSERT … VALUES syntax.
Examples
The following examples show valid INSERT … VALUES statements using the "four-part" query syntax.
For more information on four-part queries, see "Query Syntax for the AVEVA Historian OLE DB Provider" in
Chapter 6, "Data Retrieval Subsystem," in the AVEVA Historian Concepts Guide.
INSERT INSQL.Runtime.dbo.AnalogHistory (DateTime, TagName, Value, OPCQuality)
VALUES ('1999-11-11 16:05:10', 'NonIOTag1', 56, 192)
INSERT INTO INSQL.Runtime.dbo.StringHistory (DateTime, TagName, Value, wwTimeZone, wwVersion)
VALUES ('1999-11-11 16:05:10', 'IOstring1', 'Batch 10', 'Eastern Standard Time', 'latest')

AVEVA™ Historian Administration Guide
Chapter 6 – Importing, Inserting, or Updating History Data
© 2021 AVEVA Group plc and its subsidiaries. All rights reserved. Page 196
You can also use the view name in place of the four-part name. For example, in the following queries, v_History
and v_AnalogHistory are used instead of the four-part name INSQL.Runtime.dbo.History and
INSQL.Runtime.dbo.AnalogHistory, respectively.
INSERT v_History (TagName, OPCQuality, Value, DateTime)
VALUES ('NonIOtag1', 192, 56, '1999-11-11 16:05:10')
INSERT INTO v_History (TagName, DateTime, Value, OPCQuality)
SELECT 'ManualReactTemp', DateTime, 32 + Value * 9 / 5, 192 FROM v_AnalogHistory
WHERE TagName = 'ReactTemp'
AND DateTime >= dateadd(mi, -50, getdate())
AND DateTime < dateadd(mi, -10, getdate())
AND wwRetrievalMode = 'Delta'
You can use SQL variables in a four-part query. For example.
DECLARE @Value float
DECLARE @DateTime DateTime
SET @Value = 1.2345
SET @DateTime = DateAdd(Minute, -10, GetDate())
INSERT v_History (DateTime, TagName, Value, OPCQuality)
VALUES (@DateTime, 'NonIOTag1', @Value, 192)
Using the wwVersion Parameter for INSERTs
You can use the wwVersion parameter to specify different handling for data that you are inserting. You can use
the following values for wwVersion:
REALTIME
LATEST
ORIGINAL
You can insert any quality detail values, but it is recommended that you use values of either 0 (BAD), 64
(Uncertain), or 192 (GOOD).
Inserting Real-time Original Data
Real-time data insertion by means of an INSERT statement is supported for all non-I/O Server tags. Data that is
acquired in this manner is handled just like real-time data coming from an I/O Server tag. You insert real-time
data into history by specifying REALTIME for the value of the wwVersion parameter in a Transact-SQL INSERT
statement. All data inserted as real-time data is assumed to be "original" data. "Original" data is the first data
value that is stored for a particular timestamp.
Real-time data is always inserted into the current history block and incorporated into the primary (real-time)
data stream. This eliminates the performance overhead that is associated with inserting and/or versioning
non-real-time data, thus making the inserts very efficient.
For example, you can create a client application that uses Transact-SQL INSERT statements to insert real-time
data into the system.
The following restrictions apply to a real-time insert.
You cannot insert real-time data for an I/O Server tag.
You must have SQL Server permissions to perform an insert.

AVEVA™ Historian Administration Guide
Chapter 6 – Importing, Inserting, or Updating History Data
© 2021 AVEVA Group plc and its subsidiaries. All rights reserved. Page 197
In the following example, a value is inserted for 'MyAnalogTag1' directly into the primary data stream. The
timestamp for the value is determined by the result of the getdate() function:
INSERT INSQL.Runtime.dbo.AnalogHistory (DateTime, TagName, Value, OPCQuality, wwVersion)
VALUES(getdate(), 'MyAnalogTag1', 10, 192, 'REALTIME')
You can also allow the system to timestamp the value by specifying a NULL value for the DateTime column. The
timestamp is the current time of the historian. For example:
INSERT INSQL.Runtime.dbo.AnalogHistory (DateTime, TagName, Value, OPCQuality, wwVersion)
VALUES(null, 'MyAnalogTag1', 10, 192, 'REALTIME')
Note that this is a special case that is supported by the REALTIME parameter; under normal circumstances a
NULL value for the DateTime column produces an error.
Inserting Original Non-Streamed Data
You insert original data into history by specifying ORIGINAL for the value of the wwVersion parameter in a
Transact-SQL INSERT statement.
You can insert original data for both I/O Server tags and non-I/O Server tags. However, to insert original data for
I/O Server tags, the AllowOriginals system parameter must be set to 1. For more information, see Editing System
Parameters on page 279.
If original data is already stored in the history blocks with the same timestamps as the data you are inserting, the
system retains the first set of original values and adds the second set of original values as well, resulting in
multiple original values for the same timestamps. If you specify to retrieve original values, there is no way to
determine the order in which the values were inserted. In a case such as this, it is better to insert revision data,
if the added performance overhead is not a problem.
The following query inserts an original value for 'NonIOTag1' into history:
INSERT INSQL.Runtime.dbo.AnalogHistory (DateTime, TagName, Value, OPCQuality, wwVersion)
VALUES('2002-11-11 16:05:10', 'NonIOTag1', 10, 192, 'ORIGINAL')
Inserting Latest Revision Data
The AVEVA Historian supports inserting the first (original) and last (latest) version of a tag value.
You insert revision data into history by specifying LATEST for the value of the wwVersion parameter in a
Transact-SQL INSERT statement. This is essentially the same as performing an update, but without some of the
limitations.
You can insert revision data for both I/O Server tags and non-I/O Server tags.
The following query inserts revision data for 'NonIOTag1' into history:
INSERT INSQL.Runtime.dbo.AnalogHistory (DateTime, TagName, Value, OPCQuality, wwVersion)
VALUES('2002-11-11 16:05:10', 'NonIOTag1', 15, 192, 'LATEST')
UPDATE Syntax
The AVEVA Historian implements UPDATE only by the OPENQUERY function, not by a four-part syntax. The
reason for this is the method of implementation of UPDATE in Microsoft SQL Server. If you attempt to update
values using the four-part query syntax, you will receive an error.
Also, a limitation of using the OPENQUERY function is that SQL variables cannot be used in the UPDATE
statement.

AVEVA™ Historian Administration Guide
Chapter 6 – Importing, Inserting, or Updating History Data
© 2021 AVEVA Group plc and its subsidiaries. All rights reserved. Page 198
Updating data in history always results in a new history version, and can be performed multiple times; however,
only the original or the latest version of the data is available upon retrieval.
Syntax
The syntax of the UPDATE statement in the OPENQUERY portion is:
SELECT * FROM OpenQuery(INSQL, 'UPDATE { table_name }
SET
column_name = constant [,...n]
WHERE
<search_condition>')
Arguments
table_name
The name of the extension table into which you want to update the data. Valid values are: AnalogHistory,
DiscreteHistory, StringHistory or History.
column_name
Valid values are: Value, OPCQuality. (Update of the vValue column of the History table is not supported.)
Remarks
For the <search_condition>, DateTime and TagName search criteria are mandatory. The DateTime criterion
must refer to a time range; an update at a single time point ('DateTime=') is not supported.
Important: When updating data using the OLE DB provider, the greater than operator (>) and the less than
operator (<) are always interpreted as >= and <=, respectively. For more information, see Example 2 in this
section.
DateTime >[=] earlier_datetime_value AND DateTime <[=] later_datetime_value
Similarly, TagName may refer to one or more tags:
TagName = ...
-or-
TagName [NOT] LIKE ...
-or-
TagName IN ( ... )
'TagName NOT IN (…)' is not supported. This is similar to the capabilities of OpenQuery SELECT; 'NOT IN' syntax
is also not supported here.
As with INSERT … VALUES, wwTimeZone is optional. If not specified, the time zone defaults to the time zone of
the AVEVA Historian.
Important: Other types of search conditions (for example, using a condition on Value) are not supported.
Example 1
The supported UPDATE syntax is shown in the following example:
SELECT * FROM OPENQUERY(INSQL, 'UPDATE History SET Value = 10, OPCQuality = 192
WHERE TagName LIKE "Line1V%"
AND DateTime >= "1999-11-11 16:05:10"
AND DateTime <= "1999-11-11 16:05:40" ')

AVEVA™ Historian Administration Guide
Chapter 6 – Importing, Inserting, or Updating History Data
© 2021 AVEVA Group plc and its subsidiaries. All rights reserved. Page 199
This query sets the Value to 10 and the OPCQuality to 192 for all data values for the specified tags, when the
specified DateTime criteria are met.
Example 2
For the following query, the data that is updated will include the timestamps of 2002-10-03 14:59:59 and
2002-10-03 16:00:00, respectively. Existing points at these timestamps will therefore be affected by the update.
SELECT * FROM OPENQUERY(INSQL, 'UPDATE History SET Value = 1, OPCQuality = 192
WHERE TagName = "Manual_AD32SI1"
AND DateTime > "2002-10-03 14:59:59"
AND DateTime < "2002-10-03 16:00:00" ')
Renaming Tags
The Historian Tag Rename Utility lets you rename tags in AVEVA Historian while preserving the historical data
associated with those tags. At rename, the old tag’s data history is linked to the new tag name that you specify.
Note: For classic history blocks, use the earlier version of the Tag Rename utility. In this case, be sure to run the
earlier version before you run the new Historian Tag Rename Utility.
Historian tags, along with other tags, are stored in the Runtime database in the Tag, AnalogTag, DiscreteTag, and
StringTag tables. You can view these tags in the ArchestrA System Management Console. These tags cannot be
renamed from the Historian Configuration Editor.
To view Historian tags in the Runtime database
In ArchestrA System Management Console, expand Historian, expand Historian Group, expand Configuration
Editor, expand System Configuration, and then expand Tag Configuration.
The Historian also stores tag meta data, including information about tag name and tag version, in history blocks.
About Historian Tag Ownership
Although all tags are created and stored with their associated data in a historian server, each tag has an implicit
"owner". That owner is the entity responsible for creation and re-creation of that tag and for sending data
associated with it. Tag ownership may change over time, but at any point in time it can be clearly identified. A
tag can have one of three possible owners:
AVEVA Application Server. When an application server is deployed, a tag is created and its name is
automatically generated from the object hierarchy. If, for some reason, that historian tag completely
disappeared from the historian server, the AVEVA Application server could recreate that tag automatically at
the next deployment.
AVEVA Historian SDK application, if it adds a tag before sending data. As in the case with the AVEVA
Application Server, that application can re-create the tag automatically if necessary.
AVEVA Historian, if that tag is an IDAS tag or one created manually through the Configuration Editor or a
stored procedure.
AVEVA Historian can become a tag owner for already-collected data if the associated AVEVA Application Server
deployment or SDK application no longer exists and is no longer able to re-create or send data.

AVEVA™ Historian Administration Guide
Chapter 6 – Importing, Inserting, or Updating History Data
© 2021 AVEVA Group plc and its subsidiaries. All rights reserved. Page 200
If a tag must be renamed, the first step is renaming it in the owner and then forcing the owner to re-create a tag
with the new name. For AVEVA Application Server, it means making changes in the object hierarchy and
redeploying. For an SDK application, it means renaming the tag in the application, restarting the application to
reconnect to the historian, and then reconfiguring the current most recent version of the tag.
If, however, the Application Server no longer exists or the application is no longer used, the tag ownership is
already transferred to the historian and that first step is unnecessary.
After the tag owner re-creates the tag with a new name, the new incoming data will be stored under that new
tag name. However, previously collected data is still associated with the old name. To make that old data visible,
you can use the Tag Rename Utility to update previous tag metadata records with the new tag name without
changing the tagids of those records.
Preparing to Rename Application Server Tags
Before renaming Application Server tags with the Tag Rename Utility, be sure to do the following:
1. Complete the store-and-forward at the user end to synchronize the tag information.
For more information, see the Application Server documentation.
2. Undeploy any Galaxies that are already deployed using the System Platform IDE.
For more information, see the Application Server documentation.
3. Stop, shutdown, and disable the Historian.
For more information, see Starting and Stopping AVEVA Historian (see "Starting and Stopping AVEVA Historian"
on page 28).
Important: After connecting to the database, the Tag Rename Utility will check for the Runtime database
version and will proceed only if you are using version 11.5 or higher.
Renaming Tags Using the Tag Rename Utility
To rename tags:
1. Open the Tag Rename Utility.
2. Provide authentication information in either of these ways:
o Use Windows authentication. With this method, you are not required to provide a username and
password. You will be connected with the credentials that you have already used to log onto the
computer.

AVEVA™ Historian Administration Guide
Chapter 6 – Importing, Inserting, or Updating History Data
© 2021 AVEVA Group plc and its subsidiaries. All rights reserved. Page 201
o Use SQL Server authentication. With this method, you must provide the username and password for the
SQL Server.
Important: SQL Server authentication is provided for backward compatibility only. For improved security, we
recommend that you use Windows authentication.
Note: For either authentication method to work, you must have administrator privileges on the SQL Server
Runtime database.
3. Click Connect to connect to the Historian Runtime database.
4. Click Add Tag to specify the tag you want to rename.
5. In Old Tag Name, type the current tag name.

AVEVA™ Historian Administration Guide
Chapter 6 – Importing, Inserting, or Updating History Data
© 2021 AVEVA Group plc and its subsidiaries. All rights reserved. Page 202
6. In New Tag Name, type a new name for the tag. The tag names may contain letters, numbers, and the
special characters "_" and "$", but no spaces. Click OK.
7. Repeat steps 4 through 6 for each tag you want to rename.
8. Click Rename Tags. A screen like this displays your tags:
You may see both red and green outcomes as a result of renaming the tags.
o Green indicates that the Tag Rename Utility has successfully renamed the tag in the Runtime database.
o Red indicates that the rename was not successful. This typically happens because the connection failed,
the old tag did not exist, or the new tag name was a duplicate. The Details column shows the reasons
for any failure.
Note: You can also rename several tags at a time by clicking Add CSV, and then specifying a .CSV file that
contains an old tag name and a new tag name consecutively in each row.
9. After using the Tag Rename Utility, enable and start the Historian.
For more information, see Starting and Stopping AVEVA Historian (see "Starting and Stopping AVEVA
Historian" on page 28).
Your tags will be updated to the new tag name and contain the history associated with the old tag.
10. If applicable, open the System Platform IDE and deploy the Galaxies.
For more information, see the Application Server documentation.
Updating Replicated Data
Updating replicated data is very similar to updating non-replicated data with a few exceptions.
Always update data at the tier-1 historian. The replication process then propagates the information from the
tier-1 historian to the tier-2 historian. In other words, do not attempt to update Tier-2 data. Remember that
there is some latency with propagating updated information, typically from a few seconds to a few minutes.
However, bandwidth limitations and the quantity of data to be replicated may also cause delays in propagation.
After propagation, all replicated tag values and their OPC qualities are identical on both tiers.

AVEVA™ Historian Administration Guide
Chapter 6 – Importing, Inserting, or Updating History Data
© 2021 AVEVA Group plc and its subsidiaries. All rights reserved. Page 203
If any data modification is performed on the tier-2 historian, including deletion of history blocks and if the data
for the same tag is then modified on the tier-1 historian and an overlapping time interval, then the data
modification on the tier-2 historian may be overwritten during replication. The replication process also creates
new "patch" history blocks on the tier-2 historian when necessary.
If some history blocks are deleted on the tier-1 historian manually or due to scheduled disk management, the
tier-2 values remain unchanged.
For more information on tag replication and replication servers, see Managing and Configuring Replication on
page 204.

© 2021 AVEVA Group plc and its subsidiaries. All rights reserved. Page 204
About Replication
With AVEVA Historian, you can replicate tag information
from one historian to another. This creates a "tiered"
relationship between historians. That is, the tier-1
historian send its replicated data to a tier-2 historian.
Historian also supports multi-tier replication. Data
originating at tier 1 can be replicated to tier 2, then
again to tier 3, and so on.
AVEVA Historian can replicate process data as well as
alarms and events.
AVEVA Historian supports two types of replication:
Simple replication
You can replicate tag data directly using simple replication, where the tag information is replicated directly
to the next-tier historian (for example, from tier 1 to tier 2). For simple replication, every value for a tag is
copied.
Summary replication
You can also set up summary tags that receive a summarized version of the tag data.
Replication Schedules
Each real-time summary has a specified schedule, by which the summary is calculated and sent for storage to
the next-tier historian with the timestamp of the cycle.
There are two types of replication schedules:
Periodic replication schedules
You can configure a summary to replicate based on an cycle such as 1 minute, 5 minutes, 1 hour, 1 day, and
so on. The cycle boundaries are calculated starting at midnight, lower-tier (originating) server local time, and
continue in fixed time increments. The time between cycles is constant within a day even through a daylight
savings change. Note that the last cycle in a day may be shorter to force replication at midnight. The
calculation cycle starts at midnight. For example, a 13-minute cycle is stored at 12:00 a.m., 12:13, 12:26, ...
11:27 p.m., 11:40, 11:53, and then again at 12:00 a.m.
Chapter 7
Managing and Configuring Replication

AVEVA™ Historian Administration Guide
Chapter 7 – Managing and Configuring Replication
© 2021 AVEVA Group plc and its subsidiaries. All rights reserved. Page 205
Custom replication schedules
Custom schedules force replication cycles to occur at fixed times of the day in lower-tier (originating) server
local time. You choose the fixed times of day.
Replication Schedules and Daylight Savings Time
Daylight Savings Time affects replication schedules that are triggered according to a time period, such as every
hour, every thirty minutes, and so on. Replication schedules that are triggered at a fixed time that you specify
are not affected.
In the following examples, the time change occurs at 2:00 a.m.
In this example, the summary period is configured to be every 30 minutes. On the "fall back" day, will be two
extra summaries performed during the repeated hour for that day. For the "spring forward" day, there will be
two summaries missing because of the skipped hour. The next replication occurs at the next scheduled time. In
this case, it would be 3:00 a.m.
Summary Period = 30 Minutes
Regular Day
1:00 a.m. Standard
1:30 a.m. Standard
2:00 a.m. Standard
2:30 p.m. Standard
3:00 a.m. Standard
3:30 a.m. Standard
“Fall Back” Day
1:00 a.m. Daylight
1:30 a.m. Daylight
1:00 a.m. Standard
1:30 a.m. Standard
2:00 a.m. Standard
2:30 p.m. Standard
3:00 a.m. Standard
3:30 a.m. Standard
“Spring Forward” Day
1:00 a.m. Standard
1:30 a.m. Standard
3:00 a.m. Daylight
3:30 a.m. Daylight
time gap
extra summaries
In the next example, the summary period is configured for every four hours. The scheduled summaries do not
occur exactly on or within the boundaries of the time change hour. In this case, on the "fall back" day, the
summary subsequent to the time change hour includes four hours of data for the "fall back" day. An extra
summary for an hour’s worth of data is performed at the end of the "fall back" day. On the "spring forward" day,
the summary period that contains the skipped hour includes one less hour of data.
Summary Period = 4 Hours
Regular Day
0:00 a.m. Standard
4:00 a.m. Standard
8:00 a.m. Standard
12:00 p.m. Standard
16:00 a.m. Standard
20:00 a.m. Standard
24:00 a.m. Standard
“Fall Back” Day
0:00 a.m. Daylight
3:00 a.m. Standard
7:00 a.m. Standard
11:00 p.m. Standard
15:00 a.m. Standard
19:00 a.m. Standard
23:00 a.m. Standard
0:00 a.m. Standard
“Spring Forward” Day
0:00 a.m. Standard
4:00 a.m. Daylight
8:00 a.m. Daylight
12:00 p.m. Daylight
16:00 a.m. Daylight
20:00 a.m. Daylight
24:00 a.m. Daylight
4 hours of data
summarized
only 3 hours of
data summarized
“extra” hour

AVEVA™ Historian Administration Guide
Chapter 7 – Managing and Configuring Replication
© 2021 AVEVA Group plc and its subsidiaries. All rights reserved. Page 206
For a custom summary period, the summaries always occur at the fixed times of day that you specify in local
time. However, the summary includes and extra hour of data for the "fall back" day (because of the overlap
hour) and for the "spring forward" day (because of the skipped hour).
Summary Period = Custom: 0, 4, 8, 12, 16, 20
Regular Day
0:00 a.m. Standard
4:00 a.m. Standard
8:00 a.m. Standard
12:00 p.m. Standard
16:00 a.m. Standard
20:00 a.m. Standard
24:00 a.m. Standard
“Spring Forward” Day
0:00 a.m. Standard
4:00 a.m. Daylight
8:00 a.m. Daylight
12:00 p.m. Daylight
16:00 a.m. Daylight
20:00 a.m. Daylight
24:00 a.m. Daylight
only 3 hours of
data summarized
“Fall Back” Day
0:00 a.m. Daylight
4:00 a.m. Standard
8:00 a.m. Standard
12:00 p.m. Standard
16:00 a.m. Standard
20:00 a.m. Standard
24:00 a.m. Standard
extra hour -
5 hours of data
summarized
If a Daylight Savings Time change causes a scheduled time to be ambiguous, such as 1:30 a.m. on a "fall back"
day when the clock jumps from 1:59 a.m. Daylight Savings Time to 1:00 a.m. standard time and the time could
be interpreted as 1:30 a.m. Daylight Savings Time or 1:30 a.m. Standard Time, the replication will occur at the
latter of the two occurrences. In this case it would be 1:30 a.m. Standard Time.
Replication Groups
A replication group abstracts a tag from a schedule. You can assign multiple summary tags to a single replication
group.
Summary Tags
Summary Tag A
Summary Tag B
Summary Tag C
.
Summary Tag
N
Replication Group
Replication
Server A
1 Day
Replication Schedule
1 Day
Multiple groups can be assigned to a single schedule. This simplifies maintenance. If you need to edit the
schedule (for example, change the time of day for a shift end), you only need to edit the replication schedule,
not the individual groups or summary tag configurations.
Summary Tag A
Summary Tag B
Summary Tag C
Summary Tag D
Summary Tag E
Summary Tag F
Replication
Server A
Replication Groups
My Group A
Replication Schedule
8-hour shift
Summary Tags
My Group B

AVEVA™ Historian Administration Guide
Chapter 7 – Managing and Configuring Replication
© 2021 AVEVA Group plc and its subsidiaries. All rights reserved. Page 207
A replication group must be unique for a type of summary tag, either analog or state. You can, however, have
the same group name for analog summary tags as you do for state summary tags. You can also have the same
replication group defined in multiple servers.
Replication
Server A
Replication
Server B
Summary Tag A
Summary Tag B
Summary Tag C
Summary Tag D
Summary Tag E
Summary Tag F
Replication Schedule
8-hour shift
Summary Tags
My Group A
My Group A
Replication Groups
How Replication is Handled for Different Types of Data
An accurate map of data between replication tiers is maintained over time. This mapping includes both tag
configuration and data synchronization.
Replication is unidirectional -- it goes from one tier to the next tier. For example, from the tier-1 historian to the
tier-2 historian, but not from tier 2 to tier 1. If the data on a next-tier historian is changed in any way, the system
does not try to map the change back to the lower-tier historian.
For example, suppose a tag from historian A is replicated in real-time to historian B. The tag on historian B has
exactly the same data and OPC quality values as the tag on historian A. The replication system performs the
following actions:
When a new original value fitting the real-time window gets stored on historian A, it gets transmitted and
stored on historian B, as well as the original value.
If you perform an insert or update operation for some old values of the historian A, the same change is
reflected on historian B.
If some store-and-forward data gets merged into history on historian A, the same data gets transmitted to
historian B and gets merged into history of historian B.
Replication is implemented in two ways: streaming replication and queued replication. The replication system
uses a combination of streamed replication and queued replication as required.
Streaming Replication
When values of originating tier-1 tags are received from an IDAS or HCAL (AVEVA Application Server) and arrive
at the tier-1 historian as a time-ordered data stream directly, the historian not only stores the data, but also
forwards it to the Replication subsystem if replication is configured for those tags.
Then the Replication subsystem immediately streams that data to the tier-2 historian for simple replication, or
performs summary calculations and streams the resulting summaries. Likewise, if there are more tiers beyond
tier 2, the Replication subsystem streams the data beyond tier 2 to the next-level tiers.
This happens equally efficiently for tag values of timestamps close to the current system time and for late data
tags.

AVEVA™ Historian Administration Guide
Chapter 7 – Managing and Configuring Replication
© 2021 AVEVA Group plc and its subsidiaries. All rights reserved. Page 208
If any next-tier historian becomes unavailable, the Replication subsystem continues to stream replicated data
into the local store-and-forward path. When the connection is restored, all replicated data is sent as compressed
snapshots to the next-tier historian and incorporated into history.
Streaming replication is the fastest and most efficient way of data replication, but there are some scenarios
where it cannot be used. In that case, another method called queued replication is applied.
Queued Replication
AVEVA Historian uses queued replication in certain cases when streaming replication is not appropriate, such as
when:
The data stream is interrupted.
For example, the remote IDAS configured for store-and-forward cannot communicate with the tier-1
historian for a long time. When the connection is restored, the store-and-forward data finally arrives at the
tier-1 historian. But by that time, it may already be streaming newer data.
Lower-tier historian gets new data.
For example, an insert, update, or CSV file import operation is performed for lower-tier tag values. This
means the summaries should be recalculated for that time period, and then re-replicated to the next-tier
historian(s).
The lower-tier historian is stopped or restarted.
For example, if the lower-tier historian is restarted and there are some summaries spanning across the
startup/shutdown time, they must be recalculated and re-replicated to the next-tier historian(s).
When such cases occur, the Replication subsystem receives notifications from the manual data storage service.
The notifications contain information about what kind of lower-tier tag data (original or latest) has changed for a
particular time interval. The Replication subsystem places that notification record into the replication queue
stored in the Runtime database of the lower-tier historian. Later, when the connection to the next-tier historian
is restored, the Replication subsystem processes that queue by querying the lower-tier data and replicating it to
the next-tier historian(s). When the queue item is successfully processed, it is removed from the replication
queue.
Although the Replication subsystem optimizes the queue by combining adjacent records, queued replication is
slower and requires more system resources as compared to streamed replication, because it involves querying
lower-tier data already stored on disk.
Queued replication does not support data values with timestamps before the year 1970.
Tag Configuration Synchronization between Tiered Historians
If a summary tag is deleted on the lower-tier historian, its corresponding tag on each next-tier historian remains
intact to allow for retrieval of data already collected. A lower-tier tag cannot be deleted from the lower-tier
historian if it is being replicated. You must first delete the tag replication and then delete the lower-tier tag.
A next-tier tag can be deleted from the next-tier historian, but it should be deleted only after the corresponding
replication has been deleted from the lower-tier historian in that replication relationship. Otherwise, it will be
recreated.

AVEVA™ Historian Administration Guide
Chapter 7 – Managing and Configuring Replication
© 2021 AVEVA Group plc and its subsidiaries. All rights reserved. Page 209
Replication Run-time Operations
Communication between tiers of replication historians may be interrupted because of a network outage or
some other reason. When such interruptions occur, the replicated tags can still be configured and the data
collected. Then, when communication is restored, the replication configuration and data are sent to the
next-tier historian.
System and data integrity is not guaranteed if a disorderly shutdown occurs, such as a power outage.
Replication for tags will stop if:
You delete the source tag configuration on the tier-1 historian.
You configure the tier-1 tag so that its data values are not stored.
An integer analog tag is being replicated as a state summary, and you change the source tag to be a real
analog tag.
Replication Latency
Replication latency is the time it takes for the system to make a value available for retrieval on the next-tier
historian from the moment it was stored or calculated on the previous tier.
Replication latency depends primarily on whether the streaming or queued replication method is being applied
in each particular case and the available system resources to execute that method in each particular case.
Streaming replication tends to have a shorter latency period than queued replication as it deals with smaller
amounts of data and is processed at a higher priority.
Replication Delay for "Old" Data
Replication delay identifies how frequently "old" data -- which includes inserts, updates, and store-and-forward
data -- is sent from the one tier to the next-tier historian. The replication delay applies only to queued
replication.
You specify the delay using the OldDataSynchronizationDelay system parameter. For more information, see
System Parameters (see "System Parameters" on page 36).
This delay represents your intent, while the replication latency identifies the real time difference. If the latency
period becomes longer than the replication delay, the system will not be able to maintain the expected
replication.
If you set the OldDataSynchronizationDelay system parameter to 0 (zero), all changes detected in the lower-tier
are immediately sent to the next-tier historian(s), which may be very inefficient for certain applications.
Continuous Operation
If a next-tier historian that is configured for store-and-forward operations becomes unavailable, AVEVA
Historian ensures these continuous operations:
You can still add, modify and delete replication and summary objects in the local configuration of the
lower-tier historian.
You can store data locally for next-tier tags created before the next-tier historian became unavailable or
while it is still unavailable.

AVEVA™ Historian Administration Guide
Chapter 7 – Managing and Configuring Replication
© 2021 AVEVA Group plc and its subsidiaries. All rights reserved. Page 210
Once the next-tier historian is available, the Replication Service does the following:
Compares the latest replication and summary objects with the next-tier tags currently existing on the
next-tier historian
Performs a dynamic reconfiguration to ensure all data is synchronized.
Sends reconfiguration history that was stored locally to the next-tier historian so it can be merged with
other history information.
Once done, It will appear as though the disconnection between the tiers never took place.
Overflow Protection
If a next-tier historian cannot handle the incoming replication data, the Replication Service detects the situation
and switches into store-and-forward mode. The data is then accumulated locally until the limit is reached. If that
happens, all data to be sent to the next-tier historian is discarded and an error message is logged.
Security for Data Replication
Connections from a lower-tier historian to a next-tier historian must be authenticated before any replication
task can be performed on the next-tier historian.
A local Windows user group called aaReplicationUsers is created on the next-tier historian during the next-tier
historian installation. The ArchestrA user account is automatically added to this group. Only members of the
aaReplicationUsers group are allowed to perform replication tasks. These include adding, modifying, and
sending values for replication tags. This group is not allowed to perform other non-replication tasks, such as
adding or modifying a tier-1 tag.
When you configure a replication server on one historian, you must specify a valid Windows user account on the
next-tier historian for the replication service to use.
For example, suppose you are configuring a replication server on a tier-1 historian. The tier-2 security account
does not have to be a valid account on the tier-1 historian or even be in the same security domain as the tier-1
historian. If no replication user credentials are configured in at the tier-1 historian, the ArchestrA user account
credential is passed to the tier-2 historian for authentication.
Adding a Replication Server
A replication server is a next-tier historian that receives and stores replicated data. The "next" tier depends on
where the data is being sent from. A tier-1 historian replicates to its next tier, tier 2. The tier-2 historian
replicates to its next tier, tier 3, and so on.
A replication server is configured on the lower-tier historian; that is, the one sending the replication data:
The tier-2 replication server configuration is defined on the tier-1 historian.
Tier 3 is configured on tier 2, and so on.
When you define the configuration for a replication server, you set up replication schedules, groups, and tags for
that next-tier historian.

AVEVA™ Historian Administration Guide
Chapter 7 – Managing and Configuring Replication
© 2021 AVEVA Group plc and its subsidiaries. All rights reserved. Page 211
Important: Replication is not supported between a case-sensitive historian and a case-insensitive next-tier
historian.
If the next-tier historian doesn’t yet exist or can’t be reached over the network, the information is held until the
lower-tier historian can connect with an instance of AVEVA Historian on the next-tier computer. If the lower-tier
historian cannot communicate with the next-tier historian for any reason, data accumulates in the designated
store-and-forward path.
By default, AVEVA Historian creates a local replication server (named Local Replication) as part of the installation
process. You can create replication tags that use this local replication server or another replication server.
When you create a new replication server, the system automatically generates replication groups for analog
summary and state summary replication types using default replication schedules. For more information, see
Adding a Replication Group on page 232.
A few default replication schedules are also created for your new replication server, and you can use these
schedules to create replication groups.
The system also creates a list of system tags for each replication server. For more information on the default
system tags, see Replication Subsystem Tags on page 48 in the AVEVA Historian Concepts Guide.
Note: If you want to use AVEVA Insight as a replication server, see Adding AVEVA Insight as a Replication Server
(see "Adding AVEVA Insight as a Replication Server" on page 214) for specific steps.
To add a replication server
1. In the System Management Console, expand a server group and then expand a server.
2. Expand Configuration Editor, expand System Configuration, and then expand Replication.
3. Right-click Replication Servers and select New Replication Server. The New Replication Server dialog box
appears.
4. Configure the basic options for the replication server as follows:

AVEVA™ Historian Administration Guide
Chapter 7 – Managing and Configuring Replication
© 2021 AVEVA Group plc and its subsidiaries. All rights reserved. Page 212
o Node Name/IP Address
Type the node name or IP address of the computer where the next-tier historian resides. (This node
name or IP address does not need to be active or accessible when you set up the information for the
new replication server.)
o Description
Type a description of the server. This description appears in the System Management Console and in
Historian Client reports.
o Store & Forward path
Type the store-and-forward path for data for this next-tier replication server. This must be an absolute
path on the current computer. Remote paths are not supported for store-and-forward addresses.
o Replicate Alarms and Events
This is enabled by default. This replicates alarms and events to the replication server.
Note that this is a simple replication of alarms and events. Summary replication does not apply.
o Replicate to AVEVA Insight
Check this to replicate data to AVEVA Insight.
o Connection Info
Type the user name and password for the replication server. To specify a Windows domain, prefix the
username with the domain name and a backslash. For example: <domainname>\<username>.
o TCP Port
Type the TCP port to use for the new replication server. The TCP port is used by the next-tier historian to
receive data from the replication service on the lower-tier historian. This can be an integer between 1
and 65535. The default is 32568. This port number must match the ReplicationTcpPort system
parameter value that is specified on the next-tier historian. Be sure that you open this port in Windows
Firewall. The port must not conflict with any other ports used by other applications on the next-tier
historian.
5. To test the connection to the new replication server computer, click Test Connection.
The test succeeds only if:
o There is a valid node name.

AVEVA™ Historian Administration Guide
Chapter 7 – Managing and Configuring Replication
© 2021 AVEVA Group plc and its subsidiaries. All rights reserved. Page 213
o The TCP port is the same for both the lower-tier and next-tier nodes. To configure the TCP port, click the
Advanced tab.
o Valid credentials for an account that has permission on the next-tier node to send replication data are
entered.
If the test fails, see the ArchestrA Logger entries on both the lower-tier and next-tier historians for more
information.
6. Click Next. The New Replication Server - Advanced dialog box appears.
You can use the default summary and simple replication tag naming schemes, or you can create your own.
7. In the Summary Replication Tag Naming Scheme and Simple Replication Tag Naming Scheme areas, select
the replication tag naming scheme to use. Specify a custom naming scheme by selecting Custom and clicking
the ellipsis button to the right of the box. The Naming Scheme dialog box appears. For information about
configuring the naming scheme, see Specifying Naming Schemes for Replication on page 219.
8. Configure the remaining advanced settings as follows:
o Min SF Duration
Enter the minimum duration in seconds for the replication service to function in store-and-forward
mode. The replication service functions in store-and-forward mode for this length of time even if the
condition that caused the replication service to function in store-and-forward mode no longer exists.
The duration can be an integer from 0 to 3600. Pick a value that provides a smooth transition for
store-and-forward operation and prevents the system from repeatedly going in and out of
store-and-forward mode.
o Compression Enabled
Select this option to enable compression for the packets sent to the replication server. For guidelines on
using compression, see the performance information in the AVEVA System Platform Installation Guide.
o Buffer Count
Enter the number of 64KB buffers to allocate for the new replication server. This can be an integer from
128 to 2048. You may need to increase the buffer count to accommodate high data rates.
o Bandwidth

AVEVA™ Historian Administration Guide
Chapter 7 – Managing and Configuring Replication
© 2021 AVEVA Group plc and its subsidiaries. All rights reserved. Page 214
– Select Unlimited to allow unlimited bandwidth to be used by the HCAL to communicate with the
historian.
– Otherwise, leave it unselected and enter a value in the Kbps box to specify a custom bandwidth.
This can be an integer from 10 to 1000000.
Setting a limit on the bandwidth throttles the amount of data that is sent during operations such as
a store-and-forward, an update, or a CSV export. You commonly use this feature when you have a
WAN with a low bandwidth. For example, suppose your WAN has a 128kbps bandwidth between
the lower-tier and next-tier historians. If you have real-time streaming data that requires 64kbps for
normal operation but the network is down for 8 hours and information is saved for
store-and-forward, it will take 8 hours for the data to be uploaded. If you leave this set to Unlimited,
it will work fine.
But if you have 256kbps bandwidth that you have to share with other applications, set this to
128kbps to throttle the store-and-forward data and anything that isn’t streaming. This prevents the
historian’s operations from choking the other applications for bandwidth. The most common
symptom of a problem is that when you come out of store-and-forward and start sending data, the
remote desktop is very sluggish and unresponsive. The bandwidth limit also applies to streaming
data. However, streaming data will not be throttled, and instead HCAL will be put into
store-and-forward mode. For example, if the streaming bandwidth is always 96kbps, and you set the
limit at 128kbps, there will be 32kbps remaining for store-and-forward to use. However, if you had a
sudden spike and streaming jumped up to 156kbps, it would exceed the limit and force HCAL into
store-and-forward mode.
o High Latency Network
– Select this option if the connection to the replication server takes place over a high-latency network
(ping response times over 500 milliseconds). This option allows for longer connection timeouts. If
you use this option, we recommend that you also enable compression.
– Leave it unselected if you are not expecting connection timeouts, as this setting can negatively
affect performance on a low-latency network.
9. Click Finish. The new replication server appears in the replication server list.
Adding AVEVA Insight as a Replication Server
If you want to connect from AVEVA Historian to AVEVA Insight as a next-tier server, follow these steps.
Note: You must have an account with AVEVA Insight first to complete these steps. If you do not have an AVEVA
Insight account, go to the AVEVA Insight site (https://insight.connect.aveva.com
https://insight.connect.aveva.com/) and click Register.
To add a replication server
1. In the System Management Console, expand a server group and then expand a server.
2. Expand Configuration Editor, expand System Configuration, and then expand Replication.

AVEVA™ Historian Administration Guide
Chapter 7 – Managing and Configuring Replication
© 2021 AVEVA Group plc and its subsidiaries. All rights reserved. Page 215
3. Right-click Replication Servers and select New Replication Server. The New Replication Server dialog box
appears.
4. Specify a Node Name and Description for the next-tier server. The default name is provided, but you can
type your own. The description you provide appears in the System Management Console and in Historian
Client reports.
Note: Although the field is called Node Name/IP Address, an IP address is not allowed for AVEVA Insight.
5. Check the Replication to AVEVA Insight check box.
6. Click Register.
This launches AVEVA Insight Publisher.

AVEVA™ Historian Administration Guide
Chapter 7 – Managing and Configuring Replication
© 2021 AVEVA Group plc and its subsidiaries. All rights reserved. Page 216
7. Follow the on-screen instructions to sign into AVEVA Insight, register your Insight data source, and publish
your historian replication tags to Insight.
Note: For more information about publishing data to AVEVA Insight, see AVEVA Insight help
(https://insight.connect.aveva.com/help https://insight.connect.aveva.com/help).
8. Once the registration process is complete, you'll see encrypted information in the Connection Info box.
Important: Do NOT tamper with this encrypted string in any way. This information is valid only on the
computer that created it. If you backup or restore Runtime, or use the DB Config Import/Export utility to
move it to a different computer, you must re-register using the same data source name and then select the
Replace option.

AVEVA™ Historian Administration Guide
Chapter 7 – Managing and Configuring Replication
© 2021 AVEVA Group plc and its subsidiaries. All rights reserved. Page 217
This is an example of the encrypted information you'll see:
9. Click Next. The New Replication Server - Advanced dialog box appears.
You can use the default summary and simple replication tag naming schemes, or you can create your own.
10. In the Summary Replication Tag Naming Scheme and Simple Replication Tag Naming Scheme areas, select
the replication tag naming scheme to use. Specify a custom naming scheme by selecting Custom and clicking
the ellipsis button to the right of the box. The Naming Scheme dialog box appears. For information about
configuring the naming scheme, see Specifying Naming Schemes for Replication on page 219.
11. Configure the remaining advanced settings as follows:

AVEVA™ Historian Administration Guide
Chapter 7 – Managing and Configuring Replication
© 2021 AVEVA Group plc and its subsidiaries. All rights reserved. Page 218
o Min SF Duration
Enter the minimum duration in seconds for the replication service to function in store-and-forward
mode. The replication service functions in store-and-forward mode for this length of time even if the
condition that caused the replication service to function in store-and-forward mode no longer exists.
The duration can be an integer from 0 to 3600. Pick a value that provides a smooth transition for
store-and-forward operation and prevents the system from repeatedly going in and out of
store-and-forward mode.
o Compression Enabled
Select this option to enable compression for the packets sent to the replication server. For guidelines on
using compression, see the performance information in the AVEVA System Platform Installation Guide.
o Buffer Count
Enter the number of 64KB buffers to allocate for the new replication server. This can be an integer from
128 to 2048. You may need to increase the buffer count to accommodate high data rates.
o Bandwidth
– Select Unlimited to allow unlimited bandwidth to be used by the HCAL to communicate with the
historian.
– Otherwise, leave it unselected and enter a value in the Kbps box to specify a custom bandwidth.
This can be an integer from 10 to 1000000.
Setting a limit on the bandwidth throttles the amount of data that is sent during operations such as
a store-and-forward, an update, or a CSV export. You commonly use this feature when you have a
WAN with a low bandwidth. For example, suppose your WAN has a 128kbps bandwidth between
the lower-tier and next-tier historians. If you have real-time streaming data that requires 64kbps for
normal operation but the network is down for 8 hours and information is saved for
store-and-forward, it will take 8 hours for the data to be uploaded. If you leave this set to Unlimited,
it will work fine.
But if you have 256kbps bandwidth that you have to share with other applications, set this to
128kbps to throttle the store-and-forward data and anything that isn’t streaming. This prevents the
historian’s operations from choking the other applications for bandwidth. The most common
symptom of a problem is that when you come out of store-and-forward and start sending data, the
remote desktop is very sluggish and unresponsive. The bandwidth limit also applies to streaming
data. However, streaming data will not be throttled, and instead HCAL will be put into
store-and-forward mode. For example, if the streaming bandwidth is always 96kbps, and you set the
limit at 128kbps, there will be 32kbps remaining for store-and-forward to use. However, if you had a
sudden spike and streaming jumped up to 156kbps, it would exceed the limit and force HCAL into
store-and-forward mode.
o High Latency Network
– Select this option if the connection to the replication server takes place over a high-latency network
(ping response times over 500 milliseconds). This option allows for longer connection timeouts. If
you use this option, we recommend that you also enable compression.
– Leave it unselected if you are not expecting connection timeouts, as this setting can negatively
affect performance on a low-latency network.
12. Click Finish. The new replication server appears in the replication server list.

AVEVA™ Historian Administration Guide
Chapter 7 – Managing and Configuring Replication
© 2021 AVEVA Group plc and its subsidiaries. All rights reserved. Page 219
Specifying Naming Schemes for Replication
A replication naming scheme is a collection, or expression, of identifiers that fully describe a replication tag.
Replication tag naming schemes identify the information being replicated quickly and easily and also prevent
name collisions between tags that inadvertently have identical names. You are encouraged to plan your naming
conventions and system requirements before implementing a naming scheme.
Note: Name collisions can occur when you have two or more tags (usually from different historians) that have
the same name. The data stored from one tag is mixed with data from the other tag, contaminating the data on
the replication server.
The naming scheme placeholders are described in the following table:
Value
Description
<ReplicationDefaultPrefix>
A prefix based on the replication server name.
<SourceTagName>
The name of the source tag on the lower-tier historian that is being
replicated to the next-tier historian.
<TypeAbbreviation>
The type of summary tag: blank for analog summary or S for state
summary. The type abbreviation is most useful for preventing
collisions between analog tags. For an integer source tag, you can
create both analog and state summary tags, which can result in tag
naming collisions if you use only the other naming parameters.
<GroupAbbreviation>
The abbreviation for the replication group.

AVEVA™ Historian Administration Guide
Chapter 7 – Managing and Configuring Replication
© 2021 AVEVA Group plc and its subsidiaries. All rights reserved. Page 220

AVEVA™ Historian Administration Guide
Chapter 7 – Managing and Configuring Replication
© 2021 AVEVA Group plc and its subsidiaries. All rights reserved. Page 221
This diagram illustrates the naming scheme relationships:
New Replication Server
Summary Replication Tag Naming Scheme:
<ReplicationDefaultPrefix>.<SourceTagName>.<TypeAbbreviation><GroupAbbreviation>
Simple Replication Tag Naming Scheme:
<ReplicationDefaultPrefix>.<SourceTagName>
ReplicationDefaultPrefix system
parameter
StateSummaryTypeAbbreviation system parameter
AnalogSummaryTypeAbbreviation system parameter
New Replication Group
Summary Replication Tag Naming Scheme:
<ReplicationDefaultPrefix>.<SourceTagName>.<TypeAbbreviation><GroupAbbreviation>
GroupAbbreviation:
<GroupAbbreviation>
New Replication Schedule
Schedule Abbreviation:
<Schedule Abbreviation>
default value
SummaryReplicationNamingScheme system parameter
SimpleReplicationNamingScheme system parameter
default
scheme
default
scheme
New Replication Tag
Destination Tag Name:
<ReplicationDefaultPrefix>.<SourceTagName>.<TypeAbbreviation>
default
scheme
fixed value
fixed value

AVEVA™ Historian Administration Guide
Chapter 7 – Managing and Configuring Replication
© 2021 AVEVA Group plc and its subsidiaries. All rights reserved. Page 222
When you define a new replication server:
The default scheme for the simple replication tag naming scheme is taken from the
SimpleReplicationNamingScheme system parameter.
The default scheme for the summary replication tag naming scheme is taken from the
SummaryReplicationNamingScheme system parameter.
When you define a new replication schedule, you define a schedule abbreviation.
When you define a new replication group:
The default value for the group abbreviation is taken from the schedule abbreviation for the associated
replication schedule.
The default scheme for the summary replication tag naming scheme is copied from the summary replication
tag naming scheme of the associated replication server.
When you define a new replication tag:
The value for the <ReplicationDefaultPrefix> is taken from the current setting of the ReplicationDefaultPrefix
system parameter.
The value for the <TypeAbbreviation> is taken from the StateSummaryReplicationTypeAbbreviation or
AnalogSummaryReplicationTypeAbbreviation system parameter, depending on the type of replication (the
"folder" within the server). The <TypeAbbreviation> is applicable only for summary replicated tags.
To configure the naming scheme
1. Specify a custom naming scheme in a dialog box by clicking Custom, and then clicking the button to the right
of the box. The Naming Scheme dialog box appears.
2. Enter the naming scheme to use for tagging the replication tags. The parameters you can use and an
example of what the string looks like appear in the Tag Name Example box.
Note: Simple replication tags do not have a type abbreviation and are not assigned to a group. You can
use the <TypeAbbreviation> and <GroupAbbreviation> parameters in a simple replication tag naming
scheme, but they always have empty values.
3. Click Finish.

AVEVA™ Historian Administration Guide
Chapter 7 – Managing and Configuring Replication
© 2021 AVEVA Group plc and its subsidiaries. All rights reserved. Page 223
Multiple lower-tier historians can replicate alarm and events to the same next-tier historian. Replication records
on the next-tier historian include a source name to indicate the originating lower-tier historian. By default, that
is the server name itself, but it can be modified.
To change source name for a lower-tier historian
1. In the SMC, click Configuration Editor, click System Configuration, and then click Parameters.
2. In the list on the right, right-click ReplicationDefaultPrefix and then click Properties.
3. In Value, type a new name. Click OK.
Editing Replication Server Properties
You can edit the properties for a replication server. The general procedure and options are the same as for
adding a replication server.
To edit properties for a replication server
1. In the System Management Console, expand a server group and then expand a server.
2. Expand Configuration Editor, expand System Configuration, expand Replication, then expand Replication
Servers.

AVEVA™ Historian Administration Guide
Chapter 7 – Managing and Configuring Replication
© 2021 AVEVA Group plc and its subsidiaries. All rights reserved. Page 224
3. Right-click the replication server to be edited and then click Properties. The Properties dialog box appears.
4. Edit the general properties. The options are the same as for adding a new replication server. For more
information, see Adding a Replication Server on page 210.
Important: Non-replicated data contains the replication server name as part of the store-and-forward
identification information. Changing the node name/IP address can create orphaned data with no
connection to the replication server.
Also, if you have non-replicated data in the old store-and-forward path, changing the path can create
orphaned data with no connection to the replication server.
If you change the store-and-forward path, you must commit the change to the database before the change
will go into effect.

AVEVA™ Historian Administration Guide
Chapter 7 – Managing and Configuring Replication
© 2021 AVEVA Group plc and its subsidiaries. All rights reserved. Page 225
5. Click the Advanced tab.
6. Edit the advanced properties. The options are the same as for adding a new replication server. For more
information, see Adding a Replication Server on page 210.
When you change a naming scheme, the change is reflected for all subsequent tag entries, but the change
does not affect any existing replication data already on the server.
7. When you are done, click OK.
Deleting a Replication Server
You can delete a replication server using the System Management Console. Deleting the server also
automatically deletes the replication groups associated with the server.
WARNING! Be very certain that you are deleting the right replication server and that you have backed up data
and tag information appropriately.
If you have configured a tag for replication to a server, you must first delete the tag replication before you can
delete the server.
To delete a replication server
1. In the System Management Console, expand a server group and then expand a server.
2. Expand Configuration Editor, expand System Configuration, expand Replication, then expand Replication
Servers.
3. Select the server in the details pane and perform any of the following:
o Click the Delete button on the toolbar.
o On the Action menu, click Delete.
o Right-click the tag and then click Delete.

AVEVA™ Historian Administration Guide
Chapter 7 – Managing and Configuring Replication
© 2021 AVEVA Group plc and its subsidiaries. All rights reserved. Page 226
Configuring Tags to Be Replicated
Simple replication is when the destination tag on the next-tier historian has the same type and storage rules as
the source tag on the lower-tier historian, and that the destination tag will also have the same values/data.
The rules for other kinds of tags also apply to replicated tags:
Each tag is identified by a unique name.
Configuration information for each type of tag is stored in the historian, as well as the history for tags over
time.
You can use the Configuration Editor to view and edit information for existing tag definitions, create
definitions for new tags, or delete existing tags.
For more information about tags and tag naming conventions, see About Tags in the AVEVA Historian Concepts
Guide.
You can create simple replication tags one at a time or in multiples.
If you delete a replication tag, the associated tag entities are deleted. Replication continues until you manually
commit the change to the database or stop and restart the system. If you modify a replication tag, the changes
are automatically committed.
Adding a Single Tag for Simple Replication
You can configure a tag for simple replication. This is particularly useful if you have added or modified a tag, or
are now using a tag as part of summary calculations, and just need to add a simple replication tag for that one
tag.
To add a single simple replication tag
1. In the System Management Console, expand a server group and then expand a server.
2. Expand Configuration Editor, expand System Configuration, expand Replication, expand Replication
Servers, then expand the replication server.
3. Right-click the Simple Replication folder and select Add Single Tag. The New Simple Tag Replication dialog
box appears.

AVEVA™ Historian Administration Guide
Chapter 7 – Managing and Configuring Replication
© 2021 AVEVA Group plc and its subsidiaries. All rights reserved. Page 227
4. In the Replication Server box, select the replication server to create the tag on.
5. In the Source Tag Name box, type the name of the tag that provides the source data for the summary tag.
(For more information on finding a tag, see Finding Source Tags on page 238.)
6. In the Destination Tag Name box, type the name of the simple replication tag.
Note: The Current Editor option is reserved for future use.
7. Click Finish. The simple replicated tag appears in the folder.
Adding Multiple Tags for Simple Replication
When you are setting up a new replication server or incorporating a new set of tags from an application, it is
easier to configure tags for simple replication all at once rather than singly.
To add multiple simple replication tags
1. Start the System Management Console (sometimes labeled "System Platform Management Console"). You'll
find it in the Start menu under AVEVA Utilities or AVEVA, depending on the version.
1. In the the left pane, expand a server group and then expand a server.
2. Expand Configuration Editor, expand System Configuration, expand Replication, expand Replication
Servers, then expand the replication server.
3. Right-click the Simple Replication folder and select Add Multiple Tags. The Add Multiple Tags - Step 1 of 2
dialog box appears.
4. In the Tag Name box, select an option from the drop-down list. Check Not to negate the search option in the
Tag Name box. Type the search string in the box to the right.
5. If you also want to search using a description, select an operator in the Operator box and then make entries
in the Description boxes.
6. Click Find Now to start the search. Results matching the criteria appear in the Found Tags box.
7. Move tags from the Found Tags box to the Target Tags box by double-clicking them or highlighting the tags
and using buttons to the right of the Found Tags box.

AVEVA™ Historian Administration Guide
Chapter 7 – Managing and Configuring Replication
© 2021 AVEVA Group plc and its subsidiaries. All rights reserved. Page 228
8. Click OK. The Add Multiple Tags - Step 2 of 2 dialog box appears.
9. You can modify the destination tagname by editing it directly in the Destination Tag Name column.
10. Click Apply. The system adds the tags. A status indicating the outcome of operation appears for each tag in
the Status field.
If you prefer, you can search for tags using a SQL query. Click the SQL Query tab, then use the same procedure
as for adding a single summary tag using the SQL Query tab. For more information, see Adding a Summary Tag
on page 237.
Editing Simple Replication Tag Properties
You can edit the properties for a simple replication tag. The general procedure is similar to the procedure for
adding a simple replication tag.
To edit properties for a simple replication tag
1. In the System Management Console, expand a server group and then expand a server.
2. Expand Configuration Editor, expand System Configuration, expand Replication, then expand Replication
Servers.
3. Expand the replication server, and then select the Simple Replication folder.

AVEVA™ Historian Administration Guide
Chapter 7 – Managing and Configuring Replication
© 2021 AVEVA Group plc and its subsidiaries. All rights reserved. Page 229
4. Double-click the tag you want to edit properties for. The Properties dialog box appears.
5. In the Replication Server list, click the replication server.
6. In the Source Tag box, type the name of the tag that provides the source data for the tag. For more
information on finding a tag, see Finding Source Tags on page 238.
7. In the Replicated Tag box, type the name of the replicated tag. The naming scheme shown for the replicated
tag appears depends on the system parameter or as specified for the replication server.
Note: The Current Editor option is reserved for future use.
8. Click OK. The tag’s properties are updated.
Deleting a Simple Replication Tag
You can delete a simple replication tag through the System Management Console.
If you delete a replication tag from the lower-tier historian, data will no longer be replicated its corresponding
next-tier historian. However, the replicated data for the deleted tag is not deleted from the next-tier historian
for the simple replicated tag. Also, the replication tag is not deleted from the next-tier historian.
WARNING! Be very certain that you are deleting the right tag.
To delete a simple replication tag
1. In the System Management Console, expand a server group and then expand a server.
2. Expand Configuration Editor, expand System Configuration, expand Replication, expand Replication
Servers, then expand the replication server, expand the Simple Replication folder.
3. Select the tag in the details pane and perform any of the following:
o Click the Delete button on the toolbar.
o On the Action menu, click Delete.

AVEVA™ Historian Administration Guide
Chapter 7 – Managing and Configuring Replication
© 2021 AVEVA Group plc and its subsidiaries. All rights reserved. Page 230
o Right-click the tag and then click Delete.
Adding a Replication Schedule
A replication schedule defines the interval or specific times for summary periods. Replication intervals are
defined by a number of minutes or hours.
The AVEVA Historian sets up several standard replication schedules: 1, 5, 15, and 30 minutes, 1 hour, and 1 day.
You can also add custom replication schedules to fit your own time requirements.
Replication is triggered at the schedule interval calculated from the beginning of the day (local time). For
example, if you specify a 5-hour interval: replication will have summary values at 0:00, 5:00, 10:00, 15:00, 20:00
and again at 1:00. This is only the case for periodic schedules, not custom ones.
If a partial interval has elapsed at midnight, it will automatically trigger whether or not the interval has expired.
All replication intervals cannot be longer than one day (24 hours).
Custom replication schedules are a list of start times (local time) to trigger the summary. These will only trigger
at the specified times and will not necessarily trigger at the end of the day.
You can also define a schedule abbreviation that is used when new replication groups are defined using the
particular schedule. The schedule abbreviation is automatically generated as the interval is modified, but you
can override the default. For example, with a tag named LevelTag1 configured for 7 minute replication using the
schedule abbreviation 7m and being replicated from LocalServer1 to ReplServer2, the abbreviation is included in
the destination tag name: LocalServer1.LevelTag1.7m.
The schedules you set up are expressed in local time and are impacted by Daylight Savings Time changes. For
more information, see Replication Schedules and Daylight Savings Time on page 205 .
To add a replication schedule
1. In the System Management Console, expand a server group and then expand a server.
2. Expand Configuration Editor, expand System Configuration, and then expand Replication.
3. Right-click Replication Schedule and select New Replication Schedule. The New Replication Schedule dialog
box appears.
4. In the Schedule Name box, type the name of the schedule (up to 256 characters).

AVEVA™ Historian Administration Guide
Chapter 7 – Managing and Configuring Replication
© 2021 AVEVA Group plc and its subsidiaries. All rights reserved. Page 231
5. In the Schedule Abbreviation box, type the schedule abbreviation (up to 32 characters). This is used as part
of the default naming scheme.
6. Check Automatically create replication group for each new Replication Server to have the Historian add
this schedule group to the default list of schedule groups whenever you create a replication server. (To add
it to an existing server, you have to manually add the group.)
7. Select Interval and specify a time to set a regular time interval for replication. Alternatively, you can select
Custom Replication Schedules and then enter specific trigger times for the replication schedule. A custom
replication schedule can have up to 100 trigger times.
8. Click Finish. The new replication schedule appears in the replication schedule list.
Editing Replication Schedule Properties
You can edit the properties for a replication schedule. The general procedure is similar to the procedure for
adding a replication schedule.
Replication schedules are referenced by replication groups rather than copied, so changes to a replication
schedule affect all replication groups that reference that schedule. However, changes to the tag naming rules
(such as the schedule abbreviation) do not affect any tags already configured for replication.
You can modify replication schedules when there are existing replication entities referencing the schedules or
groups. When you change the schedule for a summary tag, an extra replication summary is sent at the time of
the configuration change to transition to the new schedule.
If you change an interval replication schedule to a custom replication schedule, there is loss of data on the
next-tier historian for the period from the last interval schedule to the first custom replication scheduled.
To edit properties for a replication schedule
1. In the System Management Console, expand a server group and then expand a server.
2. Expand Configuration Editor, expand System Configuration, expand Replication, then expand Replication
Schedule.

AVEVA™ Historian Administration Guide
Chapter 7 – Managing and Configuring Replication
© 2021 AVEVA Group plc and its subsidiaries. All rights reserved. Page 232
3. Right-click the replication schedule to be modified and then click Properties. The Properties dialog box
appears.
4. Edit the general properties. The options are the same as for adding a new replication schedule. For more
information, see Adding a Replication Schedule on page 230.
5. Click OK.
Deleting a Replication Schedule
You can delete a replication schedule through the System Management Console.
WARNING! Be very certain that you are deleting the right replication schedule.
If you have configured a replication schedule for use in a replication group, you must first remove the replication
schedule from the group before you can delete the schedule.
To delete a replication schedule
1. In the System Management Console, expand a server group and then expand a server.
2. Expand Configuration Editor, expand System Configuration, expand Replication, then expand Replication
Schedules.
3. Select the schedule in the details pane and perform any of the following:
o Click the Delete button on the toolbar.
o On the Action menu, click Delete.
o Right-click the tag and then click Delete.
Adding a Replication Group
When you create a new replication group, you can add it to existing replication group configurations.

AVEVA™ Historian Administration Guide
Chapter 7 – Managing and Configuring Replication
© 2021 AVEVA Group plc and its subsidiaries. All rights reserved. Page 233
You can have an unlimited number of groups.
To add a replication group
1. In the System Management Console, expand a server group and then expand a server.
2. Expand Configuration Editor, expand System Configuration, expand Replication, then expand Replication
Servers.
3. Expand the replication server you want to add the group to, and then right-click the folder you want to
create the replication group in. Select New Replication Group. The New Replication Group dialog box
appears.
4. In the Group Name box, type the name for the new group (up to 255 characters).
5. In the Schedule Name list, select an existing schedule to assign to the group.
6. In the Summary Replication Tag Naming Scheme area, select the replication tag naming scheme to use.
Specify a custom naming scheme by selecting Custom and clicking the ellipsis button to the right of the box.
The Naming Scheme dialog box appears. For information about configuring the naming scheme, see
Specifying Naming Schemes for Replication on page 219.
7. In the Group Abbreviation area, select the default group abbreviation or type a custom group abbreviation.
8. Click Finish. The new replication group appears in the replication server’s group list.
Editing Replication Group Properties
You can edit the properties for a replication group. The general procedure is similar to the procedure for adding
a replication group.
You can modify replication groups when there are existing replication entities referencing the schedules or
groups. When you change the schedule for a summary tag, an extra replication summary is sent at the time of
the configuration change to transition to the new schedule.
To edit properties for a replication group
1. In the System Management Console, expand a server group and then expand a server.
2. Expand Configuration Editor, expand System Configuration, expand Replication, then expand Replication
Servers.

AVEVA™ Historian Administration Guide
Chapter 7 – Managing and Configuring Replication
© 2021 AVEVA Group plc and its subsidiaries. All rights reserved. Page 234
3. Expand the replication server, and then expand the folder the replication group is in.
4. Right-click the replication group to be modified and then click Properties. The Properties dialog box
appears.
5. Edit the general properties. The options are the same as for adding a new replication group. For more
information, see Adding a Replication Group on page 232.
6. Click OK. The replication group’s properties are updated.
Deleting a Replication Group
You can delete a replication group through the System Management Console.
If you have configured replication tags in a replication group, you must first remove the replication tags from the
group before you can delete the replication group.
If the replication group contains replication entities, you cannot delete the replication group.
WARNING! Be very certain that you are deleting the right replication group and that you have backed up data
and tag information appropriately.
To delete a replication group
1. In the System Management Console, expand a server group and then expand a server.
2. Expand Configuration Editor, expand System Configuration, expand Replication, then expand Replication
Servers.
3. Expand the replication server you want to delete the group from.
4. Select the group in the details pane and perform any of the following:
o Click the Delete button on the toolbar.
o On the Action menu, click Delete.
o Right-click the tag and then click Delete.

AVEVA™ Historian Administration Guide
Chapter 7 – Managing and Configuring Replication
© 2021 AVEVA Group plc and its subsidiaries. All rights reserved. Page 235
Creating a Replication Group for Multiple Servers
You can quickly create the same replication group for multiple servers. The replication group is based on a
replication schedule that you select.
To create a replication group for multiple servers
1. In the System Management Console, expand a server group and then expand a server.
2. Expand Configuration Editor, expand System Configuration, and then expand Replication.
3. Select Replication Schedules.
4. In the details pane, right-click the desired schedule and then click Create replication groups. The Create
replication groups dialog box appears.
5. Use the arrow buttons to move one or more replication servers from the Available Replication Servers
window to the Create group for servers window.
6. Click OK.
About Summary Replication
Summary replication takes information from a source tag on a lower-tier historian and summarizes the tag data
to a next-tier historian in one of two types of summary tag:
Analog summary tag
State summary tag
If a lower-tier historian is unable to perform a scheduled summary calculation for any reason, it adds a record
about the event into a replication queue. When there are enough system resources available, or there is a
specific event from another subsystem, the lower-tier historian can perform the summary calculations and clear
the queue.
You can add analog or state summary tags one at a time or in multiples.
State summary replication is not supported for scaled tags.

AVEVA™ Historian Administration Guide
Chapter 7 – Managing and Configuring Replication
© 2021 AVEVA Group plc and its subsidiaries. All rights reserved. Page 236
About Analog Summary Replication
Analog summary replication produces summary statistics for analog tags. The statistics relate only to the
recorded interval. Statistics available are:
Time-weighted average
Standard deviation
Integral
First value in a period with timestamp
Last value in a period with timestamp
Minimum value in a period with timestamp
Maximum value in a period with timestamp
Start time of summary period
End time of summary period
OPC Quality
Percentage of values with Good quality
Value
When you retrieve the data, you specify which calculation you want to return. For more information, see
Querying the AnalogSummaryHistory View in the AVEVA Historian Retrieval Guide.
The functionality provided by analog summary replication is similar to using the minimum, maximum, average,
and integral retrieval modes. For a comparison example, see Querying Aggregate Data in Different Ways in the
AVEVA Historian Retrieval Guide.
When you use the AVEVA Historian SDK to retrieve analog summary tag data, the values returned through the
SDK for analog summary tags from history correspond to the "Last" values in the AnalogSummaryHistory table
when using defaults. Use the corresponding retrieval mode to get the minimum, maximum, average, slope, and
integral values.
About State Summary Replication
State summary replication summarizes the states of a tag value. State summary replication can be applied to
analog (integer only), discrete, and string tags.
You use this for analyzing process variables with a limited number of states, such as a machine’s state of
running/starting/stopping/off. State summary replication provides the following, for each distinct state:
Total time
Percent of the cycle
Shortest time
Longest time
Average time

AVEVA™ Historian Administration Guide
Chapter 7 – Managing and Configuring Replication
© 2021 AVEVA Group plc and its subsidiaries. All rights reserved. Page 237
OPC Quality
Value
A state summary results in a series of values, each representing a different state, for the same tag and time
period.
When you retrieve the data, you specify which calculation you want to return. For more information, see
Querying the StateSummaryHistory View in the AVEVA Historian Retrieval Guide.
The functionality provided by analog summary replication is similar to using the ValueState and RoundTrip
retrieval modes.
You can define state summary replication for a large number of states, but state data is dropped if the number
of states occurring in the same reporting period exceeds the maximum number of states allowed. You configure
the maximum states when you create the state summary tag. The default number of maximum states is 10. The
Replication subsystem will calculate summaries for the first 10 distinct states, in the order in which they occur in
the data (not in numeric or alphabetic order). Be aware that the higher the number of maximum states, the
more system resources are used to keep track of the time-in-state for each distinct state.
Adding a Summary Tag
You can add a single analog or state summary tag. This is particularly useful if you have added or modified a tag
and simply need to add a summary tag for that one tag.
WARNING! If you are replicating from multiple source tags to the same summary tag on a next-tier replication
server, the next-tier logger does not log a message of the naming conflict. As a result, it is possible to have
multiple source tags overwriting each other in the same summary tag. Make sure you have a naming convention
for your destination tags that avoids potential name collisions.
To add a single summary tag
1. In the System Management Console, expand a server group and then expand a server.
2. Expand Configuration Editor, expand System Configuration, expand Replication, then expand Replication
Servers.
3. Expand the replication server, then expand the Analog Summary Replication or State Summary Replication
folder.

AVEVA™ Historian Administration Guide
Chapter 7 – Managing and Configuring Replication
© 2021 AVEVA Group plc and its subsidiaries. All rights reserved. Page 238
4. Right-click the replication group and select Add Single Tag. The New Analog Summary Tag Replication
dialog box or New State Summary Tag Replication dialog box appears.
5. In the Replication Server box, select the replication server to create the tag on.
6. In the Replication Group box, select the replication group to assign the tag to.
7. If you are defining a state summary tag, in the Maximum States box, type the maximum number of states
allowed in the same reporting period. The default number of maximum states is 10. The replication
subsystem will calculate summaries for the first 10 distinct states, in the order in which they occur in the
data (not in numeric or alphabetic order). The higher the number of maximum states, the more system
resources are used to keep track of the time-in-state for each distinct state.
8. In the Source Tag Name box, type the name of the lower-tier tag that provides the source data for the
summary tag. For more information on finding a tag, see Finding Source Tags on page 238.
9. In the Destination Tag Name box, type the name of the new next-tier summary tag. By default, the
destination tag name appears as configured for the SummaryReplicationNamingScheme system parameter
or as configured for the replication server.
Note: The Current Editor option is reserved for future use.
10. Click Finish. The new summary tag appears in the selected replication group.
Finding Source Tags
If you aren’t sure of the exact tag name or need to verify which tag to use, you can search for tags as part of the
process of adding summary tags.

AVEVA™ Historian Administration Guide
Chapter 7 – Managing and Configuring Replication
© 2021 AVEVA Group plc and its subsidiaries. All rights reserved. Page 239
To find a tag to use as the source tag
1. Click the button to the right of the Source Tag Name box. The Tag Finder dialog box appears.
2. In the Tag Name box, select an option from the drop-down list. Check Not to negate the search option in the
Tag Name box. Type the search string in the box to the right.
3. If you also want to search using a description, select an operator in the Operator box and then make entries
in the Description boxes.
4. Click Find Now to start the search. Results matching the criteria appear in the Found Tags box.
5. Double-click a tag in the Found Tags box to move it to the Target Tags box. You can also use the > and <
buttons to move tags between the boxes.
6. Click OK. The selected tag appears in the Source Tag Name box on the Add Analog Summary Tag
Replication dialog box or the Add State Summary Tag Replication dialog box.
If you prefer, you can search for tags using a SQL query.
1. Click the button to the right of the Source Tag Name box. The Tag Finder dialog box appears.

AVEVA™ Historian Administration Guide
Chapter 7 – Managing and Configuring Replication
© 2021 AVEVA Group plc and its subsidiaries. All rights reserved. Page 240
2. Click the SQL Query tab.
3. Type a SQL query in the box and then click Find Now. The qualifying tags appear in the Found Tags box.
If you want an example of how this works for your system, use the preceding procedure to select tags based
on a string and/or description, then look at the SQL Query tab. The search criteria appear in a SQL query. For
example, the following screen shows the results of searching for tags containing the string "KC" and a
description containing the string "level."
4. Select a tag and click OK as described in the previous procedure. The selected tag appears in the Source Tag
Name box on the New Analog Summary Tag Replication dialog box or the New State Summary Tag
Replication dialog box.
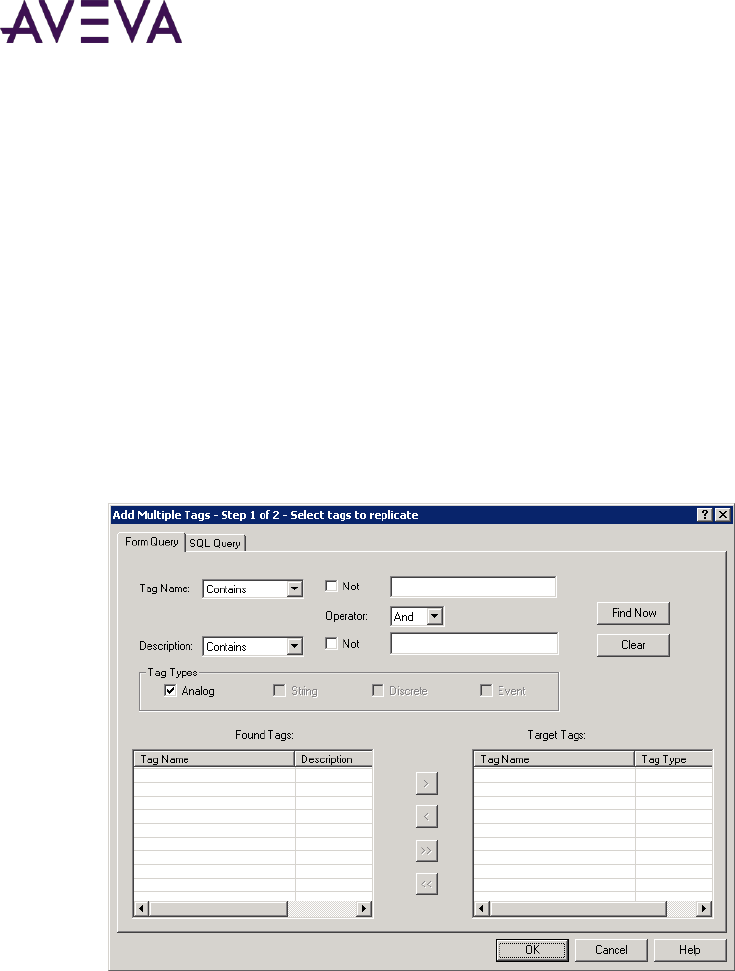
AVEVA™ Historian Administration Guide
Chapter 7 – Managing and Configuring Replication
© 2021 AVEVA Group plc and its subsidiaries. All rights reserved. Page 241
Adding Multiple Summary Tags
When you are setting up a new replication server or incorporating a new set of tags from an application, it is
easier to add summary tags all at once rather than singly.
To add multiple summary tags
1. In the System Management Console, expand a server group and then expand a server.
2. Expand Configuration Editor, expand System Configuration, expand Replication, then expand Replication
Servers.
3. Expand the replication server, then expand the Analog Summary Replication or State Summary Replication
folder.
4. Right-click the replication group you want to add the tag to and select Add Multiple Tags. The Add Multiple
Tags - Step 1 of 2 - Select Tags to Replicate dialog box appears.
5. In the Tag Name box, select an option from the drop-down list. Check Not to negate the search option in the
Tag Name box. Type the search string in the box to the right.
6. If you also want to search using a description, select an operator in the Operator box and then make entries
in the Description boxes.
7. Click Find Now to start the search. Results matching the criteria appear in the Found Tags box.
8. Move tags from the Found Tags box to the Target Tags box by double-clicking them or highlighting the tags
and using the buttons to the right of the Found Tags box.

AVEVA™ Historian Administration Guide
Chapter 7 – Managing and Configuring Replication
© 2021 AVEVA Group plc and its subsidiaries. All rights reserved. Page 242
9. Click OK. The Add Multiple Tags - Step 2 of 2 - Create replicated tags dialog box appears.
10. Check the tag names. You can edit the destination tag names in this dialog box by selecting the specified tag
and clicking the name to modify in the Destination Tag Name column. By default, the destination tag
specified by the system parameter appears in this dialog box. The destination tagname can be modified by
editing it directly in the Destination Tag Name column.
11. Click Apply. The system adds the tags to the specified replication group. A status indicating the outcome of
operation appears for each tag in the Status column.
If you prefer, you can search for tags using a SQL query. Click the SQL Query tab, then use the same procedure
as for adding a single summary tag using the SQL Query tab. For more information, see Adding a Summary Tag
on page 237.
Creating a Summary Tag Quickly Using Default Settings
You can select an existing tag on a lower-tier server and then quickly configure a summary tag.
To create a replication tag
1. In the System Management Console, expand a server group, and then expand a server.
2. Expand Configuration Editor, expand System Configuration, and then expand Tag Configuration.
3. Select the appropriate folder. For example, Analog Tags.

AVEVA™ Historian Administration Guide
Chapter 7 – Managing and Configuring Replication
© 2021 AVEVA Group plc and its subsidiaries. All rights reserved. Page 243
4. In the details pane, right-click the source tag for which you want to create an associated summary tag and
then click Replicate To. The Replicate To dialog box appears.
5. In the Replication Server Name list, click the replication server.
6. In the Replication Type list, click the type of replication, either Analog Summary Replication or State
Summary Replication.
7. In the Replication Group list, click the replication group.
8. In the Destination Tag Name box, type the name of the summary tag. By default the destination name
appears as configured for the replication server.
9. Click OK. The Operation Result dialog box appears, showing the details of the source tag, destination tag,
and the status of the operation.
10. Click Close.
Editing Summary Tag Properties
You can edit the properties for a summary tag. The general procedure is similar to the procedure for adding a
summary tag.
In case of a change that would result in a tag name collision with tags defined on the same lower-tier historian
going to the same next-tier historian, the change is discarded and an error message appears. Collisions with
replication tags configured from other lower-tier historians are overwritten without an error message from the
next-tier historian. Be careful not to create or modify a replicated tag on a lower-tier historian to have the same
tagname that already exists on a next-tier historian. The system does not prevent you from having a replicated
tag on a next-tier historian receiving data from multiple lower-tier historians. However, when you retrieve data
for that replicated tag on the next-tier historian using the tag name, an incorrect blend of data from the two (or
more) data sources is returned. Collisions of non-replication tags on the next-tier historian fail at connection
time and are logged to the ArchestrA Logger.
When you change the replication server node name or replication group, the replication tag is removed from the
old group and added to the new group. Replication tags that are changed to a new replication server or group
do not have their changes logged to the new server or group until changes are committed.

AVEVA™ Historian Administration Guide
Chapter 7 – Managing and Configuring Replication
© 2021 AVEVA Group plc and its subsidiaries. All rights reserved. Page 244
To edit properties for a summary tag
1. In the System Management Console, expand a server group and then expand a server.
2. Expand Configuration Editor, expand System Configuration, expand Replication, then expand Replication
Servers.
3. Expand the replication server, expand the Analog Summary Replication folder or State Summary
Replication folder, and then expand the replication group containing the summary tag.
4. Double-click the summary tag you want to edit properties for. The Properties dialog box appears.
5. In the Replication Server list, click the replication server to edit.
6. In the Replication Group list, click the replication group.
7. In the Source Tag box, type the name of the tag that provides the source data for the summary tag. For
more information on finding a tag, see Finding Source Tags on page 238.
8. In the Replicated Tag box, type the name of the summary tag.
Note: The Current Editor option is reserved for future use.
9. Click OK.
Deleting Replication for a Summary Tag
You can delete replication for a summary tag through the System Management Console.
The data of the summary tag at the next-tier historian is not deleted when you delete a summary tag at the
lower-tier historian. You can query for the summary tag on the next=tier historian for data as long as the
summary tag exists on the next-tier historian.
WARNING! Be very certain that you are deleting the right summary tag.
To delete replication for a summary tag
1. In the System Management Console, expand a server group and then expand a server.

AVEVA™ Historian Administration Guide
Chapter 7 – Managing and Configuring Replication
© 2021 AVEVA Group plc and its subsidiaries. All rights reserved. Page 245
2. Expand Configuration Editor, expand System Configuration, expand Replication, then expand Replication
Servers.
3. Expand the replication server, expand the Analog Summary Replication folder or the State Summary
Replication folder, and then expand the replication group containing the summary tag.
4. Select the tag in the details pane and perform any of the following:
o Click the Delete button on the toolbar.
o On the Action menu, click Delete.
o Right-click the tag and then click Delete.
Viewing Source Details for a Summary Tag
You can view the source details for an analog or state summary tag, such as the source tag, source historian, and
the engineering unit and raw value information of the source tag from a next-tier historian.
To view details for a summary tag from a next-tier historian
1. In the System Management Console on the next-tier historian, expand a server group and then expand a
server.
2. Expand Configuration Editor, expand System Configuration, and then expand Tag Configuration.
3. Click either the Analog Summary Replication folder or the State Summary Replication folder.
4. In the details pane, right-click the summary tag for which you want to view details. The Properties dialog
box appears.
5. Click the General tab. The following properties are shown:
o The TagName box shows the name of the summary tag.
o The Source Server box shows the name of the lower-tier historian from which the source data
originates.

AVEVA™ Historian Administration Guide
Chapter 7 – Managing and Configuring Replication
© 2021 AVEVA Group plc and its subsidiaries. All rights reserved. Page 246
o The Source box shows the name of the tag that provides the source data for the summary tag.
6. If you have selected an analog summary tag, click the Analog tab and view the properties.
o The Engineering Unit box shows the unit of measure. Examples are mph, grams, and pounds.
o The MinEU box shows the minimum value of the tag, measured in engineering units.
o The MaxEU box shows the maximum value of the tag, measured in engineering units.
o The MinRaw box shows the minimum value of the raw acquired value.
o The MaxRaw box shows the maximum value of the raw acquired value.
7. Click OK.
Viewing the List of Associated Replicated Tags for a Tag
You can view the list of all of the replicated tags that are configured/based on a particular source tag from a
lower-tier historian.
To view the list of replicated tags for a source tag
1. In the System Management Console on the lower-tier historian, expand a server group and then expand a
server.
2. Expand Configuration Editor, expand System Configuration, and then expand Tag Configuration.
3. Select the type of tag for which you want to view the summary tags.
4. In the details pane, double-click the tag. The Properties dialog box appears.

AVEVA™ Historian Administration Guide
Chapter 7 – Managing and Configuring Replication
© 2021 AVEVA Group plc and its subsidiaries. All rights reserved. Page 247
5. Click the Replication tab.
A list of all of the simple replicated, analog summary, and state summary tags that use the tag as a source
are shown.
6. Click OK.

© 2021 AVEVA Group plc and its subsidiaries. All rights reserved. Page 248
About Security
The AVEVA Historian uses two security mechanisms:
Windows operating system security
Microsoft SQL Server security
Important: SQL Server authentication is provided for backward compatibility only. For improved security, we
recommend that you use Windows authentication.
Note: During installation, Historian requires that you change the passwords for any default login accounts, such
as wwUser. Use of default passwords (which are often published in various documents) is highly discouraged.
For clients to access the historian, they must pass through both of these security levels. The historian
Management Console (within the System Management Console) in particular adds an additional level of security
checking to restrict access to functions affecting the state of the historian to only authorized users. Also, some of
the historian components require Windows and SQL Server logins.
For more information on configuring user rights assignments for local security policies, see the Microsoft
documentation.
Security for AVEVA Historian is managed using the following tools:
Microsoft SQL Server Management Studio.
Use this application to manage access to the SQL Server and databases.
Windows Local Users & Groups MMC snap-in.
Use this to manage permissions on the historian and for the OData/REST web service interface. You can also
use it as an alternative to configuring permissions within the database when using Windows authentication.
ArchestrA Change Network Account utility.
Use this utility to modify the Windows login for the historian services.
Windows Operating System Security
To log on to AVEVA Historian as a client, the first thing a user must be able to do is to log on to the operating
system on their computer. For the Windows operating system, a valid user account, consisting of a login ID
(username) and password, is required to log on to the computer. This Windows user account can also be used to
gain access to network resources in the domain.
Chapter 8
Managing Security

AVEVA™ Historian Administration Guide
Chapter 8 – Managing Security
© 2021 AVEVA Group plc and its subsidiaries. All rights reserved. Page 249
SQL Server also requires authentication in order for clients to connect to it. You can use either Windows
authentication or SQL Server authentication. For more information, see SQL Server Security on page 249.
Default Windows User Account for AVEVA Historian Services
All of the modules in the AVEVA Historian, except for the Management Console and the Configuration Editor,
run as Windows services, and therefore require a valid Windows user account (the ArchestrA administrative
user account) to ensure proper operation. This ArchestrA user account is specified during installation.
The ArchestrA account must be a member of the local administrators group on the server hosting the historian,
as well as on all computers hosting a remote IDAS.
You can change the ArchestrA user account by using the ArchestrA Change Network Account Utility.
WARNING! Changing the ArchestrA user account affects all ArchestrA components that run as services, not
just historian services. If you change this account, you must restart the computer.
Do not configure historian services (including remote IDASs) to run under a specific user account. All services
should be configured by default to log on to the Windows operating system using the LocalSystem account. The
historian services will impersonate the ArchestrA user account, and this impersonation will fail if the service is
not run using the LocalSystem account.
SQL Server Security
Because the AVEVA Historian works closely with Microsoft SQL Server, it uses and takes advantage of the
security features that Microsoft SQL Server has to offer. The purpose of security for a SQL Server is to control
who can access the server, access specific databases within a server, and perform certain actions within a
database.
Note: During installation, Historian requires that you change the passwords for any default login accounts, such
as wwUser. Use of default passwords (which are often published in various documents) is highly discouraged.
A database user must pass through two stages of security for the historian:
Authentication, which validates the user’s identity to the server itself.
Database authorization, which controls the database(s) that user can access, as well as the types of actions
that the user can perform on objects within the database.
User authentication and database authorization are managed from Microsoft SQL Server Management Studio.
To access information in the AVEVA Historian databases, users need to be granted access to the databases. The
historian is shipped with preconfigured database roles and user accounts to serve as a starting point for your
security model. Database roles, SQL Server login IDs, and user accounts are managed using the Microsoft SQL
Server Management Studio.
Authentication
Microsoft SQL Server authenticates users with individual login account and password combinations. After the
user’s identity is authenticated, if authentication is successful, the user is allowed to connect to a SQL Server
instance. There are two types of authentication:

AVEVA™ Historian Administration Guide
Chapter 8 – Managing Security
© 2021 AVEVA Group plc and its subsidiaries. All rights reserved. Page 250
Windows authentication
Uers must connect to the SQL Server using a Windows user account (a Windows login ID and password that
is provided during the Windows login session).
SQL Server authentication
Users must connect to the SQL Server using SQL Server login account (a SQL Server login ID and password).
SQL Server can operate in one of two security modes, which control the type of accounts that must be used for
access to the server:
Windows authentication mode
The SQL Server only uses Windows authentication.
Mixed mode
The SQL Server uses both Windows authentication and SQL Server authentication. If the login name matches
the Windows network username, then validation is handled by the Windows security mechanisms. If the
user login name does not match the Windows network username, then Microsoft SQL Server security
mechanisms are used.
Important: SQL Server authentication is provided for backward compatibility only. Microsoft recommends that
you use Windows authentication, when possible.
For more information about authentication, see your Microsoft SQL Server documentation.
Default Windows Security Groups
The following Windows security groups are created by default on the AVEVA Historian computer. Use these
groups to assign different levels of database permissions to users.
aaAdministrators
aaPowerUsers
aaUsers
aaReplicationUsers
Each group is automatically configured to be a member of the SQL Server database role with the same name.
For example, the aaAdministrators Windows security group is a member of the default aaAdministrators SQL
Server database role. If you add Windows users to the aaAdministrators security group, they will automatically
be given permissions of the aaAdministrators SQL Server database role.
AVEVA Historian Default Logins
When the AVEVA Historian is installed, default SQL Server logins are created that you can use for logging on to
the historian from client applications. These default logins provide "out of the box" functionality in that you do
not have to create logins to start using the system. The following table describes the pre-configured logins:

AVEVA™ Historian Administration Guide
Chapter 8 – Managing Security
© 2021 AVEVA Group plc and its subsidiaries. All rights reserved. Page 251
Login
Name
Password
Description
aaAdmin
pwAdmin
A user who can access and modify all data and create objects. Cannot drop
the database or truncate tables.
aaPower
pwPower
A user with full read access and the ability to create objects and modify the
contents of the non-core tables.
aaUser
pwUser
A read-only user who can access all data, but cannot modify data or
consume database resources.
aadbo
pwddbo
Database owner. Full permissions.
The default database for each of these logins is the historian Runtime database. This default security model is
provided as a starting point for system security and is suitable for many types of installations.
These logins are valid if the Microsoft SQL Server is set to mixed mode security. If only Windows authentication
is used, you must configure the access rights for each user.
Important: Never use blank passwords for logins.
The following logins are provided for backward compatibility only. They will be deprecated in a future release.
Do not use these logins.
Login Name
Password
Description
wwUser
wwUser
Same as aaUser.
wwPower
wwPower
Same as aaPower.
wwAdmin
wwAdmin
Same as aaAdmin.
wwdbo
pwddbo
Same as aadbo.
Database Authorization
After a user successfully connects to the Microsoft SQL Server, the user needs authority to access databases on
the server. This is accomplished by user accounts for each database. A database user consists of a user name
and a login ID. Each database user must be mapped to an existing login ID.
User names are stored in the sysusers table in each database. When a user tries to access a database, the
Microsoft SQL Server looks for an entry in the sysusers table and then tries to find a match in the syslogins table
in the master database. If the Microsoft SQL Server cannot resolve the username, database access is denied.
The types of actions the user can perform in the database are based on authority information defined in the
user account. The authority to perform a certain action is called a permission. There are two types of
permissions: object permissions and statement permissions.

AVEVA™ Historian Administration Guide
Chapter 8 – Managing Security
© 2021 AVEVA Group plc and its subsidiaries. All rights reserved. Page 252
Permission
Description
Object
Regulates the actions that a user can perform on certain database objects that
already exist in the database. Database objects include things such as tables, indexes,
views, defaults, triggers, rules, and procedures. Object permissions are granted and
revoked by the owner (creator) of the object.
Statement
Controls who can issue particular Transact-SQL statements. Database statements
include commands such as SELECT, INSERT, or DELETE. Statement permissions, also
called command permissions, can only be granted and revoked by the system
administrator or the database owner.
Users can be grouped into roles, which is a single unit against which you can apply permissions. Permissions
granted to, denied to, or revoked from a role also apply to any members of the role.
AVEVA Historian Default Users and Roles
AVEVA Historian is shipped with a number of preconfigured user accounts and roles.
Note: During installation, Historian requires that you change the passwords for any default login accounts, such
as wwUser. Use of default passwords (which are often published in various documents) is highly discouraged.
The following table describes the default SQL Server usernames, the login IDs and database roles to which they
belong, and the actions that they are allowed to perform in the Runtime database. You can add additional users
and roles using SQL Server Enterprise Manager.
Login ID
Username in
Database
Member of Role
Permissions
aaUser
aaUser
aaUsers
SELECT on all tables
INSERT, UPDATE, DELETE on PrivateNameSpace
and Annotation
aaPower
aaPower
aaPowerUsers
CREATE Table
CREATE View
CREATE Stored procedure
CREATE Default
CREATE Rule
SELECT on all tables
INSERT, UPDATE, DELETE on grouping tables

AVEVA™ Historian Administration Guide
Chapter 8 – Managing Security
© 2021 AVEVA Group plc and its subsidiaries. All rights reserved. Page 253
Login ID
Username in
Database
Member of Role
Permissions
aaAdmin
aaAdmin
aaAdministrators
CREATE Table
CREATE View
CREATE Stored procedure
CREATE Default
CREATE Rule
DUMP Database
DUMP Transaction
SELECT, INSERT, UPDATE, DELETE on all tables
aadbo
dbo
db_owner
Full database owner capabilities
The following users and roles are provided for backward compatibility only. They will be deprecated in a future
release. Do not use these users and roles.
Login ID
Username in
Database
Member of Role
Permissions
wwUser
wwUser
wwUsers
Same as for aaUser.
wwPower
wwPower
wwPowerUsers
Same as for aaPower.
wwAdmin
wwAdmin
wwAdministrators
Same as for aaAdmin.
wwdbo
wwdbo
db_owner
Same as for aadbo.
Each default role contains the corresponding SQL Server user account, as well as the corresponding default
Windows security group. For more information on the default Windows security groups, see Default Windows
Security Groups on page 250.
Default SQL Server Login for AVEVA Historian Services
Some components of the AVEVA Historian require a SQL Server login ID to access the master, Runtime, and
Holding databases. By default, the historian uses the ArchestrA user account to log on to the Microsoft SQL
Server, using Windows authentication.
For Microsoft SQL Server, if the Windows user account is an administrative account on the local computer, it will
map the account to the sysadmin fixed server role. (This user will be granted the same permissions as the sa SQL
Server user account.) Because the ArchestrA user account is always a local administrative account, it will always
have administrative permissions (sysadmin) within the SQL Server.

AVEVA™ Historian Administration Guide
Chapter 8 – Managing Security
© 2021 AVEVA Group plc and its subsidiaries. All rights reserved. Page 254
Management Console Security
The AVEVA Historian Management Console (which is part of the overall System Management Console) runs in
the context of the logged on Windows user account. To protect against unauthorized access to the AVEVA
Historian, you must specify a separate Windows user account that the Management Console will use to connect
to the historian. You can specify this account when you set up the server registration properties. For more
information on registration, see About Administrative Tools on page 19.
If the account specified is not a member of the local administrators group on the computer hosting the historian,
the Management Console has "read-only" access. That is, you may view all the information shown in the
Management Console, but you cannot perform any control actions on the historian, such as starting or stopping
the system.
Important: To prevent possible unauthorized access, the password for the Management Console login account
must NOT be blank.
Verifying the Authentication Mode for a SQL Server
The AVEVA Historian is compatible with either Windows authentication mode or mixed mode (Windows
authentication and SQL Server authentication).
Important: SQL Server authentication is provided for backward compatibility only. For improved security, we
recommend that you use Windows authentication.
To verify the authentication mode
1. Start SQL Server Management Studio.
2. In the console tree, right-click the SQL Server.
3. In the shortcut menu that appears, click Properties. The SQL Server Properties dialog box appears.

AVEVA™ Historian Administration Guide
Chapter 8 – Managing Security
© 2021 AVEVA Group plc and its subsidiaries. All rights reserved. Page 255
4. Click the Security tab.
5. Verify the authentication mode.
The SQL Server and Windows option corresponds to mixed mode authentication. If you change the
authentication mode, you must stop and restart the SQL Server. Also, modification tracking in the historian,
if enabled, will not occur until you restart the historian.
The AVEVA Historian services log on to SQL Server using the ArchestrA user account, which is a Windows
account. For information, see Default Windows User Account for AVEVA Historian Services on page 249.
6. Click OK.
Managing Logins
A login account must be added to the Microsoft SQL Server before a user can access a SQL Server. By default,
only members of the sysadmin and securityadmin server roles can add SQL Server logins. Logins are managed
using SQL Server Management Studio.
Note: Creating individual login accounts for each user is not required if Windows authentication mode is used
in SQL Server. You can map Windows user accounts and groups to SQL Server logins using the SQL Server
Management Studio. For more information, see Adding a User to a Role on page 266.
A member of the sysadmin server role can add logins and configure certain login options, such as a username
(login ID), password, a default database, and a default language. If the user is not assigned a username in the
default database, the user's login name is used.

AVEVA™ Historian Administration Guide
Chapter 8 – Managing Security
© 2021 AVEVA Group plc and its subsidiaries. All rights reserved. Page 256
In addition to the default Microsoft SQL Server logins, four more default logins are created during AVEVA
Historian installation: aaAdmin, aadbo, aaPower, and aaUser.
If a large number of users will be connecting to the database with the same set of permissions, creating a single
database role to grant access for all of these users will reduce the work involved in account management. The
individual users can then be added to the database role. For more information, see your Microsoft
documentation.
Four Windows security groups are created when you install the historian:
aaAdministrators
aaPowerUsers
aaReplicationUsers
aaUsers
These groups are mapped to SQL Server database roles of the same name. You can assign different levels of
capability to users by adding the users to the Windows groups.
For more information about default AVEVA Historian logins and Windows security groups, see About Security on
page 248.
If you are a member of the sysadmin server role, you can add, modify, and remove logins, as well as administer
database roles. For detailed information on managing logins, see your Microsoft documentation.
Viewing Login Properties
To view properties for a login:
1. In SQL Server Management Studio, expand the server group and then expand the SQL Server associated with
the AVEVA Historian.
2. Expand Security and then click Logins. The default logins appear in the details pane.
3. Double-click the login for which you want to see the properties. The SQL Server Login Properties dialog box
appears.
For information on configuring login properties, see your Microsoft documentation.
Adding a Login
You can add a login that uses either Windows authentication (recommended) or SQL Server authentication.
To add a login
1. In SQL Server Management Studio, expand the server group and then expand the SQL Server associated with
the AVEVA Historian.
2. Expand Security and then right-click the Logins folder.

AVEVA™ Historian Administration Guide
Chapter 8 – Managing Security
© 2021 AVEVA Group plc and its subsidiaries. All rights reserved. Page 257
3. In the shortcut menu that appears, click New Login. The SQL Server Login Properties dialog box appears.
4. Do the following:
a. In the Name box, type the name of the new login. If you are using Windows authentication, click Search
and browse the network for a Windows user account.
b. In the Authentication group, configure the new login to use Windows authentication or SQL Server
authentication. If you use SQL Server authentication, you must enter a password for the login.
c. In the Database list, select the database that the login will use by default.
d. Select a language from the Language list, or leave as <Default> to use United States English.

AVEVA™ Historian Administration Guide
Chapter 8 – Managing Security
© 2021 AVEVA Group plc and its subsidiaries. All rights reserved. Page 258
5. Click Server Roles.
6. To assign the new login to an existing server role(s), select the appropriate check box in the list. This will
probably not be necessary unless you are defining a power user who will require specific administrative
capabilities on the server.

AVEVA™ Historian Administration Guide
Chapter 8 – Managing Security
© 2021 AVEVA Group plc and its subsidiaries. All rights reserved. Page 259
7. Click the User Mapping tab.
8. The User column contains the username to map to the login ID. The default username is the same as the
login name.
9. Select the databases that can be accessed by the new login. AVEVA Historian users generally require access
to the Runtime and Holding databases. They only need access to the master database if they are to be
granted administrative (or higher) privileges.
When you select a database, available database roles for that database appear in the Database Roles list.
By default, all new logins are a member of the Public database role. You can select an additional or different
role for the login for a particular database.
10. When you have configured the login, click OK.
11. If you created a login with a SQL Server password, you are prompted to confirm the new password. Confirm
the password and then click OK.
Local Times and System Times
The Historian Console is date/time format sensitive, but the historian server is not. However, SQL Server handles
converting string values to dates and vice versa in queries and as a result, is sensitive to the date/time format.
For example, SQL Server bases its interpretation of "12/30/09" as DMY, MDY, or YMD based on the "default date
order" associated with the "Default Language" for the SQL Server login used by the database connection.

AVEVA™ Historian Administration Guide
Chapter 8 – Managing Security
© 2021 AVEVA Group plc and its subsidiaries. All rights reserved. Page 260
Note: You cannot directly set the default date order for a login. You can only set the default language, which
has an associated default date order.
If you are using SQL authentication for your logins or you are using Windows authentication and you have an
explicit SQL login, changing the date format is straightforward using SQL Management Studio.
If you are using Windows authentication with a Windows group login such as BUILTIN/Administrators, it is not
always apparent which group applies to a particular Windows account. If all the logins can use the same date
order/language, change them all to that one.
If you need differing date formats, set the default language for new logins with the langid value in the
syslanguages table (sys.syslanguages in Transact-SQL). The initial default language is based on the language
version of the SQL Server installation. You can use the SET LANGUAGE or SET DATEORDER statements or
sp_addlogin or sp_defaultlanguage in Transact-SQL to override the default language for a particular login for a
session.
Managing Users and Roles using the Configurator
To make managing a large number of database users easier, each username can be assigned to a Microsoft SQL
Server role. All members of a role inherit the permissions that are assigned to that role. For example, if the user
"MaryH" is added to the "aaPowerUsers" role, that user is automatically granted the permissions for that role. If
a role name is not specified, the user is added only to the public role, which includes all users. There are two
types of roles: server roles and database roles.
Using the AVEVA Historian Security configurator, you can manage users and role assignments all at once from a
simple interface.
You can also use SQL Server Management Studio to individually assign Windows users and user groups, as well
as Microsoft SQL Server users and roles, to roles. For more information, see Managing Users and Roles using
SQL Server Management Studio on page 264.
For more information about default AVEVA Historian users and roles, see About Security on page 248.

AVEVA™ Historian Administration Guide
Chapter 8 – Managing Security
© 2021 AVEVA Group plc and its subsidiaries. All rights reserved. Page 261
Viewing All Users and Role Assignments
To view all users and role assignments:
1. Launch the configurator, and select the AVEVA Historian Security node.
2. The Historian Users section lists all active user accounts assigned to Historian roles, with one entry for each
role the user is assigned to.

AVEVA™ Historian Administration Guide
Chapter 8 – Managing Security
© 2021 AVEVA Group plc and its subsidiaries. All rights reserved. Page 262
Adding Users and Assigning Roles
To add a user and assign a role:
1. Launch the configurator, and select the AVEVA Historian Security node.

AVEVA™ Historian Administration Guide
Chapter 8 – Managing Security
© 2021 AVEVA Group plc and its subsidiaries. All rights reserved. Page 263
2. You can assign roles to Windows domain and local user accounts, and the configurator sets up the SQL
Server user and role mappings accordingly. To assign a role to an existing domain or local user account,
select Add Users.... The standard Windows user selection dialog displays.
Select a user account with this dialog, and select OK.
3. The user account is added to the Historian Users section, and assigned the Historian Users role by default.
To assign a different role, click beside the role name, and select another role from the list. To assign
multiple roles to a user account, repeat steps 2 and 3 for each different role.

AVEVA™ Historian Administration Guide
Chapter 8 – Managing Security
© 2021 AVEVA Group plc and its subsidiaries. All rights reserved. Page 264
4. To create a new local Windows user account and assign it a role, select Create User. The create user dialog
displays.
5. Select Local Account, enter a new User Name, select Create new user, and enter the new user's Password.
Select OK when you are finished.
6. The user account is created with the password you specified. It is added to the Historian Users section, and
assigned the Historian Users role by default. To assign a different role, click beside the role name, and
select another role from the list.
7. Repeat the above steps until you have finished adding users and role assignments, and then select
Configure. All of your changes are applied.
Managing Users and Roles using SQL Server Management Studio
To make managing a large number of database users easier, each username can be assigned to a Microsoft SQL
Server role. All members of a role inherit the permissions that are assigned to that role. For example, if the user
"MaryH" is added to the "aaPowerUsers" role, that user is automatically granted the permissions for that role. If
a role name is not specified, the user is added only to the public role, which includes all users. There are two
types of roles: server roles and database roles.
Using SQL Server Management Studio, you can assign Windows users and user groups, as well as Microsoft SQL
Server users and roles, to roles.

AVEVA™ Historian Administration Guide
Chapter 8 – Managing Security
© 2021 AVEVA Group plc and its subsidiaries. All rights reserved. Page 265
You can also use the AVEVA Historian Security configurator to manage users and role assignments all at once
from a simple interface. For more information, see Managing Users and Roles using the Configurator on page
260.
For more information about default AVEVA Historian users and roles, see About Security on page 248.
Viewing All Users and Roles for a Database
To view all users and roles:
1. In SQL Server Management Studio, expand the server group and then expand the SQL Server associated with
the AVEVA Historian.
2. Expand Databases, expand the database for which you want to view all users and roles; for example, the
Runtime database, then expand Security.
3. To view all users, click Users. All users appear in the details pane.
4. To view all roles, click Roles. All roles appear in the details pane.
Adding a New Database User
To add a database user
1. In SQL Server Management Studio, expand the server group, and then expand the SQL Server associated
with the AVEVA Historian.
2. Expand Databases, expand the database to which you want to add the new user, then expand Security.

AVEVA™ Historian Administration Guide
Chapter 8 – Managing Security
© 2021 AVEVA Group plc and its subsidiaries. All rights reserved. Page 266
3. Right-click Users and then click New Database User. The Database User Properties dialog box appears.
4. In the User name box, type the new user name.
5. In the Login name list, select the login ID to associate with the user name. You can also select <new> and
then type a new login ID to be added to the system at the same time as the database user.
6. In the Default schema list, select the default schema for the user. This schema owns all the objects this user
creates, unless a different schema is specified.
7. In the Owned Schemas window, check the owned schemas for this user. (Schemas can only be owned by a
single user.)
8. In the Database role membership window, select the database role to make the user a member of.
Note: All users are also included in the public role. Membership in this role is permanent and cannot be
altered.
9. Click OK.
Adding a User to a Role
To add a user to a role, you must have system administrator permissions.
To add a user to a role:
1. In SQL Server Management Studio, expand the server group and then expand the SQL Server instance
associated with the AVEVA Historian.
2. Expand Databases and then expand the database to which you want to add the user to a role.

AVEVA™ Historian Administration Guide
Chapter 8 – Managing Security
© 2021 AVEVA Group plc and its subsidiaries. All rights reserved. Page 267
3. Click Roles. In the details pane, right-click the role to which you want to add a user and then click Properties.
The Database Role Properties dialog box appears.
4. Click Add. In the dialog box that appears, select the user from the list and then click OK.
5. Click OK.
Managing Permissions
Permissions are the allowed actions that a user can perform in a designated SQL Server database. You can give
object or statement permissions to any user or database role. Users inherit the permissions of any roles to which
they belong.
Setting Object Permissions
Object permissions control the actions that a user can perform on database objects, such as tables, indexes,
views, defaults, triggers, rules, and procedures. You must be the owner (creator) of an object to grant and
revoke permissions. You can grant object permissions by user and role, and by object.
To grant object permissions by object
1. In SQL Server Management Studio, expand the server group and then expand the SQL Server associated with
the AVEVA Historian.
2. Expand Databases and then expand the database to which you want to add the object permission. For
example, expand the Runtime database.

AVEVA™ Historian Administration Guide
Chapter 8 – Managing Security
© 2021 AVEVA Group plc and its subsidiaries. All rights reserved. Page 268
3. Right-click the object and then click Properties. The Properties dialog box appears.
4. Click Permissions. The Permissions dialog box appears.
5. For each user or role, select permissions to grant for the object.
6. Click OK.
To grant object permissions by user or database role
1. In SQL Server Management Studio, expand the server group and then expand the SQL Server associated with
the AVEVA Historian.
2. Expand Databases and then expand the database to which you want to add the object permission. For
example, expand the Runtime database.
3. Click Security.
4. Click either Users or Roles.
5. If you are selecting a role, click Database Roles or Application Roles.
6. Right-click the user or role and then click Properties. The Properties dialog box for the user or role appears.

AVEVA™ Historian Administration Guide
Chapter 8 – Managing Security
© 2021 AVEVA Group plc and its subsidiaries. All rights reserved. Page 269
7. Click Securables. The Securables page appears.
8. Select the object for which you want to grant permissions, and then select the permissions to grant listed in
the Explicit tab.
9. Click OK.
Setting Statement Permissions
Statement permissions control who can issue particular Transact-SQL statements, such as SELECT, INSERT, or
DELETE. You must be a member of the sysadmin or db_owner roles to grant and revoke statement permissions.
Note: CREATE DATABASE permissions can only be set from the master database.
To set statement permissions
1. In SQL Server Management Studio, expand the server group and then expand the SQL Server associated with
the AVEVA Historian.
2. Expand Databases and then right-click the database for which you want to set statement permissions. For
example, right-click the Runtime database.
3. Click Properties. The Database Properties dialog box appears.

AVEVA™ Historian Administration Guide
Chapter 8 – Managing Security
© 2021 AVEVA Group plc and its subsidiaries. All rights reserved. Page 270
4. Click Permissions. The Permissions page appears.
5. Select the user or role to which you want to grant permissions, and then select the permissions to grant.
6. Click OK.
Managing Passwords
Note: During installation, Historian requires that you change the passwords for any default login accounts, such
as wwUser. Use of default passwords (which are often published in various documents) is highly discouraged.
If you are a member of the sysadmin role, you can change the password for any login. If you are not a member
of the sysadmin role, you can modify only your own password.
Important: If you are using mixed mode authentication, it is very important to have a password for the system
administrator (sa) for the Microsoft SQL Server. If any user does not have a password, AVEVA reserves the right
to refuse Technical Support services.
To change a password
1. In SQL Server Management Studio, expand the server group and then expand the SQL Server associated with
the AVEVA Historian.
2. Expand Security and then click Logins.

AVEVA™ Historian Administration Guide
Chapter 8 – Managing Security
© 2021 AVEVA Group plc and its subsidiaries. All rights reserved. Page 271
3. In the details pane, right-click the user for which you want to change the password and then click
Properties. The Login Properties dialog box appears.
4. In the Password box, type the new password and then confirm it.
5. Click OK.
Adding a User to a Windows Operating System Group
When the AVEVA Historian is installed, default Windows security groups are created on the server computer and
are automatically configured to be members of the database roles with the same names.
You must be an administrator to add a user to a group.
If Windows authentication mode is used with SQL Server, you can simply add Windows users to these groups.
For example, you can add an Active Directory group to the aaUsers group and all members will be able to query
the Historian Runtime database; you don't also need to add them to the login/role within SQL Server.
Note: You can also use the configurator to manage this. For more information, see Managing Users and Roles
using the Configurator on page 260.
Access to the oData/REST interface is accomplished using Windows groups, not through SQL Server.

AVEVA™ Historian Administration Guide
Chapter 8 – Managing Security
© 2021 AVEVA Group plc and its subsidiaries. All rights reserved. Page 272
To add a user to a group
1. On the Windows Start menu, point to Programs, point to Administrative Tools, and then click Computer
Management. The Computer Management console appears.
2. Expand System Tools, expand Local Users and Groups, and then click Groups.
3. In the details pane, right-click the name of the historian group to which you want to add a user.

AVEVA™ Historian Administration Guide
Chapter 8 – Managing Security
© 2021 AVEVA Group plc and its subsidiaries. All rights reserved. Page 273
4. In the shortcut menu that appears, click Add to Group. The <Group Name> Properties dialog box appears.
5. Click Add. The Select Users or Groups dialog box appears.
6. Select the users or other groups to add to the historian group.

AVEVA™ Historian Administration Guide
Chapter 8 – Managing Security
© 2021 AVEVA Group plc and its subsidiaries. All rights reserved. Page 274
7. Click Add.
8. Click OK. The <Group Name> Properties dialog box appears, showing the new users or groups in the
Members window.
9. Click OK.

© 2021 AVEVA Group plc and its subsidiaries. All rights reserved. Page 275
Some administrative tasks apply to the entire AVEVA Historian system, such as configuring system parameters or
committing configuration changes. You can also view a system report that includes information such as tag
counts and data acquisition details.
About the Configuration Subsystem
Configuration data is information about elements that make up the AVEVA Historian, such as tag definitions, I/O
Server definitions, and storage locations for historical data files. Configuration data is relatively static and does
not change frequently during normal plant operation. The Configuration subsystem stores and manages
configuration data.
Setting up the required databases and included entities (such as tables, stored procedures, and views) to
support a typical factory environment would take countless hours. However, when you install the historian, all
of these entities are defined for you, allowing you to quickly start using AVEVA Historian.
Configuration data is stored in SQL Server tables in the Runtime database. If you are already using InTouch HMI
software, you can easily import much of this information from existing InTouch applications, thus preserving
your engineering investment. If you are using Application Server, much of the AVEVA Historian configuration is
handled automatically by Application Server. You can also use the System Management Console to manually add
definitions and configure the system. You can make bulk modifications to your historian configuration or
migrate the configuration from one historian to another using the AVEVA Historian Database Export/Import
Utility.
You can reconfigure the system at any time with no interruption in the acquisition, storage, and retrieval of
unaffected tags. Configuration data can be stored with a complete revision history.
Configuration Subsystem Components
The components of the Configuration subsystem are:
Component
Description
Runtime database
SQL Server database that stores all configuration information.
Chapter 9
Viewing or Changing System-Wide
Properties

AVEVA™ Historian Administration Guide
Chapter 9 – Viewing or Changing System-Wide Properties
© 2021 AVEVA Group plc and its subsidiaries. All rights reserved. Page 276
Component
Description
Configuration and
management tools
Consists of the System Management Console client application, the
AVEVA Historian Database Export/Import Utility, and the configuration
tools shipped with Microsoft SQL Server. For more information, see
About Administrative Tools on page 19.
Configuration Service
(aahCfgSvc.exe)
Internal process that handles all status and configuration information
throughout the system. This process runs as a Windows service.
About the Runtime and Holding Databases
A relational database management system (RDBMS) such as Microsoft SQL Server can contain many databases.
A database is a collection of objects such as:
Tables
Stored procedures
Views
User-defined data types
Users and groups
AVEVA Historian includes two preconfigured databases: the Runtime and Holding databases.
The historian embeds a full-featured Microsoft SQL Server. The historian supports all system tables associated
with SQL Server. For more information on the Microsoft SQL Server tables, see your Microsoft documentation.
Note: When installed on a case-sensitive Microsoft SQL Server, the Runtime and Holding databases are
case-sensitive. Be sure that you use the correct case when performing queries.
Runtime Database
The Runtime database is the online database against which the AVEVA Historian runs. The tables within the
Runtime database store all configuration information, such as:
System configuration
Tag definitions
InTouch integration information
System namespaces and grouping information
Classic Event subsystem configuration information
User-entered annotations

AVEVA™ Historian Administration Guide
Chapter 9 – Viewing or Changing System-Wide Properties
© 2021 AVEVA Group plc and its subsidiaries. All rights reserved. Page 277
Runtime database tables are usually used as references or lookup tables by the historian and client applications.
Any changes to the historian are reflected in these configuration tables. The configuration tables exist as normal
SQL Server tables and data within them can be modified by using the Microsoft Transact-SQL query language.
For more information on Transact-SQL, see your Microsoft documentation.
The Runtime database also stores some types of history data:
Modification tracking data
Classic Event subsystem data
Tables that store modification tracking and event data are also normal SQL Server tables.
Finally, the Runtime database is used to logically store historized tag values. Although the tag values are stored
in the history block files on disk, the values appear to be saved to tables in the Runtime database. For more
information on history blocks, see History blocks and partitions. For more information on retrieving historized
tag values, see About Data Retrieval.
Note: You cannot change the name of the Runtime database.
Holding Database
The Holding database temporarily stores topic and configuration data imported into AVEVA Historian from an
InTouch node. When you import configuration data from an InTouch application, the data is first mapped to
table structures in the Holding database. Then, the data is moved into the Runtime database.
Important: Do not modify any entities in the Holding database.
For more information about importing configuration information from an InTouch application, see Importing
and Exporting Tag Configurations on page 102.
About the Configuration Service
The Configuration Service is an internal process that accepts configuration changes and updates the Runtime
database. Thus, the Configuration Service is the only component that interacts with the configuration store.
The Configuration Service runs as a Windows service and accepts and distributes configuration information to
and from different parts of the system by a set of interfaces. The Configuration Service also serves as a gateway
for all information pertaining to the status of the different components of AVEVA Historian.
Dynamic Configuration
AVEVA Historian supports dynamic configuration. That means you can reconfiguration of tags and other objects
in the historian database while the system is running. The historian automatically detects and applies the
modifications to its internal run-time state without requiring the system to be restarted. In addition, clients do
not experience interruptions due to configuration changes.
The dynamic configuration feature in the historian caters for all possible database modifications that affect the
run-time operation of the system. The Configuration subsystem is designed to ensure that no loss of data occurs
for tags that are not affected by the modifications being applied. However, tags that require a change in data
acquisition configuration will obviously lose data during the reconfiguration.

AVEVA™ Historian Administration Guide
Chapter 9 – Viewing or Changing System-Wide Properties
© 2021 AVEVA Group plc and its subsidiaries. All rights reserved. Page 278
In most cases, the system continues to run uninterrupted. In the following cases, a restart of the system is
required:
When you change the main historization path in the system, a parameter that is rarely modified after
installation.
When you modify the DataImportPath system parameter.
For a description of the effect of various types of modifications made while the system is running, see Effects of
Configuration Changes on the System on page 278.
Dynamic configuration is usually a two-step process:
1. Add, modify, or delete one or more objects in the database, using the System Management Console,
Transact-SQL statements, or the database modification tool of your choice.
As soon as you make a change, the Runtime database is updated to reflect the change. For example, when
you add an analog tag using the wizard within the Configuration Editor, the database is updated as soon as
you click Finish.
2. After making all of the modifications, you must commit the changes, which triggers the dynamic
configuration process in the server. Modifications made to the system are done in a transactional fashion.
The database modifications are not reflected in the running system until you commit the changes. You are
committing changes to the system, not to the database.
You can commit changes to the configuration of the system as often as you want. You can also commit changes
in batches or individually. There is no limit on the number of changes that may be committed to the system.
Configuration changes typically take effect within 10 seconds under maximum data throughput conditions.
For information on cases in which a commit is prevented, see Cases in Which Configuration Changes Are Not
Committed on page 279.
Effects of Configuration Changes on the System
Different types of dynamic changes to the database affect the system in different ways.
A summary of typical changes and their effect on the system after a commit is as follows.
Modifying system parameters
A modification to system parameters usually takes effect immediately. If you change the HistoryCacheSize
parameter and commit the change, the cache is not immediately flushed to bring the cache size to less than
or equal to the new value.
Modifying storage locations
Modifying the circular storage location requires a shutdown and restart of AVEVA Historian. Changes to the
other storage locations take effect immediately.
Adding, deleting, and modifying tags
Modifying data acquisition characteristics of a tag could result in a brief period of data loss, for that tag. As a
guideline, any change to the source of data for the tag (for example, modifying the item name, topic name,
or I/O server name of the tag) will result in a short gap in data for the tag, while the system disconnects from
the old data source and connects to the new data source.

AVEVA™ Historian Administration Guide
Chapter 9 – Viewing or Changing System-Wide Properties
© 2021 AVEVA Group plc and its subsidiaries. All rights reserved. Page 279
Adding, deleting, and modifying IDASs
Adding a new IDAS to the system results in a new set of system tags being added (the status and
performance system tags associated with that IDAS).
Modifying an IDAS may result in data loss for the tags serviced by that IDAS (for example, moving an IDAS to
another computer causes a disconnect from the data sources).
Adding, deleting, and modifying I/O Servers and topics
Modifying I/O Server or topic characteristics may result in data loss for their tags, if the modification implies
a disconnect from the data source.
Cases in Which Configuration Changes Are Not Committed
If the system is not running, or storage is stopped, any commit is ignored and the contents of the
ConfigStatusPending table are cleaned up. The exceptions are changes to the following fields in the
SystemParameter table:
HistoryCacheSize
HistoryDaysAlwaysCached
AutoStart
If the system is running, a commit is not allowed if a previous dynamic configuration is still in progress. A
message appears, indicating that the commit is not allowed.
Viewing Properties for System Parameters
To open the Properties dialog box for an item in the details pane, do any of the following:
Double-click the item.
Right-click the item and click Properties.
Select the item and click the Properties button .
Select the item and click Properties on the Action menu.
Editing System Parameters
Note: Not all system parameters are editable.
For a list of system parameters, see System Parameters on page 36.
To edit a system parameter:
1. In the System Management Console, expand a server group, expand the server, and then expand
Configuration Editor.

AVEVA™ Historian Administration Guide
Chapter 9 – Viewing or Changing System-Wide Properties
© 2021 AVEVA Group plc and its subsidiaries. All rights reserved. Page 280
2. Expand System Configuration and then click Parameters. A list of all of the system parameters appears in
the details pane.
3. Double-click the system parameter you want to edit. The Properties dialog box for that parameter displays.
4. In the Value box, type a new value of the system parameter.
5. (Optional) In the Description box, type a new description of the system parameter.
6. Click OK.
Adding a System Parameter
You can create your own named system parameters for the AVEVA Historian by adding rows to the
SystemParameter table using a SQL script.

AVEVA™ Historian Administration Guide
Chapter 9 – Viewing or Changing System-Wide Properties
© 2021 AVEVA Group plc and its subsidiaries. All rights reserved. Page 281
Committing Configuration Changes
After you make a change to the database (for example, add a tag), you must commit the change to the AVEVA
Historian system. All database changes are immediately implemented. However, database modifications are not
applied to the system until you commit them. You are committing the changes to the system, not the database.
The system reconfigures itself with no interruption for unaffected objects in the database.
Changes cannot be committed:
During the first five minutes after starting the historian.
During the creation of a new data block because of a prior change.
For more information, see Dynamic Configuration on page 277 in the AVEVA Historian Concepts Guide.
To commit configuration changes to the system:
1. In the System Management Console, expand a server group and then expand a server.
2. Right-click Configuration Editor (or any sub-items in the console tree) and then click Commit Pending
Changes. The Commit Pending Changes - Confirmation dialog box appears.
3. To view a list of the pending changes, click Display.

AVEVA™ Historian Administration Guide
Chapter 9 – Viewing or Changing System-Wide Properties
© 2021 AVEVA Group plc and its subsidiaries. All rights reserved. Page 282
Column descriptions are as follows:
Object Type
Used to indicate the type of object to which the modifications apply.
Status
Used to indicate the type of modification.
Object Key
The unique identifier of the modified object. If the modified object is a system parameter, the value will be
0. For all other object types, the value is from one of the following tables and columns:
IODriver.IODriverKey; IOServer.IOServerKey; Topic.TopicKey; Tag.wwTagKey; StorageLocation.StorageType;
SnapshotDetail.StorageSize.
Item
The key identifier for the column modified in the table. For example, TagName for the Tag table, Name for
the Topic table, and so on.
4. To commit the outstanding changes, click Commit.
5. An information box appears, showing the status of the reconfiguration.
6. Click OK.
Tracking Modifications
AVEVA Historian tracks modifications (inserts, updates, and deletions) to columns in the Runtime database. If
your plant tracks changes for compliance with regulatory agencies, you can configure the historian to use
modification tracking.
Modification tracking is system-wide; it is controlled by the ModLogTrackingStatus system parameter. You
cannot turn modification tracking on or off at a table level. Enabling modification tracking decreases the
historian's performance when making changes to the system. This is due to the extra work and space required to
track the changes. However, there is no performance degradation during run-time operation.
Information in the modification tracking tables are stored in the data files of the Microsoft SQL Server database.
If modification tracking is turned on, the amount of data that is stored in these files is greatly increased.
All of the objects for which modifications can be tracked are stored in the HistorianSysObjects table.
You can track changes to configuration data. For example, additions or changes to tag, I/O Server, and storage
location definitions. For more information, see About Modification Tracking for Configuration Changes on page
283.
Note: Changes to history data are tracked through an internal stored procedure called
aaInternalHistoryModTrack. It captures the data modification with History view.
The types of changes that will be tracked is controlled by the ModLogTrackingStatus system parameter. You can
track inserts, updates, and deletes, as well as various combinations. For more information, see Turning
Modification Tracking On/Off on page 284.

AVEVA™ Historian Administration Guide
Chapter 9 – Viewing or Changing System-Wide Properties
© 2021 AVEVA Group plc and its subsidiaries. All rights reserved. Page 283
About Modification Tracking for Configuration Changes
For configuration data, when a modification is made to a table in the database, a record for the modification is
inserted into the ModLogTable table. One row will be inserted for each separate type of modification, either an
insert, update, or delete.
The actual value changes are recorded in the ModLogColumn table. Each column that is modified will result in a
row inserted into the ModLogColumn table. The entry in the ModLogColumn table includes both the column
value before the change and the new column value.
For example, if you added (inserted) a single analog tag to the system, the following changes would be reflected
in the modification tracking tables:
Two rows would be added to the ModLogTable table, one to track the change to the Tag table and one to
track the change to the AnalogTag table.
One row for each of the columns in both of the Tag and AnalogTag tables will be added to the
ModLogColumn table.
As another example, if you updated for a single analog tag the StorageType column in the Tag table and the
ValueDeadband and RateDeadband columns in the AnalogTag table, the following changes would be reflected in
the modification tracking tables:
Two rows would be added to the ModLogTable table, one to track the change to the Tag table and one to
track the change to the AnalogTag table.
Three rows would be added to the ModLogColumn table to record the changes to the StorageType,
ValueDeadband, and RateDeadband columns.
Important things to note:
For a tier-2 historian, modification tracking for a replicated tag appears as being made by the system account
that the configuration service is running under, which is typically NT AUTHORITY\SYSTEM. To find out who
modified a tag, examine the ModLogTable of the tier-1 historian.
If modification tracking is enabled and tags are configured in offline mode and modified, only the last known
modifications are recorded in the modification tables.
About Modification Tracking for Historical Data Changes
Modifications to history data can be performed by either executing Transact-SQL statements or by using the CSV
import functionality. In the case of Transact-SQL statements, the AVEVA Historian OLE DB provider provides the
change information to the modification tracking tables by means of a stored procedure. This stored procedure is
also used by the Storage subsystem to communicate changes that are the result of a CSV import.
Although the history data that is changed is physically stored on disk in the history blocks, for the purposes of
modification tracking, the data is considered to reside in the History_OLEDB extension table. For more
information on extension tables, see Extension Tables for History Data.
When a modification is made to history data, a record for the modification is inserted into the ModLogTable
table. One row will be inserted for each separate type of modification, either an insert or an update, for each
tag.

AVEVA™ Historian Administration Guide
Chapter 9 – Viewing or Changing System-Wide Properties
© 2021 AVEVA Group plc and its subsidiaries. All rights reserved. Page 284
The ModLogColumn table is used to store details for the column modification in the History_OLEDB table. The
modified column will always be the vValue column. The total count of consecutive value changes attempted per
tag is stored in the NewValue column of the ModLogColumn table.
The OldValue column contains the value stored in the column before the modification was made, if the
modification was to a configuration table. For modifications to history data using SQL INSERT and UPDATE
statements, this column contains the timestamp of the earliest data affected by the INSERT or UPDATE
operation. If multiple changes are made to the same data, then only the most recent change will be contained in
this column. This column is not used for modifications made to history data using a CSV file.
For example, if you insert 20 data values into history for the ReactTemp analog tag using a CSV import, the
following changes would be reflected in the modification tracking tables:
One row would be added to the ModLogTable table, to track the change to the History_OLEDB table. The
UserName column will contain the name of the user as contained in the CSV file header.
One row would be added to the ModLogColumn table to record that the value change occurred. A value of
20 will be stored in the NewValue column to indicate that 20 values were inserted.
Turning Modification Tracking On/Off
Use the ModLogTrackingStatus system parameter to configure modification tracking. The following table
describes the allowable values:
Value
Type of Modification(s) Tracked
1
inserts
2
updates
3
inserts + updates
4
deletions
5
inserts + deletions
6
updates + deletions
7
inserts + updates + deletions
For information on editing system parameters, see Editing System Parameters on page 279.
For more information on modification tracking, see Tracking Modifications on page 282.
Viewing Database Modifications
For more information on modification tracking, see Tracking Modifications on page 282.
You can search for all database modifications or apply filtering to return modifications for only those tables and
columns you specify.
Note: To view database modifications, you must enable modification tracking. For more information, see
Turning Modification Tracking On/Off on page 284.

AVEVA™ Historian Administration Guide
Chapter 9 – Viewing or Changing System-Wide Properties
© 2021 AVEVA Group plc and its subsidiaries. All rights reserved. Page 285
To view a current list of modifications:
1. In the System Management Console, expand a server group, and then expand a server.
2. Right-click Configuration Editor (or any sub-items in the console tree) and then click Track Modifications.
The Modification Tracker - Selection dialog box appears.
3. In the Modification Date area, configure the time span for the search.
All Modification Dates
Returns all changes to table columns made since modification tracking was first enabled.
Between
Returns all modifications between the start date and end date that you specify. Click the date arrow to
access a calendar in which you can pick the date.
During the Previous
Returns all modifications for a recent time period. Durations can be in minutes, hours, days, weeks, or
months.
4. In the Modification Type area, select the types of modifications to search for.
5. In the Object Type area, set the type of modifications to search for.
Table Name
Returns modifications for all tables in the database or for a specified table. Only tables that currently have
modifications appear in the list.
Column Name
Returns modifications for a specified column in the selected table. This option is only available if you select
to filter on a single table.
Object Key
The key identifier for the column modified in the table. For example, TagName for the Tag table, Name for
the Topic table, and so on.

AVEVA™ Historian Administration Guide
Chapter 9 – Viewing or Changing System-Wide Properties
© 2021 AVEVA Group plc and its subsidiaries. All rights reserved. Page 286
6. To reset the dialog box options back to the defaults, click Clear.
7. Click Search to search for database modifications according to the filter options you select. A list of all
matching modifications appears.
Column descriptions are as follows:
Date and Time
The timestamp of when the modification occurred.
Table
The name of the modified object.
Column
The name of the modified column.
Modification Type
The type of modification.
Row Key
The key identifier for the column modified in the table. For example, TagName for the Tag table, Name for
the Topic table, and so on.
New Value
The new value stored in the column, if the modification was to a configuration table. For modifications to
history data, this column contains the total count of consecutive value updates attempted.
Old Value
The value stored in the column before the modification was made, if the modification was to a configuration
table. For modifications to history data using SQL INSERT and UPDATE statements, this column contains the
timestamp of the earliest data affected by the INSERT or UPDATE operation. If multiple changes are made to
the same data, then only the most recent change will be contained in this column. This column is not used
for modifications made to history data using a CSV file.
User
The name of the database user that made the modification. The value of this column reflects the Windows
authentication user name (for example, DOMAIN\user_login_name) or the SQL Server authentication user
name (for example, dbo), depending on how the user is logged into the SQL Server when the modification is
made. In the case of a CSV file import, this column contains the user name as it appears in the CSV file.
8. To sort on a column, click the column name at the top of the window.
9. Click Cancel to close the dialog box.

AVEVA™ Historian Administration Guide
Chapter 9 – Viewing or Changing System-Wide Properties
© 2021 AVEVA Group plc and its subsidiaries. All rights reserved. Page 287
Viewing the Runtime Database Report
The Runtime database report includes information such as:
System parameters
Total number of licensed tags
Number of cyclically-stored tags for each storage rate
Number of analog tags for each storage type (delta, cyclic, or "forced")
Acquisition subsystem details
Event tag definitions
Summary information
To view the database report:
1. In the System Management Console, expand a server group, and then expand a server.
2. Click Configuration Editor. The report appears in the details pane.
3. Click a major heading in the report to view a list of objects for that category.
4. To select, copy, or print the information, right-click in the window and then click the appropriate command
from the shortcut menu.
Using a Redundant Historian
You can configure the AVEVA Historian to have a "partner" AVEVA Historian that can be used as a hot backup if
the primary historian is not available. This is called a "redundant historian" setup.
If AVEVA Application Server is configured to send data to the AVEVA Historian, the AppEngine automatically
sends data to both the primary historian and the specified partner. If one of the historians goes offline, the
AppEngine stores the historized data until the historian comes back online. After the connection is restored, the
AppEngine forwards the data to the historian that was offline.

AVEVA™ Historian Administration Guide
Chapter 9 – Viewing or Changing System-Wide Properties
© 2021 AVEVA Group plc and its subsidiaries. All rights reserved. Page 288
The Historian Client automatically detects and selects the online Historian from the redundant pair.
The historians in a redundant setup are not intended to be a synchronized pair, where both the historian
configuration and data are fully and automatically synchronized. It is up to you to make sure that the two
historians are symmetrical and synchronized. The following recommendations are examples of actions you
should take to keep the pair synchronized, or else incoming data is not stored as previously described.
If you make configuration changes for one historian, be sure to perform the same actions on the partner.
If you import a CSV file on one historian, you will need to repeat the import on the partner.
If you add or update data to one Historian using SQL or the Historian SDK, you will need to repeat the action
on the partner.
To specify a historian partner:
1. In the System Management Console, expand Historian Group, expand the server, and then expand
Configuration Editor.
2. Expand System Configuration and then click Parameters. A list of all system parameters displays in the
details pane.
3. Double-click the Historian Partner system parameter. The System Parameter Properties dialog box appears.
4. In the Value box, type the computer name of the partner historian. You can use either the host name, fully
qualified name, or an IP address. Leading backslashes are optional.
Note: In network environments where AppEngine and Historian Client computers on different subnets must
access the partner, be careful to use a name or IP address that can be correctly resolved from all of those
network locations and not just between the historian servers themselves.
5. Click OK.
Changing the Default Network Protocol
AVEVA Historian client/server connections are set in the same way as Microsoft SQL Server connections. No
additional configuration is required to run client applications against the AVEVA Historian if you are using the
default named pipes protocol.
However, you can change the client configuration parameters by using the SQL Server Client Network Utility.
The historian supports clients using Net-Libraries for named pipes, IPX/SPX, TCP/IP sockets, and any other
protocol supported by Microsoft SQL Server.
For more information changing the network protocol used by clients, see the documentation for the Microsoft
SQL Server Client Network Utility.
Configuring a Custom TCP Port
AVEVA Historian uses default TCP port 32568 for communication.
The "sending" application (for example, Application Server for data collection or a tier-1 server for
replication) needs to allow outbound connections on the configured port.

AVEVA™ Historian Administration Guide
Chapter 9 – Viewing or Changing System-Wide Properties
© 2021 AVEVA Group plc and its subsidiaries. All rights reserved. Page 289
The "receiving" Historian (for example, the historian server for data collection or the tier-2 server for
replication) needs to allow inbound connections on the configured port.
No inbound connections need to be allowed into the "sending" application for this communications channel,
but it may be needed by other components (for example, if the "sending" node is also receiving SuiteLink
data, SuiteLink requires port 5413 to be opened).
These requirements apply to the Windows Firewall and any hardware firewall sitting between the systems.
You can configure a custom port for data historization from AVEVA Application Server and for replication.
WARNING! If the historian is running and receiving data, clients using the port, such as AppEngines or
replication, will be disconnected and go into store-and-forward mode. Make sure all clients have
store-and-forward configured or data loss will occur.
To configure a custom port for Application Server:
1. Change the ReplicationTcpPort system parameter on the historian. Do the following:
a. Start the System Management Console (SMC).
b. Make sure that the historian is not shut down and disabled. If it is, right-click Management Console,
point to All Tasks, and then click Enable (allow to run) Historian.
c. Change the ReplicationTcpPort system parameter default value to the custom port number. For more
information on editing system parameters, see Editing System Parameters on page 279.
A message appears stating that you must manually update the firewall settings.
d. Commit the configuration change. For more information on committing changes, see Committing
Configuration Changes on page 281.
The configuration service detects the change and restarts the Historian Client Access Point (HCAP) to
allow it to use the custom port.
e. To confirm the change, open the ArchestrA Logger to see a message from aahClientAccessPoint such as
"Client access point (Opening Historian listening port nnnnnn)…" where nnnnnn is the custom port
number you just configured.
2. Update the firewall settings on the Historian computer and update router/switch settings to allow
communication through the custom port.
3. Change the TCP port on the Application Server. Do the following:
a. Undeploy the Galaxy.
b. Open the object editor for either the WinPlatform or the AppEngine.
c. In the History area of the configuration options, expand Advanced settings and change the TCP port
option value to the custom port number.
d. Save the configuration.
e. Repeat steps b through d for all AppEngines.
f. Redeploy the Galaxy.
Application Server now sends data to the historian through the custom port.

AVEVA™ Historian Administration Guide
Chapter 9 – Viewing or Changing System-Wide Properties
© 2021 AVEVA Group plc and its subsidiaries. All rights reserved. Page 290
To configure a custom port for replication:
1. Change the ReplicationTcpPort system parameter to the custom port value on the tier-2 historian.
2. Update the firewall settings on the tier-2 historian computer and update router/switch settings to allow
communication through the custom port.
3. Change the replication server TCP port setting to the custom port value on the tier-1 historian. For more
information on editing replication server properties, see Editing Replication Server Properties on page 223.
4. Commit the configuration change. For more information on committing changes, see Committing
Configuration Changes on page 281.
The tier-1 historian now replicates data to the tier-2 historian through the custom port.
Historian Client Web Customization
The following section outlines some additional tasks you can perform to customize your AVEVA Historian Client
Web installation.
White Labeling
You can customize AVEVA Historian to change the look and feel of certain interface elements on the main page
to match your company standards.
Configuring Customizable White Label Settings
UI customization is controlled by the presence of a "BrandingInfo.json" file. The file's location is the
Configuration subfolder, located in the folder identified by the Data Path setting in the Historian Server
configurator.

AVEVA™ Historian Administration Guide
Chapter 9 – Viewing or Changing System-Wide Properties
© 2021 AVEVA Group plc and its subsidiaries. All rights reserved. Page 291
To configure customized white label settings:
1. Launch the configurator, and select the Historian Server node. Note the location specified by the Data Path
setting.
2. Locate the folder named Configuration inside the folder identified by the Data Path setting. For example,
if the Data Path is C:\Historian, then use the folder C:\Historian\Configuration.
3. Create a text file in the Configuration folder, named BrandingInfo.json. Copy the following text into the
file to use as a template:
{
"HeaderBackgroundColor": "#0F76C7",
"HeaderForegroundColor": "#F4F4F4",
"SiteTitle": "AVEVA Historian Client Web",
"CompanyLogo": "/Images/AVEVA_Blue.svg",
"CompanyLogo_Link": "https://www.aveva.com/",
"InsightLogo": "/Images/wwo-logo-home.png",
"Copyright": "Copyright © 2020 AVEVA Group plc and its subsidiaries.<br>All rights
reserved."
}
4. Update the provided sample values with your own values as required:
o HeaderBackgroundColor - This is the background color of the page header
o HeaderForegroundColor - This is the text color of the page header
o SiteTitle - This is the site title displayed in the page header

AVEVA™ Historian Administration Guide
Chapter 9 – Viewing or Changing System-Wide Properties
© 2021 AVEVA Group plc and its subsidiaries. All rights reserved. Page 292
o CompanyLogo - This is the path to the company logo
o CompanyLogo_Link - This is the URL that is loaded when the company logo is clicked
o InsightLogo - This is the path to the Insight logo displayed in the middle of the home/main page
o Copyright - This is the copyright information that is displayed.
Notes: A color value can be specified either as a name (ie. blue, red), or as a hexadecimal color code (ie.
#0012FF, #E83311).
The image files used for logos can be in either SVG or PNG file formats. Other file formats are incompatible.
The paths specified for logo files are relative to the hosting directory path for Insight. The default path is
C:\Program Files (x86)\Wonderware\HistorianInsight\Server\wwwroot. For example, if the value for
CompanyLogo is set to /Images/logo.png, then the image file should be located in C:\Program Files
(x86)\Wonderware\HistorianInsight\Server\wwwroot\Images\logo.png.
5. Save the file, and restart the AVEVA Historian Web Client service.
6. After the service has restarted, refresh the AVEVA Historian Web Client home page to see your custom
values applied.
CORS Whitelisting
CORS origin configuration is a form of whitelisting mechanism for the back-end API to determine the origin of
the web applications that are allowed to request resources from a different domain. This must be configured
with the identity of the front-end web application so that the front-end application is allowed to access the API,
and no other applications are allowed access.
Configuring the CORS Whitelist
The CORS whitelist is controlled by the presence of a "CorsSetting.json" file. The file's location is the
Configuration subfolder, located in the folder identified by the Data Path setting in the Historian Server
configurator.

AVEVA™ Historian Administration Guide
Chapter 9 – Viewing or Changing System-Wide Properties
© 2021 AVEVA Group plc and its subsidiaries. All rights reserved. Page 293
To configure CORS whitelist settings:
1. Launch the configurator, and select the Historian Server node. Note the location specified by the Data Path
setting.
2. Locate the folder named Configuration inside the folder identified by the Data Path setting. For example,
if the Data Path is C:\Historian, then use the folder C:\Historian\Configuration.
3. Create a text file in the Configuration folder, named CorsSetting.json. Copy the following text into the
file to use as a template:
{
"Origin": ""
}
4. Within the second set of quotation marks, enter a comma-separated list of all the CORS origins granted
access to the API, including scheme and port.
For example, the following sample would grant API access to requests from server1.company.com on port
8080, and server.company2.com on port 80:
{
"Origin": "http://server1.company.com:8080,http://server.company2.com:80"
}
5. Save the file, then restart the AVEVA Historian Web Client and AVEVA Historian Gateway services.
Export Data to Excel Online
The version of Excel that you use must be version 2002 (Build 12527.20470) or later for complete functionality.

AVEVA™ Historian Administration Guide
Chapter 9 – Viewing or Changing System-Wide Properties
© 2021 AVEVA Group plc and its subsidiaries. All rights reserved. Page 294
This add-in relies on the Microsoft Excel API version 1.11 for complete functionality. Partial functionality is
available with the Microsoft Excel API version 1.9. Please refer to the following document from Microsoft for a
list of supported Excel versions by API level:
https://docs.microsoft.com/en-us/office/dev/add-ins/reference/requirement-sets/excel-api-requirement-sets.
To determine your Excel version:
1. Open an existing workbook in Excel, or create a new one.
2. Select the File menu.
3. Select Account.
4. Locate the About Excel section on the screen to view the version information:
Minimum Supported Versions of Microsoft Excel
The following table summarizes the minimum supported version of Excel for specific add-in functionality:
Excel Version
Excel Build
Excel API Version
Add-in Functionality
1903
11425.20204
1.9
Custom Functions - The ability to use custom functions
is enabled, but the output range must be refreshed
manually to update the data.
2002
12527.20470
1.11
Dynamic Array Formulas - Custom functions can be
used, and the output range is updated automatically
when the function parameters change.
2008
13127.20408
1.12
Date/Time Formatting - Date/time format defaults to
the format defined by the system's regional settings.
Registering and Installing the Excel Add-In
You must register and install the Excel add-in before you can use it with AVEVA Historian Client Web.
To register and install the Excel add-in:
1. Open a blank workbook in Excel.

AVEVA™ Historian Administration Guide
Chapter 9 – Viewing or Changing System-Wide Properties
© 2021 AVEVA Group plc and its subsidiaries. All rights reserved. Page 295
2. Select the File menu, then select Options. The Excel Options dialog displays.
3. Select Trust Center, and then click Trust Center Settings. The Trust Center dialog displays.
4. Select Trusted Add-in Catalogs.
5. In the Catalog Url field, enter the UNC path for the shared location created on the Historian server. The UNC
path should use this format:
\\your_server_name\InsightAddIn
6. Click Add catalog. A new line appears in the table.

AVEVA™ Historian Administration Guide
Chapter 9 – Viewing or Changing System-Wide Properties
© 2021 AVEVA Group plc and its subsidiaries. All rights reserved. Page 296
7. Select the new line, then select the Show in Menu option.
8. Click OK, then restart Excel to apply the changes.
Applying the Add-In to a Workbook
To apply the add-in to a workbook:
1. Open a workbook in Excel.
2. Select the Insert menu, then click My Add-ins. The Office Add-ins dialog displays.
3. Select Shared Folder, then select the AVEVA Historian add-in.
4. Click OK.
5. The AVEVA Historian add-in appears in the menu bar.
Note: If your version of Excel is not supported by the add-in, an error message displays in the side panel.

AVEVA™ Historian Administration Guide
Chapter 9 – Viewing or Changing System-Wide Properties
© 2021 AVEVA Group plc and its subsidiaries. All rights reserved. Page 297

© 2021 AVEVA Group plc and its subsidiaries. All rights reserved. Page 298
Performance of the AVEVA Historian can be considered in two conceptual contexts; as processes running within
the Windows operating system, and as software modules acquiring and storing data.
Monitoring the General Status of AVEVA Historian
To monitor the status:
1. In the console tree, expand a server group and then expand a server.
2. Expand Management Console and then click Status. The overall status information appears in the details
pane.
o A snapshot of the current system status. For more information, see Viewing the Current System Status
on page 299.
o The status of different components of the system. For more information, see Viewing the Status of
System Modules on page 301.
o A log of status messages. For more information, see Viewing System Status Messages on page 302.
Note: The information in the details pane is refreshed according to the rate specified in the registration
properties for the server. For more information, see Registering AVEVA Historian Servers on page 15.
Chapter 10
Monitoring the System

AVEVA™ Historian Administration Guide
Chapter 10 – Monitoring the System
© 2021 AVEVA Group plc and its subsidiaries. All rights reserved. Page 299
Viewing the Current System Status
The system status window of the details pane shows the current values for key system tags.
Many of the items in the display are self-explanatory. All timestamps reflect the time of the AVEVA Historian
computer, which may be different than the System Management Console running on a remote computer.
However, all timestamps are formatted according to the Windows regional settings for the local computer.
Descriptions for some of the items are as follows:
Time of last reconfiguration
The time that the last reconfiguration of the system was committed. For more information, see Dynamic
Configuration on page 277.
System status
The current status of the system.The icon for the corresponding server in the console tree shows the current
state.
Icon
State
Connecting
Unchecked
Starting
Running
Stopping
Stopped

AVEVA™ Historian Administration Guide
Chapter 10 – Monitoring the System
© 2021 AVEVA Group plc and its subsidiaries. All rights reserved. Page 300
Icon
State
Disconnected
License status
The status of license validation. For more information on licensing, see the AVEVA System Platform Installation
Guide.
Total number of tags in database
The total number of all tags in the database.
Number of licensed tags in database
The total number of tags for which the historian will retrieve data. If the historian is unlicensed, the tag count
shows the number of system tags.
Licensed tag count
The total number of tags you can configure for data retrieval in AVEVA Historian.
Total number of data values received
The number of tag values received since the System Management Console was started up. This value is
continuously updated as long as the system is running.
Overall data rate
Average rate (per second) at which data values are acquired by the system.
Fatal errors, critical errors, errors and warnings
The number of errors detected since the AVEVA Historian was restarted or since an error reset was performed.
For more information on errors, see System Messages on page 40.
Time of last error reset
The time that the error count was reset back to 0. For more information, see Resetting Error Counts on page
300.
Space available on XXX path
The total amount of space for historical data storage in the storage location. For more information about
storage locations, see Storage Partition Locations on page 173.
System version
The current version of the AVEVA Historian.
Resetting Error Counts
Error counts are automatically set to zero at system startup and shutdown. You can also set the error counts
back to zero at any time.
To reset error counts:
1. In the console tree, expand a server group and then expand a server.

AVEVA™ Historian Administration Guide
Chapter 10 – Monitoring the System
© 2021 AVEVA Group plc and its subsidiaries. All rights reserved. Page 301
2. Right-click Management Console, point to All Tasks, and then click Reset Error Counts. The Reset AVEVA
Historian Error Counts confirmation box appears.
3. Click OK. The number of errors shown in the system status window resets to 0.
Viewing the Status of System Modules
The module status window of the details pane indicates whether or not the module is started.
See the following table to find out more about each of these modules.
Module
For more information, see
Storage, Indexing, Metadata server, Event
storage
Managing Data Storage on page 157
Classic data redirector
Classic Storage Subsystem in the AVEVA Historian
Supplemental Reference
Replication
Managing and Configuring Replication on page 204
Classic Event system
Classic Events Subsystem in the AVEVA Historian
Supplemental Reference
Retrieval, OLE DB provider, Historian I/O
Server
AVEVA Historian Retrieval Guide
System driver
About System Driver and System Tags on page 43

AVEVA™ Historian Administration Guide
Chapter 10 – Monitoring the System
© 2021 AVEVA Group plc and its subsidiaries. All rights reserved. Page 302
Module
For more information, see
Data acquisition, Client access point, Data
import
Data Acquisition Subsystem
Viewing System Status Messages
Status messages are shown in the bottom window of the details pane. These messages are also written to the
ArchestrA Log Viewer (not all messages written to the Log Viewer are shown here). For more information on the
Log Viewer, see Monitoring System Messages on page 305.
Viewing Status Information
Using the Management Console, you can monitor five main areas of the system: general system status, data
acquisition, client connections, history blocks, and legacy error messages. These items appear in the console
tree.
If you click Status, the details pane shows the overall status for the AVEVA Historian, such as whether the
server is running, the number of system errors, and the time since the last startup.
If you click Data Acquisition, the details pane shows each data source (IOServer\topic or other client) that is
supplying the historian with data.
If you click Replication, the details pane shows a list of servers to which this Historian is replicating data. On
the server actually receiving the data, there will be a corresponding entry under its Data Acquisition node.
For more information on tag replication, see Managing and Configuring Replication on page 204.
If you click Clients, the details pane shows the status of all clients that are currently connected to the
historian.

AVEVA™ Historian Administration Guide
Chapter 10 – Monitoring the System
© 2021 AVEVA Group plc and its subsidiaries. All rights reserved. Page 303
If you click History Blocks, the details pane shows a list of all of the history blocks stored on the historian
computer.
For more information on administering history blocks, see Managing Partitions and History Blocks on page
173.
For more information on monitoring the general status, data acquisition, client connections, and the system
message log, see Monitoring the System on page 298.
If you have multiple historian servers registered in the console, make sure that you select the server you want to
manage before you right-click in the tree to select a short-cut menu command.
Monitoring Data Acquisition
You can monitor the status of data acquisition from all configured data sources. You can monitor how
individual data sources are performing compared to past history or to another data source.
For more information on data acquisition, see Configuring Data Acquisition on page 130.
To view data acquisition status
1. In the console tree, expand a server group and then expand a server.
2. Expand Management Console and then click Data Acquisition. Data acquisition information appears in the
details pane.
Tier-1 historian sources appear in this pane when you view the data acquisition for a tier-2 historian.
Note: The information in the details pane is refreshed according to the rate specified in the registration
properties for the server. For more information, see Registering AVEVA Historian Servers on page 15.
Column descriptions are as follows:
Computer
The name of the computer on which the data source runs.
Topic
The name of the topic.
Protocol
The protocol used by the AVEVA Historian to communicate with the data source.
Tags
The total number of tags associated with the data source.
Status

AVEVA™ Historian Administration Guide
Chapter 10 – Monitoring the System
© 2021 AVEVA Group plc and its subsidiaries. All rights reserved. Page 304
The status of data acquisition from the data source.
Values
The total number of tag values received from the data source.
Rate
Average number of data values received from the topic per second.
Connections
Number of connections to the I/O Server for the topic. This number is incremented.
Monitoring Replications
You can monitor the status of replications, including how well data is being replicated on the servers.
For more information on replication, see the Managing and Configuring Replication on page 204.
To view replication status
1. In the console tree, expand a server group and then expand a server.
2. Expand Management Console and then click Replication. Replication information appears in the details
pane.
Note: The information in the details pane is refreshed according to the rate specified in the registration
properties for the server. For more information, see Registering AVEVA Historian Servers on page 15.
Column descriptions are as follows:
Replication Server
The name of the replication server.
Status
The status of replication to the replication server.
Total Tags
The total number of tags being replicated to the replication server.
Values/Sec
The average number of data values replicated per second.
Sync Queue Values/Sec
The average number of synchronization queue values replicated per second.
Total Values
The total number of values being replicated.

AVEVA™ Historian Administration Guide
Chapter 10 – Monitoring the System
© 2021 AVEVA Group plc and its subsidiaries. All rights reserved. Page 305
Monitoring Client Connections
To view the client connection status
1. In the console tree, expand a server group and then expand a server.
2. Expand Management Console and then click Clients. The client connection information will appear in the
details pane.
Note: The information in the details pane is refreshed according to the rate specified in the registration
properties for the server. For more information, see Registering AVEVA Historian Servers on page 15.
Column descriptions are as follows:
ID
Unique number that the AVEVA Historian assigns to the client.
Application
The executable name of the application that is accessing the historian.
Computer
The name of the computer on which the application in running.
User
The Windows login name under which the client application is running.
Connected At
The start time of the connection.
Duration
The length of time that the client has been connected.
For the Connected At and Duration columns, the timestamp reflects the time of the historian, shown using the
Windows regional settings for the local computer.
Monitoring System Messages
System messages provide information about the state of the AVEVA Historian as it starts up, runs, or shuts
down. For more information about system messages, see System Messages on page 40 .
From within the System Management Console, you can view the system messages generated by the AVEVA
Historian using the Log Viewer.
To view system messages
1. In the console tree, expand Log Viewer and then expand Default Group.

AVEVA™ Historian Administration Guide
Chapter 10 – Monitoring the System
© 2021 AVEVA Group plc and its subsidiaries. All rights reserved. Page 306
2. Click Local. All of the messages appear in the details pane.
For more information on the Log Viewer, see the Log Viewer documentation.
Viewing Errors in the Windows Event Viewer
The Event Viewer is a Windows administrative tool for managing error log files. It allows the logs on any
workstation or server to be viewed from any other workstation or server that is connected by a network. The
Event Viewer can be used to check the logs for the following type of messages:
Error messages from the operating system.
Messages confirming that scheduled Windows events occurred correctly.
Error messages from AVEVA Historian.
There are hundreds of messages that can appear in the logs, depending on how your system is configured and
how healthy it is. It is important to know what the messages mean and what action is required.
To view errors in the Event Viewer
1. Start up the Event Viewer.
2. In the console tree, click Application. Messages from all applications appear in the details pane.
3. On the View menu, click Filter. The Application Properties dialog box appears.

AVEVA™ Historian Administration Guide
Chapter 10 – Monitoring the System
© 2021 AVEVA Group plc and its subsidiaries. All rights reserved. Page 307
4. Click the Filter tab.
5. In the Event source list, click Historian.
6. Click OK. The details pane shows only AVEVA Historian errors.
7. To view the message text, double-click the message in the details pane.

AVEVA™ Historian Administration Guide
Chapter 10 – Monitoring the System
© 2021 AVEVA Group plc and its subsidiaries. All rights reserved. Page 308
Monitoring System Tags from within InTouch HMI Software
The overall health of an AVEVA Historian is monitored continuously by a dedicated system driver. Critical system
variables (throughput rates, errors, remaining disk space, and so on) and timing counters are acquired by the
system driver and stored in the same manner as plant tags. This driver allows remote monitoring of the current
and historical state of the historian, and alerts users to problems in the system.
For more information on the system tags, see About System Driver and System Tags on page 43.
For example, you can write an InTouch application that monitors the historian system health tags. Monitoring
the overall health by means of system tags is done from the "top" of the system, ensuring that each layer of the
system is working properly, from the acquisition layer up through the historian:
Using Windows Performance Logs and Alerts
You can use Microsoft Performance Logs and Alerts console to monitor system variables that pertain to your
computer's operating system and hardware. Performance Logs and Alerts allows you to view different types of
counters that have been incorporated into the Windows operating system.
In Performance Logs and Alerts, "counters" are associated with objects and with instances of objects. Objects
include memory, processes, servers, system, and so on. Instances of objects identify, for example, specific
processes. Counters include such measurements as percentage of processor time, private bytes, available
memory, and so on. The available counters depend on the object and the instances selected.
You can select one or more process instances so that the Performance Logs and Alerts provides measurements
of counters for, for example, all the AVEVA Historian processes running within the Windows operating system.
Using counters within Performance Logs and Alerts can provide valuable information to assist in system tuning
and to identify bottlenecks in a sluggish system. Using the Pool Non-paged Bytes counter of the memory object,
for instance, can identify memory leaks that contribute to a poorly responsive system.
For information on using Performance Logs and Alerts, see the documentation for your Windows operating
system.

© 2021 AVEVA Group plc and its subsidiaries. All rights reserved. Page 309
You can configure WinPlatforms and AppEngines in Application Server so that the ArchestrA model view for
objects and attributes hosted by these objects can be replicated to the AVEVA Historian. Galaxies and objects in
ArchestrA are represented in the historian as groups in the public namespace.
You can then browse the model view representation using any historian client application that shows the
historian public groups, such as the Historian Client Trend.
Model View Representation in the Historian Namespace
The ArchestrA model view namespace is represented in the AVEVA Historian database as a public group
namespace. Each Galaxy and object in the model view is represented as a namespace group in the database.
The top-level group reflects the name of the Galaxy. The top-level Galaxy group contains a group for every child
Area and object, so that the ArchestrA object hierarchy is accurately reflected in the group/sub-group structure.
Only one Galaxy can be represented in a single historian.
Each group under the Galaxy group is named according to the object in the model view that it represents. Each
group can contain:
Additional child groups.
Historian tagnames for the historized attributes of the object that the group represents.
Groups that represent objects without any historized attributes, if the objects contain child objects with
historized attributes or if they contain special types of objects, such as traceability objects.
Chapter 11
Browsing the ArchestrA Model View Using
Historian Clients

AVEVA™ Historian Administration Guide
Chapter 11 – Browsing the ArchestrA Model View Using Historian Clients
© 2021 AVEVA Group plc and its subsidiaries. All rights reserved. Page 310
The following illustrates the mapping between a sample ArchestrA model view namespace and the
corresponding group namespace in the historian:
Model View Replication to the Historian
Model view replication is the process of sending the model view hierarchy information to the AVEVA Historian
and incorporating it into the public group namespace. Replication is initiated by ArchestrA.
Replication is a two-step process:
1. The historian is checked to see if there is a need to update the public group namespace with information
from the model view.
Replication only occurs when the public group namespace is determined to be out of sync with the model
view, in terms of objects with historized attributes and/or special types of objects, such as traceability
objects.
2. The required model view changes are transmitted to the historian and incorporated into the public
namespace.
During replication, only the object/attribute information that needs to change in the historian is transmitted
and processed, with the exception of Area objects. For example, if one object is added to a Galaxy of 1000
objects, the new object will be the only entity transmitted to the historian and incorporated into the public
group namespace. Because the amount of data for Area objects is small, all Area information is transmitted
and processed, without negatively impacting performance.
ArchestrA objects and attributes that can be replicated include:

AVEVA™ Historian Administration Guide
Chapter 11 – Browsing the ArchestrA Model View Using Historian Clients
© 2021 AVEVA Group plc and its subsidiaries. All rights reserved. Page 311
All historized attributes.
All objects that contain historized attributes.
All objects that contain other objects with historized attributes. This allows for representation of the
complete hierarchy from the Galaxy level down to lowest-level object that has historized attributes, even if
objects at intermediate levels do not have any historized attributes.
Some special types of objects that do not typically have historized attributes, such as traceability objects.
Also, their parent objects are replicated, as needed, to fill out the entire hierarchy.
Attributes that are not historized do not appear in the historian namespace.
Replication occurs when:
Objects with historized attributes and/or traceability objects are deployed.
Objects with historized attributes and/or traceability objects are redeployed.
The historian starts up, and there was a relevant change to the model view while the historian was offline.
There may be a delay in the replication.
If you undeploy or delete an object, the changes will not be replicated until you perform a redeploy.
If replication fails to complete (for example, due to a network failure), ArchestrA will try to send the model
information again during the next scan cycle, until the replication succeeds. No error message is logged to the
ArchestrA Logger if replication fails; however, you can log a custom message using the "ModelViewSync" custom
log flag.
Replication Configuration using the IDE
Use the System Platform IDE to enable or disable the automatic replication of the ArchestrA model view to the
AVEVA Historian computer.
Replication is configured at the platform and engine levels.
Configuring Replication for a WinPlatform
Configuring replication at the platform level simply enables any WinPlatform attributes, marked for
historization, to be associated with the WinPlatform in the historian namespace.
To configure model view replication for a WinPlatform
1. Start the IDE.

AVEVA™ Historian Administration Guide
Chapter 11 – Browsing the ArchestrA Model View Using Historian Clients
© 2021 AVEVA Group plc and its subsidiaries. All rights reserved. Page 312
2. In the model view, browse to the WinPlatform that you want to configure.
3. Open the object editor for the selected WinPlatform.
4. Click the Engine tab.
5. Select the Enable storage to historian check box, if not already checked.
6. Select the Enable Tag Hierarchy check box.
7. In the Historian box, specify the name of the AVEVA Historian computer.
8. Configure other history settings as required.
9. Close the editor, saving your changes.
10. Close the IDE.
Configuring Replication for an AppEngine
Configuring replication at the engine level enables the replication of AppEngine attributes marked for
historization, as well as the replication of all qualifying objects hosted by the AppEngine, and their attributes.
To configure model view replication for an AppEngine
1. Start the IDE.

AVEVA™ Historian Administration Guide
Chapter 11 – Browsing the ArchestrA Model View Using Historian Clients
© 2021 AVEVA Group plc and its subsidiaries. All rights reserved. Page 313
2. In the model view, browse to the AppEngine that you want to configure.
3. Open the object editor for the selected AppEngine.
4. Click the General tab.
5. Select the Enable storage to historian check box, if not already checked.
6. Select the Enable Tag Hierarchy check box.
7. In the Historian box, specify the name of the AVEVA Historian computer.
8. Configure other history settings as required.
9. Close the editor, saving your changes.
10. Close the IDE.
Enabling Replication at Runtime
You can enable or disable replication at run time without having to undeploy and redeploy the engine of any
affected objects. To do this, set the Engine.Historian.EnableTagHierarchy attribute to True. This attribute is
available for both WinPlatform and AppEngine objects.

AVEVA™ Historian Administration Guide
Chapter 11 – Browsing the ArchestrA Model View Using Historian Clients
© 2021 AVEVA Group plc and its subsidiaries. All rights reserved. Page 314
Viewing Historized Attributes in the AVEVA Historian Configuration
Editor
Note: You cannot view the model hierarchy in the AVEVA Historian System Management Console.
To view historized attributes
1. In the AVEVA Historian System Management Console, expand a server group and then expand a server.
2. Expand Configuration Editor, expand System Configuration, and then expand Tag Configuration.
3. Select any of the tag type groups, such as Analog Tags.
4. In the details pane shows all tags of that type, including historized attributes from AVEVA Application Server.
Browsing the Model Hierarchy in a Historian Client
You can browse the ArchestrA model view hierarchy in any AVEVA Historian client that incorporates the Public
Groups folder in the navigation tree, such as the Historian Trend client.
It is recommended that you not modify the model view hierarchy replication either directly from the database
or by using an application such as the Historian Trend client.
To browse the model hierarchy
1. Start a client, such as the Historian Trend client.
2. Connect to the historian.
3. In the navigation tree, expand Public Groups.

AVEVA™ Historian Administration Guide
Chapter 11 – Browsing the ArchestrA Model View Using Historian Clients
© 2021 AVEVA Group plc and its subsidiaries. All rights reserved. Page 315
4. Expand the group that reflects the name of the Galaxy you want to browse.
5. Navigate through the ArchestrA model view hierarchy and select a group representing an object with
historized attributes.
6. Select attributes for which you want to view history data in the client.

AVEVA™ Historian Administration Guide
Chapter 11 – Browsing the ArchestrA Model View Using Historian Clients
© 2021 AVEVA Group plc and its subsidiaries. All rights reserved. Page 316
For example, when you select a group in the Trend Tag Picker, the Tags pane shows a list of all the historian
tagnames representing the historized attributes of the selected group (object).
If only the objects at the bottom of the model view hierarchy are deployed, the names for the objects higher in
the hierarchy are not available to clients. To enable replication of the hierarchy in other applications, ArchestrA
generates generic names for the undeployed objects. Client applications display these generic names instead of
the actual names that appear in the IDE.

© 2021 AVEVA Group plc and its subsidiaries. All rights reserved. Page 317
If you install AVEVA Historian from an earlier version, you may still use some legacy features when
Data is collected by previous historian versions
Events are stored in A2ALMDB
Classic Event subsystem is used for notifications
Classic Storage subsystem was used for classic IDASes.
Note that the Classic Storage subsystem is now replaced by the Classic Data Redirector process
(aahStoreSvc.exe), which performs the same functionality.
This table compares legacy features with upgraded features in Historian 2017:
Legacy feature
Upgraded feature in Historian 2017
Classic storage subsystem
The current storage subsystem. See Managing Data Storage on
page 157.
Classic events subsystem
(now Classic Data Redirector
process)
Events are managed through the Alarms and Events subsystem.
A2ALMDB
New events are written to special history blocks for events. For
more information, see Managing Partitions and History Blocks on
page 173.
Classic Storage Subsystem
Note: The Classic Storage subsystem is now replaced by the Classic Data Redirector process (aahStoreSvc.exe),
which performs the same functionality.
Appendix A
Legacy Features

AVEVA™ Historian Administration Guide
Appendix A – Legacy Features
© 2021 AVEVA Group plc and its subsidiaries. All rights reserved. Page 318
Starting with AVEVA Historian 2014 R2, classic storage as a subsystem no longer exists. However, all historical
data that was collected by the Classic Storage subsystem from previous releases remains fully accessible in a
seamless manner.
Any tags previously configured for classic storage will automatically use storage after you install AVEVA Historian
2014 R2 or later.
Starting with AVEVA Historian 2014 R2, data from the following sources are accepted by a classic storage
"redirector" service (aahStoreSvc.exe) and sent to the current Storage subsystem.
A remote IDAS that has not been upgraded to Historian 2017
System driver
Memory Management for Retrieval of Classic Storage Data
The AVEVA Historian Indexing Service (aahIndexSvc.exe) is used to retrieve data that was stored by the Classic
Storage subsystem.
For large systems, it is possible that loading the tag information from all of the history blocks will require more
memory than the 2 GB limit that is imposed by the Windows operating system for a single process. The actual
limit may be even be less than 2 GB, if the amount of installed RAM is insufficient.
The total amount of tag information for the history blocks depends not only on the total number of tags, but
also on the number of tag versions, which are created during modifications to old data. Therefore, it is
recommended that you monitor the memory consumption for all systems, large and small, if you are regularly
performing data inserts, updates, or CSV file imports.
To avoid excessive memory consumption by the AVEVA Historian Indexing Service, tune and monitor the service
for your system using the following system parameters and system tags.
HistoryCacheSize and HistoryDaysAlwaysCached system parameters.
You can limit the maximum amount of memory the Indexing Service can use for tag information by adjusting
the value of the HistoryCacheSize system parameter. When this parameter is set 0 (default), the Indexing
Service selects a default cache value automatically by taking into account the amount of installed physical
memory and the maximum available address space for the process. In some rare cases when some specific
performance tuning is needed, you may want to set the HistoryCacheSize parameter manually. In this case,
the Indexing Service uses the specified value, but still may automatically change the effective
HistoryCacheSize if the specified value is too low or too high.
Regardless of whether the effective HistoryCacheSize was selected automatically (default) or specified by
you, the Indexing Service manages the cache using a "least-recently used" algorithm. In this algorithm, when
there is a request to access a history block that is not currently cached, the Indexing Service unloads the tag
information from the least-recently used history block and then loads the tag information from the
requested block.
All of these operations are performed automatically in the background, but you may notice a slowness data
retrieval if the data is retrieved from a block that is not currently loaded into memory. Keep in mind that the
smaller the amount of memory that you allocate for the cache, the potentially longer it may take to service
data requests.

AVEVA™ Historian Administration Guide
Appendix A – Legacy Features
© 2021 AVEVA Group plc and its subsidiaries. All rights reserved. Page 319
To guarantee the maximum retrieval performance for the newest history blocks (for example, if you a
running a trend application for the last week), you can "lock" a certain number of the most recent history
blocks in the cache. To do this, set the number of days to be locked in the cache by changing the
HistoryDaysAlwaysCached system parameter.
SysHistoryCacheFaults and SysHistoryCacheUsed system tags.
To determine if you need to clamp the memory used by the Indexing Service, use the Windows Task
Manager application or the Performance console to see how much memory is used by the aahIndexSvc.exe
process. Also, you can monitor the SysHistoryCacheFaults and SysHistoryCacheUsed system tags. A high
number of cache faults may be indicating that the cache size is insufficient. The SysHistoryCacheUsed system
tag shows the number of bytes currently used for keeping the tag information. This tag may be helpful to
see how much memory is consumed by the tag information, even if the memory management is not
enabled.
At any time, you can observe the current status of the history blocks in the AVEVA Historian Management
Console. When the tag information from a history block is not loaded into memory, the history block icon is
dimmed. You can manually refresh the console window to see changes in the status for the history blocks.
About the Real-Time Data Window
The real-time data window is applicable only for store-and-forward data from remote IDASes that are not
upgraded to Historian 2017.
The real-time "window" is the maximum delay, relative to current time of the server, in which data is
considered real-time by storage. The real-time window can range from -30 seconds to +999 milliseconds of the
current server time.
For real-time data, the timestamp for the data value must fall within the time window.
For late data, the timestamp for the data value can fall either inside or outside of the time window,
depending on whether the late date setting is enabled for the topic. Note that late data can be processed
very slowly if the timestamp falls outside of the real-time window.
For non-streamed data, the data can have any timestamp.
The following rules apply when storing data with timestamps relative to the real-time window:
If the late data setting for a tag topic is not enabled and the received data is more than 30 seconds late, the
value is discarded, and a warning is logged. If the received data value is within 30 seconds of the server time,
it is stored as received.
If the late data setting for a tag topic is enabled and the received data value is within the real-time window,
then the value is stored by the real-time storage service with no changes. If the received data value is
outside of the real-time window, then the value is passed to the alternate storage services and stored
without changes.
If the late data setting for a tag topic is enabled, the received data value is stored in delta mode, even if the
tag is configured for cyclic storage and the received data value is within the real-time window.
For more information on the late data setting for a topic, see IDAS Late Data Handling.
You can adjust the real-time window for "late" data topics by configuring the RealTimeWindow system
parameter. The real-time window for regular real-time data (not "late") is fixed as 30 seconds. For more
information, see Editing System Parameters on page 279.

AVEVA™ Historian Administration Guide
Appendix A – Legacy Features
© 2021 AVEVA Group plc and its subsidiaries. All rights reserved. Page 320
Adjusting the real-time window also has implications if you are using delta storage with a swinging door
deadband. For more information, see Swinging Door Deadband for Delta Storage.
If the system does not have enough memory to adequately process real-time data, the window is adjusted
internally. An appropriate message is logged. The value of the RealTimeWindow system parameter, however,
remains unchanged.
Important: The real-time window is not intended to accommodate time synchronization problems between
an IDAS and the historian. It is imperative that you properly synchronize the IDAS and historian. If the IDAS is
sending data in a steady stream outside of the real-time window, it is likely there is a time synchronization
problem. For more information, see Time Synchronization for Data Acquisition on page 132.
If a data value is discarded because it did not fit the requirements of the real-time window, the historian logs a
warning message. Warning messages are logged at one intervals during the period when data is being discarded.
Determining If the Real-Time Window Is Configured Appropriately for a Swinging
Door Deadband
To determine if the real-time window is configured correctly for a swinging door deadband, look at the number
of data values that are forced to be stored while the system waits for the next valid data point to make the
filtering calculation.
The SysRateDeadbandForcedValues system tag counts the number of "extra" points forced to be stored as a
result of an insufficient real-time window for swinging door storage. Also, you can determine the number of
points forced to be stored for an individual tag by executing a query that uses the full retrieval mode and
specifies a quality detail of 2240, which indicates that these points were stored because of an insufficient
real-time window.
If you find a large number of forced storage points, you can either reconfigure the tag to use delta storage or
increase the real-time window.
Note: The first two points received for a tag configured for swinging door storage are always stored.
Also, use caution when setting the real-time window to accommodate a swinging door deadband.
If your system has a large tag count or high data throughput, increasing the real-time window will increase
the memory requirements for storage, because the storage system will have to process more data as
real-time data, which is more resource-intensive than the storage of late data.
If you increase the real-time window and you apply a swinging door deadband to a slow-changing tag, the
amount of storage space required increases because the tag value is forced to be stored more often than if
you used delta storage with no deadband.
Classic Event Subsystem
Plant events range from startups and shutdowns, through trips and shift changes, to batch events and operator
actions.

AVEVA™ Historian Administration Guide
Appendix A – Legacy Features
© 2021 AVEVA Group plc and its subsidiaries. All rights reserved. Page 321
You can use the AVEVA Historian Classic Event subsystem to detect events and associate actions when they are
detected. At a basic level, anything that can be determined by examining stored data can be used as an event.
The Classic Event subsystem can be configured to periodically check to see if an event occurred. This is called
event detection. A subsequent action can then be triggered after an event is detected. However, there is no
guarantee of immediacy for actions; in fact, other mechanisms can preempt actions under certain
circumstances.
For the historian, event storage encapsulates more than just the fact that something happened. An event is the
set of attributes describing the moment a detection criterion is met on historical tag values in the historian.
Attributes of an event include the date and time that the event occurred in history and the date and time that it
was detected. Records of detected events can be logged to the database regardless of whether or not any
configured actions are subsequently initiated. In other words, sometimes it may be desirable to simply log the
fact that an event occurred without initiating an action. The opposite may be true, as well.
In short, the Classic Event subsystem performs the following basic functions:
Detects when events occur by comparing sets of criteria against historical data in the database.
Optionally logs event records to a dedicated SQL server table (EventHistory).
Optionally triggers a configured action each time an event is occurs.
For information about configuring events within the Classic Events Subsystem, see the Configuring Classic Events
on page 335.
The Classic Event subsystem does not support Daylight Savings Time changes. The Replication subsystem,
however, does handle Daylight Savings Time changes, and you can use replication to generate data summaries
according to a schedule. For more information, see Managing and Configuring Replication on page 204.
Classic Event Subsystem Components
The following table describes the components of the Classic Event subsystem.
Component
Description
Configuration Editor
Part of the System Management Console. Used to specify event definitions
and possible actions.
Runtime database
Stores event definition information and all data generated by the Event
subsystem, such as records of event detections, data summaries, and data
snapshots.

AVEVA™ Historian Administration Guide
Appendix A – Legacy Features
© 2021 AVEVA Group plc and its subsidiaries. All rights reserved. Page 322
Component
Description
Event System Service
(aahEventSvc.exe)
Internal process that coordinates event detection and action functions. This
process runs as a Windows service. Using the System Management Console,
you can configure the event service to automatically start and stop at the
same time as the AVEVA Historian. The event service is responsible for:
Reading event definition information from the Runtime database.
Creating event detectors and actions, including allocating the necessary
processing threads and establishing database connections.
Initiating the event detection cycle.
SQL variables
Available for use in event queries.
You use the System Management Console to configure the Classic Event subsystem.
Uses for the Classic Event Subsystem
Generally, you should use the AVEVA Historian Classic Event subsystem to monitor non-critical system
conditions that occur only occasionally. For example, possible event detections that you can set up include:
Detect all occurrences in history when the value of a discrete tag is set to 0
Detect if the system clock is set to a specified date and/or time
Determine the state of information in the database by a SQL statement
You can use event actions to perform tasks such as the following:
Send e-mail messages to remind managers about weekly maintenance checks
Summarize plant data to create a statistical analysis over defined periods of time
Take "snapshots" of system data
Modify storage conditions (such as time and value deadbands)
Generally perform any database-related task
The Classic Event subsystem is not designed to transfer data to and from the database continually and should
not be used in this manner. The only exception is for summary actions; the Classic Event subsystem can
continually process data aggregates so that they are available for reporting purposes.
The Classic Event subsystem should not be used as an alarm system. An alarm system such as provided with
InTouch HMI software can be used to alert operators to specific satisfied conditions. The InTouch alarm system
is intended as a notification system to inform operators of process and system conditions promptly upon their
occurrence. The InTouch alarm system supports displaying, logging, and printing capabilities for process alarms
and system events. (Alarms represent warnings of process conditions, while events represent normal system
status messages.) For more information on the InTouch alarm system, see your InTouch documentation.

AVEVA™ Historian Administration Guide
Appendix A – Legacy Features
© 2021 AVEVA Group plc and its subsidiaries. All rights reserved. Page 323
In contrast, the Classic Event subsystem is intended to initiate actions based upon historical event detection. An
alarm system presupposes an immediate message response is propagated for all configured alarms at the time
the respective conditions are met. In this sense, the historian Classic Event subsystem is not an alarm system.
The Classic Event subsystem queues up detected events and processes them accordingly based upon
preconfigured priorities.
Classic Event Subsystem Features and Benefits
You can obtain a number of distinct operational benefits from properly using the features of the Classic Event
subsystem. A list of key benefits is as follows:
Unlike real-time alarming, the Classic Event subsystem determines events from stored historical data and is
not dependent on real-time detection. No events are missed unless the machine is severely overloaded for a
long period of time.
The Classic Event subsystem is SQL-based, thus providing a means of managing database-related tasks
within the system. You can use custom SQL queries as detectors, as well as create custom SQL-based
actions.
A number of preconfigured detectors and actions are available.
Detections may be made by external sources. (A COM mechanism is available for invoking the detector in
the Classic Event subsystem.)
Time-based detection (based on the system clock time) allows you to schedule certain tasks, such as data
aggregations (summaries).
The Classic Event subsystem is designed to manage overload situations. If the system is currently busy due
to some other processing for a period of time, the Classic Event subsystem will "catch up" at a later time
during off-peak periods. If the overall AVEVA Historian is continuously overloaded, the Classic Event
subsystem degrades in functionality gracefully.
You can select which actions have priority and can assign certain actions (preferably only a few) never to be
compromised, even under overload conditions.
System tags are available to monitor Classic Event subsystem conditions.
Classic Event Subsystem Performance Factors
The overall performance of the AVEVA Historian Classic Event subsystem is subject to factors related to data
storage and query processing time. Too often, systems are commissioned with specifications that estimate
average or "typical" expected loading. Instead, you should size the system so that it can accommodate the peak
load that you expect during the projected system life cycle. Some performance factors you should consider are:
Sufficient hardware.
Your selection of hardware is important to guarantee peak performance for the range of behaviors required
for a given operating environment. For example, you should make sure that you have enough disk space to
store the records of detected events and the results of any actions (summaries, value snapshots, and so on).
Processor availability.
The Classic Event subsystem is subject to processor availability as much as any other software sharing a
common platform. At any given moment, multiple processes contend for processor time.

AVEVA™ Historian Administration Guide
Appendix A – Legacy Features
© 2021 AVEVA Group plc and its subsidiaries. All rights reserved. Page 324
Nature of the database queries executed by the Classic Event subsystem.
For example, because Classic Event subsystem actions typically operate on normal SQL Server tables, they
are subject to performance limitations of the Microsoft SQL Server. Also, query activity tends to be very
CPU-intensive and is extremely sensitive to other concurrent activities being performed on the same server.
Time intervals for SQL-based detectors.
For more information, see Time Intervals for SQL-Based Detectors on page 325.
Performance can vary greatly for the same event task, depending upon the computer configuration, user
interaction, and other unpredictable activity common in a plant situation with shared database and server
resources. It is often very difficult to determine precisely what combinations of hardware and software
parameters will work optimally for your required operating environment. Therefore, you should test your Classic
Event subsystem configuration before running it in a production environment to make sure that the system will
not become overloaded during peak use.
Event Tags
An event tag is a name for an event definition in the system. For example, if you want to detect an event when a
tank temperature reaches 100 degrees, you can define an event tag and name it "TankAt100." Event tags differ
from the other tag types in the AVEVA Historian (analog, discrete, and string). Analog, discrete, and string tag
types are the definitions of variables to be stored. In contrast, an event tag is a named reference for the
definition of the specific event you want to detect, including an optional action to perform when the event is
detected. An event tag provides a way to reference all event definition information in the system.
Event tags are created and maintained using the System Management Console. When you define an event tag,
you must specify:
A name, description, and other general configuration information.
The event criteria, which describes the conditions that must exist for the event and how often the Classic
Event subsystem checks to see if an event occurred.
Whether or not to log the event detection.
Whether or not to enable or disable event detection.
An optional action that is triggered when an event is detected.
Event Detectors
Each event tag must have an associated event detector. An event detector is a mechanism for determining when
the set of event criteria for an event tag has been satisfied. When you configure an event detector, you must
first configure its type and then configure the parameters associated with that detector type. You can choose
from the following types of event detectors:
SQL-Based Detectors on page 325
Schedule Detectors on page 326
External Detectors on page 327

AVEVA™ Historian Administration Guide
Appendix A – Legacy Features
© 2021 AVEVA Group plc and its subsidiaries. All rights reserved. Page 325
The generic SQL, analog specific value, and discrete specific value detectors are SQL-based detectors. The
schedule detector is a time-based detector. The external detector is used when triggering an event by the
ActiveEvent ActiveX control.
For all detectors, the Classic Event subsystem will initially base the query for data in history at the time the
Classic Event subsystem starts. Subsequently, the Classic Event subsystem will base the query on the last
successful detection; that is, the time of the most recent detection becomes the starting time for the next
detection.
SQL-Based Detectors
Analog specific value, discrete specific value, and generic SQL detectors operate on data stored in the database.
The detection criteria for each of these detectors is a SQL statement that is executed against the AVEVA
Historian. Generic SQL detectors can query against both the historian and Microsoft SQL Server.
Generic SQL Detectors
A generic SQL detector detects an event based on criteria that are specified in a SQL statement. You can use
pre-configured SQL templates that are stored in the database as the basis for your script, or you can create your
own script from scratch.
To use a pre-configured SQL template, simply select it from a list of available templates when defining the event
tag.
If you create a new script, you will need to add it to the SQLTemplates table in the Runtime database in order for
it to appear in the list of pre-configured templates. You should test your SQL queries in SQL Server Query
Analyzer before using them in a generic SQL event detector.
Specific Value Detectors
Two specific value detectors are available:
Analog specific value detector
Discrete specific value detector
These detectors can be used to detect if a historical tag value matches the state defined by the detector criteria.
For the criteria, historical values are compared to a target value that you specify. If a value matches the criteria,
then an event is logged into the EventHistory table, and any associated actions will be triggered. For example, an
analog specific value detector could be configured to detect if the value of 'MyAnalogTag' was ever greater than
1500. Likewise, a discrete value detector could be configured to detect if the value of 'MyDiscreteTag' was ever
equal to 0.
For a specific value detectors, you can apply either edge detection or a resolution to the returned data. The
resolution is used only when the edge detection is set to NONE (in which case the retrieval mode is cyclic). For
more information, see these topics from the AVEVA Historian Retrieval Guide:
Resolution (Values Spaced Every X ms) (wwResolution)
Edge Detection for Events (wwEdgeDetection)
Time Intervals for SQL-Based Detectors

AVEVA™ Historian Administration Guide
Appendix A – Legacy Features
© 2021 AVEVA Group plc and its subsidiaries. All rights reserved. Page 326
For SQL-based detectors, you must specify a time interval that indicates how often the detector will execute.
The time interval is very important in that it affects both the response rate of any event actions and the overall
performance of the system.
The detection of an event may occur significantly later than the actual time that the event occurred, depending
on the value you specify for the time interval. The time between when an event actually occurred in history and
when it was detected is called latency.
For example, you configure a detector to detect a particular event based on a time interval of 10,000 ms (10
seconds). This means that every 10 seconds, the event detector will check to see if the event occurred. If the
event occurs 2,000 ms (2 sec) after the last check, the event detector will not detect that the event occurred
until the full 10 seconds has elapsed. Thus, if you want a greater possibility of detecting an event sooner, you
should set the time interval to a lower value.
Also, the time interval affects when an associated action will occur, because there could be some actions that
are queued to a time equal to or greater than the interval.
The following are recommendations for assigning time intervals:
When configuring multiple event detectors, distribute them evenly across multiple time intervals; don't
assign them all to the same interval.
All configured detectors are first divided into groups, based on their assigned time interval. The detectors
are then sequentially ordered for processing in the time interval group. The more detectors assigned to a
particular time interval, the longer it will take the system to finally process the last one in the group. While
this should not have a negative impact on actual detection of events, it may add to increased latency.
Avoid assigning a faster time interval than is really necessary.
The time interval for detectors should not be confused with a rate required by a real-time system that needs
to sample and catch the changes. For the Classic Event subsystem, a slower time interval simply means that
more rows are returned for each scan of the history data; no events are lost unless then detection window is
exceeded (for more information, see "Detector overloads" on page 370). For example, you create an event
tag with a detector time interval of 1 minute, and you expect an event to occur every 5 seconds. This means
that the system would detect 12 events at each time interval. In most cases, this is an acceptable rate of
detection. Also, assigning short time intervals will result in higher CPU loading and may lead to degraded
performance.
For detailed information on how detectors are executed, see Classic Event Subsystem Resource Management on
page 330.
The EventHistory table can be used to determine if too many event tags have the same time interval. If the
latency between when the event actually occurs (stored in the DateTime column) and when it was detected
(stored in the DetectDateTime column) is constantly growing and/or multiple event occurrences are being
detected during the same detector time interval, you need to move some of the event detectors to a different
time interval.
Schedule Detectors
The schedule detector is a time-based detector. A schedule detector detects whether the system clock is equal
to or greater than a specific date and/or time. For example, you could log an event every week on Monday at
2:00 p.m.

AVEVA™ Historian Administration Guide
Appendix A – Legacy Features
© 2021 AVEVA Group plc and its subsidiaries. All rights reserved. Page 327
Schedule detectors are different from other detectors in that they are real-time detectors. The value of the
system clock is checked every second. Schedule detectors are very fast and can be used without great concern
about efficiency. Thus, a schedule detector provides the only real-time event processing. However, there is no
guarantee of when the action will occur.
All of the schedule detectors that you set up are handled by a dedicated scheduling thread. This allows for a
separation between the processing load needed to execute schedule detectors and the processing load needed
to perform all of the other event work. The scheduling thread will maintain a list of detection times in a time
queue. If you add a schedule detector, the thread will register the detection time in the queue and then re-sort
the list of all detection times from the earliest to the latest.
The time of the system clock is then compared with the time of the first item in the schedule queue. If the
system clock time is equal to or greater than the time of the first item, the detection algorithm for the first item
will be invoked and the detection will be performed.
The Classic Event subsystem does not account for Daylight Savings Time changes. If you set up a schedule
detector that runs periodically with a specified start time, you will need to change the start time to reflect the
time change. Another solution would be to use the time-weighted average retrieval mode instead of the Classic
Event subsystem to generate averages, because the retrieval mode handles the Daylight Savings Time changes.
However, if the period for the average is hourly, then it is recommended that you use the Classic Event
subsystem, as the amount of data will not generally not be a factor in the speed of calculating the average.
External Detectors
For an external detector, event detection is triggered from an external source by the ActiveEvent ActiveX
control that is provided as part of the AVEVA Historian. For example, an InTouch or Visual Basic script can invoke
the necessary ActiveEvent methods to trigger an event. This ActiveX control must be installed on the computer
from which you want to trigger the external event.
For more information, see Configuring an External Detector on page 343.
Event Actions
An event may or may not be associated with an event action. An event action is triggered after the event
detector determines that the event has occurred. The Classic Event subsystem is not intended to run external
processes. There is only a very limited ability to run external program files or to call methods from COM
interfaces within the given system or network.
Actions are not required; there are times when you may want to simply store when events happened. In this
case, you would select "None" for the action type when defining the event tag.
Generic SQL Actions
A generic SQL action executes an action that is outlined in a SQL statement. For example, a SQL action can
update the database (for example, turning off storage for tags) or copy data to a separate table or database.

AVEVA™ Historian Administration Guide
Appendix A – Legacy Features
© 2021 AVEVA Group plc and its subsidiaries. All rights reserved. Page 328
You can use pre-configured SQL templates that are stored in the database as the basis for your script, or you can
create your own script entirely from scratch. You cannot submit multiple queries against the AVEVA Historian in
a single event action and you cannot use GO statements. Also, if you are querying against history data, the SQL
statement is subject to the syntax supported by the AVEVA Historian OLE DB provider. You should test your SQL
queries in SQL Server Query Analyzer before using them in a generic SQL event action.
Snapshot Actions
A snapshot action logs into dedicated SQL Server tables the data values for selected analog, discrete, or string
tags that have the same timestamp as the detected event. Quality is also logged. Value snapshots are stored in
tables according to the tag type, either AnalogSnapshot, DiscreteSnapshot, or StringSnapshot.
A snapshot action requires an expensive SQL join between the extension tables and the snapshot tag table. The
process of performing the join and logging the retrieved results to the snapshot tables can be very slow. This is
because most of the tables used for event snapshots are normal SQL Server tables, subject to the data
processing limitations of Microsoft SQL Server. Thus, the higher the number of snapshots that are being taken
by the event system, the higher the transaction load on the Microsoft SQL Server.
Important: The Classic Event subsystem is not a data acquisition system. DO NOT attempt to use snapshot
actions to move data stored in the extension tables to normal SQL Server tables. This type of misapplication is
guaranteed to result in exceedingly poor throughput and storage rates.
When trying to determine how many snapshots can be made by the system, you should execute the intended
snapshot queries to the server using a batch file, leaving the Classic Event subsystem out of the exercise. By
executing repeated snapshot queries at the server as fast as the computer will allow, you can better determine
how many snapshots can be performed on a system over a given time period. Using this result and applying a
safety factor may provide a good guideline for assessing how much your system can safely handle. Keep in mind
that discrete snapshots are many times slower than analog snapshots.
E-mail Actions
An e-mail action sends a pre-configured Microsoft Exchange e-mail message. Although e-mail actions are
useful for sending non-critical messages triggered by an event detection, these types of actions are not to be
used for alarm-type functionality. For e-mail notifications of alarm situations, use an alarm system such as the
SCADAlarm alarm notification software.
Deadband Actions
Important: Deadband actions are no longer supported. Any configured deadband actions are ignored.
A deadband action changes the time and/or value storage deadband for one or more tags that are using
delta storage. (Value deadbands only apply to analog tags.) Deadband change actions are useful for increasing
data storage based on an event occurring. For example, an event detector has detected that a boiler has tripped,
you might want to start saving the values of certain tags at a higher rate to help you determine the cause of the
trip.

AVEVA™ Historian Administration Guide
Appendix A – Legacy Features
© 2021 AVEVA Group plc and its subsidiaries. All rights reserved. Page 329
Summary Actions
A summary action is a set of aggregation calculations to be performed on a set of tags between a start time
and an end time with a defined resolution. When you configure a summary action, you must define the type of
aggregation you want to perform (called a summary operation) and the analog tags that you want to be
summarized. The Classic Event subsystem performs average, minimum, maximum and sum calculations on the
basis of a specific event being detected.
Note: Summary actions using the Classic Event subsystem are retained for backward compatibility. We
recommend that you use the more robust and flexible Replication subsystem to perform data summaries. For
more information, see Managing and Configuring Replication on page 204.
Data summaries are useful for:
Extremely long-term data storage. Because summarized data takes up less space than full resolution data,
even a moderately sized system can store daily summary information for many years.
Production reporting. For many reporting purposes, aggregate data is more important than raw data. For
example, the total mass produced in a day is often more relevant than the actual rate of production during
the day.
Integration with business systems. The full resolution, high-performance AVEVA Historian history and
real-time data tables are best accessed with tools that can take advantage of the AVEVA Historian time
domain extensions. However, not all client tools support these SQL extensions. The summary tables reduce
the volumes of data to manageable quantities that can be used by any normal SQL client application.
A summary action is usually triggered by a schedule detector. However, you can perform a summary as a result
of any event detection.
Tag values with bad quality are not filtered out before the aggregation is performed. To perform an aggregation
with only good quality, for example, use a generic SQL action that executes an aggregation calculation query on
the History table where the value of the Quality column equals 0.
The results of all summaries are stored in the SummaryData table in the Runtime database.
Important: Use caution when setting up summary actions. Using a high resolution for your summary queries
can have a negative impact on the overall performance of the system.
Average, minimum, and maximum values can also be determined by using the time-weighted average,
minimum, and maximum retrieval modes, respectively. For more information on these retrieval modes, see
Understanding Retrieval Modes in the AVEVA Historian Retrieval Guide. Keep the following in mind when
deciding to use either the event summaries or the retrieval modes:
For the time-weighted average retrieval mode, the amount of time between the data values is a factor in the
average, whereas the event summary action is a straight statistical average. For more information, see
Average Retrieval.
Performing an average at retrieval eliminates problems that occur during Daylight Savings Time adjustments
for schedule-based summaries. For more information, see Schedule Detectors on page 326.
For a comparison of all the different types of summaries that the AVEVA Historian supports, see Querying
Aggregate Data in Different Ways in the AVEVA Historian Retrieval Guide.

AVEVA™ Historian Administration Guide
Appendix A – Legacy Features
© 2021 AVEVA Group plc and its subsidiaries. All rights reserved. Page 330
Event Action Priorities
The Classic Event subsystem contains three different queues for event actions:
Critical queue
A critical queue contains any actions for event tags that have been assigned a critical priority. Actions for
events that are given a critical priority will be processed first. It is extremely important that the critical
queue is used with caution. Only singularly important actions with short processing times should be assigned
as critical. You should never assign snapshot or summary actions as critical. There is no overload protection
for processing critical actions; if the system becomes overloaded, actions may not execute in a timely
fashion or may not execute at all.
Normal queue
This type of queue contains any actions for event tags that have been assigned a normal priority. All
non-critical events are labeled with a "normal" priority and will be processed after the critical events.
Delayed queue
This type of queue contains any actions for event tags that have been assigned a post-detector delay. The
post detector delay is the minimum amount of time that must elapse after an event was detected before
the associated action can be executed.
Classic Event Subsystem Resource Management
The Event System Service (aahEventSvc.exe) manages all of the system resources required to detect events and
process actions. System resources are allocated for detectors and actions by means of threads. A thread is an
operating system component that independently performs a particular function within a larger process. Within
the overall process of the Classic Event subsystem, event detectors and actions are assigned different threads,
so that they can execute independently of each other and thus perform more efficiently.
The Classic Event subsystem uses two thread groups, or "pools." One thread pool is for detectors and the other
one is for actions. The Event Service automatically creates both of these thread pools if there is at least one
event tag defined.
Other aspects of resource management include the number of database connections required by event system
components, and how the system handles event overloads and query failures.
Detector Thread Pooling

AVEVA™ Historian Administration Guide
Appendix A – Legacy Features
© 2021 AVEVA Group plc and its subsidiaries. All rights reserved. Page 331
The detector thread pool is made up of one or more threads allocated for SQL-based detectors and a single
thread for schedule detectors. Each thread maintains a connection to the database. The detector thread pool is
illustrated in the following diagram:
A SQL-based detector is assigned to a thread based on the time interval that you specify when you define the
event tag. Each time interval requires its own thread. For example, you define three event detectors and assign
them time intervals of 10, 15, and 20 seconds, respectively. Each event detector will be running in its own
thread, for a total of three threads.
As another example, you define three event detectors, assigning the first two a 10 second interval, and the third
a 15 second interval. The first two will be running under the same thread, while the third will be running under
its own thread, for a total of two threads.
For multiple detectors that are assigned to the same time interval, the SQL detection statement for each event
tag will be executed in sequential order. That is, the first SQL statement must return results before the next
statement can be executed. After each detection has taken place (results are returned), the detection is logged
into the EventHistory table and any associated action is queued into the action thread pool.
All schedule detectors are assigned to a single thread.
The efficiency of the detector thread pool depends on how you have spread the load when assigning time
intervals to different event tags. Detections generally do not cause overloading on the system: the actions
(especially snapshots and summaries) are where most processing and resource loading occurs.
Action Thread Pooling

AVEVA™ Historian Administration Guide
Appendix A – Legacy Features
© 2021 AVEVA Group plc and its subsidiaries. All rights reserved. Page 332
The action thread pool is essentially a pool of four threads that execute actions from three different action
queues. Each thread in the pool maintains a database connection.
The three action queues are:
Critical queue
Normal queue
Post-detector delay queue
For detailed information about each of these queues, see Event Action Priorities on page 330.
As a processor thread completes its previous task, a new action will be fetched from one of the queues. If there
are any actions in the critical queue, these will be processed first. Actions in the critical queue are executed in
the order in which they were added to the queue; that is, the oldest action sitting in the queue will be processed
first.
If the critical queue is empty, actions will be fetched from the post-detector delay queue. Actions in the
post-detector delay queue are ordered by time. Actions assigned the shortest post-detector delay will be
executed first.
If both the critical and post-detector delay queues are empty, actions will be fetched from the normal queue.
Like critical actions, normal actions are processed in the order in which they were added to the queue.
Classic Event Subsystem Database Connections
The following table contains the number of SQL Server database connections required by the different
components of the Classic Event subsystem.
Component
Number of Connections Used
Event Service
1
SQL-based detectors
1 per each time interval used

AVEVA™ Historian Administration Guide
Appendix A – Legacy Features
© 2021 AVEVA Group plc and its subsidiaries. All rights reserved. Page 333
Component
Number of Connections Used
Schedule detectors
1
Action threads
4
Handling of Event Overloads and Failed Queries
The Classic Event subsystem handles SQL-based detector and action queries that fail, as well as to degrade
gracefully if detector and action overload conditions occur.
Event query failures
If the query for a SQL-based detector fails, the query will automatically be executed again. The detection
window start time will remain the same until the next detection is made.
For a failed SQL-based action query, the query will be submitted three times. The system will establish a new
connection to the database each time the query executes. If the action query is a snapshot query, the
snapshot tables will first be "cleaned up" as part of the re-query process.
Detector overloads
A detector overload occurs when the system cannot process all of the detectors in a timely manner.
Detector overload is handled by means of the detection window. This window is defined by the difference
between the current system time and the time of the last detection. If the window grows larger than one
hour, some detections will be missed. This condition will be reported in the error log.
Action overloads
An action overload occurs when the system cannot process all of the actions in a timely manner. Only
actions assigned a normal priority have overload protection. An action will not be loaded into the normal
queue by a detector if the earliest action currently sitting in the queue has been there for an hour. (Basically,
it is assumed that the system has become so overloaded that it has not had the resources to process a single
action in the past hour.) This prevents an accumulation of actions in the normal queue when the system is
unable to process them. The system will be allowed time to recover, and actions will not start to be queued
again until the time difference between earliest and latest action in the queue is less than 45 minutes (75
percent of the time limit). In short, when the system becomes too overloaded, actions are not queued. This
condition is reported in the error log, but not for every single action missed. The first one missed is reported,
and thereafter, every hundredth missed action will be logged.
There is no overload protection for critical actions, because these types of actions should only be configured
for a very small number of critical events. There is also no overload protection for actions that have been
assigned a post-detector delay.
For more information on action priorities, see Event Action Priorities on page 330. For more information on how
actions are queued, see Action Thread Pooling on page 331.

AVEVA™ Historian Administration Guide
Appendix A – Legacy Features
© 2021 AVEVA Group plc and its subsidiaries. All rights reserved. Page 334
Classic Event Subsystem Variables
The Classic Event subsystem uses a set of variables to facilitate event detections and actions. The purpose of
these variables is to provide ease of query creation by a user (or a configuration editor). These variables are
replaced with the associated values by the event components immediately before actual query execution. The
query actually being received by the AVEVA Historian never contains the variables.
The variables and their associated values are as follows:
Variable
Description/Associated Value
@EventTime
Date/time of the detected event of the current detector.
@EventTagName
Tagname associated with the detected event.
@StartTime
Start date/time for the detector query.
@EndTime
End date/time for the detector query.
The @StartTime and @EndTime variables can be used only in detector strings. The @EventTime and
@EventTagName variables can be used only in action strings.
All of the variables are case-sensitive.
Typically, a detection query executed by a detector component is similar to the following example:
SELECT DateTime
FROM History
WHERE Tagname = 'BoilerPressure' AND Value > 75
AND DateTime > '@StartTime'
AND DateTime < '@EndTime'
@StartTime and @EndTime are simply placeholders for the detector component to coordinate event detection
over a moving time range.
The following action query show how event variables can be used:
SELECT * INTO TEMPTABLE
FROM History
WHERE DateTime = '@EventTime'
AND TagName IN
(SELECT TagName FROM SnapshotTag
WHERE EventTagName = '@EventTagName'
AND TagType = 1)
Note: These variables only function in the internal context of the Classic Event subsystem and do not apply to
queries from client tools such as SQL Server Query Analyzer.
Classic Event Subsystem Tags
The following table describes the Classic Event subsystem tags.

AVEVA™ Historian Administration Guide
Appendix A – Legacy Features
© 2021 AVEVA Group plc and its subsidiaries. All rights reserved. Page 335
TagName
Description
SysEventCritActionQSize
Size of the critical action queue. For more information, see -old-Action
Thread Pooling in the AVEVA Historian Supplemental Guide.
SysEventDelayedActionQSize
Number of entries in the delayed action queue.
SysEventNormActionQSize
Size of the normal action queue.
SysEventSystem
A discrete tag that indicates the status of the event system service
(aahEventSvc.exe). 0 = Bad; 1 = Good.
SysStatusEvent
Snapshot event tag whose value changes every hour.
Configuring Classic Events
You can use the Classic Event subsystem to set up the detection of events and associate actions with those
events. At a basic level, anything that can be determined by looking at historical or system data can be used as
an event. The Classic Event subsystem stores data to SQL Server.
Important: The Classic Event subsystem is not a real-time system; rather, it operates on historical data. For
real-time alarming, use an application such as the InTouch HMI.
When setting up an event, you must provide the following information:
The criteria for the event. For example, the value of an analog tag being equal to 1500 could be an event.
Also, the system clock on the AVEVA Historian computer reaching 9:30 a.m. on Monday morning could be an
event.
How often you want the Classic Event subsystem to check if an event occurred. This is called event
detection.
Whether or not you want information about the event detection saved to the database.
Whether or not you want to execute an action as a result of a successful event detection and the type of
action. For example, send an e-mail message.
The configuration information for the detection and action for a particular event must be given a unique name,
which is stored as an event tag.
The Historian also supports the storage of alarms and events generated through external sources such as
Application Server to history blocks.
Accessing Event Information
To access event information
1. In the console tree, expand a server group and then expand a server.
2. Expand Configuration Editor, expand System Configuration, and then expand Tag Configuration.
3. Click Event Tags. All configured event tags appear in the details pane.

AVEVA™ Historian Administration Guide
Appendix A – Legacy Features
© 2021 AVEVA Group plc and its subsidiaries. All rights reserved. Page 336
Adding an Event Tag
To add an event tag
1. In the console tree, expand a server group and then expand a server.
2. Expand Configuration Editor, expand System Configuration, and then expand Tag Configuration.
3. Click Event Tags.
4. Start the Event Tag wizard by doing any of the following:
o Click the Add button on the toolbar.
o On the Action menu, click New Tag.
o Right-click Event Tags, and then click New Tag.
The New Event Tag wizard appears.
5. In the Unique Tag Name box, type a unique name for the event tag. For information on allowable tagnames,
see Tag Naming Conventions on page 53.

AVEVA™ Historian Administration Guide
Appendix A – Legacy Features
© 2021 AVEVA Group plc and its subsidiaries. All rights reserved. Page 337
6. Click Next. You are prompted to define general information for the event tag.
7. Configure the general options for the event tag. For more information, see Editing General Information for
an Event Tag on page 339.
8. Click Next. You are prompted to configure the detector for the event tag.
9. Configure the detector for the event tag. Detectors are external, generic SQL, analog specific value, discrete
specific value, and schedule. The lower portion of the dialog box changes based on the detector type that
you select.

AVEVA™ Historian Administration Guide
Appendix A – Legacy Features
© 2021 AVEVA Group plc and its subsidiaries. All rights reserved. Page 338
For more information about...
See...
Configuring an external detector
Configuring an External Detector on page 343
Configuring an analog or discrete
specific value detector
Configuring a Specific Value Detector on page
340
Configuring a schedule detector
Configuring a Schedule Detector on page 341
Configuring a generic SQL detector
Configuring a Generic SQL Detector on page 342
10. Click Next.
11. You are prompted to configure the action for the event tag.
12. Configure the action for the event tag. Actions are none, generic SQL, snapshot, e-mail, deadband, and
summary. The lower portion of the dialog box changes based on the action type that you select.
For more information about...
See...
Configuring a generic SQL action
Configuring a Generic SQL Action on page 345
Configuring a snapshot action
Configuring a Snapshot Action on page 344
Configuring an e-mail action
Configuring an E-mail Action on page 347
Configuring a deadband action
Configuring a Deadband Action on page 343
Configuring a summary action
Configuring a Summary Action on page 350
13. Click Finish.

AVEVA™ Historian Administration Guide
Appendix A – Legacy Features
© 2021 AVEVA Group plc and its subsidiaries. All rights reserved. Page 339
Editing General Information for an Event Tag
General information for an event tag includes information about the tag definition. Event detectors and actions
are defined separately and then associated with an event tag.
To edit general information for an event tag
1. In the console tree, expand a server group and then expand a server.
2. Expand Configuration Editor, expand System Configuration, and then expand Tag Configuration.
3. Click Event Tags.
4. In the details pane, double-click the event tag to edit. The Properties dialog box appears.
5. Click the General property tab.
6. In the Description box, type a description of the tag.
7. Click Enabled to allow the detector and action for this event tag to run.
8. Click Logged to specify whether or not to log events for this tag into the EventHistory table. Event logging
can only be turned off if no associated actions are configured.

AVEVA™ Historian Administration Guide
Appendix A – Legacy Features
© 2021 AVEVA Group plc and its subsidiaries. All rights reserved. Page 340
9. In the Priority list, select a priority level for the action, either critical or normal. The priority level determines
the sorting queue to which the action will be sent. The critical queue is used for highly important events. If a
system overload condition occurs, events that are given a critical priority will always be processed first.
Events that are given a normal priority will be processed after any critical events and may possibly be
dropped (that is, not performed) on an overloaded system. For more information, see Event Action Priorities
on page 330.
10. Click OK.
Configuring Detectors
You can set up the following types of detectors:
Analog specific value
Discrete specific value
Schedule
Generic SQL
External
Note: If you change an event tag from using any SQL based detector to a time based detector, or vice versa,
stop and restart the Event system. Or, delete the existing event tag and recreate it using the desired detector.
Configuring a Specific Value Detector
The configuration is basically the same for analog and discrete specific value detectors, with only a few small
differences.
To configure a specific value detector
1. In the Detector Type list, select Analog Specific Value or Discrete Specific Value.

AVEVA™ Historian Administration Guide
Appendix A – Legacy Features
© 2021 AVEVA Group plc and its subsidiaries. All rights reserved. Page 341
2. In the Time Interval box, type the interval, in milliseconds, at which the system checks to see if the event
conditions specified by the detector occurred. This value must be greater than or equal to 500 milliseconds,
and less than or equal to 1 hour (3600000 ms).
Be careful when assigning time intervals to event tags. For more information, see Time Intervals for
SQL-Based Detectors on page 325 .
3. In the Edge Detection list, select the "edge" for the event detection.
A leading edge detection returns only rows that are the first to successfully meet the criteria (return true)
after a row did not successfully meet the criteria (returned false). A trailing edge detection returns only rows
that are the first to fail the criteria (return false) after a row successfully met the criteria (returned true). For
an edge detection of "both," all rows satisfying both the leading and trailing conditions are returned.
For more information, see Edge Detection for Events (wwEdgeDetection) .
4. In the Tag Name box, type the name of the tag to which the event criteria will be applied. To search the
database for a tag, click Search. The Tag Finder dialog box appears, in which you can query the database for
tags. For more information, see Using the Tag Finder on page 354.
5. Set the value criteria for the tag.
If you are configuring an analog specific value detector, in the Operator box, select an operator for the
criteria. Then, in the Detection Value box, type a value against which the stored values for the tag are
compared to determine if the event occurred.
If you are configuring a discrete specific value detector, in the State Value list, select the target state of the
discrete tag that causes the event to occur.
6. If you selected None in Edge Detection list, you can specify a resolution for the data. In the Resolution box,
type a sampling rate, in milliseconds, for retrieving the data in cyclic mode. The system returns values stored
over the requested time period at the interval specified by the resolution. For example, if you specify a 5000
ms resolution, the system queries for all data during the time period and then only returns those values that
occur at each 5000 ms interval, starting with the start date and ending with the end date.
Configuring a Schedule Detector
This feature is included only for backward compatibility. You should instead use summary tags and replication.
For more information on configuring replication, see Managing and Configuring Replication on page 204.

AVEVA™ Historian Administration Guide
Appendix A – Legacy Features
© 2021 AVEVA Group plc and its subsidiaries. All rights reserved. Page 342
To configure a schedule detector
1. In the Detector Type list, select Schedule.
2. In the Frequency area, select how often you want the event to occur.
When you select a frequency, different options to the right of the Frequency group become available.
3. Configure the time specific for the selected frequency.
Configuring a Generic SQL Detector
The AVEVA Historian does not validate SQL query syntax. First, test the SQL query using a tool such as Microsoft
SQL Server Query Analyzer.
To configure a generic SQL detector
1. In the Detector Type list, select Generic SQL.
2. In the Time Interval box, type the interval, in milliseconds, at which the system checks to see if the event
conditions specified by the detector occurred. This value must be greater than or equal to 500 milliseconds,
and less than or equal to 1 hour (3600000 ms).

AVEVA™ Historian Administration Guide
Appendix A – Legacy Features
© 2021 AVEVA Group plc and its subsidiaries. All rights reserved. Page 343
Be careful assigning time intervals to event tags. For more information, see Time Intervals for SQL-Based
Detectors on page 325.
3. In the Detector Query window, enter the ad-hoc query that detects the event. To open a list of SQL
templates to use for your query, click Templates.
4. To clear the window, click Clear.
Configuring an External Detector
An external detector is triggered using the AVEVA Historian ActiveEvent control. The detector is a COM
component and has an external interface. An InTouch or Visual Basic script can trigger a historian event by using
the ActiveEvent methods, which are similar to functions. Using the InvokeEventEx() method causes an external
event to be detected within the Event subsystem.
After you select "External" as your detector type, you need to configure the security attributes for the
ActiveEvent control and write the script that invokes the event. For more information, see Using ActiveEvent on
page 360.
Configuring Actions
You can set up the following types of actions: deadband, snapshot, generic SQL, e-mail, and summary.
Configuring a Deadband Action
Important: Deadband actions are no longer supported. Any configured deadband actions are ignored.
To configure a deadband action
1. In the Action Type list, select Deadband.

AVEVA™ Historian Administration Guide
Appendix A – Legacy Features
© 2021 AVEVA Group plc and its subsidiaries. All rights reserved. Page 344
2. To add one or more tags for which to set a new deadband, click Add. The Tag Finder dialog box appears, in
which you can query the database for tags. For more information, see Using the Tag Finder on page
354.Select a tag in the Tag List list, and then click Properties. The Deadband Properties dialog box appears.
3. Configure the appropriate deadbands for the tag.
Apply Time Deadband
The minimum time, in milliseconds, between stored values for a single tag. Any value changes that occur
within the time deadband are not stored. The time deadband applies to delta storage only. A time deadband
of 0 indicates that the system will store the value of the tag each time it changes.
Apply Value Deadband
The percentage of the difference between the minimum and maximum engineering units for the tag. Any
data values that change less than the specified deadband are not stored. The value deadband applies to
delta storage only. A value of 0 indicates that a value deadband will not be applied. The value deadband
applies only to analog tags.
4. Click OK. The changes appear in the Tag List window.
5. To delete a tag from the Tag List window, select the tag and then click Delete.
6. (Optional) In the Post Detector Delay box, type the amount of time, in milliseconds, that must elapse after
an event is detected before the event action can be executed.
Note: If the tag list contains a tag that is deleted from the Runtime database, then the word "Deleted" appears
as the tag type for the tag.
Configuring a Snapshot Action
A snapshot action records the values of a selected mix of analog, discrete, and string tags at the time that the
event occurred.

AVEVA™ Historian Administration Guide
Appendix A – Legacy Features
© 2021 AVEVA Group plc and its subsidiaries. All rights reserved. Page 345
To configure a snapshot action
1. In the Action Type list, select Snapshot.
All tags included in the snapshot are listed in the Snapshot Tag List list. Snapshots can include analog,
discrete, and string tags.
2. To add one or more tags, click Add. The Tag Finder dialog box appears, in which you can query the database
for tags. For more information, see Using the Tag Finder on page 354.
3. To delete a tag, select the tag in the Snapshot Tag List list and then click Delete.
4. (Optional) In the Post Detector Delay box, type the amount of time, in milliseconds, that must elapse after
an event is detected before the event action can be executed.
Configuring a Generic SQL Action
The AVEVA Historian does not validate the SQL query syntax. First test the SQL query using a tool such as
Microsoft SQL Server Query Analyzer.

AVEVA™ Historian Administration Guide
Appendix A – Legacy Features
© 2021 AVEVA Group plc and its subsidiaries. All rights reserved. Page 346
To configure a generic SQL action
1. In the Action Type list, select Generic SQL.
2. In the Action Query window, enter an ad-hoc query that detects the event. To access a list of SQL templates
to use for your query, click Templates.
For information on using event system variables in your query, see Classic Event Subsystem on page 320.
3. To clear the window, click Clear.
4. (Optional) In the Post Detector Delay box, type the amount of time, in milliseconds, that must elapse after
an event is detected before the event action can be executed.
Generic SQL Action Template for Executing a Command
To configure a generic SQL statement that executes a command, select the "Invoke an External Application"
option in the list of generic SQL action templates:
master..xp_cmdshell '<Your Command>', no_output
In the syntax, replace <Your Command> with the desired command. Be sure to enclose the command in single
quotes. For example:
master..xp_cmdshell 'dir *.exe', no_output
The xp_cmdshell extended stored procedure does not start a Windows application. You can only execute simple
DOS commands, batch files or executables (.EXEs) that do not display a user-interface window.
You must have the correct permissions set for the xp_cmdshell extended stored procedure for it to run. For
more information, see your Microsoft SQL Server documentation.
Generic SQL Action Templates for E-mail

AVEVA™ Historian Administration Guide
Appendix A – Legacy Features
© 2021 AVEVA Group plc and its subsidiaries. All rights reserved. Page 347
Note: To use the sp_send_dbmail, you must first configure a default e-mail profile or specify an explicit
profile. Refer to the SQL Server documentation for specific steps on how to configure each one. If an e-mail
message is not sent as expected, check the SQL Server Log for possible errors.
Users can use the following queries to get information about whether the e-mail profile is configured.
To view configured profiles, use this query:
SELECT * FROM msdb.dbo.sysmail_profile
To view configured e-mail accounts, use this query:
SELECT * FROM msdb.dbo.sysmail_account
To view the link between the profile and the account, use this query:
SELECT * FROM msdb.dbo.sysmail_profileaccount
To view the information about the profile (Is Default/Public), use this query:
SELECT * FROM msdb.dbo.sysmail_principalprofile
To configure a generic SQL statement that sends an e-mail message, select one of the "Send an E-mail
message…" options (one with a query and one without) in the list of generic SQL action templates. For example:
master..sp_send_dbmail
@recipients = <ToWhom>,
@body = 'The event @EventTagName occured at @EventTime',
@query = <"Your query">,
@exclude_query_output = <exclude_query_output>
In the second line of the syntax, replace <ToWhom> with the e-mail display name or complete e-mail address of
the intended recipient or recipients. Assign the e-mail message to the @message variable. Be sure to enclose
the recipient(s) and the message in single quotes. For example:
master..sp_send_dbmail
@recipients = 'John Doe',
@body = 'Check this out',
@query = 'SELECT TagName, DateTime FROM EventHistory
WHERE TagName = "SysStatusEvent"
AND DateTime = (SELECT Max (DateTime)
FROM EventHistory
WHERE TagName = "SysStatusEvent")',
@exclude_query_output = <exclude_query_output>
You must have the Microsoft SQL Server and the SQL Mail component set up properly in order for the
sp_send_dbmail extended stored procedure to work correctly.
For more information, see Configuring an E-mail Action on page 347.
Configuring an E-mail Action

AVEVA™ Historian Administration Guide
Appendix A – Legacy Features
© 2021 AVEVA Group plc and its subsidiaries. All rights reserved. Page 348
An e-mail action sends a pre-configured e-mail message when an event occurs. For the event system to support
e-mail actions, you must properly configure all of the following:
SQL Server login
Microsoft Outlook Mail Client
SQL Mail functionality for Microsoft SQL Server
E-mail action for the event system
Note: The exact steps may vary depend on what version of the Windows operating system you are using.
Setting Up Microsoft SQL Server
For Microsoft SQL Mail to work correctly, Microsoft SQL Server must be configured to log on with a user account
that has a valid MAPI mail profile. Perform these steps on the computer running the Microsoft SQL Server
Service that will process the e-mail event.
1. On the Windows Start menu, point to Programs, point to Administrative Tools, and then click Component
Services. The Component Services console appears.
2. In the console tree, click Services.
3. In the results pane, right-click on MSSQLServer and then click Properties. The Properties dialog box appears.
4. Click the General tab.
5. In the Startup Type list, click Automatic.
6. Click the Log On tab.
7. In the Log On As area, click This account. Enter the user account (domain or local) or click Browse to browse
for a valid account. The user account you select needs to have a valid MAPI mail profile set up.

AVEVA™ Historian Administration Guide
Appendix A – Legacy Features
© 2021 AVEVA Group plc and its subsidiaries. All rights reserved. Page 349
8. For information on determining the MAPI mail profile, see Determining the Microsoft Outlook Mail Profile on
page 349.
9. In the Password and Confirm Password boxes, enter the password for the user account.
10. Click OK.
11. Right-click the MSSQL Server service in the results pane, and then click Stop to stop the service.
12. After the MSSQL service stops, right-click the MSSQL Server service in the results pane, and then click Start
to restart the service.
13. Close the Component Services console.
The next step in setting up an e-mail action is to determine the Microsoft Outlook profile. For more information,
see Determining the Microsoft Outlook Mail Profile on page 349.
Determining the Microsoft Outlook Mail Profile
To properly set up the Microsoft SQL Server e-mail configuration, you need to know the name of the MAPI mail
profile for the MSSQL Server service logon account. You must determine the MAPI profile name on the
computer running MSSQL Server.
To determine the MAPI profile name
1. In Control Panel, double-click Mail.
2. Click Show Profiles.
3. Determine the MAPI mail profile.
The mail profile is commonly set to "MS Exchange Settings" so that the use the user's profile on an Exchange
Server is used.
4. Click OK.
For more information on configuring user accounts for the Exchange Client, see your Microsoft
documentation.
The next step in setting up an e-mail action is to configuring SQL mail in SQL Server Management Studio. For
more information, see Setting Up SQL Mail in SQL Management Studio on page 349.
Setting Up SQL Mail in SQL Management Studio
SQL mail is set up using the SQL Server Management Studio. Make sure that the Microsoft SQL Server is running.
For more information on configuring mail profiles, see your Microsoft SQL Server documentation.
Configuring the E-mail Action
Note: Only Microsoft Outlook addresses can be used. Internet addresses are not directly supported.

AVEVA™ Historian Administration Guide
Appendix A – Legacy Features
© 2021 AVEVA Group plc and its subsidiaries. All rights reserved. Page 350
To configure an e-mail action
1. In the Action Type list, select E-mail.
2. In the To line, enter the Outlook e-mail address of one or more persons to whom you want to send an e-mail
message when an event occurs. You can also send a copy of the e-mail to one or more persons in the Cc line.
You can access the address book of the e-mail account by clicking the To or Cc button.
3. In the Subject line, enter a synopsis of the e-mail. If you do not provide text for the subject line, "SQL Server
Message" is used by default.
4. Enter the e-mail text in the Message window.
5. (Optional) In the Post Detector Delay box, type the amount of time, in milliseconds, that must elapse after
an event is detected before the event action can be executed.
Configuring a Summary Action
If you only need scheduled data summaries, you should instead use summary tags and replication. However, if
you want to trigger summaries based on events in history, you must use the event subsystem. For more
information on configuring replication, see Managing and Configuring Replication on page 204.

AVEVA™ Historian Administration Guide
Appendix A – Legacy Features
© 2021 AVEVA Group plc and its subsidiaries. All rights reserved. Page 351
To configure a summary action
1. In the Action Type list, select Summary.
2. To add a new summary operation, click Add and define the operation. For more information, see Adding a
Summary Operation on page 351.
3. To assign analog or discrete tags to a summary operation, select the summary operation in the list and then
click Tags. For more information on adding a summary tag, see Assigning a Tag to a Summary Operation on
page 352.
4. To delete a summary action, select the summary operation in the window and then click Delete.
5. To clear the window of all summary operations, click Clear All.
6. To modify a summary action, select the summary operation in the window and then click Properties. For
more information on the dialog box that appears, see Adding a Summary Operation on page 351.
If you modify a summary operation, you may see inconsistencies between old summary data and new
summary data. You can not save the modified summary operation if its criteria is identical to an existing
summary operation associated with the current event tag.
7. (Optional) In the Post Detector Delay box, type the amount of time, in milliseconds, that must elapse after
an event is detected before the event action can be executed.
Adding a Summary Operation
You can add multiple summary operations for a single summary action, as long as no two summary operations
have the exact same configuration.

AVEVA™ Historian Administration Guide
Appendix A – Legacy Features
© 2021 AVEVA Group plc and its subsidiaries. All rights reserved. Page 352
To add a summary operation
1. In the summary action options, click Add. The Summary Operation Properties dialog box appears.
2. In the Calculation Type list, select the type of calculation to be performed: SUM, MAX, MIN, or AVG.
3. In the Time Stamp list, select the timestamp to use when storing the result of the calculation. The
timestamp can be either the time when the calculation period starts or ends.
4. In the Resolution box, enter sampling rate, in milliseconds, for retrieving the data in cyclic mode. The system
returns values stored over the requested time period at the interval specified by the resolution. For
example, if you specify a 5000 ms resolution, the system queries for all data during the time period and then
only returns those values that occur at each 5000 ms interval, starting with the start date and ending with
the end date.
In general, the higher the resolution, the more accurate the result, because you are including more values
into your aggregation. However, the calculation takes longer and consume more server resources. Avoid
very fine resolutions for summary actions associated with schedule detectors that cover long periods of
time, such as weekly.
Resolution is also very useful when calculating SUMS. For example, setting the resolution to 60,000
milliseconds for a flow in gallons per minute automatically produces a result that is the total volume.
5. In the Duration group, select the period for which the calculation must be performed.
For example, if you are associating a summary action with a duration of 1 hour with a detector that is
scheduled for 3:00 a.m. every Monday, then the system performs the aggregation on values stored between
2:00 a.m. and 3:00 a.m. on Mondays.
6. In the Description box, type a description of the summary operation.
7. Click OK.
The new summary operation now appears in the summary action grid.
Assigning a Tag to a Summary Operation
You can add more than one tag to a single summary.
You cannot add string tags to a summary operation.

AVEVA™ Historian Administration Guide
Appendix A – Legacy Features
© 2021 AVEVA Group plc and its subsidiaries. All rights reserved. Page 353
To assign a tag to a summary operation
1. In the summary action options, select the summary operation in the list and then click Tags. The Summary
Tag List dialog box appears.
2. To search for a tag in the database, click Add. The Tag Finder dialog box appears, in which you can query the
database for tags. For more information, see Using the Tag Finder on page 354.
3. After you add a tag, select the tag in the list and then click Properties. The Summary Tag List Properties
dialog box appears.
4. In the Lower Limit and Upper Limit boxes, set the validity range for the summary tag. Setting a validity range
allows you to control the lower or higher limits at which the calculation is performed.
Upper Limit
The upper limit of validity for the tag's value. Values higher than this limit are not used in the calculation. By
default, this value is set to 1000000000.

AVEVA™ Historian Administration Guide
Appendix A – Legacy Features
© 2021 AVEVA Group plc and its subsidiaries. All rights reserved. Page 354
Lower Limit
The lower limit of validity for the tag's value. Values lower than this limit are not used in the calculation. By
default, this value is set to -1000000000.
For example, if the lower validity limit is 1000, the calculation algorithm ignores all returned data with a
value lower than 1000 when performing the aggregation.
5. In the Description box, type a description of the summarized tag. This normally describes the result of the
operation, although this description can be the same as that of the tag on which the operation is performed.
6. Click OK. The new summary operation tag will appears in the Summary Tag List dialog box.
7. To delete a summary tag from the list, select the tag and then click Delete.
8. To delete all of the summary tags, click Clear All.
Using the Tag Finder
You can search the database for tags using the Tag Finder dialog box. This dialog box can be accessed, for
example, by clicking the Search or Add button in a dialog box.
Using the Tag Finder, you can quickly search the database for tags that match a particular search pattern for
either a tagname or a tag's description. You can either search for tags by using the point-and-click interface or by
typing in your own SQL statement. After the Tag Finder returns a set of tags that match the query, you can select
the ones you want to include.
Using the Form Query Tab

AVEVA™ Historian Administration Guide
Appendix A – Legacy Features
© 2021 AVEVA Group plc and its subsidiaries. All rights reserved. Page 355
Use the Form Query tab of the Tag Finder dialog box to select the criteria to search the database.
To form and execute the query
1. In the Tag Name list, choose the phrase for the search criteria for the tagname. For example, "Ends with."
2. Enter the tagname search parameters for the query. For example, "level". When searching for tags, you only
need to specify wildcard characters to exclude a middle portion of the search word. For example, "le%el".
3. To exclude the parameter for a search, click Not.
4. To add search parameters for a tag's description, select a logical operator from the Operator list.
5. In the Description list, choose the phrase for the search criteria for the tag description. This field is optional.
6. Enter the tag description search parameters for the query. This field is optional. When searching for tags,
you only need wildcard characters to exclude a middle portion of the description.
7. To exclude the parameter for a search, click Not.
8. In the Tag Types area, select a tag group to search.
9. After you set the query parameters, click Find Now to run the query.
The results of a tag search appears in the Found Tags window of the Tag Finder dialog box.

AVEVA™ Historian Administration Guide
Appendix A – Legacy Features
© 2021 AVEVA Group plc and its subsidiaries. All rights reserved. Page 356
10. To add a tag, select the tag in the Found Tags window and then use the arrow button to move the selected
tag into the Target Tags window.
11. Click OK.
To view the syntax used to query the database, click the SQL Query tab.
Using the SQL Query Tab
Use the SQL Query tab of the Tag Finder dialog box to enter and run your own SQL queries against the database.
To form and execute the query
1. In the query window, type in the WHERE clause parameters for the SQL query.
Note: You cannot change the SELECT statement. The required tables and columns for the query result are
already entered for you.
2. After you enter the query parameters, click Find Now to run the query.
The results of a tag search appears in the Found Tags area of the Tag Finder dialog box.
3. To add a tag, select the tag in the Found Tags window and then use the arrow button to move the selected
tag into the Target Tags window.

AVEVA™ Historian Administration Guide
Appendix A – Legacy Features
© 2021 AVEVA Group plc and its subsidiaries. All rights reserved. Page 357
4. Click OK.
Retrieving Logged Event Data
When an event is detected, the event system logs the following into the EventHistory table: 1) the name of the
event tag to which the criteria is associated; 2) the date/time stamp of the event occurrence; 3) the time the
event is detected, and 4) the detection criteria information.
The detection criteria information, shown in the Edge column, is as follows:
Value
Description
0
Trailing Edge Detection (SQL Detectors)
1
Leading Edge Detection (SQL Detectors)
2
Detection on Both Edges (SQL Detectors)
3
No Edge Detection (SQL Detectors)
4
Schedule Detection
5
External Detection
If a snapshot action was configured for the event, the snapshot data is logged between the SnapshotTag table
and the snapshot table for the tag type (for example, the AnalogSnapshot table). If a summary action is
configured for the event, the aggregated data is stored in the SummaryHistory and SummaryData tables.
To view the event history, perform a query on EventHistory table. For example, an event tag, "EventTag1"
detects when the value of "ReactLevel" was equal to 2000. The query to retrieve the event history on January 1,
2001, between 12:36 p.m. and 12:41 p.m. is:
SELECT * FROM EventHistory
WHERE TagName = 'EventTag1'
AND DateTime >= 'Jan 1 2001 12:36 PM'
AND DateTime <= 'Jan 1 2001 12:41 PM'
To view action snapshot information for an event tag (no wildcards allowed), use the v_EventSnapshot view and
specify the name of the event tag as the event in the WHERE clause. For example:
SELECT * FROM v_EventSnapshot
WHERE Event = 'EventTag1'
This query returns the name of the event tag, the time of the event occurrence, and the detection time, as well
as the name, value, and quality for each tag in the snapshot. One row is returned for each tag value.
Viewing Summary Information
If you configure summary actions in the event system, you can view information pertaining to them in the
console tree. You can also view the summary history.

AVEVA™ Historian Administration Guide
Appendix A – Legacy Features
© 2021 AVEVA Group plc and its subsidiaries. All rights reserved. Page 358
To view summary information
1. In the console tree, expand a server group and then expand a server.
2. Expand Configuration Editor, expand System Configuration, and then expand Tag Configuration.
3. Expand Summaries.
4. To view all summaries sorted according to name of the event tag, expand Event Tag View.
5. To view all summaries grouped by summary operation (AVG, MIN, MAX, SUM), expand Operation View.
Viewing Summary Tag Properties
If you select the summary operation details item ("Dur. xxxx, Res. xxxx, Timestamp x") in the console tree, the
summary tag properties appear in the details pane. The columns for the properties are as follows:
Tag Name
The name of the tag to be summarized.
Description
The description of the summarized tag. This normally describes the result of the operation, although this
description can be the same as that of the tag on which the operation is performed.
Upper Limit
The upper limit of validity for the tag's value. Values higher than this limit are not used in the calculation. By
default, this value is set to 1000000000.
Lower Limit
The lower limit of validity for the tag's value. Values lower than this limit are not used in the calculation. By
default, this value is set to -1000000000.

AVEVA™ Historian Administration Guide
Appendix A – Legacy Features
© 2021 AVEVA Group plc and its subsidiaries. All rights reserved. Page 359
Viewing Data for a Summary Tag
To view the summary data for a event tag, click the summary operation details item ("Dur. xxxx, Res. xxxx,
Timestamp x") in the console tree. The summary tag properties appear in the details pane. Double-click a
summary tag in the pane.
The columns are as follows:
TagName
The unique name of the tag within the AVEVA Historian system.
Summary Date
The date applicable to the results of the calculation. It is either the time of the beginning or end of the
calculation period, as specified by the summary operation definition.
Value
The value of the summary.
Quality
The basic data quality indicator associated with the data value.
Viewing History for a Summary Operation

AVEVA™ Historian Administration Guide
Appendix A – Legacy Features
© 2021 AVEVA Group plc and its subsidiaries. All rights reserved. Page 360
To view the summary history for a particular operation, right-click the summary operation details item ("Dur.
xxxx, Res. xxxx, Timestamp x") in the console tree and click Properties.
The Summary History columns are as follows:
Summary Date
The date applicable to the results of the calculation. It is either the time of the beginning or end of the
calculation period, as specified by the summary operation definition.
Operation Start
The timestamp when the calculation started for the operation.
Operation End
The timestamp when the calculation completed for the operation.
Using ActiveEvent
ActiveEvent is an ActiveX control that notifies the Event subsystem when an event occurs in another application,
such as InTouch HMI software. ActiveEvent is script-based. You can use it in any application that uses a
COM-enabled scripting language to detect an event for that application. COM-enabled scripting languages
include InTouch scripting and Visual Basic.
After you install the ActiveEvent control on an InTouch computer using the AVEVA Historian installation
program, ActiveEvent does not automatically appear in the list of available ActiveX objects for use within
WindowMaker. You need to run the Wizard/ActiveX installation from within WindowMaker, as well. For more
information on performing a Wizard/ActiveX installation, see your InTouch documentation.

AVEVA™ Historian Administration Guide
Appendix A – Legacy Features
© 2021 AVEVA Group plc and its subsidiaries. All rights reserved. Page 361
To enable external event detection for the historian, you must:
1. Create an event tag in the historian to store the event occurrence information. Make sure that the detection
type is set to External.
You can define the event tag so that the event is associated with an action that is triggered from the
historian, such as executing a SQL script, sending an e-mail message, or recording the values of a set of tags
at the time the event occurred.
For more information, see Adding an Event Tag on page 336.
2. Install the ActiveEvent control so that it can be used in the ActiveX container application (for example, in
InTouch HMI software).
For more information on installing the ActiveEvent control, see the AVEVA System Platform Installation
Guide.
3. Configure the DCOM security attributes for the external detector to be used with ActiveEvent. Security
attributes must be set up on the AVEVA Historian computer.
For information, see Configuring Security Attributes for ActiveEvent on page 361.
4. Write a script that notifies the historian event system of the external event.
For more information, see ActiveEvent Methods on page 364.
Important: You cannot use ActiveEvent in an InTouch version 7.0 SP2 application.
Synchronize the system time for the ActiveEvent computer with the system time for the historian. If the
ActiveEvent computer time is ahead, the event system may generate NULL values for snapshot data.
Configuring Security Attributes for ActiveEvent
For ActiveEvent to work, security attributes (for example, permission to launch) must be correctly configured.
Configure the security attributes on the AVEVA Historian computer using the DCOMCnfg.Exe program.
To configure security attributes for ActiveEvent:
1. On the Windows Start menu, click Run. The Run dialog box appears.
2. In the Open box, type DCOMCnfg.Exe.

AVEVA™ Historian Administration Guide
Appendix A – Legacy Features
© 2021 AVEVA Group plc and its subsidiaries. All rights reserved. Page 362
3. Click OK. The Distributed COM Configuration Properties dialog box appears.
4. Click Computers, then My Computer, and then DCOM Config, and then select EventDetector Class.
5. Click Properties. The EventDetector Class Properties dialog box appears.
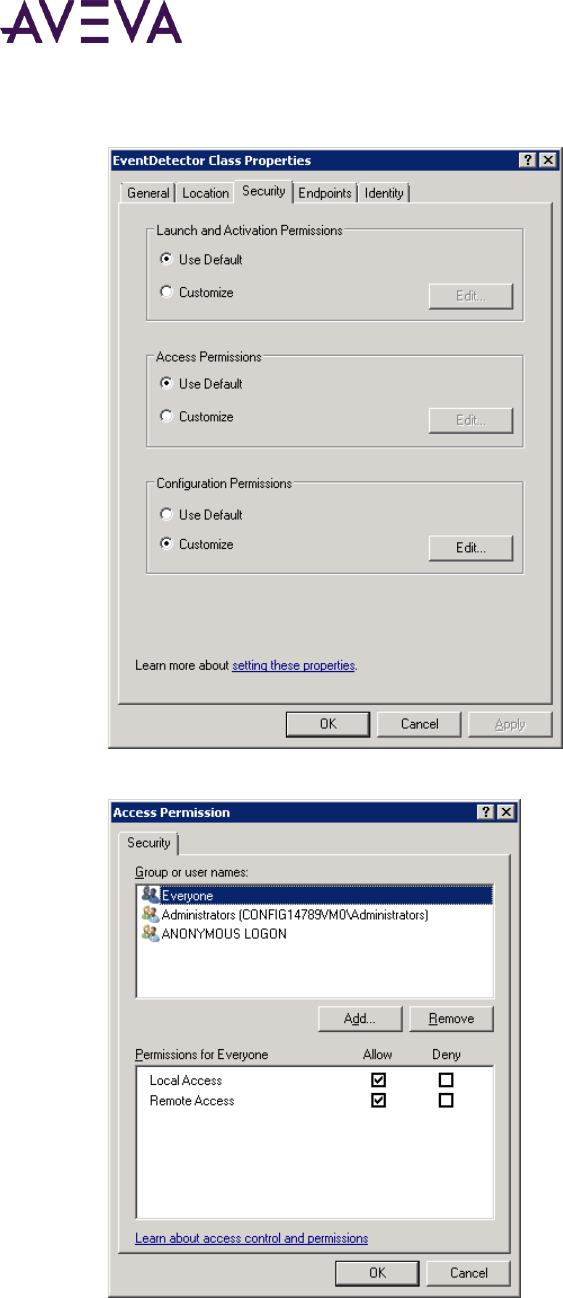
AVEVA™ Historian Administration Guide
Appendix A – Legacy Features
© 2021 AVEVA Group plc and its subsidiaries. All rights reserved. Page 363
6. Click the Security tab.
7. Select Access permissions - Customize and then click Edit. The Access Permission dialog box appears.

AVEVA™ Historian Administration Guide
Appendix A – Legacy Features
© 2021 AVEVA Group plc and its subsidiaries. All rights reserved. Page 364
8. Click Add. The Select Users, Computers, and Groups dialog box appears.
9. In the Names list, type Everyone.
10. Click OK. The Access Permission dialog box now shows the Everyone group with allowed access.
11. Click OK to return to the EventDetector Class Properties dialog box.
Repeat the general procedure to add Everyone to the launch permissions.
1. Select Launch and Activation permissions - Customize and then click Edit.
2. Repeat steps 8 through 11 to add the Everyone group to the list of users who have launch permissions.
3. Click OK to close the EventDetector Class Properties dialog box.
4. Click OK to close the DCOMCnfg.Exe program.
ActiveEvent Methods
Use ActiveEvent's methods in scripts to connect to an AVEVA Historian and trigger an event. The ActiveEvent
control aids the remote triggering of events on the historian by first initializing with the historian computer
name and event tag, and then calling the InvokeEventEx() method.
ActiveEvent can be scripted using any scripting language that supports COM. For example, an InTouch script can
trigger an AVEVA Historian event if you use this control in an InTouch application. You can also trigger an event
from a Visual Basic script.
Note: ActiveEvent does not work in asynchronous mode in an InTouch application.
The following example InTouch script connects to a server named "WWHistorianServer1," adds the event tag
called "ExternalEvent," and logs an "ExternalEvent" event tag event.
{ Connect ActiveEvent to your AVEVA Historian--only needs to be done once.}
intResult = #WWHistEvent1.InitializeEx( "WWHistorianServer1");
{Was initialization successful or are we already initialized? }
IF intResult == 0 OR intResult == 4 THEN
intResult = #WWHistEvent1.AddEventTag("ExternalEvent");
IF intResult == 0 THEN
intResult = #WWHistEvent1.InvokeEventEx("ExternalEvent");
IF intResult == 0 THEN
sDisplayResult = "Logged event";
ELSE
sDisplayResult = "Failed to log event";
ENDIF;

AVEVA™ Historian Administration Guide
Appendix A – Legacy Features
© 2021 AVEVA Group plc and its subsidiaries. All rights reserved. Page 365
ENDIF;
ENDIF;
AddEventTag()
Adds an event tag to the active event tag list
Method
AddEventTag(string EventTag)
Parameter
EventTag
Name of the event tag with which the ActiveEvent event detector is associated. ActiveEvent is used with an
external type event detector.
Returns Value
0 = Success.
2 = Unable to execute method because ActiveEvent is not initialized.
7 = Remote function call failed.
InitializeEx()
Creates a connection to the AVEVA Historian.
Method
InitializeEx(string ComputerName)
Parameter
ComputerName
Name of the computer on which the historian is running. If you are not connecting to the historian over a
network, use a blank string ("") for the computer name.
Note: You cannot use an AVEVA Historian alias for this parameter.
Returns Value
0 = Success.
1 = Unknown failure.
3 = Unable to initialize ActiveEvent.
4 = ActiveEvent is already initialized.
7 = Remote function call failed.
8 = Unable to determine local computer name.
Remarks
After you initialize the historian, use the IsConnected property to determine if the connection was successful.
Also, you only need to initialize with the server one time. You can invoke an unlimited number of events after
initialization has occurred.

AVEVA™ Historian Administration Guide
Appendix A – Legacy Features
© 2021 AVEVA Group plc and its subsidiaries. All rights reserved. Page 366
If you are using the InTouch HMI software, initialization does not occur unless the ActiveEvent ActiveX control is
part of an open window. This limits the use of the InvokeEventEx method within InTouch Application Scripts,
Condition Scripts, or Data Change Scripts.
When you close an InTouch window, all ActiveX controls are automatically uninstantiated.
InvokeEventAtTimeEx()
Triggers the event at a specified date/time.
Method
InvokeEventAtTimeEx(string TagName, string EventDateTime)
Remarks
You can invoke an unlimited number of events after you initialize with an AVEVA Historian.
Parameter
TagName
Name of the event tag with which the ActiveEvent event detector is associated. ActiveEvent is used with an
external type event detector.
EventDateTime
Date/time that you want the event triggered. This date is in local time for the historian. The event date and
time must be formatted as:
YYYY-MM-DD hh:mi:ss.mmm
Returns Value
0 = Success.
1 = Unknown failure.
2 = Unable to execute method because ActiveEvent is not initialized.
5 = Unable to perform date/time conversion due to invalid format.
6 = Date/time cannot be a future date.
7 = Remote function call failed.
InvokeEventEx()
Triggers the event at the time this method is called.
Method
InvokeEventEx(string EventTag)
Remarks
You can invoke an unlimited number of events after you initialize with an AVEVA Historian.
Parameter
EventTag
Name of the event tag with which the ActiveEvent event detector is associated. ActiveEvent is used with an
external type event detector.

AVEVA™ Historian Administration Guide
Appendix A – Legacy Features
© 2021 AVEVA Group plc and its subsidiaries. All rights reserved. Page 367
Returns Value
0 = Success.
1 = Unknown failure.
2 = Unable to execute method because ActiveEvent is not initialized.
7 = Remote function call failed.
IsConnected
Determines whether a connection to the AVEVA Historian exists.
Method
IsConnected
Returns Value
0 = Not connected
1 = Connected to the historian
RemoveEventTag()
Removes an event tag from the active event tag list.
Method
RemoveEventTag(string EventTag)
Parameter
EventTag
Name of the event tag to remove from the list of external events for the ActiveEvent control.
Returns Value
0 = Success.
2 = Unable to execute method because ActiveEvent is not initialized.
7 = Remote DCOM call failed.
Scripting Example: Triggering Events within an InTouch Application
To trigger an event within an InTouch application, include these methods in an InTouch script, similar to the
following:
#WWHistEvent1.InitializeEx("Historian01"); {Initialized the server}
#WWHistEvent1.AddEventTag("ASVTag");
#WWHistEvent1.AddEventTag("SysStatusEvent"); {Added event tag}
#WWHistEvent1.InvokeEventEx("ASVTag");
#WWHistEvent1.InvokeEventEx("SysStatusEvent"); {Invoked event}
where:
WWHistorianEvent1 is the name of the instantiation of the ActiveEvent ActiveX control
Historian01 is the computer name for the AVEVA Historian (not an alias)

AVEVA™ Historian Administration Guide
Appendix A – Legacy Features
© 2021 AVEVA Group plc and its subsidiaries. All rights reserved. Page 368
ASVTag is the name of the event tag that is associated with this external detector
To add more tags to be detected, use the AddEventTag() method and use InvokeEventEx() specifying the
tagname. A single ActiveEvent control handles many tags.
Scripting Example: Triggering Multiple Events within Visual Basic
In this Visual Basic script, the initialization occurs with AVEVA Historian running on a specified computer, and
more than one event is invoked:
Private Sub Command1_Click()
Dim ComputerName As String
ComputerName = "Computer1"
Dim TagName As String
Dim Connected As Long
TagName = "Event1"
WWHistEvent1.InitializeEx ComputerName
WWHistEvent1.AddEventTag TagName
Connected = WWHistEvent1.IsConnected
If Connected = 1 Then
WWHistEvent1.InvokeEventEx TagName
WWHistEvent1.InvokeEventEx TagName
WWHistEvent1.InvokeEventEx TagName
MsgBox ("Sent off three events")
Else
MsgBox ("Failed To Connect")
End If
End Sub
History Block Storage for Alarms and Events
Historian can store alarm and events history in history blocks.
For information about setting up history blocks for alarms and events, see the AVEVA System Platform
Installation Guide.
You can migrate alarms and events from the A2ALMDB database to history blocks. For more information, see
Migrating Data from the A2ALMDB Database to History Blocks on page 380.
Note: Alarms and events from AVEVA Application Server versions prior to 2014 R2 were stored in the A2ALMDB
database. Events previously configured using the Classic Event subsystem were stored in SQL Server tables in the
Runtime database.
A2ALMDB Database
The A2ALMDB SQL Server database stores alarms and events generated through external sources such as
Application Server.

AVEVA™ Historian Administration Guide
Appendix A – Legacy Features
© 2021 AVEVA Group plc and its subsidiaries. All rights reserved. Page 369
Notes: Starting with AVEVA Historian 2014 R2, alarms and events from Application Server can be stored to
history blocks instead of the A2ALMDB database. Also, the Classic Event subsystem stores data in the Runtime
database, not the A2ALMDB database. For more information on the Classic Event subsystem, see Configuring
Classic Events on page 335.
Earlier versions of AVEVA System Platform used WWALMDB database rather than A2ALMDB for alarms and
events. If you are currently using WWALMDB and want to to use A2ALMDB instead, you may need to change
your alarm historization settings from within the System Platform IDE and change your alarm queries to use
A2ALMDB.
Managing the A2ALMDB database is necessary to ensure that the size of the database is maintained within its
normal operating parameters. If the database is left unchecked and allowed to grow unbounded, the risk of
losing valuable data increases.
You manage the alarm database using two alarm database utilities. Use the Alarm DB Purge-Archive utility to
remove records from the database permanently or archive them to files. Use the Alarm DB Restore utility to
query previously archived data.
Purging is used to permanently remove data that is no longer required. Archiving allows data to be exported to a
file so they can later be restored in needed.
The following figure shows how both utilities purge/archive records and then restore them back to the
database.
You must be logged into the computer as an administrator to use the Alarm DB Purge-Archive utility.
Configuring Purge or Archive Settings
Use the Alarm DB Purge-Archive utility to:
Manually purge or archive records from the database to free up space and improve performance.

AVEVA™ Historian Administration Guide
Appendix A – Legacy Features
© 2021 AVEVA Group plc and its subsidiaries. All rights reserved. Page 370
Automatically purge or archive records regularly.
Optionally archive database records to files.
Save the status of archive or purge operations to a log file to troubleshoot problems.
Show the status of purge or archive operations.
Configuring the Database Connection
You must select a database to restore the archived data to. If the specified database is not present on the
server, you are prompted to create a new database with default server parameters.
To configure a database for restoring
1. Open the Alarm DB Restore utility. Do the following:
a. In the Tools view, expand Applications.
b. Double-click Alarm DB Restore.
2. Click the Configure tab.
3. Configure the connection to the alarm database. Do the following:
a. In the SQL Server Name list, click the node name of the server that hosts the alarm database.
b. In the Database Name box, type the name of the alarm database.
c. In the User Information area, type an alarm database user name and password in the respective boxes.
4. Click Test Connection to test your connection to the database. A message indicates whether the connection
to the alarm database is successful or not. Click OK.

AVEVA™ Historian Administration Guide
Appendix A – Legacy Features
© 2021 AVEVA Group plc and its subsidiaries. All rights reserved. Page 371
5. Click Apply.
Configuring How Much Data to Purge from the Server
You can:
Select the type of alarm records to be purged from the alarm database.
Optionally, archive purged records from the alarm database to files.
Select the folder location to store the purge log file.
You can select the type of table that needs to be purged, either the AlarmDetail or AlarmConsolidated table.
Notes: The Historian alarm database is named A2ALMDB. Earlier versions of AVEVA System Platform used
WWALMDB database rather than A2ALMDB for alarms and events. If you are currently using WWALMDB and
want to to use A2ALMDB instead, you may need to change your alarm historization settings from within the
System Platform IDE and change your alarm queries to use A2ALMDB.
The Historian A2ALMDB database is created only in Detailed mode, while the InTouch WWALMDB database is
supported in both Detailed and Consolidated modes.
All data from the day previous to the number specified is purged. Valid entries are 0-9999. If you select 0, all
records are purged from the alarm database except the current day’s records.
To select records to purge
1. Open the Alarm DB Purge-Archive utility. Do the following:
a. In the Tools view, expand Applications.
b. Double-click Alarm DB Purge-Archive.
2. Click the General tab.

AVEVA™ Historian Administration Guide
Appendix A – Legacy Features
© 2021 AVEVA Group plc and its subsidiaries. All rights reserved. Page 372
3. In the Purge Properties area, configure the type of records to purge. Do either of the following:
o Click Detailed Mode to purge alarm records that are saved in the database in Detailed mode.
o Click Consolidated Mode to purge alarm records that are saved in the database in Consolidated mode.
4. In the Days Online box, type the number of days worth of records to retain in the alarm database.
5. Click Apply.
Configuring the Archive of Purged Data
You archive the records purged from the alarm database and then restore them using the Alarm DB Restore
utility.
When you purge the alarm database, the Alarm DB Purge-Archive utility automatically creates a set of nine
archive files that correspond to the purged alarm database tables. Each file contains the purged records of a
single table.
The Alarm DB Purge-Archive utility assigns names to the archive files based upon the table name, date, and time
when the purge operation occurred. For example, the name of the archive file for the AlarmMaster table that
was purged on June 22, 2007 at 5:30 p.m. is formatted like the following:
AlarmMaster_06222007_1730.txt
To configure the archive
1. Open the Alarm DB Purge-Archive utility. Do the following:
a. In the Tools view, expand Applications.
b. Double-click Alarm DB Purge-Archive.

AVEVA™ Historian Administration Guide
Appendix A – Legacy Features
© 2021 AVEVA Group plc and its subsidiaries. All rights reserved. Page 373
2. Click the General tab.
3. Select the Archive check box.
4. In the Archive Folder Path box, type the folder location where archive files should be saved or click the
ellipsis button to browse for the location.
5. Select the Create Unique Folders check box if you want the archive files to be placed in an individual
sub-folder beneath the archive file folder.
6. Click Apply.
Configuring Log File Settings
The Alarm DB Purge-Archive utility generates status messages during a purge operation. You can view these
messages online from the utility’s Status window. The Alarm DB Purge-Archive utility also writes purge
messages to the purge log file named WWAlmPurge.log.
The example below shows the messages stored in the log file after a successful purge operation.
Purge Started on 12:16:48 PM 6/22/2007
Starting transaction....
Archiving Table ProviderSession...
Archiving Table Query...
Archiving Table Cause...
Archiving Table Alarm Master...
Archiving Table OperatorDetails...
Archiving Table Alarm Detail...
Archiving Table Comment...
Archiving Table Events...
Archiving Table TagStatus...

AVEVA™ Historian Administration Guide
Appendix A – Legacy Features
© 2021 AVEVA Group plc and its subsidiaries. All rights reserved. Page 374
Purging records in the database...
Committing....
Purge Completed On 12:16:52 PM 6/22/2007
144 records from AlarmMaster were purged along with the related records from other tables.
By default, the purge log file is stored in this folder: C:\Users\UserName\Documents\My InTouch Applications.
You can change the storage location of the purge log file.
The Alarm DB Purge-Archive utility appends new messages to the log file each time a purge occurs.
To set archive logging
1. Open the Alarm DB Purge-Archive utility. Do the following:
a. In the Tools view, expand Applications.
b. Double-click Alarm DB Purge-Archive.
2. Click the General tab.
3. In the Log File Path box, type the folder location where the purge log file should be placed or click the
ellipsis button to browse for the location.
4. Click Apply.
Manually Purging and Archiving the Database
You can purge and archive your alarm database manually. This overrides the activation time and starts the
purging and archiving immediately.
The purge operation checks for the presence of an archive file and appends to the same. If the archive file is not
present, the file is created as per the naming convention and then used for archiving.

AVEVA™ Historian Administration Guide
Appendix A – Legacy Features
© 2021 AVEVA Group plc and its subsidiaries. All rights reserved. Page 375
The purge operation does not delete entries in tables such as ProviderSession, Query, and Cause that are linked
to the main tables such as AlarmMaster through foreign key constraints. The related records in these tables are
written to the files to maintain the data consistency and also retained in the database.
Caution: Manually purge all records (the Purge All Now option) only when the Alarm DB Logger service is
stopped. If the purge operation is committed successfully while the Alarm DB Logger service is running, the
Alarm DB Logger service stops logging and starts caching records.
To manually purge and archive records from the alarm database
1. Open the Alarm DB Purge-Archive utility. Do the following:
a. In the Tools view, expand Applications.
b. Double-click Alarm DB Purge-Archive.
2. Click the Purge/Archive tab.
3. Click Test Now to perform a test purge to verify your connection to the database and archive locations.
The test purge creates empty archive files in the specified archive folder. The Status area shows a message
that the test was successful.
The Test Now button is available only if you have chosen to archive your purged records. The Archive option
is located on the General tab.
4. Purge the records from the database. Do either of the following:

AVEVA™ Historian Administration Guide
Appendix A – Legacy Features
© 2021 AVEVA Group plc and its subsidiaries. All rights reserved. Page 376
o Click Purge Now to purge the selected records.
o Click Purge All Now to purge all records.
5. To stop a purge, click Cancel Purge. If you cancel the purge, the alarm database is rolled back to its original
state.
Setting a Schedule for Automatic Purging
The Alarm DB Purge-Archive utility can automatically purge or archive records from the alarm database at
scheduled intervals. You can perform a test purge to verify your connection to the database and target locations
and to start and stop purging.
To set a schedule for automatic purging
1. Open the Alarm DB Purge-Archive utility. Do the following:
a. In the Tools view, expand Applications.
b. Double-click Alarm DB Purge-Archive.
2. Click the Purge/Archive tab.
3. In the Time Interval area, select a purge interval, either daily, weekly, or monthly.
If you click Weekly or Monthly, a Day box appears in the Activation Time area for you to specify the day of
the week or day of the month.
If you click Daily, in the Time box, configure the time of day that you want the purge/archive operation to
start.
4. In the Run As area, click Service to run the purge-archive utility as a service. It is recommended to run the
scheduled utility as a service to ensure the utility restarts automatically after a computer reboot.

AVEVA™ Historian Administration Guide
Appendix A – Legacy Features
© 2021 AVEVA Group plc and its subsidiaries. All rights reserved. Page 377
5. Click Apply to save your purge and archive settings.
6. Click Activate to place the Alarm DB Purge-Archive utility on an automatic purge schedule.
7. Click Close.
Restoring the Alarm Database
The Alarm DB Restore utility restores the archived alarm records in the archive files back to your alarm
database. The following figure summarizes the steps to restore alarm records to the database.
Alarm Database
Alarm Records
Alarm Records
Archive Records
Archive
Request
Alarm DB
Restore
Archive
Files
Log File
Alarm Records
To restore a database, you must:
Configure the connection to the alarm database.
Select which records to restore to the alarm database.
Restore archived records to the alarm database.
When minimized, the Alarm DB Restore utility appears as an icon in the system tray. When you right-click the
icon, a menu shows the following commands:
Command
Description
Restore
Begins the restoring process.
Cancel Restore
Cancels the restoring process.
Clear Status
Clears the status window.
Hide Window
Minimizes the Alarm DB Restore utility to an icon in the system tray.
Show Window
Opens and maximizes the Alarm DB Restore utility.
Exit
Closes the Alarm DB Restore utility.
If you right-click in the Alarm DB Restore utility, the same menu appears.
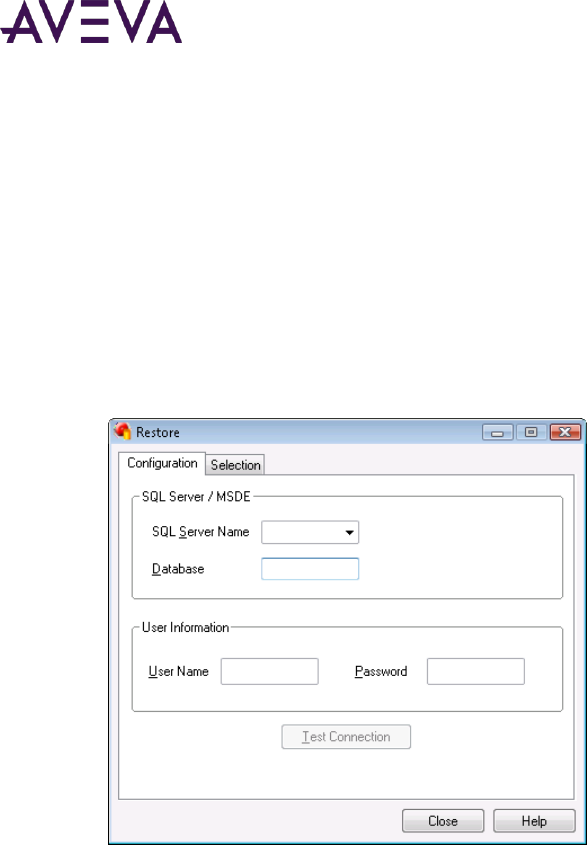
AVEVA™ Historian Administration Guide
Appendix A – Legacy Features
© 2021 AVEVA Group plc and its subsidiaries. All rights reserved. Page 378
Configuring the Database Connection
You must select a database to restore the archived data to. If the specified database is not present on the
server, you are prompted to create a new database with default server parameters.
To configure a database for restoring
1. Open the Alarm DB Restore utility. Do the following:
a. In the Tools view, expand Applications.
b. Double-click Alarm DB Restore.
2. Click the Configure tab.
3. Configure the connection to the alarm database. Do the following:
a. In the SQL Server Name list, click the node name of the server that hosts the alarm database.
b. In the Database Name box, type the name of the alarm database.
c. In the User Information area, type an alarm database user name and password in the respective boxes.
d. Click Test Connection to test your connection to the database. A message indicates whether the
connection to the alarm database is successful or not. Click OK.
4. Click Close.
Configuring Which Files to Restore
You can select a time period for the records to restore and whether you want the database tables to be
recreated.
If you cancel the restore, the database is rolled back to its original state.

AVEVA™ Historian Administration Guide
Appendix A – Legacy Features
© 2021 AVEVA Group plc and its subsidiaries. All rights reserved. Page 379
Caution: If you try to restore archived alarms that are already present in the database, the archived records
are not restored. This avoids duplicate alarm/event entries in the database. The Alarm GUID or Event GUID
associated with records determines whether an alarm or event is already present in the database.
To select database records to restore
1. Open the Alarm DB Restore utility. Do the following:
a. In the Tools view, expand Applications.
b. Double-click Alarm DB Restore.
2. Click the Selection tab.
3. In the Folder Path for Archived Files box, type the full path (up to 255 alphanumeric characters) to the
location of the archived files or click the button to locate and select the folder where archived files are
stored.
4. In the Restore files later than (Date/Time) area, select the date and time to start restoring records to the
database.
The starting date and time are set by default to the current date and time.
5. In the Folder path for log file box, type the full path (up to 255 alphanumeric characters) where the log files
are created and stored or click the button to locate and select a folder.
6. If you select the Recreate Tables check box, the tables of the specified alarm database are recreated.
Depending on the type of logging you selected for the alarm records contained in the archived files, select:
o Detailed - Recreate the alarm database tables in detailed mode.
o Consolidated - Recreate the alarm database tables in consolidated mode.
Important: Recreating tables overwrites all records currently stored in the alarm database.
7. Click Restore.

AVEVA™ Historian Administration Guide
Appendix A – Legacy Features
© 2021 AVEVA Group plc and its subsidiaries. All rights reserved. Page 380
Starting a Database Restore Operation
You restore archived database records after you have established the database connection, specified the
archived files folder and a time filter.
To restore database records from an archive
1. Open the Alarm DB Restore utility. Do the following:
a. In the Tools view, expand Applications.
b. Double-click Alarm DB Restore.
2. Click the Selection tab.
3. Click Restore. A message shows whether the restoration is successful and the number of records restored to
the database.
Migrating Data from the A2ALMDB Database to History Blocks
You can migrate the alarm and event data in the A2ALMDB database to history blocks. Before you start the
migration, be sure that:
The historian is running.
The user account used to connect to the A2ALMDB database is a member of the aaAdministrators group.
Members of the aaPowerUsers group can also run the utility if they are granted the VIEW DATABASE STATE
permission.
The historian is configured to store alarms and events to history blocks.

AVEVA™ Historian Administration Guide
Appendix A – Legacy Features
© 2021 AVEVA Group plc and its subsidiaries. All rights reserved. Page 381
There is at least one record in the A2ALMDB database.
At the end of the migration, the following migration statistics are logged to the ArchestrA Logger:
Number of alarms and events in the database
Number of events forwarded to history block storage
Number of events/second forwarded to history block storage
To migrate alarm and event data
1. On the Start menu, click All Programs, click AVEVA, click Historian and then click Migrate A2ALMDB. The
Migrating Alarm and Event to Block Storage utility appears.
2. In the SQL Login Information area, specify a user account that has administrative access to the A2ALMDB
database.
3. Click Connect.
4. Click Start to begin the migration.
