
1
STP500: SAP Business Network - Enterprise Account - Quick Reference Guide
Version:
Last Updated:
Quick Reference Guide
SAP Training
3M Business Transformation & Information Technology
Progress set in motion
>
Source To Pay
6.2
21-Aug-2023
STP500: SAP Business Network
Enterprise Account

2
STP500: SAP Business Network - Enterprise Account - Quick Reference Guide
This document provides a summary of the listed transactions for each PO Type.
▪ Purchase Order (PO): Pages 3 - 4
▪ Purchase Order Acknowledgement (POA): Pages 5 - 6
▪ Advanced Ship Notice (ASN): Pages 7 - 9
▪ Country-Specific Invoicing Rules for 3M: Page 10
▪ Invoice: Pages 11 - 14
▪ Line-Item Credit Memo: Pages 15-16
▪ Additional Information: Page 17
To view more detailed information, go to:
STP500: SAP Business Network - Enterprise Account - User's Guide
Table of Contents

3
STP500: SAP Business Network - Enterprise Account - Quick Reference Guide
Material Order
Line Items 1, 2, etc
Free Text Description Service Order
Line Items 10001, 10002, etc
Limit Order
Line Items 00001, 00002, etc
Purchase Order (PO)
• Limit Orders are used when 3M is requesting a service
from you in which the total service is unknown or when
the service extends over multiple payment periods and
multiple payments are made.
• The order information available on the Order Details tab
at the Header Level includes:
▪ 3M Company who issued PO, Ship To location,
Payment terms, Supplier Address, Remit To
information, Transport Terms instructions on how to
ship, Comments (if applicable).
▪ 3M Buyer Contact for all questions, comments, or
changes regarding the PO.
▪ Possible orders statuses are:
o New: Initial state, new order.
o Confirmed: All quantities confirmed.
o Shipped: All quantities have been shipped .
o Invoiced: All ordered quantities have been
invoiced.
o Changed. The original order is marked with an
Obsolete status and replaced by this subsequent
(changed) order.
o Cancelled: Order has been canceled.
o Failed: SAP Business Network experienced a
problem routing the order to your account.
Purchase Order Detail: Header
• Free Text Description Service Orders are used when 3M
is requesting a fixed-rate service with defined start and
end dates.
• The order information available on the Order Details tab
at the Header Level includes:
▪ 3M Company who issued PO, Ship To location,
Payment terms, Supplier Address, Remit To
information, Transport Terms instructions on how to
ship, Comments (if applicable).
▪ 3M Buyer Contact for all questions, comments, or
changes regarding the PO.
▪ Possible orders statuses are:
o New: Initial state, new order.
o Confirmed: All quantities confirmed.
o Shipped: All quantities have been shipped .
o Invoiced: All ordered quantities have been
invoiced.
o Changed. The original order is marked with an
Obsolete status and replaced by this subsequent
(changed) order.
o Cancelled: Order has been canceled.
o Failed: SAP Business Network experienced a
problem routing the order to your account.
• Material Orders are used when 3M is purchasing
tangible goods/materials.
▪ Free Text Description Material Orders: 3M is ordering
a material that is not in your catalog.
▪ Catalog Material Orders: 3M is ordering a material
with a Supplier part number pulled from your catalog.
▪ 3M Material Orders: 3M is ordering a material with
a 3M part number pulled from 3M Master Data.
• The order information available on the Order Details tab
at the Header Level includes:
▪ 3M Company who issued PO, Ship To location,
Payment terms, Supplier Address, Remit To
information, Transport Terms instructions on how to
ship, Comments (if applicable).
▪ 3M Buyer Contact for all questions, comments, or
changes regarding the PO.
▪ Possible orders statuses are:
o New: Initial state, new order.
o Confirmed: All quantities confirmed.
o Shipped: All quantities have been shipped .
o Invoiced: All ordered quantities have been
invoiced.
o Changed. The original order is marked with an
Obsolete status and replaced by this subsequent
(changed) order.
o Cancelled: Order has been canceled.
o Failed: SAP Business Network experienced a
problem routing the order to your account.

4
STP500: SAP Business Network - Enterprise Account - Quick Reference Guide
Material Order
Line Items 1, 2, etc
Free Text Description Service Order
Line Items 10001, 10002, etc
Limit Order
Line Items 00001, 00002, etc
Purchase Order (PO)
• On the Order Details tab, scroll down to view the Line
Items section. Each line describes a quantity of items 3M
wants to purchase.
• The Summary level of the order displays the 3M Item ID
materials or services, Customer Part Number (if
applicable), and description.
• The Type will be displayed as Service.
• Click Details to view additional information at the Line-
Item Level, including:
▪ Unit Details
▪ Pricing Details
▪ Comments (full item description)
▪ Tax Details (only available for United States and
Canada transactions)
• The Tax Status displays on the order line item if
applicable to the Supplier's country, and the Tax details
are based on country requirements.
Purchase Order Detail: Line Items
• On the Order Details tab, scroll down to view the Line
Items section. Each line describes a quantity of items 3M
wants to purchase.
• The Summary level of the order displays the 3M Item ID
materials or services, Customer Part Number (if
applicable), and description.
• The Type will be displayed as Service.
• Click Details to view additional information at the Line-
Item Level, including:
▪ Unit Details
▪ Pricing Details
▪ Comments (full item description)
▪ Tax Details (only available for United States and
Canada transactions)
• The Tax Status displays on the order line item if
applicable to the Supplier's country, and the Tax details
are based on country requirements.
• On the Order Details tab, scroll down to view the Line
Items section. Each line describes a quantity of items 3M
wants to purchase.
• The Summary level of the order displays the 3M Item ID
materials or services, Customer Part Number (if
applicable), and description.
• The Type will be displayed as Material.
• Click Details to view additional information at the Line-
Item Level, including:
▪ Unit Details
▪ Pricing Details
▪ Comments (full item description)
▪ Tax Details (only available for United States and
Canada transactions)
• The Tax Status displays on the order line item if
applicable to the Supplier's country, and the Tax details
are based on country requirements.
5
STP500: SAP Business Network - Enterprise Account - Quick Reference Guide
Material Order
Line Items 1, 2, etc
Free Text Description Service Order
Line Items 10001, 10002, etc
Limit Order
Line Items 00001, 00002, etc
Order Confirmation
• Order Confirmations (POAs) are required to be
completed prior to invoicing for all POs and PO changes.
Order Confirmations must be submitted within 48 hours
of PO receipt.
• Multiple Order Confirmations are not recommended for
when the status is the same on all lines.
• If you are unable to fulfill a line item, or the amount or
UOM is incorrect, you must be in direct contact with the
3M Buyer. A Change Order or Cancelled Order will be
issued.
• Do not reject any Purchase Order line items through
the SAP Business Network.
• Delivery Date:
▪ You may propose changes to the delivery date on the
order confirmation. The delivery date on a limit order
simply denotes the start of period when you begin
invoicing 3M.
▪ 3M issues a Change PO if the changes are agreed to
and approved through the order confirmation or
through direct contact (for exceptions) with your 3M
Buyer.
▪ All change orders require a new order confirmation
prior to submission of the invoice.
• Keep the Unit of Measure (UOM) as shown on the PO.
• Do not Reject the entire order.
• Limit POs must be confirmed at the line-item level.
Do not select Confirm Entire Order.
• Order Confirmations (POAs) are required to be
completed prior to invoicing for all POs and PO changes.
Order Confirmations must be submitted within 48 hours
of PO receipt.
• Multiple Order Confirmations are not recommended for
when the status is the same on all lines.
• If you are unable to fulfill a line item, or the amount or
UOM is incorrect, you must be in direct contact with the
3M Buyer. A Change Order or Cancelled Order will be
issued.
• Do not reject any Purchase Order line items through
the SAP Business Network.
• Quantity and Price
▪ You must contact the 3M Buyer to change the
quantity or price.
▪ 3M issues a Change PO if the changes are agreed to
and approved through the order confirmation or
through direct contact (for exceptions) with your 3M
Buyer.
▪ All change orders require a new order confirmation
prior to submission of the invoice.
• Verify the UOM on the PO is the UOM to be used on the
invoice.
▪ If the UOM is incorrect, you must be in direct contact
with the 3M Buyer and specify the UOM needed in the
Comments. You cannot invoice with a different UOM
than shown on the PO.
• Order Confirmations (POAs) are required to be
completed prior to invoicing for all POs and PO changes.
Order Confirmations must be submitted within 48 hours
of PO receipt.
• Multiple Order Confirmations are not recommended for
when the status is the same on all lines.
• If you are unable to fulfill a line item, or the amount or
UOM is incorrect, you must be in direct contact with the
3M Buyer. A Change Order or Cancelled Order will be
issued.
• Do not reject any Purchase Order line items through
the SAP Business Network.
• Quantity and Price
▪ You may propose changes to delivery date, quantity,
and price on the Material Order: Order Confirmation.
▪ 3M issues a Change PO if the changes are agreed to
and approved through the order confirmation or
through direct contact (for exceptions) with your 3M
Buyer.
▪ All change orders require a new order confirmation
prior to submission of the invoice.
• Verify the UOM on the PO is the UOM to be used on the
invoice.
▪ If the UOM is incorrect, you must be in direct contact
with the 3M Buyer and specify the UOM needed in the
Comments. You cannot invoice with a different UOM
than shown on the PO.

6
STP500: SAP Business Network - Enterprise Account - Quick Reference Guide
Material Order
Line Items 1, 2, etc
Free Text Description Service Order
Line Items 10001, 10002, etc
Limit Order
Line Items 00001, 00002, etc
Order Confirmation
The steps for confirming Limit Orders are:
1. From the PO view, click Create Order Confirmation
and select Update Line Items.
2. The Order Confirmation Header displays. Enter the
Confirmation #, not to exceed 10 characters.
3. Enter the Est Completion Date, which should be the
same as the need-by date.
4. Scroll down to view the Line Items and choose either
Confirm or Confirm All.
5. Once finished, click Next to proceed to the review
page. Review the order confirmation and click Submit.
Your order confirmation is sent to 3M.
Order confirmation notifications are submitted based on
your Supplier Profile configuration. Upon completing your
order confirmation, you will receive an email notifying you
that an order confirmation has been submitted.
Continued
The steps for confirming Free Text Description Orders are:
1. From the PO view, click Create Order Confirmation
and select either Confirm Entire Order to confirm at
the Header Level or Update Line Items to confirm or
make modifications at the Line-Item Level.
2. The Order Confirmation Header displays. Enter the
Confirmation #, not to exceed 10 characters.
• Confirm Entire Order:
▪ Enter the Est Completion Date, which should be
the same as the need-by date.
▪ Click Next.
• Update Line Items:
▪ Scroll down to view the line items and choose:
Confirm Based on Schedule Lines (Confirm based
on Schedule lines uses the need-by date. Continue
to update the status for each line item.)
or Confirm All (You received the PO and will
perform the requested work.)
• Once finished, click Next.
3. Review the order confirmation and click Submit. Your
order confirmation is sent to 3M.
Order confirmation notifications are submitted based on
your Supplier Profile configuration. Upon completing your
order confirmation, you will receive an email notifying you
that an order confirmation has been submitted.
The steps for confirming Material Orders are:
1. From the PO view, click Create Order Confirmation
and select either Confirm Entire Order to confirm at
the Header Level or Update Line Items to confirm or
make modifications at the Line-Item Level.
2. The Order Confirmation Header displays. Enter the
Confirmation #, not to exceed 10 characters.
• Confirm Entire Order:
▪ Enter the Est Completion Date, which should be
the same as the need-by date.
▪ Click Next.
• Update Line Items:
▪ Scroll down to view the line items and choose:
Confirm (Enter the quantity) or Confirm with
change in Unit Price, Delivery Date, or Quantity
(Click on Details to propose changes. If the
Delivery date is not changed, enter need-by date).
Repeat for all lines.
▪ Once finished, click Next.
▪ If you confirmed only some lines of a multi-line PO,
the Current Order Status of those lines will show
Confirmed, while the others will remain
Unconfirmed.
3. Review the order confirmation and click Submit. Your
order confirmation is sent to 3M.
Order confirmation notifications are submitted based on
your Supplier Profile configuration. Upon completing your
order confirmation, you will receive an email notifying you
that an order confirmation has been submitted.

7
STP500: SAP Business Network - Enterprise Account - Quick Reference Guide
Material Order
Line Items 1, 2, etc
Free Text Description Service Order
Line Items 10001, 10002, etc
Limit Order
Line Items 00001, 00002, etc
Ship Notice (ASN)
• Not applicable • Ship Notices will only be required for Free Text
Description Service Orders when materials goods are
being shipped across international borders.
• Ship Notices (ASNs) are required 24 hours prior to the
shipment arriving at 3M's dock.
• The PO will determine if a Ship Notice (ASN) is required.
If applicable, the Ship Notice (ASN) is required prior to
invoicing.
The steps for creating a ship Notice (ASN) are:
1. From the PO view, click Create Ship Notice.
2. The Ship Notice Header displays. Enter the Packing
Slip ID, not to exceed 35 characters.
3. Enter the Deliver Date, which should represent your
best estimate of the delivery date to the 3M location.
4. If you are paying the freight, choose one of the
options from the Carrier Name
drop-down list or select Manage Carrier
to create a new carrier.
5. If freight is paid directly to the carrier by 3M,
select Other from the Carrier Name drop-
down list and enter the 3M Carrier Vendor ID
(provided by 3M).
• If you do not know the Carrier Vendor ID, refer to
the 3M Carrier Vendor ID List and change the
location based on the ship-to Country.
• If the Carrier is not listed, contact the 3M Buyer.
6. Enter the Tracking No. Do not include special
characters or spaces.
7. The Bill of Lading No. is required. Do not include
special characters or spaces.

8
STP500: SAP Business Network - Enterprise Account - Quick Reference Guide
Material Order
Line Items 1, 2, etc
Free Text Description Service Order
Line Items 10001, 10002, etc
Limit Order
Line Items 00001, 00002, etc
Ship Notice (ASN)
• Not applicable 7. The Bill of Lading No. is required. Do not include
special characters or spaces.
8. Choose a Shipping Method from the drop-down
menu.
9. The Delivery and Transport information section should
remain with the system default values.
10. Enter the Trailer ID in the Equipment Identification
Code field. Do not include special characters or
spaces.
11. Scroll down to the Order Items section and update the
quantity shipped for each line item in the Ship Qty
field.
12. The Batch ID and Production Date are required if the
material is 3M batch managed. The Supplier Batch
number should be entered into the Batch ID field. The
Batch ID must be alpha numeric and not exceed
10 digits. It cannot begin with the number zero nor
include special characters or spaces.
• On the PO, Line-Item Level, click Details to view
Information on Ship Notice [Optional].
• If you have questions about batch management,
contact the 3M Buyer.
13. Enter the Production Date, if applicable.
14. The Expiry Date is required if the material is shelf-life
managed.
Use Add Ship Notice Line if you are shipping in different
quantities or for any amount with a different batch ID or
production date. Click on Remove if shipping Ship Qty in
full.
Continued

9
STP500: SAP Business Network - Enterprise Account - Quick Reference Guide
Material Order
Line Items 1, 2, etc
Free Text Description Service Order
Line Items 10001, 10002, etc
Limit Order
Line Items 00001, 00002, etc
Ship Notice (ASN)
• Not applicable Additional line-item details are required on Ship Notices
(ASNs).
15. Click Add Details.
16. Click PACKAGING to enter applicable information.
17. Enter Weight (Net Weight) as a numeric value.
18. Enter the Gross Weight as a numeric value. This must
be a higher value than the Weight (Net Weight).
19. Begin typing the Unit (weight unit of measure) then
select from the available list.
20. Once finished, click Next to proceed to the Ship
Notice Summary page.
21. Review the Ship Notice (ASN) and click Submit. Your
Ship Notice (ASN) is sent to 3M.
After submitting your Ship Notice (ASN), the Purchase
Order Status updates to Shipped. If items are partially
shipped, the Purchase Order Status updates to Partially
Shipped.
Additional line-item details are required on Ship Notices
(ASNs).
15. Click Add Details.
16. Click PACKAGING to enter applicable information.
17. Enter Weight (Net Weight) as a numeric value.
18. Enter the Gross Weight as a numeric value. This must
be a higher value than the Weight (Net Weight).
19. Begin typing the Unit (weight unit of measure) then
select from the available list.
20. Once finished, click Next to proceed to the Ship
Notice Summary page.
21. Review the Ship Notice (ASN) and click Submit. Your
Ship Notice (ASN) is sent to 3M.
After submitting your Ship Notice (ASN), the Purchase
Order Status updates to Shipped. If items are partially
shipped, the Purchase Order Status updates to Partially
Shipped.
Continued
10
STP500: SAP Business Network - Enterprise Account - Quick Reference Guide
Material Order
Line Items 1, 2, etc
Free Text Description Service Order
Line Items 10001, 10002, etc
Limit Order
Line Items 00001, 00002, etc
Country-Specific Invoicing Rules for 3M
for All Types of Purchase Orders
3M Belgium: If not included in the material prices, tolls levied when materials are transported by road in a large truck should be included in the shipping charges.
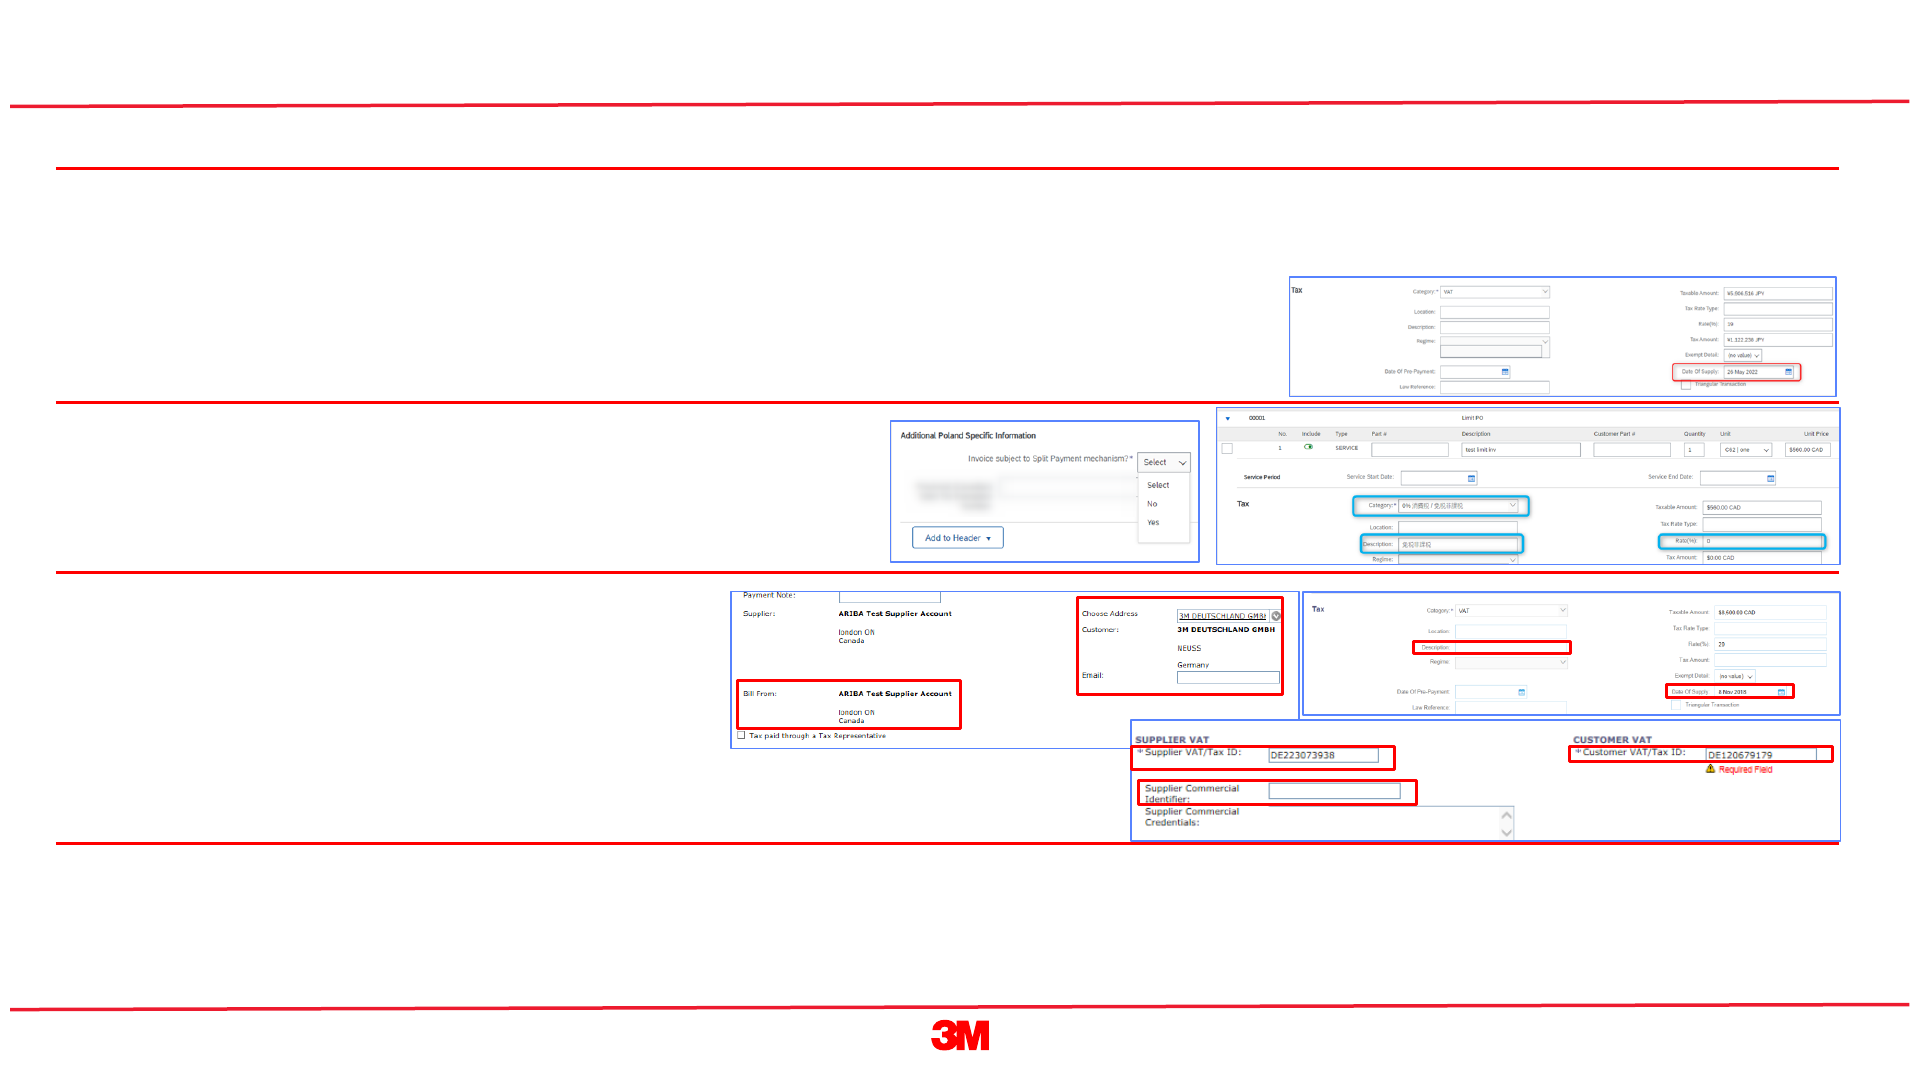
Europe (All): If the billing Supplier is in Europe and sending an invoice to any European 3M entity, both Supplier VAT registration number and 3M VAT registration number must be included in the
Ariba invoice.
For invoices where VAT is applicable, the Supplier VAT/Tax ID field is mandatory. You can automatically default your VAT ID onto the invoice by adding it to your company profile. VAT numbers
cannot contain spaces, hyphens, or any special characters. If these fields are not applicable, leave the fields blank. Do not enter NA.
In addition, invoices that originate from EU countries must provide this information, per EU directives:
• Date of Supply (Header and Line-Item Level)
• The Supplier Commercial Registration ID (if applicable to your country)
Poland Split Payment mechanism: Select Yes or No to confirm if your invoice is subject
to the Polish Split Payment mechanism or not.
The Reason for tax exemption (Header or Line-Item Level) in Tax Description field.
EU Requirement: Invoices originating from EU countries must provide
this information, per EU directives:
• Date of Supply (Header and Line-Item level).
• The Reason for tax exemption (Header or Line-Item level) in
Tax Description field.
• The Customer Address which determines the Customer VAT or
Tax ID based on the Customer Bill To Address.
• The Supplier Commercial Registration ID (if applicable).
• The Supplier VAT/Tax ID.
• The Customer VAT/Tax ID.
Mexican Third-Party Providers selling to 3M Panama Pacifico and shipping to San Luis Potosi in Mexico must include the following Header comment on your invoice:
- OPERACION EFECTUADA AL AMPARO DEL ARTICULO 105 Y 112 DE LA LEY ADUANERA, ARTICULO 29 FRACCION I.
- DE LA LEY DEL IVA. ARTICULO 156 DEL REGLAMENTO DE LA LEY ADUANERA 5.1.3., 5.2.2, 5.2.3 Y 4.3.22 DE.
- LAS REGLAS DE CARÁCTER GENERAL EN MATERIA DE COMERCIO EXTERIOR VIGENTE.
- In addition, Vendor should include IMMEX Number for 3M Purification S de RL de CV (2679-2006).

11
STP500: SAP Business Network - Enterprise Account - Quick Reference Guide
Material Order
Line Items 1, 2, etc
Free Text Description Service Order
Line Items 10001, 10002, etc
Limit Order
Line Items 00001, 00002, etc
Invoicing
• An invoice cannot be created until the order is
confirmed.
• Once you submit an invoice to 3M, a Service Entry
Sheet (SES) is automatically generated and routed to
3M for review and approval.
• Before you start creating your invoice, please review the
Country Specific Invoicing Rules for 3M to determine if
any apply to your organization.
• If you need to create a credit, always use Line-Item
Credit for the complete invoiced amount. Then, if the
credit value is less than the actual credit amount, create
an invoice for the balance owed.
• An invoice cannot be created until the order is
confirmed.
• If Material goods are being shipped across international
borders, Ship Notices (ASNs) will be required for
Material Type Orders before the invoice can be created.
• Once you submit an invoice to 3M, a Service Entry
Sheet (SES) is automatically generated and routed to
3M for review and approval.
• Before you start creating your invoice, please review the
Country Specific Invoicing Rules for 3M to determine if
any apply to your organization.
• If you need to create a credit, always use Line-Item
Credit for the invoiced amount. Then, if the credit value
is less than the actual credit amount, create an invoice
for the balance owed.
• An invoice cannot be created until the Purchase Order
Confirmation and the Ship Notice (ASN) have been
completed.
• Before you start creating your invoice, please review the
Country Specific Invoicing Rules for 3M to determine if
any apply to your organization.
• The SAP Business Network Supports:
▪ Detail invoices: Apply against a single PO referencing
line-item information
▪ Partial invoices:
o Apply against specific line items from a single
purchase order.
o Partial quantity or subset of line items from a single
purchase order.
▪ Credit Memo: Credit memo (PO or invoice) Line-Item
Level.
• The SAP Business Network does not Support:
▪ Paper invoices
▪ Header or Summary invoices with no line-item details.
▪ Summary or Consolidated invoices against multiple
purchase orders
▪ Invoicing for Purchasing Cards (P-Cards)
▪ Duplicate invoices
▪ Cancel invoices: Suppliers must issue a Line-Item
Credit Memo for previously submitted invoices.
▪ Non-PO invoices
▪ Attachments

12
STP500: SAP Business Network - Enterprise Account - Quick Reference Guide
Material Order
Line Items 1, 2, etc
Free Text Description Service Order
Line Items 10001, 10002, etc
Limit Order
Line Items 00001, 00002, etc
Invoicing
The steps for creating an invoice are:
1. From the PO view, click Create Invoice and select
Standard Invoice.
2. Select a line item to invoice. You can only invoice for
one line item at a time. If there are multiple lines on
the order, you will need to complete the invoicing
steps again for each additional line.
3. Click Next.
4. On the Invoice Header, enter the invoice #. It cannot
exceed 16 characters. It can contain alpha and
numeric characters, but it cannot contain lowercase
letters, leading zeros, dashes, slashes, spaces, periods,
or other special characters.
5. Enter the original Invoice Date. The Invoice Date
cannot be backdated more than 364 days.
6. Verify the Remit To address.
7. Tax can be submitted at the Header Level or at the
Line-Item Level. Select the appropriate option and
category. Refer to Country Specific Invoicing Rules for
3M, if applicable.
8. Scroll down to add invoicing details at the Line-Item
Level. Click Add/Update and select Add General
Service.
Only use Add/Update and Add General Service. Any
other options will cause the invoice to fail. If this button is
not available, STOP and contact your 3M Buyer.
Do not use the Add button. Using Add causes a blank line
to come into 3M's system and will result in your being
rejected by 3M.
Continued
The steps for creating an invoice are:
1. From the PO view, click Create Invoice and select
Standard Invoice.
2. Select a line item to invoice. You can only invoice for
one line item at a time. If there are multiple lines on
the order, you will need to complete the invoicing
steps again for each additional line.
3. Click Next.
4. On the Invoice Header, enter the invoice #. It cannot
exceed 16 characters. It can contain alpha and
numeric characters, but it cannot contain lowercase
letters, leading zeros, dashes, slashes, spaces, periods,
or other special characters.
5. Enter the original Invoice Date. The Invoice Date
cannot be backdated more than 364 days.
6. Verify the Remit To address.
7. Tax can be submitted at the Header Level or at the
Line-Item Level. Select the appropriate option and
category. Refer to Country Specific Invoicing Rules for
3M, if applicable.
8. Verify the Description.
9. Verify the Quantity.
10. Verify the Unit (Unit of Measure). It will default from
the order. You will not be able to invoice in a different
UOM than the UOM specified on the order. Invoices in
a different UOM will be rejected.
The steps for creating an invoice are:
1. From the PO view, click Create Invoice and select
Standard Invoice.
▪ The Create Invoice selection will not be available
until the Ship Notice (ASN) has been completed.
2. On the Invoice Header, enter the invoice #. It cannot
exceed 16 characters. It can contain alpha and
numeric characters, but it cannot contain lowercase
letters, leading zeros, dashes, slashes, spaces, periods,
or other special characters.
3. Enter the original Invoice Date. The Invoice Date
cannot be backdated more than 364 days.
4. Verify the Remit To address.
5. Tax can be submitted at the Header Level or at the
Line-Item Level. Select the appropriate option and
category. Refer to Country Specific Invoicing Rules for
3M, if applicable.
6. Shipping Costs must be entered at the Header Level.
Choose Header level shipping, click on Add to
Header, select the appropriate option in the drop-
down menu, and enter the Shipping Amount and
Shipping Date in the Shipping Cost Section.
▪ If you are an integrated Supplier, you can enter
shipping charges at the Line-Item Level.
7. Comments can be added to the Header Level by
selecting from the Add to Header drop-down list.
Attachments are not supported by 3M through the
Ariba Network.

13
STP500: SAP Business Network - Enterprise Account - Quick Reference Guide
Material Order
Line Items 1, 2, etc
Free Text Description Service Order
Line Items 10001, 10002, etc
Limit Order
Line Items 00001, 00002, etc
Invoicing
9. Enter a Description.
10. Enter the Quantity.
11. Select the Unit (Unit of Measure) from the drop-down
menu.
12. Enter the Unit Price.
13. Optional: Enter the Service State Date and the
Service End Date.
14. Click on Update to allow Ariba to complete
calculations.
15. If you selected the Line Level tax radio button at the
Header Level, click the Tax Category checkbox.
16. Select the tax type you want to apply.
17. Click Add to Included Lines.
18. The Tax section displays. Review the Taxable
Amount. Enter the tax rate in the Rate % field.
▪ If a Line Item is tax exempt, from the Exempt Detail
drop-down menu, select Exempt or Zero Rated. In
the Description field, provide the reason. Date of
Supply is an EU directive for applicable countries.
19. Once finished, click Next to proceed to the review
page. Review the invoice and click Submit. Your
invoice is sent to 3M.
Continued
11. Verify the Unit Price.
12. Optional: Enter the Service State Date and the
Service End Date.
13. Click on Update to allow Ariba to complete
calculations.
14. If you selected the Line Level tax radio button at the
Header Level, click the Tax Category checkbox.
15. Select the tax type you want to apply.
16. Click Add to Included Lines.
17. The Tax section displays. Review the Taxable
Amount. Enter the tax rate in the Rate % field.
▪ If a Line Item is tax exempt, from the Exempt Detail
drop-down menu, select Exempt or Zero Rated. In
the Description field, provide the reason. Date of
Supply is an EU directive for applicable countries.
18. Once finished, click Next to proceed to the review
page. Review the invoice and click Submit. Your
invoice is sent to 3M.
Once the remaining services are performed, a second
invoice will need to be created for the balance. Ariba will
allow you to create an invoice for more than the remaining
balance on the PO, but the invoice will be rejected by 3M.
If you selected the Line level tax radio button at the
Header Level, you need to add tax lines to every line item
you will invoice.
8. Click the Tax Category checkbox.
9. Select the tax type you want to apply.
10. Click Add to Included Lines.
11. The Tax section displays. Review the Taxable
Amount. Enter the tax rate in the Rate % field.
▪ If a Line Item is tax exempt, from the Exempt Detail
drop-down menu, select Exempt or Zero Rated. In
the Description field, provide the reason. Date of
Supply is an EU directive for applicable countries.
12. Scroll down to the Line Items section.
▪ If the green toggle is visible, the line item is
included on the invoice.
▪ If the grey toggle is visible, the line item is excluded
from the invoice
▪ Select the checkbox to the left of the item and click
Delete to remove the line item from the invoice.
13. If needed, update the Quantity for each line item.
14. To add miscellaneous charges (except shipping
charges), select Add Material from
the Add drop-down menu.
▪ Do not use Add General Service or Add Labor
Service for shipping costs. Shipping costs must be
added at the Header Level.
15. Once finished, click Next to proceed to the review
page. Review the invoice and click Submit. Your
invoice is sent to 3M.

14
STP500: SAP Business Network - Enterprise Account - Quick Reference Guide
Material Order
Line Items 1, 2, etc
Free Text Description Service Order
Line Items 10001, 10002, etc
Limit Order
Line Items 00001, 00002, etc
Invoicing
• Invoice Statuses are:
▪ Sent / Processing: The invoice has been received and
is being processed.
▪ Pending Approval: The Service Sheet has been routed
for approval.
▪ Approved: The invoice has been processed and
invoice amounts approved.
▪ Rejected: The invoice has been rejected because it
did not pass validation or the Buyer/Accounts Payable
canceled the invoice.
▪ Paid: The invoice amounts have been paid.
• Statuses of Service Entry Sheets are:
▪ Added to the pending queue. This means the
document has been sent to 3M.
▪ Accepted: It has been received by 3M.
▪ Approved: The document has been reviewed and
approved by 3M.
• Routing Statuses of Invoices are:
▪ On Hold: Waiting for approval of the Service Entry
Sheet.
▪ Acknowledged: Service Entry Sheet is approved.
▪ Rejected: Service Entry Sheet has incorrect
information and was rejected by 3M.
Continued
If the PO was not invoiced in full, create additional
invoices for the remaining balance.
Note: Ariba will allow you to create an invoice for more
than the remaining quantity on the PO, but the invoice will
be rejected by 3M.
• Invoice Statuses are:
▪ Sent / Processing: The invoice has been received and
is being processed.
▪ Pending Approval: The Service Sheet has been routed
for approval.
▪ Approved: The invoice has been processed and
invoice amounts approved.
▪ Rejected: The invoice has been rejected because it
did not pass validation or the Buyer/Accounts Payable
canceled the invoice.
▪ Paid: The invoice amounts have been paid.
• Statuses of Service Entry Sheets are:
▪ Added to the pending queue. This means the
document has been sent to 3M.
▪ Accepted: It has been received by 3M.
▪ Approved: The document has been reviewed and
approved by 3M.
• Routing Statuses of Invoices are:
▪ On Hold: Waiting for approval of the Service Entry
Sheet.
▪ Acknowledged: Service Entry Sheet is approved.
▪ Rejected: Service Entry Sheet has incorrect
information and was rejected by 3M.
If the PO was not invoiced in full, create additional
invoices for the remaining balance.
Note: Ariba will allow you to create an invoice for more
than the remaining quantity on the PO, but the invoice will
be rejected by 3M.
• Invoice Statuses are:
▪ Sent / Processing: The invoice has been received and
is being processed.
▪ Approved: The invoice has been processed and
invoice amounts approved.
▪ Rejected: The invoice has been rejected because it
did not pass validation or the Buyer/Accounts Payable
canceled the invoice.
▪ Paid: The invoice amounts have been paid.
• Routing Statuses of Invoices are:
▪ Acknowledged: The invoice has been transmitted to
3M.
▪ Rejected: The invoice was rejected by 3M.

15
STP500: SAP Business Network - Enterprise Account - Quick Reference Guide
Material Order
Line Items 1, 2, etc
Free Text Description Service Order
Line Items 10001, 10002, etc
Limit Order
Line Items 00001, 00002, etc
Line-Item Credit Memo
• An invoice cannot be created until the order is
confirmed.
• Once you submit an invoice to 3M, a Service Entry
Sheet (SES) is automatically generated and routed to
3M for review and approval.
• Before you start creating your invoice, please review the
Country Specific Invoicing Rules for 3M to determine if
any apply to your organization.
• If you need to create a credit, always use Line-Item
Credit for the invoiced amount. Then, if the credit value
is less than the actual credit amount, create an invoice
for the balance owed.
• On the Order Details tab, scroll down to view the Line
Items section. Each line describes a quantity of items 3M
wants to purchase.
• The Summary level of the order displays the 3M Item ID
materials or services, Customer Part Number (if
applicable), and description.
• The Type will be displayed as Service.
• Click Details to view additional information at the Line-
Item Level, including:
▪ Unit Details
▪ Pricing Details
▪ Comments (full item description)
▪ Tax Details (only available for United States and
Canada transactions)
• The Tax Status displays on the order line item if
applicable to the Supplier's country, and the Tax details
are based on country requirements.
• On the Order Details tab, scroll down to view the Line
Items section. Each line describes a quantity of items 3M
wants to purchase.
• The Summary level of the order displays the 3M Item ID
materials or services, Customer Part Number (if
applicable), and description.
• The Type will be displayed as Material.
• Click Details to view additional information at the Line-
Item Level, including:
▪ Unit Details
▪ Pricing Details
▪ Comments (full item description)
▪ Tax Details (only available for United States and
Canada transactions)
• The Tax Status displays on the order line item if
applicable to the Supplier's country, and the Tax details
are based on country requirements.
Before you start creating your Line-Item Credit Memo, please review the Country Specific Invoicing Rules for 3M to determine if any apply to your organization.
The steps for creating a Line-Item Credit memo are:
1. From the PO view, click Create Invoice and select Line-Item Credit Memo. Do NOT use Credit Memo.
2. Click the radio button to the left of the Invoice Number to which the credit will be issued against.
3. Click Create Line-Item Credit Memo.
4. On the Create Line-Item Credit Memo Header, enter the Credit Memo #. It cannot exceed 16 characters. It can contain alpha and numeric characters, but it cannot contain
lowercase letters, leading zeros, dashes, slashes, spaces, periods, or other special characters.
5. Enter the original Credit Memo Date. The Credit Memo Date cannot be backdated more than 364 days.
6. Verify the Remit To address.
By default, the original invoice values display and are summarized with a negative value. Once you select your line items and adjust the Quantity and Value, the summary will
update.
7. Shipping Costs must be entered at the Header Level. (If you are an integrated Supplier, you can enter shipping charges at the Line-Item Level.)
Choose Header level shipping, click on Add to Header, select the appropriate option in the drop-down menu, and enter the Shipping Amount and Shipping Date in the
Shipping Cost Section.
8. Comments can be added to the Header Level by selecting from the Add to Header drop-down list. Attachments are not supported by 3M through the Ariba Network.
9. Tax credit can be submitted at the Header Level or at the Line-Item Level. Select the appropriate option.
▪ If submitting at the Header Level, once you adjust the line-item quantity and value, the Taxable Amount and Tax Amount will automatically recalculate.
- If VAT is applicable, the Supplier VAT/Tax ID field is mandatory. Use NA when shipping to the United States. Leave the fields blank if not applicable.
- Refer to Country Specific Invoicing Rules for 3M, if applicable.
10. If you selected the Line Level tax radio button at the Header Level, you need to add tax lines to every line item included on the Line-Item Credit Memo.
Click the Tax Category checkbox.
11. Select the tax type you want to apply.
12. Click Add to Included Lines.
for All Types of Purchase Orders

16
STP500: SAP Business Network - Enterprise Account - Quick Reference Guide
Material Order
Line Items 1, 2, etc
Free Text Description Service Order
Line Items 10001, 10002, etc
Limit Order
Line Items 00001, 00002, etc
Line-Item Credit Memo
• An invoice cannot be created until the order is
confirmed.
• Once you submit an invoice to 3M, a Service Entry
Sheet (SES) is automatically generated and routed to
3M for review and approval.
• Before you start creating your invoice, please review the
Country Specific Invoicing Rules for 3M to determine if
any apply to your organization.
• If you need to create a credit, always use Line-Item
Credit for the invoiced amount. Then, if the credit value
is less than the actual credit amount, create an invoice
for the balance owed.
• On the Order Details tab, scroll down to view the Line
Items section. Each line describes a quantity of items 3M
wants to purchase.
• The Summary level of the order displays the 3M Item ID
materials or services, Customer Part Number (if
applicable), and description.
• The Type will be displayed as Service.
• Click Details to view additional information at the Line-
Item Level, including:
▪ Unit Details
▪ Pricing Details
▪ Comments (full item description)
▪ Tax Details (only available for United States and
Canada transactions)
• The Tax Status displays on the order line item if
applicable to the Supplier's country, and the Tax details
are based on country requirements.
• On the Order Details tab, scroll down to view the Line
Items section. Each line describes a quantity of items 3M
wants to purchase.
• The Summary level of the order displays the 3M Item ID
materials or services, Customer Part Number (if
applicable), and description.
• The Type will be displayed as Material.
• Click Details to view additional information at the Line-
Item Level, including:
▪ Unit Details
▪ Pricing Details
▪ Comments (full item description)
▪ Tax Details (only available for United States and
Canada transactions)
• The Tax Status displays on the order line item if
applicable to the Supplier's country, and the Tax details
are based on country requirements.
Continued
13. The Tax section displays. Review the Taxable Amount. Enter the tax rate in the Rate % field.
▪ If a Line Item is tax exempt, from the Exempt Detail drop-down menu, select Exempt or Zero Rated. In the Description field, provide the reason. Date of Supply is an EU
directive for applicable countries.
14. Scroll down to the Line Items section.
▪ If the green toggle is visible, the line item is included on the Line-Item Credit Memo.
▪ If the grey toggle is visible, the line item is excluded from the Line-Item Credit Memo.
▪ Select the checkbox to the left of the item and click Delete to remove the line item from the invoice.
15. Update the Quantity as a negative value.
16. Adjust the Unit Price, if editable. This will remain a positive value.
17. To add a comment, click Line Item Actions and select the Comments option. The Comments field displays at the Line-Item Level.
18. Click Update to refresh the data or Next to review and submit.
19. To add miscellaneous charges (except shipping charges), select Add Material from the Add drop-down menu.
20. Once finished, click Next to proceed to the review page. Review the Line-Item Credit Memo and click Submit. Your Line-Item Credit Memo is sent to 3M.
for All Types of Purchase Orders

17
STP500: SAP Business Network - Enterprise Account - Quick Reference Guide
The first point of contact for all PO-related questions/issues is the 3M Buyer listed
on the purchase order.
Contact your internal Account Admin for Ariba-related issues, including but not
limited to the workbench, tiles, and roles.
Connect with 3M's Supplier eCommerce Support
for all inquiries on transacting electronically with 3M.
Filter by region, so the correct 3M eCommerce
Team receives your message.
Additional Information
