
User’s Manual
FreeStyle Libre 3 app
User’s Manual
CAUTION: Federal law restricts this device to
sale by or on the order of a physician.
CONTINUOUS GLUCOSE MONITORING SYSTEM
Your Name _________________________________________________
WARNING:
Before you use the FreeStyle Libre 3 System, review all the product
instructions and the Interactive Tutorial. The Quick Reference
Guide and Interactive Tutorial give you quick access to important
aspects and limitations of the System. The User’s Manual includes
all safety information and instructions for use. Talk to your health
care professional about how you should use your Sensor glucose
information to help manage your diabetes.
Failure to use the System according to the instructions for use
may result in you missing a severe low blood glucose or high
blood glucose event and/or making a treatment decision that
may result in injury. If your glucose alarms and readings from the
System do not match symptoms or expectations, use a ngerstick
blood glucose value from a blood glucose meter to make diabetes
treatment decisions. Seek medical attention when appropriate.

Contents
Important Safety Information........................... 1
Indications For Use . . . . . . . . . . . . . . . . . . . . . . . . . . . . . . . . . . . . . . . 1
Compatible Devices, Apps, and Software .................. 2
Contraindications . . . . . . . . . . . . . . . . . . . . . . . . . . . . . . . . . . . . . . . . 2
Warnings.................................................3
Cautions and Limitations . . . . . . . . . . . . . . . . . . . . . . . . . . . . . . . . . 4
Interfering Substances...................................16
Reader Symbols ........................................17
App Symbols . . . . . . . . . . . . . . . . . . . . . . . . . . . . . . . . . . . . . . . . . . . 19
Getting to Know Your System . . . . . . . . . . . . . . . . . . . . . . . . . . 21
Sensor Kit ...............................................23
Reader Kit . . . . . . . . . . . . . . . . . . . . . . . . . . . . . . . . . . . . . . . . . . . . . . 24
FreeStyle Libre 3 app ....................................26
Reader Home Screen ....................................27
App Home Screen .......................................28
Reporting Software......................................29
Setting up Your System for the First Time . . . . . . . . . . . . . . 30
Reader Setup............................................30
App Setup...............................................33
Applying Your Sensor . . . . . . . . . . . . . . . . . . . . . . . . . . . . . . . . . . 36
Starting Your Sensor . . . . . . . . . . . . . . . . . . . . . . . . . . . . . . . . . . . 41
Starting Your Sensor with the Reader.....................41
Starting Your Sensor with the App . . . . . . . . . . . . . . . . . . . . . . . 43
iPhone Users ............................................45
Android Phone Users ....................................46

Checking Your Glucose .................................48
Checking Your Glucose with the Reader ..................48
Checking Your Glucose with the App .....................50
Understanding Your Glucose Readings . . . . . . . . . . . . . . . . . . . 54
Making Treatment Decisions ...........................58
Making Treatment Decisions – Getting Started ...........59
Using Your Glucose Reading to Make a
Treatment Decision .....................................65
Reader Alarms..........................................81
Setting Reader Alarms ...................................84
Setting Reader Alarm Sounds ............................89
Using Reader Alarms . . . . . . . . . . . . . . . . . . . . . . . . . . . . . . . . . . . . 90
App Alarms.............................................92
Setting App Alarms......................................99
Using App Alarms . . . . . . . . . . . . . . . . . . . . . . . . . . . . . . . . . . . . . .107
Adding Notes to Glucose Readings....................111
Adding Notes in the Reader.............................111
Adding Notes in the App................................113
Reviewing Your History . . . . . . . . . . . . . . . . . . . . . . . . . . . . . . .115
Reviewing Your History in the Reader . . . . . . . . . . . . . . . . . . .115
Reviewing Your History in the App . . . . . . . . . . . . . . . . . . . . . .121
Removing Your Sensor ................................125
Replacing Your Sensor ................................126
Using Reminders . . . . . . . . . . . . . . . . . . . . . . . . . . . . . . . . . . . . . .127
Using Reminders in the Reader . . . . . . . . . . . . . . . . . . . . . . . . .127
Using Reminders in the App ............................129

Using the Reader’s Built-in Meter . . . . . . . . . . . . . . . . . . . . .131
Intended Use...........................................131
Blood Glucose Testing . . . . . . . . . . . . . . . . . . . . . . . . . . . . . . . . . .135
Control Solution Testing ................................142
Living With Your System...............................147
Activities ...............................................147
Charging the Reader....................................151
Reader Settings and Information ........................153
App Settings and Other Menu Options . . . . . . . . . . . . . . . . .155
Maintenance and Disposal ............................158
Troubleshooting . . . . . . . . . . . . . . . . . . . . . . . . . . . . . . . . . . . . . .163
Reader Does Not Power On . . . . . . . . . . . . . . . . . . . . . . . . . . . . .164
Problems at the Sensor Application Site .................165
Problems Starting Your Sensor or Receiving
Sensor Readings........................................167
Problems Receiving Alarms . . . . . . . . . . . . . . . . . . . . . . . . . . . . .176
Blood Glucose Error Messages . . . . . . . . . . . . . . . . . . . . . . . . . .182
Problems Checking Your Blood Glucose . . . . . . . . . . . . . . . . .186
Perform a Reader Test...................................188
Customer Service . . . . . . . . . . . . . . . . . . . . . . . . . . . . . . . . . . . . . .188
System Specications . . . . . . . . . . . . . . . . . . . . . . . . . . . . . . . . .189
Labeling Symbols . . . . . . . . . . . . . . . . . . . . . . . . . . . . . . . . . . . . .196
Performance Characteristics . . . . . . . . . . . . . . . . . . . . . . . . . .198
Electromagnetic Compatibility (EMC) .................227
Limited Warranty......................................239

Important Safety Information
Indications For Use
The FreeStyle Libre 3 Continuous Glucose Monitoring System is a real
time continuous glucose monitoring (CGM) device with alarms capability
indicated for the management of diabetes in persons age 4 and older.
It is intended to replace blood glucose testing for diabetes treatment
decisions, unless otherwise indicated.
The System also detects trends and tracks patterns and aids in the
detection of episodes of hyperglycemia and hypoglycemia, facilitating
both acute and long-term therapy adjustments. Interpretation of the
System readings should be based on the glucose trends and several
sequential readings over time.
The System is also intended to autonomously communicate with digitally
connected devices. The System can be used alone or in conjunction
with these digitally connected devices where the user manually controls
actions for therapy decisions.
1
Compatible Devices, Apps, and Software
For a list of compatible devices, apps, and software that can be used with
the FreeStyle Libre 3 Sensor, please go to:
www.FreeStyleLibre.us/support/overview.html
Use of the Sensor with devices, apps, and software that are not listed may
cause inaccurate glucose readings.
The FreeStyle Libre 3 app runs on Apple iOS and Android smart devices.
Please check www.FreeStyleLibre.com for more information about device
compatibility before upgrading your phone or its operating system.
If available, Abbott authorized Reader rmware updates will be made
accessible through www.FreeStyleLibre.com.
Contraindications
Automated Insulin Dosing: The System must not be used with
automated insulin dosing (AID) systems, including closed loop and
insulin suspend systems.
2

Cautions and Limitations
The following are important cautions and limitations to keep in mind so
you can use the System safely. They are grouped into categories for easy
reference.
What to know about Reader Alarms:
• For you to receive alarms, they must be on and your Reader should
be within 33 feet of you at all times. The transmission range is 33 feet
unobstructed. If you are out of range, you may not receive glucose
alarms.
• To prevent missed alarms, make sure the Reader has sucient charge
and that sound and/or vibration are turned on.
What to know about App Alarms:
• Disable your phone’s automatic operating system (OS) updates. Prior
to updating your phone’s OS or updating the App, you should check
the Mobile Device and OS Compatibility Guide to determine if the
FreeStyle Libre 3 app is compatible with your OS and your phone. The
OS Compatibility Guide is available in the Help Section of the App or on
www.FreeStyleLibre.com. You should check the OS Compatibility Guide
periodically to make sure that your OS and your phone continue to be
compatible with the App.
Contraindications (cont.)
MRI/CT/Diathermy: The System must be removed prior to
Magnetic Resonance Imaging (MRI), Computed Tomography
(CT) scan, or high-frequency electrical heat (diathermy)
treatment. The eect of MRI, CT scans, or diathermy on the
performance of the System has not been evaluated. The
exposure may damage the Sensor and may impact proper
function of the device which could cause incorrect readings.
WARNINGS:
• Do not ignore symptoms that may be due to low or high blood
glucose: If you are experiencing symptoms that are not consistent
with your glucose readings, consult your health care professional.
• Use your blood glucose meter to make diabetes treatment decisions
when you see the
symbol during the rst 12 hours of wearing a
Sensor, if your Sensor glucose reading does not match how you feel,
or if the reading does not include a number.
• If you are using FreeStyle Libre 3 app, you must have access to a
blood glucose monitoring system as the App does not provide one.
• Choking hazard: The System contains small parts that may be
dangerous if swallowed.
3

Cautions and Limitations
The following are important cautions and limitations to keep in mind so
you can use the System safely. They are grouped into categories for easy
reference.
What to know about Reader Alarms:
• For you to receive alarms, they must be on and your Reader should
be within 33 feet of you at all times. The transmission range is 33 feet
unobstructed. If you are out of range, you may not receive glucose
alarms.
• To prevent missed alarms, make sure the Reader has sucient charge
and that sound and/or vibration are turned on.
What to know about App Alarms:
• Disable your phone’s automatic operating system (OS) updates. Prior
to updating your phone’s OS or updating the App, you should check
the Mobile Device and OS Compatibility Guide to determine if the
FreeStyle Libre 3 app is compatible with your OS and your phone. The
OS Compatibility Guide is available in the Help Section of the App or on
www.FreeStyleLibre.com. You should check the OS Compatibility Guide
periodically to make sure that your OS and your phone continue to be
compatible with the App.
4
• In the event that an App or OS update causes your previously
compatible phone to become incompatible, you may be notied
ahead of time via e-mail or through the App. Make sure that your
LibreView account has your current e-mail address to receive important
information.
• After an OS update, open your App and check your device settings to
make sure it's working properly. Some OS features may impact your
ability to receive alarms or glucose readings. For example, if you use an
iPhone and the iOS Screen Time feature, add the FreeStyle Libre 3 app
to the list of Always Allowed apps to ensure that you receive alarms or
if you use an Android Phone do not use the Android Digital Wellbeing
app.
• For you to receive alarms, your phone should be within 33 feet of you at
all times. The transmission range is 33 feet unobstructed. If you are out
of range, you may not receive alarms. If you want to receive the App's
optional alarms, make sure these are turned on.
• For iPhone, do not force close the App. The App must be running in the
background to receive alarms. If you force close the App you will not
receive alarms. Re-open the App to ensure you will receive alarms.
5
• If you restart your phone, open your App to make sure it’s working
properly.
• The App will ask for phone permissions which are needed to receive
alarms. Allow these permissions when requested.
• Your phone must have a Bluetooth connection with your Sensor to
receive glucose readings and glucose alarms. In the phone settings,
keep Bluetooth ON. For iPhones, in the phone settings for the App,
allow the App to access Bluetooth.
• Check to make sure that you have the correct phone settings and
permissions enabled. If your phone is not congured properly, you will
not be able to use the App, so you will not receive alarms or be able to
check your glucose.
o iPhones: In the phone settings for the App under Notications, keep
Allow Critical Alerts ON
o Android Phones: In the phone settings for the App, keep Do Not
Disturb Access permission ON
• If your phone is not congured correctly, the App will be in "Alarms
Unavailable" state and you will not be able to check your glucose or
receive any alarms, including the Urgent Low Glucose Alarm.
6
• To turn on Critical Alerts (iPhone) / Do Not Disturb Permission (Android
Phone), follow the instructions in the App.
• For Android Phones, you may need to add the FreeStyle Libre 3 app to
the list of apps that will not be restricted or put to sleep.
• If you adjust the phone ringer volume (iPhone) or Media volume
(Android Phone) to silent or use the phone Do Not Disturb setting, keep
‘Override Do Not Disturb’ setting in the App ON for Low Glucose, High
Glucose, and Signal Loss Alarms to ensure you receive audible alarms.
• You should disconnect headphones or speakers from your phone when
you are not using them as you may not hear audio for alarms. If using
headphones, keep them in your ears.
• If you are using peripheral devices connected to your phone, such as
wireless headphones or a smartwatch, you may receive alarms on only
one device or peripheral, not all.
• Keep your phone well charged and turned on.
7

What to know before using the System:
• Review all product information before use.
• Take standard precautions for transmission of blood borne pathogens
to avoid contamination.
• Make sure that your devices and Sensor kits are kept in a safe place, and
maintain your devices under your control during use. This is important
to help prevent anyone from accessing or tampering with the System.
Who should not use the System:
• Do not use the System in people less than 4 years of age. The System
is not cleared for use in people under 4 years of age.
• Do not use the System if you are on dialysis or critically ill. The
System is not cleared for use in these groups and it is not known how
dierent conditions or medications common to these populations may
aect performance of the System.
• Performance of the System when used with other implanted medical
devices, such as pacemakers, has not been evaluated.
8

What should you know about wearing a Sensor:
• Wash application site on the back of your upper arm using a plain soap,
dry, and then clean with an alcohol wipe. This will help remove any oily
residue that may prevent the Sensor from sticking properly. Allow site
to air dry before proceeding. Carefully preparing the site according to
these instructions will help the Sensor stay on your body for the full
wear duration specied by your Sensor insert and help prevent it from
falling o early.
• The Sensor can be worn for up to the wear duration specied by your
Sensor insert. Remember to always have your next Sensor available
before your current one ends so you can keep getting your glucose
readings.
• In the event that your Sensor stops working and you do not have
another Sensor readily available, you must use an alternate method to
measure your glucose levels and inform your treatment decisions.
• The System is designed to detect certain conditions which may occur
where the Sensor is not working as intended and shut it o, telling
you to replace your Sensor. This may occur if the Sensor gets knocked
o from the skin or if the System detects that the Sensor may not be
performing as intended. Contact Customer Service if you receive a
Replace Sensor message before the end of the wear duration specied
by your Sensor insert. Customer Service is available at 1-855-632-8658
7 Days a Week from 8AM to 8PM Eastern Time; excluding holidays.
9
• Some individuals may be sensitive to the adhesive that keeps the
Sensor attached to the skin. If you notice signicant skin irritation
around or under your Sensor, remove the Sensor and stop using the
System. Contact your health care professional before continuing to use
the System.
• Intense exercise may cause your Sensor to loosen due to sweat or
movement of the Sensor. If the Sensor is becoming loose or if the
Sensor tip is coming out of your skin, you may get no readings or
unreliable low readings. Remove and replace your Sensor if it starts to
loosen and follow the instructions to select an appropriate application
site. Do not attempt to reinsert the Sensor. Contact Customer Service
if your Sensor becomes loose or falls o before the end of the wear
period. Customer Service is available at 1-855-632-8658 7 Days a Week
from 8AM to 8PM Eastern Time; excluding holidays.
• Do not reuse Sensors. The Sensor and Sensor Applicator are designed
for single use. Reuse may result in no glucose readings and infection.
Not suitable for re-sterilization. Further exposure to irradiation may
cause unreliable low results.
• If a Sensor breaks inside your body, call your health care professional.
10

How to Store the Sensor Kit:
• Store the Sensor Kit between 36°F and 82°F. Storage outside of this
range may cause inaccurate Sensor glucose readings.
• If you suspect that the temperature may exceed 82°F (for example, in an
un-airconditioned home in summer), you should refrigerate your Sensor
Kit. Do not freeze your Sensor Kit.
• Store your Sensor Kit in a cool, dry place. Do not store your Sensor Kit in
a parked car on a hot day.
• Store the Sensor Kit between 10-90% non-condensing humidity.
How to Store the Reader:
• Store the Reader between -4°F and 140°F. Storage in temperatures
outside of this range, such as in a parked car on a hot day, may cause the
Reader to not function properly.
When not to use the System:
• Do NOT use if the Sensor Kit package or Sensor Applicator appear to
be damaged or if tamper label indicates Sensor Applicator has already
been opened due to risk of no results and/or infection.
11

• Do NOT use if Sensor Kit contents are past expiration date.
• Do NOT use if the Reader appears to be damaged due to risk of electric
shock and/or no results.
What to know about the System:
• The FreeStyle Libre 3 System is intended for use by a single person.
It must not be used by more than one person due to the risk of
misinterpreting glucose information.
• FreeStyle Libre 3 app and FreeStyle Libre 3 Readers do not share data.
Before you start a Sensor, you must choose whether to use the Reader
or the App with the Sensor. Once you start a Sensor, you cannot switch
your device.
What to know before you Apply the Sensor:
• Wash application site on the back of your upper arm using a plain soap,
dry, and then clean with an alcohol wipe. This will help remove any oily
residue that may prevent the Sensor from sticking properly. Allow site
to air dry before proceeding. Carefully preparing the site according to
these instructions will help the Sensor stay on your body for the full
wear duration specied by your Sensor insert and help prevent it from
falling o early.
• Clean hands prior to Sensor handling/insertion to help prevent
infection.
12

• Change the application site for the next Sensor application to prevent
discomfort or skin irritation.
• Only apply the Sensor to the back of the upper arm. If placed in other
areas, the Sensor may not function properly.
• Select an appropriate Sensor site to help the Sensor stay attached to the
body and prevent discomfort or skin irritation. Avoid areas with scars,
moles, stretch marks, or lumps. Select an area of skin that generally
stays at during normal daily activities (no bending or folding). Choose
a site that is at least 1 inch away from an insulin injection site.
When is Sensor Glucose dierent from Blood Glucose:
• Physiological dierences between the interstitial uid and capillary
blood may result in dierences in glucose readings between the
System and results from a ngerstick test using a blood glucose meter.
Dierences in glucose readings between interstitial uid and capillary
blood may be observed during times of rapid change in blood glucose,
such as after eating, dosing insulin, or exercising.
What to know about X-Rays:
• The Sensor should be removed prior to exposing it to an X-ray machine.
The eect of X-rays on the performance of the System has not been
evaluated. The exposure may damage the Sensor and may impact
proper function of the device to detect trends and track patterns in
glucose values during the wear period.
13

When to remove the Sensor:
• If the Sensor is becoming loose or if the Sensor tip is coming out of
your skin, you may get no readings or unreliable readings, which may
not match how you feel. Check to make sure your Sensor has not come
loose. If it has come loose, remove it, apply a new one, and contact
Customer Service.
• If you believe your glucose readings are not correct or are inconsistent
with how you feel, perform a blood glucose test on your nger to
conrm your glucose. If the problem continues, remove the current
Sensor, apply a new one, and contact Customer Service. Customer
Service is available at 1-855-632-8658 7 Days a Week from 8AM to 8PM
Eastern Time; excluding holidays.
What to know about the Reader:
• Do NOT place the Reader in water or other liquids as this may cause it to
not function properly and may lead to risk of fire or burns.
• The FreeStyle Libre 3 Reader has a built-in blood glucose meter that is
designed to be used only with FreeStyle Precision Neo blood glucose
test strips and MediSense Glucose and Ketone Control Solution. Using
other test strips with the Reader’s built-in meter will produce an error
or cause the Reader’s built-in meter to not turn on or start a test. The
Reader’s built-in meter does not have ketone testing functionality.
14

• The Reader’s built-in meter is not for use on people who are
dehydrated, hypotensive, in shock, or for individuals in hyperglycemic-
hyperosmolar state, with or without ketosis.
• The Reader’s built-in meter is not for use on neonates, in critically-ill
patients, or for diagnosis or screening of diabetes.
• See Using the Reader’s Built-in Meter section for additional important
information on the use of the Reader’s built-in meter.
What to know about charging your Reader:
• Always use the Abbott provided power adapter and yellow USB cable
that came with your Reader to minimize the risk of fire or burns. Take
care when plugging and unplugging your USB cable. Do not force or
bend the end of the USB cable into the Reader's USB port.
• Choose a location for charging where you can easily access the power
adapter and quickly disconnect to prevent the potential risk of electrical
shock.
• The maximum surface temperature of the Reader and/or the power
adapter could go as warm as 111°F when it's charging or 117°F
during normal use. Under these conditions, do not hold the Reader
or the power adapter for ve minutes or more. People with disorders
of peripheral circulation or sensation should use caution at this
temperature.
15
• Do NOT expose the USB cable or power adapter to water or other
liquids as this may cause them to not function properly and may lead to
risk of fire or burns.
Interfering Substances
Taking ascorbic acid (vitamin C) supplements while wearing the Sensor
may falsely raise Sensor glucose readings. Taking more than 500 mg of
ascorbic acid per day may aect the Sensor readings which could cause
you to miss a severe low glucose event. Ascorbic acid can be found in
supplements including multivitamins. Some supplements, including cold
remedies such as Airborne® and Emergen-C®, may contain high doses of
1000 mg of ascorbic acid and should not be taken while using the Sensor.
See your health care professional to understand how long ascorbic acid is
active in your body.
16

Reader Symbols
Symbol What It Means
Active Sensor
Direction your glucose is going. See Understanding
Your Glucose Readings section for more information.
Caution
View previous/next screen
Sound and Vibration ON
Sound ON, Vibration OFF
Sound OFF, Vibration ON
Sound and Vibration OFF
Sensor communicating with Reader
Sensor not communicating with Reader
17

Symbol What It Means
When you see this symbol during the rst 12 hours
of wearing a Sensor, conrm Sensor glucose readings
with a blood glucose test before making treatment
decisions.
Notes
+
Add more information to notes
Food note
Insulin note
Time changed on Reader
Blood glucose test
Settings
Control solution test result
Low battery
Battery charging
Sensor too cold
Sensor too hot
18

App Symbols
Symbol What It Means
App icon
Alarms are unavailable
Scan New Sensor / Start New Sensor
Direction your glucose is going. See Understanding
Your Glucose Readings section for more information
Caution
When you see this symbol during the rst 12 hours
of wearing a Sensor, conrm Sensor glucose readings
with a blood glucose test before making treatment
decisions
Add/edit notes
Food note
19

Symbol What It Means
Insulin (Rapid or Long-acting) note
Alarm
Exercise note
Time change
Main Menu
Multiple/Custom notes
Share report (Android Phone)
Share report (iPhone)
Additional information
Calendar
Sensor too cold
Sensor too hot
20

Getting to Know Your System
The FreeStyle Libre 3 System (“System”) has two main parts: a disposable
Sensor and either a handheld Reader or mobile App to wirelessly receive
and display your glucose readings from the Sensor. Before you start
your Sensor, choose which device you want to use. The Reader and App
only work with FreeStyle Libre 3 Sensors and cannot be used with other
Sensors. When they’re in range, the Sensor and your device automatically
communicate to give you glucose alarms. These alarms are on by default.
When the Sensor and your device are not in range or unable to
communicate, the Sensor will store all 14 days of glucose data. This data
is automatically sent from the Sensor to your device when the devices are
back within range.
21

IMPORTANT:
• Before you use your System, review all the product instructions and
the Interactive Tutorial. You can access the Interactive Tutorial at
www.FreeStyleLibre.com. The Quick Reference Guide and Interactive
Tutorial give you quick access to important aspects and limitations
of the System. The User’s Manual includes all safety information and
instructions for use. Refer to your phone instructions for use for how
to use your phone.
• Go to www.FreeStyleLibre.com to view the “Tips for Kids".
• Talk to your health care professional about how you should use your
Sensor glucose information to help manage your diabetes.
• During the rst 12 hours of Sensor wear the
symbol will display,
and you cannot use Sensor values to make treatment decisions
during this time. Conrm Sensor glucose readings with a blood
glucose test before making treatment decisions during the rst 12
hours of Sensor wear when you see the
symbol.
When opening your Sensor Kit and Reader Kit, check that the contents
are undamaged and that you have all parts listed. If any parts are missing
or damaged, contact Customer Service. Customer Service is available at
1-855-632-8658 7 Days a Week from 8AM to 8PM Eastern Time; excluding
holidays. FreeStyle Libre 3 app is available for download from the App
Store (iPhone) or Google Play Store (Android Phone).
22

Sensor Kit
The FreeStyle Libre 3 Sensor Kit includes:
• Sensor Applicator
• Product insert
The Sensor (only visible after applied) measures and stores glucose
readings when worn on your body. By following the instructions, you use
the Sensor Applicator to apply the Sensor on the back of your upper arm.
The Sensor has a small, exible tip that is inserted just under the skin. The
Sensor can be worn for up to the wear duration specied by your Sensor
insert.
Note: The Sensor Applicator is sterile and
non-pyrogenic unless opened or damaged. Using
a non-sterile or pyrogenic Sensor might cause
infection.
Sensor Applicator
Applies the Sensor to your body.
23

Reader Kit
The Reader Kit includes:
• FreeStyle Libre 3 Reader
• Yellow USB Cable
• Interactive Tutorial on USB
• Power Adapter
• User’s Manual
• Quick Start Guides for Reader & App
• Quick Reference Guide
Power Adapter
5V, 550mA or 0.55A
Yellow USB Cable
USB Port
Used to charge the Reader
and connect it to a computer.
Test Strip Port
Insert a test strip here to use
the built-in meter.
Touchscreen
Home Button
Turns the Reader on/o
and takes you to the
Home Screen from any
other screen.
24

The Reader can be used to start a Sensor, receive glucose alarms, and get
glucose readings from the Sensor. The Reader can store approximately
90-days of glucose history and notes you enter about activities, such as
taking insulin, eating food, or exercising. This information can help you
understand how these activities aect your glucose. The Reader also
includes a built-in meter for blood glucose testing. To use the built-in
meter, you need FreeStyle Precision Neo blood glucose test strips, control
solution, a lancing device, and lancets. These items are not included in
the Reader Kit and must be obtained separately from your FreeStyle
Libre 3 System provider (pharmacy or mail order supplier). If you suspect
an adverse cybersecurity event related to the FreeStyle Libre 3 System,
contact Customer Service.
IMPORTANT:
• If the Reader is dropped or subjected to impact, do a Reader
Test to check that it is still working properly. See Perform a
Reader Test section for instructions.
• If the Reader becomes too hot to hold, do NOT use and contact
Customer Service about replacing your Reader, yellow USB
cable, and power adapter. Customer Service is available at
1-855-632-8658 7 Days a Week from 8AM to 8PM Eastern Time;
excluding holidays.
25

FreeStyle Libre 3 app
You can use the App to start a Sensor, receive glucose alarms, get
glucose readings from the Sensor, and store your glucose history and
notes you enter.
FreeStyle Libre 3 iOS app is available for download
from the App Store.
FreeStyle Libre 3 Android app is available for download
from Google Play Store.
The App is not compatible with all phones. Before upgrading your phone
or its operating system, check www.FreeStyleLibre.com.
• You must keep Critical Alerts (iPhone) / Do Not Disturb Permission
(Android Phone) and Bluetooth on. If these settings are turned o, you
will not be able to use the App, so you will not receive alarms or be
able to check your glucose.
• You are responsible for properly securing and managing your phone.
If you suspect an adverse cybersecurity event related to the FreeStyle
Libre 3 System, contact Customer Service.
• FreeStyle Libre 3 is not intended for use on a phone that has
been altered or customized to remove, replace or circumvent the
manufacturer’s approved conguration or use restriction, or that
otherwise violates the manufacturer’s warranty.
26

Reader Home Screen
The Reader Home Screen provides access to information about your
glucose and the System. You can press the Home Button to get to the
Home Screen.
View Glucose
Review History
Start New Sensor
Ends in 14 days
10:23pm
Current time set on
the Reader
Sensor Status
Information about your
current Sensor.
Battery charge remaining
Sound/Vibration setting
Signal Status
Shows if Sensor is
communicating with
Reader.
Settings
Touch to access Alarms,
Reminders, and other
Reader settings.
Review History
Touch to review information
about your past glucose
readings.
Start New Sensor
Touch to start a new
Sensor.
View Glucose
Touch to view your
Sensor glucose.
27
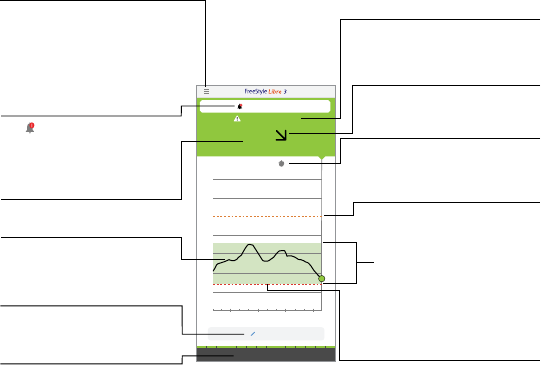
App Home Screen
The App Home Screen displays your current glucose, glucose trend
arrow, and glucose graph. It is automatically updated every minute with
glucose data from the Sensor.
Main Menu
Tap to access the Home screen,
Alarms, Logbook, other history
options, and Connected Apps.
You can also access Settings,
Help, and other information.
Note Symbol
Tap to review notes you've entered.
Glucose Trend Arrow
Direction your glucose is going.
Message
You may be able to tap the message
for more information.
High Glucose Alarm Level
Your High Glucose Alarm level.
Low Glucose Alarm Level
Your Low Glucose Alarm level.
(Example screen displayed for iPhone)
Target Glucose Range
The graph shows your target
glucose range. This is not related
to glucose alarm levels.
Glucose Graph
Graph of your current and
stored glucose readings.
Current Glucose
Your most recent glucose value.
Alarms Unavailable
The symbol displays if
alarms are not available.
Tap the symbol for more
information.
Add Note
Tap to add notes to the
glucose reading.
Sensor Life
Remaining life time of Sensor.
28
Reporting Software
Software can be used to create reports based on glucose readings from
FreeStyle Libre 3 Sensors. Go to www.FreeStyleLibre.com and follow
onscreen instructions to download and install the compatible software.
You are responsible for keeping your computer secure and up to date, for
example by using anti-virus software and installing system updates.
29

Setting up Your System for the First Time
Reader Setup
Complete the setup if you want to use the Reader with the Sensor or use
the Reader’s built-in meter.
Step Action
1
Press the Home Button to turn on the Reader.
2
If prompted, use the touchscreen to select your
preferred language for the Reader. Touch OK to
continue.
Note: Use the pad of your nger. Do NOT use
your ngernail or any other object on the screen.
30

Step Action
3
Set the Current Date using the arrows on the
touchscreen. Touch next to continue.
4
Set the Current Time. Touch next to continue.
14
back next
Current Date
June
2022
12 am 00
back next
Current Time
CAUTION: It is very important to set the time
and date correctly. These values aect the
Reader data and settings.
31

Step Action
5
The Reader now displays important information about key
topics to help you use the System. Touch next after reviewing
each screen. Touch done to go to the Home Screen.
32

App Setup
Complete the setup if you want to use the App with the Sensor.
Note: FreeStyle Libre 3 app is only compatible with certain mobile
devices and operating systems. Please check www.FreeStyleLibre.com
for more information about device compatibility before upgrading your
phone or its operating system.
Step Action
1
Check that your phone is connected to a network (WiFi or
cellular). You can then install FreeStyle Libre 3 app from the App
Store (iPhone) or Google Play Store (Android Phone). Tap the
App icon to open the App.
Note: You only need to be connected to a network for setup,
using LibreView, and sharing with other authorized apps
through the Connected Apps menu option within the FreeStyle
Libre 3 app. You do not need to be connected to get glucose
data from a Sensor, add notes, or review your history in the App.
2
Swipe left to view some helpful tips or tap GET STARTED NOW
at any point.
33

Step Action
3
Conrm phone and OS compatibility and tap NEXT.
4
Conrm your country and tap NEXT.
5
You may need a LibreView account to use the App. Follow
onscreen instructions to review legal information, phone
warnings, and create a new account or login to your existing
account. You can continue using an existing Sensor with the
App on a compatible phone that is logged into the same
LibreView account.
34

Step Action
6
Conrm your glucose unit of measure and tap NEXT.
7
Select how you count carbohydrates (in grams or servings) and
tap NEXT. The carbohydrate unit will be used in any food notes
you enter in the App.
8
The App now displays some important information. Accept the
requested permissions.
Tap NEXT after reviewing each screen.
9
Apply a new Sensor and then tap NEXT. Go to Starting Your
Sensor section.
Note: If you need help applying your Sensor, tap HOW TO
APPLY A SENSOR or go to Applying Your Sensor section.
35

Applying Your Sensor
CAUTION: Intense exercise may cause your Sensor to loosen
due to sweat or movement of the Sensor. If the Sensor is
becoming loose or if the Sensor tip is coming out of your skin,
you may get no readings or unreliable low readings. Remove
and replace your Sensor if it starts to loosen and follow the
instructions to select an appropriate application site. Do not
attempt to reinsert the Sensor. Contact Customer Service if
your Sensor becomes loose or falls o before the end of the
wear period. Customer Service is available at 1-855-632-8658
7 Days a Week from 8AM to 8PM Eastern Time; excluding
holidays.
IMPORTANT: Before using your Sensor Applicator, make sure you
have an alcohol wipe (70% isopropyl alcohol) on hand to prepare
the application site. This is not included in the Sensor Kit.
36

Step
Action
1
Apply Sensors only on the back of your upper
arm. If placed in other areas, the Sensor may not
function properly and could give you inaccurate
readings. Avoid areas with scars, moles, stretch
marks, or lumps.
Select an area of skin that generally stays at
during your normal daily activities (no bending
or folding). Choose a site that is at least 1 inch
(2.5 cm) away from an insulin injection site. To
prevent discomfort or skin irritation, you should
select a dierent site other than the one most
recently used.
2
Wash application site using a plain soap, dry, and
then clean with an alcohol wipe. This will help
remove any oily residue that may prevent the
Sensor from sticking properly. Allow site to air
dry before proceeding.
Note: The area MUST be clean and dry following
these instructions, or the Sensor may not stay
on for the full wear duration specied by your
Sensor insert.
37
Step
Action
3
Unscrew the cap from the Sensor Applicator and
set the cap aside.
Cap
CAUTION:
• Do NOT use if the Sensor Kit package or
Sensor Applicator appear to be damaged
or tamper label indicates Sensor
Applicator has already been opened.
• Do NOT put cap back on as it may
damage the Sensor.
• Do NOT touch inside Sensor Applicator as
it contains a needle.
Tamper
Label
38

Step
Action
4
Place the Sensor Applicator over the prepared
site and push down rmly to apply the Sensor to
your body.
5
Gently pull the Sensor Applicator away from your
body. The Sensor should now be attached to your
skin.
Note: Applying the Sensor may cause bruising
or bleeding. If there is bleeding that does not
stop, remove the Sensor and contact your
health care professional.
CAUTION: Do NOT push down on the Sensor
Applicator until placed over prepared site to
prevent unintended results or injury.
Sensor
39

Step
Action
6
Make sure the Sensor is secure after application.
Put the cap back on the Sensor Applicator.
Discard the used Sensor Applicator according to
local regulations.
Note: If using the App, you can tap Help in
the Main Menu to access an in-app tutorial on
applying a Sensor.
40

Starting Your Sensor
Starting Your Sensor with the Reader
Before you start your Sensor, choose which device you want to use. If you
start the Sensor with the Reader, you will be unable to use the App to
check your glucose or receive alarms.
Step
Action
1
Press the Home Button to turn on the Reader.
2
Touch Start New Sensor.
View Glucose
Review History
Start New Sensor
No Active Sensor
10:23pm
41

Step
Action
3
Hold the Reader near the Sensor to scan it. This
starts your Sensor. If sounds are turned on,
the Reader beeps when the Sensor has been
successfully activated. The Sensor can be used to
check your glucose after 60 minutes.
Note: If the Sensor is not successfully scanned
within 15 seconds, the Reader displays a prompt
to scan the Sensor again. Touch OK to return to
the Home Screen and touch Start New Sensor
to scan your Sensor.
minutes
New Sensor
Starting Up
60
Sensor can be used in:
OK
42

Starting Your Sensor with the App
Before you start your Sensor, choose which device you want to use. If you
start the Sensor with the App, you will be unable to use the Reader to
check your glucose or receive alarms.
IMPORTANT:
• The App requires that your phone has date and time enabled
to set automatically. You can check this in your phone settings.
Manual changes to your phone’s time and date setting can lead to
incorrect time stamp or inability to use the App.
• When using the App, you should keep your phone well charged
and be sure you have access to a blood glucose monitoring
system.
• When you start your Sensor, you will receive a tone and vibration.
If your phone's volume is turned o, you will not hear the tone.
43

• iPhone Users: The NFC (Near Field Communication) antenna is
on the top edge of iPhone. Hold this area near your Sensor when
you are scanning. You may need to adjust your scan distance
based on what clothing you are wearing. In addition to proximity
and orientation, other factors can aect NFC performance. For
example, a bulky or metallic case can interfere with the NFC
signal. Keep in mind that the ease of scanning a Sensor may vary
between phone models.
• Android Phone Users: The NFC (Near Field Communication)
antenna is located on the back side of most Android Phones.
Move your phone around slowly and, if needed, gently touch the
Sensor. In addition to proximity and orientation, other factors can
aect NFC performance. For example, a bulky or metallic case
can interfere with the NFC signal. Keep in mind that the ease of
scanning a Sensor may vary between phone models.
• Please check www.FreeStyleLibre.com for more information
about device compatibility and the location of the NFC antenna
on your phone.
44

iPhone Users
Step Action
1
From the App Home Screen, tap the Scan New Sensor
button. Your phone is now ready to scan the Sensor to start
it.
2
Touch the Sensor with the TOP of your phone. You will
receive a tone and vibration after you have successfully
started the Sensor. If your phone’s volume is turned o,
you will not hear the tone.
45

Step Action
3
The Sensor can be used to check your glucose after
60 minutes. While the Sensor is starting up, you can
navigate away from the App. If notications are enabled,
you will see a notication when the Sensor is ready.
Note: If you have an active Sensor and want to start a new
Sensor, go to the Menu and tap Start New Sensor
.
Android Phone Users
Step Action
1
From the App Home Screen, scan the Sensor with the BACK
of your phone to start it. You will receive a tone and vibration
after you have successfully started the Sensor. If your
phone’s volume is turned o, you will not hear the tone.
Note: Each phone model is dierent. Touch the Sensor with
your phone or move your phone around slowly until you
learn how to scan.
46

Step Action
2
The Sensor can be used to check your glucose after
60 minutes. While the Sensor is starting up, you can
navigate away from the App. You will see a notication when
the Sensor is ready.
Note: If you have an active Sensor and want to start a new
Sensor, go to the Menu and tap Start New Sensor
.
Note:
• If you need help, tap HOW TO SCAN A SENSOR to view an in-app
tutorial. You can also access this later by going to the Main Menu and
then tapping Help.
• If your Sensor is not successfully scanned, you may receive a Scan Error
message. Follow the instructions in the message.
• See Troubleshooting section for additional error messages.
47

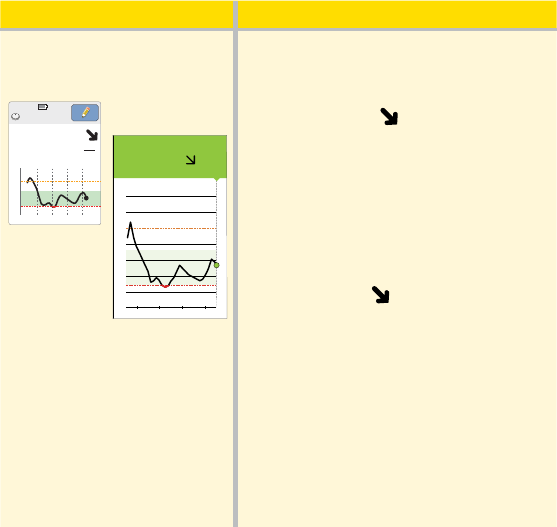
Checking Your Glucose
Checking Your Glucose with the Reader
Step Action
1
Turn the Reader on by pressing
the Home Button or touch
View Glucose from the Home
Screen.
2
The Reader displays your current glucose reading. It includes
your Current Glucose, a Glucose Trend Arrow indicating which
way your glucose is going, and a graph of your current and
stored glucose readings.
View Glucose
Review History
Start New Sensor
Ends in 14 days
10:23pm
OR
48

Step Action
2
(cont.)
Note:
• The graph displays glucose readings above 350mg/dL as
350mg/dL. For sequential readings above 350mg/dL, a line
is displayed at 350mg/dL. The Current Glucose number can
be as high as 400mg/dL.
350
250
150
50
10am 4pm 10pm
mg
dL
82
Glucose Going
Low
Glucose Trend
Arrow
Direction your
glucose is going.
Glucose Graph
Graph of your current
and stored glucose
readings.
Insulin Note
High Glucose Alarm Level
Low Glucose Alarm Level
Current Glucose
Your most recent
glucose value.
Message
Touch for more
information.
Food Note
Add Notes
Touch to add notes to
the glucose reading.
Target Glucose Range
Your Target Glucose
Range is not related to
your glucose alarm
settings.
49

Step Action
2
(cont.)
• The symbol may appear, indicating the Reader time was
changed. Gaps in the graph may result or glucose readings
may be hidden.
• All available glucose data is used to make your graph so you
can expect to see some dierences between the graph line
and previous current glucose readings.
• Results screen will not automatically update even if new
data has arrived. Return to the Home Screen by pressing the
Home Button and then touch View Glucose to update the
results screen.
Checking Your Glucose with the App
Step Action
1
Open the App.
50
Step Action
2
If you have an active Sensor, the Home Screen displays your
glucose reading. It includes your Current Glucose, a Glucose
Trend Arrow indicating which way your glucose is going, and a
graph of your current and stored glucose readings.
(Example screen displayed for iPhone)
Current Glucose
Glucose Graph
Glucose Trend Arrow
51

Step Action
2
(cont.)
Current Glucose - Your most recent glucose value.
Glucose Trend Arrow - Direction your glucose is going.
Glucose Graph - Graph of your current and stored glucose
readings.
Note:
• The graph displays glucose readings above 350mg/dL as
350mg/dL. For consecutive readings above 350mg/dL, a
line is displayed at 350mg/dL. The Current Glucose number
can be as high as 400mg/dL.
• The symbol may appear, indicating the phone’s time was
changed.
• All available glucose data is used to make your graph so you
can expect to see some dierences between the graph line
and previous current glucose readings.
52

• Your current glucose value determines the background color on the
Home Screen:
• If you are not receiving glucose readings you will not receive Low
or High Glucose Alarms.
• In order for the FreeStyle Libre 3 app to share data with other
connected apps, please do the following:
o Enable WiFi or cellular service.
o Disable Low Data mode.
Orange - High glucose (above 250 mg/dL)
Yellow - Between the Target Glucose Range and high or low glucose level
Green - Within the Target Glucose Range
Red - Low glucose (below 70 mg/dL)
53

Understanding Your Glucose Readings
Glucose Trend Arrow
The Glucose Trend Arrow gives you an indication of the direction your
glucose is going.
Glucose is rising quickly
(more than 2mg/dL per minute)
Glucose is rising
(between 1 and 2mg/dL per minute)
Glucose is changing slowly
(less than 1mg/dL per minute)
Glucose is falling
(between 1 and 2mg/dL per minute)
Glucose is falling quickly
(more than 2mg/dL per minute)
54

Messages
Below are messages you may see with your glucose readings.
Reader
Display
App
Display
What To Do
350
250
150
50
10am 4pm 10pm
mg
dL
Low Glucose
LO
350
250
150
50
10am 4pm 10pm
mg
dL
High Glucose
HI
If LO appears, your reading is lower
than 40mg/dL. If HI appears, your
reading is higher than 400mg/dL.
You can tap the symbol for
more information. Check your
blood glucose on your nger with
a test strip. If you get a second LO
or HI result after doing a blood
glucose test, contact your health
care professional immediately.
Note: In the App, the background
color corresponds to your current
glucose value.
55

Reader
Display
App
Display
What To Do
350
250
150
50
10am 4pm 10pm
350
250
150
50
63
mg
dL
Low Glucose
350
250
150
50
10am 4pm 10pm
289
mg
dL
High Glucose
If your glucose is higher than
250mg/dL or lower than
70mg/dL, you will see a message
on the screen. You can tap the
symbol for more information
and set a reminder to check your
glucose.
350
250
150
50
10am 4pm 10pm
72
mg
dL
Glucose Going
Low
350
250
150
50
10am 4pm 10pm
237
mg
dL
Glucose Going
High
If your glucose is projected to
be higher than 250mg/dL or
lower than 70mg/dL within
15 minutes, you will see a
message on the screen. You can
tap the symbol for more
information and set a reminder
to check your glucose.
56

Reader
Display
App
Display
What To Do
mg
dL
110
Ends in 14 days
7:03am
350
250
150
50
6pm 12am 6am
During the rst 12 hours of Sensor
wear the symbol will display,
and you cannot use Sensor values
to make treatment decisions
during this time. Conrm Sensor
glucose readings with a blood
glucose test before making
treatment decisions during the
rst 12 hours of Sensor wear when
you see the symbol.
Note:
• If you are not sure about a message or reading, contact your health care
professional before you do anything.
• Messages you receive with your glucose readings are not related to
your glucose alarm settings.
57

Making Treatment Decisions
Work with your health care professional to put together a plan for
managing your diabetes that includes when to use the System information
for making treatment decisions. You should also talk to your health
care professional about the best times to check your glucose. Consider
checking your glucose before a period when you will not be monitoring
your glucose, such as before driving, exercising or sleeping.
WARNING: The System can replace blood glucose testing except in
the below situations. These are the times when you need to do a blood
glucose test before deciding what to do or what treatment decision to
make as Sensor readings may not accurately reect blood glucose levels:
Do a blood glucose test if you think your
glucose readings are not correct or do not
match how you feel. Do not ignore symptoms
that may be due to low or high glucose.
Do a blood glucose test when you see the
symbol during the rst 12 hours of wearing a
Sensor or the Sensor glucose reading does not
include a Current Glucose number.
58
Making Treatment Decisions – Getting Started
Before you start using the System for treatment decisions, make sure
you have a good understanding of how the System works for your body.
Continue to use your blood glucose meter for treatment decisions
until you are comfortable with the information you receive from your
System. This includes understanding that: Sensor performance can vary
in between Sensors, within a Sensor wear period (duration specied by
your Sensor insert), and in dierent situations. There may be variations
between Sensors during the rst 12 hours after insertion, so pay attention
to how each newly inserted Sensor is working for you when deciding
whether to make treatment decisions based on your Sensor readings.
Getting familiar with the System could take days, weeks, or even months.
The more you check readings from the System with a blood glucose
meter, the better you will understand how the System works for you.
Work with your health care professional to put together a plan for
managing your diabetes that includes when to use the System
information for making treatment decisions.
59
Helpful Tips
• Conrm your Sensor glucose readings with a blood glucose meter until
you understand:
o Sensor accuracy may vary between Sensors.
o Sensor accuracy may vary during a Sensor wear session.
o Sensor accuracy may vary in dierent situations (meals, exercise, rst day of
use, etc.).
• Check your glucose often to see how carbs, medication, exercise, illness,
or stress levels impact your Sensor glucose readings. The information
you get can help you gure out why your glucose sometimes goes too
high or too low, and how to prevent it from doing so in the future.
• Talk to your health care professional about how your insulin works. The
more you understand about your insulin, including how long it takes to
start working and how long it lasts in your body, the more likely you will
be to make better treatment decisions.
• Making a treatment decision doesn’t just mean taking insulin. Treatment
decisions can also include things like taking fast-acting carbs, eating, or
even doing nothing and checking again later.
60
• Your health care professional can also help you to understand when
doing nothing and checking again later is the right treatment decision.
For example, if your glucose is high and going up, your rst instinct may
be to take more insulin to lower your glucose, however depending on
when you last took insulin or your recent activity, the right treatment
decision may be to do nothing and check again later. Avoid “insulin
stacking”.
• Sensor glucose values, which are based on interstitial uid glucose
levels, can be dierent from blood glucose levels (ngersticks),
particularly during times when your blood glucose is changing quickly.
If your glucose readings and alarms from the System do not match your
symptoms or expectations, use a ngerstick blood glucose value from a
blood glucose meter to make diabetes treatment decisions.
61

When not to use Sensor Glucose readings for treatment decisions
No Current Glucose Number
When there is no Current Glucose number, such as when you receive an
error message or a LO or HI result, you don’t have enough information to
make a treatment decision. Do a blood glucose test and treat based on
that result.
Glucose
Rising
Quickly
Blood Glucose
100 mg/dL
Sensor Glucose
95 mg/dL
Glucose
Falling
Quickly
Sensor Glucose
80 mg/dL
Blood Glucose
70 mg/dL
62

When you see the symbol during the rst 12 hours of wearing a
Sensor
During the rst 12 hours of Sensor wear the
symbol will display, and
you cannot use Sensor values to make treatment decisions during this
time. Conrm Sensor glucose readings with a blood glucose test before
making treatment decisions during the rst 12 hours of Sensor wear when
you see the symbol.
Think Your Readings are Incorrect?
Don’t trust Sensor glucose readings that you think may be incorrect or
that don’t match what you would expect based on your recent activity.
For example, if you ate dinner but forgot to take insulin before eating, you
would expect your glucose to be high. If your glucose reading is low, then
it doesn’t match your recent activity, so don’t use it to make treatment
decisions. Don’t make treatment decisions if you think your Sensor
glucose readings are incorrect. Do a blood glucose test and treat based on
that result.
63
Symptoms Don’t Match Readings
There may be times when your symptoms don’t match your Sensor
glucose readings. For example, you are feeling shaky, sweaty, and dizzy
– symptoms you generally get when you have low glucose, but your
glucose reading is within your target range. When symptoms don’t match
readings, do a blood glucose test and treat based on that result. Don’t
ignore symptoms that may be due to low or high blood glucose.
If you’re the caregiver, pay attention to times when the symptoms of the
one you’re caring for don’t match their Sensor glucose readings. When
symptoms don’t match readings, do a blood glucose test and treat based
on that result.
When to do Nothing and Check Again Later
Your health care professional can help you understand when doing
nothing and checking again later is the right treatment decision. For
example, if your glucose is high and going up, your rst instinct may be to
take more insulin to lower your glucose, however depending on when you
last took insulin or your recent activity, the right treatment decision may
be to do nothing and check again later.
Don’t take a correction dose within 2 hours of your meal dose. This may
result in “insulin stacking” and low glucose.
64
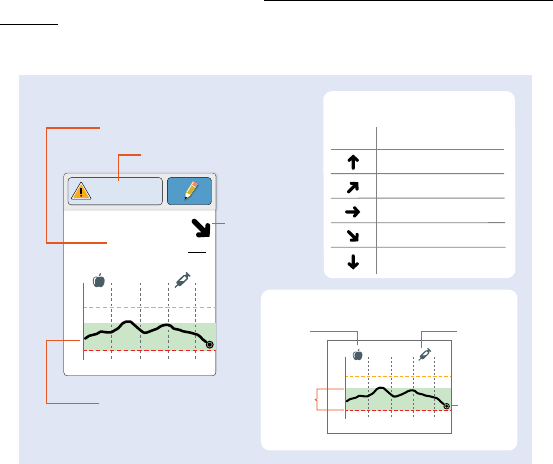
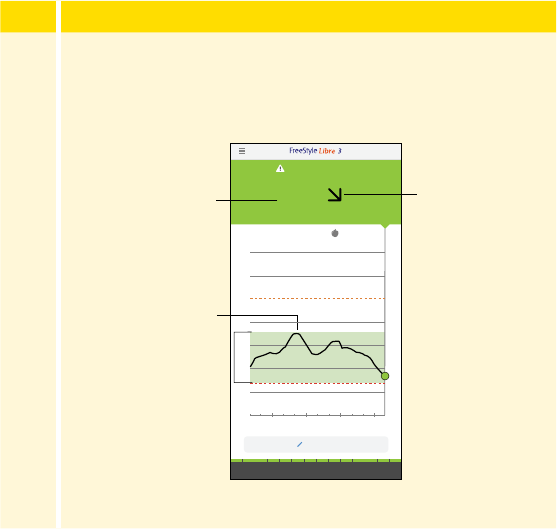
Using Your Glucose Reading to Make a Treatment
Decision
After you check your glucose, use all of the information on the
screen when deciding what to do or what treatment decision
to make.
Reader
mg/dL
350
250
150
50
10am 4pm 10pm
mg
dL
82
Glucose Going
Low
350
250
150
50
10am 4pm 10pm
Current Glucose
Message
Glucose Graph
Graph of your current and stored glucose readings
Food Note
Target
Glucose
Range
Insulin Note
Current
Glucose
Glucose Trend Arrow
Direction your glucose is going
Arrow What it means
Glucose rising quickly
Glucose rising
Glucose changing slowly
Glucose falling
Glucose falling quickly
Glucose
Trend
Arrow
Glucose Graph
Glucose Going
Low
Time
65

App
Current Glucose
Message
Target
Glucose
Range
Insulin NoteFood Note
Current
Glucose
Glucose Trend Arrow
Direction your glucose is going
Arrow What it means
Glucose rising quickly
Glucose rising
Glucose changing slowly
Glucose falling
Glucose falling quickly
Glucose
Trend
Arrow
Glucose Graph
Time
Glucose Graph
Graph of your current and stored glucose readings
66

This table provides some information on how you can factor the Glucose
Trend Arrow into your treatment decisions. Remember that you should
never make a treatment decision based on the Glucose Trend Arrow
alone.
Glucose
Trend
Arrow
Treatment Decision Considerations
Low Glucose
(< 70 mg/dL)
Glucose in
Target Range
High Glucose
(> 250 mg/dL)
Treat low glucose
according to your health
care professional’s
recommendation.
If you are about to eat,
take insulin to cover
your meal. Consider
taking a little more since
glucose is rising quickly.
If you have taken insulin
recently, do nothing and
check again later.
Avoid “insulin stacking”.
If you are about to eat,
take insulin to cover
your meal. Consider
taking a little more since
glucose is high and
rising quickly.
If this is between
meals, consider taking
an insulin correction
dose, unless you have
taken insulin recently. If
you have taken insulin
recently, do nothing and
check again later.
Avoid “insulin stacking”.
67

Glucose
Trend
Arrow
Treatment Decision Considerations
Low Glucose
(< 70 mg/dL)
Glucose in
Target Range
High Glucose
(> 250 mg/dL)
Treat low glucose
according to your health
care professional’s
recommendation.
If you are about to eat,
take insulin to cover
your meal. Consider
taking a little more since
glucose is rising.
If you have taken insulin
recently, do nothing and
check again later.
Avoid “insulin stacking”.
If you are about to eat,
take insulin to cover
your meal. Consider
taking a little more since
glucose is high and
rising.
If this is between
meals, consider taking
an insulin correction
dose, unless you have
taken insulin recently. If
you have taken insulin
recently, do nothing and
check again later.
Avoid “insulin stacking”.
68

Glucose
Trend
Arrow
Treatment Decision Considerations
Low Glucose
(< 70 mg/dL)
Glucose in
Target Range
High Glucose
(> 250 mg/dL)
Treat low glucose
according to your health
care professional’s
recommendation.
If you are about to eat,
take insulin to cover
your meal.
If this is between meals,
do nothing and check
again later.
If you are about to eat,
take insulin to cover
your meal. Consider
taking a little more since
glucose is high.
If this is between
meals, consider taking
an insulin correction
dose, unless you have
taken insulin recently. If
you have taken insulin
recently, do nothing and
check again later.
Avoid “insulin stacking”.
69

Glucose
Trend
Arrow
Treatment Decision Considerations
Low Glucose
(< 70 mg/dL)
Glucose in
Target Range
High Glucose
(> 250 mg/dL)
Treat low glucose
according to your health
care professional’s
recommendation.
If you are about to eat,
take insulin to cover
your meal. Consider
taking a little less since
glucose is falling.
If this is between
meals, consider eating
a snack or fast-acting
carbohydrates to stay
within target and check
again later.
If you are about to eat,
take insulin to cover
your meal. Consider
taking a little less since
glucose is falling.
If this is between meals,
consider doing nothing
and check again later.
Avoid “insulin stacking”.
70

Glucose
Trend
Arrow
Treatment Decision Considerations
Low Glucose
(< 70 mg/dL)
Glucose in
Target Range
High Glucose
(> 250 mg/dL)
Treat low glucose
according to your health
care professional’s
recommendation.
If you are about to eat,
take insulin to cover
your meal. Consider
taking a little less
since glucose is falling
quickly.
If this is between
meals, consider eating
a snack or fast-acting
carbohydrates to stay
within target and check
again later.
If you are about to eat,
take insulin to cover
your meal. Consider
taking a little less
since glucose is falling
quickly.
If this is between meals,
consider doing nothing
and check again later.
Avoid “insulin stacking”.
71

Example Scenarios
Here are some example scenarios to help you understand how to use the
information on your screen. Always use all of the information on the screen
before deciding what to do or what treatment decision to make. If you are
not sure about what to do, consult your health care professional.
What you see What it means
When you wake-up:
mg
dL
110
Ends in 14 days
7:03am
350
250
150
50
6pm 12am 6am
Reader
App
When you wake-up on your rst day
of wearing a Sensor, your current
glucose is 110mg/dL. There is also the
symbol on the screen.
During the rst 12 hours of Sensor
wear the
symbol will display, and
you cannot use Sensor values to make
treatment decisions during this time.
Conrm Sensor glucose readings with
a blood glucose test before making
treatment decisions during the rst
12 hours of Sensor wear when you see
the
symbol.
72

What you see What it means
Before breakfast:
App
Reader
350
250
150
50
8pm 2am 8am
mg
dL
115
Ends in 2 days
8:06am
Before breakfast, your current glucose
is 115mg/dL. The graph shows that
your glucose is going up and so does
the trend arrow
.
Consider what might be causing your
glucose to go up and what you might
do to prevent a high glucose. For
example:
• How much insulin should you take
before your meal?
• Since you see
, should you
consider taking a little more insulin?
73

What you see What it means
Before lunch:
App
Reader
350
250
150
50
12am 6am 12pm
Ends in 3 days
12:00pm
mg
dL
90
When you checked your glucose before
lunch, it was 90mg/dL and rising.
Before eating lunch, you took enough
insulin to cover the meal and a little
more since your trend arrow was
.
74

What you see What it means
After lunch:
App
Reader
350
250
150
50
1am 7am 1pm
Ends in 3 days
1:30pm
mg
dL
225
90 minutes later, your current glucose
is 225mg/dL. The graph shows that your
glucose is still going up, and so does the
trend arrow
.
Don’t take a correction dose within
2 hours of your meal dose. This may
result in “insulin stacking” and low
glucose.
Consider what might be causing your
glucose to go up and what you might
do to prevent a high glucose. For
example:
• Has the insulin you took for your meal
reached its full eect?
• Check your glucose again later.
75

What you see What it means
In the afternoon:
App
Reader
350
250
150
50
3am 9am 3pm
72
mg
dL
Glucose Going
Low
Between meals, your current glucose is
72mg/dL. The Glucose Going Low
message tells you that your glucose is
projected to be low within 15 minutes.
Think about what might be causing
your glucose to go low. Consider eating
a snack to stay within target. Avoid
taking insulin as this can cause low
glucose.
76

What you see What it means
After exercising:
App
Reader
350
250
150
50
5am 11am 5pm
Ends in 9 days
5:47pm
mg
dL
204
After exercising, you are feeling shaky,
sweaty, and dizzy – symptoms you
generally get when you have low
glucose. But, your current glucose is
204mg/dL.
Anytime you get a reading that doesn’t
match how you feel, do a blood
glucose test.
77
What you see What it means
Before dinner: Before dinner, your current glucose is
134mg/dL. The graph shows that your
glucose is going down and so does
the trend arrow
.
Consider what might be causing your
glucose to go down and what you
might do to prevent a low glucose. For
example:
• How much insulin should you take
to cover your meal?
• Since you see
, should you think
about taking a little less insulin?
App
Reader
350
250
150
50
7am 1pm 7pm
mg
dL
134
Ends in 7 days
7:34pm
78
Other considerations
Deciding how much rapid-acting insulin to take for dierent meals and
situations can be dicult. Work with your health care professional to
discuss dierent situations and what might work best for you. Here are
some questions to consider:
Meal dosing
• What do you do if your before meal glucose is high?
• What do you do if your before meal glucose is low?
• How much time do you wait to eat after taking your meal insulin?
• Do you adjust the amount of meal insulin based on the number of carbs
or how much you are planning to eat?
• Do you adjust your meal insulin dose for high fat foods such as pizza?
• Do you know how to adjust your insulin doses when drinking alcoholic
beverages?
High glucose corrections
• Do you take extra insulin if your glucose is high?
• How do you decide how much insulin to take for a high glucose?
• How long do you wait between insulin doses to avoid insulin stacking?
79
Bedtime
• How often do you check your glucose before bed?
• What do you consider a safe bedtime glucose?
• What do you do if your bedtime glucose is high?
• What do you do if your bedtime glucose is low?
• When should you eat a bedtime snack?
• What do you do if your before meal glucose is high?
• What do you do if your before meal glucose is low?
Other factors
• How do you adjust your insulin dose based on the Glucose Trend Arrow?
• How do you adjust your insulin dose for dierent types of exercise or
activities?
• How do you adjust your insulin doses for stress?
• How do you adjust your insulin doses for illness?
80

Reader Alarms
When in range of the Reader, your Sensor automatically communicates
with the Reader to give you Low and High Glucose Alarms. These alarms
are on by default.
Please read all the information in this section before setting and using
alarms.
IMPORTANT: Glucose alarms are an important safety feature for
some people. For example, those that have impaired awareness of
hypoglycemia or a history of severe hypoglycemia. Before you turn
alarms o or change their settings, please consult your health care
professional.
CAUTION:
• For you to receive alarms, they must be on and your Reader should
be within 33 feet of you at all times. The transmission range is 33
feet unobstructed. If you are out of range, you may not receive
glucose alarms.
• To prevent missed alarms, make sure the Reader has sucient
charge and that sound and/or vibration are turned on.
81

IMPORTANT: What to know about glucose alarms
• Check your glucose often. If you get a Low or High Glucose
Alarm, you must obtain a glucose result to determine what to
do next.
• The Low and High Glucose Alarms should not be used
exclusively to detect low or high glucose conditions. The
glucose alarms should always be used along with your current
glucose, glucose trend arrow, and glucose graph.
• Low and High Glucose Alarm levels are dierent from your
Target Glucose Range values. Low and High Glucose Alarms
tell you when your glucose has passed the level you set in
the alarm. Your Target Glucose Range is displayed on glucose
graphs on the Reader and used to calculate your Time In
Target.
82

IMPORTANT: How to prevent missed alarms
• Alarms must be kept on for you to receive them and you should
ensure that your Reader is within 33 feet of you at all times. The
Sensor itself will not issue alarms.
• If the Sensor is not communicating with the Reader,
you will not receive glucose alarms, and you may miss
detecting low glucose or high glucose episodes. You will
see the
symbol on the Home Screen when the Sensor is
not communicating with the Reader. Make sure the Signal
Loss Alarm is on so you will be notied if your Sensor has not
communicated with the Reader for 20 minutes.
• Make sure the Reader’s sound and/or vibration settings are on
and your Reader is near you. The Home Screen indicates the
sound/vibration setting when any alarm is on:
Sound and Vibration ON
Sound ON, Vibration OFF
Sound OFF, Vibration ON
Sound and Vibration OFF
83

Setting Reader Alarms
Work with your health care professional to determine your alarm settings.
Step Action
1
From the Home Screen, touch the Settings
symbol
. Touch Alarms.
2
Touch Change Alarm Settings.
View Glucose
Review History
Start New Sensor
10:23pm
Ends in 14 days
Alarms
Sound & Vibration
Time & Date
Settings
1 / 4
Change Alarm Settings
Alarm Settings
Low Glucose 70 mg/dL
High Glucose 250 mg/dL
Signal Loss On
OK
84

Step
Action
3
Select the alarm you want to set or turn o.
CAUTION: If alarms are turned o, you will
not get a notication when you have low
glucose or high glucose.
Low Glucose Alarm: Noties you when your
glucose is below the level you set.
High Glucose Alarm: Noties you when your
glucose is above the level you set.
Signal Loss Alarm: Noties you when your
Sensor is not communicating with the Reader
and that you will not receive Low or High
Glucose Alarms.
OK
Low Glucose Alarm
High Glucose Alarm
Signal Loss Alarm
Change Alarm
Settings
85

Alarm How to Set
Low
Glucose
Alarm
The Low Glucose Alarm is on by default.
The alarm level is initially set to
70mg/dL. You can use the arrows
to change this value between
60mg/dL and 100mg/dL. If the
alarm is on, you will be notied
when your glucose falls below the
level you set. Touch the slider to
turn the alarm o.
Touch done to save.
On
?
mg/dL
70
done
Low Glucose Alarm
86

Alarm How to Set
High
Glucose
Alarm
The High Glucose Alarm is on by default.
The alarm level is initially set to
250mg/dL. You can use the arrows
to change this value between
120mg/dL and 400mg/dL. If the
alarm is on, you will be notified
when your glucose rises above the
level you set. Touch the slider to
turn the alarm off.
Touch done to save.
Signal
Loss
Alarm
If the alarm is on, you will be
notied when your Sensor has not
communicated with your Reader
for 20 minutes and you are not
receiving Low or High Glucose
Alarms. Touch the slider to turn the
alarm o.
Touch done to save.
On
?
mg/dL
250
done
High Glucose Alarm
done
On
Turn On to get notified when
the glucose alarms you set are
not available because your
Sensor is not communicating
with the Reader.
Signal Loss Alarm
87

Step
Action
4
OK
Low Glucose Alarm
High Glucose Alarm
Signal Loss Alarm
Change Alarm
Settings
Change Alarm Settings
Alarm Settings
Low Glucose 70 mg/dL
High Glucose 250 mg/dL
Signal Loss On
OK
When you are nished setting your alarms,
touch OK. The Alarms Settings screen now
shows your current alarm settings. Touch OK
to return to the main Settings menu, or touch
Change Alarm Settings to make additional
updates.
88

Setting Reader Alarm Sounds
Step Action
1
From the Home Screen, touch the
Settings symbol
. Touch Sound &
Vibration to change the alarm sounds.
2
Touch the sound or vibration setting you
would like to change.
Note: These settings apply to the alarms
as well as other Reader functions.
Touch OK to save.
View Glucose
Review History
Start New Sensor
10:23pm
Ends in 14 days
Alarms
Sound & Vibration
Time & Date
Settings
1 / 4
High
On
Off
Off
Sound & Vibration
System
Sounds
Volume
Touch
Sounds
Vibration
OK
89

Using Reader Alarms
What you See What it Means
Low Glucose Alarm
Dismiss Alarm
63
mg
dL
The Low Glucose Alarm noties you if your
glucose drops below the level you set.
Touch Dismiss Alarm or press the Home Button
to dismiss the alarm. You will only receive one
alarm per low glucose episode.
High Glucose Alarm
Dismiss Alarm
252
mg
dL
The High Glucose Alarm noties you if your
glucose rises above the level you set.
Touch Dismiss Alarm or press the Home Button
to dismiss the alarm. You will only receive one
alarm per high glucose episode.
90

What you See What it Means
Signal Loss Alarm
Dismiss Alarm
The Signal Loss Alarm noties you if your Sensor
has not communicated with the Reader for 20
minutes and you are not receiving Low or High
Glucose Alarms. Signal loss could be caused by
the Sensor being too far away from the Reader
(over 33 feet) or another issue such as an error or
problem with your Sensor or Reader.
Touch Dismiss Alarm or press the Home Button
to dismiss the alarm. You will only receive one
alarm per signal loss episode.
Note: If you ignore an alarm, you will receive it again in 5 minutes
if the condition still exists.
91

App Alarms
FreeStyle Libre 3 app includes several types of alarms. These are all turned
on by default and initially set to sound regardless of your phone's sound
or Do Not Disturb settings. If there's a time where you need quiet, you
have a couple of options.
• You can choose to silence all your glucose and signal loss alarms for a set
period by turning on Silent Mode (if available).
• You can individually select to turn o the Override Do Not Disturb
setting for the High Glucose, Low Glucose, or Signal Loss Alarm if you
want the alarm to follow your phone's volume setting and be silent
when you have Do Not Disturb enabled.
Note: The Urgent Low Glucose Alarm can only be silenced by turning on
Silent Mode.
Optional Glucose Alarms: Low Glucose and High Glucose Alarms are
turned on by default, but can be turned o or customized to alarm at
dierent glucose levels.
92
Urgent Low Glucose: Urgent Low Glucose Alarm will be delivered when
your glucose goes below 55mg/dL. This alarm cannot be turned o or
customized but can be silenced with your other glucose alarms for a set
period.
Optional Signal Loss Alarm: Signal Loss Alarm will be delivered when
your Sensor isn’t communicating with the App. This alarm is turned on by
default, but can be turned o or customized.
Fixed System Alarms: Replace Sensor and Sensor Ended Alarms will be
delivered when your Sensor needs to be replaced, and the Check Sensor
Alarm will be delivered when the Sensor tip may not have been inserted
under the skin. These alarms are a little dierent and will always sound
regardless of your phone's sound, Do Not Disturb, or Silent Mode settings.
These alarms cannot be modied or turned o and indicate you are no
longer receiving glucose readings or glucose alarms.
Note: The iPhone app includes an App Stopped Alarm to indicate you
have force closed the App.
93

Please read all the information in this section before setting and using
alarms.
CAUTION:
• For you to receive alarms, your phone should be within 33 feet of
you at all times. The transmission range is 33 feet unobstructed.
If you are out of range, you may not receive alarms. If you want
to receive the App's optional alarms, make sure these are turned
on.
• For iPhone, do not force close the App. The App must be running
in the background to receive alarms. If you force close the App
you will not receive alarms. Re-open the App to ensure you will
receive alarms.
• If you restart your phone, open your App to make sure it’s
working properly.
• The App will ask for phone permissions which are needed to
receive alarms. Allow these permissions when requested.
• Your phone must have a Bluetooth connection with your Sensor
to receive glucose readings and glucose alarms. In the phone
settings, keep Bluetooth ON. For iPhones, in the phone settings
for the App, allow the App to access Bluetooth.
94

• Check to make sure that you have the correct phone settings and
permissions enabled. If your phone is not congured properly, you
will not be able to use the App, so you will not receive alarms or be
able to check your glucose.
o iPhones are to be congured as follows:
■ In the phone settings for the App under Notications, keep
Allow Critical Alerts ON
o Android Phones are to be congured as follows:
■ In the phone settings for the App, keep Do Not Disturb Access
permission ON
• If your phone is not congured correctly, the App will be in "Alarms
Unavailable" state and you will not be able to check your glucose
or receive any alarms, including the Urgent Low Glucose Alarm.
• To turn on Critical Alerts (iPhone) / Do Not Disturb Permission
(Android Phone), follow the instructions in the App.
95

• If you adjust the phone ringer volume (iPhone) or Media volume
(Android Phone) to silent or use the phone do not disturb setting,
keep ‘Override Do Not Disturb’ setting in the App ON for Low
Glucose, High Glucose, and Signal Loss Alarms to ensure you
receive audible alarms.
• You should disconnect headphones or speakers from your phone
when you are not using them as you may not hear audio for
alarms. If using headphones, keep them in your ears.
• If you are using peripheral devices connected to your phone, such
as wireless headphones or a smartwatch, you may receive alarms
on only one device or peripheral, not all.
• Keep your phone well charged and turned on.
• Disable your phone’s automatic operating system updates. After
an operating system update, open your App and check your device
settings to make sure it’s working properly.
• Some operating system features may impact your ability to receive
alarms. For example, if you use an iPhone and the iOS Screen Time
feature, add FreeStyle Libre 3 to the list of always allowed apps to
ensure that you receive alarms or if you use an Android Phone do
not use the Android Digital Wellbeing app.
96

IMPORTANT:
• The Urgent Low, Low, and High Glucose Alarms should not be used
exclusively to detect low or high glucose conditions. The glucose
alarms should always be used along with your current glucose,
glucose trend arrow, and glucose graph.
• Low and High Glucose Alarm levels are dierent from your Target
Glucose Range values. Low and High Glucose Alarms tell you when
your glucose has passed the level you set in the alarm. Your Target
Glucose Range is displayed on glucose graphs in the App and used
to calculate your Time in Ranges.
• Make sure your phone is near you. The Sensor itself will not issue
alarms.
• If the Sensor is not communicating with the App, you will
not receive glucose alarms, and you may miss detecting low
glucose or high glucose episodes. You will see the symbol on
the screen when the Sensor is not communicating with the App. If
the Signal Loss Alarm is on, you will be notied if your Sensor has
not communicated with the App for 20 minutes.
97

• If you see the symbol, this means you are not getting alarms.
Confirm your settings are as follows:
iPhone settings:
o Allow Notifications is ON
o Lock screen and Banners alerts are ON
o Notifications sounds are ON
Android Phone settings:
o Lock screen notifications are ON
o Channel notifications or Pop-up notifications are ON
o Battery optimization is OFF
o Phone Media volume is ON
If alarms are unavailable because of any of these settings you will
still be able to check your glucose. Touch the
symbol for more
information.
98

Setting App Alarms
To access your alarm settings, go to the Main Menu and tap Alarms.
Work with your health care professional to determine your alarm
settings.
99

Silent Mode (if available)
Step Action
1
Silent Mode is o by default. If you want to turn it on, touch the
slider.
2
Tap the time field to set the duration. Tap SAVE.
3
Tap TURN ON to confirm.
Note: You can turn Silent Mode off at any time before the end
of the set duration.
IMPORTANT: When Silent Mode is enabled, you will not
hear your glucose and signal loss alarms even if you've
turned on 'Override Do Not Disturb'. You may still get the
visual and vibratory notications based on your phone's
settings.
100

Low Glucose Alarm
Step Action
1
The Low Glucose Alarm is on by default. The alarm level is
initially set to 70mg/dL. Tap to change this value between
60mg/dL and 100mg/dL. If the alarm is on, you will be notied
when your glucose falls below the level you set. Tap the slider to
turn the alarm o. Tap SAVE.
2
Choose the sound for this alarm. Tap SAVE.
3
Override Do Not Disturb for the alarm is on by default. Keep
Override Do Not Disturb ON if you want the alarm to play a
sound and appear on the lock screen even if your phone is
muted or Do Not Disturb is on. The alarm vibration will match
your phone setting. You won't hear a sound if you have turned
on Silent Mode.
101

Step Action
4
Tap the back button to
return to the main alarm
settings screen.
Low Glucose Alarm
Low Glucose Alarm
Alarm Tone Custom
Override Do Not Disturb
When glucose goes below 70 mg/dL
SOUNDS
ALARM
Turn ON if you want this alarm to always play a sound even if
your phone is muted or Do not disturb is on.
On
On
(Example screen
displayed for iPhone)
(Example screen displayed
for Android Phone)
102

High Glucose Alarm
Step Action
1
The High Glucose Alarm is on by default. The alarm level is
initially set to 250mg/dL. Tap to change this value between
120mg/dL and 400mg/dL. If the alarm is on, you will be
notied when your glucose rises above the level you set.
Tap the slider to turn the alarm o. Tap SAVE.
2
Choose the sound for this alarm. Tap SAVE.
3
Override Do Not Disturb for the alarm is on by default. Keep
Override Do Not Disturb ON if you want the alarm to play a
sound and appear on the lock screen even if your phone is
muted or Do Not Disturb is on. The alarm vibration will match
your phone setting. You won't hear a sound if you have turned
on Silent Mode.
103

Step Action
4
Tap the back button to
return to the main alarm
settings screen.
High Glucose Alarm
High Glucose Alarm
Alarm Tone Custom
Override Do Not Disturb
When glucose goes above 250 mg/dL
SOUNDS
ALARM
Turn ON if you want this alarm to always play a sound even if
your phone is muted or Do not disturb is on.
On
On
(Example screen
displayed for iPhone)
(Example screen displayed
for Android Phone)
104
Signal Loss Alarm
Step Action
1
If the alarm is on, you will be notied when your Sensor has not
communicated with the App for 20 minutes and you are not
receiving glucose readings, Urgent Low, Low, or High Glucose
Alarms. Tap the slider to turn the alarm o.
2
Choose the sound for this alarm. Tap SAVE.
3
Override Do Not Disturb for the alarm is on by default. Keep
Override Do Not Disturb ON if you want the alarm to play a
sound and appear on the lock screen even if your phone is
muted or Do Not Disturb is on. The alarm vibration will match
your phone setting. You won't hear a sound if you have turned
on Silent Mode.
105

Step Action
4
Tap the back button to
return to the main alarm
settings screen.
Signal Loss Alarm
Signal Loss Alarm
Override Do Not Disturb
Alarm Tone Custom
SOUNDS
Turn ON if you want this alarm to always play a sound even if
your phone is muted or Do not disturb is on.
On
On
Receive a Signal Loss Alarm when your glucose
alarms are not available because the Sensor is not
communicating with the App.
(Example screen
displayed for iPhone)
(Example screen displayed
for Android Phone)
106

Using App Alarms
What you see What it means
Noties you if your glucose drops
below 55mg/dL. Open the App or
tap the Dismiss button to dismiss the
alarm. You will receive the Urgent Low
Glucose Alarm every 30 minutes until
your glucose reading is at or above
55mg/dL.
Noties you if your glucose drops
below the level you set. Open the App
or tap the Dismiss button to dismiss
the alarm. You will only receive one
alarm per low glucose episode.
LIBRE 3
now
54 mg/dL
Urgent Low Glucose Alarm
LIBRE 3
now
67 mg/dL
Low Glucose Alarm
107

What you see What it means
Noties you if your glucose rises above
the level you set. Open the App or
tap the Dismiss button to dismiss the
alarm. You will only receive one alarm
per high glucose episode.
Noties you if your Sensor has not
communicated with the App for
20 minutes and you are not receiving
glucose readings or Urgent Low, Low,
or High Glucose Alarms. Signal loss
could be caused by the Sensor being
too far away from your phone (over
33 feet) or another issue such as an
error or problem with your Sensor.
Open the App or tap the Dismiss
button to dismiss the alarm.
LIBRE 3
now
251 mg/dL
High Glucose Alarm
LIBRE 3
now
Glucose alarms are not available.
Signal Loss Alarm
108

What you see What it means
Noties you if your Sensor has ended.
You will not receive glucose alarms
after this time unless you start a new
Sensor. Remove your Sensor and start
a new Sensor to check your glucose.
Open the App or tap the Dismiss
button to dismiss the alarm.
Noties you if your Sensor has ended.
You will not receive glucose alarms
after this time unless you start a new
Sensor. Remove your Sensor and start
a new Sensor to check your glucose.
Open the App or tap the Dismiss
button to dismiss the alarm.
LIBRE 3
Replace Sensor
now
Your Sensor is not working.
Please remove your Sensor and
start a new one.
LIBRE 3
Sensor Ended
now
Open the app to start a new Sensor.
109

What you see What it means
(iPhone only)
Noties you if the App has been
closed. The App must be running in
the background to receive alarms. Tap
the alarm to re-open the App.
Note: For all alarms except the Sensor Ended Alarm and App
Stopped Alarm: If you ignore an alarm, you will receive it again in
5 minutes if the condition still exists. Only your most recent alarms
will display on your screen.
LIBRE 3
now
The app must be running in the
background to receive alarms.
Tap to re-open the app.
App Stopped
110

Adding Notes to Glucose Readings
Notes can be saved with your glucose readings to help you track things
like food, insulin, and exercise.
Adding Notes in the Reader
You can add a note at the time of your glucose reading or within 15
minutes after your reading was obtained.
Step Action
1
From the Glucose Reading screen, add notes
by touching the
symbol in the upper right
corner of the touchscreen. If you do not want to
add notes, you can press the Home Button to go
to the Home Screen or hold the Home Button to
turn the Reader o.
350
250
150
50
10am 4pm 10pm
72
mg
dL
Glucose Going
Low
111

Step Action
2
Select the checkbox next to the notes
you would like to add. Touch the down
arrow to view other note options. After
you check the box for food and insulin
notes, the
+
symbol appears to the
right of the note. You can touch it to
add more specic information to your
note. Then touch OK.
• Insulin notes: Enter the number of units
taken.
• Food notes: Enter grams or serving
information.
Note: Food
and insulin notes are shown on your
glucose graphs and in your Logbook as symbols.
3
Touch OK to save your notes.
You can review your notes from the Logbook. See Reviewing Your History
section for more information.
+
+
+
OK
Add Notes
1 / 2
Rapid-Acting
Insulin
Long-Acting
Insulin
Food
units
Enter Rapid-Acting
Insulin
OK
+
+
+
OK
Add Notes
1 / 2
Rapid-Acting
Insulin
Long-Acting
Insulin
Food
112

Adding Notes in the App
In the App, notes can be saved with your glucose readings to help you
track food, insulin, and exercise. You can also add your own comment.
Step Action
1
Tap the symbol on the Home Screen.
2
Select the checkbox next to the notes you would like to add.
After you check the box, you can add more specic information
to your note.
• Food notes: Enter meal type and grams or serving information
• Insulin notes: Enter the number of units taken
• Exercise notes: Enter intensity and duration
113

Step Action
3
Tap DONE to save your note.
Notes you add are shown on your glucose graph and in
your Logbook as symbols. Low or High Glucose Alarms you
receive will also be shown in the Logbook. You can review
a note by tapping its symbol on your glucose graph or by
going to the Logbook. See Reviewing Your History section for
more information about the Logbook. To edit a note from
the glucose graph, tap the symbol and then tap the
. Tap
DONE when you are nished.
Food Exercise
Insulin (Rapid or
Long-acting)
Food + Insulin
Multiple/Custom notes – indicates dierent types
of notes entered together or notes entered within a
short period of time. A numbered badge next to
the symbol indicates the number of notes.
114

Reviewing Your History
Reviewing and understanding your glucose history can be an important
tool for improving your glucose control. The Reader and App store
about 90 days of information and have several ways to review your past
glucose readings, notes, past alarm data, and other information.
Reviewing Your History in the Reader
Step Action
1
Press the Home Button to turn on the Reader.
IMPORTANT:
• Work with your health care professional to understand
your glucose history.
• Remember that FreeStyle Libre 3 app and FreeStyle Libre 3
Readers do not share data.
115

Step Action
2
Touch the Review History icon.
3
Use the arrows to view the available options.
View Glucose
Review History
Start New Sensor
No Active Sensor
10:23pm
Logbook
Daily Graph
Average Glucose
Review History
1 / 2
Daily Patterns
Time In Target
Low Glucose Events
Sensor Usage
116

Logbook
The Logbook contains entries for notes you added
as well as each time you received an Urgent Low,
Low, or High Glucose Alarm. If you entered Notes
with a glucose reading, the symbol appears in
that row. For more information about the symbols,
see Reader Symbols section.
Touch the entry to review the detailed information,
including any Notes you entered.
OK
Logbook
23 Feb
10:23am
23 Feb
6:37am
22 Feb
11:09pm
143
98
108
mg/dL
117

Daily Graph
A graph of your Sensor glucose readings by day.
The graph shows your Target Glucose Range and
symbols for notes you have entered.
Note:
• While Sensor glucose readings are gathered in
the System range of 40-400mg/dL, the Daily
Graph display range is 0-350mg/dL for ease
of review on screen. Glucose readings above
350mg/dL are displayed as 350mg/dL. For
sequential readings above 350mg/dL, a line is
displayed at 350mg/dL.
• The symbol may appear indicating the
Reader time was changed. Gaps in the graph
may result or glucose readings may be hidden.
12
am
12
pm
12
am
350
250
150
50
OK
Daily Graph
(mg/dL)
22 Feb
Wednesday
118

Other History Options
Use the arrows to view information about your last 7, 14, 30, or 90 days.
Average Glucose
Information about the average of your Sensor
glucose readings. The overall average for the time
is displayed above the graph. The average is also
shown for four dierent 6-hour periods of the day.
Readings above or below your Target Glucose
Range are yellow, while readings in range are green.
Daily Patterns
A graph showing the pattern and variability of your
Sensor glucose over a typical day. The thick black
line shows the median (midpoint) of your glucose
readings. The gray shading represents a range
(5-95 percentiles) of your Sensor readings.
Note: Daily Patterns needs at least 5 days of
glucose data.
OK
Last 7 Days
12
am ampm
12 12
121
152
134
Average:
119 mg/dL
69
Average Glucose
12
am
12
pm
12
am
350
250
150
50
OK
Daily Patterns
(mg/dL)
Last 7 Days
119

Time In Target
A graph showing the percentage of time your
Sensor glucose readings were above, below, or
within certain glucose ranges. The graph is based
on your Target Glucose Range.
Low Glucose Events
Information about the number of low glucose
events measured by your Sensor. A low glucose
event is recorded when your Sensor glucose
reading is lower than 70mg/dL for 15 minutes or
longer. The total number of events is displayed
above the graph. The bar graph displays the low
glucose events in four dierent periods of the
day.
Sensor Usage
Information about how often you viewed
your Sensor glucose readings and how much
information has been captured from your Sensor.
OK
34%
54%
12%
Time In Target
Above
In Target
Below
Target Range
80-140 mg/dL
Last 7 Days
OK
Last 7 Days
12
am ampm
12 12
1
0
Total Events:
10
3
6
Low Glucose
Events
OK
100%
5
Views Per
Day
Time Sensor
is Active
Sensor Usage
Last 7 Days
120

Reviewing Your History in the App
From the Main Menu, tap Logbook to view the Logbook or tap on one of
the other history options under Reports.
Logbook
The Logbook contains entries for notes you added as well as each
time you received an Urgent Low, Low, or High Glucose Alarm. If
you would like to view a dierent day, tap the
symbol or use
the arrows. To add a note to a Logbook entry, tap on the entry
and then tap the
symbol. Select your note information and tap
DONE.
To add a note that is independent of a Logbook entry, tap the
symbol on the main Logbook screen. Tap the symbol if you
want to add a note on a dierent date.
121

Other History Options
Daily Patterns: A graph showing the pattern and variability of your
Sensor glucose readings over a typical day. The thick black line shows
the median (midpoint) of your glucose readings. The light blue
shading represents the 5th - 95th percentile range of your glucose
readings. Dark blue shading represents the 25th - 75th percentile
range.
Note: Daily Patterns needs at least 5 days of glucose data.
Time In Ranges: A graph showing the percentage of time your
Sensor glucose readings were above, below, or within certain
glucose ranges. The Custom graph is based on your Target Glucose
Range, and the Standard graph is based on a Target Range of 70 to
180mg/dL.
Low Glucose Events: Information about the number of low glucose
events measured by your Sensor. A low glucose event is recorded
when your Sensor glucose reading is lower than 70mg/dL for longer
than 15 minutes. The total number of events is displayed below the
graph. The bar graph displays the low glucose events in dierent
periods of the day.
122

Average Glucose: Information about the average of your Sensor
glucose readings. The overall average for the selected time period is
displayed below the graph. The average is also shown for dierent
periods of the day. Readings above or below your Target Glucose
Range are yellow, orange, or red. Readings in range are green.
Daily Graph: A graph of your Sensor glucose readings by day. The
graph shows your Target Glucose Range and symbols for notes you
have entered.
• Glucose readings above 350mg/dL are displayed as 350mg/dL.
For sequential readings above 350mg/dL, a line is displayed at
350mg/dL.
• The
symbol may appear indicating a time change. Gaps in the
graph may result or glucose readings may be hidden.
Sensor Usage: Information about how often you viewed your Sensor
glucose readings in the App and how much information has been
captured from your Sensor.
123

Glucose Management Indicator (GMI): Glucose Management
Indicator uses average Sensor glucose data. GMI* can be used as an
indicator of how well your glucose levels have been controlled.
*The formula is based on the published reference:
GMI (%) = 3.31 + 0.02392 x (mean glucose mg/dL)
GMI (mmol/mol) = 12.71 + 4.70587 x (mean glucose mmol/L)
Reference: Bergenstal, Richard M. et al. “Glucose Management Indicator (GMI): A New
Term for Estimating A1C From Continuous Glucose Monitoring.” Diabetes Care, ADA,
November 2018.
Note:
• Tap the symbol (iPhone) or symbol (Android Phone) on any
report to share a screenshot of the report.
• Tap the symbol to view a description of the report.
• To view a dierent report, tap the dropdown menu above the report,
or go to the Main Menu.
• On all reports except the Daily Graph, you can select to show
information about your last 7, 14, 30, or 90 days.
124

Removing Your Sensor
Step Action
1
Pull up the edge of the adhesive that keeps your
Sensor attached to your skin. Slowly peel away
from your skin in one motion.
Note: Any remaining adhesive residue on the
skin can be removed with warm soapy water or
isopropyl alcohol.
2
Discard the used Sensor following directions from your health
care professional. See Maintenance and Disposal section.
When you are ready to apply a new Sensor, follow the
instructions in Applying Your Sensor and Starting Your Sensor
sections. If you removed your last Sensor before it ended, go to
"Start New Sensor"
in the menu to start the new one. You
will be prompted to conrm that you would like to start a new
Sensor.
Note: After removing your Sensor you may observe a slight
bump at the insertion site. This goes away quickly, usually in a
day or two.
125

Replacing Your Sensor
Your Sensor automatically stops working after the wear duration and must
be replaced. You should also replace your Sensor if you notice any irritation
or discomfort at the application site or if your device reports a problem
with the Sensor currently in use. Taking action early can keep small
problems from turning into larger ones.
CAUTION: If the Sensor is becoming loose or if the Sensor tip is
coming out of your skin, you may get no readings or unreliable
readings, which may not match how you feel. Check to make
sure your Sensor has not come loose. If it has come loose,
remove it, apply a new one, and contact Customer Service.
Customer Service is available at 1-855-632-8658 7 Days a Week
from 8AM to 8PM Eastern Time; excluding holidays.
126

Using Reminders
You can create single or repeating reminders to help you remember things
like checking your glucose or taking insulin. You can also set a reminder to
remind you to check your alarm settings if you have turned o any of your
alarms temporarily.
Using Reminders in the Reader
Step
Action
1
View Glucose
Review History
Start New Sensor
10:23pm
Ends in 14 days
From the Home Screen, touch the Settings
symbol
.
Scroll down using the arrow and
touch Reminders.
2
Touch to select which Type of reminder you
want to set: Check Glucose, Take Insulin, or
Other, which is a general reminder to help you
remember something.
Reminders
Control Solution Test
Language
2 / 4
cancel save
Set Reminder
Other
Daily
XX:XX
Type
Repeat
Time
127

Step
Action
3
Touch to select how often you want the reminder to Repeat:
Once, Daily, or Timer.
Note: You can set the reminders for a specic time (e.g. 8:30am)
or as a timer (e.g. 3 hours from the current time).
4
Set the reminder Time using the arrows on the touchscreen.
Touch save.
5
From the Reminders screen, you can turn the
reminder On/O or add new reminders.
Touch done to return to the Home Screen.
You will get your reminder even if the Reader is turned
o. Touch OK to dismiss your reminder or snooze to be
reminded again in 15 minutes.
Note: Reminders will not appear if the Reader is
connected to a computer.
add new done
Reminders
8:30am
12:30pm
00:00:00
On
On
Off
12:30pm
Reminder
snooze
15 min
OK
128

Using Reminders in the App
Note: To receive reminders, make sure notications for the App are
enabled. If you want to receive a sound/vibration with your reminder,
ensure that sound/vibration on your phone is turned on, sound is set at
a level you can hear, and your phone’s Do Not Disturb feature is turned
o. If Do Not Disturb is on, you will only see your reminder on the screen.
Step Action
1
To add a new reminder, go to the Main Menu and tap
Reminders. Tap ADD REMINDER.
2
Name your reminder.
3
(Example screen
displayed for iPhone)
Tap the time elds to set the time for the
reminder.
Note: If you would like the reminder to
repeat, tap the slider to the right. You can
also select which days you would like to
receive the reminder.
10 44 PM
7
8
9
41
42
43 AM
11
12
1
45
46
47
(Example screen displayed for iPhone)
129

Step Action
4
Tap DONE. You will now see your reminder on the list along
with the time you will receive it.
Note:
• There is one default reminder to help you remember to check your
glucose. This Check Glucose reminder can be changed or disabled but
cannot be deleted.
• To turn o a reminder, tap the slider to the left.
• To delete a reminder, swipe the reminder (swipe left for iPhones, swipe
right for Android Phones) and tap the
symbol. The Check Glucose
reminder cannot be deleted.
• Your reminders will be received as notications that you can swipe or
tap to dismiss.
130

Using the Reader’s Built-in Meter
The Reader has a built-in meter that can be used to test your blood
glucose, or to test the meter and strips with control solution.
Intended Use
The FreeStyle Libre 3 Reader’s built-in meter is for use outside the body
only (in vitro diagnostic use) in the quantitative measurement of glucose
in fresh whole blood for self testing by lay users from the ngers. It is
not intended to be used for testing neonatal blood samples or for the
diagnosis or screening of diabetes.
The FreeStyle Libre 3 Reader’s built-in meter is indicated for the home (lay)
user in the management of patients with diabetes. It is intended to be used
by a single person and should not be shared.
The FreeStyle Precision Neo Blood Glucose Test Strips are for use with the
FreeStyle Libre 3 Reader’s built-in meter to quantitatively measure glucose
(sugar) in fresh capillary whole blood samples drawn from the ngertips.
WARNING: Do NOT use the built-in meter while the
Reader is connected to an electrical outlet or a computer
due to the potential risk of electrical shock.
131

IMPORTANT:
• Use only FreeStyle Precision Neo test strips. Other test strips may
produce inaccurate results.
• Read all the instructions in this section. Failure to follow
instructions may cause incorrect blood glucose results. Practice the
testing procedures before using the Reader’s built-in meter.
• Read the test strip instructions for use before performing your rst
blood glucose test as they contain important information. They
also let you know how to store and handle the test strips and give
you information about sample types.
• The Reader’s built-in meter is not for use on people who
are dehydrated, hypotensive, in shock, or for individuals in
hyperglycemic-hyperosmolar state, with or without ketosis.
• The Reader’s built-in meter is not for use on neonates, in critically-ill
patients, or for diagnosis or screening of diabetes.
• Follow your health care professional’s advice when testing blood
glucose levels.
• Severe dehydration (excessive water loss) may cause false low test
strip results. If you believe you are suering from dehydration,
consult your health care professional right away.
132

IMPORTANT: (cont.)
• Inaccurate test strip results may occur in severely hypotensive
individuals or patients in shock.
• Inaccurate test strip results may occur for individuals experiencing a
hyperglycemic-hyperosmolar state, with or without ketosis.
• Observe caution when using around children. Small parts may
constitute a choking hazard.
• You should clean and disinfect the Reader once per week. The
Reader should also be cleaned and disinfected prior to being
handled by any person providing testing assistance to the user.
• The Reader is for use by a single person. It must not be used on
more than one person including other family members due to the
risk of spreading infection. All parts of the Reader are considered
biohazardous and can potentially transmit infectious diseases, even
after performing the cleaning and disinfection procedure.
1, 2
• Use the Reader’s built-in meter within the test strip operating
temperature range (59˚F – 104˚F) or you will see Error Message E-1.
• Use a test strip immediately after removing from its foil packet.
• Only use a test strip once.
133

IMPORTANT: (cont.)
• Do not put urine on the test strip.
• Do not use expired test strips as they may cause inaccurate results.
• Do not use at altitudes higher than 10,000 feet above sea level.
• Do not use a wet, bent, scratched, or damaged test strip.
• Do not use the test strip if the foil packet has a hole or is torn.
• Results from the built-in meter are shown only in your Logbook
and not in other history options.
• Refer to your lancing device instructions for use for how to use
your lancing device.
• This device is not intended for use with multiple patients in health
care or assisted-use settings such as hospitals, physician oces, or
long-term care facilities because it has not been cleared by FDA
for use in these settings, including for routine assisted testing or as
part of glycemic control procedures. Use of this device on multiple
patients may lead to transmission of Human Immunodeciency
Virus (HIV), Hepatitis C Virus (HCV), Hepatitis B Virus (HBV), or other
bloodborne pathogens.
134

Blood Glucose Testing
You can use the built-in meter to check your blood glucose, whether you
are wearing a Sensor or not. Be sure to read the test strip instructions for
use prior to using the built-in meter.
Step Action
1
Wash your hands with warm soapy water for
accurate results. Thoroughly dry your hands.
To warm the site, apply a warm dry pad or rub
vigorously for a few seconds.
Note: Do not use lotion or cream on the test
site. Avoid moles, veins, bones, and tendons.
Bruising may occur at the test site. If you get a
bruise, consider selecting another site.
CAUTION: Test on your ngers in accordance
with the Intended Use in this section.
135

Step Action
2
Check the test strip expiration date. Do not use expired test
strips as they may give inaccurate results.
3
Open the foil test strip packet at the notch and
tear down to remove the test strip. Use the test
strip immediately after removing from the foil
packet.
4
Insert the test strip with the three black lines at
the end facing up. Push the strip in until it stops.
Note: The Reader’s built-in meter turns o after 2
minutes of inactivity.
Abbott Diabetes Care Ltd.
Range Road
Witney, Oxon, OX29 0YL
Made in UK.
Blood Glucose
Sensor Electrode
Abbott Diabetes Care Ltd.
Range Road
Witney, Oxon, OX29 0YL
Made in UK.
4˚C
136

Step Action
5
Use your lancing device to obtain a blood drop
and apply blood to the white area at the end
of the test strip. Refer to your lancing device
instructions for use if you need help using your
lancing device.
If sounds are turned on, the Reader beeps once
to let you know you have applied enough blood.
You will see a buttery on the screen while you
wait for your result. Do not remove the test strip
while the buttery is on the screen. If sounds are
turned on, the Reader beeps once when your
result is ready.
If the buttery does not appear, you may not
have applied enough blood to the test strip.
Apply a second drop of blood to the test strip
within 5 seconds of the rst drop. If the buttery
still does not appear or if more than 5 seconds
have passed, discard the test strip. Turn o the
Reader and repeat the steps in this section with a
new test strip.
Apply Blood
137

Step Action
5
(cont.)
Note:
• E-3 means the blood drop is too small, or incorrect test
procedure, or there may be a problem with the test strip.
• E-4 means the blood glucose level may be too high to be read
by the system or there may be a problem with the test strip.
See Troubleshooting section for more information.
6
After reviewing your result, remove and discard the used test
strip according to local regulations.
Your Blood Glucose Results
Blood glucose results are marked on the
results screen and in the Logbook with the
symbol.
Note: Contact your health care professional if
you have symptoms that do not match your test
results.
IMPORTANT: After performing a blood glucose test, wash
your hands with soap and water and thoroughly dry them.
143
mg
dL
10:23pm
Example Screen Only
138

The normal glucose level for a non-diabetic adult is below 100mg/dL
when fasting, and less than 140mg/dL within two hours of a meal.
3
Consult your health care professional to determine the range that is
appropriate for you.
Display What To Do
mg
dL
Low Glucose
LO
mg
dL
High Glucose
HI
If LO appears on the Reader, your result is lower
than 20mg/dL. If HI appears on the Reader, your
result is higher than 500mg/dL. You can touch the
message button for more information. Check your
blood glucose again with a test strip. If you get a
second LO or HI result, contact your health care
professional immediately.
IMPORTANT: The built-in meter displays results from
20 - 500mg/dL. Low or high blood glucose results can
indicate a potentially serious medical condition.
139

Display What To Do
63
mg
dL
Low Glucose
289
mg
dL
High Glucose
If your glucose is higher than 250mg/dL or lower
than 70mg/dL, you will see a message on the
screen. You can touch the message button for
more information and set a reminder to check
your glucose.
After you get your blood glucose result, you can add Notes by touching
the
symbol. If you do not want to add a Note, press the Home Button
to go to the Home Screen or hold the Home Button to turn the Reader o.
IMPORTANT: You should clean and disinfect your Reader once
per week. Refer to the Maintenance and Disposal section for
instructions.
140

Accuracy of the Reader's built-in meter
Results from the Reader's built-in meter may vary slightly from your
actual blood glucose value. This may be due to slight dierences in
technique and natural variation in test technology. The table below
shows the results of a study where 119 typical users used the built-in
meter to check their blood glucose level. For example, in the study, the
built-in meter gave results within 15% of true blood glucose level 115
out of 119 times.
Accuracy results for all glucose concentrations
Dierence
range between
the true blood
glucose level
and the built-in
meter result
Within ± 5 mg/dL
and 5%
Within ± 10 mg/dL
and 10%
Within ± 15 mg/dL
and 15%
Within ± 15 mg/dL
and 20%
The number
and percent
that match true
blood glucose
level within X%
68/119 (57.1%) 105/119 (88.2%) 115/119 (96.6%) 116/119 (97.5%)
141

Control Solution Testing
You should do a control solution test when you are not sure of your test
strip results and want to check that your Reader’s built-in meter and test
strips are working properly.
IMPORTANT:
• Control solution results should fall within the control solution range
printed on the test strip instructions for use.
• Do NOT use control solution past the expiration date. Discard
control solution 3 months after opening or on the expiration date
printed on the bottle, whichever comes rst. (Example: open April
15, discard July 15; write the discard date on the side of the bottle.).
• The control solution range is a target range for control solution
only, not for your blood glucose results.
• The control solution test does not reect your blood glucose level.
• Use only MediSense (low, medium or high) Glucose and Ketone
Control Solution with the Reader’s built-in meter.
• Check that the LOT number printed on the test strip foil packet and
instructions for use match.
• Replace the cap securely on the bottle immediately after use.
• Do NOT add water or other liquid to the control solution.
• Contact your FreeStyle Libre 3 System provider (pharmacy or mail
order supplier) for how to obtain control solution.
142
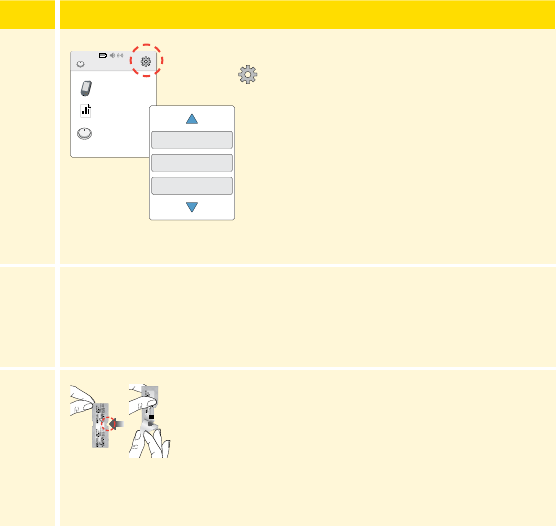
Step
Action
1
View Glucose
Review History
Start New Sensor
10:23pm
Ends in 14 days
From the Home Screen, touch the Settings
symbol
.
Scroll down using the arrow and
touch Control Solution Test.
2
Check the test strip expiration date.
3
Open the foil test strip packet at the notch and
tear down to remove the test strip.
Reminders
Control Solution Test
Language
2 / 4
Abbott Diabetes Care Ltd.
Range Road
Witney, Oxon, OX29 0YL
Made in UK.
Blood Glucose
Sensor Electrode
Abbott Diabetes Care Ltd.
Range Road
Witney, Oxon, OX29 0YL
Made in UK.
4˚C
143

Step
Action
4
Insert the test strip with the three black lines
facing up. Push the strip until it stops.
Note: The Reader’s built-in meter turns o after 2
minutes of inactivity.
5
Shake the control solution bottle to mix the
solution. Apply a drop of control solution to the
white area at the end of the test strip.
If sounds are turned on, the Reader beeps once
to let you know that you have applied enough
control solution.
Apply Control Solution
144

Step
Action
5
(cont.)
You will see a buttery on the screen while you
wait for the result. Do not remove the test strip
while the buttery is on the screen. If sounds are
turned on, the Reader beeps once when the result
is ready.
If the buttery does not appear, you may not have
applied enough control solution to the test strip.
Apply a second drop of control solution to the
test strip within 5 seconds of the rst drop. If the
buttery still does not appear or if more than 5
seconds have passed, discard the test strip. Turn
o the Reader and repeat the steps in this section
with a new test strip.
145

Control Solution Results
Compare the control solution result to the range
printed on the test strip instructions for use. The
result on your screen should be in this range.
Control solution results are marked on the
results screen and in the Logbook with a
symbol.
Note: Repeat the control solution test if the results are outside
of the range printed on the test strip instructions for use.
Stop using the built-in meter if the control solution results are
repeatedly outside of the printed range. Contact Customer
Service. Customer Service is available at 1-855-632-8658 7 Days a
Week from 8AM to 8PM Eastern Time; excluding holidays.
100
mg
dL
10:23pm
Control Solution Test
Example Screen Only
146

Living With Your System
Activities
Activity What You Need To Know
Bathing,
Showering, and
Swimming
CAUTION: Do NOT place the Reader in
water or other liquids as this may cause it
to not function properly and may lead to
risk of re or burns.
Your Sensor is water-resistant and can be worn
while bathing, showering, or swimming.
Note: Do NOT take your Sensor deeper than
3 feet (1 meter) or immerse it longer than
30 minutes in water. Bluetooth performance
may be impacted if using the system while
underwater.
147

Activity What You Need To Know
Sleeping Your Sensor should not interfere with your sleep.
Place your device nearby so you will receive
alarms and any reminders you have set.
Traveling by Air You may use your System while on an aircraft,
following any requests from the ight crew.
• The Reader is classed as a Medical-Portable
Electronic Device (M-PED) that meets all
required M-PED emission standards for safe use
onboard an aircraft: RTCA/DO160, Section 21,
Category M.
IMPORTANT: You will not receive alarms
or glucose readings while your phone is in
airplane mode unless you enable Bluetooth.
148

Activity What You Need To Know
Traveling by Air
(cont.)
• Some airport full-body scanners include x-ray or
millimeter radio-wave, which you cannot expose
your Sensor to. The eect of these scanners
has not been evaluated and the exposure may
damage the Sensor or cause inaccurate results.
To avoid removing your Sensor, you may request
another type of screening. If you do choose to go
through a full-body scanner, you must remove
your Sensor.
• The Sensor can be exposed to common
electrostatic (ESD) and electromagnetic
interference (EMI), including airport metal
detectors. You can also keep your Reader on
while going through these.
149

Activity What You Need To Know
Traveling by Air
(cont.)
Note: Changing the time and date aects the
graphs and statistics. The
symbol may appear
on your glucose graph indicating a time change.
Gaps in the graph may result or glucose readings
may be hidden.
If you are changing time zones, you can change
the time and date settings on the Reader by
touching the Settings symbol
from the Home
Screen, then Time & Date.
150

Charging the Reader
A fully charged Reader battery should last up to 4 days. Your battery
life may vary depending on your usage. A Low Battery message
accompanies your result when you have enough charge remaining for
about one day of use.
CAUTION:
• Always use the Abbott provided power adapter and yellow USB
cable that came with your Reader to minimize the risk of fire or
burns. Take care when plugging and unplugging your USB cable.
Do not force or bend the end of the USB cable into the Reader's
USB port.
• Choose a location for charging where you can easily access the
power adapter and quickly disconnect to prevent the potential
risk of electrical shock.
• The maximum surface temperature of the Reader and/or the
power adapter could go as warm as 111°F when it's charging or
117°F during normal use. Under these conditions, do not hold
the Reader or the power adapter for ve minutes or more. People
with disorders of peripheral circulation or sensation should use
caution at this temperature.
• Do NOT expose the USB cable or power adapter to water or other
liquids as this may cause them to not function properly and may
lead to risk of fire or burns.
151

Step Action
1
Before charging, to minimize the risk of fire or burns:
• Check the provided power adapter and yellow USB cable to
make sure they are not damaged.
• Check the Reader's USB port and make sure it is dry and free
of debris.
2
Plug the yellow USB cable into an electrical
outlet using the power adapter. Then, plug the
other end of the USB cable into the USB port on
the Reader.
Note:
• You must charge the Reader when the battery is low to keep
using the Reader.
• To fully charge the battery, charge the Reader for at least 3 hours.
• If the Reader does not turn on after being charged or you notice a
signicant deterioration in battery life, contact Customer Service about
replacing your Reader, yellow USB cable, and power adapter. Customer
Service is available at 1-855-632- 8658 7 Days a Week from 8AM to 8PM
Eastern Time; excluding holidays.
• Fully charge your Reader before storing it for more than 3 months.
152

Reader Settings and Information
You can go to the Settings menu to change many settings on the Reader,
like alarm settings, sound & vibration, time & date, and target range. The
Settings menu is also where you go to do a Control Solution Test or to
check the System Status.
Step
Action
1
To get to the Settings menu, touch the Settings
symbol
on the Home Screen.
2
Touch the setting you want to change:
Alarms – See Reader Alarms section for information on setting
alarms
Sound & Vibration – Set Reader sound and vibration. These
also apply to alarms
View Glucose
Review History
Start New Sensor
10:23pm
Ends in 14 days
Alarms
Sound & Vibration
Time & Date
Settings
1 / 4
153

Step
Action
2
(cont.)
Time & Date – Change the Time or Date
Reminders – See Using Reminders section for information on
setting reminders
Control Solution Test – Perform a control solution test
Language – Change the language on the Reader
System Status – Check Reader information and performance
• View System Information: The Reader will display information
about your System including:
o Current Sensor end date and time
o Reader serial number and version number
o Serial numbers and status codes of most recent Sensors (up
to three)
o Sensor version for most recent Sensor
o Number of Sensors that have been used with Reader
o Number of tests that have been performed using test strips
154

Step
Action
2
(cont.)
• View Event Logs: A list of events recorded by the
Reader, which may be used by Customer Service to help
troubleshoot your System
• Perform a Reader Test: The Reader Test will perform internal
diagnostics and allow you to check that the Display is
showing all pixels, sounds and vibrations are working, and
the Touchscreen is responding when touched
Report Settings – Work with your health care professional to
set your Target Glucose Range, which is displayed on glucose
graphs on the Reader and used to calculate your Time In Target.
Your Target Glucose Range is not related to your alarm settings
Reader Basics – Review the information screens shown during
the Reader setup
Dose Increment – You can set the insulin dose increment
to either 1.0 or 0.5 units for use with insulin notes
App Settings and Other Menu Options
You can go to the Main Menu to change settings like your LibreView
password. You can also access the Connected Apps option, Help, and
information about the App.
155

App Settings:
Unit of Measurement – View the glucose unit of measure used in the
App.
Report Settings – Work with your health care professional to set your
Target Glucose Range, which is displayed on glucose graphs in the App
and used to calculate your Time In Ranges Custom report. The Target
Glucose Range setting will not set glucose alarm levels. Tap SAVE
when you are done.
Carbohydrate Units – Choose grams or servings for food notes that
you enter. Tap SAVE when you are done.
Account Settings:
Note: You must have a LibreView account and be signed in to manage
Account Settings. To sign into an existing account or create a new
account choose Sign In from the Main Menu. Not all Account Settings
may be available, depending on your app version.
Account Settings – View/change your LibreView account information.
Account Password – Change your LibreView account password.
Sign Out – Sign out of your LibreView Account.
Account Options – Sign out or delete your LibreView account.
Signing out of your account means you will no longer be able to:
• Use the account with the FreeStyle Libre 3 app unless you sign back
in.
156

• Use the Connected Apps or Account Settings features.
Deleting your account means you will no longer be able to:
• Use your current Sensor.
• Access your account and all related data. Data will be deleted and
cannot be recovered for future use.
• Use the account with the FreeStyle Libre 3 app.
• Use the Connected Apps or Account Settings features.
Connected Apps:
The Connected Apps option in the Main Menu opens a web browser
within the App. It lists dierent apps you can connect with to share
your data. To connect your data with apps listed in the Connected
Apps option, select them from the list of apps, and follow the onscreen
instructions.
Help:
View in-app tutorials, access the product labeling, and review the
App’s legal information. You can also view the Event Log, which is a list
of events recorded by the App. This may be used by Customer Service
to help troubleshoot.
About:
View App software version and other information.
157

Maintenance and Disposal
Cleaning and Disinfecting the Reader
Cleaning and disinfecting your Reader is important to prevent the spread
of infectious diseases. The Reader has a mean use life of 3 years and has
been validated for 156 cleaning and disinfection cycles (the equivalent of
1 cycle per week for 3 years).
You should clean and disinfect the Reader once a week. The Reader should
also be cleaned and disinfected prior to being handled by any person
providing testing assistance to the user.
Cleaning is the physical removal of organic soil from the Reader surfaces.
Keeping the Reader clean helps ensure that it is working properly and
that no dirt gets in the device. Cleaning allows for successful, subsequent
disinfection.
Disinfection is a process that destroys pathogens, such as viruses and other
microorganisms, on the Reader surfaces. Disinfecting the Reader helps
ensure that no infection is passed on when you or others come in contact
with the Reader.
158
This device is not intended for use with multiple patients in health care or
assisted-use settings such as hospitals, physician oces, or long-term care
facilities because it has not been cleared by FDA for use in these settings,
including for routine assisted testing or as part of glycemic control
procedures.
Use of this device on multiple patients may lead to transmission of
Human Immunodeciency Virus (HIV), Hepatitis C Virus (HCV), Hepatitis B
Virus (HBV), or other bloodborne pathogens.
To clean and disinfect your Reader, you will need Clorox Healthcare Bleach
Germicidal Wipes, EPA Reg. #67619-12.
These disinfectant wipes contain a 0.55% Sodium Hypochlorite (NaOCl)
solution and have been shown to be safe for use with the Reader. They
may be purchased at major online retailers, such as Walmart.com,
Amazon.com, and OceDepot.com.
Note: Additional information about the risks for transmitting bloodborne
pathogens to persons undergoing ngerstick procedures for blood
sampling can be found. See References section for more information.
159

Step Action
1
Turn o the Reader before you clean and disinfect it.
2
Clean the outside surfaces of the Reader with a bleach wipe
until visibly clean. Make sure liquid does not get into the test
strip and USB ports.
3
For disinfection, use a second bleach wipe to wipe all outside
surfaces of the Reader until they are wet. Make sure liquid
does not get into the test strip and USB ports. Allow the
Reader surfaces to remain wet for 60 seconds.
4
Dry with clean paper towel to remove any residual moisture.
160

Step Action
5
When nished, thoroughly wash your hands with soap and
water.
IMPORTANT: Do NOT use the Reader if you notice any signs of
deterioration on the Reader (such as clouding or crazing on the
display of the Reader, corroding, eroding or swelling of the plastic
housing, or cracking of plastic housing or display) or if the Reader
does not turn on. Contact Customer Service about replacing your
Reader. Customer Service is available at 1-855-632-8658 7 Days a
Week from 8AM to 8PM Eastern Time; excluding holidays.
CAUTION: Do NOT place the Reader in water or other liquids.
Avoid getting dust, dirt, blood, control solution, water, bleach,
or any other substance in the test strip or USB port as this may
cause the Reader to not function properly and may lead to risk
of fire or burns.
161
Maintenance
The System has no serviceable parts.
Disposal
This product should be disposed of in accordance with all applicable local
regulations related to the disposal of electronic equipment, batteries,
sharps, and materials potentially exposed to body uids.
Contact Customer Service for further information on the appropriate
disposal of system components. Customer Service is available at
1-855-632-8658 7 Days a Week from 8AM to 8PM Eastern Time; excluding
holidays.
162

Troubleshooting
This section lists problems that you may experience, the possible cause(s),
and recommended actions. If there is an error, a message will appear on
the screen with directions to resolve the error.
IMPORTANT: If you are having issues with the App, please
keep in mind that uninstalling the App will cause you to lose all
historical data on the App, and may end the Sensor currently
in use. Please call Customer Service if you have any questions.
Customer Service is available at 1-855-632-8658 7 Days a Week
from 8AM to 8PM Eastern Time; excluding holidays.
163

Reader Does Not Power On
Problem What It May Mean What To Do
Reader does not
power on after
you press the
Home Button or
insert a test strip.
Reader battery is
too low.
Charge the Reader.
Reader is outside
of its operating
temperature range.
Move the Reader to a
temperature between
50°F and 113°F and then
try to power it on.
If the Reader still does not power on after trying these steps, contact
Customer Service. Customer Service is available at 1-855-632-8658
7 Days a Week from 8AM to 8PM Eastern Time; excluding holidays.
164

Problems at the Sensor Application Site
Problem What It May Mean What To Do
The Sensor is
not sticking
to your skin.
The site is not free
of dirt, oil, hair, or
sweat.
1. Remove the Sensor.
2. Clean the site with a plain
soap and water and then
clean with an alcohol wipe.
3. Follow the instructions in
Applying and Starting Your
Sensor sections. Consider
shaving the site, avoiding use
of lotions prior to insertion,
and applying the Sensor to
your non-dominant arm.
Customer Service: 1-855-632-8658 7 Days a Week from 8AM to 8PM Eastern Time; excluding holidays.
165

Problem What It May Mean What To Do
Skin irritation
at the Sensor
application
site.
Seams or other
constrictive clothing
or accessories
causing friction at
the site.
Ensure that nothing rubs on the
site.
You may be sensitive
to the adhesive
material.
If the irritation is where the
adhesive touches skin, contact
your health care professional to
identify the best solution.
Customer Service: 1-855-632-8658 7 Days a Week from 8AM to 8PM Eastern Time; excluding holidays.
166

Problems Starting Your Sensor or Receiving Sensor
Readings
Display What It May Mean What To Do
Scan Error The device was
unable to scan the
Sensor.
• iPhone: Tap the scan button
and try scanning the Sensor
again. The NFC antenna is on
the top edge of the phone.
Scan your Sensor by touching
the Sensor with the TOP of
your phone. Move your phone
around slowly if needed.
Proximity, orientation, and
other factors can affect NFC
performance. For example,
a bulky or metallic case
can interfere with the NFC
signal. Contact Customer
Service if the error persists
after repeated attempts of
scanning. Customer Service is
available at 1-855-632-8658
7 Days a Week from 8AM to
8PM Eastern Time; excluding
holidays.
Customer Service: 1-855-632-8658 7 Days a Week from 8AM to 8PM Eastern Time; excluding holidays.
167

Display What It May Mean What To Do
Scan Error
(cont.)
• Android Phone: Try scanning
the Sensor again. The NFC
antenna is located on the back
side of most Android phones.
Scan your Sensor by touching
the Sensor with the BACK of
your phone. Move your phone
around slowly if needed.
Proximity, orientation, and
other factors can affect NFC
performance. For example,
a bulky or metallic case
can interfere with the NFC
signal. Make sure you are not
touching any buttons on the
phone or the screen.
• Reader: Try scanning again.
You may need to move away
from potential sources of
electromagnetic interference.
Customer Service: 1-855-632-8658 7 Days a Week from 8AM to 8PM Eastern Time; excluding holidays.
168

Display What It May Mean What To Do
Sensor
Already in
Use
The Sensor was
started by another
device.
Both the Reader and App can
only be used with a Sensor that
it started. Check your glucose
with the device that started
it. Or, apply and start a new
Sensor.
Enable
Bluetooth
The Bluetooth
setting on your
phone is turned off.
Go to your phone settings and
enable Bluetooth.
Customer Service: 1-855-632-8658 7 Days a Week from 8AM to 8PM Eastern Time; excluding holidays.
169

Display What It May Mean What To Do
Incompatible
Sensor
The FreeStyle Libre 3
Reader and FreeStyle
Libre 3 app can
only be used with
the FreeStyle Libre
3 Sensor. Check
that you are using
the App or Reader
that is compatible
with your Sensor.
You may need to
download a different
app if your Sensor is
not compatible.
If you still have questions about
compatibility, tap "Learn more"
or call Customer Service.
Replace
Sensor
The System has
detected a problem
with your Sensor.
Apply and start a new Sensor.
Customer Service: 1-855-632-8658 7 Days a Week from 8AM to 8PM Eastern Time; excluding holidays.
170

Display What It May Mean What To Do
Allow Access
to Critical
Alerts (iPhone)
/ Allow
Access to Do
Not Disturb
(Android
Phone)
Access to Critical
Alerts / Do Not
Disturb was
disabled.
Follow the instructions on the
screen to allow permission for
Critical Alerts (iPhone) / Do
Not Disturb (Android Phone).
You will not be able to receive
Sensor readings or start a new
Sensor until these permissions
are allowed.
Sensor ready
in X minutes
The Sensor is unable
to provide a glucose
reading during the
start-up period.
Check again after the duration
specified on the screen.
Customer Service: 1-855-632-8658 7 Days a Week from 8AM to 8PM Eastern Time; excluding holidays.
171

Display What It May Mean What To Do
Scan
Timeout
(Reader only)
The Reader is not
held close enough
to the Sensor.
Bring the screen of the Reader
close to the Sensor.
Check Sensor The Sensor tip may
not be under your
skin.
Try to start your Sensor again.
If you see “Check Sensor” again
on the screen, your Sensor was
not applied properly. Remove
this Sensor and apply and start
a new Sensor.
Sensor Ended The Sensor has
ended.
Apply and start a new Sensor.
Customer Service: 1-855-632-8658 7 Days a Week from 8AM to 8PM Eastern Time; excluding holidays.
172

Display What It May Mean What To Do
Signal Loss Sensor has not
automatically
communicated with
your device in the
last 5 minutes.
Make sure your device is
within 33 feet of the Sensor.
If using the App, make sure
you have not force closed the
App. Tap the
symbol for
more information. Try turning
Bluetooth OFF then ON again.
If that doesn't work, try turning
your phone OFF then ON again.
Signal Loss
Alarm
Sensor has not
automatically
communicated with
your device in the
last 20 minutes.
Make sure your device is within
33 feet of the Sensor. If the
Signal Loss Alarm continues
to show, contact Customer
Service.
Bluetooth Off Bluetooth is turned
off.
Go to your phone settings and
enable Bluetooth.
Customer Service: 1-855-632-8658 7 Days a Week from 8AM to 8PM Eastern Time; excluding holidays.
173

Display What It May Mean What To Do
Sensor Error The Sensor is unable
to provide a glucose
reading. Tap the
symbol for more
information.
Check again after the duration
specified in the message.
Sensor Too
Hot
Your Sensor is too
hot to provide a
glucose reading. Tap
the
symbol for
more information.
Move to a location where the
temperature is appropriate and
check again in a few minutes.
Sensor Too
Cold
Your Sensor is too
cold to provide a
glucose reading. Tap
the
symbol for
more information.
Move to a location where the
temperature is appropriate and
scan again in a few minutes.
Customer Service: 1-855-632-8658 7 Days a Week from 8AM to 8PM Eastern Time; excluding holidays.
174

Display What It May Mean What To Do
Unexpected
Application
Error
The App has
detected an
unexpected error.
Shut down the App completely
and restart.
New Sensor
Starting Up
(Reader) or
New Sensor
Starting Up
(App)
Sensor is not ready
to read glucose.
Wait until the Sensor start-up
period has completed.
New Sensor
Found
You scanned a new
Sensor before your
previous Sensor
ended.
Your device can only be used
with one Sensor at a time. If
you start a new Sensor, you will
no longer be able to use your
old Sensor. If you would like to
begin using the new Sensor,
select “Yes” and scan again.
Glucose
Reading
Unavailable
Your Sensor is too
hot or too cold.
Move to a location where the
temperature is appropriate and
check your glucose again.
Customer Service: 1-855-632-8658 7 Days a Week from 8AM to 8PM Eastern Time; excluding holidays.
175

Problems Receiving Alarms
Problem What It May Mean What To Do
You are not
receiving
alarms.
You have turned
alarms off.
If using the Reader, touch the
Settings symbol and then
select Alarms. If using the App,
go to the Main Menu and then
select Alarms. Choose the alarm
you want to turn on and set.
Customer Service: 1-855-632-8658 7 Days a Week from 8AM to 8PM Eastern Time; excluding holidays.
176

Problem What It May Mean What To Do
You are not
receiving
alarms.
(cont.)
The Sensor is not
communicating with
your device.
or
There may be a
problem with your
Sensor or device.
The Sensor must be within range
(33 feet) of your device for you
to receive alarms. Make sure that
you are within this range. You
will see the
symbol at the
top of the Home Screen (if using
the Reader) and the symbol
at the top of the screen (if using
the App) when your Sensor has
not communicated with your
device in 5 minutes. If the Signal
Loss Alarm is on, you will be
notied if there has been no
communication for 20 minutes.
If the Signal Loss Alarm is on and
continues to show even when
your Sensor is in range of your
device, contact Customer Service.
Customer Service: 1-855-632-8658 7 Days a Week from 8AM to 8PM Eastern Time; excluding holidays.
177

Problem What It May Mean What To Do
You are not
receiving
alarms.
(cont.)
Sound/vibration are
turned off in your
Reader settings.
Check the Reader’s sound and
vibration settings to confirm
sound/vibration are on.
One or more of
the following is
turned off in your
phone settings:
Allow Critical Alerts,
Notifications, Lock
Screen and Banner
alerts, Notification
sounds, or general
phone sounds or
vibration.
Check to make sure that you
have the correct settings and
permissions enabled on your
phone to receive alarms.
Customer Service: 1-855-632-8658 7 Days a Week from 8AM to 8PM Eastern Time; excluding holidays.
178

iPhone settings:
• Bluetooth is ON
• Allow Critical Alerts is ON
• Allow Notications is ON
• Lock Screen and Banner alerts are ON
• Notications sounds are ON
Android Phone settings:
• Bluetooth is ON
• Lock Screen notications are ON
• Channel notications or Pop-up notications are ON
• Battery Optimization is OFF
• Do Not Disturb access permission is ON
• Phone Media volume is ON
Go to Setting App Alarms section for more information.
Customer Service: 1-855-632-8658 7 Days a Week from 8AM to 8PM Eastern Time; excluding holidays.
179

Problem What It May Mean What To Do
You are not
receiving
alarms.
(cont.)
You have enabled
Silent Mode in the
App.
Check your alarm settings to
confirm Silent Mode is turned off.
You may have set an
alarm level that is
higher or lower than
you intended.
Confirm your alarm settings are
appropriate.
You have already
dismissed this type
of alarm.
You will receive another alarm
when a new low or high glucose
episode starts.
Your Sensor has
ended.
Replace your Sensor with a new
one.
Customer Service: 1-855-632-8658 7 Days a Week from 8AM to 8PM Eastern Time; excluding holidays.
180

Problem What It May Mean What To Do
You are not
receiving
alarms.
(cont.)
If you are using
peripherals such as
wireless headphones
or a smartwatch, you
may receive alarms
on only one device
or peripheral, not all.
Disconnect headphones or
peripherals when you are not
using them.
You have closed the
App.
Make sure the App is always open
in the background.
Your device's battery
is dead.
Charge your device. If using the
Reader, use the included USB
cable.
Customer Service: 1-855-632-8658 7 Days a Week from 8AM to 8PM Eastern Time; excluding holidays.
181

Blood Glucose Error Messages
Error
Message
What It May Mean What To Do
E-1
The temperature is
too hot or too cold
for the Reader to
work correctly.
1. Move the Reader and test
strips to a location where the
temperature is within the test
strip operating range. (See
test strip instructions for use
for the appropriate range).
2. Wait for the Reader and test
strips to adjust to the new
temperature.
3. Repeat the test using a new
test strip.
4. If the error reappears, contact
Customer Service.
E-2
Reader error. 1. Turn o the Reader.
2. Repeat the test using a new
test strip.
3. If the error reappears, contact
Customer Service.
Customer Service: 1-855-632-8658 7 Days a Week from 8AM to 8PM Eastern Time; excluding holidays.
182

Error
Message
What It May Mean What To Do
E-3
Blood drop is too
small.
or
Incorrect test
procedure.
or
There may be a
problem with the test
strip.
1. Review the testing
instructions.
2. Repeat the test using a new
test strip.
3. If the error reappears, contact
Customer Service.
E-4
The blood glucose
level may be too high
to be read by the
system.
or
There may be a
problem with the test
strip.
1. Repeat the test using a new
test strip.
2. If the error reappears, contact
your health care professional
immediately.
Customer Service: 1-855-632-8658 7 Days a Week from 8AM to 8PM Eastern Time; excluding holidays.
183

Error
Message
What It May Mean What To Do
E-5
Blood was applied
to the test strip too
soon.
1. Review the testing
instructions.
2. Repeat the test using a new
test strip.
3. If the error reappears, contact
Customer Service.
E-6
The test strip may not
be compatible with
the Reader.
1. Check that you are using
the correct test strip for
the Reader. (See test strip
instructions for use to verify
your strip is compatible with
the Reader).
2. Repeat the test using a test
strip for use with your Reader.
3. If the error reappears, contact
Customer Service.
Customer Service: 1-855-632-8658 7 Days a Week from 8AM to 8PM Eastern Time; excluding holidays.
184

Error
Message
What It May Mean What To Do
E-7
Test strip may be
damaged, used, or
the Reader does not
recognize it.
1. Check that you are using
the correct test strip for
the Reader. (See test strip
instructions for use to verify
your strip is compatible with
the Reader).
2. Repeat the test using a test
strip for use with your Reader.
3. If the error reappears, contact
Customer Service.
E-9
Reader error. 1. Turn o the Reader.
2. Repeat the test using a new
test strip.
3. If the error reappears, contact
Customer Service.
Customer Service: 1-855-632-8658 7 Days a Week from 8AM to 8PM Eastern Time; excluding holidays.
185

Problems Checking Your Blood Glucose
Problem What It May Mean What To Do
The Reader
does not
start a
test after
inserting a
test strip.
Test strip is not
inserted correctly
or not inserted fully
into the strip port.
1. With the 3 black lines facing
up, insert the test strip into
the strip port until it stops.
2. If the Reader still does not
start a test, contact Customer
Service.
Reader battery is too
low.
Charge the Reader.
The test strip is
damaged, used, or
unrecognizable by
the Reader.
Insert a new FreeStyle Precision
Neo test strip.
Reader is outside
of its operating
temperature range.
Move the Reader to a
temperature between 50°F and
113°F and then try to power it
on.
Customer Service: 1-855-632-8658 7 Days a Week from 8AM to 8PM Eastern Time; excluding holidays.
186

Problem What It May Mean What To Do
The test
does not
start after
applying
the blood
sample.
Blood sample is too
small.
1. See test strip instructions
for use for re-application
instructions.
2. Repeat the test using a new
test strip.
3. If the test still does not start,
contact Customer Service.
Sample applied after
the Reader turned
off.
1. Review the testing
instructions.
2. Repeat the test using a new
test strip.
3. If the test still does not start,
contact Customer Service.
Problem with
Reader or test strip.
1. Repeat the test using a new
test strip.
2. If the test still does not start,
contact Customer Service.
Customer Service: 1-855-632-8658 7 Days a Week from 8AM to 8PM Eastern Time; excluding holidays.
187

Perform a Reader Test
If you think the Reader is not working properly, you
can check the Reader by performing a Reader Test.
Touch the Settings symbol
from the Home
Screen, select System Status and then select
Reader Test.
Note: The Reader Test will perform internal
diagnostics and will allow you to check that the
display, sounds, and touchscreen are working
properly.
Customer Service
Customer Service is available to answer any questions you may have about
your FreeStyle Libre 3 System. Customer Service is available at 1-855-632-
8658 7 Days a Week from 8AM to 8PM Eastern Time; excluding holidays.
A printed copy of the User's Manual is available upon request. The latest
version of the User's Manual is available at www.FreeStyleLibre.us/
support/overview.html
System Info
Reader Test
Event Log
System Status
OK
188
System Specifications
See test strip and control solution instructions for use for additional
specications.
Sensor Specifications
Sensor glucose assay
method
Amperometric electrochemical sensor
Sensor glucose reading
range
40 to 400mg/dL
Sensor size 2.9 mm height and 21 mm diameter
Sensor weight 1 gram
Sensor power source One silver oxide battery
Sensor data Up to 14 days
189

Sensor memory
Up to 14 days (glucose readings stored
every 5 minutes)
Sensor transmission range 33 feet (10 meters) unobstructed
Operating temperature 50°F to 113°F
Sensor Applicator storage
temperature
36°F to 82°F
Operating and storage
relative humidity
10-90%, non-condensing
Sensor water resistance
and ingress protection
IP27: Can withstand immersion into 3
feet (one meter) of water for up to 30
minutes. Protected against insertion of
objects > 12 mm diameter.
Operating and storage
altitude
-1,250 ft (-381 meters) to 10,000 ft
(3,048 meters)
Radio Frequency
2.402-2.480 GHz BLE; GFSK;
4.6 dBm EIRP
190

Reader Specifications
Blood glucose assay
range
20 to 500mg/dL
Reader size 95 mm x 60 mm x 16 mm
Reader weight 65 grams
Reader power source One lithium-ion rechargeable battery
Reader battery life 4 days of typical use
Reader memory 90 days of typical use
Reader operating
temperature
50°F to 113°F
Reader storage
temperature
-4°F to 140°F
191
Operating and storage
relative humidity
10-90%, non-condensing
Reader moisture
protection
Keep dry
Operating and storage
altitude
-1,250 ft (-381 meters) to 10,000 ft
(3,048 meters)
Reader display timeout
60 seconds (120 seconds when test
strip is inserted)
Radio Frequency
Near Field Communication (13.56 MHz
RFID); ASK Modulation; 124 dBuV/m;
1.5 inch communication range
2.402-2.480 GHz BLE; GFSK; 2dBm EIRP
Data port Micro USB
Minimum Computer
Requirements
System must only be used with
EN60950-1 rated computers
Mean use life 3 years of typical use
192

Reader cleaning and
disinfection
The Reader has a mean use life of
3 years, which is 156 cleaning and
disinfection cycles (1 cycle per week
for 3 years).
Power Adapter
Abbott Diabetes Care PRT31887
Output: 5V, 550mA or 0.55A
Operating temperature: 50°F to 104°F
USB Cable
Abbott Diabetes Care PRT21373
Length: 37 inches (94 cm)
Color: Yellow
Security Measures and Quality of Service
Security Measures:
The communication between the Receiver (App or Reader) and Sensor during an activation scan is
a short range Near Field Communication (NFC) method which makes it dicult to interfere with
or intercept during transmission. The communication between the Receiver and Sensor for glucose
data is a standard Bluetooth Low Energy (BLE) connection. Mutual authentication is performed
between the Receiver and Sensor during the pairing process using application certicates,
preventing unauthorized devices from connecting to the Sensor. The transmitted data is protected
by encryption. This prevents unauthorized devices from accessing the data if they are within range
and intercept the transmission. Under normal operation, the industry standard BLE protocols allow
for many users to be in the same vicinity. In the case where the connection is lost due to out-of-
range or interference, only the authenticated Receiver that is paired with the Sensor will be able to
193
reconnect and receive glucose data. For apps, only apps logged into the same LibreView account
that activated the Sensor are able to complete pairing with the Sensor. For Readers, only the
Reader that activated the Sensor is able to complete pairing with the Sensor.
Quality of Service (QoS):
QoS for the FreeStyle Libre 3 Reader and Sensor wireless communications using NFC (for Sensor
activation) is assured when the Reader is brought near the Sensor. The communication for activation
is specied to occur within 15 seconds.
QoS for the Reader and Sensor wireless communications using BLE for normal operation (receiving
glucose readings and alarms) is assured at regular 1-minute intervals. If connection is lost between
the Reader and Sensor for 5-minutes, the Reader will display an indication of "Signal Loss" on
the results screen. If connection is lost for 20 minutes, the Reader alarms the user if the alarm is
turned on. If connection is lost between the Reader and the Sensor, all lost glucose data will be
automatically retrieved when the connection is restored. The Reader is designed to only accept BLE
data from recognized and paired Sensors. The transmission range for BLE communication is 33 feet
unobstructed. If the Reader and Sensor are seeing frequent signal loss at longer distances, bring
them closer together.
QoS for the FreeStyle Libre 3 app and Sensor wireless communication using NFC (for Sensor
activation) is assured when the phone is touched to the Sensor. The communication for activation
takes place within 1 second. If the expected response is not received, the phone will continue to
retry.
194
QoS for the FreeStyle Libre 3 app and Sensor wireless communications using BLE for normal
operation (receiving glucose reading and alarms) is assured at regular 1-minute intervals. If
connection is lost between the App and Sensor for 5-minutes, the App will display an indication of
“Signal Loss” on the Home Screen. If connection is lost for 20 minutes, the App alarms the user if
the alarm is turned on. If connection is lost between the Sensor and the App, all lost glucose data
will be automatically retrieved when the connection is restored. The App is designed to only accept
BLE data from recognized and paired Sensors. The transmission range for BLE communication is 33
feet unobstructed. If the phone and Sensor are seeing frequent signal loss at longer distances, bring
them closer together.
195

Labeling Symbols
Consult instructions for
use
Catalog number
Temperature limit Serial number
Manufacturer Keep dry
Batch code Non-ionizing radiation
Type BF applied part Caution
Do not re-use
Sterilized using
irradiation
MR unsafe Humidity limitation
Use-by date
Contains FCC ID:
N6C-SXSDCAG,
IC: 4908B-SXSDCAG
FCC Declaration of
Conformity mark
196

Do not use if package is damaged.
For Sterile Barrier: Do not use if the product
sterile barrier system or its packaging is
compromised.
CAUTION: Federal law restricts this device to
sale by or on the order of a physician.
This product contains electronic equipment,
batteries, sharps and materials that may
contact bodily uids during use. Dispose of
product in accordance with all applicable local
regulations.
Sterile Barrier. Refer to Instructions for Use if
opened or damaged.
Single sterile barrier system with protective
packaging outside
197

Performance Characteristics
Overview of Clinical Studies
Three studies were conducted in the United States (US) to evaluate the performance, safety,
eectiveness, and precision of the FreeStyle Libre 3 Continuous Glucose Monitoring System (System).
One study included adults (Study 1), one study included pediatrics (Study 2) and one study included
both adults and pediatrics (Study 3).
All subjects required insulin to manage their diabetes. To measure the precision of the System, each
subject wore two Sensors, one on the back of each upper arm, for a period of up to 14 days. While in
the clinic, subjects had their venous blood glucose analyzed using a laboratory reference method, the
Yellow Springs Instrument Life Sciences 2300 STAT Plus™ Glucose & Lactate Analyzer (YSI). Sensor
glucose readings were then compared to the YSI glucose results in subjects 6 years and older to
evaluate the System’s performance. For subjects 4-5 years old, System performance was compared
against a self-monitoring blood glucose meter.
Study 1: Study 1 was conducted at 5 centers with 146 subjects in total (91.1% Type 1, 8.9% Type 2), all
aged eighteen and older. Subjects had their venous blood glucose analyzed over three separate visits to
the clinical center. Each visit lasted up to ten hours. 144 subjects were analyzed during the beginning
of the Sensor wear period (day 1, 2, or 3), 91 subjects were analyzed during the early middle period
(day 7 or 8), 55 subjects were analyzed during the late middle period (day 9 or 12), and 76 subjects
were analyzed during the end period (day 13 or 14). During each visit, adult subjects had their glucose
levels deliberately manipulated per the study protocol to raise or lower glucose. This was done to assess
performance of the System over the range that the System measures glucose (40 – 400mg/dL).
Study 2: Study 2 was conducted at 4 centers with 139 subjects in total (98.6% Type 1, 1.4% Type 2),
all aged four to seventeen. Subjects age six and older had their venous blood glucose analyzed for up
to 16 hours over one or two separate visits to the clinical center. Each visit lasted up to eight hours.
198
During each visit, subjects age 11 and older had their glucose levels deliberately manipulated per the
study protocol to raise or lower glucose. This was done to assess performance of the System over the
range that the System measures glucose (40 – 400mg/dL). 48 subjects were analyzed during the
beginning of the Sensor wear period (day 1 or 2), 50 subjects were analyzed during the early middle
period (day 7 or 8), 51 subjects were analyzed during the late middle period (day 9 or 12), and 51
subjects were analyzed during the end period (day 13 or 14). All subjects tested their blood glucose
using ngerstick capillary samples at least four times during each day of the study.
Study 3: Study 3 was conducted at 4 centers with 100 adult and pediatric subjects in total (83.0 %
Type 1, 17.0% Type 2). 56 adult subjects were aged 18 and older, 39 pediatric subjects were aged
six to seventeen and 5 pediatric subjects were aged four to ve. Subjects aged six and older had
their venous blood glucose analyzed for up to 16 hours over one or two separate visits to the clinical
center. Each visit lasted up to eight hours. 81 subjects were analyzed during the beginning of the
Sensor wear period (day 1, 2 or 3), 46 subjects were analyzed during the early middle period (day 7
or 8), 47 subjects were analyzed during the late middle period (day 9 or 12), and 34 subjects were
analyzed during the end period (day 13 or 14).
Accuracy
Accuracy of the System was measured by comparing paired System Glucose Measurement (CGM) and
YSI blood glucose values. The percentage of total System readings that were within 20mg/dL for YSI
blood glucose values < 70mg/dL or 20% of YSI for blood glucose values ≥ 70mg/dL is displayed in
Table 1a. The Mean Absolute Relative Dierence (MARD) gives an indication of the average percent
disagreement between the CGM and the reference. For example, in the Adult subject group, 92.9%
of the readings fell within 20mg/dL of YSI blood glucose values < 70mg/dL and within 20% of
YSI blood glucose values ≥ 70mg/dL. The total number of data pairs considered in the analysis
was 23,503. In the Adult subject group, the Mean Absolute Relative Dierence was 8.9% for the
comparison with YSI reference. In the Pediatric subject group, the Mean Absolute Relative Dierence
was 9.4% for the comparison with YSI reference.
199

Table 1a: Overall Accuracy to YSI
Subject
Group
Number of
CGM-
Reference
Pairs
Number of
Subjects
Percent
Within
±20% /
±20 mg/dL
Percent
Within
±20% /
±20 mg/dL
on Day 1
Percent
Within
±20% /
±20 mg/dL
in rst
12 hours
MARD (%)
Adults 23503 200 92.9 87.5 81.4 8.9
Children
(age 6-17)
8614 168 91.1 85.4 81.6 9.4
Children
(age 4-5)*
413 13 86.4 87.5 89.2 11.5
*
No YSI measurements were obtained for children ages 4-5; results displayed are from CGM-SMBG matched paired
measurements.
The accuracy of dierent CGM glucose ranges versus YSI reference was assessed by calculating the
percentage of System readings that were within 15%, 20%, and 40% for reference values
≥ 70mg/dL, and within 15mg/dL, 20mg/dL, and 40mg/dL for values < 70mg/dL. For blood
glucose values < 70mg/dL, the dierence in mg/dL between the CGM and YSI blood glucose values
was calculated. For values ≥ 70mg/dL, the relative dierence (%) to the YSI blood glucose values
was calculated. The results categorized within CGM glucose ranges are presented in Tables 1b and
1c. The results categorized within YSI glucose ranges are presented in Tables 1d and 1e.
200

Table 1b: Accuracy to YSI within CGM Glucose Ranges (Adult; n=200)
CGM
Glucose
Level
†
(mg/dL)
Number
of CGM-
Reference
Pairs
Percent
Within
±15 mg/dL
Percent
Within
±20 mg/dL
Percent
Within
±40 mg/dL
Percent
Within
±15%
Percent
Within
±20%
Percent
Within
±40%
Mean
bias
(mg/dL)
MARD
(%)
<54 543 84.7 92.6 99.4 -6.7 14.2
54-69 3124 88.7 93.7 99.0 -3.6 11.0
70-180 11128 79.8 88.8 99.3 -4.9 9.8
181-250 4112 90.9 96.0 99.9 -7.7 7.2
>250 4596 94.1 98.0 100.0 -5.9 6.0
†
System range is 40-400mg/dL.
201

Table 1c: Accuracy to YSI within CGM Glucose Ranges (Pediatric*; n=168)
CGM
Glucose
Level
†
(mg/dL)
Number
of CGM-
Reference
Pairs
Percent
Within
±15 mg/dL
Percent
Within
±20 mg/dL
Percent
Within
±40 mg/dL
Percent
Within
±15%
Percent
Within
±20%
Percent
Within
±40%
Mean
bias
(mg/dL)
MARD
(%)
<54 153 68.6 75.8 95.4 -12.1 18.8
54-69 915 84.6 88.9 96.7 -5.6 12.6
70-180 4149 78.8 87.8 98.9 -4.9 10.1
181-250 1640 87.9 95.4 99.7 -7.1 7.7
>250 1757 92.7 97.8 99.8 -2.1 6.9
*
Includes children 6-17 years of age. No YSI measurements were obtained for children 4-5 years of age.
†
System range is 40-400mg/dL.
202

Table 1d: Accuracy to YSI within YSI Glucose Ranges (Adult; n=200)
YSI
Glucose
Level
(mg/dL)
Number
of CGM-
Reference
Pairs
Percent
Within
±15 mg/dL
Percent
Within
±20 mg/dL
Percent
Within
±40 mg/dL
Percent
Within
±15%
Percent
Within
±20%
Percent
Within
±40%
Mean
bias
(mg/dL)
MARD
(%)
<54 446 91.0 97.5 100.0 7.4 15.5
54-69 3111 94.5 98.5 100.0 1.4 10.3
70-180 10748 80.2 88.7 99.5 -4.5 9.7
181-250 4122 89.7 95.1 99.8 -7.3 7.5
>250 5076 91.3 96.1 99.7 -11.5 6.9
203

Table 1e: Accuracy to YSI within YSI Glucose Ranges (Pediatric*; n=168)
YSI
Glucose
Level
(mg/dL)
Number
of CGM-
Reference
Pairs
Percent
Within
±15 mg/dL
Percent
Within
±20 mg/dL
Percent
Within
±40 mg/dL
Percent
Within
±15%
Percent
Within
±20%
Percent
Within
±40%
Mean
bias
(mg/dL)
MARD
(%)
<54 140 91.4 96.4 99.3 7.6 16.4
54-69 773 96.4 98.7 100.0 1.0 9.4
70-180 4168 76.7 85.7 98.3 -4.2 10.7
181-250 1559 86.8 92.9 99.1 -5.0 8.1
>250 1974 90.8 97.7 99.9 -9.9 7.4
*
Includes children 6-17 years of age. No YSI measurements were obtained for children 4-5 years of age.
204

Agreement with ‘LO’ and ‘HI’ CGM Reading against YSI Reference
The System reports glucose concentrations between 40 and 400mg/dL. When the System
determines that glucose level is below 40mg/dL, it will report as ‘LO’. When the System determines
that glucose level is above 400mg/dL, it will report as ‘HI’. Tables 2a and 2b display the
concurrence between the CGM and YSI reference glucose when CGM reads ‘LO’. For example, in the
Adult subject group, when CGM reading was ‘LO’, YSI glucose values were less than 50mg/dL 20.0%
of the time, less than 60mg/dL 40.0% of the time, less than 70mg/dL 40.0% of the time, less than
80mg/dL 80.0% of the time, and equal to or above 80mg/dL 20.0% of the time.
Table 2a: Concurrence Analysis with ‘LO’ CGM Reading (Adult; n=200)
CGM-
Reference
Pairs
YSI (mg/dL)
N
<50 <60 <70 <80 ≥80
n 1 2 2 4 1 5
Cumulative % 20.0 40.0 40.0 80.0 20.0
Table 2b: Concurrence Analysis with ‘LO’ CGM Reading (Pediatric*; n=168)
CGM-
Reference
Pairs
YSI (mg/dL)
N
<50 <60 <70 <80 ≥80
n 0 1 3 3 0 3
Cumulative % 0.0 33.3 100.0 100.0 0.0
*
Includes children 6-17 years of age. No YSI measurements were obtained for children 4-5 years of age.
205

Tables 2c and 2d display the concurrence between the CGM and YSI reference glucose when CGM
reads ‘HI’. In the Adult subject group, when CGM reading was ‘HI’, YSI glucose values were above
350mg/dL 97.6% of the time, above 300mg/dL 100.0% of the time, above 250mg/dL 100.0% of
the time, and less than or equal to 250mg/dL 0.0% of the time.
Table 2c: Concurrence Analysis with ‘HI’ CGM Reading (Adult; n=200)
CGM-
Reference
Pairs
YSI (mg/dL)
N
>350 >300 >250 ≤250
n 120 123 123 0 123
Cumulative % 97.6 100.0 100.0 0.0
Table 2d: Concurrence Analysis with ‘HI’ CGM Reading (Pediatric; n=168)
CGM-
Reference
Pairs
YSI (mg/dL)
N
>350 >300 >250 ≤250
n 40 43 45 0 45
Cumulative % 88.9 95.6 100.0 0.0
*
Includes children 6-17 years of age. No YSI measurements were obtained for children 4-5 years of age.
206
Concurrence of System and Reference (CGM vs. YSI)
The percentage of concurring glucose values (CGM vs. YSI) in each glucose reference range is presented
for each CGM range in Tables 3a and 3b and for each YSI range in Tables 3c and 3d. For example, in
the Adult subject group, when the System glucose readings were within the 81 to 120mg/dL range,
actual blood glucose values were between 40 and 60mg/dL 0.2% of the time, between 61 and
80mg/dL 9.2% of the time, between 81 and 120mg/dL 71.1% of the time, between 121 and
160mg/dL 19.1% of the time, between 161 and 200mg/dL 1.0% of the time, and between 201 and
250mg/dL 0.1% of the time.
207

Table 3a: Concurrence Analysis by CGM Glucose Level (Adult; n=200)
CGM Glucose
Level
(mg/dL)
YSI Glucose Level (mg/dL)
N
<40 40-60 61-80 81-120
121-
160
161-
200
201-
250
251-
300
301-
350
351-
400
>400
<40
†
20.0 20.0 40.0 20.0 . . . . . . . 5
40-60 0.4 52.0 43.7 3.8 . 0.1 . . . . . 1950
61-80 . 17.8 62.2 19.6 0.4 0.0 . . . . . 3317
81-120 . 0.2 9.2 70.5 19.4 0.7 0.1 . . . . 4147
121-160
. . 0.1 8.4 71.1 19.1 1.0 0.2 0.1 . . 3883
161-200 . . . . 10.4 66.4 22.1 1.0 0.2 . . 2806
201-250 . . . . . 8.6 67.8 22.0 1.5 0.1 . 2804
251-300 . . . . . 0.1 8.8 67.6 21.7 1.7 0.1 2469
301-350 . . . . . . 0.4 13.9 68.9 15.8 1.1 1580
351-400 . . . . . . . 0.5 27.8 62.9 8.8 547
>400
†
. . . . . . . . 2.4 63.4 34.1 123
†
Levels out of System dynamic range.
208

Table 3b: Concurrence Analysis by CGM Glucose Level (Pediatric*; n=168)
CGM Glucose
Level
(mg/dL)
YSI Glucose Level (mg/dL)
N
<40 40-60 61-80 81-120
121-
160
161-
200
201-
250
251-
300
301-
350
351-
400
>400
<40
†
. 33.3 66.7 . . . . . . . . 3
40-60 0.5 47.5 41.3 9.6 0.9 0.2 . . . . . 554
61-80 . 11.4 59.7 26.8 2.0 . . . . . . 1025
81-120 . 0.2 8.2 67.4 22.8 1.3 0.1 . . . . 1590
121-160
. . . 9.1 71.1 18.4 1.3 . . . . 1437
161-200 . . . 0.1 15.5 66.0 18.2 0.2 . . . 1094
201-250 . . . . 0.3 10.6 59.1 29.0 1.0 0.1 . 1157
251-300 . . . . . 0.1 13.6 63.8 21.3 1.2 . 933
301-350 . . . . . . 0.3 24.4 58.4 16.7 0.2 616
351-400 . . . . . 1.0 . 0.5 34.1 59.1 5.3 208
>400
†
. . . . . . . 4.4 6.7 33.3 55.6 45
*
Includes children 6-17 years of age. No YSI measurements were obtained for children 4-5 years of age.
†
Levels out of System dynamic range.
209

Table 3c: Concurrence Analysis by YSI Glucose Level (Adult; n=200)
YSI Glucose
Level
(mg/dL)
CGM Glucose Level (mg/dL)
N
<40
†
40-60 61-80 81-120
121-
160
161-
200
201-
250
251-
300
301-
350
351-
400
>400
†
<40 12.5 87.5 . . . . . . . . . 8
40-60 0.1 62.9 36.6 0.4 . . . . . . . 1612
61-80 0.1 25.8 62.5 11.5 0.1 . . . . . . 3301
81-120 0.0 1.9 16.3 73.5 8.2 . . . . . . 3977
121-160
. . 0.3 20.8 71.4 7.5 . . . . . 3871
161-200 . 0.0 0.0 0.9 25.7 64.8 8.4 0.1 . . . 2876
201-250 . . . 0.1 1.4 22.2 68.2 7.8 0.2 . . 2787
251-300 . . . . 0.3 1.1 24.3 65.6 8.6 0.1 . 2543
301-350 . . . . 0.3 0.3 2.2 29.3 59.5 8.3 0.2 1830
351-400 . . . . . . 0.3 6.0 34.8 48.0 10.9 716
>400
. . . . . . . 1.8 16.4 43.6 38.2
110
†
Levels out of System dynamic range.
210

Table 3d: Concurrence Analysis by YSI Glucose Level (Pediatric*; n=168)
YSI Glucose
Level
(mg/dL)
CGM Glucose Level (mg/dL)
N
<40
†
40-60 61-80 81-120
121-
160
161-
200
201-
250
251-
300
301-
350
351-
400
>400
†
<40 . 100.0 . . . . . . . . . 3
40-60 0.3 68.5 30.5 0.8 . . . . . . . 384
61-80 0.2 23.5 62.8 13.4 . . . . . . . 974
81-120 . 3.5 18.0 70.0 8.6 0.1 . . . . . 1532
121-160
. 0.3 1.3 22.9 64.6 10.7 0.2 . . . . 1583
161-200 . 0.1. . 1.8 23.4 63.7 10.8 0.1 . 0.2 . 1134
201-250 . . . 0.2 1.8 19.3 66.2 12.3 0.2 . . 1033
251-300 . . . . . 0.2 30.9 54.8 13.8 0.1 0.2 1085
301-350 . . . . . . 1.7 30.9 55.9 11.0 0.5 644
351-400 . . . . . . 0.4 4.3 40.7 48.6 5.9 253
>400 . . . . . . . . 2.7 29.7 67.6 37
*
Includes children 6-17 years of age. No YSI measurements were obtained for children 4-5 years of age.
†
Levels out of System dynamic range.
211

Glucose Rate of Change Accuracy
The System’s glucose rate of change (ROC) accuracy, as assessed by concurrence analysis, is presented
in Tables 4a and 4b. For example, in the Adult subject group, when the Sensor glucose ROC indicated
that glucose was changing slowly downward (-1 to 0mg/dL/min), actual glucose levels in the body
were falling quickly (<-2mg/dL/min) 1.0% of the time, falling (-2 to -1mg/dL/min) 7.7% of the
time, changing slowly downward (-1 to 0mg/dL/min) 68.0% of the time, changing slowly upward
(0 to 1mg/dL/min) 19.9% of the time, rising (1 to 2mg/dL/min) 2.3% of the time, and were rising
quickly (>2mg/dL/min) 1.0% of the time.
Table 4a: Concurrence Analysis by Glucose Rate of Change (Adult; n=200)
CGM
(mg/dL/min)
YSI (mg/dL/min)
N
<-2 [-2, -1) [-1, 0) [0, 1] (1, 2] >2
<-2 (i)
34.5 44.9 18.0 2.3 0.3 . 345
-2 to -1 (m)
6.9 46.6 41.2 4.0 0.8 0.5 1210
-1 to 0 (g)
1.0 7.7 68.0 19.9 2.3 1.0 11735
0 to 1 (g)
0.7 2.8 26.0 50.3 14.3 5.8 7270
1 to 2 (k)
0.2 1.7 7.7 32.7 38.0 19.8 1322
>2 (h)
0.1 0.4 3.1 14.9 33.2 48.4 941
212

Table 4b: Concurrence Analysis by Glucose Rate of Change (Pediatric*; n=168)
CGM
(mg/dL/min)
YSI (mg/dL/min)
N
<-2 [-2, -1) [-1, 0) [0, 1] (1, 2] >2
<-2 (i)
41.7 44.3 10.9 3.1 . . 192
-2 to -1 (m)
10.5 50.3 33.1 5.0 0.4 0.7 543
-1 to 0 (g)
1.7 10.1 62.7 20.5 3.4 1.5 3481
0 to 1 (g)
1.1 4.5 24.6 49.0 13.4 7.5 2923
1 to 2 (k)
0.2 2.5 9.5 29.0 38.1 20.7 603
>2 (h)
. 1.0 3.9 14.8 29.9 50.4 488
*
Includes children 6-17 years of age. No YSI measurements were obtained for children 4-5 years of age.
Alarm Performance
The tables in this section show the accuracy of the System’s Low and High Glucose Alarms. The Alarm
Rate tells you how often the alarm is right or wrong. The Detection Rate tells you how often the
System is able to recognize and notify you about a low or high glucose event.
Low Glucose Alarm Performance
Tables 5a and 5b display the percentages for these parameters:
213
True Alarm Rate
Tells you: When you got a low glucose alarm, were you actually low?
Denition: Percentage of time the alarm issued and blood glucose was below the alarm level within
15 minutes before or after the alarm.
False Alarm Rate
Tells you: Did you get a low glucose alarm that you shouldn’t have?
Denition: Percentage of time the alarm issued and blood glucose was not below the alarm level
within 15 minutes before or after the alarm.
Detection Rate
Tells you: When you were low, did you get a low glucose alarm?
Denition: Percentage of time blood glucose was below the alarm level and the alarm issued within
15 minutes before or after the glucose event.
Missed Detection Rate
Tells you: When you were low, did you miss a low glucose alarm?
Denition: Percentage of time blood glucose was below the alarm level and the alarm didn’t issue
within 15 minutes before or after the glucose event.
For example, the Adult study found that for a Low Glucose alarm level set to 70mg/dL:
84.3% of the time a low glucose alarm was received when blood glucose was indeed below the alarm
level but 15.7% of the time a low glucose alarm was received when blood glucose wasn’t actually
below the alarm level.
89.0% of the time blood glucose was below the alarm level and a low glucose alarm was
appropriately issued but 11.0% of the time the glucose event was missed and no alarm was issued.
214

Table 5a: Low Glucose Alarm Performance (Adult; n=200)
Low Glucose
Alarm level
(mg/dL)
Alarm Rate Detection Rate
True Alarm Rate (%) False Alarm Rate (%)
Correct Detection
Rate (%)
Missed Detection
Rate (%)
60 70.9 29.1 75.8 24.2
70 84.3 15.7 89.0 11.0
80 90.3 9.7 97.0 3.0
90 92.3 7.7 98.4 1.6
Table 5b: Low Glucose Alarm Performance (Pediatric*; n=168)
Low Glucose
Alarm level
(mg/dL)
Alarm Rate Detection Rate
True Alarm
Rate (%)
False Alarm
Rate(%)
Correct Detection
Rate (%)
Missed Detection
Rate (%)
60 60.5 39.5 86.8 13.2
70 77.1 22.9 92.8 7.2
80 82.3 17.7 96.2 3.8
90 90.0 10.0 97.5 2.5
*
Includes children 6-17 years of age. No YSI measurements were obtained for children 4-5 years of age.
215
High Glucose Alarm Performance
Tables 5c and 5d display the percentages for these parameters:
True Alarm Rate
Tells you: When you got a high glucose alarm, were you actually high?
Denition: Percentage of time the alarm issued and blood glucose was above the alarm level within
15 minutes before or after the alarm.
False Alarm Rate
Tells you: Did you get a high glucose alarm that you shouldn’t have?
Denition: Percentage of time the alarm issued and blood glucose was not above the alarm level
within 15 minutes before or after the alarm.
Detection Rate
Tells you: When you were high, did you get a high glucose alarm?
Denition: Percentage of time blood glucose was above the alarm level and the alarm issued within
15 minutes before or after the glucose event.
Missed Detection Rate
Tells you: When you were high, did you miss a high glucose alarm?
Denition: Amount of time blood glucose was above the alarm level and the alarm didn’t issue
within 15 minutes before or after the glucose event.
216

For example, the Adult study found that for a High Glucose alarm level set to 200mg/dL:
98.7% of the time a high glucose alarm was received when blood glucose was indeed above the
alarm level but 1.3% of the time a high glucose alarm was received when blood glucose wasn’t
actually above the alarm level.
96.7% of the time blood glucose was above the alarm level and a high glucose alarm was
appropriately issued but 3.3% of the time the glucose event was missed and no alarm was issued.
Table 5c: High Glucose Alarm Performance (Adult; n=200)
High Glucose
Alarm level
(mg/dL)
Alarm Rate Detection Rate
True Alarm
Rate (%)
False Alarm
Rate (%)
Correct Detection
Rate (%)
Missed Detection
Rate (%)
120 99.0 1.0 98.0 2.0
140 98.7 1.3 97.5 2.5
180 98.7 1.3 96.8 3.2
200 98.7 1.3 96.7 3.3
220 98.3 1.7 96.7 3.3
240 98.0 2.0 95.5 4.5
300 96.2 3.8 90.2 9.8
217

Table 5d: High Glucose Alarm Performance (Pediatric*; n=168)
High Glucose
Alarm level
(mg/dL)
Alarm Rate Detection Rate
True Alarm Rate
(%)
False Alarm Rate
(%)
Correct Detection
Rate (%)
Missed Detection
Rate (%)
120 98.9 1.1 97.2 2.8
140 97.8 2.2 97.0 3.0
180 98.1 1.9 97.0 3.0
200 97.4 2.6 97.6 2.4
220 97.7 2.3 96.8 3.2
240 97.6 2.4 95.2 4.8
300 90.9 9.1 91.0 9.0
*
Includes children 6-17 years of age. No YSI measurements were obtained for children 4-5 years of age.
Sensor Accuracy Over Time
The Sensor can be worn for up to 14 days. The percentage of System readings within YSI values and
the Mean Absolute Relative Dierence (MARD) is presented for the following dierent wear periods
in Tables 6a and 6b: Beginning (Adult: 198 Subjects, Day 1, 2 or 3; Pediatric: 75 Subjects, Day 1,
2 or 3) Early Middle (Adult: 124 Subjects, Day 7 or 8; Pediatric: 63 Subjects, Day 7 or 8), Late Middle
(Adult: 86 Subjects, Day 9 or 12; Pediatric: 67 Subjects, Day 9 or 12), and End (Adult: 97 Subjects,
Day 13 or 14; Pediatric: 64 Subjects, Day 13 or 14). For values 70mg/dL and above, the percentage
of readings within 15%, 20%, and 40% of the YSI value was calculated. For values below
70mg/dL, the percentage of readings within 15mg/dL, 20mg/dL, and 40mg/dL of the YSI value
was calculated.
218

Table 6a: Sensor Accuracy Relative to YSI over the wear duration (Adult; n=200)
Wear
Period
Number of
CGM-reference
pairs
MARD (%)
Within ±15% /
±15 mg/dL
Within ±20% /
±20 mg/dL
Within ±40% /
±40 mg/dL
Beginning 8753 9.6 84.2 91.1 99.4
Early Middle 5540 8.4 88.2 94.7 99.8
Late Middle 4753 8.3 87.9 93.8 99.7
End 4457 8.8 86.8 93.2 99.9
Table 6b: Sensor Accuracy Relative to YSI over the wear duration (Pediatric*; n=168)
Wear
Period
Number of
CGM-reference
pairs
MARD (%)
Within ±15% /
±15 mg/dL
Within ±20% /
±20 mg/dL
Within ±40% /
±40 mg/dL
Beginning 2695 10.2 80.3 88.6 98.6
Early Middle 2031 9.0 85.5 90.9 98.4
Late Middle 1947 8.9 86.4 94.1 99.6
End 1941 9.5 84.1 91.7 99.4
*
Includes children 6-17 years of age. No YSI measurements were obtained for children 4-5 years of age.
219
Sensor Wear Duration
The Sensor can be worn for up to 14 days. To estimate how long a Sensor will work over the wear
duration, 101 Sensors were evaluated to determine how many days of readings each Sensor
provided. Of the 101 Sensors, 68.3% lasted until the nal day of use. 15 Sensors (14.9%) had “early
Sensor shut-o” where the Sensor algorithm detected that the Sensors did not function as intended
and presented the user with a Replace Sensor message. Table 7 displays the data for each day in the
wear duration for Study 3.
Because Study 3 was negatively aected by a software conguration unique to the investigational
device, a subsequent study was conducted in adults to assess the impact of the nal software
conguration on "early Sensor shut-o" as well as to determine the survival rate after eliminating
for physical factors (for example, getting caught in car seat belt, accidental knocking o the Sensor,
etc.). A total of 34 of the 39 (87.2%) Sensors gave glucose results over the entire intended wear
period of 14 days. After accounting for these factors, the actual survival rate was 94.4%.
220
Table 7: Sensor Survival Rate Over Wear Duration (n=101)
Day of Wear Number of Sensors Survival Rate (%)
1 99 98.0
2 99 98.0
3 99 98.0
4 98 97.0
5 96 95.0
6 96 95.0
7 93 92.1
8 92 91.1
9 90 89.1
10 85 84.2
11 79 78.2
12 73 72.3
13 70 69.3
14 69 68.3
221

Glucose Reading Availability
The System is designed to log a glucose reading every minute throughout the wear period after the
startup time. Table 8 shows the glucose reading capture rate for each day of the wear duration for
Study 3.
Table 8: Glucose Reading Capture Rate Over Wear Duration (n=101)
Day of Wear Number of Sensors Capture Rate (%)
1 101 99.8
2 99 99.9
3 99 99.8
4 99 99.8
5 98 99.9
6 96 99.7
7 96 100.0
8 93 99.9
9 92 99.9
10 90 99.9
11 85 99.5
12 80 99.8
13 73 99.7
14 70 100.0
222

Precision
Precision of the System was evaluated by comparing the results from two separate Sensors worn on
the same subject at the same time. Table 9 provides data from 100 subjects in Study 3. For adults,
the paired absolute relative dierence (PARD) between the two Sensors was 5.9% with coecient
of variation (CV) of 4.2%. For children ages 4-5, PARD was 4.7% with CV of 3.3%. For children
ages 6-17, PARD was 8.1% with CV of 5.7%. Paired absolute dierence (PAD) is a measurement of
absolute dierence (in mg/dL) between paired CGM readings, while PARD is the absolute relative
dierence (in %) between paired CGM readings.
Table 9: Overall between Sensor Precision (n=100)
Subject Group
Coecient of
Variation (%)
Paired Absolute
Dierence (mg/dL)
Paired Absolute
Relative Dierence
(%)
Number of Paired
Readings
Adults ages 18+
4.2 9.1 5.9 156942
Children ages
4-5
3.3 9.3 4.7 14190
Children ages
6-17
5.7 12.8 8.1 103741
223

Study 3
The purpose of Study 3 was to assess the performance of the system with a smaller form factor
Sensor, which is the nal FreeStyle Libre 3 conguration. Accuracy of the System was measured
by comparing paired System Glucose Measurement (CGM) and YSI blood glucose values. The
percentage of total system readings that were within 20mg/dL for YSI blood glucose value
< 70mg/dL or 20% of YSI for blood glucose values ≥ 70mg/dL is displayed in Table 10. The Mean
Absolute Relative Dierence (MARD) gives an indication of the average percent disagreement
between the CGM and the reference. For example, 93.2% of the readings fell within
+/- 20mg/dL of YSI blood glucose values < 70mg/dL and within +/- 20% of YSI blood glucose
values ≥ 70mg/dL. The total number of data pairs considered in the analysis was 6836. In this
study the Mean Absolute Relative Dierence was 7.9% for the comparison with the YSI reference.
Table 10: Overall Accuracy to YSI
Subject Group
Number of
Subjects
Number of
CGM-Reference
Pairs
Percent
Within ±20% /
±20 mg/dL
MARD (%)
Overall
95 6836 93.2 7.9
Adults
56 4768 94.7 7.6
Children ages
6-17
39 2068 89.7 8.7
Children ages
4-5*
5 72 88.9 10.1
*
No YSI measurements were obtained for children ages 4-5; results displayed are from CGM-SMBG matched
paired measurements.
224
Adverse Events
No device related serious adverse events occurred during the studies. In Study 1, mild skin
irritations, such as erythema, bruising, bleeding, and scabbing were reported around the insertion
site and adhesive area by a small number of subjects (10 out of 146 or 6.8%). Pain was mostly
reported as none with only one instance of mild pain. In Study 2, there were 8 instances of
erythema (4 “well-dened redness”, and 4 “slight pink”), 5 instances of edema (3 slight edema, 2
slight edema with dened edges), 2 instances of mild bleeding, one instance of mild induration and
one instance of mild rash. In Study 3, there were 5 instances of erythema (3 “well-dened redness”,
and 2 “slight pink”), 4 instances of mild or moderate bleeding, 2 instances of mild induration, one
instance of edema (“slight”) and one instance of mild itching.
Ascorbic Acid Interference
Taking ascorbic acid (vitamin C) supplements while wearing the Sensor may falsely raise Sensor
glucose readings. Taking more than 500 mg of ascorbic acid per day may aect the Sensor
readings which could cause you to miss a severe low glucose event. Ascorbic acid can be found
in supplements including multivitamins. Some supplements, including cold remedies such as
Airborne® and Emergen-C®, may contain high doses of 1000 mg of ascorbic acid and should not be
taken while using the Sensor. See your health care professional to understand how long ascorbic
acid is active in your body.
225

Additional notes for Health Care Professionals
A clinical study was conducted to evaluate the eect of ascorbic acid on Sensor performance. Data
from 57 adult subjects with diabetes was collected over a 13-hour period. Each subject had a one-
hour baseline phase where venous blood was collected every 10 minutes. After this rst hour, a
dose of 1000 mg ascorbic acid was given with a meal and venous samples were collected every
20 minutes for the next four hours. A maximum average Sensor bias of 9.3mg/dL was observed
around 3 hours after the 1000 mg ascorbic acid dose. Subjects then received a second dose of
1000 mg ascorbic acid with a meal and the same process was continued for another 4 hours. A third
dose of 1000 mg ascorbic acid was then given and study subjects were followed for 4 more hours.
After the second dose of ascorbic acid the maximum average Sensor bias increased, with minimal
change in Sensor bias after the third dose, suggesting that saturation had occurred by the second
1000 mg dose of ascorbic acid. The maximum average Sensor bias after the three 1000 mg doses of
ascorbic acid was less than 20mg/dL.
226

Electromagnetic Compatibility (EMC)
FreeStyle Libre 3 Reader - FCC ID: QXS-LIB02
FreeStyle Libre 3 Sensor - FCC ID: QXS-LIB03S
• The System needs special precautions regarding EMC and needs to be installed and put into service
according to the EMC information provided in this manual.
• Portable and mobile RF communications equipment can aect the System.
• Use of accessories, transducers, and cables other than those specied or provided by Abbott
Diabetes Care could result in increased electromagnetic emissions or decreased electromagnetic
immunity of the System and result in improper operation.
• The System should not be used adjacent to or stacked with other equipment and that if adjacent
or stacked use is necessary, the System should be observed to verify normal operation in the
conguration in which it will be used.
• The device complies with part 15 of the FCC Rules. Operation is subject to the following two
conditions: (1) The device may not cause harmful interference, and (2) the device must accept any
interference received, including interference that may cause undesired operation.
• Changes or modications not approved by Abbott could void the user’s authority to operate the
equipment.
227

Guidance and manufacturer’s declaration –
electromagnetic emissions
The System is intended for use in the electromagnetic environment specied below. The customer or
the user of the System should assure that it is used in such an environment.
Emissions test Compliance
Electromagnetic
environment – guidance
RF emissions
CISPR 11
Group 1 The System uses RF energy
only for its internal function.
Therefore, its RF emissions
are very low and are not likely
to cause any interference in
nearby electronic equipment.
RF emissions
CISPR 11
Class B The System is suitable for use
in all establishments, including
domestic establishments and
those directly connected to
the public low voltage power
supply network that supplies
buildings used for domestic
purposes.
Harmonic emissions
IEC 61000-3-2
Class A
Voltage fluctuations /
flicker emissions
IEC 61000-3-3
Complies
228

Guidance and manufacturer’s declaration –
electromagnetic immunity
The System is intended for use in the electromagnetic environment specied below. The customer or
the user of the System should assure that it is used in such an environment.
Immunity
test
IEC 60601
test level
Compliance
Level
Electromagnetic
environment – guidance
Electrostatic
discharge (ESD)
IEC 61000-4-2
± 8 kV contact
± 15 kV air
± 8 kV contact
± 15 kV air
Floors should be wood, concrete or
ceramic tile. If floors are covered
with synthetic material, the relative
humidity should be at least 30%.
Electrical fast
transient/burst
IEC 61000-4-4
± 2 kV for
power supply
lines (100kHz
frequency)
± 1 kV for signal
lines (100kHz
frequency)
± 2 kV for
power supply
lines (100kHz
frequency)
± 1 kV for signal
lines (100kHz
frequency)
Mains power quality should be that
of a typical domestic, commercial,
or hospital environment.
229

Immunity
test
IEC 60601
test level
Compliance
Level
Electromagnetic
environment – guidance
Surge
IEC 61000-4-5
±1 kV
differential
mode
±2 kV common
mode
±1 kV
differential
mode
±2 kV common
mode
Mains power quality should be that
of a typical domestic, commercial,
or hospital environment.
Voltage
dips, short
interruptions and
voltage variations
on power supply
input lines
IEC 61000-4-11
0% U
T
; 0.5 cycle
At 0⁰, 45⁰, 90⁰,
135⁰, 180⁰, 225⁰,
270⁰ and 315⁰
0% U
T
; 1 cycle
and
70% U
T
;
25/30 cycles
Single phase:
at 0⁰
0% U
T
;
250/300 cycle
0% U
T
; 0.5 cycle
At 0⁰, 45⁰, 90⁰,
135⁰, 180⁰, 225⁰,
270⁰ and 315⁰
0% U
T
; 1 cycle
and
70% U
T
;
25/30 cycles
Single phase:
at 0⁰
0% U
T
;
250/300 cycle
Mains power quality should be that
of a typical domestic, commercial,
or hospital environment. If the user
of the System requires continued
operation during power mains
interruptions, it is recommended
that the System be powered from
an uninterruptible power supply or
a battery.
230

Immunity
test
IEC 60601
test level
Compliance
Level
Electromagnetic
environment – guidance
Power frequency
(50/60 Hz)
magnetic field
IEC 61000-4-8
30 A/m 30 A/m Power frequency magnetic fields
should be at levels characteristic
of a typical location in a typical
domestic, commercial, or hospital
environment.
Magnetic; IEC
61000-4-8
30 A/m 30 A/m Power frequency magnetic fields
should be at levels characteristic
of a typical location in a typical
domestic, commercial, or hospital
environment.
NOTE U
T
is the a.c. mains voltage prior to application of the test level
231

IMMUNITY
test
IEC 60601
test level
Compliance
Level
Electromagnetic
environment – guidance
Conducted RF
IEC 61000-4-6
6 Vrms
150 kHz to
80 MHz
6 Vrms Portable RF communications
equipment (including peripherals
such as antenna cables and
external antennas) should be used
no closer than 30 cm (12 inches) to
any part of the System, including
cables specified by Abbott Diabetes
Care. Otherwise degradation of the
performance of the System could
result.
Radiated RF
IEC 61000-4-3
10 V/m
80 MHz to
2.7 GHz
10 V/m
Proximity fields
from RF wireless
communications
equipment
IEC 61000-4-3
See table on next
page
Compliance to the
tested levels
232

The table below lists the immunity levels at specic test frequencies for testing the eects of
some wireless communications equipment. The frequencies and services listed in the table are
representative examples in various locations where the System may be used.
Test
frequency
(MHz)
Band
a)
(MHz)
Service
a)
Modulation
b)
Maximum
power
(W)
Distance
(m)
IMMUNITY
TEST LEVEL
(V/m)
385 380 –390 TETRA 400
Pulse
modulation
b)
18 Hz
1.8 0.3 27
450 430 – 470
GMRS 460,
FRS 460
FM
c)
± 5 kHz
deviation
1 kHz sine
2 0.3 28
710
704 – 787
LTE Band 13,
17
Pulse
modulation
b)
217 Hz
0.2 0.3 9745
780
810
800 – 960
GSM 800/900,
TETRA 800,
iDEN 820,
CDMA 850,
LTE Band 5
Pulse
modulation
b)
18 Hz
2 0.3 28870
930
233

Test
frequency
(MHz)
Band
a)
(MHz)
Service
a)
Modulation
b)
Maximum
power
(W)
Distance
(m)
IMMUNITY
TEST LEVEL
(V/m)
1720
1700 – 1990
GSM 1800;
CDMA 1900;
GSM 1900;
DECT;
LTE Band 1, 3,
4, 25; UMTS
Pulse
modulation
b)
217 Hz
2 0.3 281845
1970
2450 2400 – 2570
Bluetooth,
WLAN,
802.11 b/g/n,
RFID 2450,
LTE Band 7
Pulse
modulation
b)
217 Hz
2 0.3 28
5240
5100 – 5800
WLAN 802.11
a/n
Pulse
modulation
b)
217 Hz
0.2 0.3 9
5500
5785
a)
For some services, only the uplink frequencies are included.
b)
The carrier is modulated using a 50% duty cycle square wave signal.
c)
As an alternative to FM modulation, 50% pulse modulation at 18 Hz may be used because while it does not represent actual modulation,
it would be worst case.
234

Field strengths from xed RF transmitters, as determined by an electromagnetic site survey,
d
should
be less than the compliance level in each frequency range.
e
Interference may occur in the vicinity of equipment marked with the following symbol:
d
Field strengths from xed transmitters, such as base stations for radio (cellular/cordless) telephones
and land mobile radios, amateur radio, AM and FM radio broadcast and TV broadcast cannot be
predicted theoretically with accuracy. To assess the electromagnetic environment due to xed RF
transmitters, an electromagnetic site survey should be considered. If the measured eld strength in
the location in which the System is used exceeds the applicable RF compliance level above, the System
should be observed to verify normal operation. If abnormal performance is observed, additional
measures may be necessary, such as re-orienting or relocating the System.
e
Over the frequency range 150 kHz to 80 MHz, eld strengths should be less than 10 V/m.
235
Font License
©2013 Abbott
Licensed under the Apache License, Version 2.0 (the “License”); you may not use this le except in compliance with
the License. You may obtain a copy of the License at: http://www.apache.org/licenses/LICENSE-2.0
Unless required by applicable law or agreed to in writing, software distributed under the License is distributed
on an “AS IS” BASIS, WITHOUT WARRANTIES OR CONDITIONS OF ANY KIND, either express or implied. See the
License for the specic language governing permissions and limitations under the License.
Open Source Components: Material Design Icons
Copyright ©2014, Austin Andrews (http://materialdesignicons.com/), with Reserved Font Name Material Design
Icons.
Copyright ©2014, Google (http://www.google.com/design/) uses the license at https://github.com/google/
material-design-icons/blob/master/LICENSE
This Font Software is licensed under the SIL Open Font License, Version 1.1.
This license is copied below, and is also available with a FAQ at: http://scripts.sil.org/OFL
SIL OPEN FONT LICENSE
Version 1.1 - 26 February 2007
PREAMBLE
The goals of the Open Font License (OFL) are to stimulate worldwide development of collaborative font projects,
to support the font creation eorts of academic and linguistic communities, and to provide a free and open
framework in which fonts may be shared and improved in partnership with others.
The OFL allows the licensed fonts to be used, studied, modied and redistributed freely as long as they are not sold
by themselves. The fonts, including any derivative works, can be bundled, embedded, redistributed and/or sold
with any software provided that any reserved names are not used by derivative works. The fonts and derivatives,
however, cannot be released under any other type of license. The requirement for fonts to remain under this
license does not apply to any document created using the fonts or their derivatives.
236
DEFINITIONS
“Font Software” refers to the set of les released by the Copyright Holder(s) under this license and clearly marked
as such. This may include source les, build scripts and documentation.
“Reserved Font Name” refers to any names specied as such after the copyright statement(s).
“Original Version” refers to the collection of Font Software components as distributed by the Copyright Holder(s).
“Modied Version” refers to any derivative made by adding to, deleting, or substituting — in part or in
whole — any of the components of the Original Version, by changing formats or by porting the Font Software
to a new environment.
“Author” refers to any designer, engineer, programmer, technical writer or other person who contributed to the
Font Software.
PERMISSION & CONDITIONS
Permission is hereby granted, free of charge, to any person obtaining a copy of the Font Software, to use, study,
copy, merge, embed, modify, redistribute, and sell modied and unmodied copies of the Font Software, subject
to the following conditions:
1) Neither the Font Software nor any of its individual components, in Original or Modied Versions, may be sold
by itself.
2) Original or Modied Versions of the Font Software may be bundled, redistributed and/or sold with any
software, provided that each copy contains the above copyright notice and this license. These can be included
either as stand-alone text les, human-readable headers or in the appropriate machine-readable metadata
elds within text or binary les as long as those elds can be easily viewed by the user.
3) No Modied Version of the Font Software may use the Reserved Font Name(s) unless explicit written
permission is granted by the corresponding Copyright Holder. This restriction only applies to the primary font
name as presented to the users.
237
4) The name(s) of the Copyright Holder(s) or the Author(s) of the Font Software shall not be used to promote,
endorse or advertise any Modied Version, except to acknowledge the contribution(s) of the Copyright
Holder(s) and the Author(s) or with their explicit written permission.
5) The Font Software, modied or unmodied, in part or in whole, must be distributed entirely under this license,
and must not be distributed under any other license. The requirement for fonts to remain under this license
does not apply to any document created using the Font Software.
TERMINATION
This license becomes null and void if any of the above conditions are not met.
DISCLAIMER
THE FONT SOFTWARE IS PROVIDED “AS IS”, WITHOUT WARRANTY OF ANY KIND, EXPRESS OR IMPLIED, INCLUDING
BUT NOT LIMITED TO ANY WARRANTIES OF MERCHANTABILITY, FITNESS FOR A PARTICULAR PURPOSE AND
NONINFRINGEMENT OF COPYRIGHT, PATENT, TRADEMARK, OR OTHER RIGHT. IN NO EVENT SHALL THE COPYRIGHT
HOLDER BE LIABLE FOR ANY CLAIM, DAMAGES OR OTHER LIABILITY, INCLUDING ANY GENERAL, SPECIAL, INDIRECT,
INCIDENTAL, OR CONSEQUENTIAL DAMAGES, WHETHER IN AN ACTION OF CONTRACT, TORT OR OTHERWISE,
ARISING FROM, OUT OF THE USE OR INABILITY TO USE THE FONT SOFTWARE OR FROM OTHER DEALINGS IN THE
FONT SOFTWARE.
238

Limited Warranty
We hope that you are happy with your FreeStyle Libre 3 System. Please refer to the
User’s Manual before using your System for the rst time.
Abbott Diabetes Care (“Abbott”) warrants that the FreeStyle Libre 3 Reader
(“Reader”) shall be free from defects in material and workmanship for a period of
one (1) year from the date of manufacture or one (1) year from the original date
of purchase with proof of purchase (whichever is later). This Limited Warranty
is invalid if the Reader is modied, altered, damaged, misused or used other
than in accordance with the User’s Manual, applicable labeling, and/or inserts.
Abbott’s sole obligation is to replace the Reader, free of charge, with the same
or an alternative reader as determined by Abbott in its sole discretion. Your
replacement may be a dierent model or type. Abbott may require, as a condition
of obtaining limited warranty service, that you return the Reader postage prepaid,
with proof of purchase to an address specied by Abbott. The Limited Warranty
on the replacement Reader will expire on the date of the original Limited Warranty
expiration or 90 days after the shipment of a replacement Reader, whichever period
is longer. This Limited Warranty covers only the Reader, does not cover the sensor or
disposable accessories, extends only to the original purchaser, and is not assignable
or transferable.
TO THE EXTENT POSSIBLE UNDER LAW, THE FOREGOING ARE ABBOTT’S ONLY
WARRANTIES FOR THE READER AND STATE YOUR EXCLUSIVE REMEDY. ABBOTT
MAKES NO OTHER WARRANTIES, EXPRESS OR IMPLIED, AND ABBOTT EXCLUDES
AND DISCLAIMS ANY OTHER WARRANTIES INCLUDING, BUT NOT LIMITED TO,
IMPLIED WARRANTIES OF MERCHANTABILITY AND FITNESS FOR A PARTICULAR
PURPOSE. ABBOTT DOES NOT WARRANT THAT OPERATION OF THE READER WILL
BE UNINTERRUPTED OR ERROR FREE AND ABBOTT WILL NOT BE LIABLE FOR
ANY LOST PROFITS, LOST SAVINGS OR OTHER SPECIAL, PUNITIVE, INCIDENTAL
239
OR CONSEQUENTIAL DAMAGES RESULTING DIRECTLY OR INDIRECTLY FROM
PURCHASE, OPERATION OR USE OF THE READER OR FAILURE OF THE READER
TO PERFORM IN ACCORDANCE WITH SPECIFICATIONS. NO WARRANTY OF
MERCHANTABILITY OR FITNESS FOR A PARTICULAR PURPOSE, IF ANY IS IMPLIED
FROM THE SALE OF THE READER DESPITE ABBOTT’S SPECIFIC DISCLAIMER OF SUCH
WARRANTIES, SHALL EXTEND FOR A LONGER DURATION THAN ONE YEAR FROM
THE ORIGINAL DATE OF PURCHASE OF THE READER.
This Limited Warranty and any dispute or claim arising out of or in connection with
it shall be governed by and construed in accordance with the laws of Delaware.
Some states do not allow limitations on how long an implied warranty lasts or
the exclusion or limitation of incidental or consequential damages, so the above
limitations or exclusions may not apply to you.
Your Rights Under State Law: This Limited Warranty gives you specic legal rights,
and you may also have other rights that vary from state to state.
The circular shape of the sensor housing, FreeStyle, Libre, and related brand marks
are marks of Abbott.
LIMITED WARRANTY SERVICES
For questions or warranty service, contact Customer Service at 1-855-632-8658.
Customer Service is available 7 Days a Week from 8AM to 8PM Eastern Time;
excluding holidays.
ABBOTT MAY MODIFY OR DISCONTINUE THIS PROGRAM AT ANY TIME
WITHOUT NOTICE.
240
References:
1
“FDA Public Health Notication: Use of Fingerstick Devices on More than One
Person Poses Risk for Transmitting Bloodborne Pathogens: Initial Communication”
(2010)
http://wayback.archive-it.org/7993/20170111013014/http:/www.fda.gov/
MedicalDevices/Safety/AlertsandNotices/ucm224025.htm
2
“CDC Clinical Reminder: Use of Fingerstick Devices on More than One Person Poses
Risk for Transmitting Bloodborne Pathogens” (2010)
www.cdc.gov/injectionsafety/Fingerstick-DevicesBGM.html
3
American Diabetes Association, 2019. 2. Classication and Diagnosis of Diabetes:
Standards of Medical Care in Diabetes—2019. Diabetes Care, 42(Supplement 1),
pp.S13-S28
241

©2022-2023 Abbott ART41641-001 Rev. A 05/23
The circular shape of the sensor housing, FreeStyle, Libre, and related brand marks are
marks of Abbott. Other trademarks are the property of their respective owners.
Patent: www.abbott.com/patents
Distributed by:
Abbott Diabetes Care Inc.
1360 South Loop Road
Alameda, CA 94502 USA
Customer Service: 1-855-632-8658
7 Days a Week from 8AM to 8PM Eastern Time; excluding holidays.
www.FreeStyleLibre.com
Manufacturer
