
| 1
PURDUE BRAND TEMPLATES
USER GUIDE
PUR DUE BRAND TEMPLATES
GETTING STARTED WITH MARQ
USER GUIDE

| 2
PURDUE BRAND TEMPLATES
USER GUIDE
Table of Contents
Brand Template Gallery 3
Marq Home Page 6
Brand Assets 6
Select a Brand Template 7
Preview or Open a Brand Template 8
Create Document from Template 9
Project Workspace 10
Working with Text 11
Paste Text into a Document 13
Working with Images 14
Image and Color Formats 14
Upload/Insert an Image 15
Place Image in an Angled Box 16
Import Pages from PDF 17
Crop and Mask an Image 18
Replace an Image 19
Delete an Image 20
Insert Notes 21
Locks on Page Elements 22
O-page Content 23
Download Print Projects 24
Download Social/Digital Projects 25
Purdue Marketing and Communications has created a
growing collection of 250+ in-brand design templates on
marq.com. Having consistent and cohesive designs
in your communications and marketing materials will:
n
Instill a defining look and feel of Purdue’s brand in
your pursuit of the next giant leap.
n
Remind your audiences of Purdue’s forward-looking
approach with your innovative design.
n
Capture key elements of each unique project while
maintaining the University’s uniform brand design
and essence.
Read on to learn how to use Marq and tips and tricks to
assist you in implementing the new Purdue brand through
your communications and marketing materials.
MARQ —
BROWSER COMPATIBILITY
• Optimized for
Google Chrome
• Compatible with Firefox
• Not currently compatible
with Safari
PURDUE BRAND TEMPLATES
USER GUIDE

| 3
PURDUE BRAND TEMPLATES
USER GUIDE
Sampling of Digital Templates
CATEGORIES
Agenda/Schedule
Brochure
Calendar Pages
Digital Flyers and Posters
Digital Sign (Four Winds)
Email Header
Form
Flyer
Presentation
Report
Video Storyboard
Web Banner
Zoom Background
Purdue Brand Template Gallery
DIGITAL / PRINT / SOCIAL

| 4
PURDUE BRAND TEMPLATES
USER GUIDE
Sampling of Print Templates
CATEGORIES
A-Frame Sign
Agenda/Schedule
Award/Certificate
Brochure
Calendar
Flyer
Half-Sheet
Invitation
Newsletter
Note Card
Purdue Brand Template Gallery
DIGITAL / PRINT / SOCIAL
Postcard
Poster
Presentation
Program
Rack Card
Report
Research Poster
Retractable Banner
Stationery
Table Tent Card

| 5
PURDUE BRAND TEMPLATES
USER GUIDE
Sampling of Social Templates
CATEGORIES
Social 2x1 Graphic
(Use for FB, LI, TW)
Facebook
Instagram
Linked In
Twitter
Social Profile Icon
Purdue Brand Template Gallery
DIGITAL / PRINT / SOCIAL

| 6
PURDUE BRAND TEMPLATES
USER GUIDE
Brand Assets
n
Your home page is your starting point.
Navigate to your Projects, Images and Brand
Templates and Assets in the left column.
n
My Projects houses your in-progress and
completed Marq documents. Jump back to the
home page by clicking on the Purdue logo in
the upper left corner.
n
Purdue’s brand fonts and colors have been loaded in
Marq. They don’t need to be installed on your computer
to use them in Marq.
n
CMYK and RGB color palettes are displayed in the
Fill menu for shapes, and in the Fonts menu for text.
Marq Home Page
RGB COLORS
Use on Social/
Digital Projects
CMYK COLORS
Use on
Print Projects
| 7
PURDUE BRAND TEMPLATES
USER GUIDE
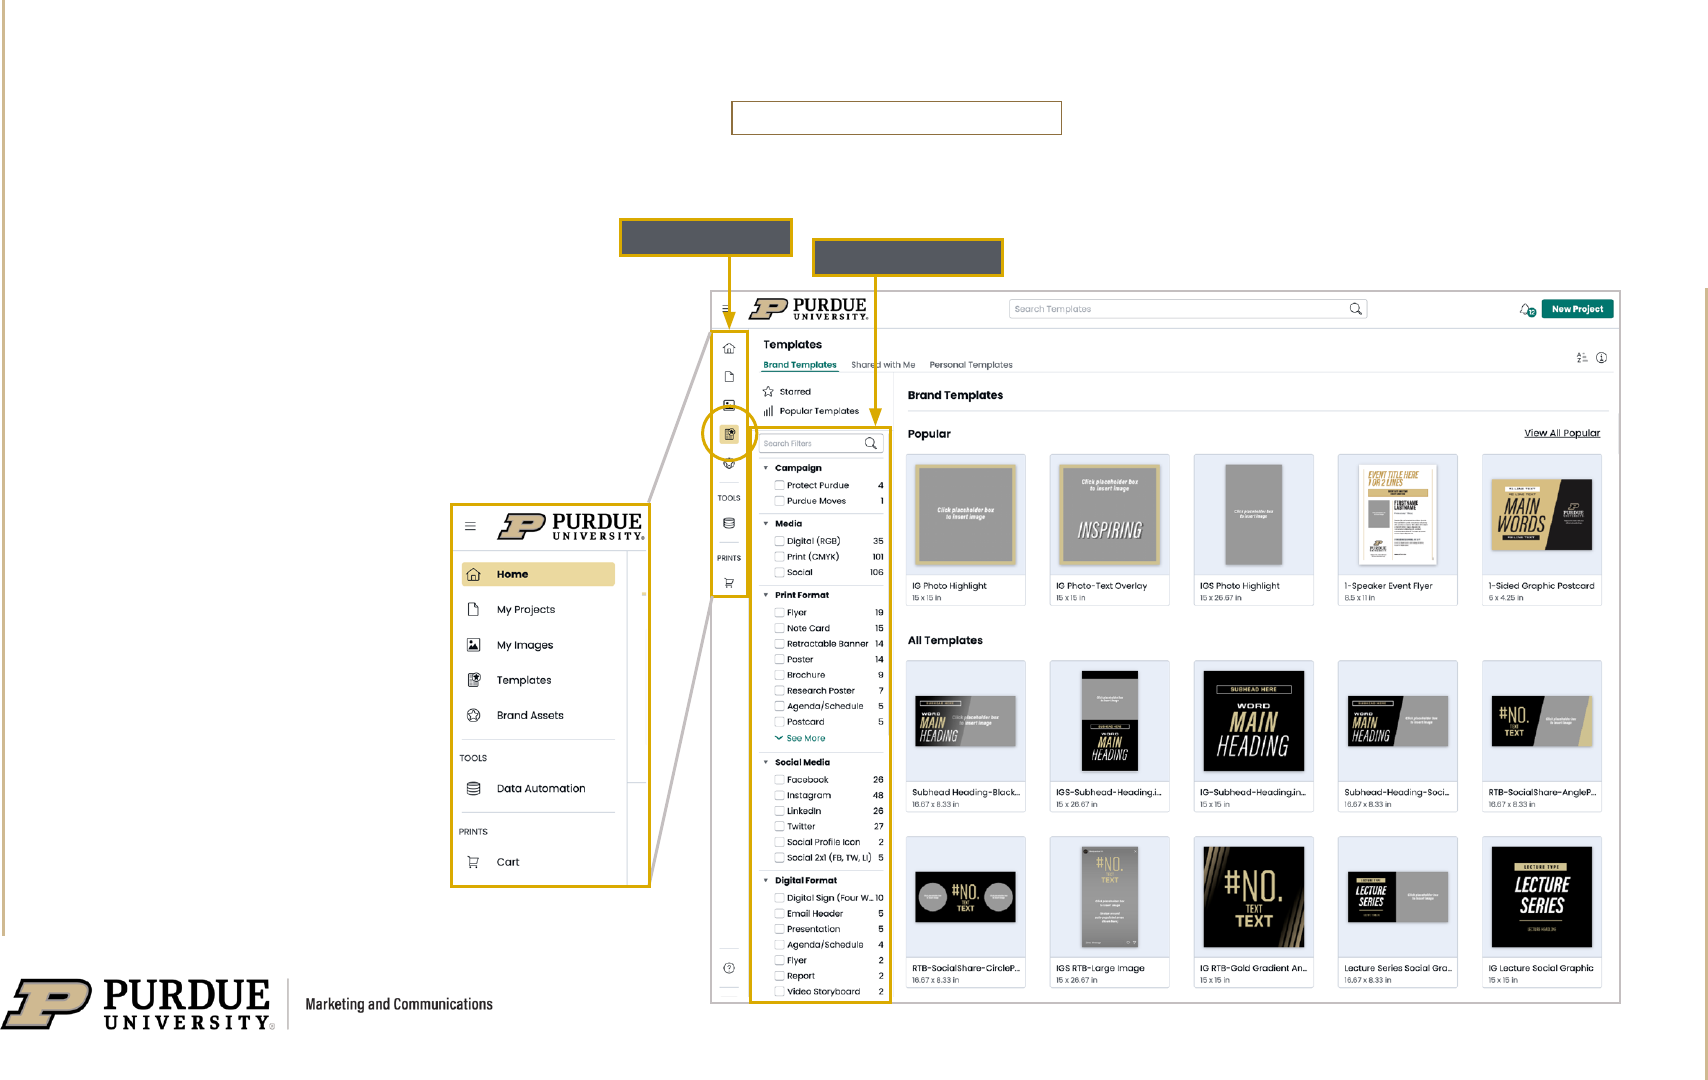
n
In the Content Pane, on the
left side of the window, click on
Templates, the icon with the star,
to view and browse the brand
templates.
n
You can narrow your search
by using the Filters column.
SEARCH FILTERS
CONTENT PANE
Select a Brand Template

| 8
PURDUE BRAND TEMPLATES
USER GUIDE
n Preview a template by h
overing and
clicking on its icon in the template gallery.
n Click the Use Template button to open a
template as a
new document.
Preview or Open a Brand Template
OPEN NEW
DOCUMENT

| 9
PURDUE BRAND TEMPLATES
USER GUIDE
n
Rename the document in the Save as field.
n
Click on Create Document.
n
Your new document will open, and auto-save
to your My Projects folder, or sub-folder that
you have created.
Create Document from Template

| 10
PURDUE BRAND TEMPLATES
USER GUIDE
n
When a document is open in the Marq
workspace, you will see the main
menu bar in the top navigation, which
contains drop-down menus for File,
View, Arrange, Insert and Help.
n
On the left side is the content pane,
which has tools to help create your
design. You can add pages, text,
images, shapes and charts
n
For digital and social projects, click the
three-dots icon on the left panel to add
buttons and videos.
Project Workspace
MAIN MENU BAR
CONTENT PANE

| 11
PURDUE BRAND TEMPLATES
USER GUIDE
Brand templates contain placeholder text,
which you can customize with your content.
Below are methods to add text to your
document:
n
Double-click on a placeholder text box
to type in your own text.
n
Upload a Word document to a Google drive.
Under the Insert tab in the top navigation,
select Import Text from Drive.
Working with Text
IMPORT
TEXT FROM DRIVE
EDIT
PLACEHOLDER TEXT
| 12
PURDUE BRAND TEMPLATES
USER GUIDE
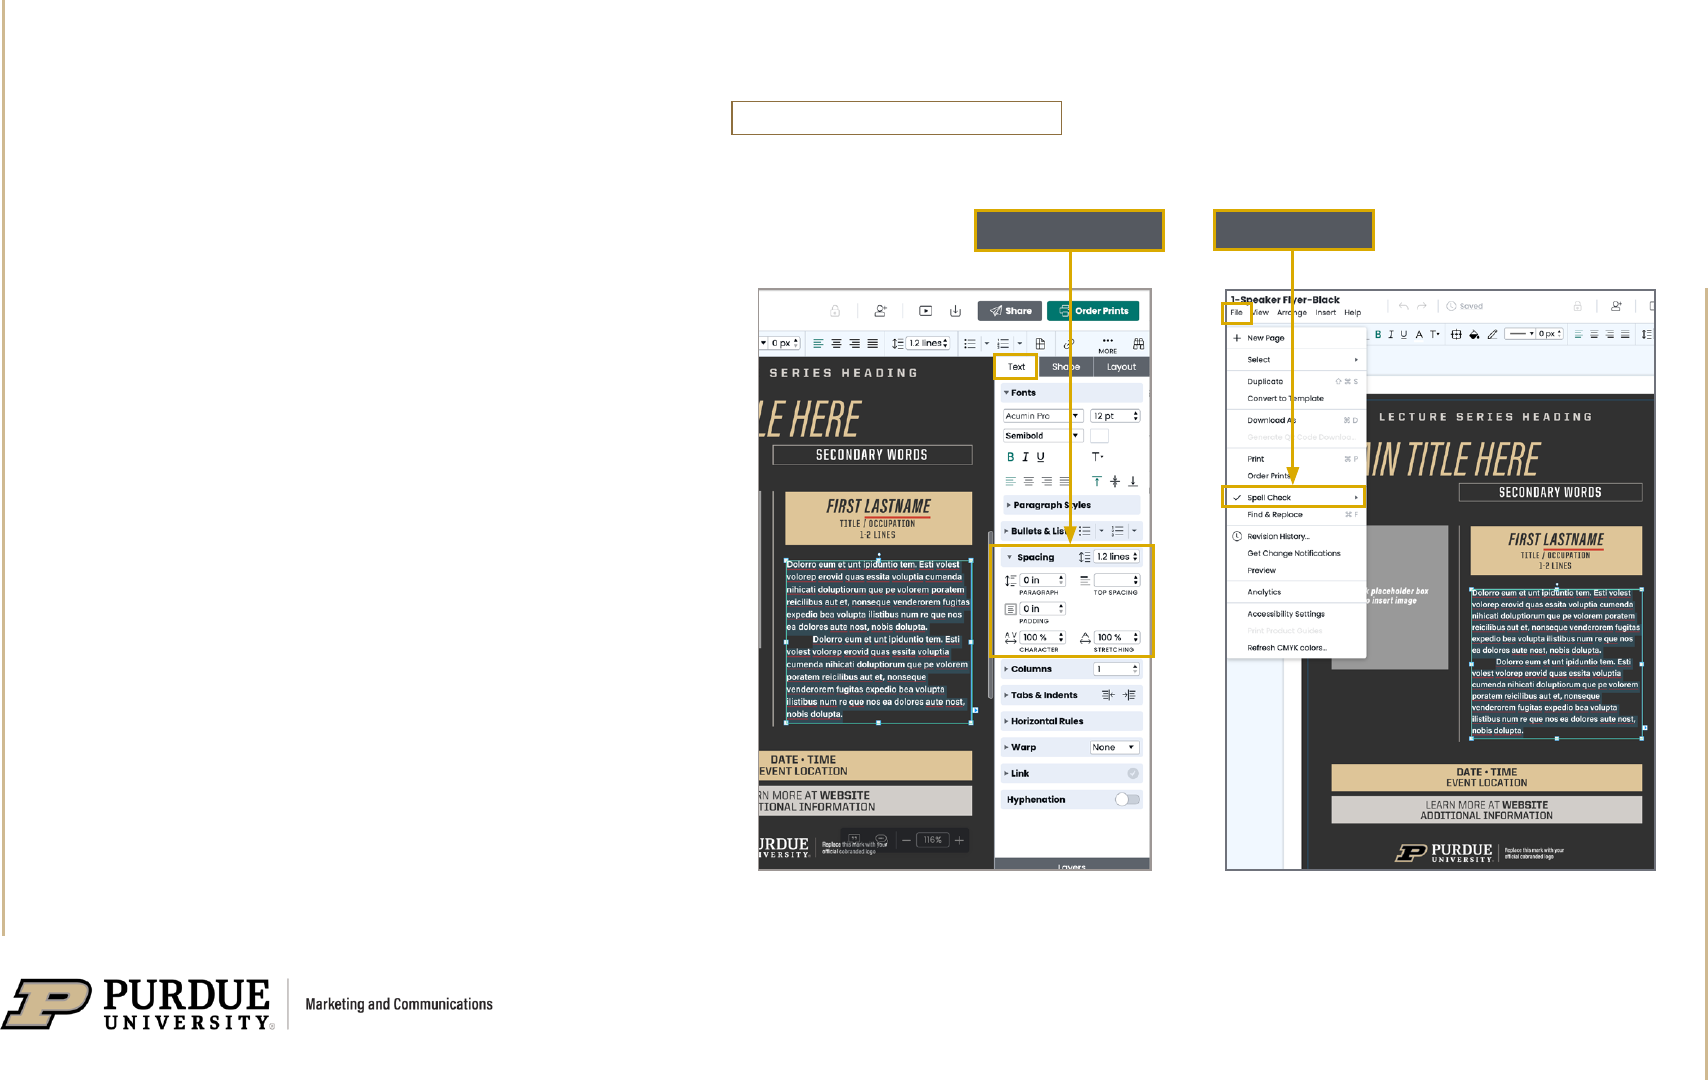
n
After text is imported, the line spacing
and character spacing may look tight.
Select the text, and the “Text” menu
appears on the right side of the window.
Under Spacing, you can adjust these
settings.
n
Marq has a Spell Check feature, indicated
by words underlined in red in your
document. This can be turned on and o
in the File menu in the top navigation.
Working with Text (continued)
SPELL CHECK
SPACING MENU

| 13
PURDUE BRAND TEMPLATES
USER GUIDE
Pasting text from a Word document produces
white boxes behind the words (only visible on
color backgrounds). To clear the white boxes,
select the text with the Text tool, and navigate to
Fonts in the Text tab:
n
Click on the capital “T” in the Fonts menu.
Another menu will pop up.
n
Then click on the capital “T” with the line
through it. This will clear formatting on the
text, removing the white background.
n
The resulting text may not retain all of its
font settings. requiring re-setting the font
style, size and other attributes.
WHITE BOXES BEHIND
PASTED TEXT
CLEAR THE
TEXT FORMATTING
Paste Text into a Document

| 14
PURDUE BRAND TEMPLATES
USER GUIDE
Image File Formats
n
Marq accepts the following image file formats:
JPG, PNG, SVG. EPS files are not supported.
Color Formats
n
Print documents: Place high-resolution JPG images
saved in print/CMYK format.
n
Digital documents: Use JPG, PNG or SVG images
saved in digital/RGB format.
n The Image Manager is located in the Content Pane in
the left column of the window.
n To access the Image Manager, click on My Images
in the Content Pane, or double-click on an image
placeholder box in your document.
Working with Images
| 15
PURDUE BRAND TEMPLATES
USER GUIDE
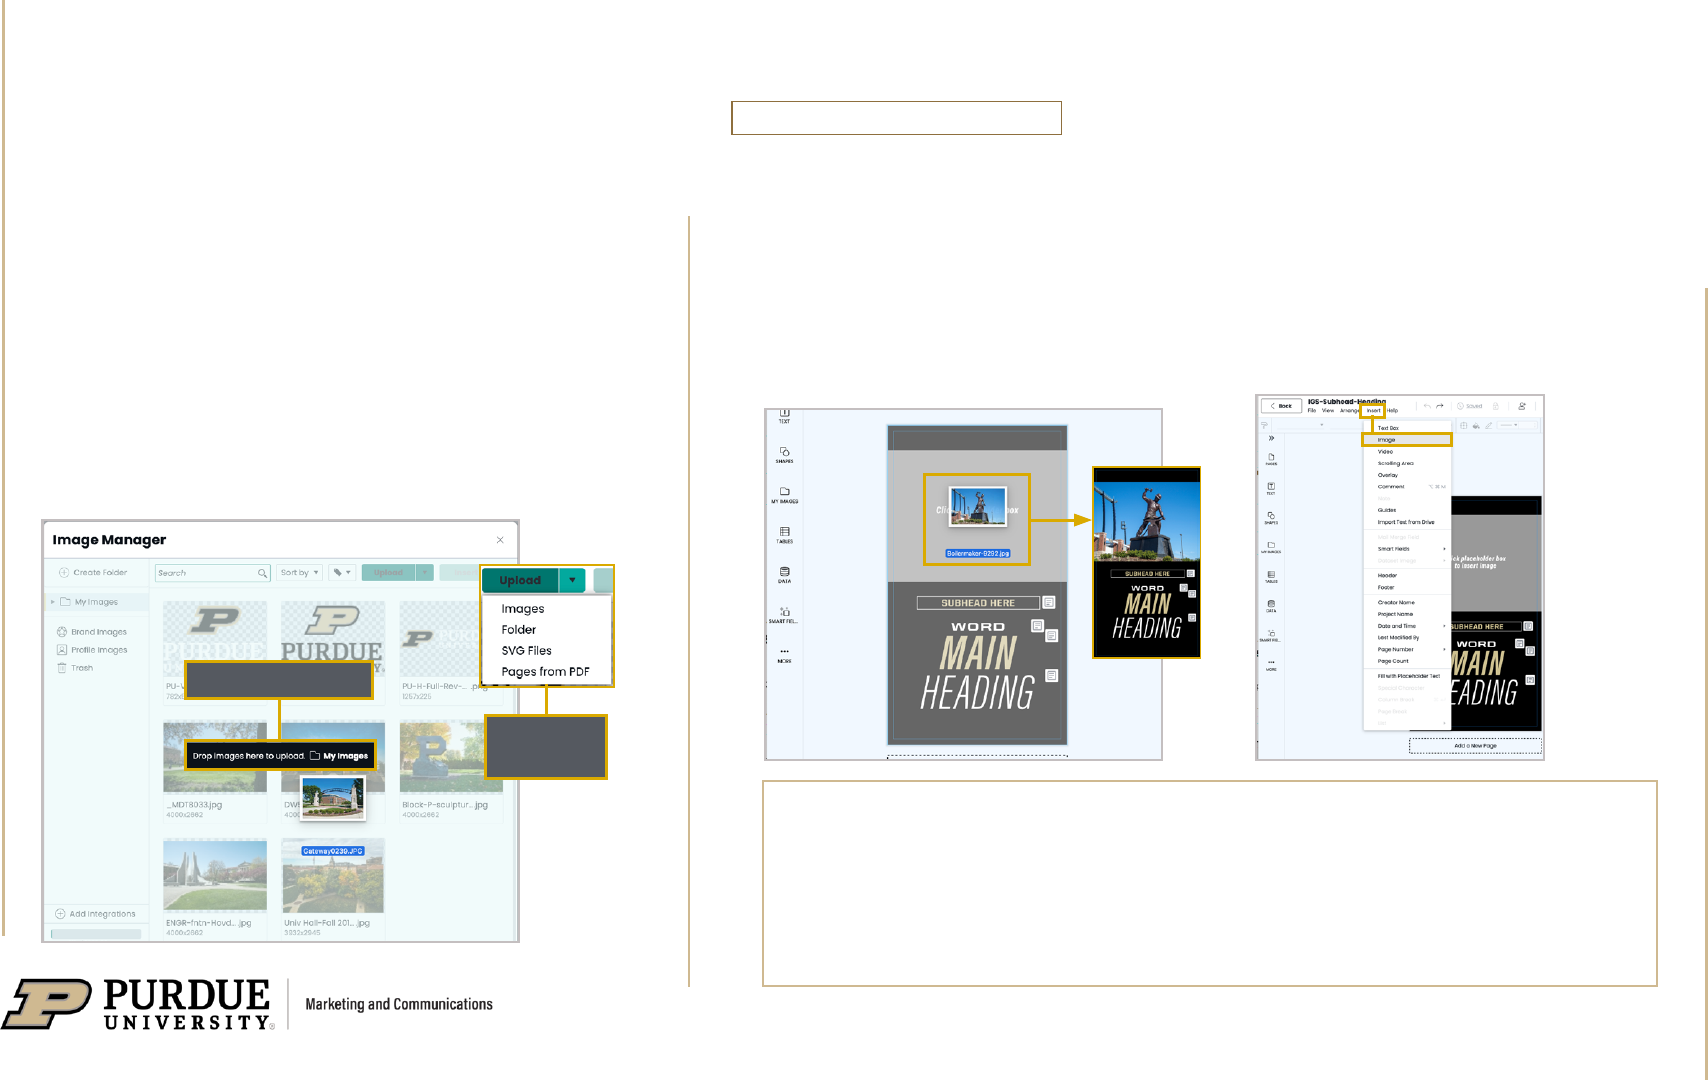
Insert Image in Image Box
n
Drag and drop
or upload a JPG or
PNG image or your co-brand logo
into the
Image Manager.
n
You can also upload a folder of
images. PDF pages will convert to
images when uploaded.
n
Drag and drop
image or your
co-brand logo directly into an
image
placeholder
in your document.
n
Use the Insert menu in the
main menu to insert an image.
DRAG AND DROP
UPLOAD
OPTIONS
Upload Image
SUGGESTIONS FOR IMAGE SOURCES
n
Images from your unit
n
Brand or co-brand logos
n
Purdue brand photography for campus partners, located in
Photoshelter photo galleries. Use this link in the MarCom toolbox:
https://marcom.purdue.edu/toolbox/photo/

| 16
PURDUE BRAND TEMPLATES
USER GUIDE
n
Select an angled image box in your document.
n
Go to the Image panel, one the right side of
the workspace.
n
Click on the small gray Image icon, which
brings up your Image Manager.
n
Select an image from the Image Manager, and
click insert to place the image in the box.
Place Image in an Angled Box
CLICK ON IMAGE ICON
IMAGE PANEL
ANGLED IMAGE BOX

| 17
PURDUE BRAND TEMPLATES
USER GUIDE
n
Importing PDF pages can be very
useful when you need to incorporate
completed pages of content, charts
or graphics.
n To use the Image Manager, click on
My Images
in the left navigation, or
Insert > Image in the top navigation.
n
Inside the Image Manager window, click
Upload, and select “pages from PDF.”
n
After uploading your PDF pages, you
can “Insert” them as new pages in
your document.
n Note:
Imported PDFs are converted
to PNG, and won’t be editable in Marq.
Import Pages from PDF
UPLOAD PAGES FROM PDF
INSERT AS NEW PAGE

| 18
PURDUE BRAND TEMPLATES
USER GUIDE
n
Select an image in your document.
n
Click on Crop & Mask in the Image tab
in the right column.
n
The image will be highlighted, allowing
for scaling and/or repositioning.
n
Hit Enter on your keyboard to exit the
cropping view.
IMAGE HIGHLIGHTED TO
SCALE AND REPOSITION
IN IMAGE BOX
CROP & MASK
Crop and Mask an Image

| 19
PURDUE BRAND TEMPLATES
USER GUIDE
n Double-click on an image in your layout
to open the Image Manager. You’ll see
all images that have been uploaded.
n Select an image and click Insert, or
Upload another image to place in your
document.
INSERT IMAGEUPLOAD IMAGE
Replace an Image

| 20
PURDUE BRAND TEMPLATES
USER GUIDE
n
To delete an image from your document, select and
delete it, using the delete key, or Cut, in the Edit menu. The
image is still stored in the Image Manager or future use.
n
To delete an image from your Image Manager,
double-click the image you’d like to remove.
n
The image manager window appears. Hover over your
photo and three vertical dots are shown in the lower right
corner of your photo.
n
Scroll down to Trash and click to delete the photo from your
document.
n
Items in the trash still appear in document layouts unless
you take the additional step to Empty Trash.
n
You can also go directly to the image manager to empty
the trash of unneeded photos.
MOVE IMAGE
TO TRASH
EMPTY TRASH
Delete an Image

| 21
PURDUE BRAND TEMPLATES
USER GUIDE
n
To make the brand templates easier to use,
notes have been added with instructions and
helpful tips. Click on a note icon to open it.
n
You can also add notes to unlocked page
elements. Go to the Insert menu and
select Note, or r
ight-click on an object in Marq
to add a note.
Insert Notes
Click on a NOTE ICON
to show info

| 22
PURDUE BRAND TEMPLATES
USER GUIDE
n
Locking some properties of page elements is a
tool within Marq that MarCom uses to manage
the integrity of the Purdue brand,
while giving
you and your team the ability to customize
documents.
n
A full lock locks all properties. If an object is
fully locked, it will have a red border and a red
lock.
n
Users can utilize and modify the unlocked
properties. If an object is partially unlocked, it
will have a yellow border and a yellow lock.
n
You can add locks to your projects as well.
If a user shares their document, their locks will
be in place for the next person, but the second
user will be able to unlock elements locked by
the first user.
Locks on Page Elements
LOCK ICONS

| 23
PURDUE BRAND TEMPLATES
USER GUIDE
n
O-page content can be placed in the
area outside the borders of your document
(pasteboard).
n
The retractable banner templates, like the one
at right, contain information on the pasteboard
about visible areas for art, and specifications for
printing.
n
To show any items that are o-page, go to
View > Show O-page Content.
n
You can
delete unused elements from your
pasteboard to keep it clean.
O-page Content
OFF-PAGE CONTENT

| 24
PURDUE BRAND TEMPLATES
USER GUIDE
FILE FORMAT
START DOWNLOAD
DOWNLOAD!
CHECK DOCUMENT
RESOLUTION
COLOR
CROP MARKS/
BLEEDS
Select PDF format for most print projects.
In some cases, JPG may be preferred.
When a print project is finished, click
Download icon in upper right corner.
Select Print (300 dpi).
Select CMYK for print. U.S. Web Coated
[SWOP] v2 is commonly used for CMYK.
If your document has images/graphics
to the edges of your project, check
Crop Marks and Bleed Marks.
Make sure design
elements are inside
safe area, or extended
to bleed areas, and
download.
Click Check
My Document to
run a print check.
Download Print Projects

| 25
PURDUE BRAND TEMPLATES
USER GUIDE
FILE FORMAT
START DOWNLOAD
RESOLUTION
COLOR
DOWNLOAD!
Select JPG format, or PNG if a transparent
background is needed.
When your social/digital project is finished,
click Download icon in upper right corner.
Select Screen (72 dpi).
Select an RGB color profile. RGB is the mode
for social/digital images and graphics.
Download your final file.
Download Social/Digital Projects

| 26
PURDUE BRAND TEMPLATES
USER GUIDE
marcom.purdue.edu
EA/EOU
Produced by Purdue Marketing and Communications
January 2023
