| Contents | ii
Contents
About This Guide........................................................................................ 4
How to Power on/off....................................................................................4
Power on the Base..............................................................................................................................4
Power on the Headset.........................................................................................................................5
Power off the Base..............................................................................................................................5
Power off the Headset.........................................................................................................................5
Pair the Headset with Base........................................................................ 5
How to Connect WH62/WH63..................................................................... 6
WH62/WH63 Port Overview................................................................................................................6
Connect to PC via USB Cable............................................................................................................6
Connect to Desk Phone via USB Cable.............................................................................................7
How to Connect WH66/WH67..................................................................... 8
WH66/WH67 Port Overview................................................................................................................9
Connect to PC/Desk Phone via the Included USB Cable.................................................................. 9
Connect to PC/Desk Phone/Smartphone via Bluetooth................................................................... 10
BT50 LED Indicator................................................................................................................ 10
Single Bluetooth Connection.................................................................................................. 11
Two Bluetooth Connections.................................................................................................... 12
Disconnect and Remove Your Bluetooth Device....................................................................13
Edit Your Bluetooth Information..............................................................................................13
Erase All Bluetooth Pairings...................................................................................................13
Turn off Bluetooth................................................................................................................... 14
How to Wear...............................................................................................14
WH62/WH66 Headset....................................................................................................................... 14
How to Replace Ear Cushions............................................................................................... 15
WH63/WH67 Headset....................................................................................................................... 15
Wearing Styles........................................................................................................................15
Remove the Pre-installed Eartip from the Headset................................................................17
Earhook & Eartip Assembly................................................................................................... 17
Headband Assembly...............................................................................................................19
Neckband Assembly............................................................................................................... 21
How to Use.................................................................................................24
Hardware Overview........................................................................................................................... 24
WH62 Base & Headset Hardware......................................................................................... 25
WH63 Base & Headset Hardware......................................................................................... 27
WH66 Base & Headset Hardware......................................................................................... 29
WH67 Base & Headset Hardware......................................................................................... 30
| Contents | iii
WH62/WH63 Base Status LEDs.......................................................................................................31
Status and Busylight LED................................................................................................................. 32
WH66/WH67 Icons and Status Indicators.........................................................................................32
Adjust the Playback Volume..............................................................................................................33
How to Reset to Factory................................................................................................................... 34
Reset Configuration on WH62/WH63 Base........................................................................... 34
Reset Configuration on WH66/WH67 Base........................................................................... 34
How to Manage Calls................................................................................ 35
Basic Call Usage on Headset...........................................................................................................36
Basic Call Usage on WH62/WH63 Base.......................................................................................... 37
Basic Call Usage on WH66/WH67 Base.......................................................................................... 38
Merge Two Calls on WH62/WH63.................................................................................................... 39
Merge Two Calls on WH66/WH67.................................................................................................... 39
Multi-Headset Conference Calls........................................................................................................39
Add Headset(s) During a Call................................................................................................ 39
Add Headset(s) When the Base is Idle..................................................................................40
End or Leave a Conference Call............................................................................................41
Transfer a Call from Desk Phone to Headset................................................................................... 41
Transfer a Call from Headset to Desk Phone................................................................................... 41
Multiple Calls Handling......................................................................................................................42
Yealink USB Connect................................................................................ 42
Manually Pair the Base with the BT50............................................................................................. 43
Download and Install.........................................................................................................................43
Update Firmware............................................................................................................................... 44
How to Change Settings on WH62/WH63............................................... 45
How to Change Settings on WH66/WH67............................................... 46
Change the Default Outgoing Dialer Device.....................................................................................46
Change the Default Media Playback Device.....................................................................................46
Basic Settings....................................................................................................................................47
Advanced Settings.............................................................................................................................48
Optional Accessories................................................................................ 49
Use the Busylight BLT60...................................................................................................................49
Charge the Mobile Phone on WH66/WH67 Base.............................................................................50
Support....................................................................................................... 51
FAQ.................................................................................................................................................... 51
Safety Instructions............................................................................................................................. 51
| About This Guide | 4
About This Guide
This guide contains instructions for connecting and using your WH6X headset.
Note: This guide mainly takes the Teams version of WH62/WH66 as an example.
How to Power on/off
• Power on the Base
• Power on the Headset
• Power off the Base
• Power off the Headset
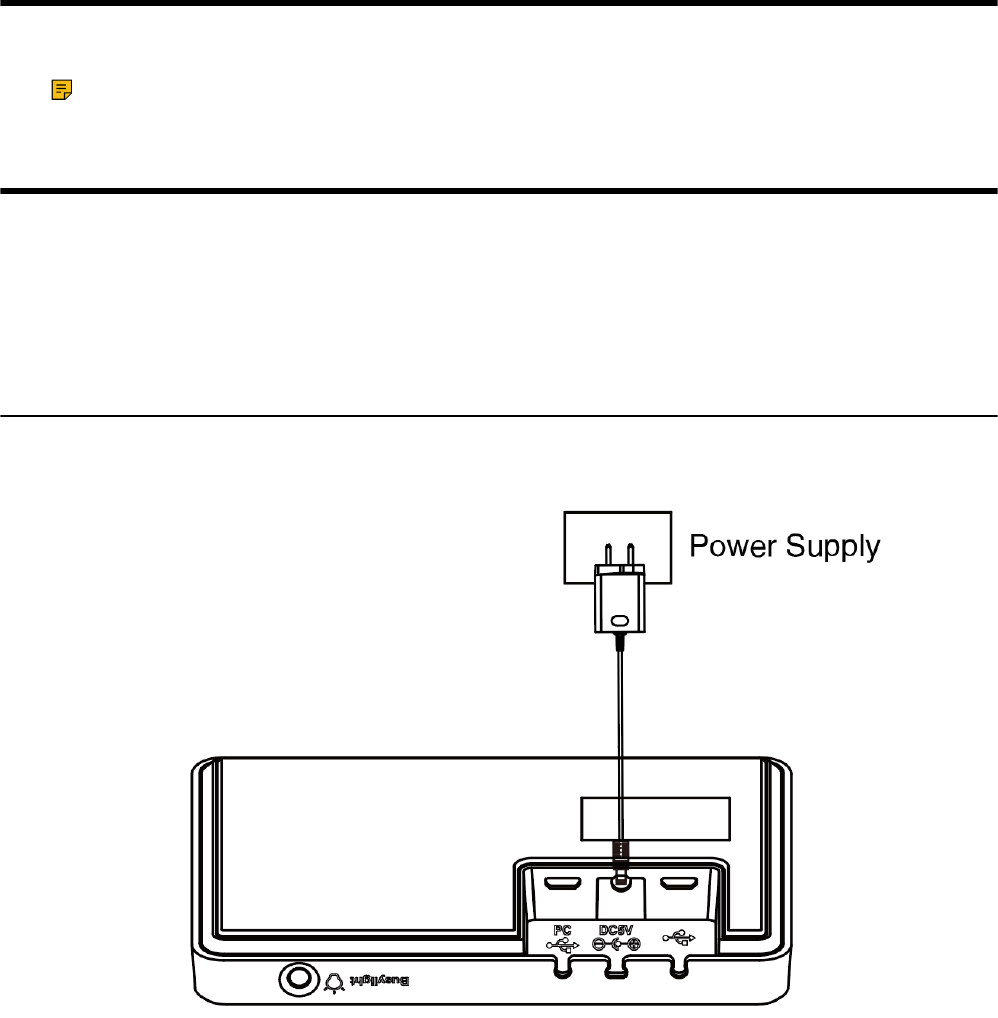
Power on the Base
About this task
Procedure
Plug the base into a power supply using the supplied power adapter.
For WH62/WH63 base, all LEDs on the base light up and then go off.
For WH66/WH67, the power LED glows red.
Related information
WH66 Base & Headset Hardware
WH67 Base & Headset Hardware

| Pair the Headset with Base | 5
Power on the Headset
Procedure
Do one of the following:
• Hold the Call Control button for 3 seconds.
• Power on the base and dock the headset in the base.
Note: The headset will be charged whenever it is docked in a base that is connected to a power
supply.
Related tasks
Power on the Base
Related information
Hardware Overview
Power off the Base
Procedure
1. For WH62/WH66/WH67 base, unplug the power adapter.
2. For WH63 base, unplug the power adapter and disconnect from the USB device.
Power off the Headset
Procedure
Undock the headset and hold the Call Control button for 3 seconds.
You hear a "power off" tone indicating headset status.
Note: Power off the headset will only disconnect the connection between the base and the
headset, but will not delete the pairing information between the base and the headset.
Pair the Headset with Base
Before you begin
The base has been connected to a power supply.
Procedure
Dock the headset in a base.
Results
The headset is successfully paired with the base. The LED on the headset glows green for 5 seconds, and
then indicates the charging status.
| How to Connect WH62/WH63 | 6
Note: You can pair up to four headsets to one base. After the headset is paired, it will keep paired
even you undock the headset.
Related tasks
Add Headset(s) During a Call
Add Headset(s) When the Base is Idle
How to Connect WH62/WH63
You can connect one or both of the desk phone and the PC.
• WH62/WH63 Port Overview
• Connect to PC via USB Cable
• Connect to Desk Phone via USB Cable
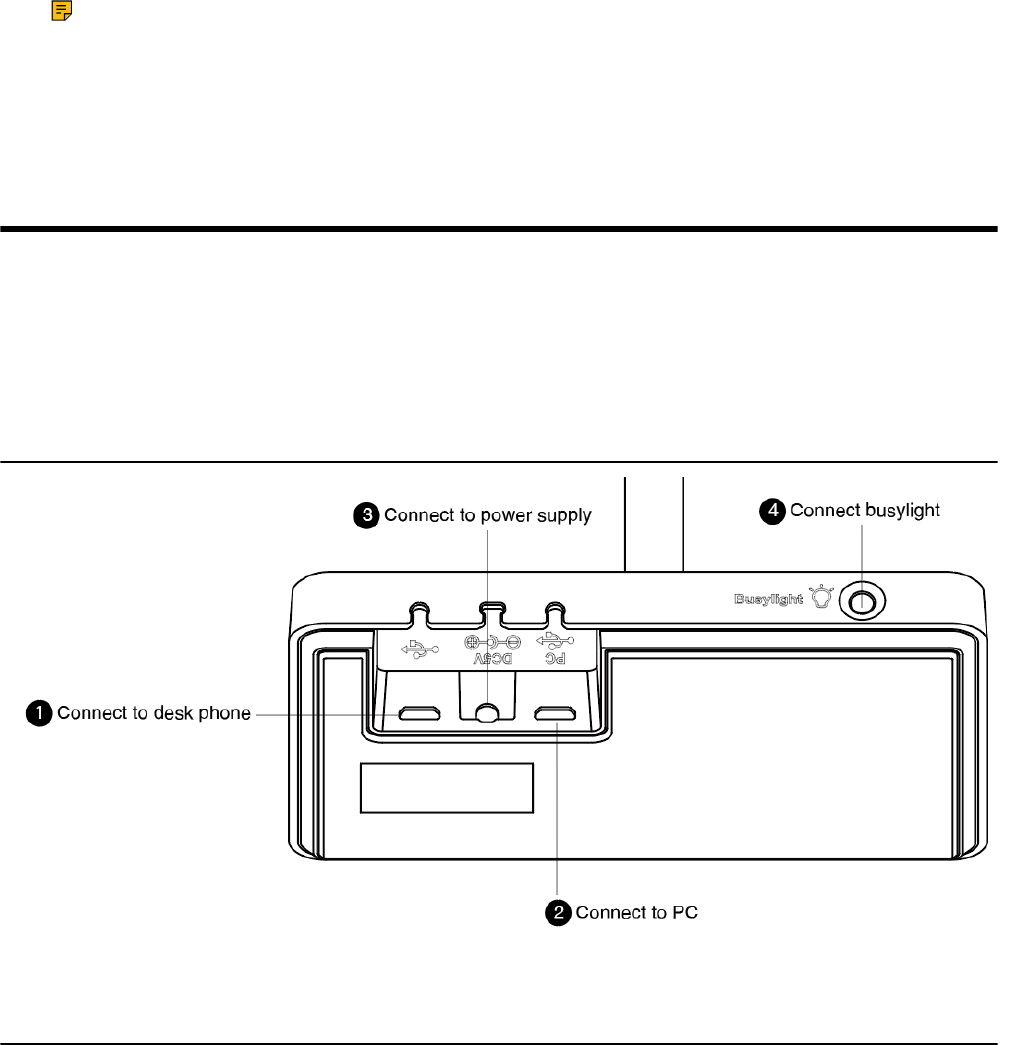
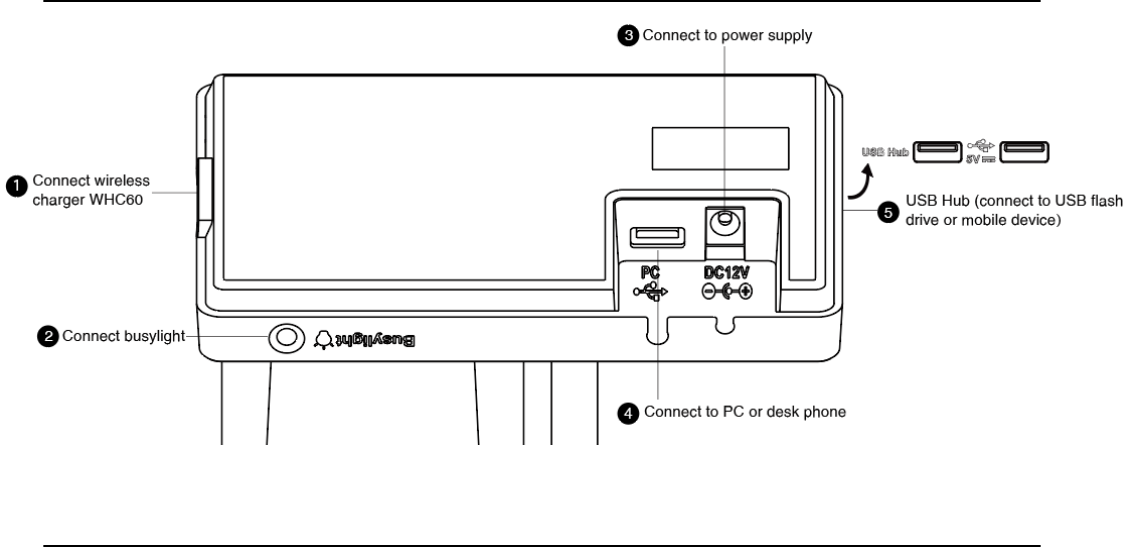
WH62/WH63 Port Overview
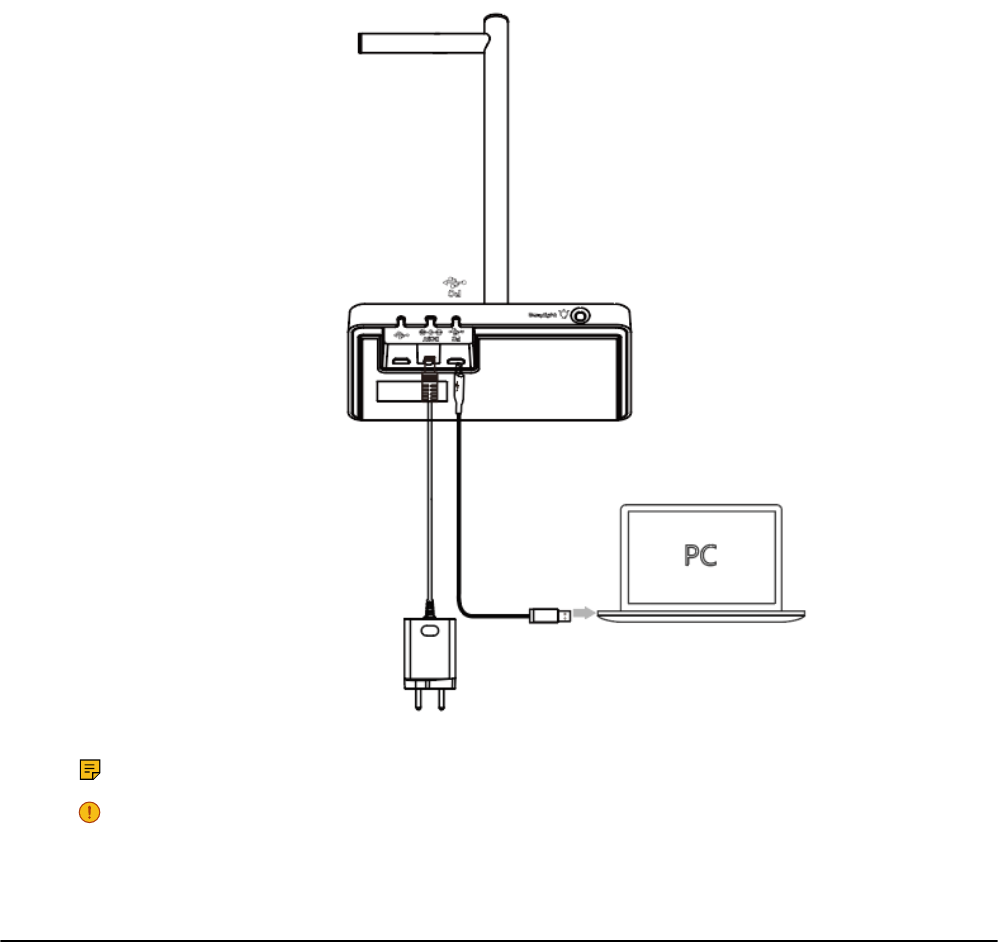
Connect to PC via USB Cable
Procedure
1. Connect one end of the USB cable to the PC port of the base.
| How to Connect WH62/WH63 | 7
2. Connect the remaining end of the USB cable to the USB port of the PC.
Note: For more information on the compatible PC, refer to the specific compatible guide.
Important: You need to connect the PC to the micro USB port of the base marked with the text
"PC".
Connect to Desk Phone via USB Cable
Procedure
1. Connect one end of the USB cable to the USB port of the base.
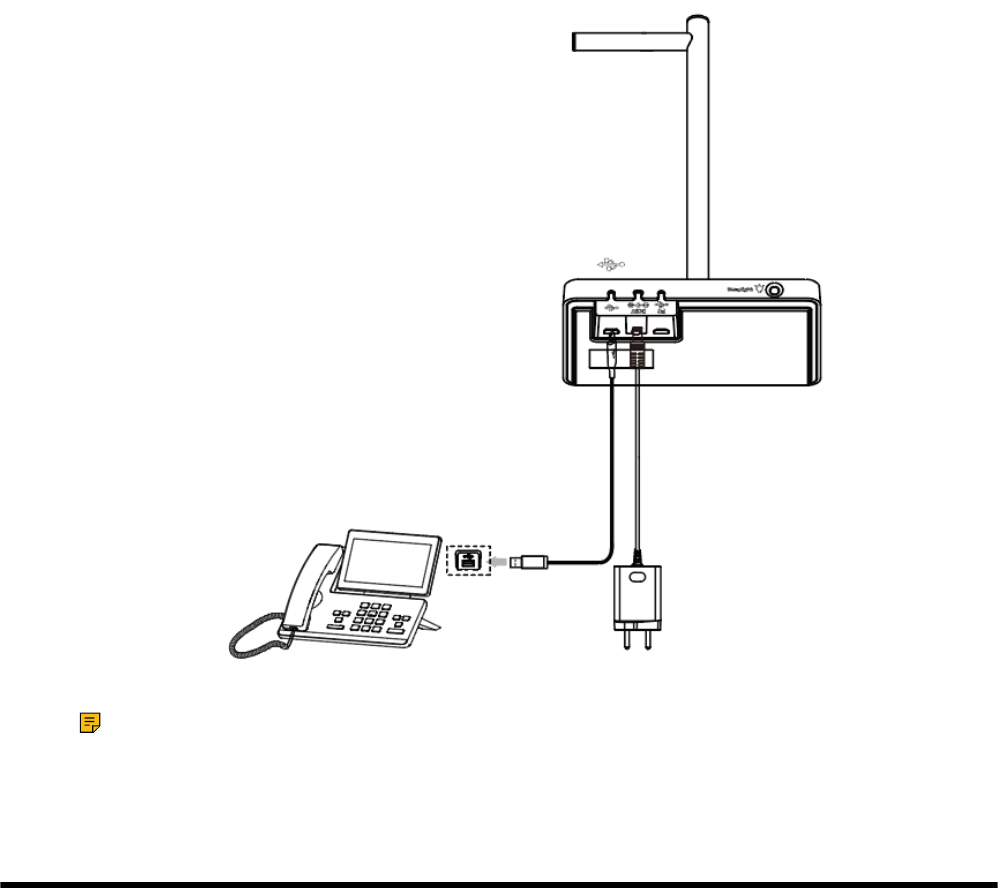
| How to Connect WH66/WH67 | 8
2. Connect the remaining end of the USB cable to the USB port of the desk phone.
Note: For more information on compatible desk phones, refer to the specific compatible guide. If
you want to connect to Yealink T3 series phones, you need to purchase Yealink EHS35 wireless
headset adapter separately.
How to Connect WH66/WH67
• WH66/WH67 Port Overview
• Connect to PC/Desk Phone via the Included USB Cable
• Connect to PC/Desk Phone/Smartphone via Bluetooth
| How to Connect WH66/WH67 | 9
WH66/WH67 Port Overview
Connect to PC/Desk Phone via the Included USB Cable
Procedure
1. Connect one end of the included USB cable to the PC port of the base.
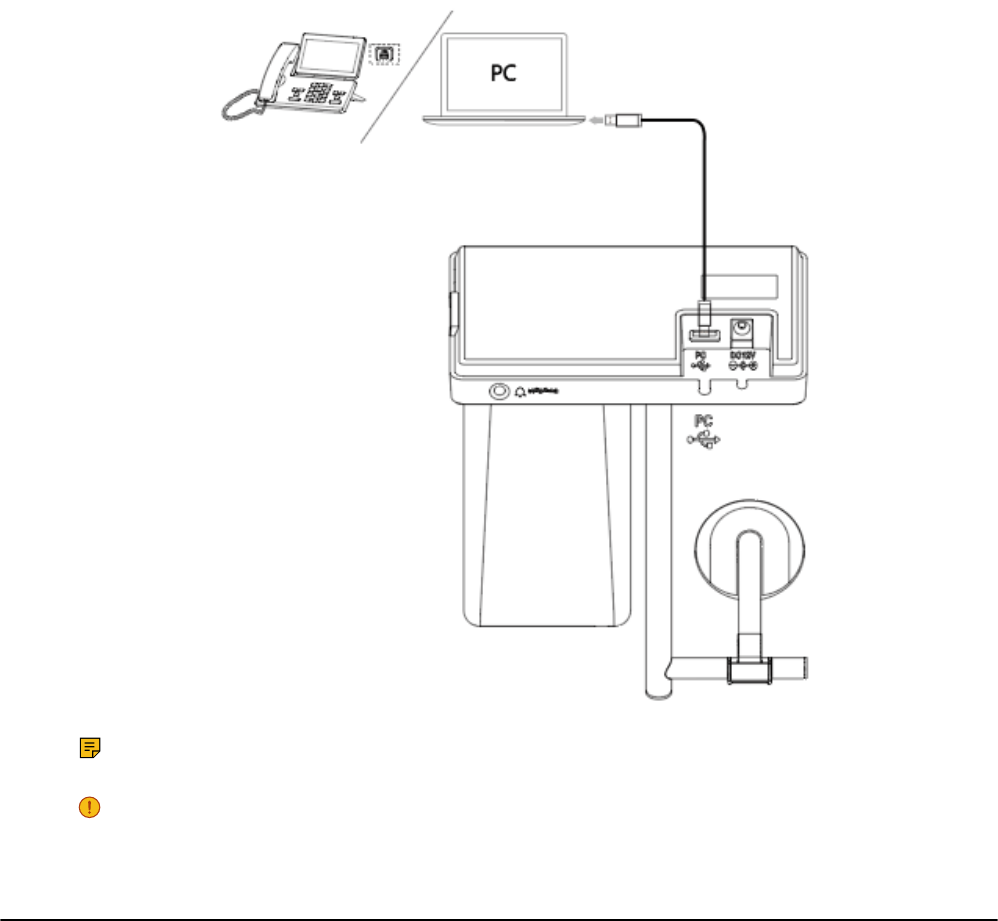
| How to Connect WH66/WH67 | 10
2. Connect the remaining end of the USB cable to the USB port of the PC/desk phone.
Note: For more information on compatible PC and desk phones, refer to the specific compatible
guide.
Important: You need to connect the PC to the USB port of the base marked with the text "PC".
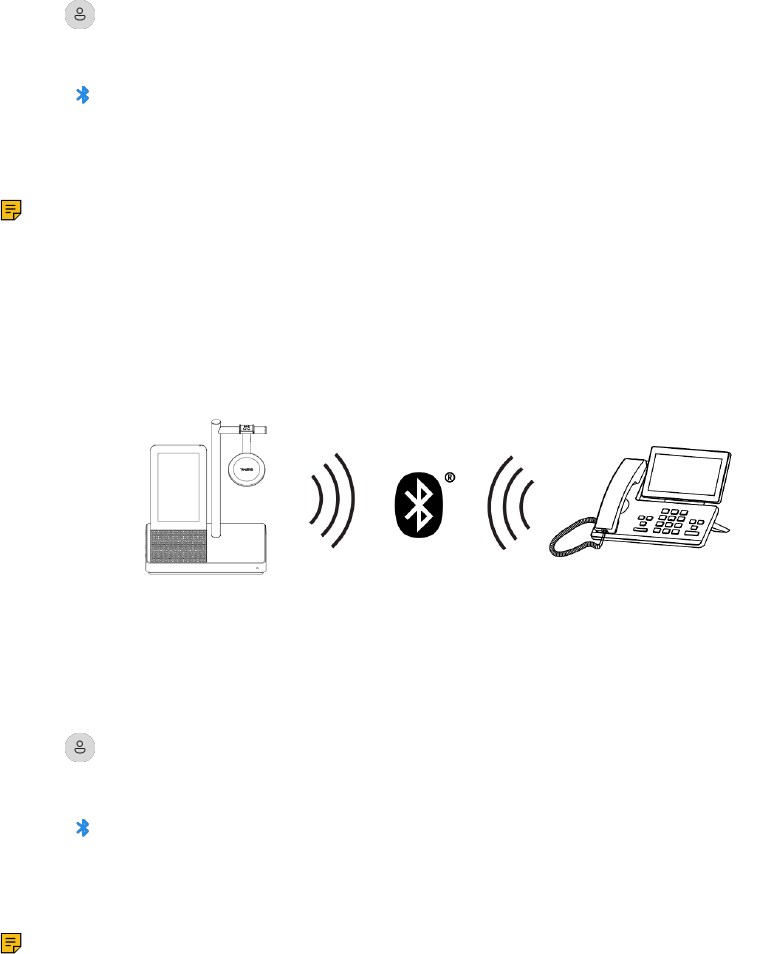
Connect to PC/Desk Phone/Smartphone via Bluetooth
You can connect your WH66/WH67 base to PC, desk phone, or smartphone via Bluetooth. And then you
can use your headset to perform call controls for the softphone/smartphone.
The base can save the pairing information of 8 Bluetooth devices connected recently.
• BT50 LED Indicator
• Single Bluetooth Connection
• Two Bluetooth Connections
• Disconnect and Remove Your Bluetooth Device
• Edit Your Bluetooth Information
• Erase All Bluetooth Pairings
• Turn off Bluetooth
BT50 LED Indicator
BT50 LED Indicator
| How to Connect WH66/WH67 | 11
LED Indicator Description
Flashing blue Bluetooth connecting
Solid blue Bluetooth connected
Off Bluetooth disconnected
Single Bluetooth Connection
You can connect to PC, smartphone, or Bluetooth headset via Bluetooth.
• Connect to PC
• Connect to Smartphone
• Connect to Desk Phone
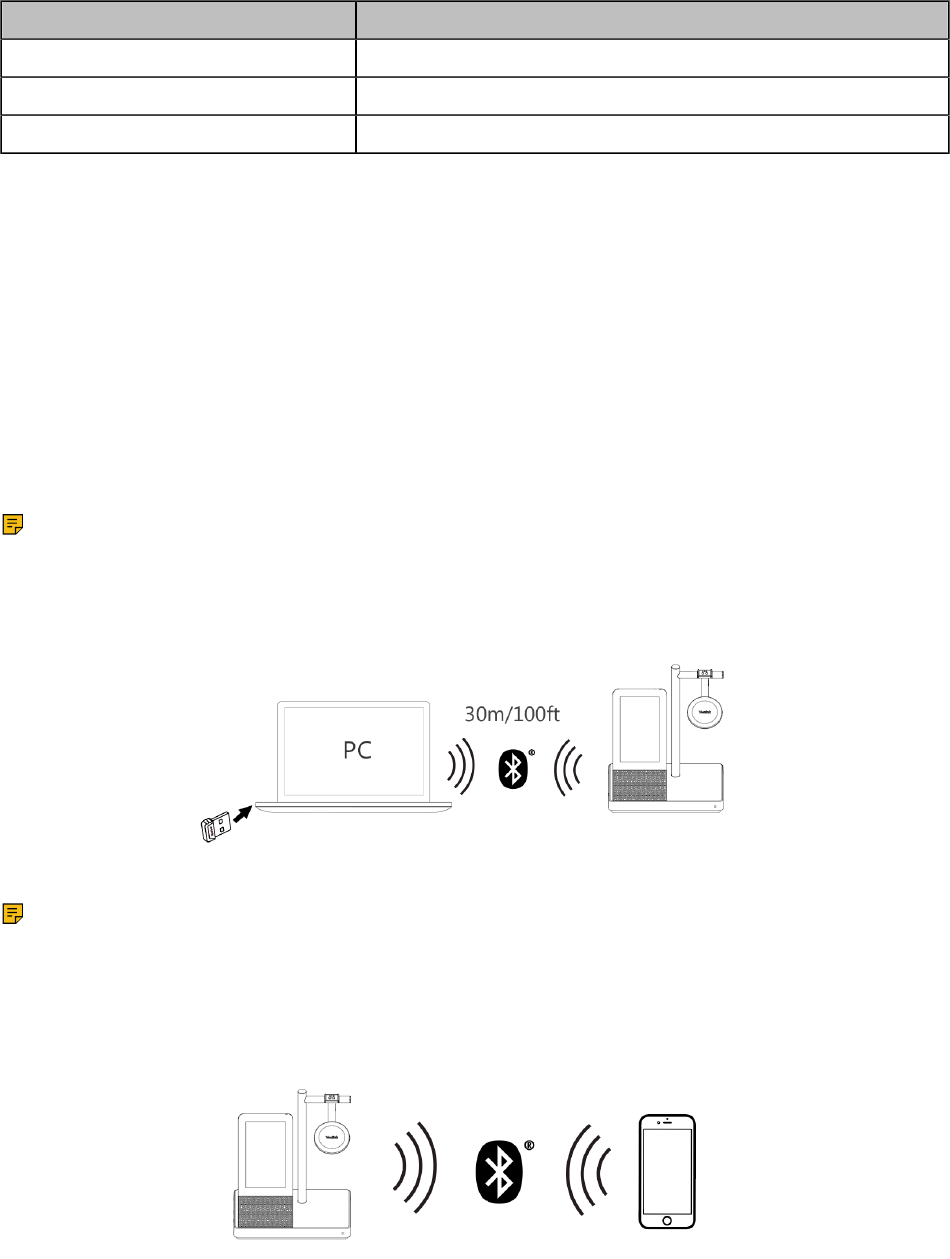
Connect to PC
You can connect the base to PC via Bluetooth dongle BT50. The base and the BT50 are pre-paired and
ready to use out of the box. The Bluetooth range is 30m/100ft.
About this task
Note: If you connect the base to PC via built-in Bluetooth, the base can only support voice pickup
and audio playback.
Procedure
Connect the BT50 into a USB port on your PC.
After a successful connection, the BT50 LED indicator glows blue.
Note: To manually pair the base with the BT50, please use Yealink USB connect. For more
information on the compatible PC, refer to the specific compatible guide.
Related tasks
Manually Pair the Base with the BT50
Connect to Smartphone
You can connect the base to a smartphone via built-in Bluetooth.
| How to Connect WH66/WH67 | 12
Procedure
1. Do the following:
• For Teams version:
Tap or the user account avatar, and tap Bluetooth.
• For UC version:
Tap .
The base automatically enters the pairing mode.
2. On your smartphone, turn on Bluetooth and select Yealink WH66/Yealink WH67.
Note: The Yealink WH66/Yealink WH67 is the default device name. You can edit the base's
Bluetooth device name. For more information on the compatible smartphone, refer to the specific
compatible guide.
Related tasks
Edit Your Bluetooth Information
Connect to Desk Phone
You can connect the base to your desk phone via Bluetooth.
Procedure
1. Do the following:
• For Teams version:
Tap or the user account avatar, and tap Bluetooth.
• For UC version:
Tap .
The base automatically enters the pairing mode.
2. On your desk phone, turn on Bluetooth and select Yealink WH66/Yealink WH67.
Note: If your desk phone does not support Bluetooth or you do not want to use the built-in
Bluetooth, you can connect the base via the pre-paired BT50. To manually pair the base with the
BT50, please use Yealink USB connect. For more information on compatible desk phones, refer
to the specific compatible guide.
Related tasks
Manually Pair the Base with the BT50
Two Bluetooth Connections
You can connect up to two Bluetooth devices at the same time.

| How to Connect WH66/WH67 | 13
Disconnect and Remove Your Bluetooth Device
You can disconnect your Bluetooth device from your base and still keep it paired. When you disconnect a
Bluetooth device, it remains paired so that you can reconnect it to your base. You can also remove your
Bluetooth device so that it is no longer paired or connected to the base.
Procedure
1. Do the following:
• For Teams version:
Tap or the user account avatar, and tap Bluetooth.
• For UC version:
Tap .
2.
Tap the connected Bluetooth device, or tap and select Disconnect.
After you disconnect the device, "Disconnected" displays below the corresponding device.
3.
Tap , and select Remove.
The screen prompts you whether to remove the device.
4. Confirm the action.
Edit Your Bluetooth Information
You can change the base's Bluetooth device name to identify your base to other devices.
Procedure
1. Do the following:
• For Teams version:
Tap or the user account avatar, and tap Bluetooth.
• For UC version:
Tap .
2. Tap My Bluetooth Information.
3.
Select / to edit the device name.
Erase All Bluetooth Pairings
You can erase all saved Bluetooth device pairings.
Procedure
1. Do the following:
• For Teams version:
Tap or the user account avatar, and tap Bluetooth.
• For UC version:
Tap .
| How to Wear | 14
2.
Tap / .
The screen prompts you whether to clear the list of paired devices.
3. Confirm the action.
Turn off Bluetooth
Procedure
1. Do the following:
• For Teams version:
Tap or the user account avatar, and tap Bluetooth.
• For UC version:
Tap .
2. Turn off Bluetooth.
How to Wear
• WH62/WH66 Headset
• WH63/WH67 Headset
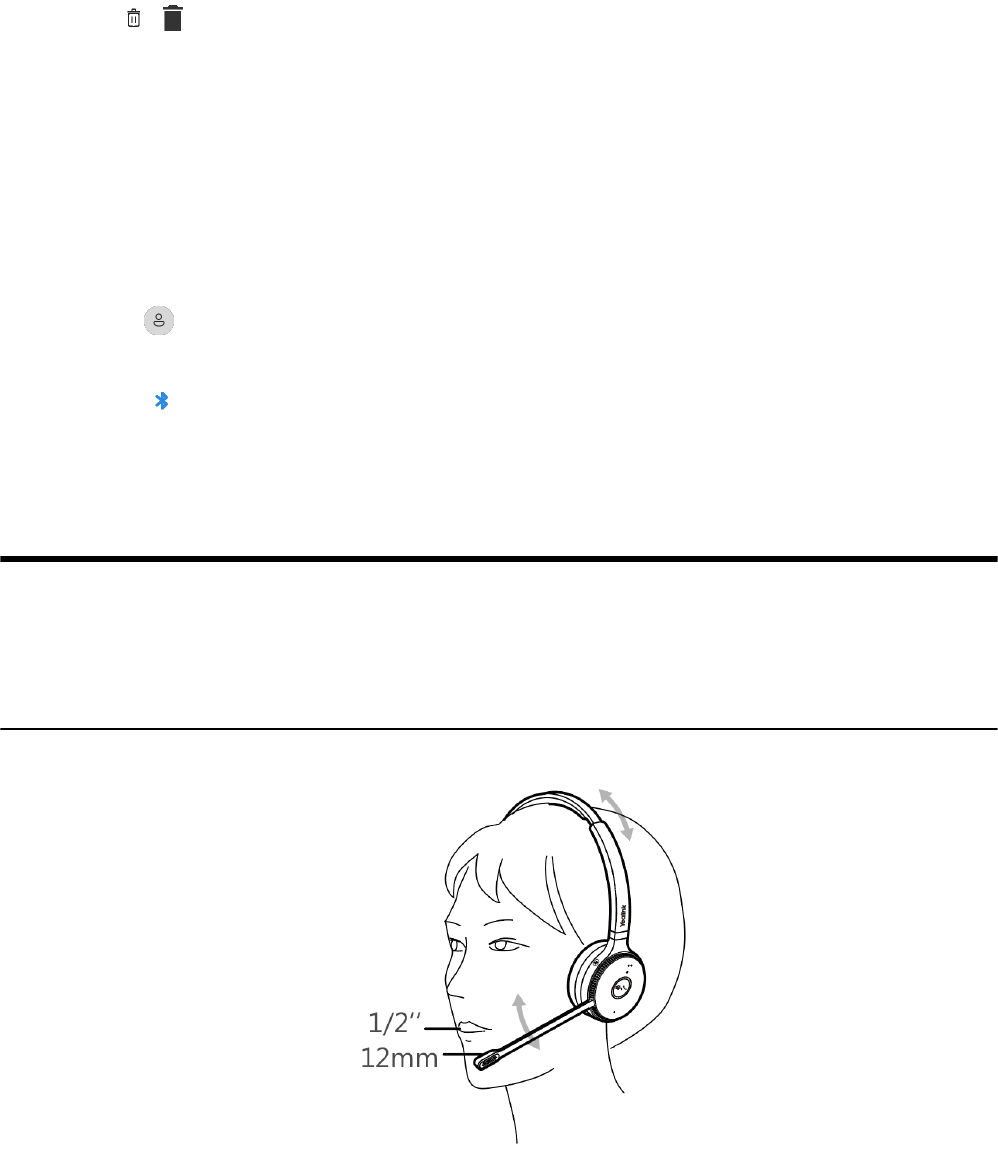
WH62/WH66 Headset
The headset can be worn with the microphone on the left or the right.
If necessary, you can bring the microphone closer or farther from your mouth.
• How to Replace Ear Cushions
| How to Wear | 15
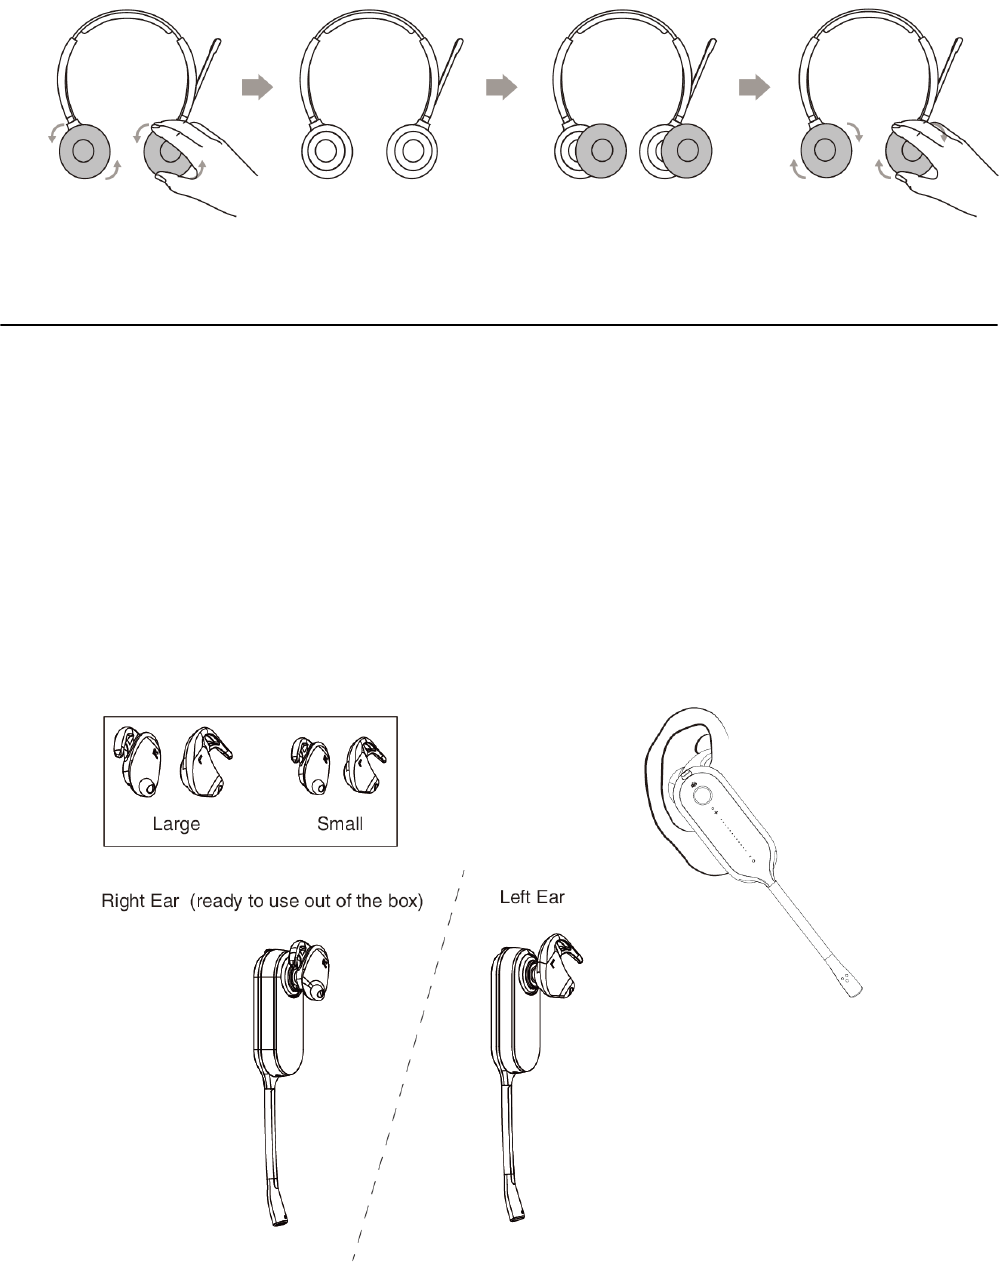
How to Replace Ear Cushions
WH63/WH67 Headset
Your headset comes configured for your right ear with a pre-installed large eartip. You can also configure
your headset for your left ear, install a different sized eartip and earhook, install the headband, or install the
neckband.
• Wearing Styles
• Remove the Pre-installed Eartip from the Headset
• Earhook & Eartip Assembly
• Headband Assembly
• Neckband Assembly
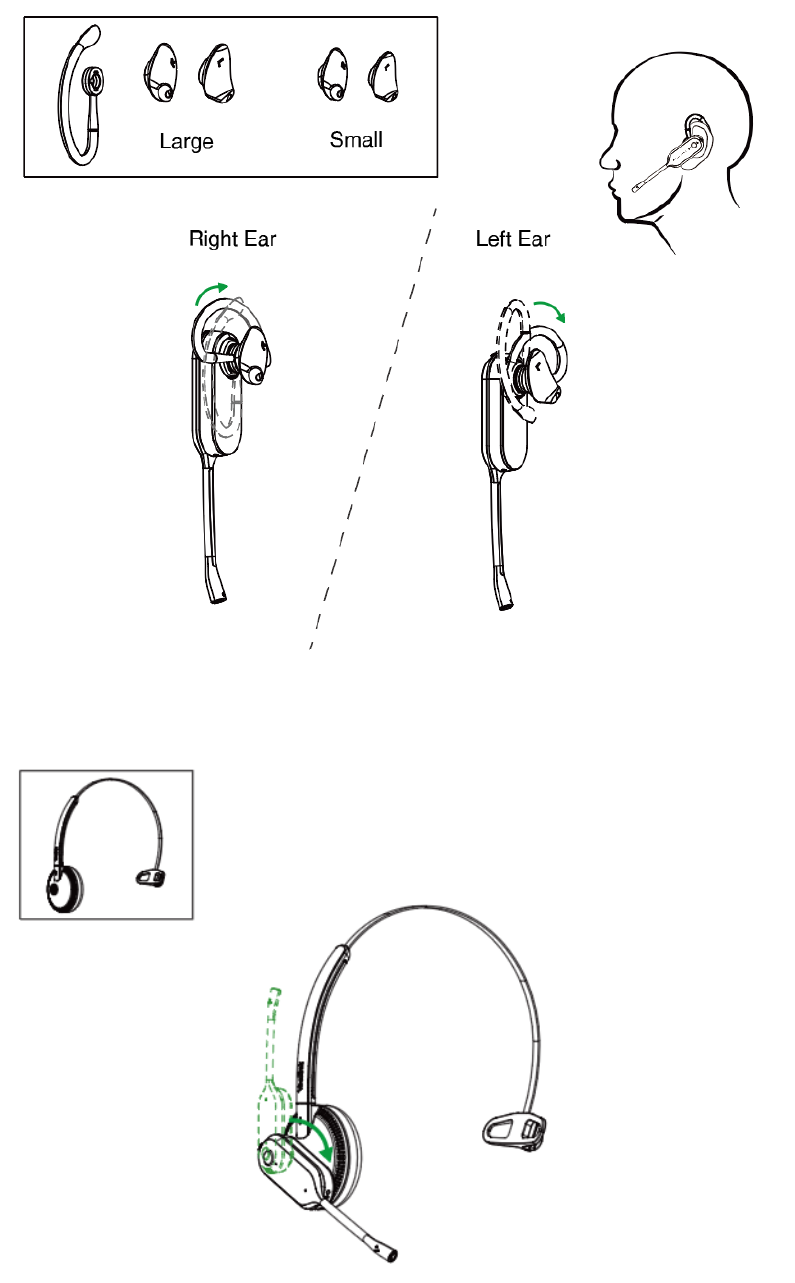
Wearing Styles
There are four wearing styles for WH63/WH67 headset.
• Eartip wearing style: faster to wear
| How to Wear | 16
• Earhook & Eartip wearing style: enhance wearing stability
• Headband wearing style: comfortable to wear
The headset can be worn with the microphone on the left or the right.
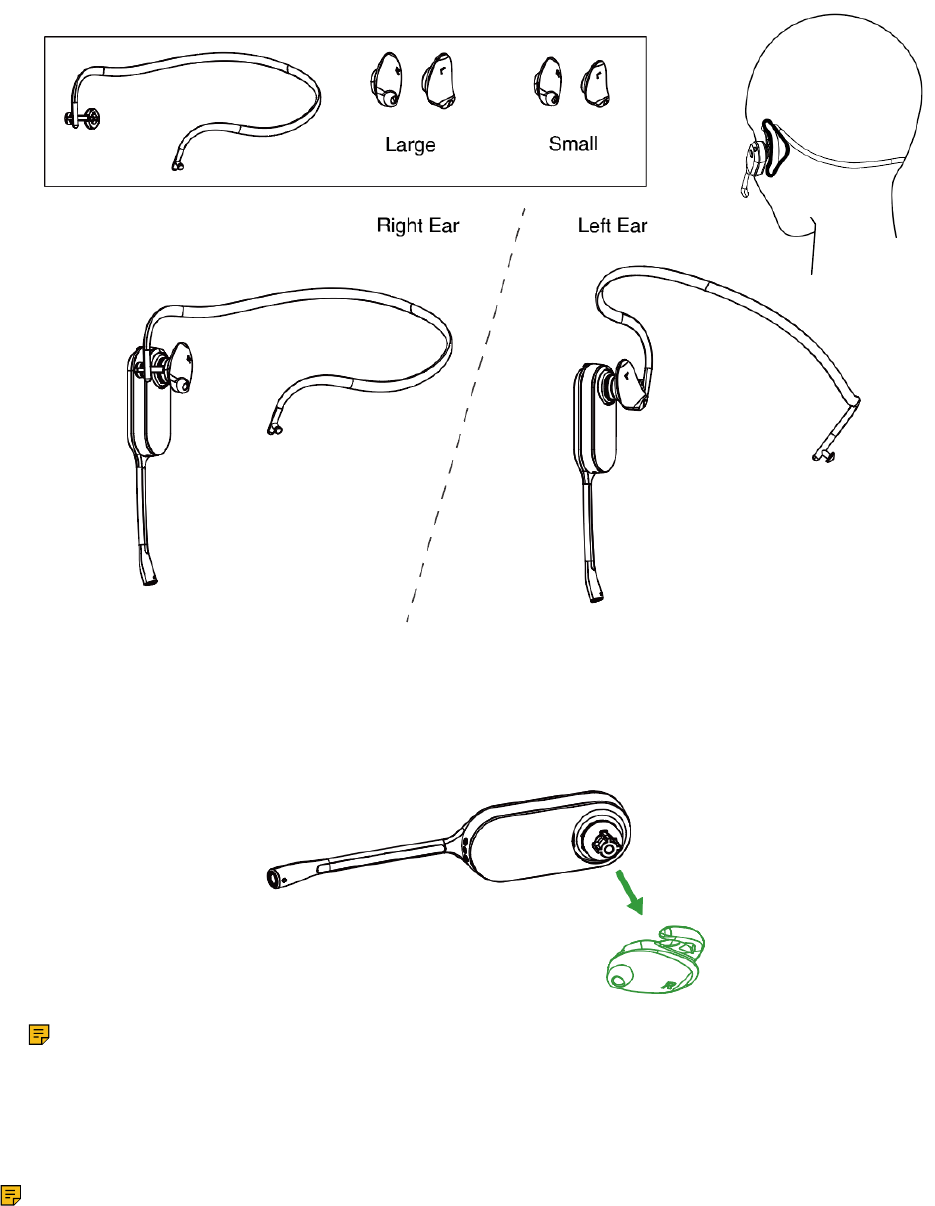
| How to Wear | 17
• Neckband wearing style: preserve your hairstyle
Remove the Pre-installed Eartip from the Headset
When you need to change the wearing styles, you can do the following:
1. Gently pull the eartip from the headset.
Note: To wear the headset on the right ear but with a different size eartip or wear the headset
on the left, select the size you want and reinstall in reverse order as shown.
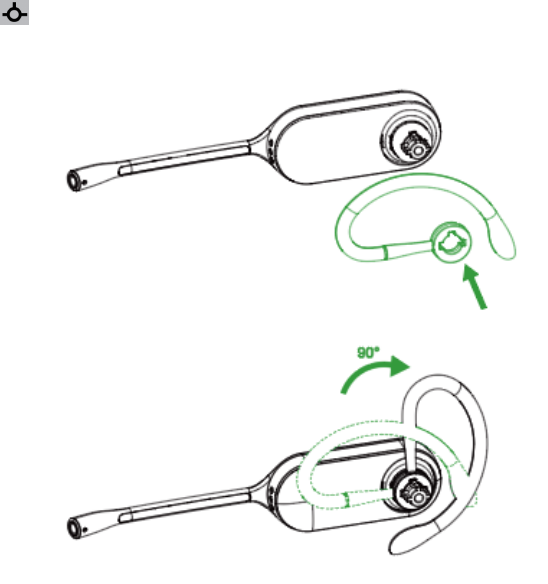
Earhook & Eartip Assembly
The headset can be assembled for wearing on the left or right ear.
Note: Before installing the earhook & eartip, remove the pre-installed eartip from the headset.
For Right ear:
| How to Wear | 18
1.
Align the earhook ( port) as shown and insert it onto the headset. Be sure the earhook is flat against
the headset and rotate the earhook up 90°.
| How to Wear | 19
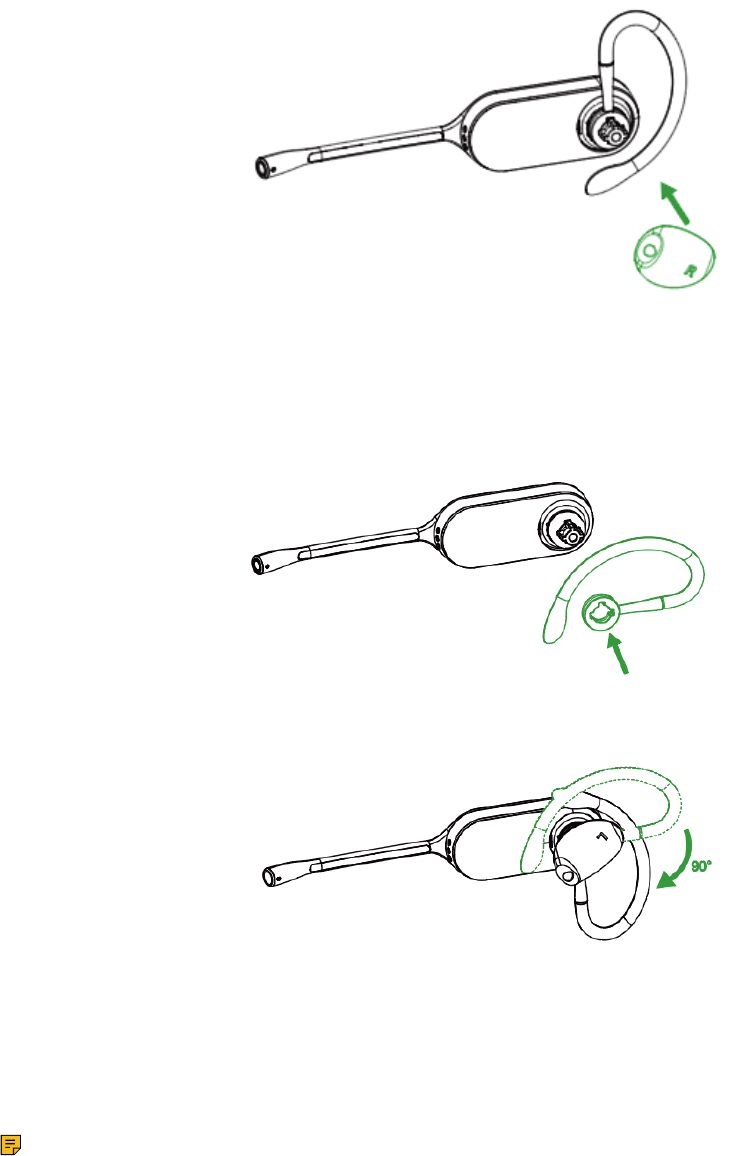
2. Choose the size of eartip that fits most comfortably. Align the eartip with the notch facing the
microphone as shown. Press on to attach.
The earhook is flexible, and can be bent to suit your ear for a secure and comfortable fit.
For left ear:
The difference between the right ear and the left ear assembly is that the direction of the earhook is
different.
Related information
Remove the Pre-installed Eartip from the Headset
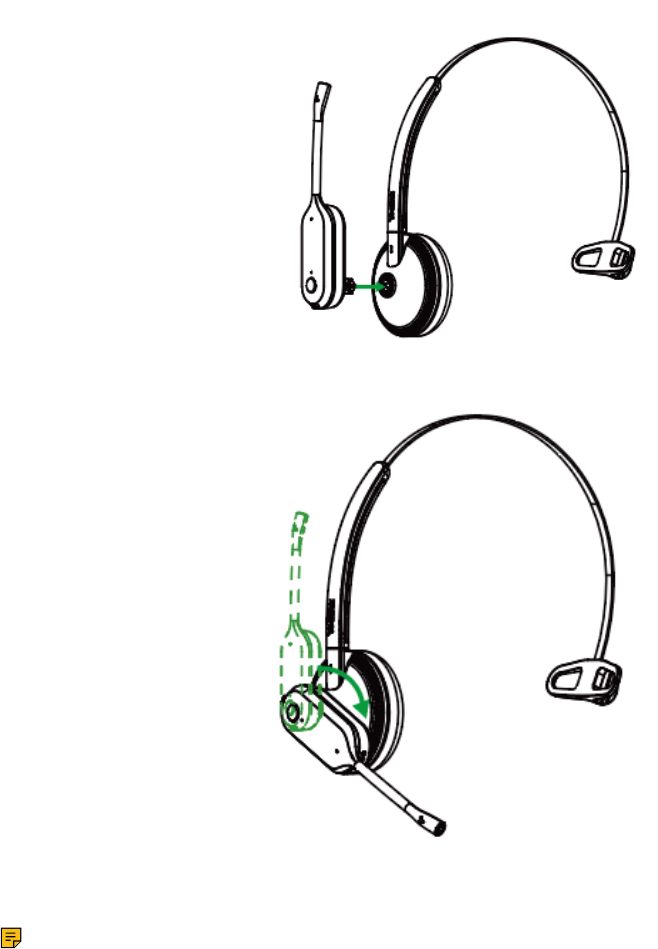
Headband Assembly
The headset can be rotated for wearing on the left or right ear.
Note: Before installing the headband, remove the pre-installed eartip from the headset.
For Right ear:
| How to Wear | 20
1. Hold the headband, so it is aligned to receive the headset as shown and insert the headset into the
headband.
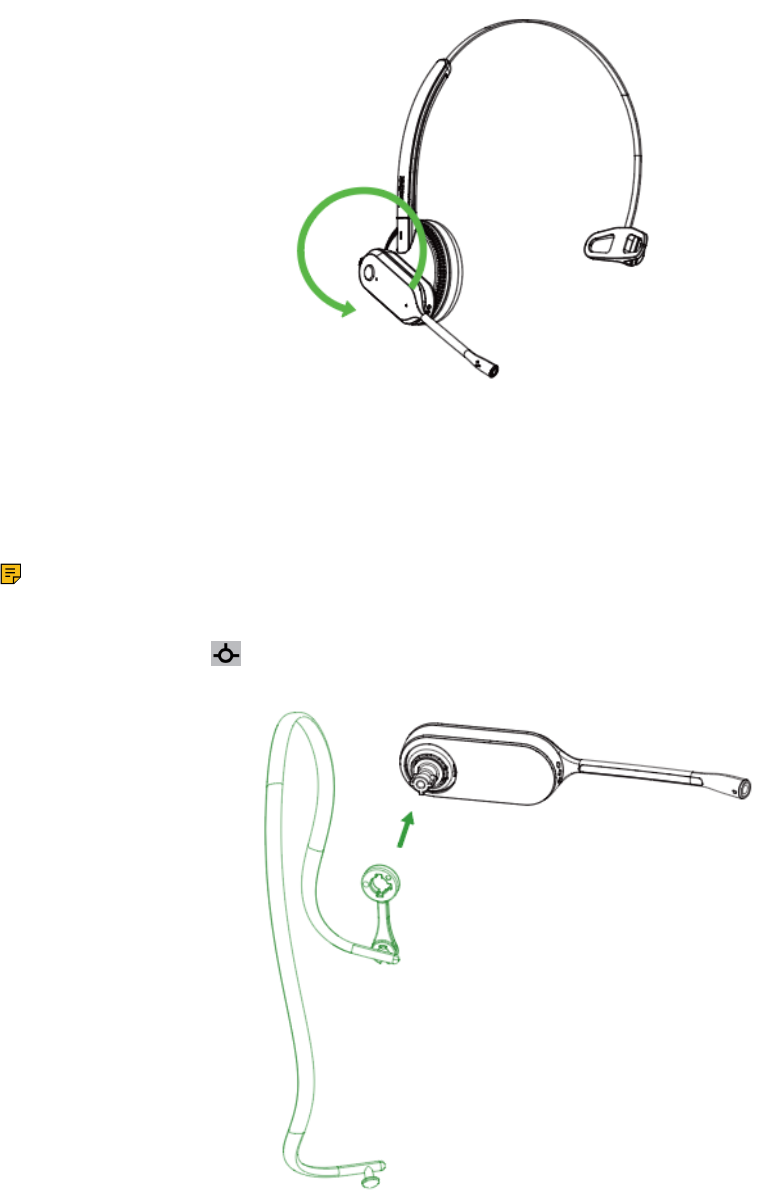
2. Rotate the headset down.
3. To optimize the position of the headset, push the headset in so the microphone is close to the corner of
your mouth.
Note: The headband is adjustable, and can be adjusted to the most comfortable fit.
For Left ear:
| How to Wear | 21
Related information
Remove the Pre-installed Eartip from the Headset
Neckband Assembly
The headset can be assembled for wearing on the left or right ear.
Note: Before installing the neckband, remove the pre-installed eartip from the headset.
For Right ear:
1.
Align the short shot ( port) as shown and insert it onto the headset.
2. Choose the size of eartip that fits most comfortably. Align the eartip with the notch facing the
microphone as shown. Press on to attach.
| How to Wear | 22
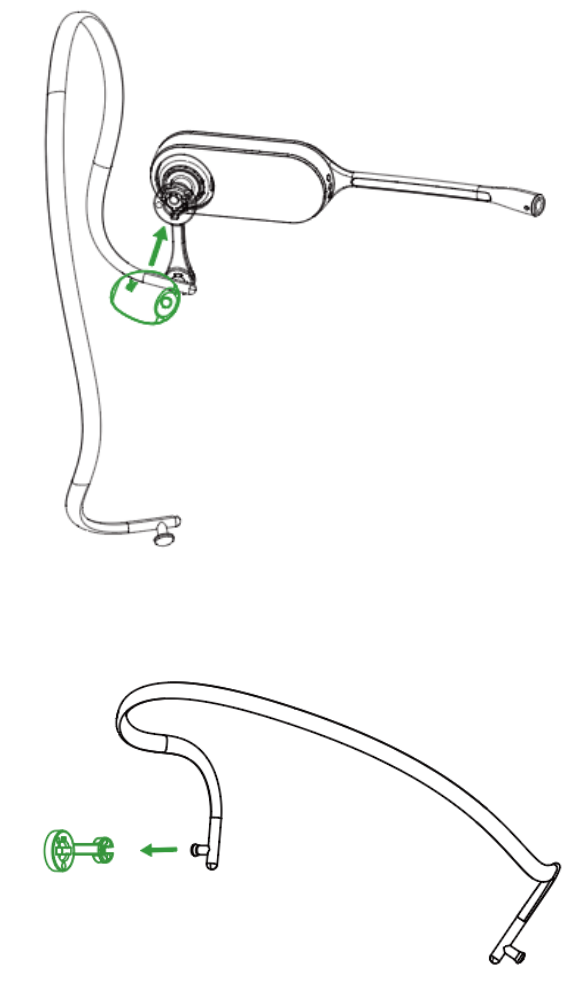
For Left ear:
1. Remove the pre-installed connecting rod.

| How to Wear | 23
2. Install the connecting rod to the other end of the neckband.
3.
Align the short shot ( port) as shown and insert it onto the headset.
4. Choose the size of eartip that fits most comfortably. Align the eartip with the notch facing the
microphone as shown. Press on to attach.

| How to Use | 24
How to Use
• Hardware Overview
• WH62/WH63 Base Status LEDs
• Status and Busylight LED
• WH66/WH67 Icons and Status Indicators
• Adjust the Playback Volume
• How to Reset to Factory
Hardware Overview
• WH62 Base & Headset Hardware
• WH63 Base & Headset Hardware
• WH66 Base & Headset Hardware
• WH67 Base & Headset Hardware
| How to Use | 25
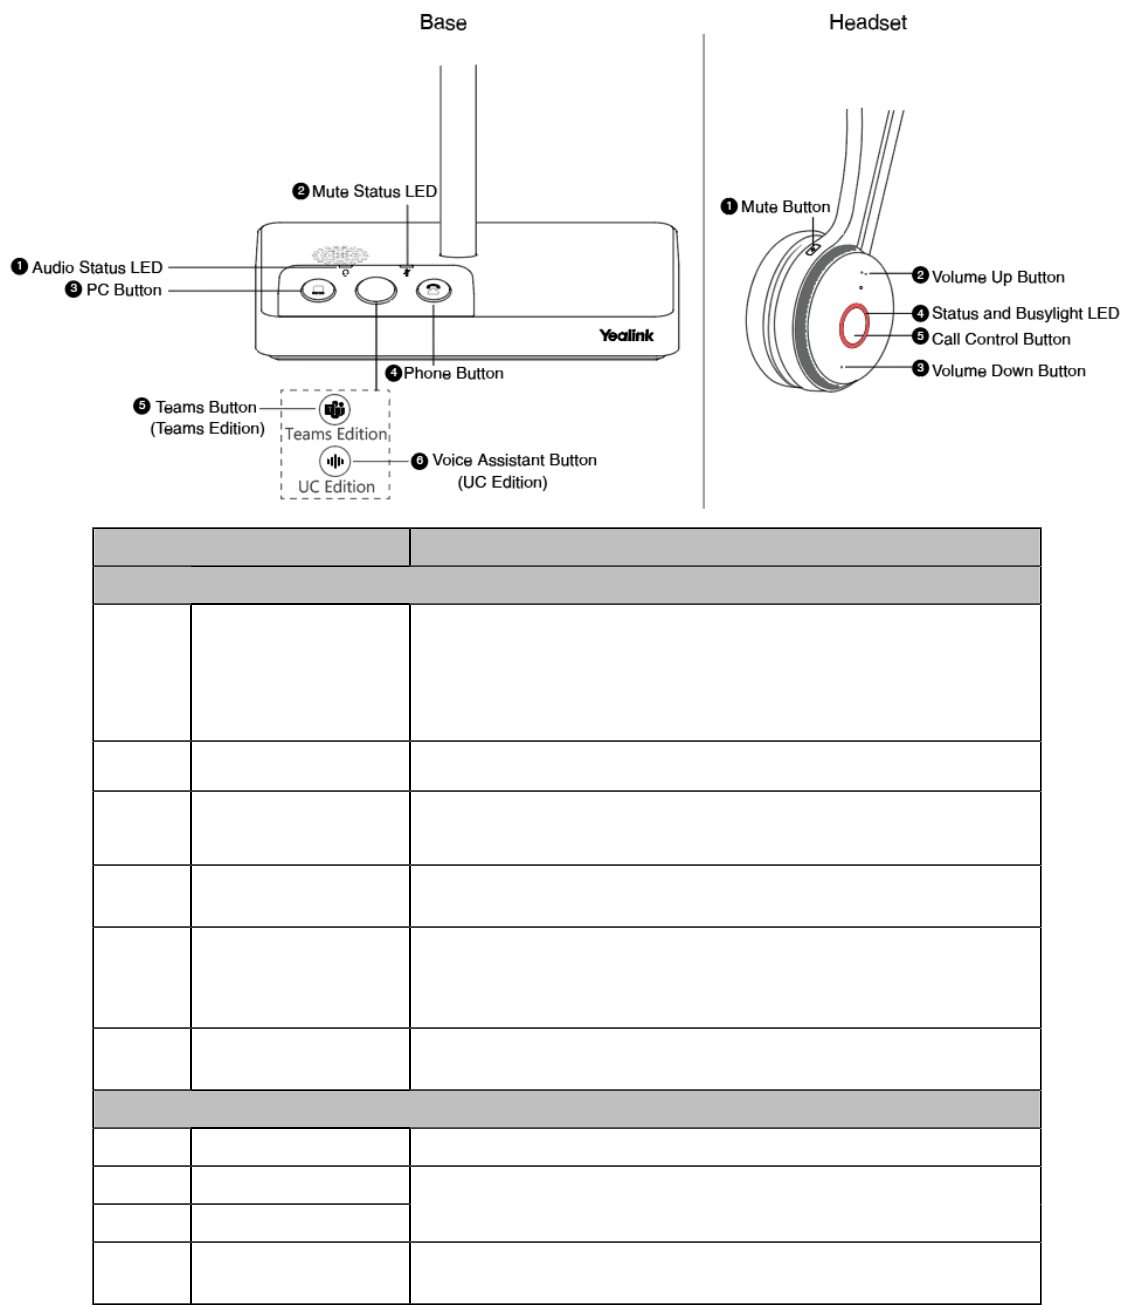
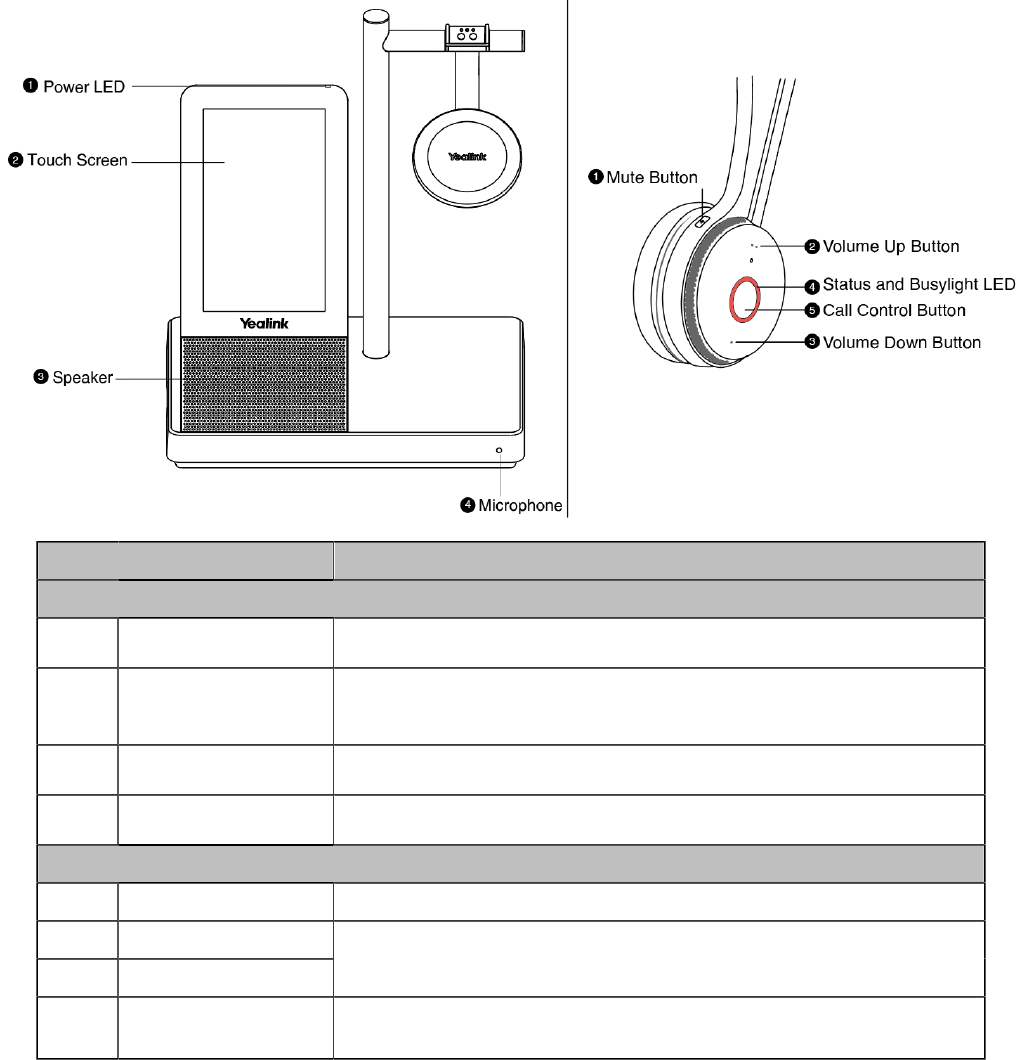
WH62 Base & Headset Hardware
Name Description
Base
1 Audio Status LED
Alerts you to the audio status between base and headset.
• Solid green: the audio connection between base and headset is
normal
• Flash orange: the headset is disconnected with base
2 Mute Status LED Alerts you when your headset is muted.
3 PC Button
Press to enter the softphone dialing screen, answer, or end a
softphone's call.
4 Phone Button
Press to enter the phone dialing screen, answer, or end a phone's
call.
5
(Teams Edition) Teams
Button
• Hold for 2 seconds to activate Cortana integrated in Teams (this
requires Microsoft's support).
• Press to invoke the Teams client in the idle state.
6
(UC Edition) Voice
Assistant Button
Hold for 2 seconds to activate the voice assistant.
Headset
1 Mute Button Toggle the microphone on and off.
2 Volume Up Button
3 Volume Down Button
Adjust the volume on your headset.
4
Status and Busylight
LED
Indicates the charging, Teams, or call status.

| How to Use | 26
Name Description
5 Call Control Button
Use to power the headset on and off.
• Hold for 3 seconds to power the headset on.
• Hold for 3 seconds to power the headset off.
Incoming and active call management depends upon if you have one
call or multiple calls.
One call:
• Press once to answer an incoming call.
• Double-press to reject an incoming call.
• Press once to end a call.
Multiple calls:
• Hold for 2 seconds to answer an incoming call and put the active
call on hold.
• Hold for 2 seconds to switch between held call and active call.
• Press once to end the current call and answer the incoming call.
• Double-press to stay on a current call, and to reject a second
incoming call.
Teams-related features:
• Hold for 2 seconds to activate Cortana integrated in Teams (this
requires Microsoft's support).
• Press once to invoke the Teams client in the idle state.
Related concepts
Status and Busylight LED
WH62/WH63 Base Status LEDs
| How to Use | 27
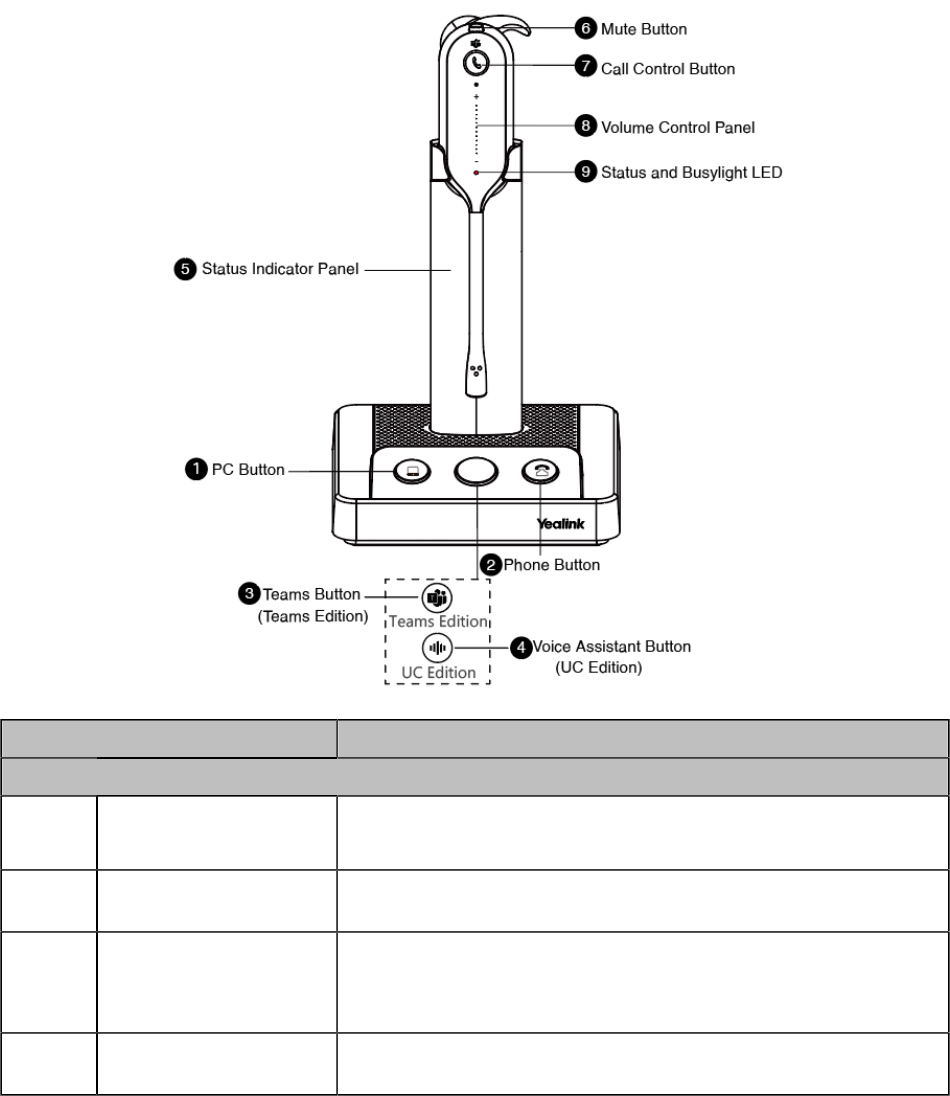
WH63 Base & Headset Hardware
Name Description
Base
1 PC Button
Press to enter the softphone dialing screen, answer or end a
softphone's call.
2 Phone Button Press to enter the phone dialing screen, answer or end a phone's
call.
3 (Teams Edition) Teams
Button
• Hold for 2 seconds to activate Cortana integrated in Teams (this
requires Microsoft's support).
• Press to invoke the Teams client in the idle state.
4 (UC Edition) Voice
Assistant Button
Hold for 2 seconds to activate the voice assistant.

| How to Use | 28
Name Description
5 Status Indicator Panel Indicate the mute status, audio status, and the headset battery
status.
For mute status LED:
• Solid white: unmuted
• Solid red: muted
For headset status LED:
• Solid green: the audio connection between base and headset is
normal
• Flash orange: the headset is disconnected with base (power off/
out of range)
For headset battery status LED: indicates the headset battery
status. No display after the headset is disconnected
Headset
6 Mute Button Toggle the microphone on and off.
7 Call Control Button
Use to power the headset on and off.
• Hold for 3 seconds to power the headset on.
• Hold for 3 seconds to power the headset off.
Incoming and active call management depends upon if you have
one call or multiple calls.
One call:
• Press once to answer an incoming call.
• Double-press to reject an incoming call.
• Press once to end a call.
Multiple calls:
• Hold for 2 seconds to answer an incoming call and put the
active call on hold.
• Hold for 2 seconds to switch between held call and active call.
• Press once to end the current call and answer the incoming call.
• Double-press to stay on a current call, and to reject a second
incoming call.
Teams-related features:
• Hold for 2 seconds to activate Cortana integrated in Teams (this
requires Microsoft's support).
• Press once to invoke the Teams client in the idle state.
8 Volume Control Panel Adjust the volume on your headset.
9
Status and Busylight
LED
Indicates the charging, Teams, or call status.
Related concepts
Status and Busylight LED
WH62/WH63 Base Status LEDs
| How to Use | 29
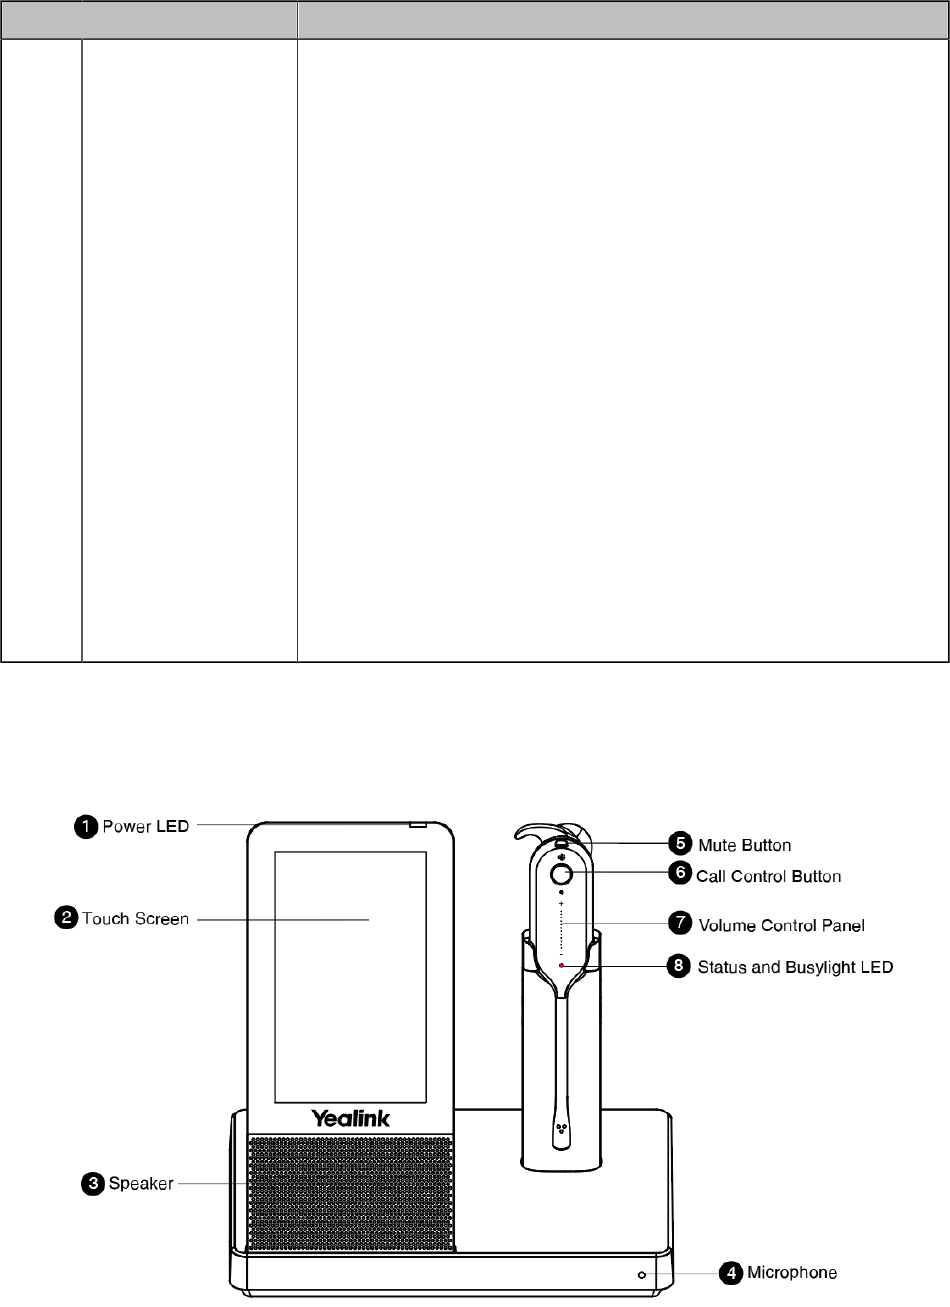
WH66 Base & Headset Hardware
Name Description
Base
1 Power LED
Indicates the base status.
2 Touch Screen
• Shows your headset's battery status, headset connection status, etc.
• Select items and navigate menus.
3 Speaker
Provide hands-free (speakerphone) audio output.
4 Microphone
Provide hands-free (speakerphone) audio input.
Headset
1 Mute Button Toggle the microphone on and off.
2 Volume Up Button
3 Volume Down Button
Adjust the volume on your headset.
4
Status and Busylight
LED
Indicates the charging, Teams, or call status.
| How to Use | 30
Name Description
5 Call Control Button
Use to power the headset on and off.
• Hold for 3 seconds to power the headset on.
• Hold for 3 seconds to power the headset off.
Incoming and active call management depends upon if you have one
call or multiple calls.
One call:
• Press once to answer an incoming call.
• Double-press to reject an incoming call.
• Press once to end a call.
Multiple calls:
• Hold for 2 seconds to answer an incoming call and put the active call
on hold.
• Hold for 2 seconds to switch between held call and active call.
• Press once to end the current call and answer the incoming call.
• Double-press to stay on a current call, and to reject a second
incoming call.
Teams-related features:
• Hold for 2 seconds to activate Cortana integrated in Teams (this
requires Microsoft's support).
• Press once to invoke the Teams client in the idle state.
Related concepts
Status and Busylight LED
WH67 Base & Headset Hardware

| How to Use | 31
Name Description
Base
1 Power LED
Indicates the base status.
2 Touch Screen
• Shows your headset's battery status, headset connection status, etc.
• Select items and navigate menus.
3 Speaker
Provide hands-free (speakerphone) audio output.
4 Microphone
Provide hands-free (speakerphone) audio input.
Headset
5 Mute Button Toggle the microphone on and off.
6
Call Control
Button
Use to power the headset on and off.
• Hold for 3 seconds to power the headset on.
• Hold for 3 seconds to power the headset off.
Incoming and active call management depends upon if you have one call
or multiple calls.
One call:
• Press once to answer an incoming call.
• Double-press to reject an incoming call.
• Press once to end a call.
Multiple calls:
• Hold for 2 seconds to answer an incoming call and put the active call
on hold.
• Hold for 2 seconds to switch between held call and active call.
• Press once to end the current call and answer the incoming call.
• Double-press to stay on a current call, and to reject a second
incoming call.
Teams-related features:
• Hold for 2 seconds to activate Cortana integrated in Teams (this
requires Microsoft's support).
• Press once to invoke the Teams client in the idle state.
7 Volume Control
Panel
Adjust the volume on your headset.
8
Status and
Busylight LED
Indicates the charging, Teams, or call status.
Related concepts
Status and Busylight LED
WH62/WH63 Base Status LEDs

| How to Use | 32
LED Base State
PC/desk phone button
Off PC/desk phone device is not connected
Glows white
PC/desk phone device is connected and in the idle status
Glows green
In the call
Fast flashes green Ringing
Flashes green in double Hold
Teams button
Off Teams disconnected
Glows white Teams connected
Slowly-flashing white
Receive missed calls/voice mails/Teams connecting
Status and Busylight LED
The status and busylight LED can indicate the charging or call status of the headset.
LED Headset State
Off Power off / idle (not on the base)
Slowly flashes red
Battery < 5% (low battery)
Flashes red and green alternatively
Firmware update
Slowly flashes orange Out of range
Situations related to Charging
Flashes red Battery between 0% and 19%
Flashes green Battery between 20% and 100%
Glows green Battery 100% (full)
Situations related to Calls
Fast flashes red Ringing
Glows red In the call / mute
Flashes red in double Hold
Situations related to Teams
Glows purple Connecting with Teams
Flashes purple Missed call/voice message notification
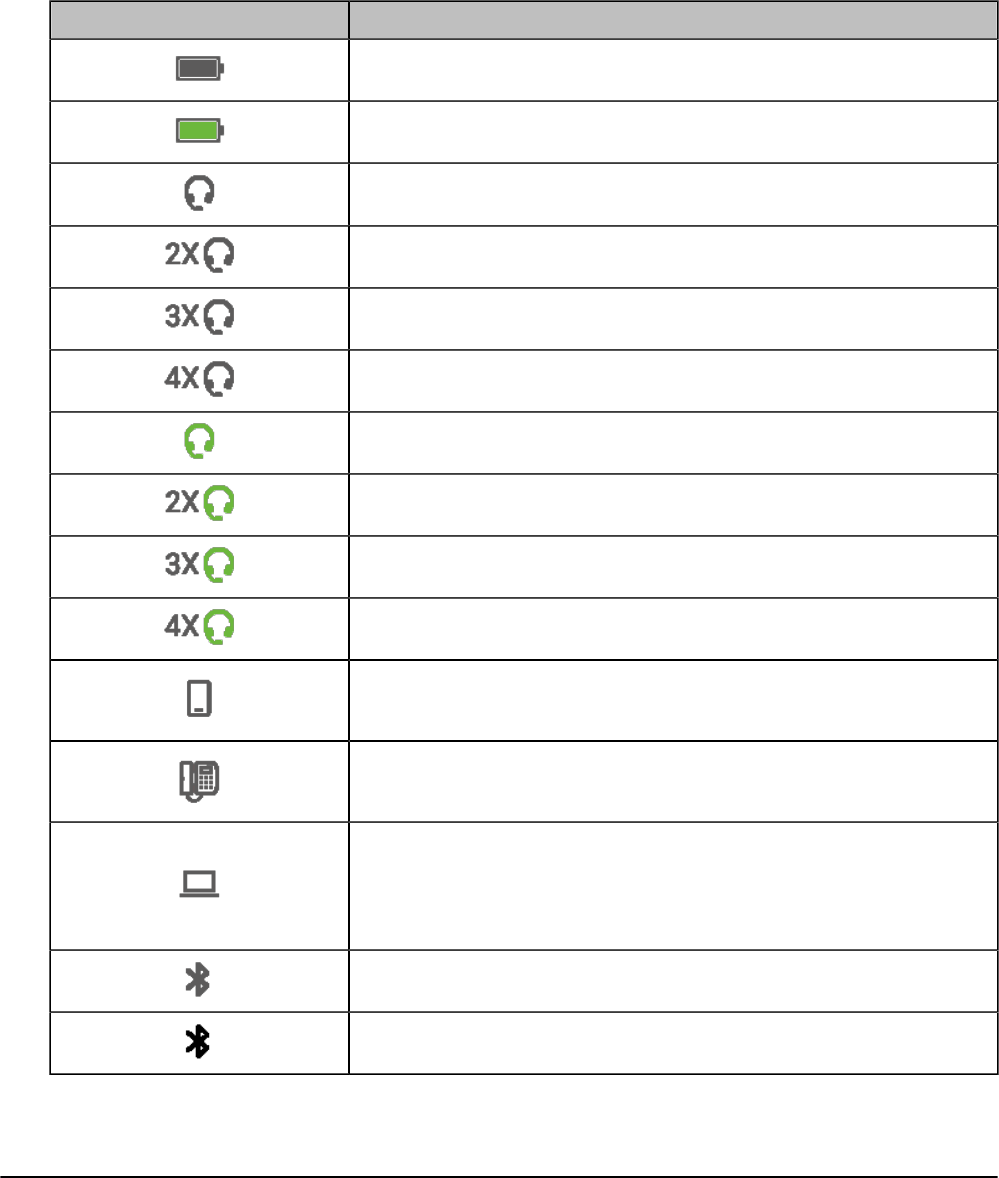
WH66/WH67 Icons and Status Indicators
| How to Use | 33
Icon Description
Battery capacity status
Battery charging status
One headset connected (idle)
Two headsets connected (idle)
Three headsets connected (idle)
Four headsets connected (idle)
One headset in use
Two headsets in conference mode
Three headsets in conference mode
Four headsets in conference mode
Smartphone
Desk phone
PC
Note: When the WH66/WH67 is connected to the desk phone
using USB, the screen displays the PC icon. It does not affect the
performance of the base and phone.
Bluetooth mode is on, but no mobile device is connected
Bluetooth mode is on, and a mobile device is connected
Adjust the Playback Volume

| How to Use | 34
Procedure
1. On the WH66/WH67 base, do one of the following:
• Swipe down from the top of the screen.
Drag the slider to adjust the volume quickly.
• For UC version:
Tap .
Go to Basic Settings > Speaker Volume.
Tap the desired value.
• For Teams version:
Tap or the user account avatar.
Go to Settings > Basic Settings > Speaker Volume.
Tap the desired value.
2. On the WH62/WH66 headset, press the Volume Up/Volume Down button.
3. On the WH63/WH67 headset, slide up or down on the volume control panel.
Note: The playback volume can also be adjusted while you are on a call.
How to Reset to Factory
Resetting configuration clears the list of paired devices and resets all settings.
• Reset Configuration on WH62/WH63 Base
• Reset Configuration on WH66/WH67 Base
Reset Configuration on WH62/WH63 Base
Procedure
Hold the PC button and Phone button for 6 seconds.
Results
The base will reboot and all settings will return to their default values.
Reset Configuration on WH66/WH67 Base

| How to Manage Calls | 35
Procedure
1. Do the following:
• For Teams version:
Tap or the user account avatar.
Go to Settings > Advanced Settings > Reset Configuration.
• For UC version:
Tap .
Go to Advanced Settings > Reset Configuration.
The screen prompts you whether to reset configuration or not.
2. Confirm the action.
Results
The base will reboot and all settings will return to their default values.
How to Manage Calls
• Basic Call Usage on Headset
• Basic Call Usage on WH62/WH63 Base
• Basic Call Usage on WH66/WH67 Base
• Merge Two Calls on WH62/WH63
• Merge Two Calls on WH66/WH67
• Multi-Headset Conference Calls
• Transfer a Call from Desk Phone to Headset
• Transfer a Call from Headset to Desk Phone
• Multiple Calls Handling

| How to Manage Calls | 36
Basic Call Usage on Headset
Headset Function Action
Answer call Press the Call Control button or undock the
headset (determined by the value of "Auto
Answer when undocked").
End call
Press the Call Control button or dock the
headset.
Reject call
Double-press the Call Control button.
Redial Double-press the Call Control button.
Hold/resume call Hold the Call Control button for 2 seconds.
Adjust volume
For WH63/WH67: slide up/down on the volume
control panel.
For WH62/WH66: press the Volume
Up/Volume Down button.
| How to Manage Calls | 37
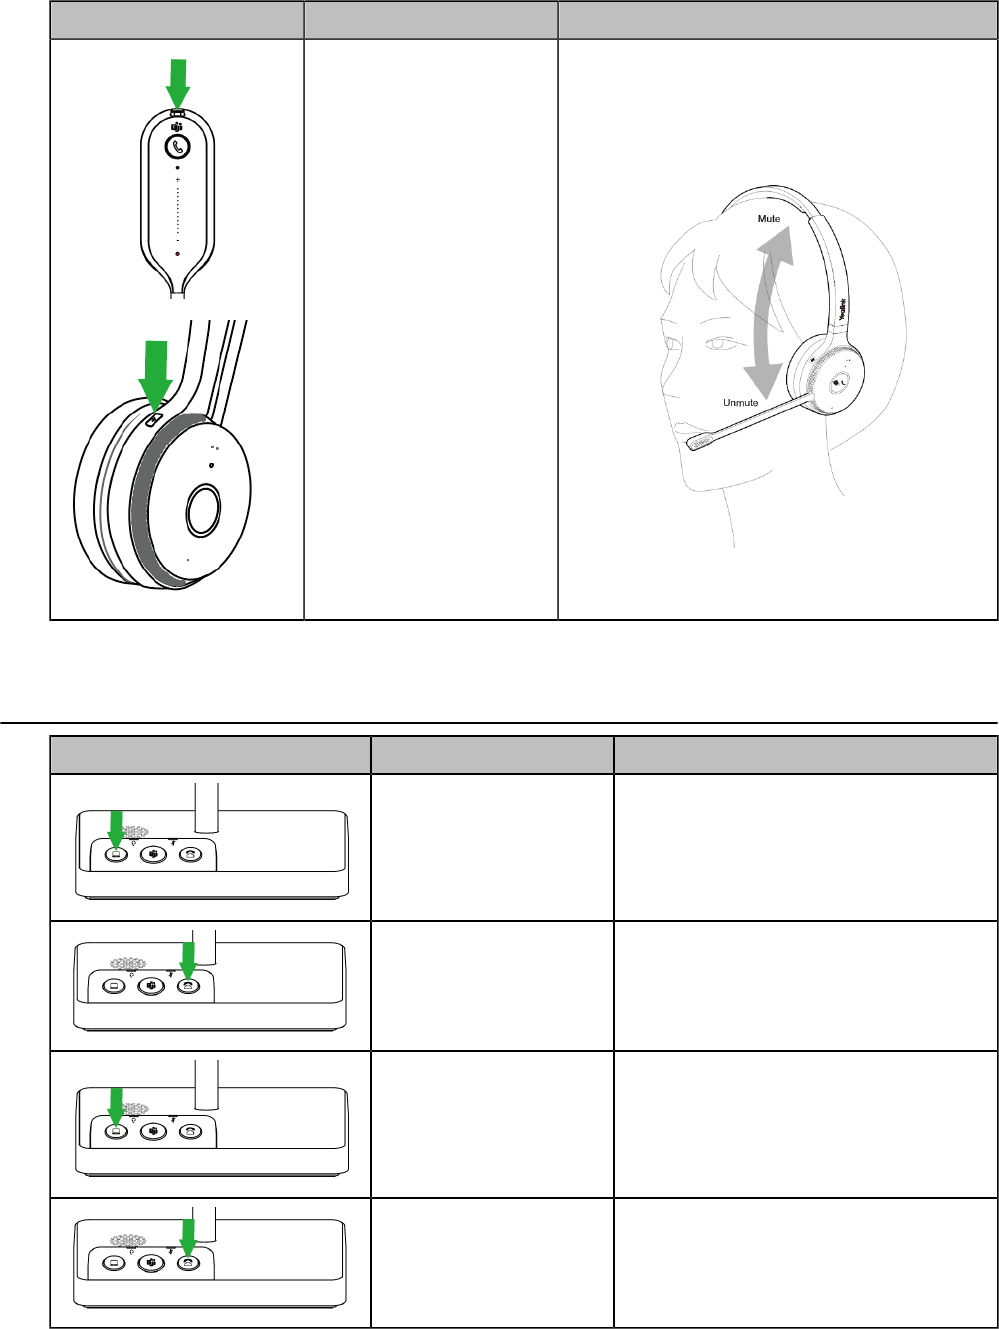
Headset Function Action
Mute/un-mute microphone Press the Mute button.
For WH62/WH66, you can also move the
microphone boom-arm up/down to mute/
unmute.
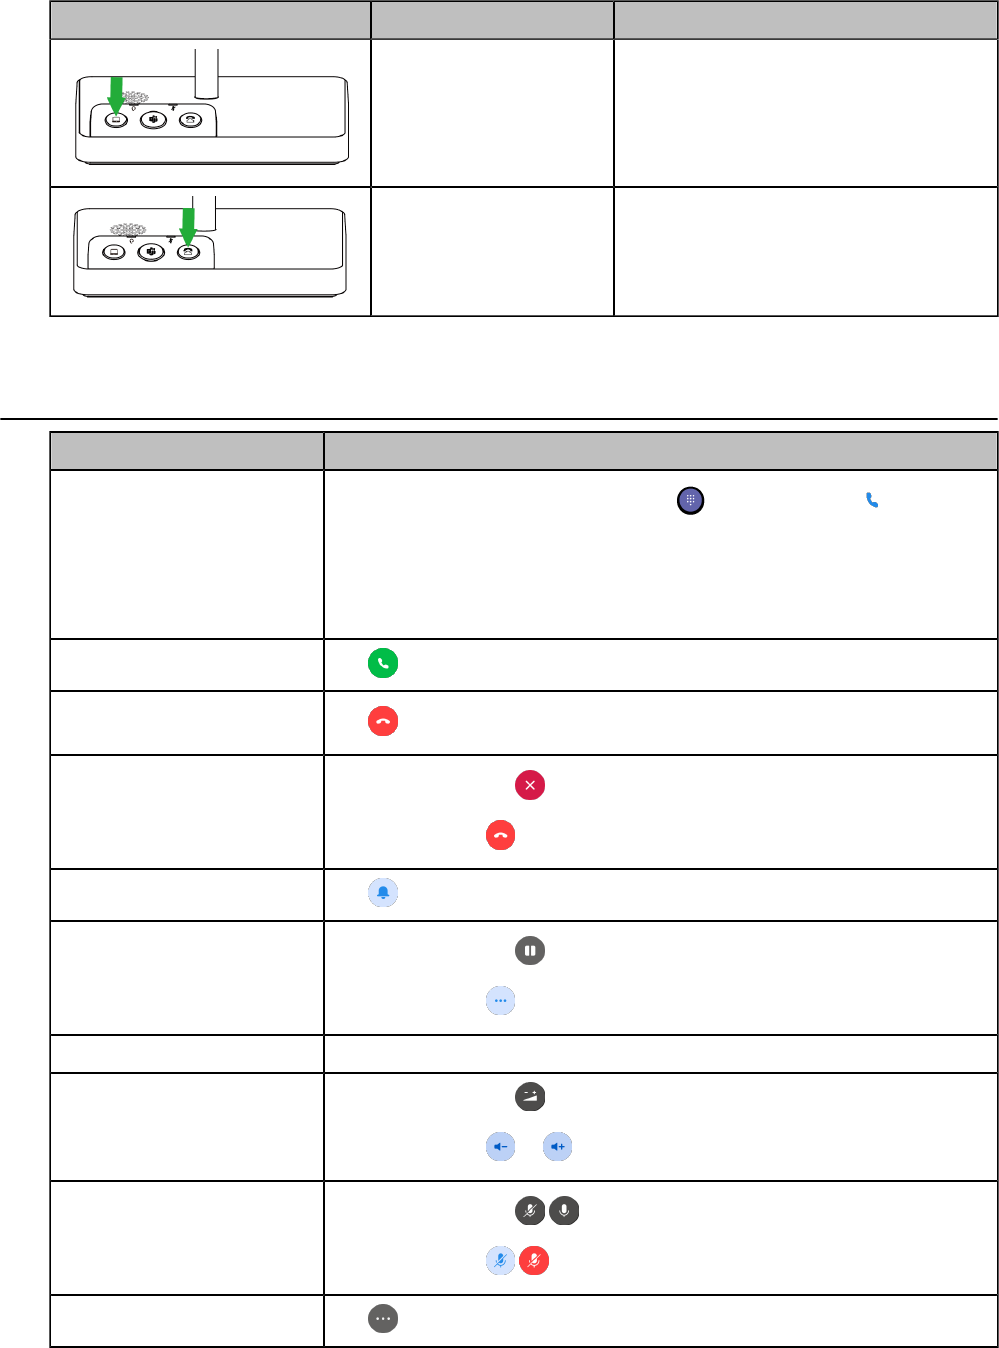
Basic Call Usage on WH62/WH63 Base
WH62/WH63 Base Function Action
Answer/end a softphone's
call
Press the PC button.
Answer/end a desk
phone's call
Press the Phone button.
Reject a softphone's call Double-press the PC button.
Reject a desk phone's
call
Double-press the Phone button.
| How to Manage Calls | 38
WH62/WH63 Base Function Action
Redial a softphone's call Double-press the PC button.
Redial a desk phone's
call
Double-press the Phone button.
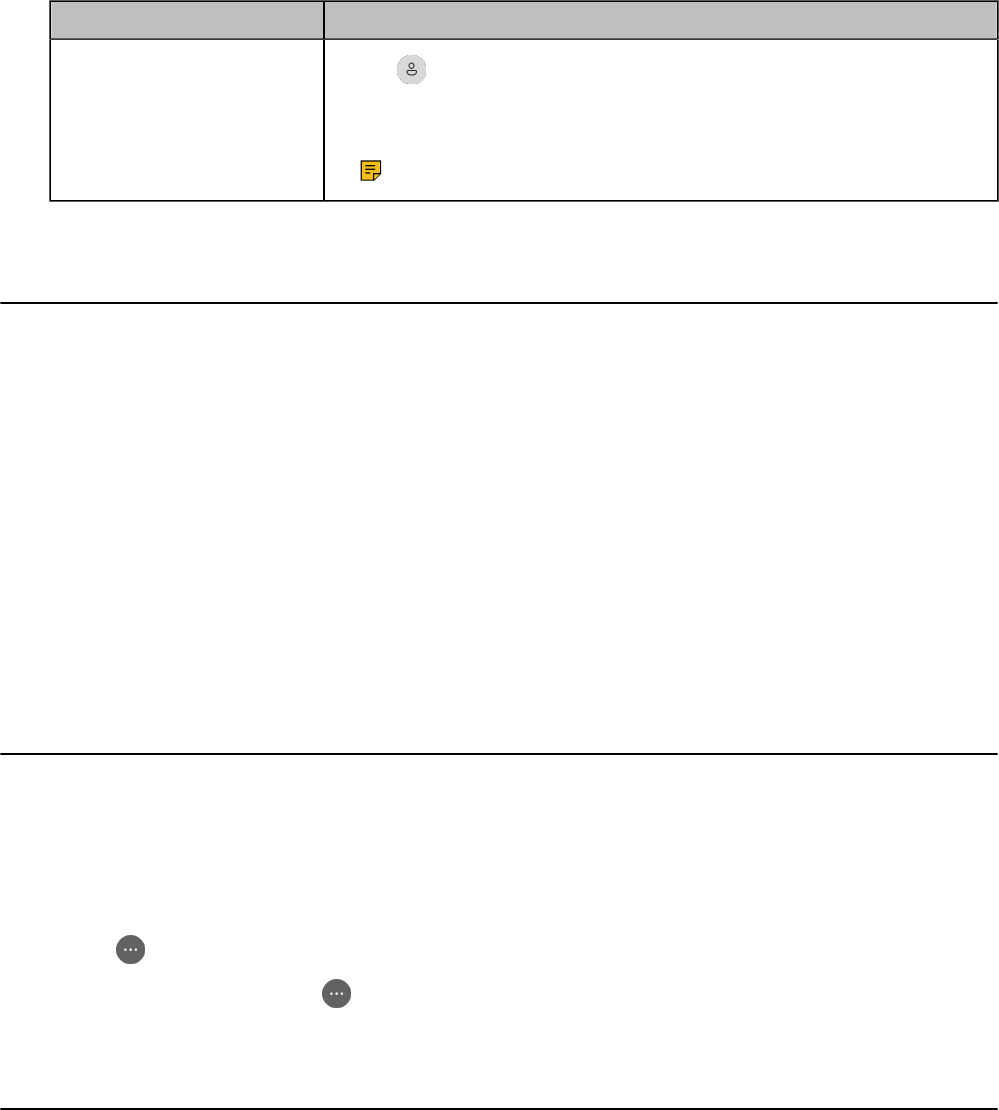
Basic Call Usage on WH66/WH67 Base
Function Action
Place a new call
1.
Tap the connected device CARD or (Teams version)/ (UC
version).
2. Enter the desired number.
3. Select the desired outgoing dialing device.
4. Tap Call.
Answer call
Tap .
End call
Tap .
Reject call
(Teams version) Tap .
(UC version) Tap .
Silence a call (UC version)
Tap .
Hold call
(Teams version) Tap .
(UC version) Tap > Hold.
Resume call Tap Resume.
Adjust volume
(Teams version) Tap and drag the slider.
(UC version) Tap or .
Mute/un-mute microphone
(Teams version) Tap / .
(UC version) Tap / .
Place a new call during a call
Tap > New call.
| How to Manage Calls | 39
Function Action
Redial
1.
Tap or the user account avatar.
2. Tap Redial.
3. Select a device to redial.
Note: It is only available for Teams version.
Merge Two Calls on WH62/WH63
You can merge two calls into one conference call.
Before you begin
• The base is connected to the PC and phone via USB.
• There is an active softphone call and an active phone call on the base.
Procedure
1. Hold the PC button and Phone button for 2 seconds.
Two calls are merged.
2. To split the conference, hold the PC button or Phone button for 2 seconds.
After splitting the conference, the call corresponding to the button is active, and the other one is placed
on hold.
Merge Two Calls on WH66/WH67
You can merge two calls into one conference call.
Before you begin
There are two calls on the base, and one of them is on the connected USB device.
Procedure
1.
Tap > Merge Calls.
2.
To split the conference, tap > Split Conf.
Multi-Headset Conference Calls
• Add Headset(s) During a Call
• Add Headset(s) When the Base is Idle
• End or Leave a Conference Call
Add Headset(s) During a Call
Up to three additional headsets can be connected to one base for conferencing.
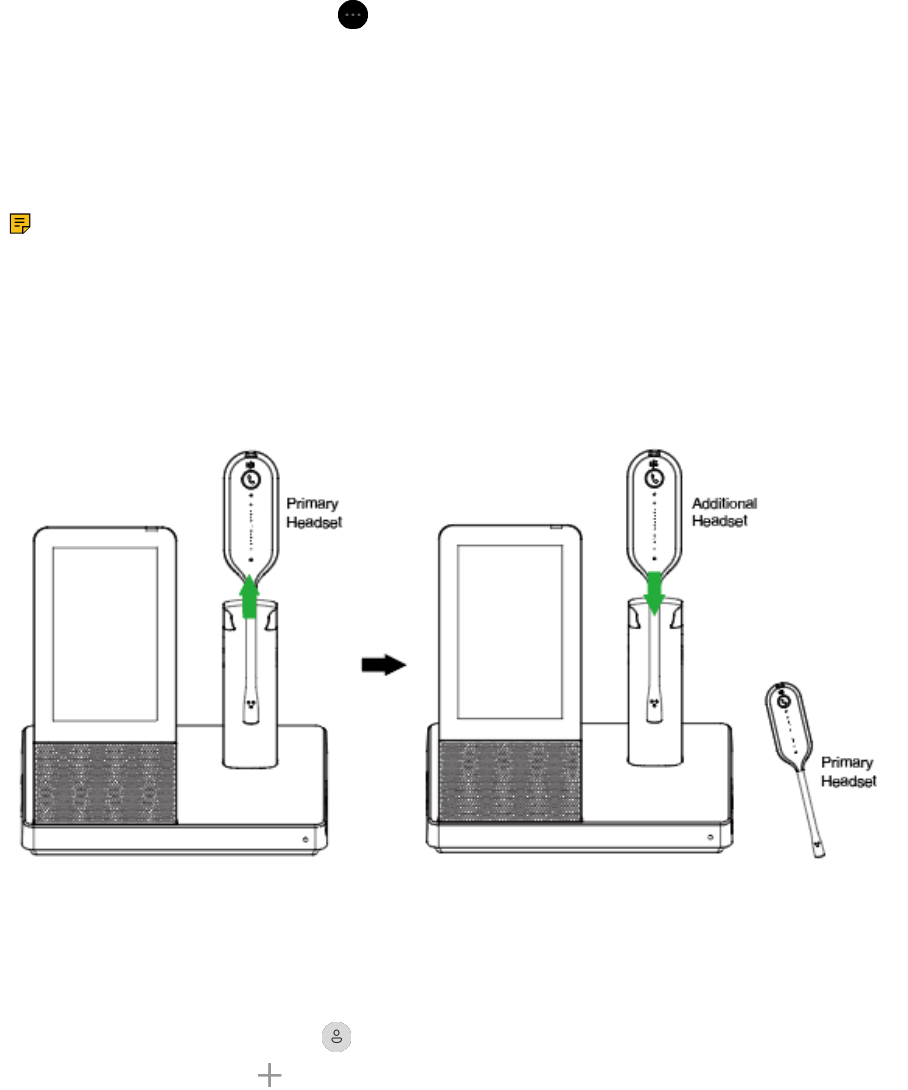
| How to Manage Calls | 40
Procedure
1. Dock an additional headset in the primary headset’s base.
For WH66/WH67, you can also go to > Add Headset.
A tone indication will play in the primary headset.
2. Press the Call Control button on the primary headset to accept the additional headset to the
conference.
The audio will now be shared between headsets.
Additional headsets are muted by default when they pair.
Note: When the call ends, the additional headset will disconnect from the base. Additional
headsets use their own tuning settings while in conferencing mode. You can mute and adjust the
volume in your headset without changing the settings on any other paired headsets.
Add Headset(s) When the Base is Idle
Up to three additional headsets can be connected to one base for conferencing.
About this task
Procedure
1. Undock the primary headset.
2. Dock an additional headset in the primary headset’s base.
For WH66/WH67, you can also tap or the user account avatar, then go to Settings > Basic
Settings > Add Headset > .
3. For WH66/WH67, select As secondary to add the headset as an additional conference headset.
A tone indication will play in the primary headset.

| How to Manage Calls | 41
4. Press the Call Control button on the primary headset to accept the additional headset to the
conference.
Once the call is established by primary headset, the audio will be shared between headsets. When the
call ends, the additional headset will disconnect from the base.
Additional headsets are muted by default when they pair.
Note: Additional headsets use their own tuning settings while in conferencing mode. You can
mute and adjust the volume in your headset without changing the settings on any other paired
headsets.
End or Leave a Conference Call
To end the call for all headsets, press the Call Control button on the primary headset, or dock the primary
headset in the base. Additional headsets can leave the conference by pressing the Call Control button on
the headset. The conference call will continue for all other headsets.
Transfer a Call from Desk Phone to Headset
Before you begin
• The base is connected to the Yealink phone via USB.
• A call is answered on the phone using the handset or speakerphone.
Procedure
1. For WH62/WH63, do one of the following:
• Press the Call Control button on the headset.
• Lift the headset from the base.
If necessary, press the HEADSET key on the desk phone. The audio will transfer from the desk phone
to the headset.
2. For WH66/WH67, press the HEADSET key on the desk phone.
The audio will transfer from the desk phone to the headset.
Transfer a Call from Headset to Desk Phone
Before you begin
• The base is connected to the Yealink phone.
• A call is answered on the headset.
Procedure
Do one of the following on the desk phone:
• Pick up the handset.
• Press the speakerphone key.
The audio will transfer from the headset to the desk phone.
| Yealink USB Connect | 42
Multiple Calls Handling
The headset and base can accept and handle multiple calls at the same time.
Multiple Call Handling Action
End the current call and answer the incoming
call
Press the Call Control button.
Put current call on hold and answer the
incoming call
Hold the Call Control button for 2 seconds.
For WH66/WH67, you can also answer on the base.
Switch between held call and active call
Hold the Call Control button for 2 seconds.
For WH66/WH67, you can also tap (for Teams
version) / tap the held call (for UC version) on the base.
Reject incoming call, while on a current call Double-press the Call Control button.
For WH66/WH67, you can also reject on the base.
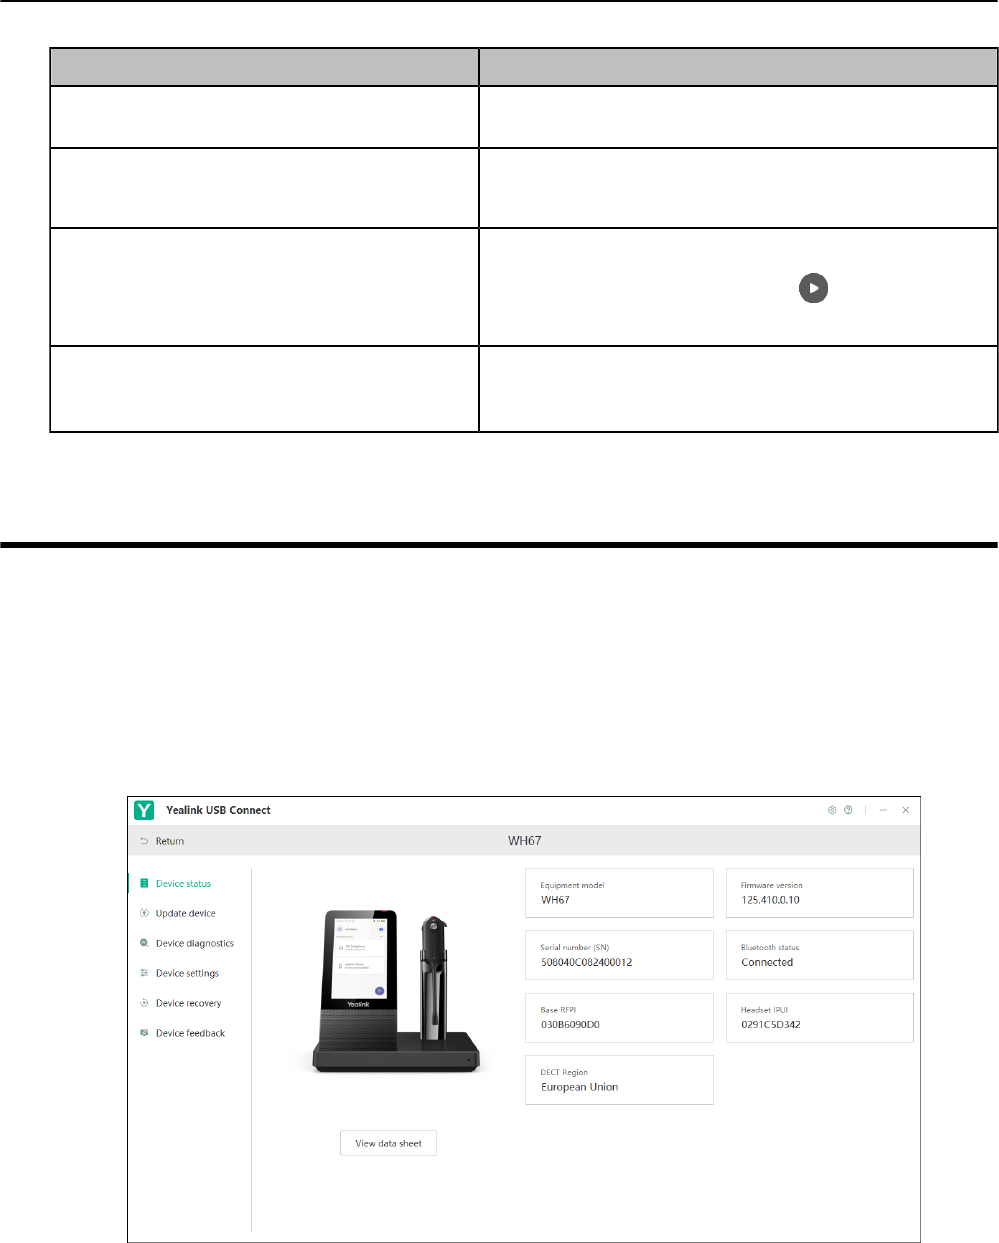
Yealink USB Connect
Yealink USB Connect is a computer software designed to manage Yealink USB devices.
With Yealink USB Connect you can:
• Get an overview of connected Yealink USB devices
• Manage your Yealink USB devices (for example, change basic/advanced settings, BT50 pair
management)
• Update your Yealink USB device to enhance its performance and features
• Give feedback on your Yealink USB device
• Manually Pair the Base with the BT50

| Yealink USB Connect | 43
• Download and Install
• Update Firmware
Manually Pair the Base with the BT50
Before you begin
Make sure that the base is in the Bluetooth pairing mode or is connected to the same PC with BT50.
Procedure
1. Select BT50 device CARD.
2. Click Pair Management.
3.
In the Pairable devices List field, click to search the pairable device.
4. Find the desired device and click Start pairing.
For more information on Yealink USB Connect, refer to Yealink USB Device Manager Client User Guide.
Download and Install
Before you begin
Connect the base to your PC.
Procedure
1. If it is the first time to connect the base to your PC, the PC prompts you as shown below:

| Yealink USB Connect | 44
2. Click the prompt box and run the program.
3. Download the Yealink USB Connect on the web page.
If the prompt box disappears, you can double-click the CD drive: USB Connect in the devices and
drives list.
Download the Yealink USB Connect on the web page.
Note: If it detects that Yealink USB Connect has been installed after connecting, Yealink USB
Connect will automatically run.
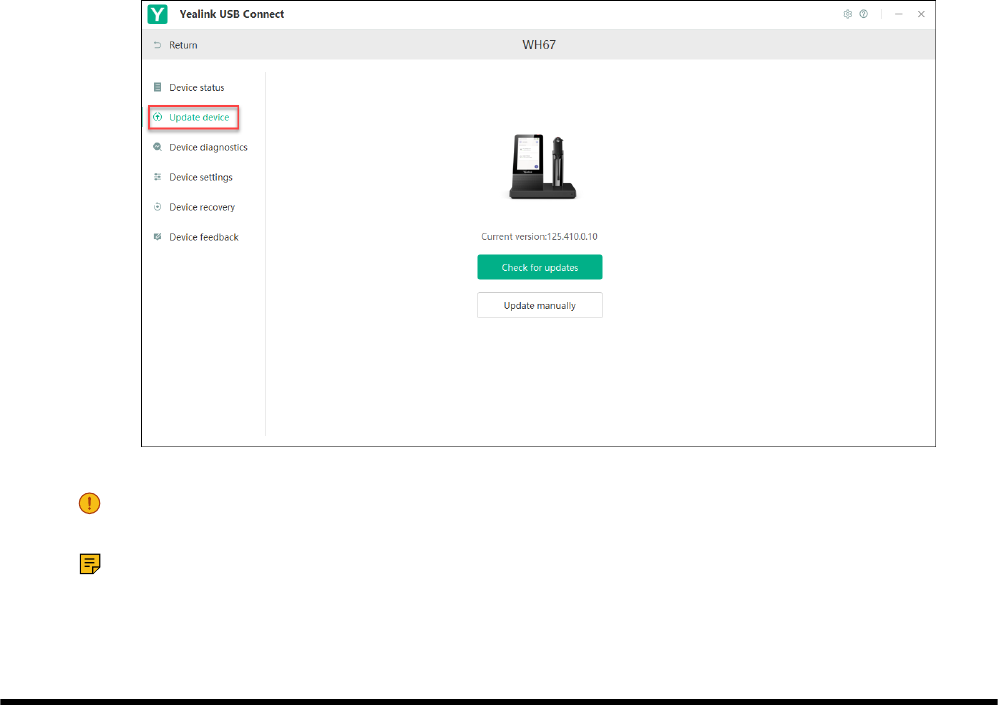
Update Firmware
| How to Change Settings on WH62/WH63 | 45
Procedure
1. Connect the base to the power supply and PC.
2. Dock the headset in a base.
3. Update the base firmware via Yealink USB Connect.
• Check for updates
• Update manually
For more information on Yealink USB Connect, refer to Yealink USB Device Manager Client User Guide.
Important: You need to connect the PC to the micro USB port of the headset marked with the
text "PC".
Note: Do not undock the headset or power off the base during the upgrade, otherwise the
headset upgrade will fail. You can dock the headset in a base to upgrade again.
How to Change Settings on WH62/WH63
Headset, base, and general settings can be changed via Yealink USB Connect.
| How to Change Settings on WH66/WH67 | 46
Related information
Yealink USB Connect
How to Change Settings on WH66/WH67
Headset, base, and general settings can be changed on the WH66/WH67 base.
• Change the Default Outgoing Dialer Device
• Change the Default Media Playback Device
• Basic Settings
• Advanced Settings
Change the Default Outgoing Dialer Device
When there are multiple devices connected to the base, you can select the default outgoing dialer device.
Procedure
1.
Tap on the idle screen.
2. Do the following:
• For Teams version:
Tap the desired outgoing dialer device.
• For UC version:
Tap Selected as audio device.
Change the Default Media Playback Device
When there are multiple devices connected to the base, you can change the default music playback device.
| How to Change Settings on WH66/WH67 | 47
Procedure
1.
Tap on the idle screen.
2. Do the following:
• For Teams version:
Tap the desired media playback device.
• For UC version:
Tap Selected as playback device when two Bluetooth devices are connected.
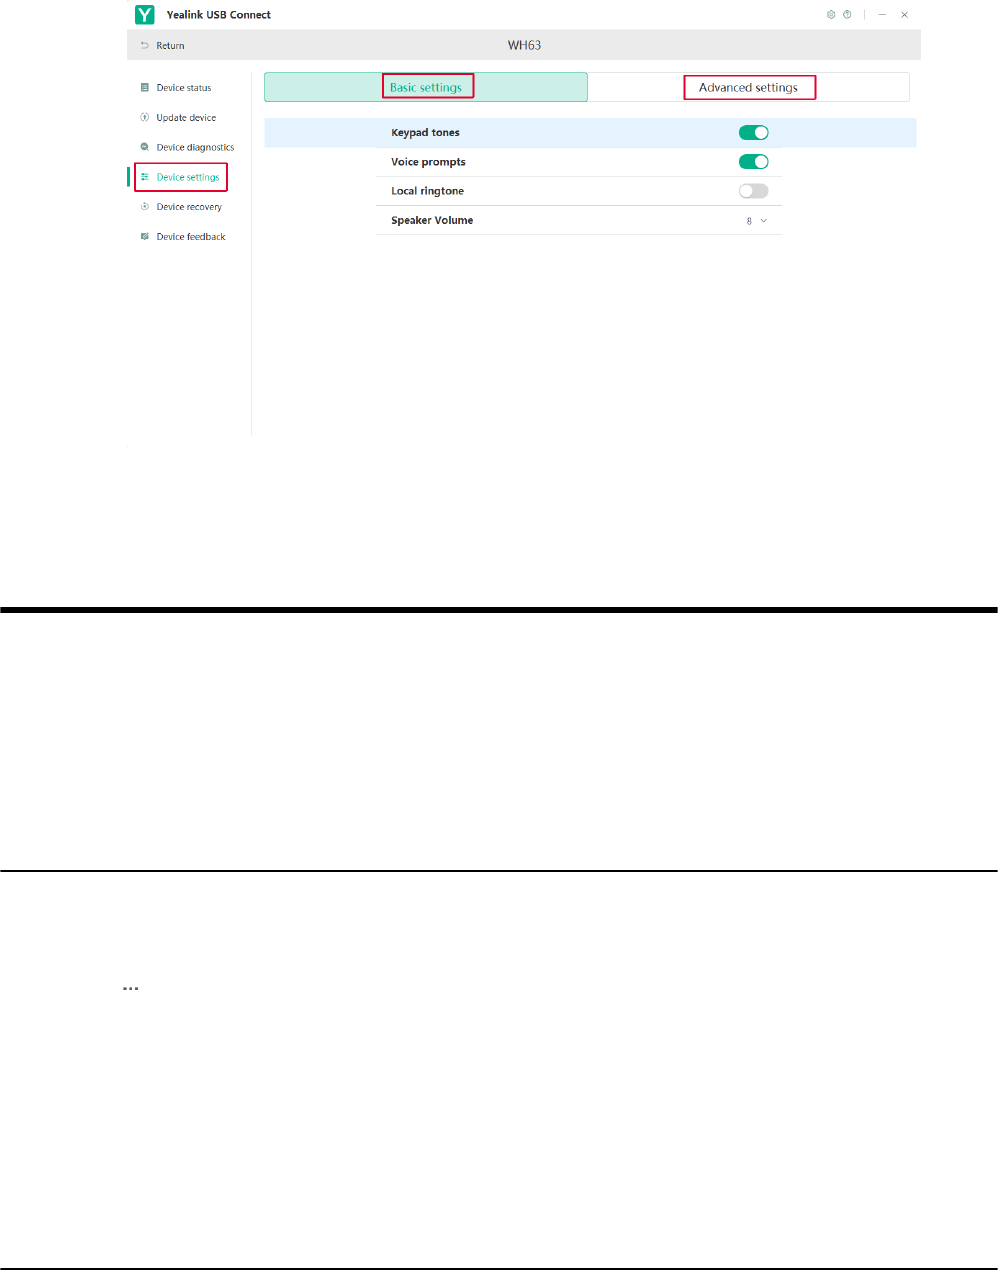
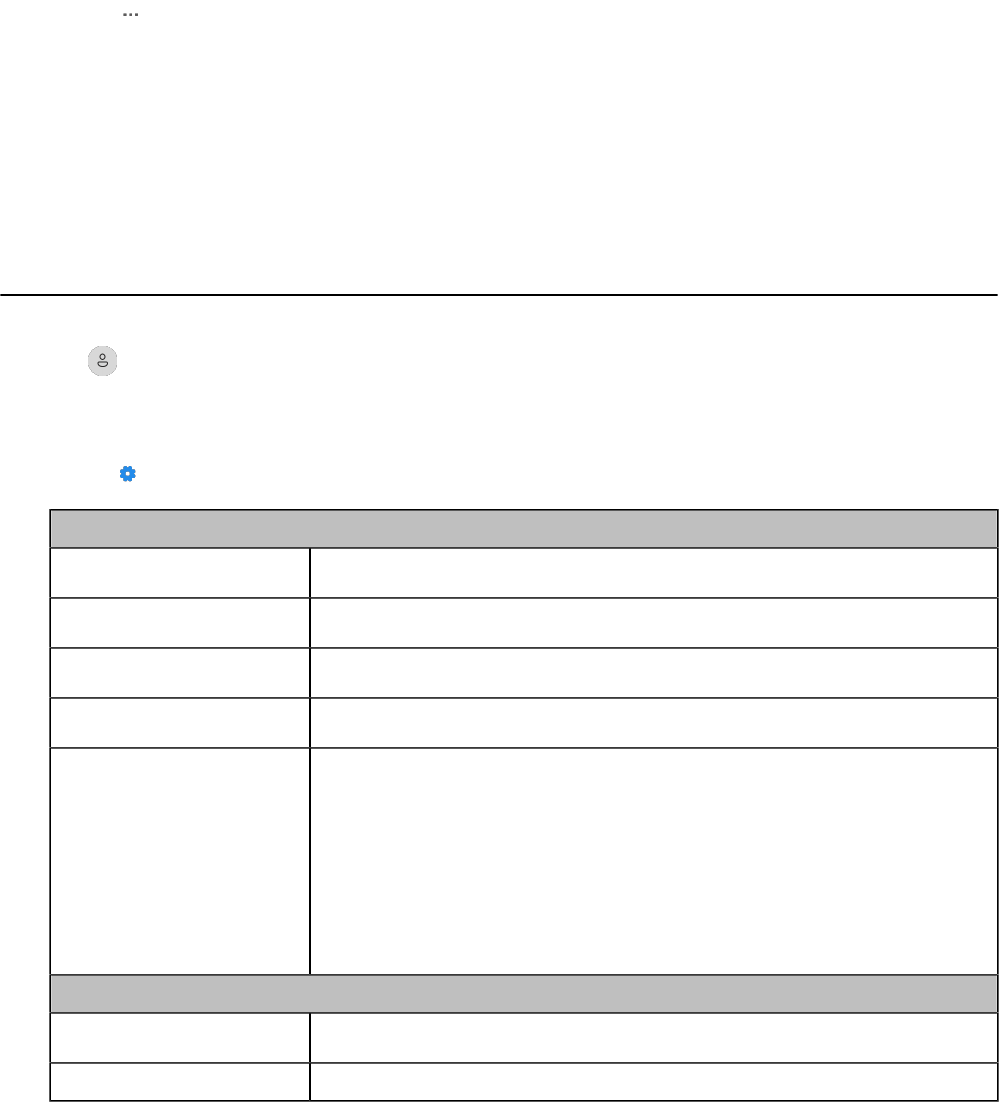
Basic Settings
For Teams version:
Tap or the user account avatar, and go to Settings > Basic Settings to access the basic settings
menu.
For UC version:
Go to > Basic Settings to access the basic settings menu.
General Settings
Language
Select the screen text language from a list of 13 languages.
Bluetooth Enable/disable the Bluetooth.
Add Headset
Add additional headsets to the base.
Time&Date Set the time and date manually.
Busylight
Set the busylight status or turn off the busylight.
• Sync (the status depends on the softphone Presence status)
• Available (LED glows green when the device is not in a call or not
ringing)
• DND (LED glows red when the device is not in a call or not ringing)
• Off (LED is off)
Note: It appears only when you connect the Busylight BLT60 to the base.
Display Settings
Backlight
Set the backlight active level and backlight time.
Screensaver Change the waiting time for the screen saver.
| How to Change Settings on WH66/WH67 | 48
Teams User Name Configure whether the Teams user name displays on the home screen
when the device disconnects with PC.
• Personal Mode (default): Display the Teams user name when the device
disconnects with PC.
• Hot Desking Mode: Do not display the Teams user name when the
device disconnects with PC.
Note: It is only available for Teams version.
Dark Theme Turn on/off dark theme.
The dark theme changes the default bright background color to a darker
color, which is easier on the eyes in low-light environments or if you prefer
less bright screens.
Note: It is only available for Teams version.
Themes Change the background and card style.
Note: It is only available for UC version.
Sound Settings
Ring Tones
Enable/disable the base to play a built-in tone while receiving an incoming
call.
Dial Tone Enable/disable the paired headset to play a dial tone when entering the
dialing screen.
Keypad Tone Enable/disable the paired headset to produce a sound when pressing the
keypad keys.
Speaker Volume Adjust the playback volume.
Related tasks
Use the Busylight BLT60
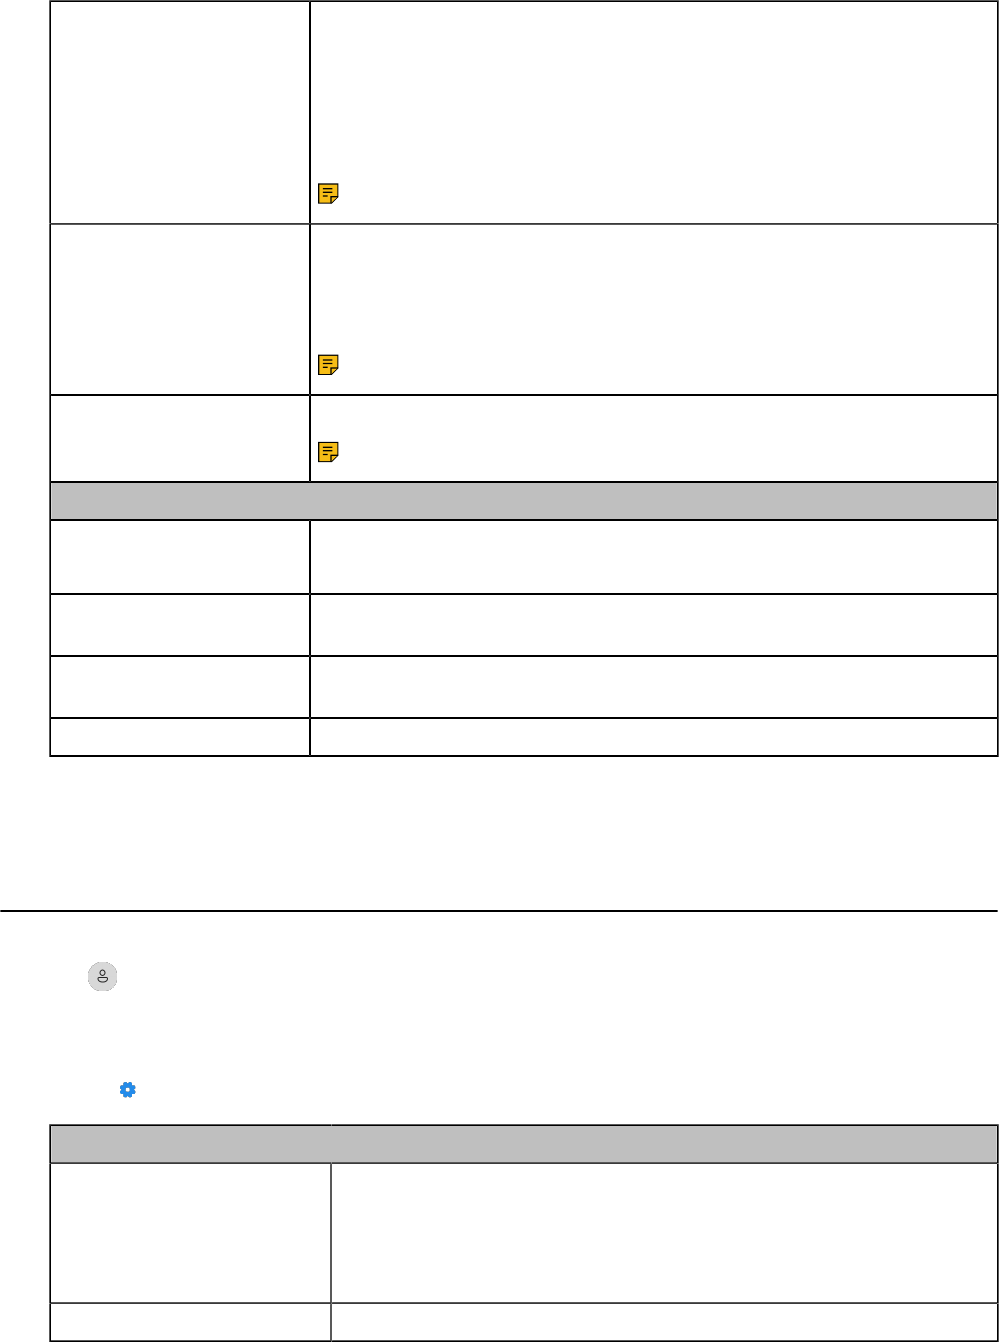
Advanced Settings
For Teams version:
Tap or the user account avatar, and go to Settings > Advanced Settings to access the advanced
settings menu.
For UC version:
Go to > Settings > Advanced Settings to access the basic settings menu.
General Settings
Wireless Range
Select the wireless range between the headset and base.
• Long: the wireless range is 150m.
• Medium: the wireless range is 30m.
• Short: the wireless range is 10m.
Voice Announcements Enable/disable the paired headset to play voice announcements.

| Optional Accessories | 49
Mute Reminder Enable/disable the paired headset to play a periodic audio reminder when
the microphone is muted.
Platform Change the platform between UC and Teams.
Calling Settings
Auto Dial Enable/disable the base to automatically dial the entered number within 5
seconds.
Call Device Select which device to use for outgoing call.
Note: It is only available for UC version.
Call Priority
Select which call takes priority when a second call is accepted.
• New call: The first call is placed on hold and the new call is active.
• Current call: The first call is active and the new call is placed on hold.
Auto Answer when Undocked Enable/disable incoming calls to be answered by undocking the headset.
Open Line when Undocked Enable/disable to enter the dialing screen when undocking the headset.
Hearing Protection Settings
Anti-Startle Protection Configure which hearing protection technology to be used.
Daily Noise Exposure Configure the daily noise exposure levels.
Optional Accessories
The base can use optional accessories when you need to extend your base's capabilities.
The following optional accessories need to be purchased separately if required for your base:
1. Busylight BLT60
2. BT50 (only for WH66/WH67 base)
3. Wireless charger WHC60 (only for WH66/WH67 base)
• Use the Busylight BLT60
• Charge the Mobile Phone on WH66/WH67 Base
Related information
Connecting to PC/Smartphone via Bluetooth
Use the Busylight BLT60
The busylight can alert you to the status of the phone or softphone. It can only display the Presence status
of one device. If multiple devices are connected, please set the device that needs to display the Presence
status as the default audio device or outgoing dialer device.
About this task
LED States Description
Presence Status (only for WH66/WH67, sync status requires softphone support)
| Optional Accessories | 50
LED States Description
LED glows green Available
LED glows orange Away
LED glows red DND/Busy
LED off Turn off the busylight, softphone does not support
Talking Status
LED fast flashes red Ringing
LED glows red In a call
LED slowly flashes green Missed call/voice message notification (this requires softphone
support)
LED off Softphone/phone does not support, turn off the busylight
Related information
Basic Settings
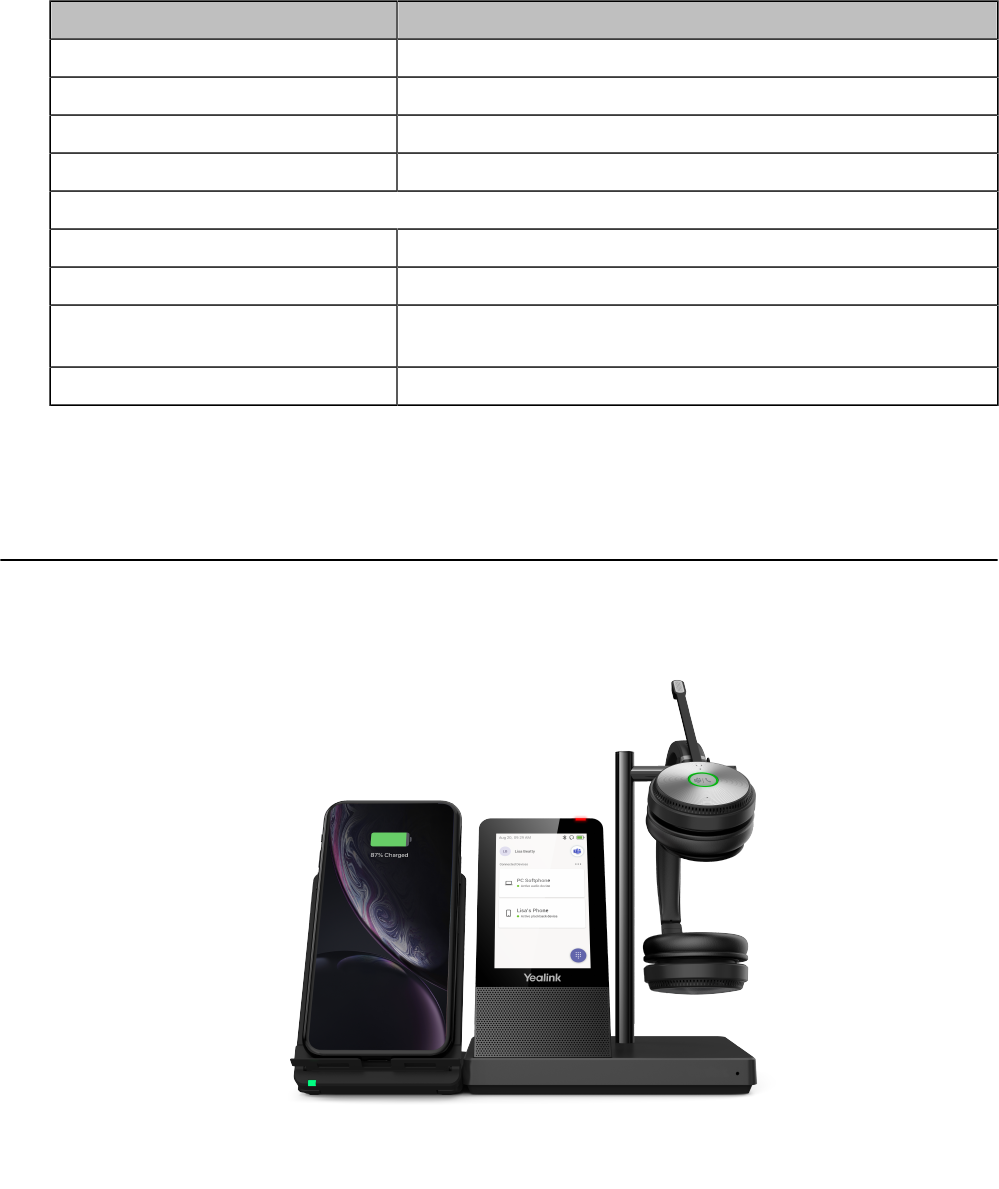
Charge the Mobile Phone on WH66/WH67 Base
If your mobile phone support wireless charging, you can charge it using the Yealink-supplied wireless
charger WHC60.
Procedure
1. Connect the wireless charger to the base directly.

| Support | 51
2. Place the mobile phone on the wireless charger.
Note: You can also connect the wireless charger to the USB charger adapter via a USB Type-C
cable.
Support
• FAQ
• Safety Instructions
FAQ
View the FAQ guide on http://support.yealink.com/.
Safety Instructions
• Storage temperature: +23 to 113°F (-5 to 45°C).
Charging temperature: +32 to 104°F (0 to 40°C)
• Do not store the headset for extended periods of time without recharging the battery (max. three
months).
• If the headset or base becomes dirty, we recommend that you clean them with a soft, lint-free cloth that
has been dampened with clean water.
