
How to create a custom shaped mat board using Illustrator and Photoshop, and Glowforge
1. In Illustrator, create a cut rectangle (stroke, no ll) in the size of the mat board you want. In this example I’m
using 2” x 3” for demonstration purposes.
2. Create the shape (stroke, no ll) of the desired opening for your photo, and place it within the cut rectangle
where you want it. Here I’m using an oval.
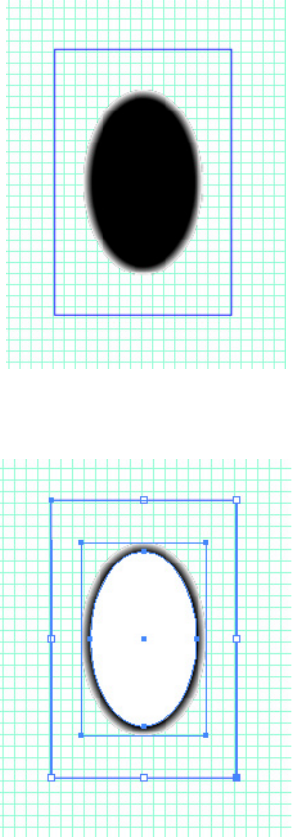
3. Choose the mat shape (oval) then select Object...Path...Oset Path. For oset, use the width you want the
bevel to be. I used 0.1 inch.
4. Make a duplicate of the inner oval and drag it to the side, to use later.
5. Change the color of the inner oval to black (RGB 0,0,0) ll, no stroke. Change the color of the outer oval to
white (RGB 255,255,255), no stroke.
6. Select both ovals. Using the Blend tool (keystroke w to select it), click on a point on one oval then on a cor-
responding point on the other oval. You will get a blend that is a smooth transition in greys from one oval to

the other. If the transition is not smooth, you may need to go to Object...Blend...Blend Options, and change the
spacing to Smooth Color.
6A. If you have a complex shape, you may get unusual blend artifacts like those shown here:
is may be due to one or both of two things:
--Possibly the path direction of one of the gures is the opposite of the other. If so, you may be able to improve
the blend by selecting one of the gures and doing a vertical reection of itself (this only works if the gure is
symmetrical).
--I found that I got strange blends if the number of anchor points of the two gures you are blending is dierent.
You can see in the gothic window blend above that the outer oset path has four additional anchor points. I was
able to delete the additional anchor points with the Delete Anchor Point tool. If you do this, it is helpful to place
a duplicate of the outer gure behind (with a bright pink stroke so you can see the contrast), then with the direct
selection tool drag the path where you deleted the anchor point until it matches the original prole.

--Repeat for all the extra anchor points. Remove the pink outline then redo the blend. Looks much better now:
7. Back to the oval: Now you need to knock out the center of the oval so it is transparent and you are le with
just a black to white blend on the edges. ere are two ways to do this.
7A. Easiest way is to use Photoshop. Make a copy of the extra inner oval, ll it with white, no stroke, and center
it over the blend. Select the blend plus the extra oval, copy, go to Photoshop...New (I make my new document
300dpi) with Background Contents as Transparent, and paste as pixels. Using the Magic Wand Tool with a toler-
ance of 1, select the inner white area and delete. Save the result as PNG.
Illustrator Photoshop
Go back to Illustrator, delete your blend plus white oval, and place the new PNG in its place, centered in the cut
rectangle. Resume with Step 8.
7B. If you don’t have Photoshop and want to do this all in Illustrator, there is a way but it’s a bit complicated.
Here are the steps:
a. Select the blend and choose Object...Rasterize with the options High (300dpi) and Background Trans-
parent.
b. Make a copy of the extra inner oval, ll with white and no stroke, and center it over the rasterized
bland.
c. With the rasterized blend and the white oval (but not the outer cutting rectangle), open the Transpar-
ency panel and from its menu choose Make Opacity Mask. Make sure Clip is unchecked and Invert Mask is
checked.

d. Do not deselect anything. Go to Object...Rasterize with the same settings you chose before.
e appearance of the blend won’t change much if at all but the Transparency panel should show that now you
are looking at a simple raster (if you don’t do the second Rasterize, the Glowforge UI can’t import the le). Pro-
ceed to Step 8.
8. Drag the remaining vector copy (should be stroked with a dierent color from the rectangle, with no ll) of
the inner oval over your image, and center it all. is vector will be for cutting or scoring around the engraved
edge of your mat board to neaten things up at the end. Save all as SVG and send to Glowforge. Engrave the
blend rst, then score or cut the inner oval, then cut the outer rectangle.
