
InDesign
your
Resumé
a how-to guide for
creating a professional
resumé using InDesign

3
InDesign your Resumé
Table of Contents
p4. Glossary
p5. The Importance of Good Design
p6. Setting up the Document
p10. Creating a Grid
p12. Pasting in Content
p14. Styling the Content
p20. Finalizing and Exporting
p22. Dos and Don’ts
p24. Further Resources

4 5
InDesign your Resumé The Importance of Good Design
Glossary
→ Boilerplate: standardized text; a
document that contains complete
resumé content
→ Decorative: fonts that are ornate
and less neutral, such as Papyrus
→ Full-bleed: the page is trimmed so
that some things go off the edge,
instead of having a margin around
the page
→ Grid: system that text-based
designs align to
→ Gutter: space between guides
→ Hard-return: line break created by
pressing Enter. Used to separate
paragraphs.
→ Hierarchy: a typographical system
that defines and differentiate
between levels of text
→ InDesign: program used for
creating layouts with lots of text
→ Kerning: the space between two
characters
→ Leading: the space between each
line of text. Make sure it’s not too
loose or too tight
→ Margin: the white space around a
page or shape
→ PDF: file format that anyone can
open, no matter the operating
system. Good file format for saving
resumés
→ Rule: a line used as a decorative
element or as a way to separate
information
→ Sans serif: font without the small
flourishes on the edge of the
character, such as Arial
→ Serif: font with small flourishes on
the edge of the character, such as
Times New Roman
→ Soft-return: line break created
by pressing Shift + Enter. Used
to separate lines of text within a
paragraph.
→ Tracking: the space between each
character in a word
→ Typography: technique of arranging
text to make content legible,
readable, and appealing when
displayed
→ Weight: different styles of a font,
ie. light, bold, italic
The Importance
of Good Design
→ Like it or not, the resumé is the first
impression an employer has of you as an artist
and as a professional. Potential employers will
likely spend an average of 10 seconds on your
resumé. It must be clear and organized, so that
it is easy to pick out important information
at a glance.
Consider your audience—depending on the
industry standard of your profession or major,
you may or may not need to design your
resumé. Check with Career Development if
you are not sure.
Prior to designing your resumé, you should
have a boilerplate text document that contains
all of your experience in one place. The type
of job you are applying for determines which
experiences will be included on your resumé. If
you do not have your resumé built, please refer
to Career Development’s “Building Your Resumé”
handout (see p24).
This is also a good opportunity to spell check
and have your content reviewed by at least one
other person. A good place to do this is during
Career Development’s Drop-In Hours, or in an
appointment with a Peer Career Advisor.

6 7
InDesign your Resumé Setting up the Document
step 01
Setting up the Document
→ First and foremost, after you open InDesign,
navigate to the InDesign tab in the top menu
bar and go to Preferences → Units & Increments.
Here, you can adjust the settings under Ruler
Units from picas to inches. This will make setting
up the document much less confusing.
Next, you need to set up the document.
Under the File tab in the top menu bar go to
New → Document. This is where you set up the
formatting for your document. Make sure the
number of pages is set to 1, and facing pages
is unchecked. The page size should be Letter,
or 8.5”x11”.

8 9
InDesign your Resumé Setting up the Document
Margins refer to the distance between the
content of the document and the edge of the
page. Try to keep your margins between half
an inch and an inch. In the New Document
dialogue, make sure the margins are set to
the desired size.
Columns are another way to organize the page.
Using two columns is a good way to start, with
around 0.5 inch gutter.
You don’t need to worry about changing any
of the other settings in this dialogue. When
you are done, press OK, and you should have
the beginnings of your resumé created!
Tip: Once your page is created, navigate to the Window tab in the top menu bar, then go
to Workspace → [Typography]. This will rearrange the toolbars so that it will be easier
to adjust text.
10 11
InDesign your Resumé
step 02
Creating a Grid
Creating a Grid
→ Working with a grid is a technique that you
should employ whenever working with text. Grids
ensure that your content will look neat and
organized, making your resumé easier to read.
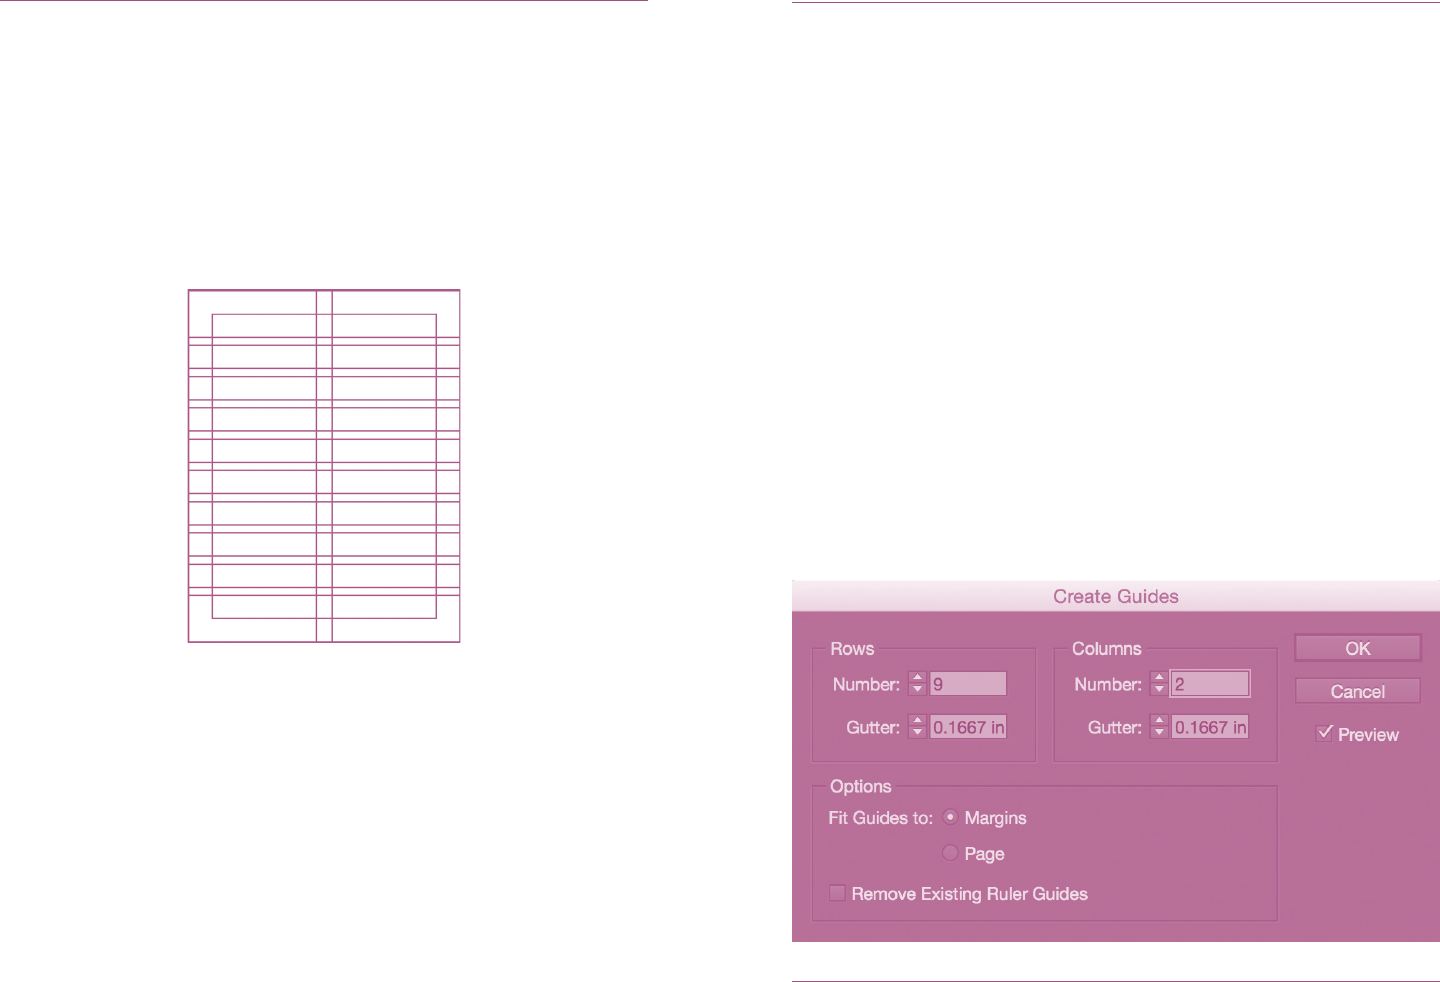
To create a grid, navigate to the top menu and
go to Layout → Create Guides. Once you are in
the Create Guides dialogue, you can adjust the
amount of rows and columns as needed. A good
setting to use is 9 rows with a gutter of 0.1667
in. You may have created columns when setting
up the document, but you can add more here
if desired. After setting the amount of columns
and rows, under the Options section ensure the
guides fit to the margins, not the page. Press OK.
Tip: Guides won’t show up when you export or print your document. To preview your document
without guides, press W on your keyboard.

12 13
InDesign your Resumé
step 03
Pasting in Content
Pasting in Content
Tip: Text can be connected between columns. If the text gets cut off in a column, a little red
square with an X will appear. To link the runoff text to another column, click the red x, and
then click the column. The text should now continue into the next column.
→ Use the text tool for creating boxes to paste
your text into. The text tool is located on the left
toolbar, and looks like a capital T. To create text
boxes, select the text tool then click and drag
with your mouse. It’s good to start with three
text boxes: one long box at the top for your
header (name, contact info, title), and two tall
boxes for your sections. Make sure that each box
aligns with the grid.
After creating your text boxes, select the desired
text box, and paste in the appropriate content
from your boilerplate document. You can paste
by navigating to the top menu bar, then select
Edit → Paste. You can also right click within a
textbox and paste from there.

14 15
InDesign your Resumé
step 04
Styling the Content
Styling the Content
→ Typography is one of the most important
aspects of a resumé. If your typography isn’t
well-considered, it can make your entire resumé
look unprofessional.
Hierarchy refers to the different levels of
typography within a document. There should
be one element that has the highest level
of hierarchy. Usually this is a title, name, or
heading. The next level of hierarchy is typically
a section title. Body text tends to be the lowest
level of hierarchy.
Most resumés consist of a few levels of
hierarchy, such as a main header (your name)
a sub header (contact info), section titles
(education, experience, etc.), position title
(intern, artist, contractor, etc.), company,
location/date and a body (description).
Tip: When dening levels of hierarchy, follow the rule “distinctly different or exactly the
same.” It is important to create contrast when working with type because too subtle shifts in
contrast can appear like a mistake.

16 17
InDesign your Resumé
A well-designed resumé can be created with just
one font. The key to creating hierarchy with one
font is to use contrasting weights and sizes. For
example, use a larger, bolder font for headers,
and a smaller, lighter font for body copy.
Everyone has different tastes in fonts. The trick
is to keep it professional. Avoid using decorative
fonts like Comic Sans or Papyrus that distract
from the information that really matters.
To adjust fonts in InDesign, highlight the text
you want to change, and click on the Character
menu in the right toolbar. Here, you can adjust
the font, font weight, size, leading, and more.
One of the major mistakes people make when
designing resumés is making their text too big.
Body text can usually be read comfortably at 8pt,
and should never be larger than 10.5pt. Sizing
will always depend on which font you choose,
but a good starting point for body text is 9pt.
Tip: When working with text, turn on Hidden Characters, so you can easily see where you’ve
inserted spaces, soft returns and hard returns. You can do this by navigating to Type in the top
menu, and go all the way to the bottom where it says Show Hidden Characters.
Using adequate spacing throughout your resumé
will ensure that all of your information reads
clearly and legibly. The spacing between lines
of text is called leading. More often than not,
the default leading will be too tight, so it is
important to make the adjustment yourself. To
do this, go to the Character menu (the same
menu where you adjusted the text font and size).
You can adjust the leading using the arrows next
to the two As stacked up next to each other.
Something else that is important to adjust is the
space between paragraphs. Instead of creating
extra line breaks between sections, you can have
more control by setting the specific spacing
before or after paragraphs. To do this, navigate
to the Paragraph menu on the right toolbar.
You can adjust the paragraph spacing using the
arrows next to the icons depicting a paragraph
with the top or bottom line highlighted.
Styling the Content
Tip: Made a mistake? Press Command + Z on your keyboard to quickly undo. To redo,
press Shift + Command + Z.

18 19
InDesign your Resumé
Using paragraph styles is a shortcut to styling
complete pages of text all at once. Creating
paragraph styles can be tedious, but can save
you so much time and energy.
You can set your paragraph styles by navigating
to the right toolbar and simply opening up the
Paragraph Styles menu. Once here, click on the
icon that looks like a piece of paper to create
new styles.
You should create a new style for each level of
your typographic hierarchy: Heading, Section
Titles, Position, Date/Location, and Body. Do
not worry about make any adjustments to these
styles just yet.
Tip: You can also create Character Styles if you want to change styling within a paragraphs,
like when you want to bold something or have stylized numbers.
Once you have the styles created, go through
your document and change each level of
hierarchy from the default paragraph style
([Basic Paragraph]) to the styles that you just
created. To do this, highlight the text that you
want to set, then navigate to the Paragraph
Styles menu, hold down the ALT key, and click
on the appropriate style. Holding down on the
ALT key ensures that you override any previous
styles applied to the text. Go through your
document and set all of the text, one level of
hierarchy at a time.
When your text is set to its specific paragraph
style, you can adjust the styling. Double-click
on the paragraph style, and you can adjust
everything mentioned previously in the guide. If
done correctly, you should be able to style each
object within the paragraph style all at once, a
much quicker way than if you were to style one
thing at a time.
Styling the Content
Tip: You can make sure all of your objects are aligned properly by navigating to the top menu
bar and going to Window → Object & Layout → Align. You can use this tool to line up objects
with the page or with each other.

20 21
InDesign your Resumé
step 05
Finalizing and Exporting
Finalizing and Exporting
→ When you are happy with the way all of the
styling looks, you may want to add additional
elements such as rules or color. If you do decide
to include color, use it sparingly, and make sure
everything still reads well when printed in black
and white.
If you are finished designing your resumé, make
sure to save it in a place that is easy to locate on
your computer. Your resumé should always be
evolving, so make updates when necessary.
When saving your resumé to send to an employer,
or to use in an online application, export it as a
PDF. You can do this by navigating to File in the
top menu, going to Export, then changing the
format to Adobe PDF (Print).
If you are going to a job interview, you will need
to print your resumé. You can print from either a
PDF or straight from InDesign.
Tip: Make sure to consider what type of paper you print on. A cotton paper or cardstock will
make a much better impression than generic laser print paper.

22 23
InDesign your Resumé
Do
→ retain your personal style
→ make sure the text is legible on-screen
and in print
→ check and double-check for typos
→ have someone edit and review (like a Peer
Career Advisor)
→ try to keep any designs, illustrations or
visual elements to the header area so as
not to be distracting
→ a photocopy test. If you are using color
be sure to print in black and white and
photocopy — can you still read everything?
Dos and Don’ts
Don’t
→ use distracting styling
→ use too many fonts (try to keep it to 2)
→ include full-bleed elements
→ include more than one page
→ use a pre-made template. It’s usually
obvious that it’s pre-made, and will make
it more challenging to customize and fit
your information
→ include a colored background. This is a
great way to anger and deter potential
employers from considering you, because
your resumé could use up a lot of the
printer’s ink

24
InDesign your Resumé
Further
Resources
→ Lynda (lynda.com/indesign-
tutorials/indesign-cc-essential-
training-2015/368575-2.html)
→ free fonts: Google Fonts
(google.com/fonts); Adobe Typekit (typekit.
com); Font Squirrel (fontsquirrel.com)
→ Thinking with Type by Ellen Lupton
→ A Type Primer by John Kane
→ other Career Development resources, such
as “Building your Resumé (PDF)”, “Tailoring
your Resumé to the Job you Want (Video)”,
and “Writing Cover Letters (PDF)”
(mica.edu/academic_services_and_libraries/
career_development/career_resources.html)

This guide was designed by Olivia Johnson in 2015.
The typefaces used are Aperҫu by Colophon Foundry,
and PT Mono by Google.
