
Assistive Technology Resource Center Moriah Brown
Colorado State University
April 2011
http://atrc.colostate.edu
1
Quick Start Guide
Olympus WS-110 Digital Recorder
Overview
The Olympus WS-110 digital recorder is designed for users to easily record high quality audio. The slim,
light-weight design of the WS-110 is perfect for recording sound in a variety of places. With 256 MB of
internal memory that allows for up to 69 hours of recording time, the WS-110 provides users with the
capability of storing a vast amount of individual recordings.
Getting Started
Turn On
To turn on the WS-110 recorder, users must slide the Hold switch downward into the off position. Once
the switch has been moved into this position, users can access all the features of the WS-110.
Turn Off
To turn off the device, simply slide the Hold switch back up into the on position. When the switch is back
into this position, all button operations are disabled. This feature is useful if the recorder is carried in a
handbag or pocket. If the recorder is stopped for 5 minutes or longer during recording or playing, it will
go into Standby (power-save) mode, in which the display will shut off. To exit Standby mode and turn
the display back on, press any button.

Assistive Technology Resource Center Moriah Brown
Colorado State University
April 2011
http://atrc.colostate.edu
2
How the Olympus WS-110 Is Organized
Folders
The Olympus WS-110 is designed to allow for easy recording, organizing and navigation of previously
recorded audio. The WS-110 comes equipped with 5 separate folders {
} in which
recorded audio can be organized. Users can change the folder selection any time the device is not
actively recording. Up to 200 messages can be recorded per folder. If “Folder FULL” or “Memory FULL”
appears on the display, no more recording is possible. In such cases, erase unnecessary files or
download to PC. To erase a single file, users must first press the Erase button and then the Play/Select
button. To erase an entire folder, press the Erase button twice.
LCD Screen
Navigating among the different recorded audio files and the other main features of the WS-110 is a
simple process due to the device’s LCD screen. This main screen provides users with the following
information:
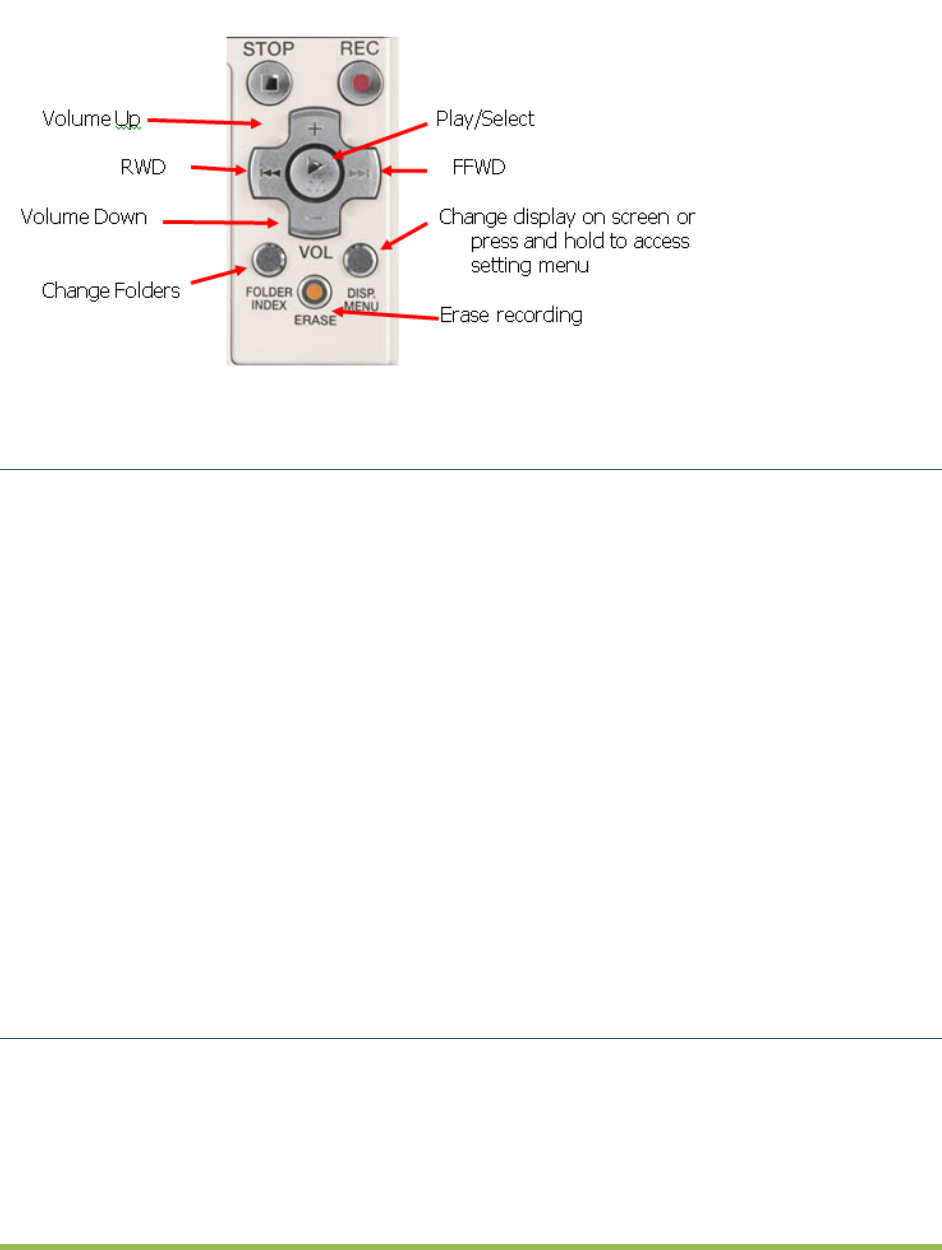
Tactile Keys
Located just below the main screen of the WS-110 are several tactile keys that allow users to record
audio, play-back recorded audio, erase recorded audio, adjust volume, navigate among different
recordings and folders, and control the device’s settings. Specific functions of the buttons are as follows:
Assistive Technology Resource Center Moriah Brown
Colorado State University
April 2011
http://atrc.colostate.edu
3
How to Record and Playback Audio
Recording Audio
To start recording, simply press the Rec. button. The record/play indicator light located at the top of the
main screen will turn red to signify that recording has started. To stop recording audio, press the Stop
button. Users can pause recordings by pressing the Record Button which will cause “Rec Pause” to flash
at the bottom of the main screen. To resume recording users need to again press the Rec. button. This
will cause recording to resume at the point of interruption. New recordings are saved as the last file in
the folder.
Playing back audio
To playback recorded audio, users must first locate the correct folder and file number of the audio they
want to hear. Once the file is located, press the Play button. The record/play indicator light will turn
green and the elapsed playing time will be indicated on the display. Users can also fast forward or
rewind during playback by pressing and holding the FFWD and RWD buttons. Once pressed, the options
of “Cancel” and “Erase” will flash alternately. Users then press the FFWD button first then the
Play/Select button.
Settings Menu
The settings of the WS-110 can be adjusted by entering the Main Menu. To do this, press and hold the
Disp. Menu button for 1 second or longer. Once in the Main Menu, users can change a variety of
settings. To navigate in the Main Menu, users can switch the items of the display screen by using the
FFWD and RWD buttons. Once the desired option is located, users can then select it by pressing the
Play/Select button. To exit the Main Menu, press the Stop button. The different settings in the Main
Menu are as follows:

Assistive Technology Resource Center Moriah Brown
Colorado State University
April 2011
http://atrc.colostate.edu
4
Record Mode
The recording mode can be chosen from HQ (high quality sound recording), SP (standard recording), and
LP (long-term recording). The recording time available on the WS-110 will change according to which
mode is chosen. While approximations of these times are provided in the User’s Manual, it should be
noted that recording audio with a higher quality setting decreases the overall recording time available
on the device.
Microphone Sensitivity
The microphone sensitivity can be changed to either Conference which is High- sensitivity (records
sounds in all directions) or Dictation which is Low-sensitivity. Conference is the most appropriate setting
while using the WS-110 to record audio during class lectures.
VCVA
This stands for Variable Control Voice Actuator. This feature works by sensing when sounds reach a
preset threshold volume. Once this level is reached, the VCVA starts recording automatically, and it then
stops recording once the volume drops below the threshold. The VCVA can extend recording time by
stopping the recording of silent periods.
Low Cut
This feature controls the Low Cut Filter function. This filter can minimize low-frequency sounds, such as
noise from a projector, to help record voices more clearly.
Voice Filter
The voice filter enables clearer audio play back by cutting both low and high-frequency tones during
slow, normal, and fast playback.
Slow Playback Speed
Users can slow the speed according to need, such as reviewing spots that you couldn’t catch during a
class lecture. The playback speed of the audio can be changed between .5 and 1.5 times speed in
increments of .125. The voices on the recording will continue to sound natural because the tone is
adjusted digitally.
Fast Playback Speed
Users can increase speed according to need, such as listening to a lecture for general content. The
playback speed of the audio can be changed between .5 and 1.5 times speed in increments of .125. The
voices on the recording will continue to sound natural because the tone is adjusted digitally.
All Play
This feature allows users to have all files in a folder played back continuously. When the last file in the
folder is finished being played back, “File End” will appear on the main screen and playback will end.

Assistive Technology Resource Center Moriah Brown
Colorado State University
April 2011
http://atrc.colostate.edu
5
Sub Menu
This feature allows users to access another menu with additional setting options. The different options
available in the Sub Menu are as follows:
1. Main Menu – allows you to return to Main Menu
2. Time and Date
3. Beep
4. LED
5. Contrast
6. Format
7. System Verification
For further description of these options and how to change them, please refer to the User’s Manual.
File Lock
This feature allows users to lock files to ensure that important data is not accidently erased. Files that
are locked are not erased even if a user chooses to erase all files from a folder at once.
Connecting to the Computer
The WS-110 features an easy-to-use direct PC link, which allows users to simply
plug the recorder directly into a computer without the need for a USB cable. This
allows users to increase the memory available on their device by storing old files on
their computer. All files are saved in a WMA (Windows Media Audio) format and
can be played back using Windows Media Player. Users can access the USB terminal
by detaching the bottom section of the device.
* Important Note: Before detaching the bottom of the recorder, set the
Hold
switch in the on position and make sure that the display is turned off. Failure to
do this could result in damaged data. For further directions on the managing files
on the computer, refer to the User’s Manual.
Changing the Battery
Th
e WS-110 runs on one AAA alkaline battery that is inserted in the back of the device. When
appears on the display, replace the battery as soon as possible. To insert a new battery:
1. Press down light on the arrow and slide the battery cover open.

Assistive Technology Resource Center Moriah Brown
Colorado State University
April 2011
http://atrc.colostate.edu
6
2. Close the batter cover completely by pressing to the direction A then sliding to direction B.
Manufacturer Information
Olympus Imaging America Inc.
3500 Corporate Parkway
PO Box 610
Center Valley, PA 18034-0610
Phone: 1-888-553-4448
Website www.olympus.com
