
Enable Auditing Manually
Lepide Data
Security Platform

Lepide Data Security Platform Enable Auditing Manually
© Lepide Software Pvt. Ltd. Page 2
Table of Contents
1. Introduction .......................................................................................................................................................................................... 3
2. Enable Auditing Automatically .......................................................................................................................................................... 3
3. Issue ....................................................................................................................................................................................................... 6
4. Solution ................................................................................................................................................................................................. 7
4.1 Enable Auditing using Group Policy Objects ......................................................................................................................... 7
4.1.1 Enable Local Audit Policies ............................................................................................................................................... 7
4.1.2 Enable Advanced Audit Policies .....................................................................................................................................12
4.1.2.1 Steps to Enable Advanced Audit Policies in Windows Server 2008 Only ....................................................12
4.1.2.2 Steps to Enable Advanced Audit Policies in Windows Server 2008 R2 and above versions ...................13
4.2 Enable Auditing using ADSIEdit.msc ......................................................................................................................................19
5. Restore Backed up Group Policy ...................................................................................................................................................26
6. Support ................................................................................................................................................................................................27
7. Copyright .............................................................................................................................................................................................28
8. Warranty Disclaimers and Liability Limitations ..........................................................................................................................28
9. Trademarks ........................................................................................................................................................................................28

Lepide Data Security Platform Enable Auditing Manually
© Lepide Software Pvt. Ltd. Page 3
1. Introduction
Welcome to the “Enable Auditing Manually” guide created for Lepide Data Security Platform. This solution provides a
comprehensive means of auditing Active Directory, Group Policy, Exchange Server, SharePoint, SQL Server, and File
Server.
This guide helps you to enable domain auditing manually. If you have any questions at any point in the process, you
can contact our Support Team. The contact details are mentioned at the end of this document.
2. Enable Auditing Automatically
While adding a domain, after you provide the appropriate details, Lepide Data Security Platform shows the following
dialog box to enable auditing at the domain level automatically.
Figure 1: Option to enable auditing automatically
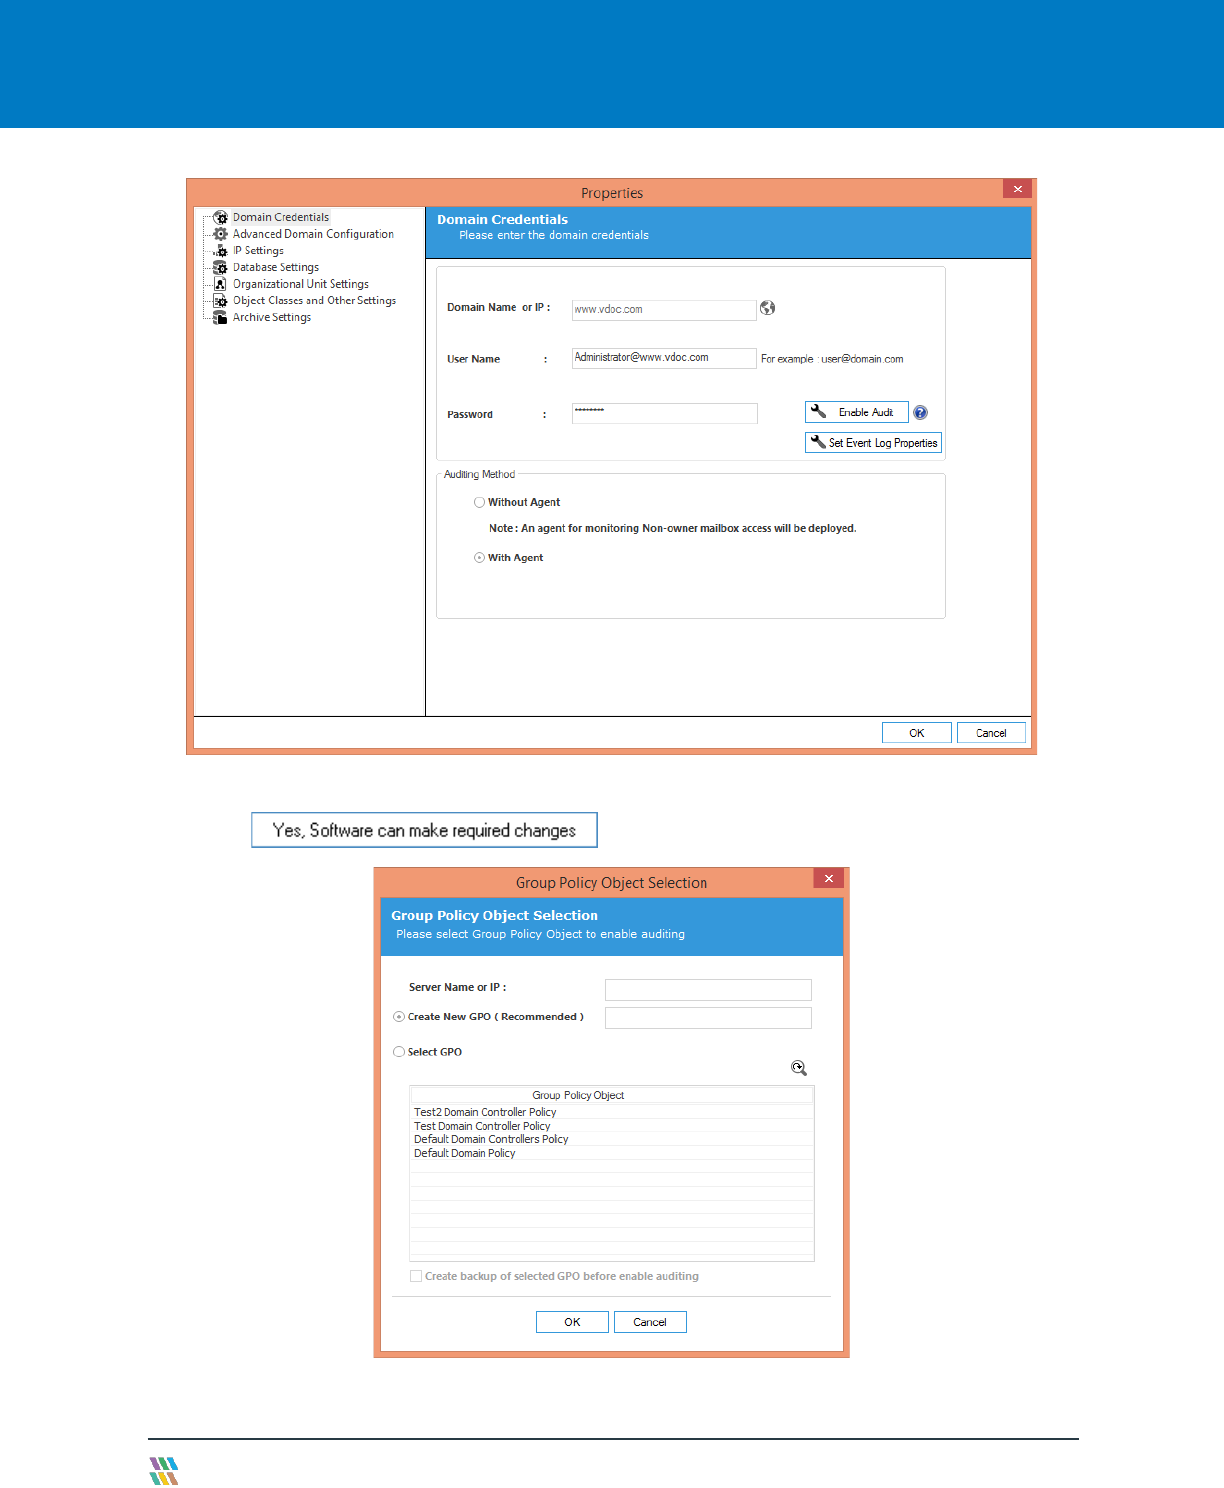
While modifying the properties of an already added domain, “Enable Audit” option appears for “Domain Credentials”
property.
Lepide Data Security Platform Enable Auditing Manually
© Lepide Software Pvt. Ltd. Page 4
Figure 2: Modifying an already added domain
You can click button. It displays the following dialog box.
Figure 3: Enable Auditing

Lepide Data Security Platform Enable Auditing Manually
© Lepide Software Pvt. Ltd. Page 5
Enter either IP Address of the primary domain controller or name of the domain. Select any of the following options.
1. Create New Policy (Recommended): Select it to create a new Domain Controller Policy. Once selected, you
have to provide the name of new Group Policy to be created.
Figure 4: Creating new Group Policy
Click "OK" to create a new Group Policy at the domain to enable the auditing.
2. Use Selected Domain Controller Policy: This option lets you select a policy to enable the auditing.
Figure 5: Select a GPO

Lepide Data Security Platform Enable Auditing Manually
© Lepide Software Pvt. Ltd. Page 6
Select this option to enable its section. Perform the following steps to select an existing Group Policy.
A. If a Group Policy is not listed here, you can click icon to rescan the domain for listing the updated
set of Group Policies.
B. You cannot select "Default Domain Controller Group Policy" or "Default Domain Group Policy" to enable
the auditing using Lepide Data Security Platform. If you try, the following error message appears on the
screen.
Figure 6: Error message while enabling auditing at Default Domain Controller Policy
C. Select a custom Group Policy created at the Domain Level or Domain Controller Level upon which the
auditing setting has to be applied.
D. Make sure to check "Create backup of selected GPO before enable auditing" box if you are enabling the
auditing on an existing Group Policy. This backup allows you to restore the previous default Domain
Controller Policy if any issue persists after enabling the auditing.
It is recommended to create a new Domain Controller Policy to enable the auditing to avoid any such issue.
E. Click "OK." The software tries to enable the auditing and create the backup of the selected group policy on
the server in "%systemdrive%\Windows\Lepide\GPOBKP_24-01-2017 18_13_35\" folder. Here, 24-01-2017
will be replaced with the date and 18_13_35 will be replaced with the time when you have clicked "OK" to
enable auditing on the selected policy.
If you face any issue in future, you can use this backup to restore the policy to the earlier state. Refer to
Section 5 of this document restore the group policy.
F. You have to wait until the auditing is enabled.
3. Issue
If Lepide Data Security Platform faces any problem in enabling the auditing, it displays the following error message
while adding/modifying the domain.

Lepide Data Security Platform Enable Auditing Manually
© Lepide Software Pvt. Ltd. Page 7
Figure 7: Error message for problem in enabling the auditing
In such cases, you have to enable the auditing settings manually on the Windows Server.
4. Solution
Auditing settings of the Active Directory environment could be setup as follows:
Auditing Entries
for
AD Forest
Partition for
Object
Access
type
Apply onto
All Active Directory
objects
Domain naming
context
Everyone
Successful
This object and all descendant
or child objects.
Active Directory
Configuration Objects
Configuration context
Everyone
Successful
This object and all descendant
or child objects.
Active Directory
Schema Objects
Schema Context
Everyone
Successful
This object and all descendant
or child objects.
Table 1: Auditing Settings
If Lepide Data Security Platform displays any error message or does not enable the auditing, then you have to enable
the auditing manually in the domain in both Group Policy Management Console and ADSIEdit Console. The steps to
be performed in both consoles are listed below.
4.1 Enable Auditing using Group Policy Objects
You have to enable the local and advanced auditing policies in the Group Policy Management Console.
4.1.1 Enable Local Audit Policies
Follow the steps below to configure the Audit Polices for Windows Server 2008, Windows Server 2008 R2, Windows
Server 2012, Windows Server 2012 R2 and Windows Server 2016.
Lepide Data Security Platform Enable Auditing Manually
© Lepide Software Pvt. Ltd. Page 8
1. Go to "Start Menu" → "All Programs" → "Administrative Tools" → "Group Policy Management". It opens
"Group Policy Management."
2. In the left panel of Group Policy Management Console, navigate to "Forest: domain.com" → "Domains" →
"domain_controller.com" → "Domain Controllers".
3. Select an already existing customized policy in “Domain Controllers” folder, which is active and enabled on
the domain controller organizational unit.
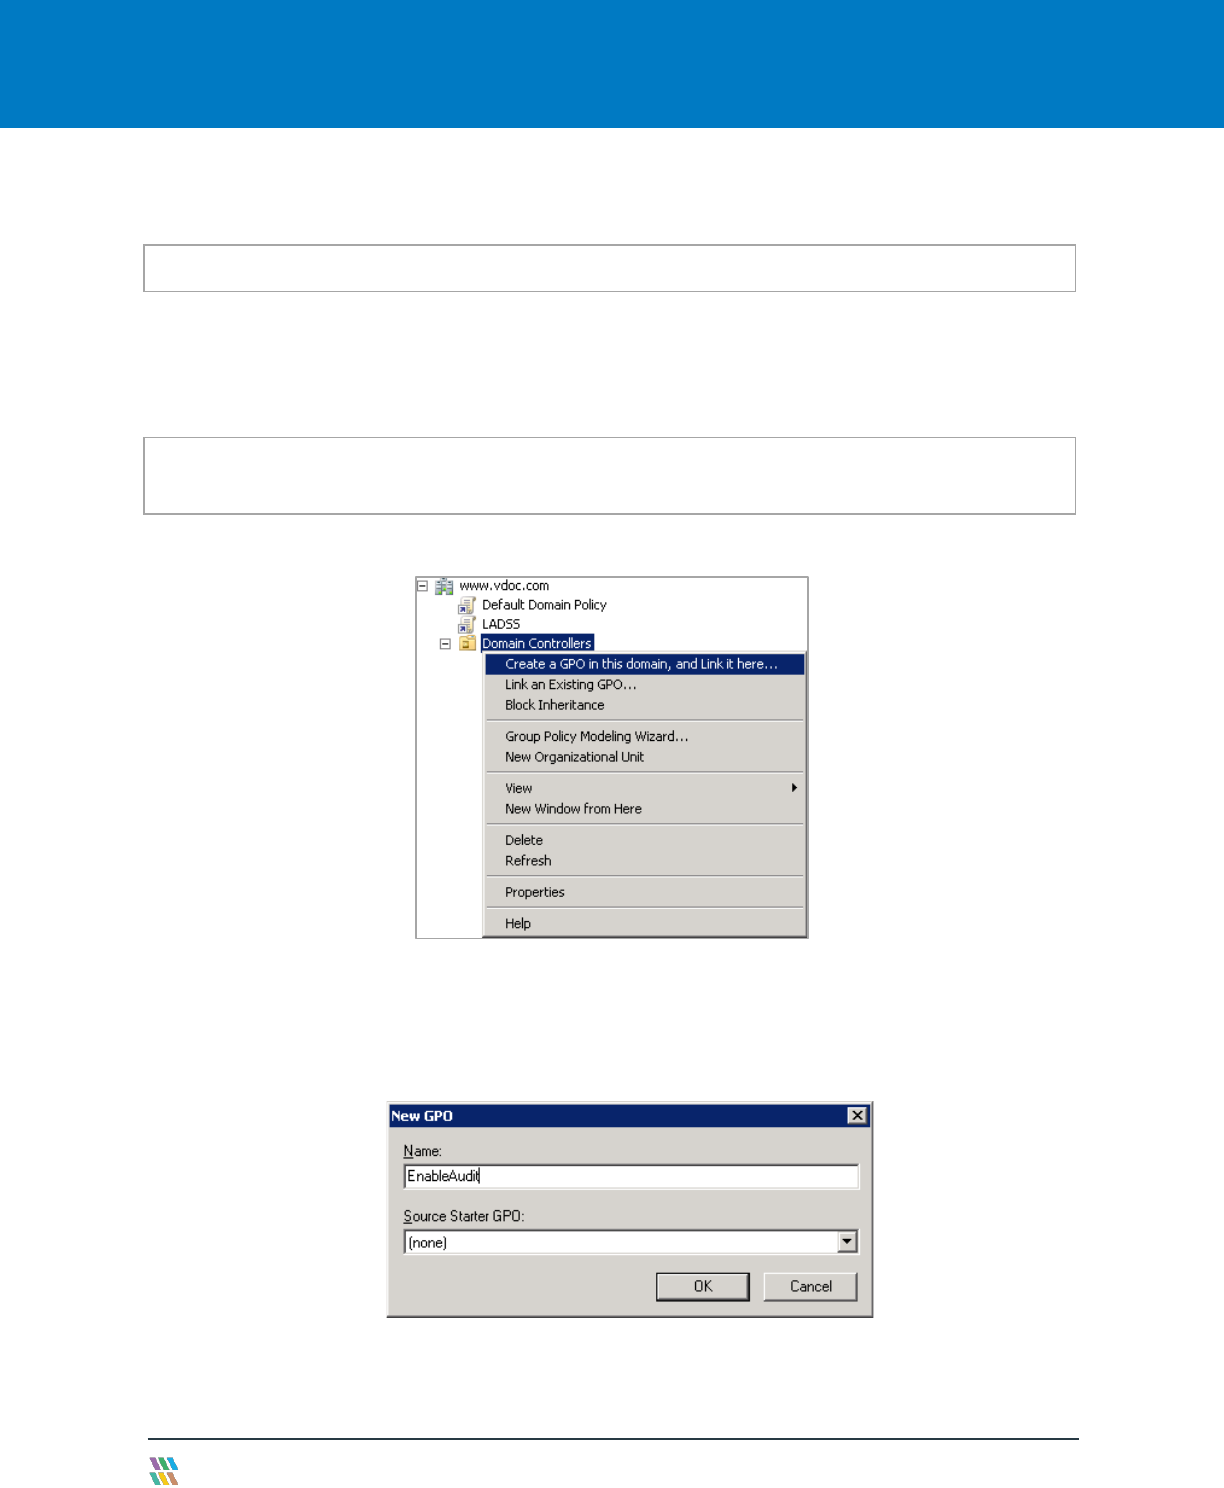
4. If an existing custom policy does not exist, right-click on "Domain Controllers" node.
Figure 8: Option to create new Group Policy
5. Click "Create a GPO in this domain, and Link it here..." to create a new Custom Group Policy. This command
also links the newly created Group Policy to the domain controller’s node.
6. The following dialog box appears on the screen, in which you have to provide the name of new policy.
Figure 9: Dialog box to create a new Group Policy
7. Enter the name of new Group Policy. Keep “none” selecting in “Source Starter GPO”.
NOTE: You can also type "GPMC.msc" in "Run" box and press "Enter" to access it.
NOTE: We do not recommend to edit “Default Domain Policy” or “Default Domain Controllers Policy” to enable
auditing at domain level for Lepide Data Security Platform.

Lepide Data Security Platform Enable Auditing Manually
© Lepide Software Pvt. Ltd. Page 9
8. Click “OK” to create the new Group Policy Object. It takes you back to Group Policy Management Console,
which now shows the newly created Group Policy in the left panel under “Domain Controllers” node.
9. Right-click newly created Group Policy to access the following context menu.
Figure 10: Option to edit Group Policy
10. Click "Edit" to access "Group Policy Management Editor" for the selected policy.
11. Browse to "Computer Configuration" → "Policies" → "Windows Settings" → "Security Settings" → "Local
Policies" → "Audit Policy". It displays the policies in the Right Panel.

Lepide Data Security Platform Enable Auditing Manually
© Lepide Software Pvt. Ltd. Page 10
Figure 11: Group Policies
12. Here, you have to configure the following policies for both successful and failed events.
a. Audit account logon events
b. Audit Account Management
c. Audit directory service access
d. Audit Logon Events
e. Audit Policy Change
13. Double-click "Audit account logon events" policy to access its properties.

Lepide Data Security Platform Enable Auditing Manually
© Lepide Software Pvt. Ltd. Page 11
Figure 12: Properties of "Account Logon Events."
14. Check "Define these policy settings" box. It enables the subsequent section.
15. Check both "Success" and "Failure" boxes under "Audit these attempts."
16. Click "Apply" and "OK." It takes you back to "Group Policy Management Editor", which now shows the
configured policy.
17. Follow the same steps to configure the following policies.
1. Audit Account Management
2. Audit directory service access
3. Audit Logon Events
4. Audit Policy Change

Lepide Data Security Platform Enable Auditing Manually
© Lepide Software Pvt. Ltd. Page 12
Figure 13: Configured the required policies
4.1.2 Enable Advanced Audit Policies
There are two different methods for Windows Servers to enable the advanced auditing policies in Group Policy
Management Console. You have to run the commands on Command Prompt for Windows Server 2008, whereas you
have to use Group Policy Management Console for Windows 2008 R2, Windows Server 2012, Windows Server 2012
R2, and Windows Sever 2016.
4.1.2.1 Steps to Enable Advanced Audit Policies in Windows Server
2008 Only
Start the Command Prompt using Administrator privileges and execute the following commands one by one.
1. Auditpol /set /category:"Account Logon" /success:enable
/failure:enable
NOTE: Do not close “Group Policy Management Editor” as you have to perform more steps here to enable the
Advanced Audit Policies, which are mentioned in the next section.

Lepide Data Security Platform Enable Auditing Manually
© Lepide Software Pvt. Ltd. Page 13
2. Auditpol /set /category:"Account Management" /success:enable
/failure:enable
3. Auditpol /set /category:"DS Access" /success:enable
/failure:enable
4. Auditpol /set /category:"Logon/Logoff" /success:enable
/failure:enable
5. Auditpol /set /category:"Object Access" /success:enable
/failure:enable
6. Auditpol /set /category:"Policy Change" /success:enable
/failure:enable
4.1.2.2 Steps to Enable Advanced Audit Policies in Windows Server
2008 R2 and above versions
You have to perform the following steps to enable the Advanced Auditing Policies in the same customized Group
Policy Object, in which you have enabled the Local Auditing Policies in the previous steps.
1. In the left panel of Group Policy Management Editor, navigate to "Computer Configuration" → "Policies" →
"Windows Settings" → "Security Settings" → "Advanced Audit Policy Configuration" → "Audit Policies." It
displays the different policy categories in the Right Panel.

Lepide Data Security Platform Enable Auditing Manually
© Lepide Software Pvt. Ltd. Page 14
Figure 14: Group Policy Objects Management Editor
2. You have to configure all policies of the following categories.
I.Account Logon
a. Audit Credential Validation
b. Audit Kerberos Authentication Service
c. Audit Kerberos Service Ticket Operations
d. Audit Other Account Logon Events
II.Account Management
a. Audit Application Group Management
b. Audit Computer Account Management
c. Audit Distribution Group Management
d. Audit Other Account Management Events
e. Audit Security Group Management
f. Audit User Account Management
III.DS Access
a. Audit Detailed Directory Service Replication

Lepide Data Security Platform Enable Auditing Manually
© Lepide Software Pvt. Ltd. Page 15
b. Audit Directory Service Access
c. Audit Directory Service Changes
d. Audit Directory Service Replication
IV.Logon/Logoff
a. Audit Account Lockout
b. Audit IPsec Extended Mode
c. Audit IPsec Main Mode
d. Audit IPsec Quick Mode
e. Audit Logoff
f. Audit Logon
g. Audit Network Policy Server
h. Audit Other Logon/Logoff Events
i. Audit Special Logon
V.Object Access
a. Audit Application Generated
b. Audit Certification Services
c. Audit Detailed File Share
d. Audit File Share
e. Audit File System
f. Audit Filtering Platform Connection
g. Audit Filtering Platform Packet Drop
h. Audit Handle Manipulation
i. Audit Kernel Object
j. Audit Other Object Access Events
k. Audit Registry
l. Audit SAM
VI.Policy Change
a. Audit Audit Policy Change
b. Audit Authentication Policy Change
c. Audit Authorization Policy Change
d. Audit Filtering Platform Policy Change
e. Audit MPSSVC Rule-Level Policy Change
f. Audit Other Policy Change Events

Lepide Data Security Platform Enable Auditing Manually
© Lepide Software Pvt. Ltd. Page 16
3. Execute the following steps to configure the above policies in the above listed different categories.
A. Click "Account Logon" category in the left panel to list all of its policies.
Figure 15: Account Logon Policies
B. In the Right Panel, double-click any policy say "Audit Credential Validation" to access its properties.

Lepide Data Security Platform Enable Auditing Manually
© Lepide Software Pvt. Ltd. Page 17
Figure 16: Properties of "Audit Credential Validation"
C. Check "Configure the following audit events" box. It enables the subsequent section.
D. Check both "Success" and "Failure" boxes.
E. Click "Apply" and "OK." It takes you back to "Group Policy Management Editor", which now shows
the configured policy.
F. Execute the above steps to configure other policies of "Account Logon" category.
4. Follow the same steps to configure all policies in the above-listed categories.
5. Close "Group Policy Management Editor." It takes you back to to “Group Policy Management Console”.
6. Select the newly created Group Policy to view its details the right panel.
7. In Right Panel, the "Security Filtering" section lets you select the objects like users, groups and computers on
which this policy will be applied.
8. Click "Add" to display the box to add the objects upon which this policy will be applicable.
9. Type "Everyone" in the text box as adding everyone means this Group Policy will be applicable on all Active
Directory Objects.

Lepide Data Security Platform Enable Auditing Manually
© Lepide Software Pvt. Ltd. Page 18
Figure 17: Selecting Everyone
10. Click "Check Names". It verifies the provided entry and formats it as a link.
11. Click “OK” to add it. It takes you back to “Group Policy Management Console”, which now shows “Everyone”
has been added to the selected custom Group Policy.
Figure 18: Added “Everyone” to apply new Group Policy on all Active Directory Objects
12. Close "Group Policy Management Console".
13. In "Run" box or at "Command Prompt", execute the following command to update the Group Policy on all
domain controllers.

Lepide Data Security Platform Enable Auditing Manually
© Lepide Software Pvt. Ltd. Page 19
gpupdate /force
Figure 19: Updating Group Policy
4.2 Enable Auditing using ADSIEdit.msc
Perform the following audit settings using the ADSIEdit.msc on any Windows Server.
Visit http://technet.microsoft.com/en-us/library/cc773354(v=ws.10).aspx to know more about installing and using
ADSIEdit.msc.
You have to perform the following steps for all Windows Server.
1. Open ADSIEdit.msc using the "Run" dialog box. You can also open it from “Start Menu” → “Administrative
Tools” → “ADSIEdit”.
2. Connect to the Active Directory. Select any node and perform below steps. Repeat these steps for each root
node.
3. Right-click on the root “ADSI Edit” and select “Connect to”.
4. It is required to connect to the following three naming contexts and to turn on their auditing.
a. Default Naming Context
b. Configuration
c. Schema
NOTE: We will connect to all these naming contexts one by one and then turn on their auditing.

Lepide Data Security Platform Enable Auditing Manually
© Lepide Software Pvt. Ltd. Page 20
Figure 20: Select the naming context to which you want to connect
5. Select “Default Naming Context”.
6. Click “OK” to establish the connection. Default Naming Context will be connected and its root node will be
displayed in “Left Panel”.
7. Expand the root node to access the domain controller’s node – “DC=www,DC=domain,DC=com”.
8. Again, right click on “ADSIEdit” parent node and select “Connect To”.
9. In “Connection Settings” box, select “Configuration” for naming context and click “OK”.

Lepide Data Security Platform Enable Auditing Manually
© Lepide Software Pvt. Ltd. Page 21
Figure 21: Connecting to Root Configuration
10. It connects ADSI Edit to the Domain Configuration and displays its root node in the Left Panel.
11. Expand the node to access “CN=Configuration,DC=www,DC=domain,DC=com”.
12. Right click on “ADSI Edit” parent node and select “Connect To”.
13. Select “Schema” as the naming context and click “OK” to connect to it.

Lepide Data Security Platform Enable Auditing Manually
© Lepide Software Pvt. Ltd. Page 22
Figure 22: Connecting to Schema
14. It connects ADSI Edit to the Schema and displays its root node in the Left Panel.
15. Expand its node to access “CN=Schema,CN=”Configuration,DC=www,DC=domain,DC=com”.
16. Now, it is required to enable the auditing settings for the following four root nodes of different naming
contexts.
a. DC=www,DC=domain,DC=com
b. CN=Configuration,DC=www,DC=domain,DC=com
c. CN=Schema,CN=Configuration,DC=www,DC=domain,DC=com
17. The user has to perform the following steps one by one for each of the above nodes.
a. Right click on “DC=www,DC=domain,DC=com” under “Default Naming Context”.

Lepide Data Security Platform Enable Auditing Manually
© Lepide Software Pvt. Ltd. Page 23
Figure 23: Right click on root node of Default Naming Context
b. Select “Properties” option to access its properties.
c. Switch to “Security” tab.
Figure 24: Security Tab of Node Properties
d. Click “Advanced” button to access the Advanced Security settings.
e. Switch to “Auditing” tab in “Advanced Security Settings”.

Lepide Data Security Platform Enable Auditing Manually
© Lepide Software Pvt. Ltd. Page 24
Figure 25: Auditing tab
f. Click "Add" to add "Everyone" for auditing using the following box:
Figure 26: Add User
g. Type “Everyone” to audit the changes made by all objects.
h. Click “Check Names” to verify the username.
i. Click “OK” to add the user. It shows “Auditing Entry” dialog box.

Lepide Data Security Platform Enable Auditing Manually
© Lepide Software Pvt. Ltd. Page 25
Figure 27: Auditing Entries for www
j. Select "This object and all descendant objects" in "Apply onto" drop-down menu.
k. Click “Full Control” in “Successful” column first.
l. Now, you have to uncheck the following entries in “Successful” column.
• Full Control
• List contents
• Read all properties
• Read permissions
Keep other entries checked in “Successful” column.
m. Make sure all checkboxes in “Failed” column are blank or not checked.
n. Keep "Apply these auditing entries to objects and/or containers within this container only" unchecked.
o. Click “OK” to apply the auditing entries. It takes you back to “Auditing” tab of Advanced Security Settings.
p. Click “Apply” and “OK” to apply the auditing settings.
q. Close “Properties”.
18. Repeat the steps (a) to (q) of Step 17 to enable the auditing of remaining root nodes.
a. CN=Configuration,DC=www,DC=domain,DC=com
b. CN=Schema,CN=Configuration,DC=www,DC=domain,DC=com

Lepide Data Security Platform Enable Auditing Manually
© Lepide Software Pvt. Ltd. Page 26
19. Close the window of ADSIEdit.msc.
5. Restore Backed up Group Policy
While enabling the auditing, Lepide Data Security Platform lets you select an existing Group Policy or create a new
one. If you are selecting an existing Group Policy, the solution allows you to take its backup. The backup is created on
the server in "%systemdrive%\Windows\Lepide\GPOBKP_24-01-2017 18_13_35\" folder. Here, 24-01-2017 will be
replaced with the date and 18_13_35 will be replaced with the time when you have clicked "OK" to enable auditing on
the selected policy.
You can perform the following steps to restore the Group Policy using this backup to restore to its earlier state before
enabling the auditing.
1. Go to "Start" → "Administrative Tools" → "Group Policy Management Console" to access its console.
2. In the left panel of "Group Policy Management Console", browse to "Forest" → "www.domain.com".
3. Right click on "Group Policy Objects" node and click "Manage Backups" option.
Figure 28: Option to manage the Group Policy Backups
4. "Manage Backups" dialog box appears on the screen.

Lepide Data Security Platform Enable Auditing Manually
© Lepide Software Pvt. Ltd. Page 27
Figure 29: Manage the backups of Group Policies
5. Click "Browse" and open "%systemdrive%\Windows\Lepide" folder.
6. Now select "GPOBKP_*" folder of that date and time when you have selected to create the backup while
enabling the auditing.
7. Click "OK". It takes you back to "Manage Backups" dialog box that shows the Group Policy from the selected
backup.
8. You can click "Restore" to restore this backup.
6. Support
If you are facing any issues whilst installing, configuring or using the solution, you can connect with our team using
the below contact information.
Product experts
USA/Canada: +1-800-814-0578
UK/Europe: +44 (0) -845-594-3766
Technical gurus
USA/Canada: +1-800-814-0578
UK/Europe: +44(0)-800-088-5478

Lepide Data Security Platform Enable Auditing Manually
© Lepide Software Pvt. Ltd. Page 28
Rest of the World: +91 (0) -991-004-9028
Rest of the World: +91(0)-991-085-4291
Alternatively, visit http://www.lepide.com/contactus.html to chat live with our team. You can also email your queries
to the following addresses:
To read more about the Lepide Data Security Platform, visit http://www.lepide.com/.
7. Copyright
Lepide Data Security Platform, LepideAuditor, LepideAuditor App, LepideAuditor App Server, LepideAuditor (Web
Console), LepideAuditor Logon/Logoff Audit Module, any and all components, any and all accompanying software,
files, data and materials, this guide, and other documentation are copyright of Lepide Software Private Limited, with
all rights reserved under the copyright laws. This user guide cannot be reproduced in any form without the prior
written permission of Lepide Software Private Limited. No Patent Liability is assumed, however, on the use of the
information contained herein.
© Lepide Software Private Limited, All Rights Reserved.
8. Warranty Disclaimers and Liability Limitations
Lepide Data Security Platform, LepideAuditor, LepideAuditor App, LepideAuditor App Server, LepideAuditor (Web
Console), LepideAuditor Logon/Logoff Audit Module, any and all components, any and all accompanying software,
files, data, and materials are distributed and provided AS IS and with no warranties of any kind, whether expressed or
implied. In particular, there is no warranty for any harm, destruction, impairment caused to the system where these
are installed. You acknowledge that good data processing procedure dictates that any program, listed above, must
be thoroughly tested with non-critical data before there is any reliance on it, and you hereby assume the entire risk
of all use of the copies of LepideAuditor and the above listed accompanying programs covered by this License. This
disclaimer of warranty constitutes an essential part of this License.
In no event does Lepide Software Private Limited authorize you or anyone else to use LepideAuditor and the above
listed accompanying programs in applications or systems where LepideAuditor and the above-listed accompanying
programs’ failure to perform can reasonably be expected to result in a significant physical injury, or in loss of life. Any
such use is entirely at your own risk, and you agree to hold Lepide Software Private Limited harmless from any and
all claims or losses relating to such unauthorized use.
9. Trademarks
Lepide Data Security Platform, LepideAuditor, LepideAuditor App, LepideAuditor App Server, LepideAuditor (Web
Console), LepideAuditor Logon/Logoff Audit Module, LepideAuditor for Active Directory, LepideAuditor for Group
Policy Object, LepideAuditor for Exchange Server, LepideAuditor for SQL Server, LepideAuditor SharePoint, Lepide

Lepide Data Security Platform Enable Auditing Manually
© Lepide Software Pvt. Ltd. Page 29
Object Restore Wizard, Lepide Active Directory Cleaner, Lepide User Password Expiration Reminder, and LiveFeed are
registered trademarks of Lepide Software Pvt Ltd.
All other brand names, product names, logos, registered marks, service marks and trademarks (except above of
Lepide Software Pvt. Ltd.) appearing in this document are the sole property of their respective owners. These are
purely used for informational purposes only. We have compiled a list of such trademarks, but it may be possible that
a few of them are not listed here.
Windows®, Windows Server 2008®, Windows Server 2008 R2®, Windows Server 2012®, Windows Server 2016®,
Exchange Server®, SharePoint Server®, and SQL Server® are registered trademarks of Microsoft Corporation in the
United States and/or other countries.
