
An easy guide for Elders: Using Smartphones in simple
steps
We have compiled this easy guide to using smartphones and becoming digitally literate, so that you
are able to easily use the internet, get information, pay your bills online, talk to your grandchildren/
loved ones using Skype, send messages to your friends/ grandchildren using WhatsApp and booking
Ola/ Uber cabs and much more.
If you are interested in these workshops, or you need any further information, please contact:
Shekar Nambiar: shekar.nambiar@helpageindia.org
Ishanti Ghose Chauhan: Ishanti.ghose@helpageindia.org
or
Contact:
Head Office: C – 14, Qutab Institutional Area, New Delhi – 110016, Tel No.: 011-41688955/ 56
or
To contact your nearest HelpAge India State office, log onto www.helpageindia.org/contact-us/
or simply call the Head Office number given above.
Guide Compiled and Designed by:
Ms. Ishanti Ghose Chauhan

1
2
3
4 - 5
6
7
8
9 - 10
11
12
13
14 - 15
16 - 17
18 - 19
20
21 – 22
23 – 24
25 - 27
28 - 29
30 - 32
How to use your Smartphone
How to use your Smartphone Camera
How to clean Phone Storage and free space
How to use your iPhone
How to send a Message/ Text/ SMS
How to Compose and Send a WhatsApp message
How to Take and Send a Photo/ Video in WhatsApp
How to create an Email ID
How to compose and send an Email
How to download Apps from Google Play Store
How to register as a user on Paytm
How to pay Utility bills from Paytm
How to pay Utility Bills Online/ through Website
How to use Net Banking to make payments online
Safety Basics and Account Safety for Online Transactions
How to use Google Maps
How to use Ola to book Cabs
How to use Uber to book Cabs
How to Skype with your loved ones
How to register and use Facebook
How to use YouTube to watch videos
33
1
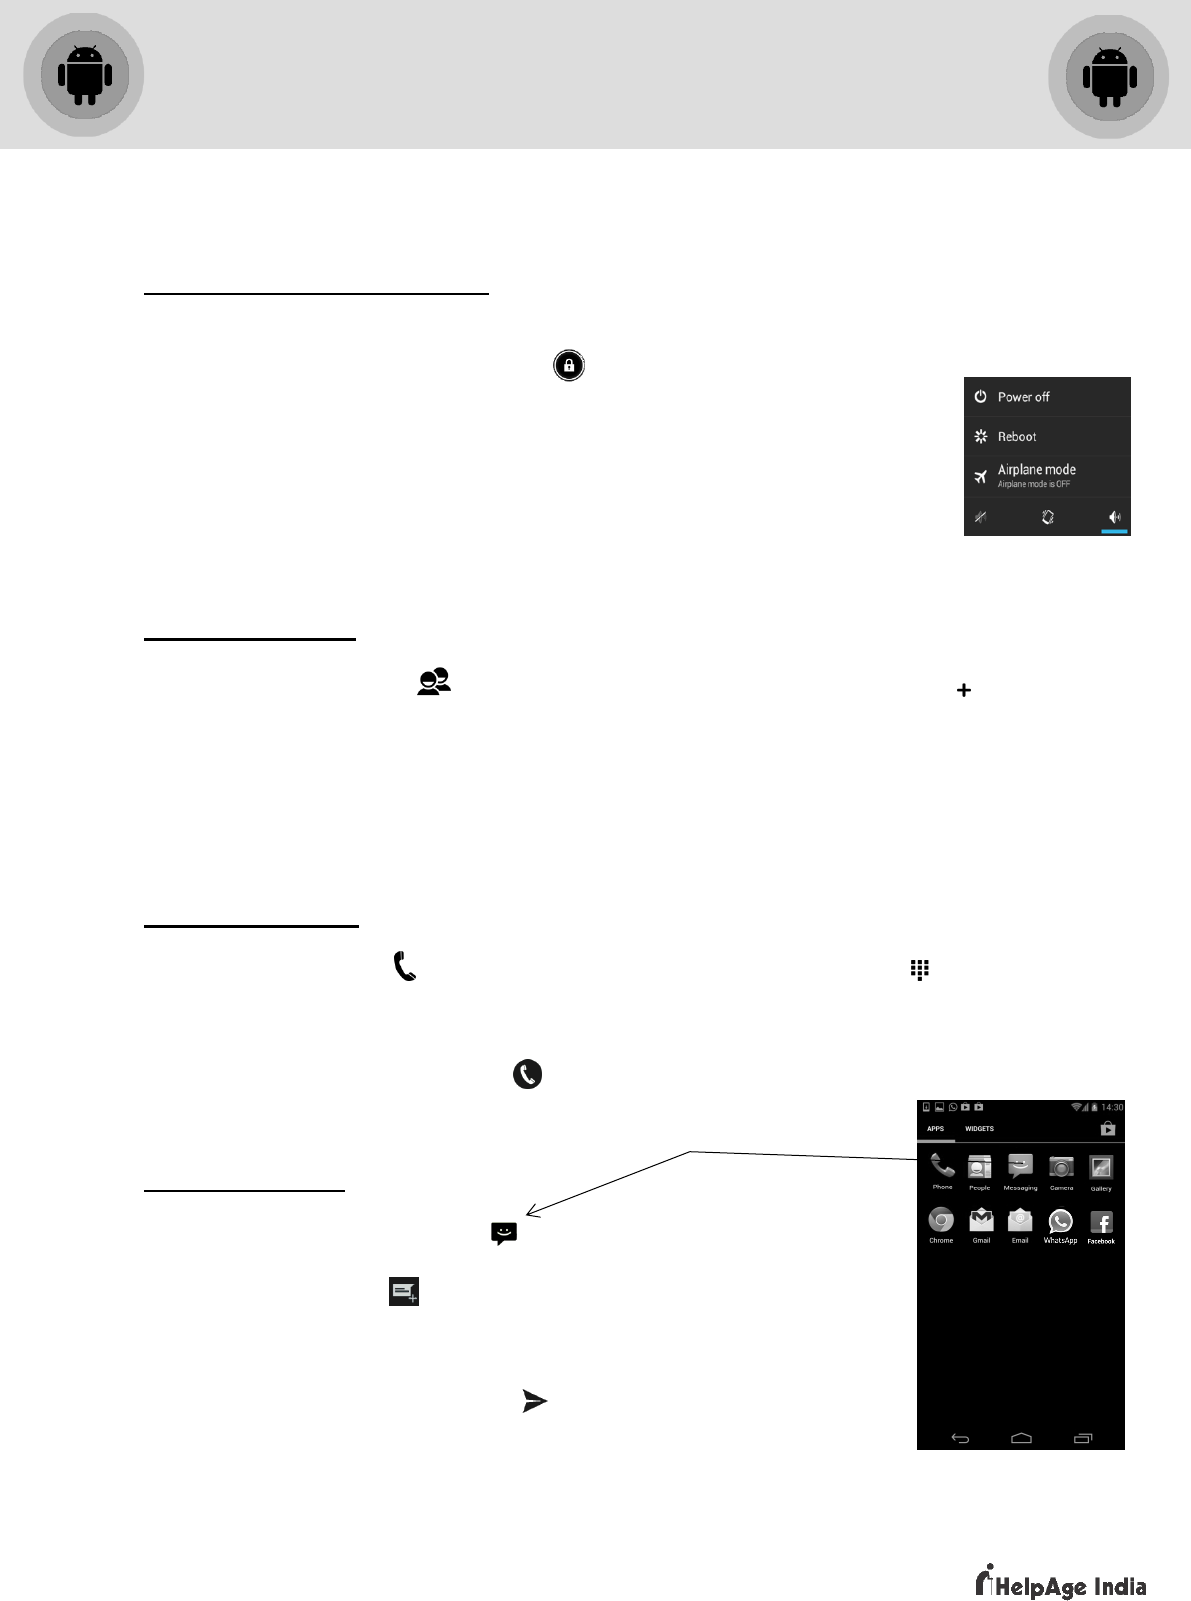
SWITCHING PHONE ON and OFF
• To turn on/unlock your device, use the power button (side of your phone). Then
swipe the screen or slide the lock symbol, depending on the phone.
This opens the home screen.
• To switch off your phone, press the same power button for longer till the
option for switching off/on is displayed.
• Tap the power off option and the screen goes blank.
SAVING CONTACTS
• Open the “contact” option displayed on the home screen. Click on the
symbol.
• Type the name of the person and the phone number in the respective bars.
• Click on the ‘save’ option and the contact is saved.
DIALING A NUMBER
• Open the ‘phone’ option on the home screen and click on ‘keypad’
• Tap on the numbers you want to dial, just like you do on a phone with real buttons.
• Click the symbol of a ‘phone’ to begin dialling.
MESSAGING / SMS
• Tap the ‘message option’ on the home screen.
• Select the writing symbol.
• Simply enter the name of the recipient and then enter the message.
• Click on the message sending symbol.
How to use your Smartphone

2
CAMERA
• Open the ‘camera’ option on the home screen/menu This will open the camera
on the screen.
• Press the centre camera button on the bottom of the screen.
• A clicking sound is heard and your picture is clicked and saved in your ‘gallery’.
• For a selfie, click on the camera reverse option on the top/right of the screen
and take the selfie with the same centre circle.
Gallery Icon
Camera Reverse
Icon to take a Selfie
Main Camera Screen
where picture will
show of what you
want to click
Camera Button
Click once to take
picture
How to use your Smartphone Camera

3
How to delete photos, videos etc. stored on your phone and free up space
• Open your phone's Settings app.
• Tap Apps & notifications.
• Tap See all apps the app Storage.
• Tap Clear storage or Clear cache. If you don't see "Clear storage," tap Clear data/
Free Up Space.
How to Clean Phone Storage and Free
Space
Go to Settings, scroll down and click on “Storage”
Click on “Internal Storage”
Click “FREE UP SPACE”

4
Switching on/off your iPhone
• To turn on your iPhone, press and hold the sleep/wake button at the
top right of your iPhone until the screen starts.
• To turn off your iPhone, press and hold the power button until you
see the ‘slide to power off’ on the screen. Slide the control and your
Phone is turned off.
Saving a contact
• Go to ‘phone’ on your home screen and then tap ‘keypad’.
• Enter the telephone number and tap the icon ‘+’ (plus) on the top-left corner.
• Tap on ’create new contact’. Enter the information like the contact name and email
address. Tap on ‘done’.
Dialling a number
• Tap the ‘phone’ icon at the bottom of your home screen. Scroll down and
select the contact you want to call. Next tap the number and the call is made.
• If the contact is not saved, then select ‘phone’ icon and then ‘keypad’. Enter the
number and tap the green ‘call’ button.
Messaging
• Press the home button and then go to the message button on your home
screen.
• Tap the ‘new message’ button (paper with a pencil) at the top-right of the
screen.
• Enter the contact name/number in the ‘to’ field. Then type the message and click
‘send’.
• A ‘delivered’ message is shown below your text.
Sleep/Wake Button
How to use your iPhone
Slide to unlock button

5
Camera
• Press the home button and then go to ‘camera’ app.
• Once you are ready to click the picture, press the ‘shutter’ button (white circle in
the centre) at the bottom of the screen.
• You can switch the camera modes by swiping through the options just above the
‘shutter’ button.
• For a selfie, switch mode from the button on the top-right corner.
WhatsApp
• Open your WhatsApp from the home screen.
• Tap ‘chats’ in the navigation bar (below).
• Tap the ‘pencil’ icon in the top-right corner and select a contact to start a new
chat.
• Type the message and click on ‘send’.
Face Time
• Click on the ‘phone’ icon. Then click on ‘contacts’.
• Select the contact you want to Face Time with. Click on the friend’s name and then
tap the Face Time button.
• Your call is made. Wait for the phones to connect on the internet.
• To end the call, press the red ‘phone’ icon.
Compose and Send a WhatsApp Message
How to use an iPhone

6
Messaging/ SMS/ Texting
Open the ‘Messaging’ App from your phone menu
The inbox should open on your screen
Click on any existing message to open it.
To create a new message, click on “Start Chat”.
Type number you was to send message in “To” section. Either you can type a new
number or select from numbers already saved in your phone.
Start typing message in “Text Message” section. Click
on to send.
Writing a new Message
Start new chat
New Message
Inbox
How to Send a Message/ SMS/ Text

7
WHATSAPP
• Open the “WhatsApp” by selecting the option on the home screen.
• Select the person from the contacts tab to whom you want to send a message. (If a
contact is not in the list, first save the number to your phone contacts.)
• Type the message and click the ‘arrow’ symbol
Contacts page
This is where you
will see all your
contacts who also
use WhatsApp
Chats Page
This is where you
will see your
chats (people you
are talking to)
Type Message Here
Name of Contact you
are chatting with
Message you type will
show here
Keypad – Type
message from here
CHATS SCREEN
CONTACTS SCREEN
NEW MESSAGE SCREEN
How to Compose and Send a
WhatsApp Message

8
How to take a photo/ video and send it through WhatsApp
Within the chat window, click on the camera icon. This will allow you to click a
photo or take a video directly and send it. You can also select photos and videos
already saved in your phone image gallery from this screen (as shown below).
How to Take & Send a Photo/
Video in WhatsApp
Click “Camera” icon
to open camera
Chat window
View to see
what you click
Photos in your gallery
Click to take photo/ press + hold
to record video
Flip Camera view
Camera view
Flash ON/OFF
Choose photos/ videos directly from
phone image gallery

9
NOTE: You will need an Email ID to configure your smartphone. All smartphones require an
Email ID to setup the device before you can start using it.
Open Settings. Open menu of your Android phone and click on Settings.
Access the “Accounts & Syncs” menu. In the Settings, select the General tab, and
then scroll down and tap “Accounts & sync” from the list.
Start a new Google account. At the bottom of the page, tap the “Add account” button.
On the next page there should be series of different accounts that can be linked to, or
created on, the Android device. Tap “Google” to continue. You will be asked if the
account being linked to the device is Existing or New; select “New.”
Fill out the forms one by one. As the signup process continues, there will be a series
of different forms to fill in. These are the pages as they appear on the app. Tap the left
and right facing arrows to go backward and forward respectively through the list.
How to create an Email ID
Step 1
Step 2
Step 3

10
Accept the Terms of Service and Privacy Policy. After you have filled out the necessary
forms, you will be shown the Terms of Service and Privacy Policy. After reading, tap “I
accept” to continue.
Save your new account. You will be required to enter in the given text field the
number/letter combination shown in the small box. Type it in to save your new account
and continue.
Set up other Google options. Once you’ve created your account, you can set up other
Google options.
Step 4
Step 5
Account Created
How to create an Email ID

11
How to Compose and Send an Email
Look of Inbox
Composing/ Send Email
Forwarding/ Replying
Email
2
Email
3
Email
4
Compose email
button
Email
1
1234sharma has sent you
an email
1234sharma
has sent you
an email.
Xxxxxxxxxxxx
xx
Xxxxxxxxxxxx
x
Xxxxxxxxxxxx
Xxxxxxxxxxxx
Xxxxxxxxxxxx
Xxxxxxxxxxxx

12
Locating Play Store on your phone
• Unlock you phone
• Click on the main menu where all your apps are located
• Scroll down by swiping down and locate Play Store
• Click on Play Store logo to open the app
Searching for an App in Playstore
• Start typing the Apps name in the Google Search bar when Play Store opens
• The app will show up on the your screen with an option to Install
• Tap on the Install button and let the app download and install on its own
• Once the app is installed it will show you two options Uninstall and Open
(shown below)
• If you wish to go directly to the App, then tap on Open (shown below)
How to download apps from
Google Play Store

13
Registering as a User on PayTM
• Open Paytm from the Apps menu
• Click on Create an Account
• Fill in your Mobile Number, Create a password to secure your
account, and enter your email id (notifications are sent to your
email id)
• After filling in all details, click on Create a New Account
• Paytm will then ask you to enter a One Time Password that will
come on your phone as an SMS (most of the times Paytm
detects the OTP on its own). Once the OTP is entered in the
space provided, click Done.
• Paytm will then prompt you to fill in your details – First Name,
Last Name, Date of Birth and select your Gender.
• Once all details are filled, click on Create Account.
• Your account will then be created.
How to register as a user on PayTM

14
Paying Utility Bills through PayTM
Open Paytm App from phone Menu
On the homepage look for – Recharge of Pay for
Select from options what you want to pay for
Eg.: You want to pay your Electricity Bill – Click on Electricity
Select State, Electricity Board and type your Consumer Number
Paytm will automatically fetch your bill amount
After carefully verifying the details on your screen, click on Proceed to Pay/Payment
Paytm will display options on how you want to make a payment – Debit Card, Credit
Card, Net Banking or ATM Card
Select payment mode – It will then direct you to your Banks website, where you will
receive and OTP to enter in box marked accordingly to verify the payment
Paytm will then confirm payment
Type Consumer Number here
How to pay Utility Bills from PayTM

15
Choose mode of payment
This screen verifies that your
payment has been successful.
If it fails, the green success will
show in red and read FAIL
Your Consumer Number and
details will show here. Before
proceeding please verify
How to pay Utility Bills from PayTM

16
Pay your Electricity/Water Bill Online
• Open the website of your electricity/water supply company which is mentioned in
the printed copy of your bill or search it through Google. For example, in Delhi the
electricity supplier’s website is www.bsesdelhi.com. *Accordingly for your specific
state, open their website*
• Click on the bill payment option which will be shown on the page of the website you
have opened.
• If you are a registered consumer, fill in the user name and password to access your
account. Or, you can create a new account also. Some websites might ask for your
identity number or CA number (contract account number) when you create your
account.
• Go on the ‘pay bill’ option and fill in the required details like your account number,
PIN number and email address, depending on the details asked.
• Have your printed copy of bill ready with you.
• The payment can be made via debit or credit card. You should have your card next
to you so that you can easily fill in your card number, the CVV (card verification
value), also known as the security code.
Note: Once the payment is made, you will receive a receipt or confirmation number. Save
it for future records.
How to pay Utility Bills
Online/ through Website
• In your browser search bar type www.bsesdelhi.com
• Hover over Payment and click on Pay online
Step 1: Opening Bills Online

17
Paying through Net banking/ Credit/ Debit Card
• Provide your bill details
• Enter the BSES account number.
• Seen your bill online and pay
• You will be taken to page where you can see your current bill online.
• Click on the 'Pay' button to initiate payment.
• Confirm payment
• Choose the payment mode:
• Credit Card / Debit Card
• Net banking Account
• Payment will be authenticated over the gateway and your credit card or your bank
account will be instantly debited.
• Transaction Reference Number that is an acknowledgement for your payment
request.
How to pay Utility Bills
Online/ through Website

18
How to make Online Payments using your Bank Account
Open Google Chrome (any browser you use)
Open your Bank website
Log into your Net Banking account from Bank website – Bank will provide you with
your User ID and a temporary password to log in
Once you log in, change your password from your profile tab
Make a payment using Fund Transfer
Locate - Fund Transfer/ Transfers/ Bill payments tab
Transfers can be made by – Funds Transfer between own accounts, 3
rd
Party
Transfer (Inter Bank Account, NEFT, RTGS, IMPS, Visa Money), One Time Transfer
Before making a transfer, you have to Add a Payee – Click on Add a Payee option –
Fill in all details in the form on your screen – Click on Submit/ Add Payee button
(Some banks might ask you to verify using your ATM Pin, Transaction Password or
OTP which you will receive on your Mobile phone through SMS)
Once you payee is added – Click on Fund Transfer
Fill in the details asked in the form on your screen
Add the payee bank IFSC code
Enter Payee details – Name, Bank Name, Bank Branch, Bank Account Number,
Amount to be transferred etc.
Verify details before submitting
Before initiating payment – bank might ask for an OTP, transaction password or ATM
pin number to finalize transfer
Enter details and submit
You will get a transfer success message on your screen with a reference/
transaction/ oder ID
For future queries on transfer history details please save the transaction ID
somewhere safe
How to use Net Banking to make
Payments Online

19
How to make Online Payments using your Bank Account/ Net Banking
Note: To generate an Online Customer ID for Net Banking purposes, you will need to visit
your branch and fill the required form. The steps below are to be followed, once you have
obtained your Customer login ID.
Open Google Chrome (any browser you use from your phone)
Open your Bank website
Log into your Net Banking account from Bank website – Either your bank will provide
you with your User ID and a temporary password to log in OR in some banks you can
create your own
If you don’t have a User ID and Password, please click “New User? Register Here”.
Once you log in, change your password from your profile tab
How to use Net Banking to make
Payments Online
For eg. Login for Standard Chartered Net Banking
Step 1
Step 2

20
How to keep your information safe while transacting online
Always use online banking only for trusted merchants/ websites
Register for mobile banking – this will ensure that you get an SMS for every
transaction
Check your savings account balance regularly for suspicious transactions
If you lose your device, make sure you call customer care and block your Wallets/
Cards etc.
Never share your PIN with anyone!
Change your password regularly
When you use a browser, it is always safer to type your bank URL (instead of clicking
on a link)
Make sure your confirm if the recipient received the amount, after a transaction
Safety Basics and Account Safety for
Online Transactions
21
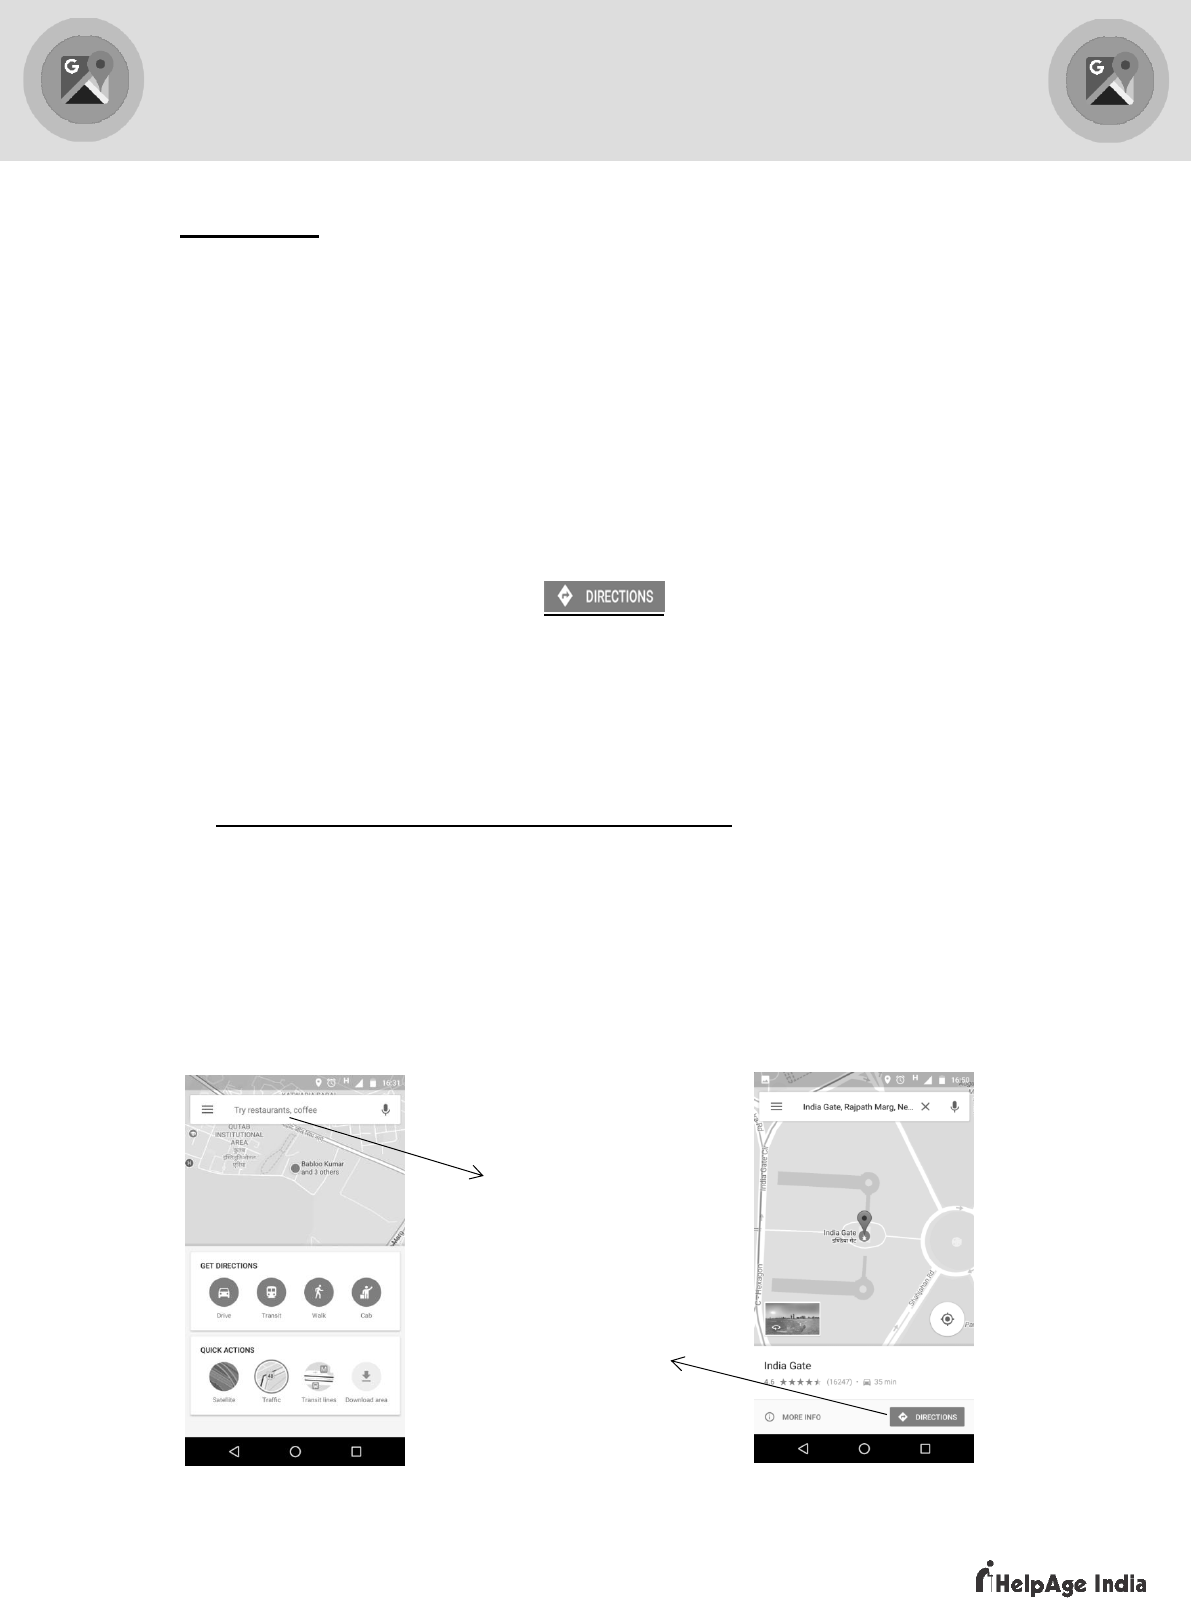
Google Maps
Locate Google Maps in your phone menu
You will see a map of your city in the background, a search bar on top, and other
options such as Get Directions – Drive, Transit, Walk or Cab and Quick Actions –
Satellite, Traffic, Transit Lines, Download Area
Make sure your location is on by going to settings > Location > Turn On
In the search bar on Google Maps click on the bar and start typing the location of
where you want to go
Google Maps will then locate your Destination on the map of your city
Click on the Directions button to visually see the route from your
starting point to your destination
The Map will show you Your Location, Your Destination, time it will take to reach,
Route Info and a Start Button to navigate to your destination and activate voice
navigation.
Using Voice Navigation to reach your Destination
By clicking on START the voice navigation will automatically get activated.
Voice Navigation is basically your phone guiding you to your destination step by
step.
Your phone has two types of voice options – Female and Male. This can be
changed from Settings > Language & Input > Text-to-Speech output
How to Use Google Maps
Type your
destination here
Click on Directions
How to Use Google Maps

22
How to Use Google Maps
Location icon
Various modes of transport
Your current Location
Destination Location
Route map from your location to Destination
Start Button – Click on
this button to start
Voice Navigation and
route map
Route Map – where to turn,
traffic updates etc
Directions – Turnings, crossings etc.
Compass
Voice Navigation Setting
Zoom

23
How to Register on Ola Cabs
Open ‘PlayStore’ and search for ‘Ola”.
Download and Install the App.
Open the App from your Menu options.
How to use Ola to Book Cabs
Enter your Mobile
Number
Enter personal details
(Only in case of new user)
Enter OTP sent by SMS
Enter OTP sent by SMS
Need to provide consent
to Ola
(Terms & Conditions)
Note: If you do not give
access to Ola, your app
will not work correctly.

24
After Registering, please follow the steps below to book a cab:
Type/ pin pick up location
Type/ pin drop
location
Types of transport
available
Hold, drag & drop pin on map to mark location
Pricing for ride
Click to confirm
booking
How to use Ola to Book Cabs

25
How to Register on Uber App:
Open the Uber App
Click on Sign Up
Fill in details in the form
Enter OTP received on phone
Confirm Sign Up
How to use Uber to Book Cabs

26
How to use Uber to Book Cabs
Open Uber App
Type Pick point & Drop point
Select type of transport
Map from where you can
drag and drop your location
Type in your Pickup
Location and Drop
Location, OR select from
dropdown list
Shows you type of transport
and pricing of each type of
available vehicle

27
Modes of Payment for Uber:
Through Paytm
Through Cash
Credit/ Debit Card
Ola
1. Ola Money
Wallet –
Add from bank
account/ debit
card
2. Ola Money
Postpaid
3. Your own
Credit/
Debit Card
4. Cash
You can add your Debit/Credit Cards.
Ola even has Ola Postpaid (Bill has to
be paid by the 10
th
of every month).
Or you can add money from your
bank account into the Ola Money
Wallet.
Modes of Payment for Ola:
Ola Money Wallet – Add from
bank account/ debit card
Ola Money Postpaid
Your own Credit/ Debit Card
Cash
How to use Uber to Book Cabs

28
Once you download and install the Skype App, your main window will look like this
How to Skype with your loved ones
Your Profile
Start a new chat
Start a new Call
Dial pad

29
Adding a contact
• Sign-in on Skype and on the home page tap on the ‘ ‘ icon displayed on the
bottom-right corner.
• Then select ’Add people’ option.
• Search for a contact by their Skype name, Phone number, Name or Email address.
• Select the contact and tap ‘add to contacts’. The contact appears in your ‘people
list’.
Skype-to-Skype call
• Once you sign-in on Skype, go to ‘people’ and select a Skype contact. Tap the ‘call’
icon.
• Select ‘Skype call’.
• To turn your video on, tap the ‘video’ symbol displayed on the bottom part of the
screen. Beside this options are available of microphone , speaker/headset, and
. The ‘+’ (plus) sign shows more options like the Dial pad, View Messages and
Send Files.
• To end a call, tap the ‘red phone’ icon.
• You can only receive a Skype call only when you area signed-in. when you receive a
skype call, an incoming call notification screen appears.
• To answer the call tap the green ‘Answer’ icon and to reject the call, tap the red
‘Decline’ icon.
How to Skype with your loved ones

30
How to Sign-Up for Facebook
• Open Facebook App from your smartphone menu
• Click on Sign-up/ Join Facebook, then click ‘Next’
• Allow FB to access your contacts and Phone call
How to Register and use Facebook
Step 1
Step 2
Step 3

31
• Follow the steps to create your account
Name
DOB
Gender
Mobile Number/ Sign up with Email Address
Choose/ Create a password
• Click on the “Sign Up” button to finish signing up
Step 4
Select your DOB
Step 5
Step 6
Step 7
Select “Gender”
Enter your Name
Enter your Mobile Number
How to Register and use Facebook

32
Click on Sign up and wait for your account
to get created
Step 8
This is how your profile will look once
created
You can Search for your friends
on Facebook from here
TIMELINE:
Write your thoughts here
News Feed – shows you what your
friends are up to
Timeline & Newsfeed
How to Register and use Facebook

33
How to use Youtube to watch videos
• Once you have a google email ID (see how to create email ID), a YouTube account is
created automatically.
• Download YouTube App from Playstore, then open app on your smartphone
YouTube main
window
Search
button
Searching on
YouTube
Search Option window
How to use YouTube to watch videos

Support a Workshop
or
Donate Now!
For more information, please contact:
Tel:
011-42030463 |
Email:
The pace of change in technology makes it difficult for most to keep up. More so with the elders who find it almost
impossible to keep up with the latest gadgets, mobile applications, new smart phones etc. This handicap excludes
elders from the main stream social fabric. To tackle this, HelpAge has started a ‘Digital Literacy’ program
introducing elders to the online world by conducting workshops across the country. Partner institutions,
organizations, volunteers and interns are encouraged to conduct basic tutorials for elders, using the HelpAge
Handbook ‘East Guide – How to use Smartphones & get Digitally Literate’.
at www.helpageindia.org

The Discount Card for 50+
MAKE YOUR AGE AN ASSET
IF YOU’RE OVER 50,
BECOME A MEMBER FOR FREE
TODAY!
The AdvantAge Card offers Senior Citizens discounts on various products & services
such as from hospitals, pathology labs, chemist, retailers and even hotels and
restaurants.
If you are 50 YEARS and more, this is the card for YOU!
You can also gift this card to an elder in your home.
To enroll online, just log onto www.helpageadvantage.org
or write to us at advantage@helpageindia.org

Head Office: C - 14, Qutab Instuonal Area, New Delhi - 110016 | Tel: 011-41688955 | Email: headoffi[email protected]g
Donate Today!
All Donaons to HelpAge India are 50% Tax Exempt under secon 80G of IT Act, 1961.
Log on to: www.helpageindia.org
Email: [email protected]
or contact your nearest HelpAge India Office
Call the HelpAge Elder Helpline (Toll free): 1800-180-1253 OR Download the ‘HelpAge SOS’ App
Working for the cause and care of disadvantaged older persons
to improve their quality of life
