
User Manual
Any company, product or service names found in this document may be the trademarks or registered trademarks of their respective companies.

Action!
Gameplay and screen recorder
Thank you for choosing Action! product.
Action! allows real-time recording/capture and live
streaming of Windows desktop in a superb HD video
quality. With Action! you can benchmark and display
game framerates, record or stream your gameplay,
add live audio commentary to create high quality
tutorials, add webcams and more!
Action! is compact, stylish and user friendly.
With outstanding performance and sleek design
Action! defines a new standard of user experience for
real-time gameplay and desktop recording and
streaming software. Enjoy!
Visit Action! home page:
https://mirillis.com/en/products/action.html
2

TABLE OF CONTENTS
3
Minimum System Requirements 4
Recommended System Requirements 5
Installation 6
Product Activation 7
User Inerface – Action! HUD 8
User Inerface – Action! Window overview 9
User Inerface – Action! Tabs 10
Video recording 11
Games & Applications recording 13
Time-shift recording 14
Active Screen recording 15
Selected Applications window recording 16
Web Videos recording in 60 FPS 17
Selected Application recording mode 18
Device recording mode 19
Adding webcams to video recordings 20
Live Streaming Introduction 21
Live Streaming – Broadcast settings 22
Live Streaming 23
Action! RCU 24
Audio recording 25
Video & Audio recording Playback 29
Benchmarking 30
Capture screenshots 31
Export recordings – introduction 32
Export recordings – settings 33
Export recordings – export completed view 34
Exporting to YouTube 35
Exporting to Facebook 36
General settings 37
Video recording settings 38
Webcam settings 40
Audio settings 43
Microphone settings 44
HUD settings 45
Export settings 46
Overlay Graphic settings 47
How to add chat overlay 50
How to add animated logo 51
Drawing Panel 53
How to add bookmarks 54
How to add to excluded processes 55
How to add translation 56
Default Hotkeys 58

MINIMUM SYSTEM REQUIREMENTS
OPERATING SYSTEM
Windows Vista®, Windows 7, Windows 8, Windows 8.1, Windows 10
DirectX® and latest graphics card drivers
Running Action! requires administrator rights.
Action! LIVE Streaming requires internet connection.
RAM MEMORY
512MB
GRAPHICS CARD REQUIREMENTS
Direct3D 9.0 compatible with Pixel Shader 2.0 support
SOUND CARD
DirectX® compatible
CPU
Intel® Celeron® 1.4GHz or equivalent processor
(SSE2 required)
4

RECOMMENDED SYSTEM REQUIREMENTS
HARDWARE ACCELERATED VIDEO RECORDING
DIRECTLY TO MP4 FILE FORMAT / HD STREAMING
Intel® processor with Intel® Quick Sync Video support.
NVIDIA® graphics card with NVENC support.
AMD Radeon™ with AMD Video Codec Engine (VCE) support.
The latest graphics drivers.
HARDWARE ACCELERATED VIDEO ENCODING
FOR EXPORT PROCESS
Intel® Sandy Bridge processor with Intel® Quick Sync Video support.
NVIDIA® graphics card with NVENC support.
NVIDIA® graphics card with NVIDIA® CUDA support.
AMD Radeon™ with AMD Video Codec Engine (VCE) support
H.265/HEVC hardware acceleration for video recording directly to MP4 file format
and for AVI recordings exporting
NVIDIA® GeForce® GTX 960, GTX 965M or higher with NVIDIA NVENC support (up to
4K). NVIDIA GPU driver R358 or above is required
The latest graphics drivers.
5
OPERATING SYSTEM
Windows Vista®, Windows 7, Windows 8, Windows 8.1, Windows 10
DirectX® and latest graphics card drivers
Windows Aero enabled for high quality desktop recording on Windows Vista and
Windows 7
Running Action! requires administrator rights.
Action! LIVE Streaming and Remote Action! require internet connection.
RAM MEMORY
1024MB (1GB)
GRAPHICS CARD REQUIREMENTS
Full Direct3D 10.0 compatible with Pixel Shader 4.0 support
SOUND CARD
DirectX® compatible
CPU
Intel® Core™ 2 Duo 2.0GHz or equivalent processor

INSTALLATION
Action! Installer
Installation
Please remember to use Action! installation file
from a trusted source.
Run Action! installation file and follow the
instructions on the screen. Action! installation
should take a minute or two.
Trial version
After installation Action! will be available as a 30-
day trial and all video recordings will include a
watermark. Product activation is required to
record and LIVE stream videos without
watermark and to continue using the application
after trial period.
Video playback
Action! includes internal basic player dedicated
for video recordings playback.
To playback Action! video recordings in AVI
and MP4 file format you can also use Splash
media player. Splash provides additional
features like SmartSeek, Audio boost, Screen
capture and more. Splash player is available
for download at Mirillis website:
https://mirillis.com/en/downloads/downloads_action.html
6

PRODUCT ACTIVATION
Activation Key
A trial version of Action! can be activated to full
version with an activation key (it may be also
called serial number).
To get an activation key you have to purchase
Action! license. Valid
e-mail address will be required for product
purchase.
Action! is available for purchase at Mirillis online
store:
https://mirillis.com/en/store/onlinestore.html
Product activation
Click activation button to
open
Activation
window, press
“Activate”
button and enter your activation key. Please
make sure that you have entered activation key
correctly. Click “
Activate”
button.
If you have any questions or problems with
Action! activation please read FAQ on Mirillis
website or contact us using online Contact form
available on Mirillis website.
Remember to keep your activation key safe!
7
“About” window – Activation

USER INTERFACE - ACTION! HUD
8
Status icons
Action! HUD status icons:
HUD display position
When Action! is running you can adjust HUD display
position to your needs with F7 hotkey. Please note
that changing HUD display position with a hotkey
does not change “HUD Startup Position” setting.
To change “HUD Startup Position” please check HUD
display settings.
You can hide/show Action! HUD with F6 hotkey.
Reset average framerate
Average framerate value can be easily reset with F5
hotkey.
About Action! HUD
The Action! user interface consists of 2 parts:
Action! window and HUD. HUD is displayed
when Action! is connected to your desktop,
games or applications and provides following
information:
1) current framerate
2) average framerate
3) 3D engine detected
4) status icon
5) progress bar (available for time limited
recordings)
6) free disk space left
7) recording time
8) microphone volume indicator
Normal status for active screen, game
or application
Recording in progress
Normal status for not active screen,
game or application
Recording paused
Time-Shift recording
Saving recording to a file
Benchmarking in progress
Capturing screenshot
Live streaming in progress

USER INTERFACE - ACTION! WINDOW OVERVIEW
9
1. Action! tabs panel
Action! tabs provide access to all Action! features:
video recording, live streaming, benchmarking,
capturing screenshots and Action! settings.
2. Options panel
All options available for selected tab.
3. Top menu
Provides quick access to Action! settings, Accounts
manager, drawing panel etc.
4. File manager and Preview area
Use file manager to manage all your recordings and
screenshots or switch to Preview mode to check
your recordings and streamings setup.

Video Recording
Video Recording tab provides all basic options for
desktop, gameplay and applications recording.
Use the manager to play, delete or export your
recordings.
Live Streaming
Live Streaming tab provides all options for Action!
Live Streaming functionality.
You can check streaming status and setup all
streaming options using this tab.
Audio Recording
Audio Recording tab provides all options for audio
recording functionality. With audio recordings
manager you can play and delete your recordings.
USER INTERFACE - ACTION! TABS
10
About button
This button is available after product activation
and provides basic information about activation
status and current product version.
Capture Screenshots
Capture Screenshots tab provides options for
capturing screenshots. Use the manager to preview
and delete screenshots saved on your hard disk
Benchmarking
Benchmarking tab provides options for games and
applications benchmarking. With the manager you
can preview and delete benchmarks saved on your
hard disk.
Settings
Settings tab provides access to several Action!
settings categories.

Recordings manager
List of video recordings
List of recordings contains thumbnail view of all
Action! video recordings from selected folder.
Use mouse double click on a thumbnail to start
selected video playback.
Manager buttons
The manager contains several buttons providing
access to following actions:
●
Delete selected recording(s)
●
Start playback of selected video
●
Open output folder
●
Export selected video
●
Export selected video to Facebook
●
Export video to YouTube
Video recording options
File format
AVI - very high video quality, using Mirillis
proprietary FICV video codec
MP4 - small file size, ready to upload to YouTube
Video size
This option allows to select output video recording
resolution.
Video scaling does not work for DirectX 8 games
and applications recording in AVI file format. In
this cases video is recorded in
Original
game or
application resolution.
VIDEO RECORDING - INTRODUCTION
11
Video recording
With Action! you can record your gameplay,
desktop and applications in a superb HD
video quality.
For recorded video playback instructions
please see chapter
Video and audio
recordings playback
.
Action! window
Video recording tab

Duration
Allows to limit your recording time to a specific
duration.
Time-Shift
With Time-Shift you will not lose any spectacular
video game action! Please see Time-Shift
Recording chapter page for more information.
Microphone
Allows to enable or disable microphone
recording. More settings for microphone are
available in Settings tab - Microphone Settings.
.
Webcam
Allows to selected webcam device and enable
or disable webcam recording. Advanced
webcam settings are available in Settings tab –
Webcam Settings.
Application
Option available only for Selected application
recording mode. This option allows to select
one application that will be recorded.
Primary/Secondary Sound Device
These options allow you to manage audio in
your video recordings. Please read Audio
Recording chapter page for more information.
VIDEO RECORDING - INTRODUCTION
12
Video framerate
Allows to select video recording framerate.
Recording mode
Recording modes available:
Game view with Action! HUD
Games & applications mode
Action! HUD on desktop
Active screen mode
Games & applications
Active screen
Active desktop region
Device recording

GAMES & APPLICATIONS RECORDING
13
Action! window
Games and applications recording mode
Start recording
Application recording button is not
available for Games & applications recording
mode. Use F9 hotkey to start recording, stop
video recording by pressing F9 hotkey again.
Please note that game or application must be
active to start or stop video recording.
To pause / resume video recording use
Shift+F9 hotkey.
Action! HUD
If you do not want to include HUD in recordings
please check
Do not record HUD in games and
applications
option in Settings/HUD or hide HUD
before recording start with F6 hotkey.
Introduction
Games & applications recording mode is
dedicated to record gameplay and other
DirectX or OpenGL applications.
This recording mode provides exclusive Time-
Shift option. Please see next page to read
more aboutTime-Shift Recording.
Recordings options
Select
Games & applications
recording mode to let Action! automatically
select DirectX and OpenGL games and
applications for recording. When this mode is
selected Action! HUD will be displayed in all
supported games and applications, showing
that Action! Is ready to start recording.
Game view with Action! HUD
Gameplay recording in progress

TIME-SHIFT RECORDING
14
Introduction
Time-Shift
option keeps recording all your
current gameplay action in a short loop
buffer providing possibility to instantly save
your last gameplay actions to a file with a
single hotkey.
With
Time-Shift
you will not lose any
spectacular video game action!
Time-Shift settings
Size - You can set maximum size of the time-
shift file.
Folder (Temp) - select folder where
temporary time-shift files will be stored.
Please note that those settings are not
available when Time-Shift option is enabled.
Please note that Time-Shift duration is limited,
minimum duration is 10 seconds and maximum
duration is limited to 13 minutes.
Action! Window with
Time-Shift option enabled
Time-Shift recording
To use Time-Shift, switch Action! to
Games
& applications
recording mode, enable Time-
Shift option and select your preferred Time-
Shift duration.
Run a game and check the Action! HUD
status. Time-Shift recording is
Indicated with the following icon:
To save Time-Shift recording to a file press a
hotkey (Left ALT + F9).
Please note that saving Time-Shift takes more time
than saving standard video recording.
Time-Shift settings window

ACTIVE SCREEN RECORDING
15
Introduction
Active screen recording mode allows to
record everything that happens on your
screen: all applications, games, all windows
and user actions. You can record live audio
commentary and create tutorials with ease.
Recordings options
To record your screen please select
Active
screen
recording mode
.
Select active screen
For multi-display setup Action! allows to
select which screen will be recorded. Use F8
hotkey to change active desktop.
Action! HUD
If you do not want to include Action! HUD in
recordings please check
Hide HUD during desktop recording
option in
Settings/HUD or hide HUD manually before
recording start with F6 hotkey.
Desktop view with
Active screen recording in progress
Start recording
Press start recording icon or press F9 on
keyboard to start screen recording. You can stop
video recording by pressing recording icon or F9
hotkey again.
To pause / resume video recording use
Shift+F9 hotkey.
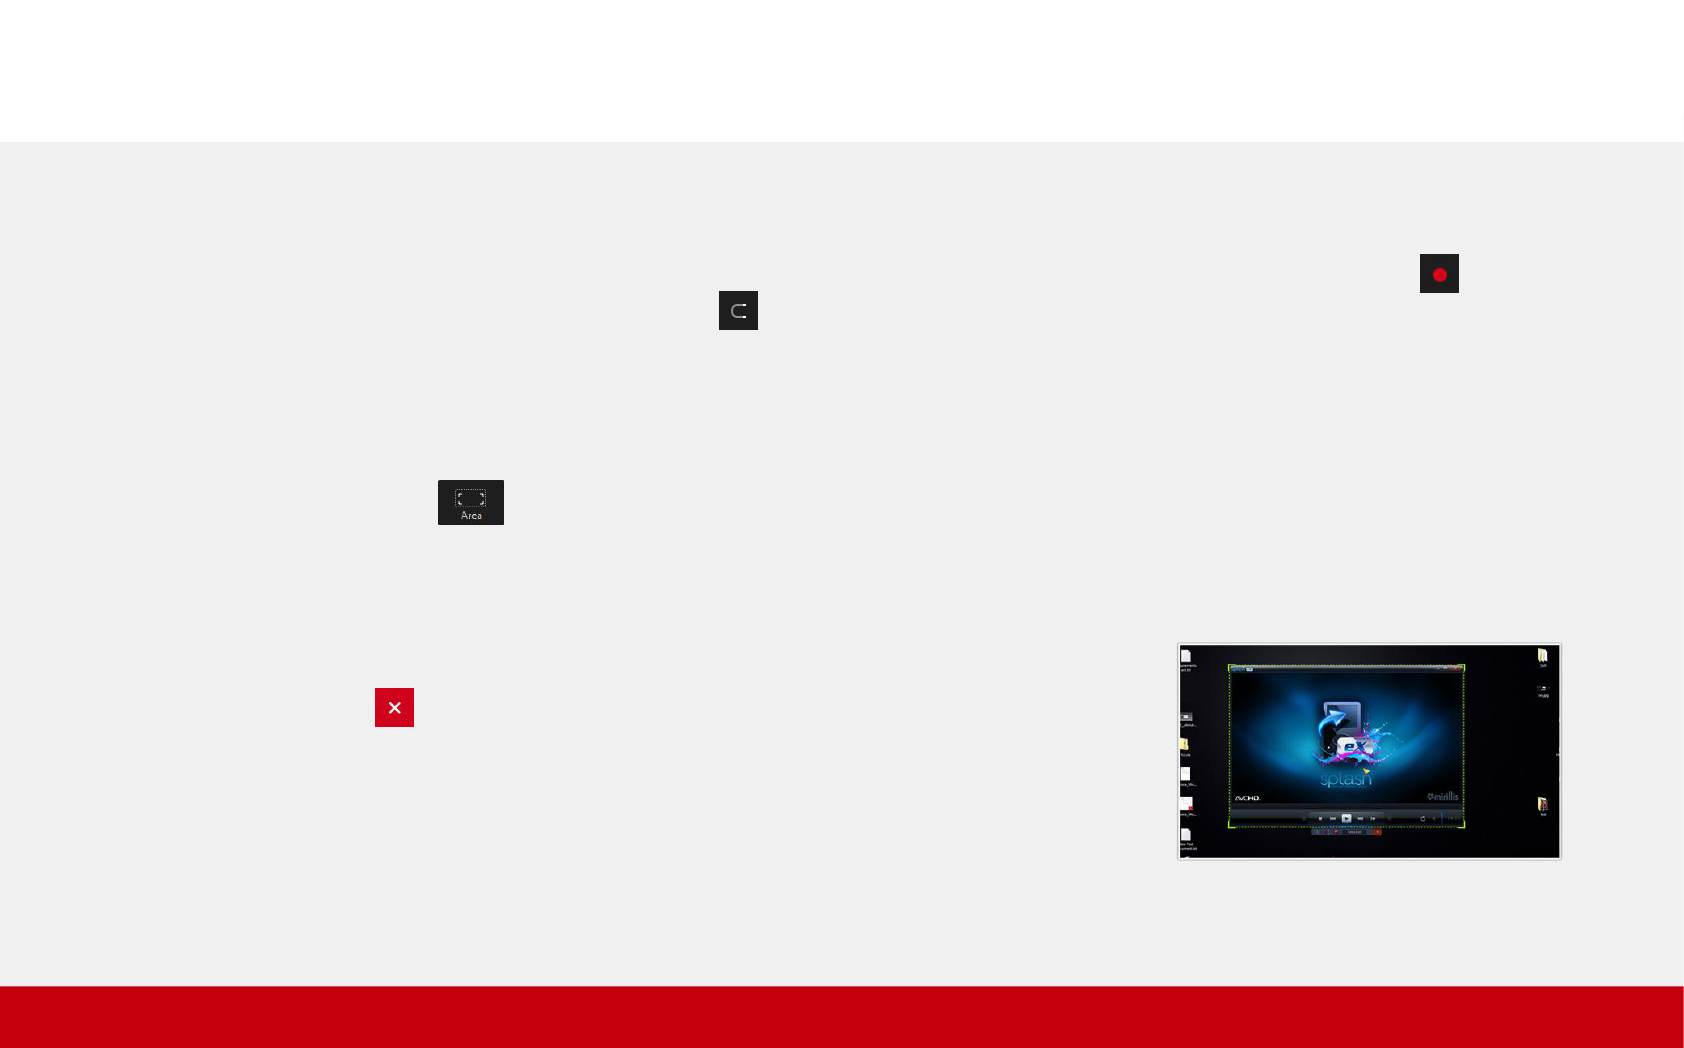
SELECTED APPLICATIONS WINDOW RECORDING WITH REGION MODE
16
Start recording
Press start recording icon or press F9
on keyboard to start active desktop region
video recording. Region frame turns red
during recording process. You can stop video
recording by pressing recording icon or F9
hotkey again.
Introduction
With
Active desktop region
recording mode
you can easily record selected applications
windows.
Recordings options
To record selected application window area
please select
Active desktop region
recording mode
.
This mode switches Action! window to
region recording mode. If you wish to switch
back to main Action! window press
Close
region recording mode
button .
Selecting window
In region recording mode please enable
Snap
to windows
option (hotkey: S) to easily
fit region to applications windows.
Move mouse cursor over applications
windows and region will automatically match
application window area. If you need to adjust
your region size or position click mouse
button or press S hotkey to disable
Snap to
windows
and adjust your region using mouse
or keyboard.
Selecting application window
wtih
Snap to window
option enabled

WEB VIDEOS RECORDING IN 60FPS
17
Start recording
Start source video playback and press start
recording icon or press F9 on keyboard
to start desktop video recording. You can
stop video recording by pressing recording
icon or F9 hotkey again.
Introduction
With Action! you can record videos from
websites and other applications in real-time.
Action! allows to record videos from defined
display region, selected application window
or in fullscreen mode.
For the best results it is recommended to
record videos in following ways:
●
with
Video framerate
set to 60 in Action!
Video Recording
settings
●
with
Video framerate
set to original source
video framerate
Recordings options
Video framerate
To record videos with 60fps please set
Video
framerate
value to 60.
Recording mode
For fullscreen video recording it is
recommended to set
Active screen
mode.
If source video is not played in fullscreen
please change recording mode to
Active
desktop region
and adjust your region
size and position to fit the source video
picture. Enable
Snap to windows
option
(hotkey: S) to easily fit your region to source
video area.

SELECTED APPLICATION RECORDING MODE
18
Selecting application
Click Select application to record dropdown to
show list of all applications available for
recording and find and select application that
you would like to record.
Start recording
Press start recording button or press F9 on your
keyboard to start video recording. You can stop
video recording by pressing recording button or
F9 hotkey again.
Introduction
Selected application recording mode allows
to record video only from one, selected by
user, application. This mode guarantees that
no other application will be included in your
final video recording. All screen area outside
your selected application will be recorded as
black area.
To use Selected application recording mode
press button to switch Action! to
Active screen recording mode and enable
Application option at the bottom of the
screen.
You may find this recording mode very
useful for LIVE Streaming, as it guarantees
that no other than desired information will
be live streamed and shared online.
Selected application recording

DEVICE RECORDING MODE
19
Setup
To record video devices press button to
switch Action! to device recording mode.
Now
select your device from Input device dropdown
and set your preferred capture resolution.
Device preview
To check video preview for selected Input device
switch Action! to preview mode.
Start recording
Press start recording button or press F9 on your
keyboard to start video recording. You can stop
video recording by pressing recording button or
F9 hotkey again.
Introduction
Select device recording mode to capture
video from various video devices. Add your
own logo, webcam, microphone commentary
and record video to your local disk or live
stream to popular services.
Example external video devices that can be
recorded with Action! device recording mode:
●
Game consoles
●
Webcams
●
Other PCs
●
Camcorders
●
TV devices
●
Tablets and smartphones
Device recording mode with preview
window
Connection diagram showing example use
of device recording mode.
GAME CONSOLE
TV WEBCAM
CAPTURE DEVICE

ADDING WEBCAMS TO VIDEO RECORDINGS
20
Action! allows to add picture from webcams
and other capturing devices to all real-time
gameplay and desktop/screen recordings.
Open Webcam Settings to setup webcam
recording. Video recording tab allows to
select webcam device and enable webcam
recording. More settings are available in
Webcam settings.
Adding webcam is very easy with user
friendly options and webcam preview screen.
Use Webcam Preview tick available at the
top-left Action! window to enable webcam
preview showing webcam position and size
in video recording.
Action! Webcam Settings

LIVE STREAMING INTRODUCTION
21
Enable Action! LIVE Streaming
To enable LIVE Streaming open Action! LIVE
tab and check Enable Action! LIVE Streaming
option.
Introduction
You can not only record everything on your
PC, but you can also share it online with LIVE
Streaming functionality. With Action! you can
easily live stream your gameplays or desktop
activity to streaming services like Twitch.TV,
hitbox, Facebook or YouTube.
Trial version lets you test LIVE Streaming
functionality for free, but Action! watermark
will be added to all streamed videos.
Watermark will be removed after activating
Action! with activation key.
Action! Live Streaming tab

LIVE STREAMING - BROADCAST SETTINGS
22
Streaming service
This option allows to setup
streaming service where your live
stream videos will be published.
You can select one from several popular
predefined streaming services or setup your
custom service.
Twitch.tv, YouTube, hitbox and Facebook
services require to log in to your account
before starting live streaming. You may be
also asked to allow Action! application to
publish to your account when using Action!
for the first time.
Please note, that you must use Custom settings if
you want to live stream to selected Facebook
page/channel and provide a stream key. Using
Facebook service settings your live stream will be
published on your wall.
Record streamed video to disk
This option allows to save streamed videos
to the local hard disk in MP4 format.
Auto-reconnect
Allows to automatically restore lost
connection with streaming service.
Video size
You can select broadcasted video size. To
stream in resolution higher than 1080p
please select original video size.
Framerate & Bitrate
Options allow to select video framerate and
bitrate.
Action! Live Streaming Account Manager
Learn more with Action! LIVE Streaming tutorials:
https://mirillis.com/en/products/tutorials/tutorials.html
Login with Facebook window

LIVE STREAMING
23
Action! HUD
After live streaming start HUD status
changes showing that live streaming is in
progress:
HUD displays LIVE status, 3D engine
detected, current framerate and streaming
duration and current number of your live
stream viewers (available for selected
services only).
Start streaming
Setup all streaming options and make sure
that “Enable Action! Live Streaming” option
is checked.
To start LIVE streaming use Start/Stop
streaming button or CTRL+F9 hotkey. You
can stop streaming by pressing Ctrl+F9
hotkey or a button again.
Please note that game or application must
be active to start or stop video streaming
using Games & applications recording mode.
Action! Live Streaming in progress

Action! RCU
24
Enable Action! RCU
To enable Action! RCU please open Action!
General settings, enable Action! RCU and
restart Action!
Run Action! RCU app on your mobile device
and select your PC from Action! RCU
computer list.
Action! RCU app features:
●
Start,stop and pause recordings
●
Start and stop LIVE Streaming
●
Display recorded webcams preview
●
Display FPS information
●
Display video recording time
●
Display 3D engine
●
Display free disk space
Introduction
Free Action! RCU app allows to control your
Action! gameplay and screen recordings with
Android mobile devices! Start, stop, pause
video recordings, display framerate
statistics, webcams preview and video
recording time.
To install Action! RCU on your mobile device
search for “Action! RCU” on Google Play.
Please note that your mobile device and PC
must be connected to the same local
network.
Action! RCU mobile app
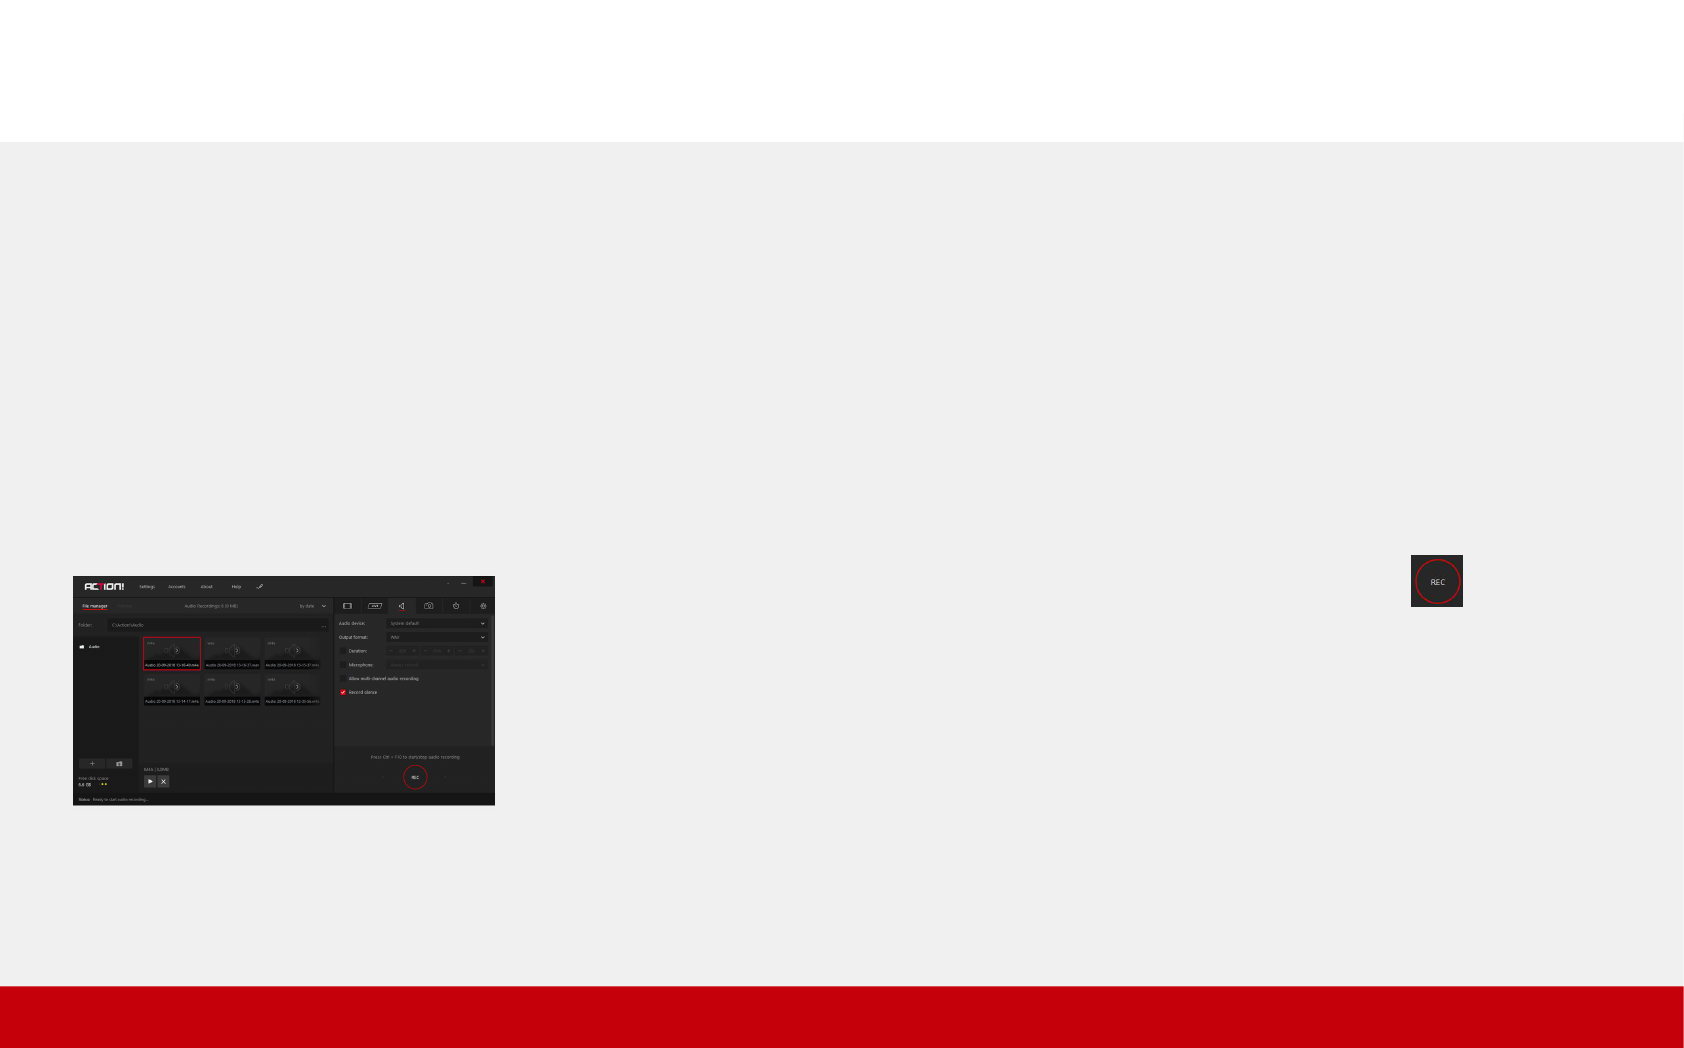
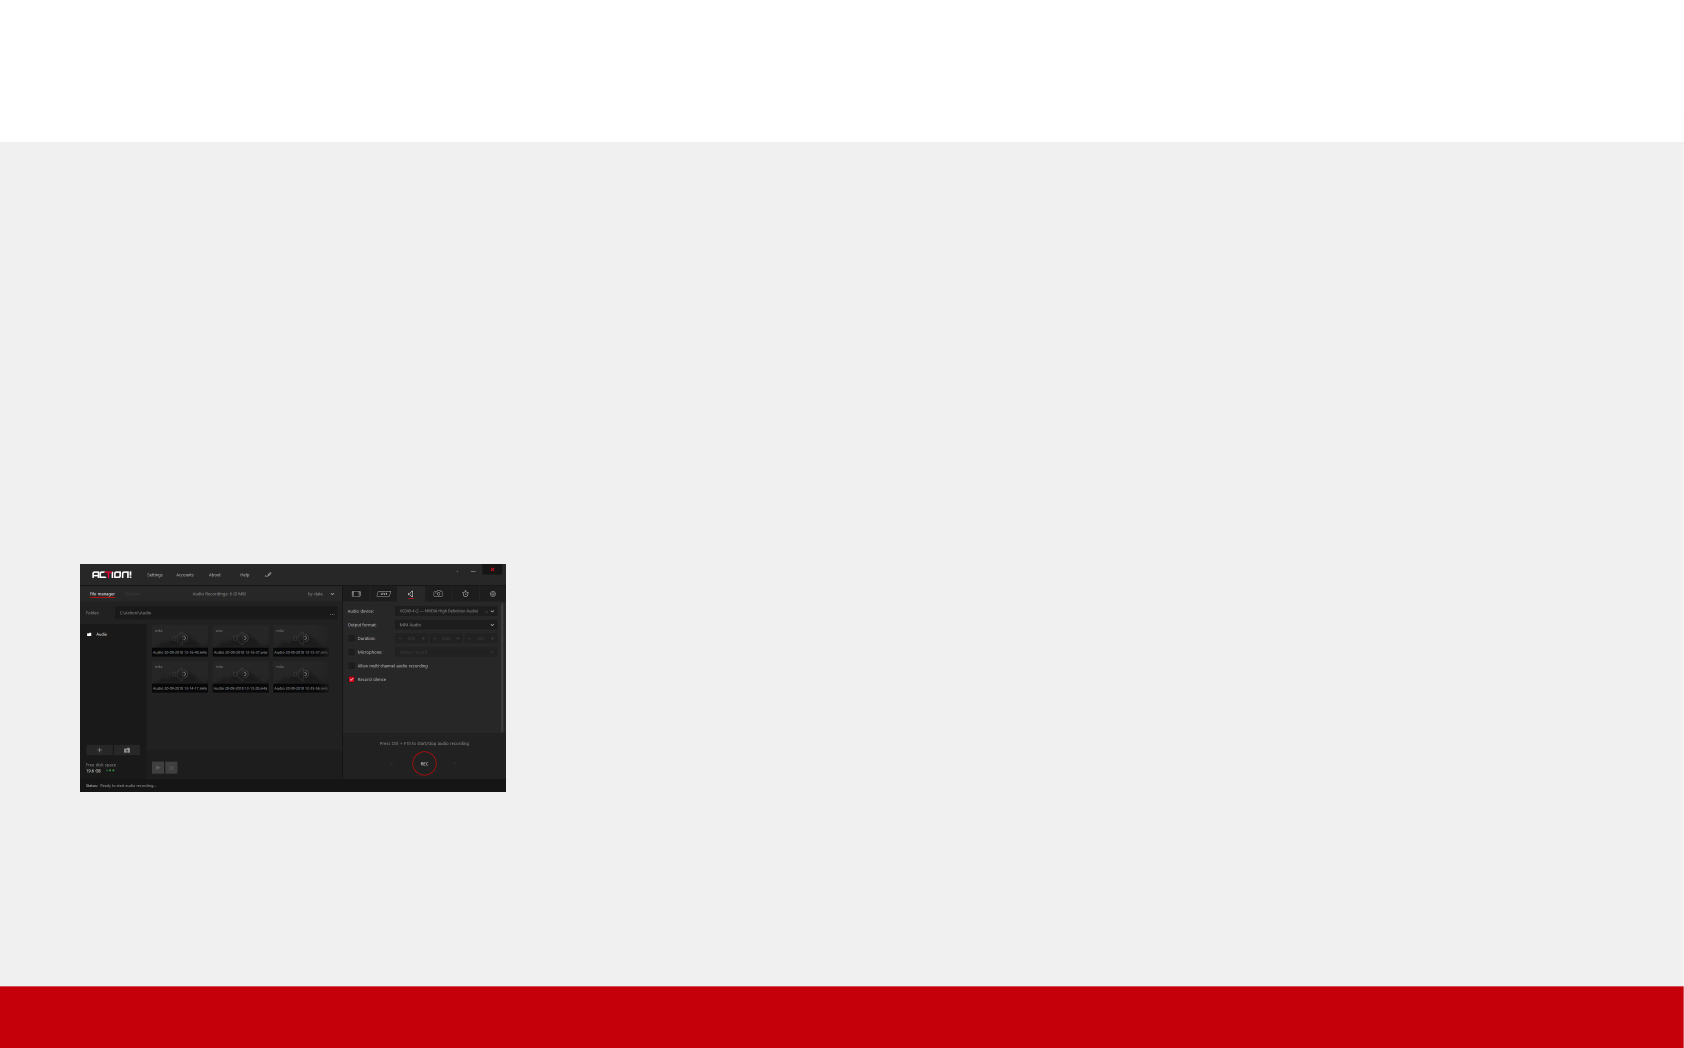
AUDIO RECORDING
25
Action! window
Audio recording tab
Record silence
Activate this option to let Action! record
audio even when there is no system sound
playing.
Microphone
Enable microphone to add live audio
commentary to your audio recordings.
Start recording
Press start recording icon or press Crtl
+ F10 on keyboard to start audio recording.
You can stop audio recording by pressing
recording icon or Crtl + F10 hotkey again.
Recording options
Duration
Enable this option when you want to record
audio for a specific time duration.
Output format
You can select WAV or MP4 Audio output
format. MP4 Audio format makes your
recordings compact and ready to playback
with modern audio playback devices.
Allow multi-channel audio recording
When enabled allows multi-channel audio
recording (i.e. 5.1 audio).
Introduction
Action! can record everything you hear on
your PC. Audio recording function allows to
record music and audio sounds from games,
applications or videos. Using microphone
you can easily create podcasts.

AUDIO RECORDING
26
recommended to set audio device to “System
default”. If you change this option to any other
device e.g. a microphone, the system sounds
(e.g. audio from a game) will not be included in a
video. Use “Volume” slider to adjust device's
volume. To record system sounds and
microphone, set “Primary Sound Device” to
“System default” enable microphone and select
the microphone you want to record. Again, use
“Volume” slider below “Microphone” option to
adjust microphone's volume. If you don’t want to
include any audio in your video disable the
option “Record system sounds” in main Audio
settings. Please remember that if you disable
the option “Record system sounds”, your
microphone will also not be included in the
recording, so there will be no sound in your
video.
three separate files. In this case you will have no
sound in your video.
5. Recording up to 4 audio tracks
simultaneously: microphone to the same file as
video and system sounds but separate track and
additionally including up to two more audio
devices recorded to two other separate audio
files - select this option if you have more audio
devices you want to record for further editing in
a video editor.
Recording video and audio
into one file.
The basic audio track is included in a video, you
can record e.g. video, microphone and system
sounds into one file. Go to main Video Recording
tab and enable “Primary Sound Device” option
and set audio device to “System default”.
“System default” allows you to record the device
selected in your operating system. If you want to
record e.g. audio from a game, it is highly
ACTION! ALLOWS TO RECORD AUDIO IN A
SEVERAL DIFFERENT WAYS:
1. Recording video and audio into one file -
choose this option if you want to have your video
and all audio (microphone and system
sounds/audio from a game) included into one
recording.
2. Recording audio to the separate track but the
same file as video - you might find this option
useful for further video editing in Sony Vegas or
other video editor.
3. Recording audio and video to two separate
files - select this option if you don’t want to
record microphone in the same file as video and
system sounds/audio from a game, but you
want to have your microphone recorded
separately to another file for further editing.
4. Recording audio and video to three separate
files, e.g. video, microphone and system sounds
- select this option if you want to have a video,
microphone and system sounds recorded to

AUDIO RECORDING
27
Recording audio and video to
two separate files
To record your audio device (e.g. a microphone)
to separate audio file go to main Video
Recording tab, select “Enable/disable additional
audio recording into separate audio file” option
and select audio device you want to record. In
this way, you will record your video and system
sound to one file and your microphone to other
separate file.
In “Microphone” settings, enable the option
“Record microphone into separate audio track”.
You are not able to see a separate track in the
interface when the recording is finished, but
after uploading your recording to video editor,
the separate audio track will be visible and
editable. “Microphone” settings allow you also to
set the volume balance between left and right
channel of your microphone. We strongly
recommend leaving this option set to 100% and
adjust it only when there is a problem with
recording microphone on one channel only. If
your system sounds/audio from a game is too
loud, then simple adjust volume levels for
primary sound device and microphone. Please
remember to enable the option “Record system
sound” in main Audio settings - if this option is
disabled no microphone sound will be recorded.
Recording audio to the
separate track but the same
file as video
To record microphone to the same file as video
but separate audio track, go to main Video
Recording tab, enable microphone and open
microphone settings.
AUDIO RECORDING
28
However, if you want to have three separate files
located in the main Video Recording view,
change the microphone file location to the same
as video .
To do this, open Audio Recording tab (speaker
icon) and on the left side of user interface
change the “Folder”, selecting the same folder
you have selected for recording your Video.
To record system sound to separate audio file
(not include in a video), go to main Audio
settings, disable the option “Record system
sounds”, then go to main Video Recording tab,
select “Enable/disable additional audio
recording into separate audio file” option and
select “System default”.
Next make sure that “Microphone” option in
main Video Recording tab is disabled.
Now if you want to record your microphone,
system sounds and video simultaneously, you
will need to set one hotkey (e.g. F10) for all
these options. Go to “Settings” and open
“Hotkeys” tab. Choose one hotkey (e.g. F10) for
“Record Video” and “Record Audio” options.
Now after pressing F10 hotkey, in the main
Video Recording view you will see two active
thumbnails: one for video and the second for
system sounds. To see active microphone
thumbnail go to Audio Recording tab.
Recording audio and video to
three separate files
To record your video, system sounds and
microphone to three separate files follow the
instruction below: To add first separate audio file
to your recording, open Audio Recording tab
(speaker icon), select audio device (e.g.
microphone) and file format.

VIDEO & AUDIO RECORDINGS PLAYBACK
Video tab manager
Audio recordings playback
Select an audio recording and click
play icon or use mouse double click on
a thumbnail to start recording playback.
Audio recording will be played using system
default application for WAV/M4A audio file
format.
Video recordings playback
Action! includes internal fast player
dedicated for video recordings playback.
Select a video recording and click play icon
or use mouse double click on a
thumbnail to start video recording playback.
To playback all Action! video recordings in
AVI and MP4 format you can also use Splash
media player. Splash provides additional
features like SmartSeek, Audio boost, Screen
capture and more.
Splash player is available for download at
Mirillis website:
https://mirillis.com/en/downloads/downloads.html
29
Video recording playback

BENCHMARKING
Action! window
Benchmarking in progress...
Start benchmarking
Press start benchmarking icon or press
F11 on keyboard to start recording
benchmark results. You can stop
benchmarking by pressing icon or F11
hotkey again.
Benchmark button is not available for
Games
& applications
recording mode selected in
Video recordings tab. Please note that in this
mode game or application must be active to
start or stop benchmarking using a hotkey.
Benchmark files
Select a benchmark file in manager list and
click open icon or use mouse double
click on a thumbnail to view selected
benchmark results.
Benchmark file will be opened using system
default application for CSV file format or a
default web browser for HTML files.
Benchmarking options
Duration
Enable this option when you want to record
benchmark results for a specific duration.
30
Introduction
Action! allows to benchmark desktop and all
supported DirectX or OpenGL games and
applications performance. Benchmark
results are saved in popular CSV or HMTL
file format.

31
CAPTURE SCREENSHOTS
Action! window
Capture screenshots tab
Capture screenshot
Press capture screenshot button or
press F12 on your keyboard to capture a
screenshot.
Capture screenshot button is not available
for
Games & applications
recording mode
selected in Video recordings tab. Use F12
hotkey to capture screenshots of your active
games and applications.
Capture options
File format
Allows to select one of available output file
formats: BMP, PNG, JPG.
Screenshot area
For multi-display setups it is possible to
select to capture a screenshot from all
screens or from a single screen only. This
option is available for
Active screen
recording mode selected in Video Recording
tab.
Introduction
Action! allows to capture screenshots of
your desktop and all supported DirectX or
OpenGL games and applications.
Select a screenshot in manager list and
click open icon or use mouse double
click on a thumbnail to view selected
screenshot.

Introduction
Action! allows to export your AVI video recordings
to all popular formats and devices. Your video
recordings are exported to MP4 file format and the
exported video is coded using H.264/AVC or
H.265/HEVC video compression standard, exported
audio is coded using AAC compression standard
(supported outputs are Stereo or 5.1).
All your MP4 video recordings can be uploaded
directly to YouTube or Facebook.
Export window
To start exporting, select a recording on your
recordings list and click
Export
button . To
hide all Action! windows click “hide” icon in the top
right corner of the Export window. Use “close” icon
to close the window, using “close” icon will stop all
exporting or uploading processes.
Exporting to YouTube and Facebook
YouTube and Facebook export profiles contain 2
settings pages (export and upload settings) and
automatically upload the exported file after
export process is completed. Use
buttons to navigate through YouTube and
Facebook profile settings pages.
EXPORT RECORDINGS - INTRODUCTION
32
Export window - Export settings

Output profile
Action! output profiles contain popular video
resolutions and predefined profiles for popular
devices providing fast and easy exporting setup.
Video size
With Video size list you can easily set your output
video size and framerate.
Please note, that Action! Export does not offer
video upscaling and only lower or equal resolutions
to your input resolution are available.
Video bitrate
Action! default video bitrate setting provides
high quality video. You can lower the video
bitrate setting to create smaller files or set
higher bitrate for better video quality.
Audio Track and Output
With audio settings you can disable audio
output.
Output size
Shows the estimated size of exported file. Green
color indicates that the exported file will be
smaller than the input file, red color indicates
that the exported file will be larger than the
input file.
33
Export window - Export in progress
EXPORT RECORDINGS - SETTINGS

Hardware acceleration
The GPU icon is displayed whenever hardware
acceleration for video encoding is used during
exporting.
Export completed
Export completed view contains short information
about exported file and icons providing fast access
to popular actions:
34
Export completed
PLAY
Starts playback of the exported file.
OPEN FOLDER
Opens the folder where the exported
file has been saved.
EXPORT RECORDINGS - EXPORT COMPLETED VIEW
AMD video encoding acceleration
Intel video encoding acceleration
Nvidia video encoding acceleration

YouTube profile
To export AVI recording or upload MP4 video
recording to YouTube please select a recording in
main Action! window and click
button. In Export window YouTube profile will be
automatically selected. Now, click Login with
Google button to continue.
Login with Google
Login window appears after pressing Login with
Google button. Login to your Google account and
select your target channel
For AVI recordings, please setup all exporting
options and click next button to show
YouTube settings page.
Privacy settings
●
Public (anyone can search for and view -
recommended)
●
Unlisted - means that only people who know
the link to the video can view it. The video will
not appear in any of YouTube's public spaces,
such as search results, your channel, or the
Browse page, but the link can be shared with
anyone.
●
Private (only specific YouTube users can view)
Start exporting to YouTube
Please read the Terms of Use displayed at the
top of the window and press START button to
upload a file to the selected service. Please
remember that you must be logged in to access
START button.
.
EXPORTING TO YOUTUBE
35
YouTube upload setup

Facebook profile
To export AVI recording or upload MP4 video
recording to Facebook please select a recording in
main Action! window and click
button. In Export window Facebook profile will be
automatically selected. Now, use Login with
Facebook button to continue.
Login with Facebook
Login window appears after pressing Login with
Facebook button. Login to your Facebook account.
You may be asked for Mirillis Streamer application
authorization when using Action! for the first time.
For AVI recordings, please setup all exporting
options and click next button to show
Facebook settings page.
Privacy controls:
●
Public (Everyone)
●
Private
●
Friends Only
●
Friends of Friends
Start exporting to Facebook
Please read the Terms of Use displayed at the top
of the window and press START button. Please
remember that you must be logged in to access
START button.
EXPORTING TO FACEBOOK
36
Facebook upload setup

37
START APPLICATION MINIMIZED TO TRAY
When you are familiar with hotkeys you can select
this option to start Action! minimized to tray. To
show Action! window double click Action! tray icon.
HIDE ACTION! WINDOW ON DESKTOP
RECORDING START
Select this option to hide Action! window to tray
mode before desktop recording starts.
SHOW ACTION! WINDOW WHEN DESKTOP
RECORDING IS FINISHED
This option shows Action! window when
desktop recording is finished. You can
immediately start playback, delete recordings or
export and upload recordings to YouTube or
Facebook.
HIDE PREVIEW ON RECORDING.STREAMING
START ( FOR BETTER PERFORMANCE)
This option automatically closes preview when
starting recording/streaming.
RUN ACTION! ON WINDOWS START
This option allows to automatically run Action! on
system startup.
ENABLE ACTION! RCU
Enable this option to remotely control recordings
with free Action! RCU app
EXCLUDED PROCESSES
This option allows you to exclude selected
application, so Action! won't detect this application.
GENERAL SETTINGS
Action! General settings
LANGUAGE
Allows to change Action! user interface language.
CHECK FOR UPDATES
This option enables automatic updates. Product
update availability is checked on application start
and application will ask you to install the update
when it is available.
Action! Exclude processes window
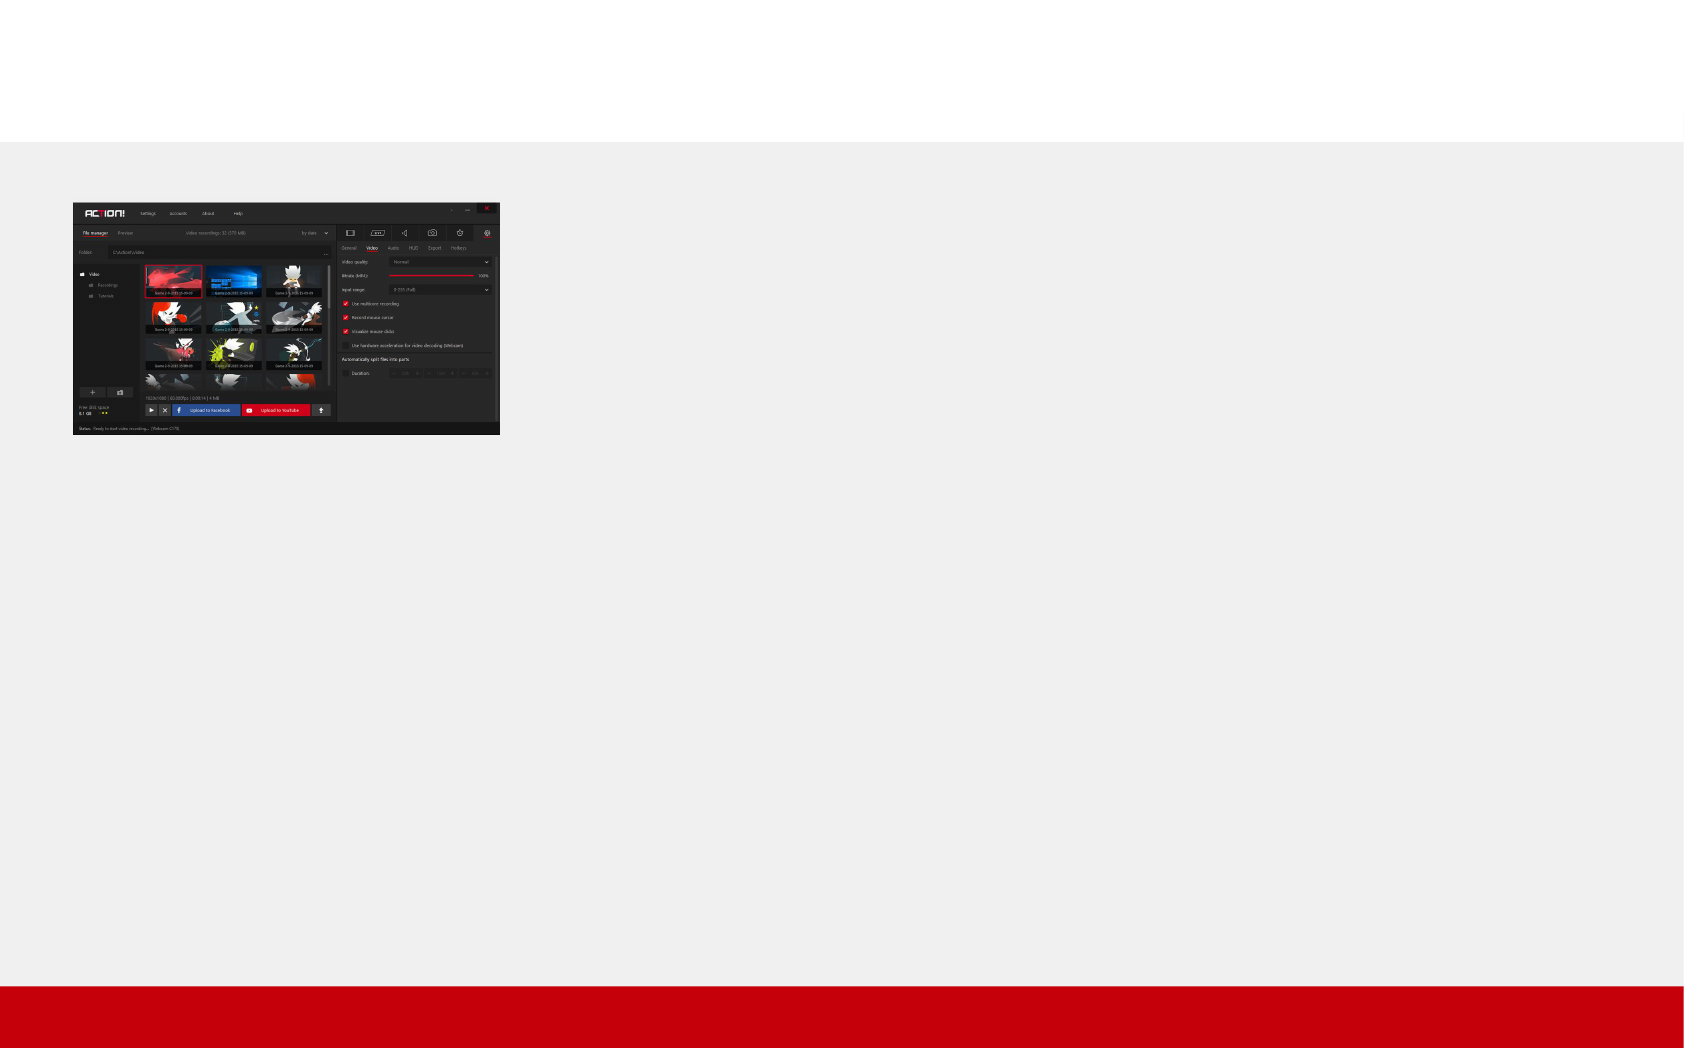
VIDEO RECORDING SETTINGS
38
INPUT RANGE
For most video recordings it is recommended to
use wide input range (0-255). However in some
cases (in example web videos or fullscreen
videos recording) narrow input range (16-235)
may give a better result.
USE MULTICORE RECORDING
Action! uses an optimized, multicore video
encoding algorithm for video recording. In some
cases single core encoding may result in better
performance. Disable this option to let Action!
encode video (during recording) utilizing only a
single CPU core.
RECORD MOUSE CURSOR
This option adds mouse cursor
to recorded video.
VISUALIZE MOUSE CLICKS
This option helps to create fantastic and clear
tutorials by adding animated mouse clicks
visualizations to recorded video.
Mouse click visualizations are only available for
desktop recordings in original video size.
USE HARDWARE ACCELERATION FOR VIDEO
DECODING (WEBCAM)
This option allows to use the power of the
integrated Intel graphics card for decoding video
from a webcam operating in mjpeg format. This
option requires an Intel processor with an
integrated graphics processor supporting Intel
Quick Sync technology.
AUTOMATICALLY SPLITS FILES INTO PARTS
This option allows you to automatically split the
recording into separate files. The recording
automatically ends after the set time has
elapsed and the new recording is started.
Action! Video recording settings
VIDEO QUALITY
Allows to select output video quality for your
recordings. Select “Low” quality to reduce output
file size and increase recording performance.
BITRATE (MP4)
Allows to control output MP4 recordings video
bitrate. Set lower bitrate values to reduce MP4
output file size.

39
HARDWARE ACCELERATION
Hardware acceleration allows to utilize the
computing power of graphics card to video
encoding.
Leveraging the computing power of graphics card
offloads CPU. This leads to better utilizing of
individual PC components and more efficient work
of operating system.
Action! allows to utilize four different hardware
accelerations: NVIDIA NVENC,
NVIDIA NVENC HEVC, Intel Quick Sync, AMD AMF.
If you have two or more NVIDIA graphics cards
supporting hardware acceleration, you can
additionally decide which one will be used to
record the video.
To do so, please click the settings button that is
located next to hardware acceleration options and
select a card from the list.
.
VIDEO RECORDING SETTINGS
Hardware acceleration settings
Variable and Constant framerates
VFR - variable framerate - it means that the
frame rate might change actively during video
recording. Action! encodes the video with a
chosen framerate, however, if a PC is not able to
sustain the constant framerate, the framerate
will change to keep the optimal performance.
CFR - constant framerate - in this mode Action!
does not change the framerate trying to keep
constant framerate. However, if the encoder
performance is not enough Action! will ultimately
switch to VFR mode.
The choice of either VFR or CFR is available
only for MP4 format. In AVI format the encoder
works only in CFR mode.
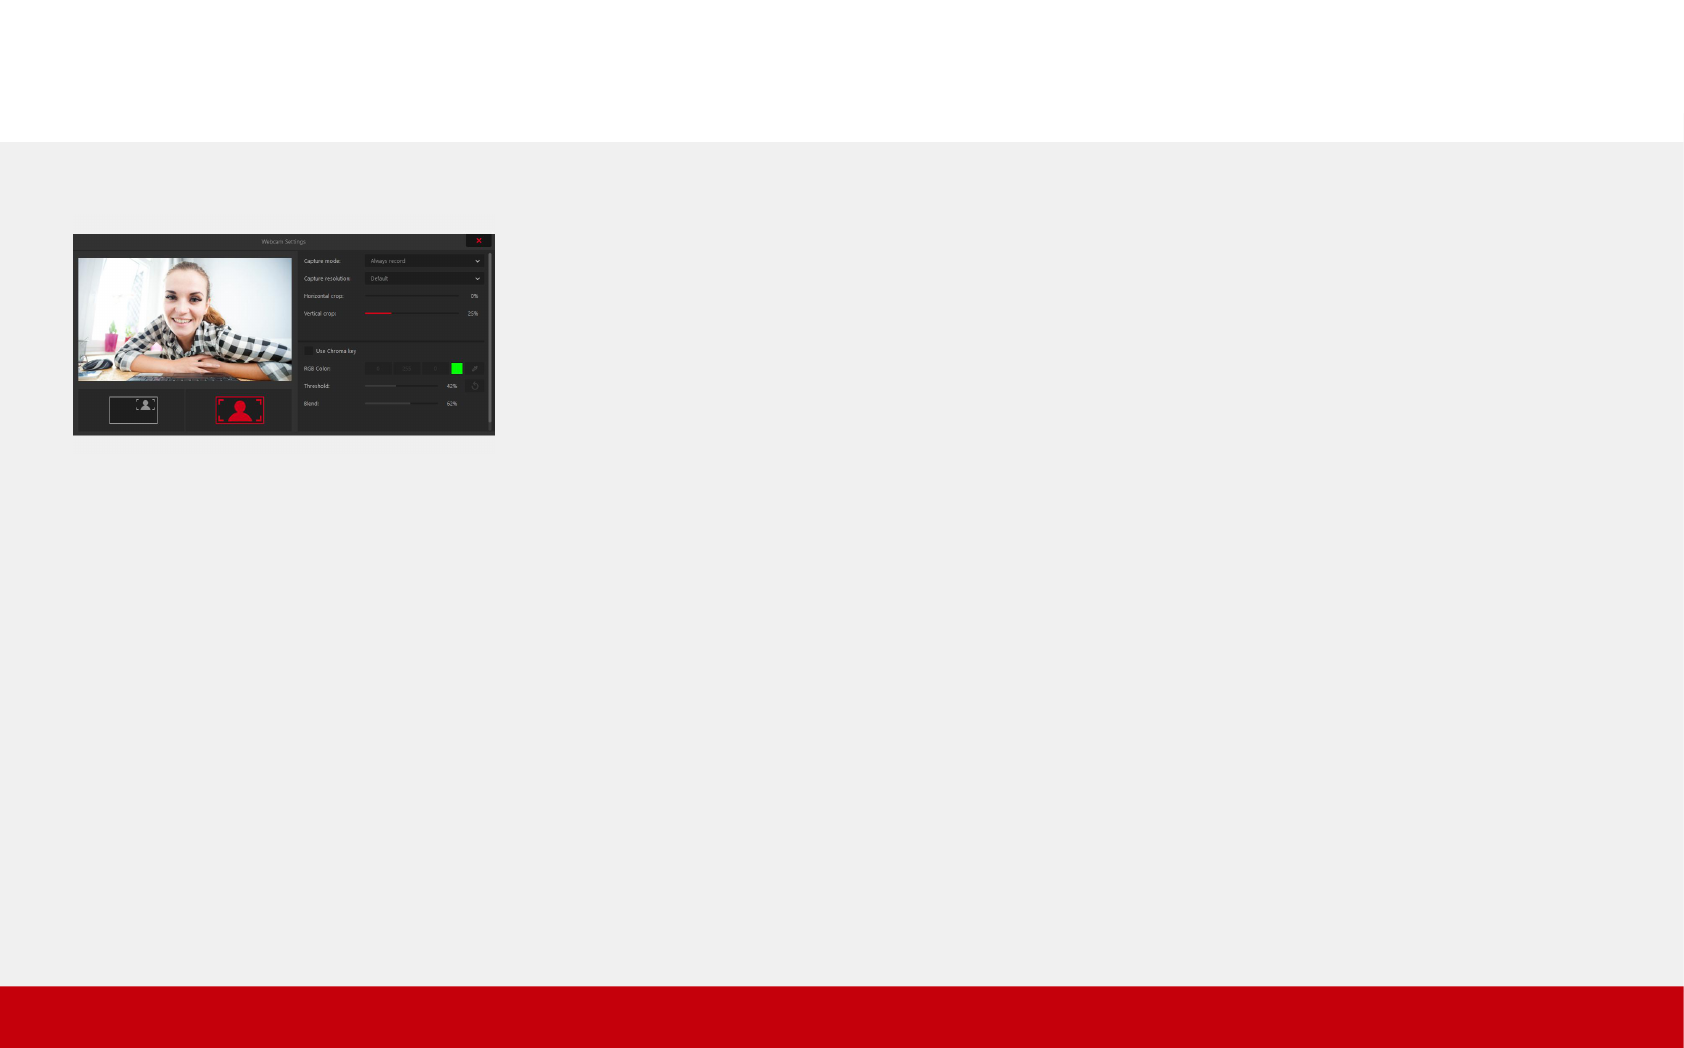
WEBCAM SETTINGS
40
Webcam settings allow to include picture from
webcam in gameplay and desktop recordings.
RECORDING MODE
This setting allows to set recording mode:
- enable continuous webcam recording
- enable option to record webcam on button
down (default hotkey: F4)
- enable and disable webcam recording using a
hotkey (default hotkey: F4)
- record webcam to separate video file. The
video is recorded in .avi extension
WEBCAM CROP SETTINGS
Allows you to crop webcam's video vertically and
horizontally.
Please note that crop settings can be seen
when in Detailed Webcam preview.
CAPTURE RESOLUTION
Allows to change webcam capture quality.
Please note that higher resolution may impact
overall recording performance. Using resolution
Higher than 1280x720 is not recommended.
VIDEO SIZE
This option allows to control size of the webcam
picture in final video recording.
POSITION
Allows to set webcam horizontal and vertical
position.
CHROMA KEY
With chroma key you can setup Action! To
record your webcam with automatic background
removal. You can additionally use alpha mask to
make your webcam picture fit even better to
your video recording.
Action! Webcam Settings

WEBCAM SETTINGS – GREEN SCREEN
41
3. Make sure that the background behind you
has a uniform color (e.g. green).
4. Enable the option „Chroma Key”.
5. Click the tool „color picker” and then click the
background to adjust the color of your green
screen.
6. Drag the „Treshold” and „Blend” sliders to get
the best result.
1. Run Action! and open webcam settings.
2. Maximize the camera view.

WEBCAM SETTINGS – How to record webcam into a separate file
42
Follow steps below to record webcam into
separate file.
1. Go to Video Recording tab and enable
Webcam option.
2. Open Webcam Settings. Webcam Settings
button is right next to selected Webcam device.
3. In Webcam Settings window extend “Capture
mode” list and select “Save webcam video as a
separate file (.avi)” option.
Please note that webcam is saved in avi file.
Recorded file can be exported to MP4 using
Export feature in Action!
“Save webcam as separate file” option

AUDIO SETTINGS
43
RECORD SYSTEM SOUNDS
This setting allows to disable audio recording.
No audio will be added to your video recordings.
ALLOW MULTI-CHANNEL AUDIO RECORDING
This setting allows to record multi-channel
audio. When option is disabled all audio will be
recorded in stereo format.
AAC BITRATE
This option is used for M4A audio recordings,
MP4 video recordings and video recordings
export.
Action! Audio settings
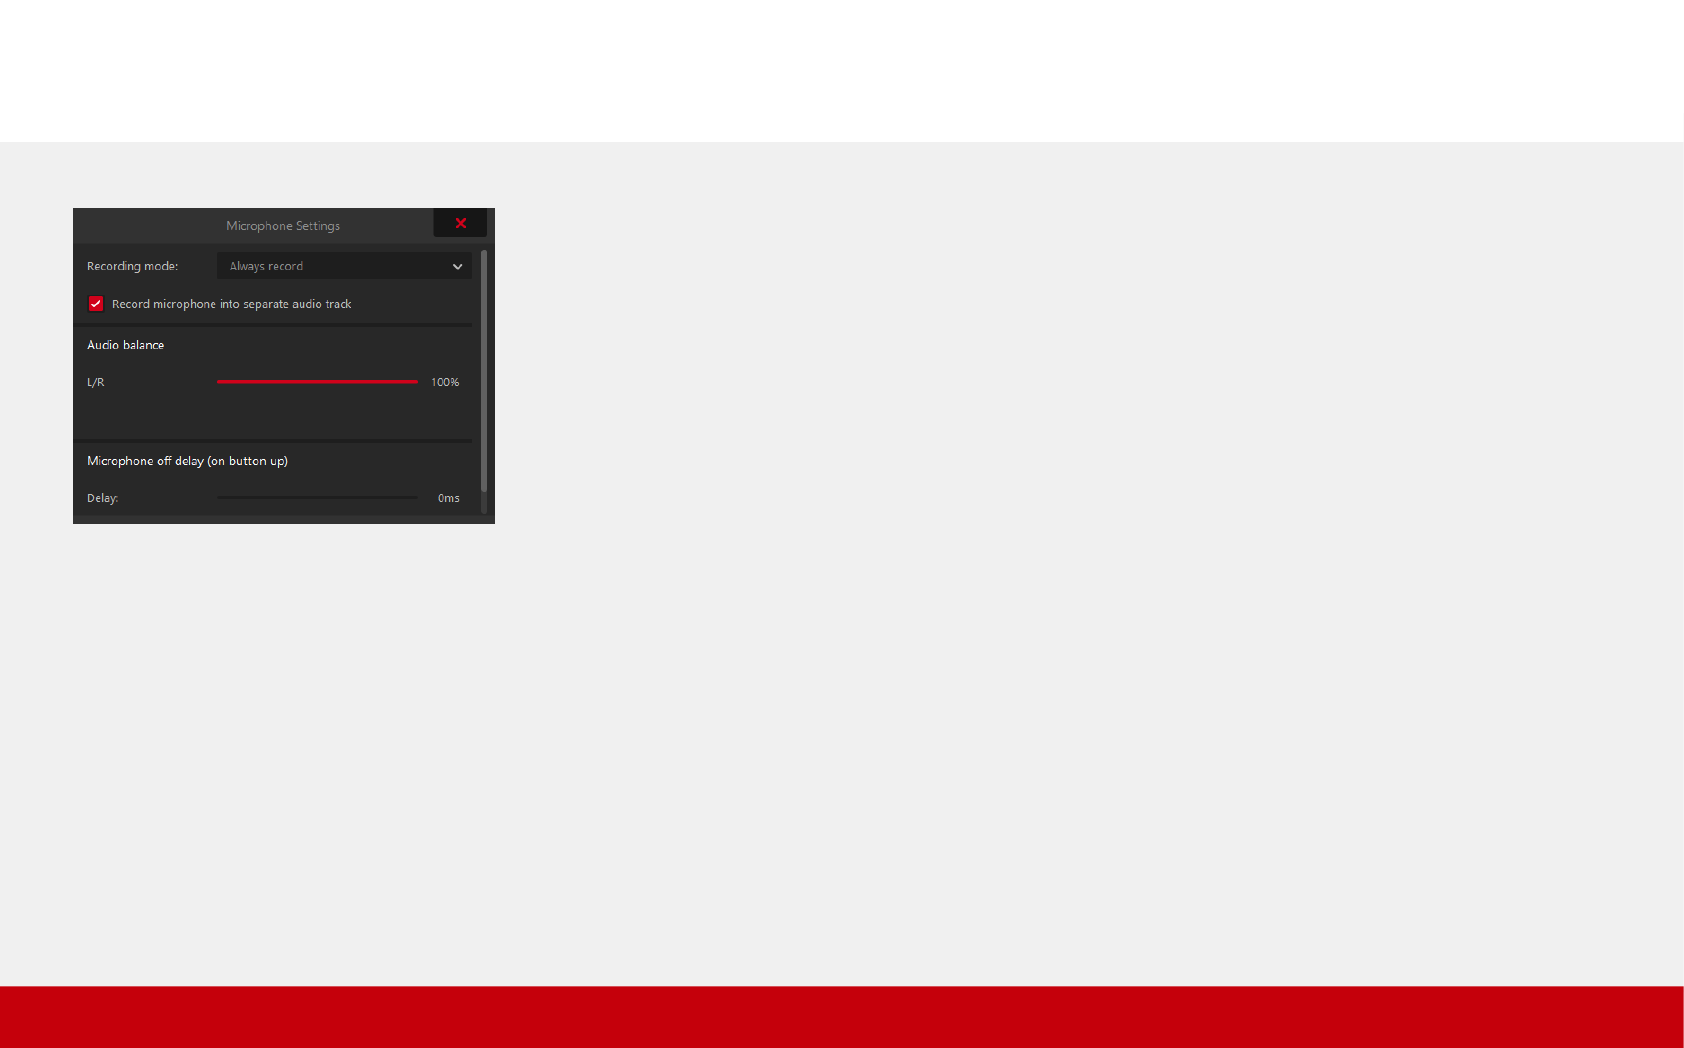
MICROPHONE SETTINGS
44
MICROPHONE RECORDING MODE
This setting allows to set recording mode:
- enable continuous microphone recording
- enable option to record microphone on button
down (default hotkey: F4)
- enable and disable microphone recording using
a hotkey (default hotkey: F4)
MICROPHONE VOLUME
This setting controls the microphone input
volume.
RECORD MICROPHONE INTO SEPARATE
AUDIO TRACK
This setting allows to record microphone
commentary to separate audio track.
Recording microphone to separate audio track
won't have any effect while Action! LIVE
Streaming
Action! Microphone settings
AUDIO BALANCE
Audio balance controls the balance between
microphone and system sounds. Adjust this
option to record clear live audio commentary.
Click Reset to default icon to reset microphone
volume and audio balance to default settings.
MICROPHONE OFF DELAY
This option allows to add additional delay to
switching microphone recording off using record
on button down microphone recording mode.

HUD SETTINGS
45
OPACITY
This setting lets you control Action! HUD opacity.
(available for Windows 7/8/8.1/10 Desktop, D3D9, D3D10,
D3D11, D3D12 and OpenGL)
DO NOT RECORD HUD DURING DESKTOP
RECORDING
Enable this option when you do not want HUD to
be included in your desktop recordings.
DO NOT RECORD HUD
IN GAMES & APPLICATIONS
With this option enabled Action! will display HUD
in games and applications, but HUD will not be
included in your recordings.
HIDE HUD ON ACTION! STARTUP
Enable this option to automatically hide HUD on
every Action! Startup.
SHOW RECORDED WEBCAMS PREVIEW
With this option you can enable recorded
webcam preview in Action! HUD and Action! RCU
app.
SHOW LIVE STREAMING VIEWERS STATISTICS
With this option you can display the current
number of your LIVE stream viewers.
HUD STARTUP POSITION
This setting lets you decide where Action!
displays HUD on startup.
When Action! is running you can change HUD
display position with a hotkey (default hotkey:
F7). Please note that changing HUD display
position with a hotkey does not change “HUD
Startup Position” setting.
Action! HUD settings

HARDWARE ACCELERATION
Use hardware acceleration for video encoding to
speed up exporting process and lower CPU
consumption.
EXPORT MOUSE CURSOR AND MOUSE
CLICKS VISUALIZATIONS
With this option enabled Action! will include
recorded mouse cursor in exported video and
additionally can export mouse clicks
visualizations.
EXPORT OUTPUT FOLDER
This option lets you change the destination
folder for exported files.
EXPORT SETTINGS
46
Action! Export settings

OVERLAY GRAPHICS SETTINGS
47
OVERLAY GRAPHICS SCALING
Next to „Overlay graphics” options there is a path
to currently selected file. Click on it to select the
right graphics.
To resize and reposition your logo overlay go to
preview mode.
Enable the option „Overlay graphics” and make
sure that „Draggable mode” option is also
enabled. You can easily change the position of
the graphics by clicking on it and dragging with a
mouse cursor in the preview mode.
To change the size of your graphics overlay or
logo in a preview mode, click on the bottom right
corner of the overlay and move it.
OVERLAY GRAPHICS SETTINGS
Overlay graphics settings allow to add custom
logo and other overlay graphics to recorded
video.
Using overlay graphics you can brand videos with
your own logo or watermark, add frames around
the video etc.
Supported file formats are:
●
BMP
●
JPG
●
PNG (with alpha channel)
Maximum supported input graphics resolution is
3840x2160.
+

HOW TO ADD CHAT OVERLAY
48
5. Click “ADD WIDGET”, go to “Miscellaneous” and
select Chat.
6. Adjust the size and position of your widget.
1. Go to player.me
2. Log in using your Twitch/YouTube or other
streaming service account.
3. Go to the left, click “My overlays” tab. Click
“Add overlay” button to create a new overlay.
4. Click on the three dots icon and select edit.
The editor will open in a new tab.

HOW TO ADD CHAT OVERLAY
49
11. Remember to enable “Custom URL sources” and
“Url 1” options to add your chat to your video and/or
display chat on your screen.
7. Click the “Save” button above to save the
overlay
8. Close editor. Go to your overlay list, hover over
your new chat overlay and select “Copy link to
clipboard”
9. Run Action!, go to LIVE tab and scroll down to
Overlay sources.
10. Paste the URL address into “Url 1” and select
“Output mode”. Select “Video” if you want to
include chat in your video. Select “Video + HUD”
option if you want to include chat in your video
and see chat on HUD during streaming. “Video”
and “Video + HUD” output modes allow to display
chat on a stream making it visible for viewers.
Select “HUD” if you want to see chat during
streaming but you don’t want to include chat in
your video and streaming. If “HUD” output mode is
selected, chat is visible only for you, your viewers
will not see the chat on your stream.

HOW TO ADD CHAT OVERLAY
50
.
.
12. Go to “Preview” mode to resize and reposition
chat on your screen
ADDITIONAL INFORMATION
You can use chat overlays from other websites.
Create an overlay, and follow steps 9-12 in order
to properly add the chat overlay to Mirillis Action!

HOW TO ADD ANIMATED LOGO (.gif, .png)
51
7. Open the settings of added source to crop the
graphic overlay.
1. Open a new notepad document and type
<html><body><img src=””/></body></html>
2. In img quotation marks paste the url address
or path to the gif file you want to use.
3. Save the file with .html extention, e.g.
Logo.html.
4. Run Action!, go to LIVE tab and scroll down to
Overlay sources section.
5. Paste the path to the gif file in any of the URL
field.
6. Remember to enable “Custom URL source” and
the URL field with the path.

HOW TO ADD ANIMATED LOGO (.gif, .png)
52
.
.
8. If the gif doesn’t have alpha channel (the
background is transparent), you can skip the first
three points and paste url address or path
location directly to Action!
9. You can change the position of your animated
logo in a Preview mode.

DRAWING PANEL
53
The „x” button allows you to clear the screen from all
annotations and drawings. The last button is used to
hide the panel.
Drawing panel can be opened either by using Ctrl + H
hotkeys or by clicking the pencil icon localized at the
top bar of Action! interface.
You can easily and quickly undo or redo changes by
using popular shortcuts Ctrl + Z and Ctrl + Y.
Drawing panel allows to easily add graphic
elements and text in any place on the screen.
Click „Drawing panel” icon to open the tool.
Drawing panel displays few different buttons. The
first button on the left enables/disables the
drawing mode. If the drawing mode is on, you
cannot interact with application winows or icons
on the screen.
Under the second button, there is a list of
available drawing tools you can use: marking tool,
text, arrow, line, square, ellipse and pencil.
The third button allows you to choose the
lineweight and font size.
The fourth icon opens color palette.
Action! Drawing Panel icon
Action! Drawing Panel settings

HOW TO ADD BOOKMARKS
54
After the recording is finished, in the recording
catalogue you will find a text file that indicates all
interesting (bookmarked) moments in your video.
To mark an interesting moment in the recording,
add a bookmark by pressing Ctrl + B shortcuts.
Such a bookmark will also help you quickly
localize the interesting part of the recording in a
video editor.
You can easily change the shortcuts
configuration. To do so, go to Settings →
Hotkeys.
You can add many bookmarks to your video
recording.
The recording that includes bookmarks is marked
with a blue bookmark symbol.
Action! File manager Notepad with saved bookmarks

HOW TO ADD TO EXCLUDE PROCESSES
55
5. After selecting the process, restart the application
to save changes.
6. From now on, Action! will not hook up with the
excluded processes.
If you don't want Action! to connect with a
selected application e.g. game launcher, you can
add this application to the list of excluded
processes.
1. Run Action! and go to Settings → General tab.
2. At the bottom of the tab you will find a list of
excluded processes. Click „Show list” to drop
down the list.
3. Click „+” symbol to add proces to the list..
4. Next, open the catalogue that contains the
program you want to exclude and select this
program. (file with .exe extension).

HOW TO ADD TRANSLATION TO ACTION!
56
6. Copy the saved file to „lang” catalogue.
1. Open Action! catalogue and go to „lang” folder.
2. Select .xml file in the language you want to
translate from, e.g. English.xml.
3. Open the file in Notepad++ or Visual Studio or
any other program that does not change the
coding and allows easy editing of .xml files.
4. Translate all lines and don't forget to enter your
name as the author of the translation in a
dedicated for that purpose place in the file
5. As you translate the file, click „File” „Save →
as” and save the file to an area you can easily
access (for example the Desktop). Name the file
using English name of the translation e.g.
Swedish.xml. To save the file directly to Action!
catalogue, open the editing program with
administrator's rights.

HOW TO ADD TRANSLATION TO ACTION!
57
7. In the same way translate one file from lang_ex
catalogue. To make translaion available in Action!
You need to translate files from both lang and
lang-ex catalogue.
8. Your translation should appear in Action!
Settings General Language→ → . Choose the
translation and run Action! again to change the
language.

BASIC ACTIONS
DEFAULT HOTKEYS
58
ACTION! HUD
MICROPHONE / WEBCAM
Enable microphone / webcam recording F4
Reset average framerate F5
Show / Hide FPS panel F6
Change FPS panel position F7
REGION CONTROL
ACTION! PLAYER SHORTCUTS
Space
Stop S
F
Loop On/Off L
+
-
M
A
Enter Full-screen Enter
Enter, Esc
0
~,1,2
i
Alt+F4, Shift+X
Play/Pause
Open Next File PageDown, Ctrl+ArrowDown
Open Previous File PageUp, Ctrl+ArrowUp
Frame by frame
Jump Forward ArrowRight
Jump Backward ArrowLeft
Jump Forward (x2) Shift + ArrowRight
Jump Backward (x2) Shift + ArrowLeft
Volume Up
Volume Down
Mute On/Off
Next audio track
Exit Full-screen
Default Window Size
50%,100%, 200% Video Size
Show file information
Exit
Move region Arrows
Resize region Shift+Arrows
Snap to windows ON / OFF S
Default region position and size 0
F9
Ctrl + F10
F11
F12
F8
Ctrl+F9
Shift+F9
Ctrl+Del
Ctrl+B
Ctrl+F
Start / Stop video recording
Start / Stop audio recording
Start / Stop benchmarking
Capture Screenshots
Change active desktop
Start / Stop Live streaming
Pause/resume video recording
Save Time-Shift to a file Left_Alt + F9
Cancel video recording
Add bookmark
Mark video recording as favorite

OPERATING SYSTEMS RESTRICTIONS
Operating systems and hardware configurations restrictions.
Windows Vista®, Windows 7, Windows 8 /
8.1 / 10
DESKTOP RECORDING
Windows Aero is required for high quality recording on Windows Vista and
Windows 7.
RECORDING WEB AND MEDIA PLAYERS VIDEOS
May not be available for copy protected HD content.
Windows® XP
Action! is not available for Windows® XP.
59

Performance
PERFORMANCE
If you experience any performance problems during recording or your
recorded video is not smooth please try one of the following solutions:
●
change recording file format to AVI if MP4 is selected
●
disable graphics overlay and/or webcam recording
●
reduce output video size
●
reduce output video framerate
●
try with “Use multicore encoding” enabled and disabled
●
make sure that Aero is enabled for Windows Vista and Windows 7
desktop recording
MULTIDISPLAY PERFORMANCE
If you experience any performance problems on multidisplay setup and the
above general performance solutions do not work please try the following
solution:
●
disable/disconnect one (or more) display device(s).
TROUBLESHOOTING
Recording
GAMES & APPLICATIONS RECORDING
If you experience any problems with games and applications recording
please try to run a game or application in windowed mode and try
recording with
Active desktop region
mode.
60

Purchase/Activation FAQ
If you have any questions or problems with Action! purchase or activation,
please read the product purchase and activation FAQ or contact us if you
do not find an answer for your problem/question.
Purchase/ Activation FAQ page:
https://mirillis.com/en/support/purchase_faq.html
Technical Support
If you have any questions or problems with Action! please read Action! FAQ
or contact us if you do not find an answer for your problem/question.
Action! FAQ page:
https://mirillis.com/en/support/products_faq_action.html
TECHNICAL AND CUSTOMER SUPPORT
Contact
https://mirillis.com/en/company/contact.html
Action! tutorials
https://mirillis.com/en/products/tutorials/tutorials.html
61
